Just Adventure original
Wild Wild West: The Steel Assassin Walkthrough
The
Surratt House (Easy Street)
- Once West enters Street’s Saloon
(formerly known as the Surratt House), he will approach the bar. Talk to Mr. Street,
the man behind the counter. Be sure to ask Street about the contraption on the
bar. - Speak to Mr. Byrd, the gentleman sitting alone and working on a crossword
puzzle. He will ask for your help three times. The answers are of a presidential
theme: Grant, Johnson and Lincoln. Grateful for your help, Byrd will give you
(in this order) bandages, liniment oil and finally, a small metal bird. The bandages
come in handy should you find yourself injured. Once you have the metal bird,
Mr. Street will remind you about the contraption on the bar and make you a nice
offer … - To fix the contraption:
- Take the bellows from the fireplace
- Take
the rod from the rifle hanging above the fireplace - Walk over to the contraption
and place the rod in the contraption socket, the bellows on the floor beneath
the rod and then place the metal bird Mr. Byrd gave you on top of the contraption
in the spoke wheel. That’s some corkpuller!
- Once Mr. Street
marvels at the contraption and tells you to see Misty, feel free to talk to the
men playing checkers–the sweethearts of this little adventure and perpetual pains
in West’s backside, Pratt and Mims. They just love meddlesome Secret Service agents
interrupting their game! - Go into the adjoining room. Misty, the lovely
lady in yellow, sits sobbing. Talk to her. She’ll begin spilling her problems
to you–the biggest of which is determining which of the tavern’s guests gets
the peach cobbler for dessert. It goes to Mr. Byrd. Once you give Misty the correct
answer, she’ll provide answers to your questions about John Wilkes Booth and his
fateful stay at the Surratt House. - Eventually, West will go down into
the basement with Misty to investigate. Pratt and Mims, the ornery fellas you
spoke with earlier, plot to get rid of West. - In the basement, Misty offers
West a kiss. Since West is a ladies man, oblige her. - A gunshot will zing
past you. Pratt’s cohorts are gunning for you! - Take the knitting needle
from the workbench (it’s next to the enormous ball of yarn). - Walk to the
cellar door. It’s locked! Use the needle to loosen the bolts. A brief cinematic
follows. - Once you’re outside, take out your weapon (revolver, rifle, electricity
gun, etc.) and start firing at the bad guys waiting for you. One’s behind the
woodpile. If you’re feeling cowboyish, shoot the log propping up the entire woodpile
on the right. The logs will tumble, exposing the rapscallion shooting at you.
Target the bad guy with the weapon’s targeting sight until it shrinks as small
as possible and remains red. It’ll take a few shots to put him away, but keep
at it. If you scare him, he might even run behind the nearest tree for safety.
Stay on him and keep blasting. - If you run out of ammo, click on the RELOAD
bar in the interface menu. You are vulnerable to enemy fire while you’re reloading,
however. If you get hit, use the bandages you received from Mr. Byrd or ones you
retrieve from fallen enemies to heal yourself. You’ll need to select the bandages,
then go to the inventory screen and click on West to heal yourself. - Once
the woodpile villain is pushing daisies, head for the wagon. Once you reach it,
another bad guy steps out of the chicken coop and starts firing at you. Take him
out. You can either weigh him down with lead or go for the more creative approach.
See the wagon next to West? There’s a lever at the front of the wagon. Click on
it. - Once the chicken coop thug has gone to that great jail cell in the
sky, take ammo from the woodpile villain. Make your way over to the chicken coop
to get ammo from the second guy you shot. In fact, it’s a good idea to check the
bodies of all your combatants for useful things like ammo, bandages and clues.
Head toward the barn behind the chicken coop. - As you reach the barn, run
inside quickly! There’s another bad guy taking shots at you. Once inside, shoot
at the hornets’ nest while avoiding the barn loft bandit. If you hit the nest,
a swarm of stinging insects will make life for the bandit a troublesome, and painful,
experience. Put him out of his misery with a few well-placed shots. - From
the barn, make your way to the water tower. It’s outside the barn and to West’s
left (it’s almost behind the barn). Take cover as a bad guy on the tower starts
shooting at you. Get to the tower’s ladder as quickly as possible! - Once
on the ladder, take out the sniper with a few shots. When you’re finished, head
back to the front of the Surratt House. From the garden, the house is in the upper
right corner of the screen. - Watch out for a couple of gunslingers looking
to make worm food out of you. Run for the dirt road that runs in front of the
house. - But wait! You can’t cross the road! Bad guys in the barn across
from you are making a duck shoot out of you. And to make matters worse, a weird
cannon contraption will fire horrendously loud charges at you should you venture
too far into the road. What to do? Hear that rumbling? A wagon’s creeping down
the road towards West. When it gets close, click on it. A brief cinematic follows
with West climbing onto the wagon and jumping off further down the road–unseen
by would-be assassins. - Once West jumps off the wagon, follow the dirt
path on the left side of the barn. Once inside, let’s play it a little sneakier
this time. Climb up the ladder. - Up in the loft, untie the hook tethered
to the block and tackle. It’ll give the bad guy a hefty sock in the head. Pull
the nail barrel on top of the trap door. Climb back down the ladder, creep over
and hit the cowbell (it’s on the post next to the wagon). Alerted to the noise,
the nearest bad guy will run underneath the trap door. Pull the rope next to the
bell and watch him get a great big boo-boo on his head. - Now click on the
oil barrel in the far corner. Run out the door and watch the other bad guy slip
‘n’ slide. Put him out of his misery with your weapon. - Two more bad guys,
alerted to the sound of the gunplay, will be waiting for you in the adjoining
barn. Get ready. - When you’re finished taking care of these tough guys,
walk over to West’s beloved horse and click on him. A closing cinematic follows. - Congratulations!
Now let’s see what Artie’s up to in Baltimore …
Baltimore
Wharf (Parkhurst’s Ladies)
- Grab the following from Gordon’s gadget
table aboard the Wanderer (it’s the big gray table): the Non Contaminating Evidence
Examiner & Retriever (the magnifying glass) and the Portable Forensic Analysis
Kit. Feel free to grab the Intensely Sensitive Safe-Cracking Stethoscope as well
(you won’t need it any time soon but it looks nice in your inventory). - At
Gordon’s chemistry lab, take the Formable Putty acid string (it’s a gray coil).
You won’t need the High Viscosity Axle grease any time soon. Once you’ve collected
all of these items, go across the room and enter Gordon’s costume room. Take the
sailor and Parkhurst costumes. Time to go to work! - When Gordon steps off
the coach and approaches the wharf’s entrance, he’ll stumble onto a conversation
with a buxom Russian beauty, Marcella Shrugov, and a wharf guard. Listen carefully. - After
Marcella the Russian babe finishes her conversation with the guard, head down
to the crates resting against the wharf’s outer wall. You have two options once
you reach this spot. You can:- Disguise yourself as a sailor and sneak
by Marcella and the guard or - Use the putty acid string on the outer
wall
- Disguise yourself as a sailor and sneak
- Either way, once inside the wharf, take a look around–with
emphasis on any areas that the pointer highlights with the "eyeball"
icon. Investigate those areas. - You should come to a barrel with some interesting
items on and below it. It’s in the bottom left corner of the wharf(near the wharf
office). You’ll see a wagon and a "Rotten Wood" warning sign. The barrel
is next to those items. - Time to investigate. Take out your magnifying
glass and examine the scene. From left to right, right-click on the hair sample,
the scorched footprints and the red paint. - Pick up a sample of the red
paint on the box near the barrel by right-clicking on the paint as you view it
through the magnifying glass. - Select the Portable Forensic Analysis Kit
to study the paint. Select the kit (it’s the gray box in your inventory) in your
right hand and the paint sample in your left hand. Now click on the beaker. Gordon
makes an interesting discovery. - Let’s take a look at the top of the barrel.
Take the metal shard on the left by right-clicking while looking at it through
the magnifying glass. Run a chemical analysis with the forensic kit as you did
with the paint. Gordon’s putting the pieces together to this mystery. - Before
you leave this spot, be sure to pick up the piece of wood. Let’s go find where
that broken piece fits. - Walk to the right of the barrel area, towards
the sailor gangplank outside the ship. Keep an eye out for the cursor changing
back to the eyeball icon again. It should do this near a box. Go check it out. - Once
at the box, place the broken piece of wood on the box. Perfect fit. Okay, enough
investigating for now. You have an appearance to make as St. John Parkhurst, British
actor extraordinaire. Since Fiddledy and Mae (Parkhurst’s leading lady) are waiting
for him at the passenger walkway, you’re going to have to find a way for Gordon
to get on the boat, disguise himself as Parkhurst and exit the boat via the passenger
walkway. - Look for the sailor entrance to the ship. A sailor stands watch.
Since you’ve changed into your sailor outfit (if you haven’t already, find a discreet
place to change), head for the sailor gangplank. - Once on board, walk behind
the stack of boxes and sacks. Change into Parkhurst and prepare to disembark.
A brief dramatic scene follows. - Marcella’s waiting for you (Parkhurst),
as are Fiddledy and Mae! If Marcella sees you up close, she’ll rat you out as
an impostor. So … exit through the sailor gangplank, dressed as Parkhurst. - Get
close to Marcella but not too close. And keep an eye out for Hershey, the
wandering chap patrolling the wharf. If you get close enough to Marcella, she
should turn and, thinking that you’re her beloved Parkhurst, will pursue you with
giddy glee. Head for the "Rotten Wood" warning sign between the barrel
and wagon next to the wharf office. Hurry! - Once you reach the sign, remove
it. Now run to the other side of the rotten patch of wood so it’s between you
and Marcella. Note: You can’t run over the rotten wood. - If you’ve done
it correctly, Marcella will step onto the rotten wood and take a messy fall. Don’t
worry–she’s okay. A little wet, but okay. - If you haven’t done the rotten
wood trick correctly, run around it as Marcella follows you and try to trick her
again. She’s pretty gullible so you shouldn’t have too much of a problem. Just
don’t let her get too close to you! - With Marcella in the briny drink,
find a private place on the wharf, change back into the sailor costume and reboard
the ship via the sailor gangplank. - Once onboard, change back into Parkhurst
and exit via the passenger gangplank. Say hello to Fiddledy and the ravishing
Mae, your leading lady. - Meanwhile, West decides to return to the scene
of the crime at the Surratt House …
The Surratt House (The
Bull Pen)
- Once inside the saloon, you’ll need to find a light
source to use so you can enter the basement again. Hmm, there’s a lantern hanging
outside … but you can’t go out. More of Pratt and Mims’ buddies are waiting
for a shot at you! Let’s investigate the saloon for a means of getting that lantern. - Enter
the room where you first met Misty. Grab the ice tongs from the table. Search
the chest drawers on the opposite side of the room for a piece of twine. These
will come in handy later. - Go back into the main room. Take the poker from
the fireplace. Take the gunpowder horn hanging above the fireplace too. And while
you’re at it, grab the bellows again. - Now, use the bellows on the spittoon
positioned on the other side of the bar. Slurp! Yuck. - Open the window
behind the counter. There shines the bright lantern. Use the spit-filled bellows
to extinguish the light, otherwise those pesky varmints outside are going to make
your life difficult. - The lantern’s extinguished, but you still can’t reach
it from here. Remove it from its hook with the poker. - West places the
lantern on a nearby stool. Take the damp wick from its base. - Take the
cork from the corkpuller. - Take the wick to the fireplace and set it on
the hot coals. After the wick dries out, take a hot coal from the dying fire with
the ice tongs. - Go back to the lantern, replace the wick and light it with
the hot coal. - West heads downstairs where he finds a mortally wounded
Misty. Turns out Pratt and the gang got violent when they found out Misty helped
West. She offers a few final words to West before breathing her last breath. A
sorrowful West promises her he will make Pratt pay. - Search for a tiny
key near the dresser, if you didn’t already pick it up from one of the bad guys
during the previous shootout in the barnyard. It should be directly underneath
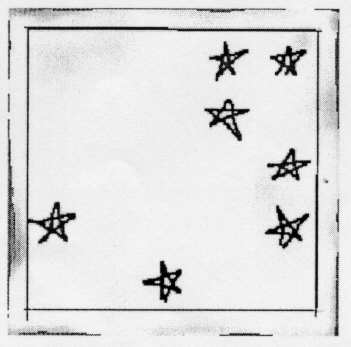
the dresser. Use it to unlock the front panel. - Ah, a puzzle! If you checked
out the Projected Light Photographical Light Reference Machine on board the Wanderer,
you probably noticed a report on the Bull, written by Arte. Remember the constellation
drawing he included at the end of the document? That was a clue. In case you didn’t
read the monograph, here’s the solution:
- The door opens, revealing a passageway. Let’s see what’s at the other end …
- It’s
the Bull’s lair! Looks like this elusive assassin has been hoarding guns, rifles
and gunpowder, as well as developing some serious firepower to carry out the diabolical
plan of assassinating President Grant. Pick up the hanky lying on the floor. "E.S."
Who could that be? - Pick up the night vision gun sitting on the worktable.
You’re going to need it. Soon. - Grab some gunpowder from the barrel in
the corner of the room and place it in the gunpowder horn. Head back upstairs. - Before
you enter the main room, walk down the hallway to the tiny table. There’s a match
there. Take it and head for the main room. - The bad guys are just waiting
for you to try and escape the house. Hmm, what to do? See that cannonball on the
bar counter? That’s your ticket out of here. However, you’ll need to take out
the first wave of bad guys hanging around outside by using your new night vision
pistol. Otherwise, you’ll be an easy target. Once you’ve dispatched them, turn
your attention to the cannonball … - Place the gunpowder in the cannonball.
Now put the twine in the cannonball. Pack them in place with the cork. Guess what
you’re making … - Now you’re going to have to get those bandits to
come in and receive their explosive surprise. Head for either of the two windows.
Get out the night vision pistol. - More bad guys!? Take some shots at them.
Try not to get hit. When you empty the night vision gun’s chambers, don’t reload.
Rather, fire an empty chamber at one of the fallen bad guys. That click will attract
the bad guys (you’ll hear one of them say, "Rush him!"). Silly rascals,
they don’t think you have any more bullets! - West will run over to the
cannonball, light the fuse with the match and run like the dickens. A cinematic
follows. Boy, Pratt & Mims want you dead in the worst of ways now!
Baltimore
Wharf (Harbor Cruise)
While West returns from his midnight snooping,
Gordon returns to the wharf to continue his investigation a little more privately …
- If you haven’t already, grab the High-Viscosity Axle Grease from Gordon’s
chemistry table. Be sure to take the Intensely Sensitive Safe-Cracking Stethoscope
from Gordon’s gadget table as well. - Go to the water cycle on board the
Wanderer in the back of the train. Gordon will use it to make a stealthy approach
to the wharf. Otherwise, you might run into some trouble by taking the stagecoach. - Once
Arte reaches the dock, climb up the ladder. Hmm, this place looks really familiar
… makes sense, since you were here during the day. Now you have to contend with
a wandering night watchman who would love to test his new pistol on you. Do your
best to avoid him and head for the far side of the wharf, where the stairwell
leading below the docks is located. - The creaking of wood, the lapping
of water, the foghorns in the distance … creepy. But, you have a job to do so
walk behind the staircase you just descended. Use the acid putty on the stairwell
base. Now place some axle grease on the floor next to the stairs. - Grab
the stairs and pull them. But make sure the guard is nowhere nearby upstairs
(you can tell by his tuneless whistling–if you hear it, he’s nearby) before you
move them. Otherwise, the watchman will come looking for you. - The stairs
should now be under the shipping office. Climb the stairs and pull out some more
acid putty. Use it on the shipping office floor, but make sure the night watchman
is nowhere nearby. - Once the acid putty has burned a nice little circle
in the floor, climb up into the office. - Inside the office, you’ll notice
a safe. You’ll also notice some potted plants nearby. Since Gordon is a lover
of all things botanical, take a look at them. Especially the sick-looking plant.
And while you’re at it, why not look under the sick-looking plant? - It’s
a combination! RD LAE RHI. Hmm … well, since combinations are usually Right,
Left, Right that takes care of the first letter in each cluster. The remaining
letters? Let’s see … D is the fourth letter, so 4 to the right. A = 1 and E
= 5, so 15 to the left. H = 8 and I = 9 so 89 to the right. (R4-LI5-R89) Voila! - Inside
the safe are some shipping papers and a ledger that provide information on the
cargo that passed through the wharf. Note the name on the papers–E. Steele. - Time
to leave the office. Head out the door. Once outside, you’ve got a serious situation
here. Not only is there a gun-toting night watchman to contend with, two more
thugs have appeared and are blocking your route to the water cycle. Here’s how
to get past them: - Lure one of the thugs into following you. This is tricky
so be extremely careful. Lead the thug towards the night watchman and hide. If
you did it correctly, the watchman will take care of the thug for you … only
to get shot by the thug as well. Two down, one to go. If you don’t succeed the
first time, keep trying. Make sure the thug doesn’t get a hold of you, though,
or it’s over! - One more thug to get out of the way. If you go to the upper
right corner of the wharf, you’ll see an anchor and some rope. Take the rope and
connect it to the anchor. - Now go trick that thug into following you. Stand
by the anchor as he gets closer … closer … closer. Once he’s standing on the
net tied to the rope, grab the anchor and watch the thug fly into the water! Wheee! - You’re
not even close to being out of the woods yet. It seems there’s one more bad guy
waiting for you below the wharf–Hershey. Strike up a conversation with him–offer
him money, offer him your watch, tell him about the water cycle and offer it to
him. He’ll ask how to operate it. Oblige him, then watch him try to operate it
… and then take a nasty spill into the briny deep. - Gordon grabs the
water cycle and heads for freedom. But not so fast! Three gunboats have entered
the harbor and are blocking your escape. You’ll need to get rid of them and find
a way past their blockade. - First gunboat: See those two boats right outside
the dock that are somewhat close to each other? The ones positioned horizontally
on the screen? One of the boats is tethered by a rope. Untie it and then push
the boats together. The cursor will change to help you figure out which boats
and what to do. Once you’ve pushed them together, lure one of the gunboats into
following you through the narrow gap you’ve created between the boats. You can
fit through it easily. The gunboat, alas, cannot. One down, two to go. - Second
gunboat: This is a little trickier, mainly because the two gunboats will stay
on your tail relentlessly. Look for the buoy floating in the water. It’s on the
opposite side of the bay from the two parallel boats. The remaining gunboats usually
congregate around it. Lure them away from it far enough so that you can get to
it without them bearing down on you with gunfire. Once you get to the buoy, sink
it by clicking on the bottom part of the buoy. Lure the second gunboat towards
where the buoy was and it’ll crash into the rocks, overturning and making a nice
little ramp for you in the process. - Third gunboat: Click on the makeshift
ramp. A cinematic sequence begins. As you hit the ramp, Gordon will make a spectacular
leap in the air over the large ship blocking his escape. The pursuing gunboat
will collide with the ship, resulting in one of the more explosive moments of
the game! - Phew! Now that Gordon’s safe and secure, let’s see what Jim
West is up to …
Garrett’s Farm (Barn Burner)
- With West atop his trusty steed, head down the dirt road to the right. You
will come to a fork in the road–keep going straight ahead. If you decide that
you’d rather go left, fine. But be ready to come back quickly–there’s a terrible
tank wanting to take shots at you! - Back on the main path, you will eventually
come to a pile of logs on the side of the road. If you look closely, you will
see an axe. Take it. - Now go back to the large tree that stands next to
the creek. Use the axe on the tree. - Once the tree falls, a bandit on the
other side will start shooting at you. Dispense your special brand o "lead
justice." Be sure to check him for ammo, blasting caps and an intriguing
note about chess. These guys don’t seem like chess players, do they? - After
the bad guy has been put away, cross the tree trunk and head towards the tiny
shack. There are two more bad guys waiting for you inside, so be prepared. - Take
the dynamite. Head back over to the log and cross the creek. - Saddle up
and head down the dirt road, past the log pile, until you encounter another thug
on horseback. Sing "Happy Trails" as you send this bad guy off to the
afterlife. - You’ve reached the end of the dirt path. In front of you, the
path continues atop a rocky embankment. West climbs off his horse and sets out
on the path. - At the top of the path, there are two villains with their
backs to you. If you picked up the Sick Gas Canister Mortar, you can stun them
quickly and then dispatch them with your favorite weapon. Otherwise, take aim
and let the blazing gunfire begin! - Continue to the right. The path curves
around several large boulders. If you look carefully, you can see the tank below
you. Focus on the rocks that switch the cursor over to "eyeball mode." - At
that spot, place the dynamite and blasting caps. Then back up (make sure you’re
far enough back so that you won’t get caught in the blast–otherwise, you die),
aim with your weapon and fire. Goodbye, tank! - Head back down the rocky
path. Now where did that horse go? Oh well, head towards the gray house. You should
be able to walk between the house and the rocky embankment, which should bring
you around towards the front of the house. - Welcome to Garrett’s Farm.
Before you enter the house, head inside the charred barn. Inside, grab the bullwhip,
the wood below the whip (use the axe on the wood to chop it up into kindling–it’ll
come in handy later, trust me) and the lead pipe resting on the barrel. And while
you’re at it, check out the writing on the bam wall. That will become important
later … - Go to the front door of the house. Hmm, closed by order
of the US Army. Well, since West was once an Army officer, they shouldn’t mind
if he does a little investigating. But first, take the bucket sitting next to
the door. - Use the axe to bust open the lock.
- Inside the house,
enter the room to West’s right. It’s the kitchen. Pick up the dirty tray lying
below the water pump. - Take the lead pipe and place it where the pump handle
should be. Place the bucket underneath the spigot. Use the handle. Once the water
fills the bucket, take the bucket from the counter. - Now let’s go into
the main room. See the chair? Move it to the fireplace. Then climb from the chair
onto the mantelpiece. Use the bullwhip on the chandelier cord. - West swings
across to the broken stairs using the whip. Climb up the stairs to the upstairs
room. - Pick up the doily lying in the corner inside the upstairs room.
Then take out the axe and chop through the broken wall. Once you’re through, take
the bicycle tire from the wheel lying against the wall. Head back downstairs. - It’s
back to the barn for you. Remember that writing on the wall? What does it mean?
Hmm, wait–the doily has an arrow drawn on it. Use the doily on the wall. It’s
a code (doily, then tray). Take the tray and clean it off with the doily. Then
place the tray where the arrow on the doily pointed–the middle peg. The sunlight
bounces off the tray and shines on a hook on the rafter. - Use the bullwhip
to pull the hook free. Sheets of paper (the missing diary pages of John Wilkes
Booth) float to the floor. As you pick up the papers and the hook, a villainous
varmint tosses a lit lantern into the barn, causing a nice little fire. Don’t
panic! - If you haven’t noticed it already, there’s a steam-powered wagon
sitting discarded on the opposite side of the barn. That’s your ticket out of
here. - To start up the wagon:
- First, grab some hay from the burning
hay pile. Light the hay with the fire. Grab another bundle of hay–but don’t light
it. Go over to the wagon. - Open the top hatch, dump the water from the
bucket into the boiler and close the hatch. - Place the bicycle tire on
the wheel gear. - Now place the nonburning hay in the side opening. Then
set the wood you chopped up with the axe on top of the hay. Finally, toss the
burning hay onto this combination to create a roaring fire. The gears begin to
spin! - Remember the hook you yanked onto the floor? Place that in the open
slot on the side of the wagon. - Remember that liniment oil you’ve had in
your satchel for a while, the stuff Mr. Byrd gave you? Use that to grease the
rusty sliding bracket. Once this is all done, press the button below the sliding
bracket. - And you’re off! The wagon crashes through the barn wall, chasing
down a wayward bad guy. West leaps to his horse and rides away safely!
- First, grab some hay from the burning
Ford’s
Theatre (Casting About)
While West returns to the Wanderer after his
Garrett’s Farm excitement, Gordon steps into the shoes of St. John Parkhurst,
one of England’s finest thespians, while investigating Ford’s Theatre.
- After a warm welcome by the cast and crew of M’lady’s Puppet (that’s the name
of the little comical farce being presented at the theater), Gordon enters his
dressing room. There’s a note from Fiddledy suggesting you read over the script
that has been provided for you. Follow his advice. Read the play. Then read it
again. Head out the door and onto the stage for your first rehearsal. - If
you read the play twice, you will impress both Fiddledy and Mae with your commanding
performance. In fact, Mae’s so impressed with you, she suggests you meet her in
her dressing room for a, ahem, private rehearsal. - Once in Mae’s dressing
room, she will attempt to seduce you with her feminine wiles. All she asks for
in return is something delightful to drink. It seems that Fiddledy has some wine
that might be just the ticket. As Mae changes into something more … comfortable,
head for Fiddledy’s office. It’s on the top floor of the theater. Before you go,
check out the note with the flowers on the tiny table next to the door. Hmm, seems
like Mae is quite popular with the menfolk. - Inside Fiddledy’s office,
you meet the "angel" behind the play and the re-opening of Ford’s Theatre,
Bartholomew Gobb. He’s also the guy who sent Mae those flowers with the card.
Gobb leaves soon after introductions are made, leaving you to snoop around Fiddledy’s
office. Check out the pictures, the folders and the correspondence inside the
desk. Take a moment to read. Grab the wine bottle on your way out of the office. - Now
you have something to drink. But first you need to open the bottle and then you
need glasses to pour the wine into. Go look for Fiddledy–he’s in the lobby (first
floor). Although he doesn’t have either a corkscrew or glasses, he provides clues
as to a possible location. - The corkscrew is on the stage floor, next to
the bed. Take it and head up to the top floor of the theater. You will find a
short stairwell that leads to Spiddle’s scene shop and the prop room. - In
the prop room, you will find a case containing glasses. Grab a couple and head
for the hallway outside your dressing room. - Next door to your dressing
room is a green room. Wash the glasses in the sink. Ah, they sparkle like new!
Now back to Mae’s dressing room … - Before you give Mae the wine,
open the bottle with the corkscrew. Place the wine in the clean glasses and then
present Mae her drink. Ah … - What’s that? Mae needs some rouge to
make herself presentable? Oh well, looks like we’re being enlisted for yet another
search. - Head up the stairs right outside Mae’s door. Follow them up to
the top floor. The door to your left belongs to your fellow actor, Degarde. He’s
a crafty chap, so be prepared. Stop inside and introduce yourself. Hmm, there’s
more to this man than meets the eye … - After speaking with Degarde,
enter the catwalk. Go up the stairs into Spiddle’s shop. - Uh-oh. Looks
like Spiddle doesn’t like actors. Head back down into the catwalk. There must
be a way to get Spiddle out of the shop … - On the catwalk, you should
see a sandbag hanging above the stage. Below is one of Spiddle’s prized chairs.
Drop the sandbag on the chair. Spiddle will come running to cry out in anguish
and start hastily fixing the shattered seat. Head back up to the shop. - Inside
the shop, grab the tools on the shop tables–a brush, a chisel, an awl and a hammer.
Now head for the prop room. - There’s a case on the far side of the prop
room. Inside is a rouge case. Go ahead and grab the string inside as well. It’ll
come in handy much later. - Something’s not right. Mae asked for "cherry
red" rouge. The rouge in the case is a funky shade of purple. Solution? Head
back to the catwalk and look for a can of red paint. Yes, red paint. Pry open
the can with the steel chisel and use the brush to place red paint on the rouge.
What Mae doesn’t know won’t hurt her … - Now back to Mae’s dressing
room. Present the rouge to her. She’s ever so grateful. Now, if you wouldn’t mind
finding her slippers … - Take the one slipper lying on Mae’s dressing
room floor. Offer it to Mae by clicking on her. Where’s the mate? Upstairs in
Degarde’s room. Unfortunately, Degarde is not in his room any more. Furthermore,
the door’s locked. You’ll need to find a key. - Head to the hallway outside
your dressing room. You’ll run into the ubiquitous Marcella, who’s asking about
her loverboy, St. John Parkhurst. Fiddledy’s doing his best to handle her, but
when she sees you–well, it’s up to you to save the day. - Let her down
easy–tell her that you’re an understudy for Parkhurst and that her leading man
is fending off a difficult paternity case. The feisty Russian lady will storm
off in a huff. Fiddledy congratulates you and leaves. Then someone appears, someone
who might’ve seen the whole incident with Marcella, someone that might make trouble
for you … - Enter the stage manager’s office. It’s directly across
from your dressing room. Once inside, take the key labeled DEGARDE from the key
rack. Take the key with no label. Looks like it’s been copied recently. Explore
the desk and read the letter of complaint concerning Spiddle. - Back at
Degarde’s dressing room, use the appropriate key to enter. Once inside, take the
appropriate slipper. And while you’re at it, check Degarde’s desk for clues. Looks
like Degarde was telling a fib about not knowing John Wilkes Booth. There’s also
a strange diagram of the theater. And a necklace with a familiar icon. And what’s
this–a telegram, signed E. Strange … - Return to Mae’s dressing
room to give her … hello, Mae? She’s gone, having left a hasty message about
having to meet her sister. And there’s a telegram here as well, also signed "E".
Oh well, maybe you’ll have your secret rendezvous with Mae later …
Broken
Hope (Broken Hopes)
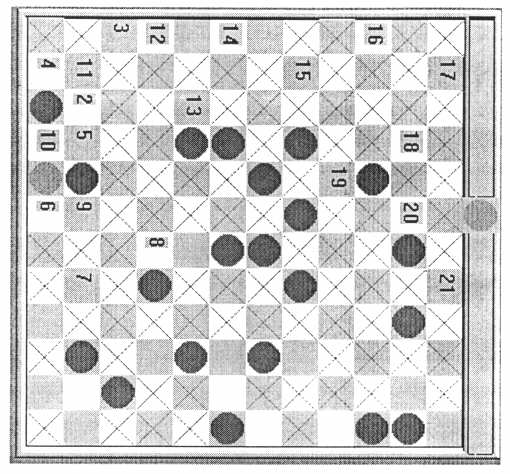
- When West arrives in Broken Hope, he comes
to a giant chessboard blocking passage to the tiny town. This is not like any
normal chessboard, though. Tall metal rods channel deadly lightning bolts that
fire should you step on an incorrect tile. Below is the pattern for traversing
the chessboard. It follows the pattern movement of a knight–now that note about
chess moves makes sense! Follow the tiles in numbered order. The red circles are
chess pieces that rest on the board. The light circle on the left (first column,
fourth row) is where West begins his chessboard journey (#1). The light circle
on the right (to the right of the last column, sixth row) is your destination.
Click on the tiles in numerical order (light, then 2, 3, 4 …).
- Now let’s head into town. Wait, you have some company–OW!
- West wakes
up in a jail cell. His babysitters? None other than Pratt and Mims. After a few
minutes of banter, the sheriff of Broken Hope makes an appearance–a dark haired
beauty by the name of Electra Steele. For those who were paying close attention
in the opening trailer, this is the little lady that killed the poor night watchman. - West
talks with Electra and receives a little TLC–the aggressive kind. After she leaves
the cell, Mims returns. Talk to him. Irritate him. Insult him. Once he gets close
enough, West will work his magic and take out this pesky thug. Grab his keys once
he’s incapacitated and free yourself. Take his gun too. - Oh, don’t go out
that front door! The town is crawling with Electra’s men. Instead, take the side
door out of the jail. - Once outside the back door, sit still. Across the
street and up on a roof is one of Electra’s guards. He’s keeping an eye on things
and would love nothing more than to spot you. Wait for him to leave and then crawl
into the window directly across from you. - Inside this tiny room, one of
Electra’s thugs snoozes away peacefully. Take his white hat and the sleeping pills
sitting on the dresser. Put the hat on your head (select it in the personal inventory
screen and then click on West’s inventory image). Head out the front door of this
building. - "Dusty?" Oh, wait–the rooftop guard’s talking to
you. He thinks you’re the guy sleeping since you’re wearing his hat. The guard
shouts for you to get him a beer. Head for the alley between the saloon and the
building from which the guard patrols. Enter the saloon from the side door. - Once
inside the saloon, two more thugs (Cliff and Norm) sit at a table, talking about
having another shot of whiskey. Creep behind the counter and drop the sleeping
pills in the whiskey bottle sitting on the counter when they’re not looking. As
soon as they take the first shot, they’ll be sleeping like babies. Grab a beer
from the rack behind you, inspect Cliff and Norm for clues and then head back
out the way you came. - Walk down the alley and behind the building where
the guard is perched and climb the ladder. West will keep his head down so this
eagle-eye scout won’t realize he’s been duped. - Once the guard takes the
beer from you, West will sneak up behind him and give him a swift blow, rendering
him unconscious. Search him for ammo. - With the guard out like a light,
climb back down the ladder and head for the building next to warehouse (it’s near
the end of town). Once inside, you’ll see and hear two thugs carrying explosives
from one room to another. There’s a grandfather clock in the corner. Set it for
12:00. Make sure they don’t see you–otherwise, you’ve got a fight on your hands.
Run outside of the building, down the sidewalk and around the corner of the last
building on main street. When the clock finishes chiming, those guys will make
a run for the town entrance. Wait until their footsteps fade into the distance
and re-enter the building. - Once the thugs are out of the way (either by
leaving or by shooting it out with them), retrieve your satchel items from behind
the box in the small room where those guys were moving box to and from. Be sure
to grab the key from the desk on the far side of the main room. And read the memo
on the small desk too. It’s time to find a way out of this one-horse town! - Run
to town’s entrance (that’s where the cemetery is located). Take out any remaining
bad guys gunning for you. Enter the undertaker’s shop. Investigate. You’ll find
some paperwork and a strange-looking casket. - On the wall is a calendar.
Move it to find a safe. Use the key you retrieved from inside the building next
to the warehouse. Inside the safe is a key to Electra’s secret lair. Head for
the cemetery. - Enter the mausoleum. Remember that key you just took from
the undertaker’s shop? Use it on the door inside the crypt. - Welcome to
the secret laboratory of the Bull. As you venture further into the lair, good
ol’ Pratt decides to trap you inside the lair by blasting the mausoleum to pieces
with dynamite. You’re going to have to find another way out–keep moving into
the lair and up the stairs. - The path forks. Go to the right. Take out
your revolver or rifle. You’re going to need firepower quickly. - Inside
the lab is another President Grant puppet. Wait a second, the head is opening
and BOOM! Uh-oh! Shoot the head with your revolver before the metal assassin can
zero in on you. One shot from this devious device will guarantee you a spot in
Arlington Cemetery. If you miss more than twice, run back down the hall and come
back. This requires precision aiming so be careful. - Once you’ve destroyed
the Grant replica, look at the plans on the table. Take the wire from underneath
the plans. And grab the batteries lying next to the opening in the back wall. - Now,
let’s head back to the fork and take the other direction. What’s that track on
the floor? Hmm, something’s coming … - Run to the electrical box
next to the track. Quickly use the metal wire and batteries as a deadly steel
assassin rolls down the track towards you. Time it correctly and Mr. Metal will
burst into an electrifying ball of flame. Once the flames die down, take the leather
gloves from its metal fingers. Head into the room behind it. - Whoa, a replica
of Ford’s Theatre? Climb the stairs leading to the replica of Fiddledy’s box.
You should find some rope–grab it. Check out the railing and West will mention
something about sight-line notches. - Okay, step on it–ran back to the
lab. Once you get there, tie the rope to the back of the lab table. Put on the
gloves and watch West make a spectacular escape from Broken Hope!
Ford’s
Theatre (En Garde)
- Gordon returns to the theater to continue his
undercover work. Upon arriving in the alleyway, Gordon stumbles onto a conversation
with the mysterious Degarde and the even more mysterious Electra Steele. Turns
out Degarde has laid a trap for our intrepid Secret Service agent. - Once
Electra leaves the alley and Degarde enters the theater, follow Degarde. Get ready. - Inside
the theater, Degarde steps out from behind the stage curtain and kicks a fencing
prop to your feet, challenging you to a duel. - The trick to this duel is
to avoid fighting if at all possible. Think defense only. The main reason is because
Degarde has a nasty sword, while you have nothing more than a flimsy stage prop.
It won’t hurt him, and should you try to take a jab at him, chances are you’re
going to receive the business end of his sharp, pointy weapon. Ouch! You can block
Degarde’s attacks by positioning your cursor on him. When the cursor appears with
a red dot, right click. Gordon will successfully parry the attack. - Make
your way to the right, towards the far side of the stage. Degarde will pursue
you, ready to jab. Keep moving to the right of the screen until you see the sandbag
ropes tied to the pin rack. When you get close enough, and when Degarde has entered
the screen, grab the rope holding the sandbag above Degarde. - Degarde winds
up with a serious sock to the head and he’s out for the count!
Endgame
(Grant Finale)
- Fiddledy’s a nervous wreck: Marcella wants to lob
rotten vegetables at "Parkhurst," Degarde is AWOL, and it’s opening
night! Gordon is getting anxious too–where is West? - Gordon pays Mae a
visit and is given the brush-off as Gobb arrives to speak with Mae. Looks like
they’re in the middle of a serious conversation. What are they saying? - If
you haven’t picked them up already, get the empty paint cans from the catwalk.
They’re sitting next to the red paint can. - Take the awl and punch holes
in the paint cans. Then use the string (if you don’t have the string, it’s in
the case where you found the rouge for Mae) on the cans. Presto! You have a "listening
device." Return to your dressing room. - Once you’re back in the dressing
room, clicking on the corner of the ceiling to the left. Gordon will climb up
and use his listening device to hear Mae and Gobb, who are directly above Gordon’s
dressing room. - Turns out Mae’s not the sweet leading lady you thought
she was! - Meanwhile, Gordon’s partner sits outside, watching Electra’s
men cold-cock Grant’s men. Once you get control of West, use the silencer to take
out the two bad guys. Once you finish off the last one, your silencer goes bust.
Don’t sweat it–there are more important things to worry about right now, like
how to get into the theater. - Look in the trash bins. You should find some
carrots. Give them to the mule. Enjoying his tasty treat, the mule moves forward,
bringing the casket directly under the window. Climb up the casket to the window. - As
Gordon, head for the stage to investigate the puppet. Is this the tool of the
Bull’s assassination? Oops, looks like Electra’s using you for target practice!
Run back into the hallway! - You must find Fiddledy! Run to his office (third
floor). It looks like poor Fiddledy has fallen prey to the Bull’s plan as well.
Use the hammer and chisel (both from Spiddle’s shop) to free him from the locked
closet. Once freed, he will tell you what happened. - Outside Fiddledy’s
office, Gordon and West meet. West decides to stop the steel puppet (a facsimile
of Fiddledy) while Gordon sets out to protect Grant. - "We meet again …"
West confronts his nemesis, Pratt. Pratt guards the Fiddledy assassin with his
deadly firearm. Once Pratt stops talking, quickly move to West’s left, between
Pratt and the Fiddledy puppet. Pratt will train his weapon on you, getting it
caught in the steel puppet’s powerful electromagnet (just like the plans in Electra’s
Broken Hope laboratory said). Now’s your chance! Punch him in the kisser! That
one’s for Misty! - All heck breaks loose! The Fiddledy puppet goes awry,
launching its rocket at the chandelier. Gobb watches as it lands squarely on him.
West runs downstairs, only to find Electra has fled. Turning to the Presidential
box, West waves to President … Gordon?
Epilogue
- Aboard
the Wanderer, West and Gordon discuss the case with Grant when they receive a
party crasher–two party crashers, actually: Electra and Mae! They’ve come to
finish the job. But wait! West and Gordon are ready for their opponents. A flash
of light and the would-be assassins are stunned. - As West, return Electra
the favor of a swift punch in the kisser by clicking on her quickly as she sways,
stunned by the light. As Gordon, click on Mae so that he’ll hit the button on
the wall next to the pool table. A hammer will swing from the ceiling, knocking
Mae onto the pool table, alongside her sister. - THE END! Thanks for playing!