Valhalla Classics The Lord of Infinity – Episodes 1-4 Walkthrough
4 sections
about 45 minutes to read
Valhalla Classics
The Lord of Infinity
– Episodes 1-4
By Vulcan Software
Ltd.
PC Game played
on the Vulcan Portal
Game Play: This is a point and click game converted to PC from the
classic Amiga game. There are the Restart, Load Game and Save Game
on the middle bar. The game manipulation is based on clicking one
of the 3 verb icons at the middle bar and any item in the game play
while facing it. The verbs are eye – look, hand – take and the hand
with a tool – operate. When an item is taken and selected in inventory,
a separate verb selections is shown. Look, drop, insert, consume and
explore mode (to go back to main game play). The little Prince walks
one square tile at a time and runs when the right mouse is pressed
(pant, pant!).
The Lord of Infinity
The Kingdom of Valhalla is currently ruled by the Lord of Infinity, a twisted
and evil man, who is feared by the people of the land. His rule is
one of betrayal based upon jealousy. His predecessor was his older
brother, the Great King Garamond, who was the true leader of the kingdom.
But Infinity always believed he should have been king and so murdered
Garamond and claimed the throne. This resulted in civil war among
the people of Valhalla. Infinity ordered the death of all Garamond’s
followers and to drown the little Prince, Garamond’s son who is the
rightful heir to the throne. The little Prince was never found. Unknown
to Infinity, the Bishop of Valhalla has rescued the child and fled
to a neighboring kingdom. 14 yrs have now passed and while still in
exile, the little Prince learned of wisdom, the history of Valhalla
and most importantly justice. Now come of age, the little Prince has
returned to the Castle of Valhalla on a quest to destroy his father’s
murderer and take his rightful drop as King of this once beautiful
land.
Episode 1 – The
Crypt
It is the desolate and treacherous area of the castle’s outer walls. Many
people have died here trying to find the 4 Orbs of the Infinity. Rumor
has it that the 4 Orbs provide access to the inner castle. So far
every adventurer has died within one of the 2 floor trapped rooms.
But legend tells us that there are detailed maps of these 2 rooms
hidden somewhere in the crypt. The only clue that has survived time
comes from an old mapmaker. It reads as follows: I painstakingly mapped
a safe passage around the floor trapped rooms. I fear for my life
and expect I will not get out of here alive. I have hidden the maps
well. I’m hoping that Infinity’s soldiers will never think to look
under the very thing that is lethal.
The game starts with the Little Prince in a hallway. Turn around, take
and look at the Guardian book. The book talks about the guardian and
her offspring, that protects the orbs buried deep in the crypt. Drop
the book. Walk down the hall and turn to the left. Take the gold
coin. ‘I’ve got it!’ Go back to the main hallway and walk down
to a room.
Trigger the Trapped Floors:
Garamond’s room – The room has the Altar of Lies and
the Stone of Garamond. Take door key from stand from
bottom of room. Go to floor tile with a knob at the center situated
at the left of the stand and operate the tile. Take one of the mapmaker’s
floor plan. Operate the lever by the locked door. Go to room on
the left.
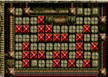
First Trapped room – Look at map and
navigate the room following the mapmaker’s floor plan except for a
tile close to the altar (see X in map). Walking the room will trigger
the traps. ‘I want to go home!’ Look at the blue chest, Weapons skull – ‘Bring me a used weapon’, a lever and the Altar of
Truth. Operate lever to open door. Drop the first floor plan.
Bloodstone room – Go down to the next room and see a heavy
rock, Bloodstone, Water of Hope, Altar of Black
Magic and Altar of Sadness. Take the Talisman of Light
from right of the room and look at the stand where you took it from.
It is the Miracle Stone. Take the door key on lower
left of the room. See a locked door at the bottom of the room. Remember
where the stamina potion is and pick it up later when needed.
Drink the stamina potion, when life force (green line on left side
of frame) is low. Go to the exit at right of room. Walk until a closed
door with gold knobs is on the Prince’s right. Insert door key from
Garamond’s room on gate with gold knobs to open it. Go down. Wine Skull room – Look at skull -‘Bring me wine’. Take
the door key. Look at pink chest. Exit
the room. Go back to Bloodstone room and insert the door key from
wine skull room on closed door at bottom of room.
Meredith’s throne room – Take one step in and operate the
knobbed floor tile. Take the second floor plan. Take and look
at Skull book. Drop the book after reading about skulls of 4 brave
warriors of Valhalla. Look at skull – ‘Do you love me?’ Look at the faucets at top left of room and at Meredith’s throne.
Exit the room and go back to the hallway off the Wine skull room.
Go up to skull on altar. Quest Skull alcove– Look at skull -‘What is
your quest?’ Operate lever at bottom right.
Second trapped room – Navigate the room:
to get the pink
chest key, see the lavender chest, take the grey crystal and the stick
at bottom right corner. ‘I quite like living on the edge.’ Exit the
room at the upper right corner. As soon as you exit the trapped room
from the right exit, turn right and operate the knobbed floor tile
to get the false birthright certificate written by Infinity.
Drop the floor plan. Look at the wishing well and drop the gold coin
on it. Take a deactivation gem. Operate the lever on the left
of the room and exit to the hallway.
Turn right on the hallway. Look at book at the end of the hallway. Drop
the book. Turn around and go up and look around the Orb room.
Exit, left and enter the garden. Read the red book about Meredith’s
jewels and then drop it.
Skulls, Chests, Guardians and such:
Wine skull room– Insert the pink key on pink chest
keyhole. Take the withered rose.
Garamond’s room – Drop the false birthright certificate on
Altar of Lies. Take Garamond’s ring. Drop Garamond’s ring on
Stone of Garamond. Take the true birthright certificate written
by Garamond. ‘That means me, you know.’
Go to the Altar of Truth at the 1st trapped room. Drop the true birthright
certificate on the Altar of Truth. ‘Unbelievable!’ Take the Symbol
of Justice. Quest Skull
alcove– Go to the Quest Skull and drop the Symbol
of Justice on the space beside the skull. Note the skull changed color.
Door opens at the top of the alcove.
Go up, left and read the Warrior’s book about needing to drop an item of
his battle dress on his grave. Drop the book. Operate the lever to
open a shortcut to Garamond’s room.
Meredith’s jewel room– Go up and see a jeweled crown,
remember the red book – DO NOT pick it up! Take strength potion
from altar and plain crown beside it. Operate lever on bottom
right of room. Take lavender
chest key. Open the next
lever to open the shortcut to the garden. Go up to room with a ‘look
dangerous’ thing on the floor. Enter and get trapped. Drop deactivation
stone on the ‘dangerous’ thing that traps the Prince. Look at the Water of Life. Drop the withered rose on Water of life to get
a beautiful rose. Take the wooden plank beside the water
of life. Do not take the poison from table.
Exit and go to the hallway top left of Meredith’s jewel room. Operate lever
to open gate to hallway by the drop you got the gold coin and remember
that there is another stamina potion here if you need it.
2nd trapped room – Insert the lavender chest key on
lavender chest to get a cold protection potion and an orange chest key. Gap Area – Go up
to the hallway where you got the gold coin. Insert the door key taken
from the Bloodstone room on the door. Enter and see a lit candle
and a chest. Drop the wooden plank across the gap in between
the 2 bushes across the way. Cross the gap. Insert orange key on orange chest. ‘So many chest, so little time.’ Take the golden chalice and deactivation device. Note another
locked room on the left. Cross the gap and leave the wooden plank
where it is for now.
Meredith’s throne room – Drop golden chalice on grate
in front of left faucet and then operate the right faucet. Take the chalice full of water. Drop the plain crown on Meredith’s throne
and get warrior’s shield. Drop beautiful rose on the space
beside the Love skull and the door behind the Prince opens. Blue-eyed
Guardian’s room –
Enter and get trapped. Do not use the deactivation device. Proceed
to the right and operate a lever. Take a gold symbol in the
Blue-eyed Guardian’s room. Operate the lever and door opens somewhere. Go back to the main
hallway by the top of the screen and get trapped again. Drop the deactivation
device on this ‘dangerous’ thing not the one by Meredith’s throne. Bloodstone room – Exit and go to Miracle Stone in the
Bloodstone room. Drop the chalice full of water on miracle stone to
get chalice full of wine. Now which skull was that? Go to Wine
skull and give him the wine. He gives you a rubber sole potion.
Electrified hallway – Go back to Bloodstone room. Drink strength
potion and take the big rock. Save game here! Go forward and
down. Drink the rubber sole potion and run up the first hallway going
up. Take the deactivation device and then go down the left
hallway to the very end of the electrified hallway. Insert stick on
hole of lever missing a handle. Operate lever. Enter lower hallway.
Warrior’s tomb room – See the Water of Beauty and Strange device. Operate lever and door opened somewhere.
Take the warrior’s sword from the warrior’s tomb. Based on
the Warrior’s book read before – drop the warrior’s shield on warrior’s
tomb and hear the electric barriers get removed. Go up and look at Black-eyed Guardian. Remember there is a stamina potion
here if needed. Go back to formerly electrified hallway and go up
the first hallway on top.
Eye of Beholder room – Go up, turn around and drop deactivation
device on ‘dangerous’ thing. In the room are a green chest, another broken lever, Eye of the Beholder
on burning hot coals and 2 engraved altars. Drop the gold symbol taken
from Blue-eyed Guardian’s room on right engraved altar.
Bloodstone Room – Drop the warrior’s sword on bloodstone
and take a sword covered in blood. 1st Trapped room – Go to Weapon’s skull and give
him the bloodied sword. A door opened somewhere.
Red-eyed Guardian – Go to the left end of the 1st
trapped room and pass through the now open door. Operate lever to
open door to shortcut to garden by orange chest. Forward to Red-eyed Guardian’s room and get green chest key. Operate another
lever. Go down. Eye of beholder room – Insert
green key on keyhole of the green chest. Take door key and
an unlit candle. Go back out to the end of the hallway on the
left.
Skull room –Insert door key just taken on closed
door. Save game here. Enter and look at skulls. All the skulls want
the talisman. Give the talisman of light to the skull on upper left
(NW) corner. He opens the door on top.
Green-eyed guardian room – Take the visa card. Look at Stone of
True Color. Drop grey crystal on stone of true color and yellow crystal. Exit the Skull room. Warrior’s
room – Insert visa card on strange device at the Warrior’s
room and the door on the left opens. Enter that door.
Remembrance skull room – Look at the skull – ‘Bring me remembrance.’
Take the mysterious rock and the blue chest key. Look at the altar again and see the Opposite
stone. Drop cold protection potion on opposite stone to get fire
protection potion. Eye of beholder room
- Consume the fire protection potion and take the Eye of the beholder.
Collect the Orbs:
Warrior’s tomb room – Drop the Eye of the beholder on Water
of beauty to get the green crystal. Green-eyed
guardian room – Insert
the green crystal. His wings go down to allow passage. Take the SE
Orb.
1st trapped room – Insert the blue chest key on blue chest.
Take Infinity’s ring and a chicken foot. Bloodstone room – Drop the chicken foot on Altar of
Black Magic. Take the black crystal. Black-eyed Guardian’s room – Insert the black crystal
on guardian. Walk in operate lever. Look at the firestone.
Drop unlit candle on firestone to get lit candle. Operate another
lever. Look at the skull -‘What is the password?’ I’ve no idea!
Gap area – Go back to the table with lit candle at the gap
area and the wooden plank. Drop lit candle beside the other lit candle.
The chest above opens. Take the red crystal. Cross the gap
using the wooden plank. Take the wooden plank. Save game here!
Enter the room on the left. Turn around and drop wooden plank on trap
tile. Take gold symbol and deactivation gem. Red-eyed guardian
- Insert the red crystal on him. Take the NW Orb and note another stamina potion.
Eye of beholder room – Drop the other gold symbol on the
left engraved stand. The left door opens. Stone
of Infinity room – Enter the room and operate the intriguing
floor tile. Take the bugle. Look at Stone of Infinity.
Drop Infinity’s ring on the Stone of Infinity and take the Gem
of Infinity, symbol of betrayal. Password
skull–While facing the password skull, look at Gem
of infinity and the Prince will say ‘Gem of Infinity, symbol of betrayal’
aloud as password. The door opens. Look at Altar of War. Drop
bugle on Altar of war and take a poppy. Go to hallway on top
and take stick. Remembrance skull
- Drop poppy on table of remembrance skull. Take parchment
- about sadness brought on by Infinity’s rule and hope about the coming
of the Prince. Bloodstone room – Drop the parchment on Altar of Sadness and get Tears of Loyalty.
Drop Tears of Loyalty on Water of Hope and get Blue crystal.
Eye of beholder room – Insert stick on hole of lever without
handle. Operate lever and a door opened somewhere. Go up to the now
opened door. Operate a lever on the left to open shortcut door
to red-eyed guardian’s room. Go back and up. Yellow-eyed guardian’s room
- Turn around and drop deactivation gem on ‘dangerous’ thing. Turn
around and drop mysterious rock on stool. That opens a door. Enter
the yellow-eyed guardian’s room. Insert the yellow crystal on guardian. Take the SW orb. Operate the lever on the hallway on the right.
Blue-eyed guardian – Insert the blue crystal. Take the NE Orb.
Operate the lever on the right to a shortcut. ‘Okay, let’s get on
with it!’ Go to the Orb room at the right end of the Crypt.
Orb Room – Drop the Orbs in their proper
stands. The dangerous barrier goes down. Look at the Final guardian.
Insert the Gem of Infinity at the final guardian. The wings go down
and go forward. Drop the heavy rock on the last barrier.
We did it! See
you in The Sanctuary!
Episode 2 – The
Sanctuary
After the Great War, Infinity used this section of the castle as a prison
for those he feared the most. The shaman had always lived peacefully
in the kingdom of Valhalla until Infinity took the crown. He promised
them sanctuary but instead he tricked them and using their own logic
against them, he turned them to stone. Years have passed and the 5
most powerful shamans are thought to still stand within the ruins,
enslaved for eternity to protect the 3 legendary magic rings of escape.
You must start with the shaman to gain entrance in the rooms in which
the rings are kept. In each of these rooms, there are thought to be
electrocution devices, armed to harm anyone who tries to steal the
magic rings. Only the bravest and most ingenious adventurer will be
able to deactivate the traps and ultimately escape this dangerous
and foreboding place.
Be careful on walking on broken tiles. The second time walking on them
will result in dropping into the abyss.
First
Ring of Escape:
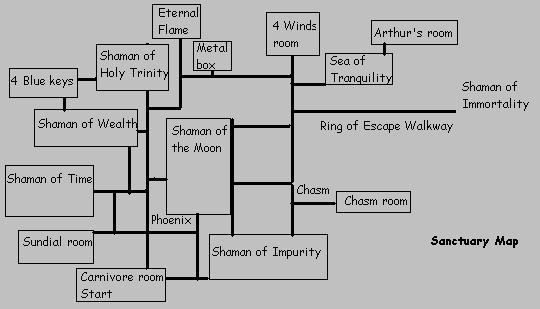
Carnivore room – Take and read the blue Shamans book. It
talks about the shamans being the protectors of the 3 rings of escape.
Drop the book. The room has burning hot coals, orange chest and
a carnivore at the top of the room. Look at ‘looks interesting’
tile with a hole at center in front of the orange chest. Operate interesting
tile and take a raw chicken leg. The carnivore did not like
the raw chicken leg. Better cook it then. Drop raw chicken leg on
burning hot coals and take cooked chicken leg and then insert
it to carnivore. Take the bone the carnivore discards. Door
opens.
Exit and turn right on hallway. Look at Flame of the Phoenix. Go
down the hallway and look at mold on the right side of the
hallway. Go farther down close to wall and look at another interesting
tile. Operate tile to get a door key. Note another broken lever
on the wall. Go back to main hallway and insert door key on door with
gold knobs.
Sundial room – Inside the room is a sundial, barrel
of ale and a heavy urn with a key behind it. Go back and
turn to hallway going up. Turn left and enter room. Shaman of Time room – Inside the room is a leopard skin,
elephant’s foot, green
chest, lion and the Shaman of time. Pick up the bundle of wood and stick.
Operate the interesting tile under the wood. Take potion of strength.
‘I suppose you want me to drink this.’ Sundial
room – Yup, consume potion of strength. Take heavy urn
and the orange chest key. Carnivore room –
Insert the orange key on orange chest. Read and take the Book
of Hours. Take S wind charm.
Go back to broken lever-hole on the wall by the Flame of phoenix and mold.
Insert stick on hole on the wall and operate the lever. Enter the
right hallway.
Shaman of Impurity room – The room has the soapstone, Water of the Fourth Dimension, lavender chest, hot stove and Shaman of Impurity.
Drop the Book of Hours on the water of the fourth Dimension to get
a watch. There is another interesting tile behind the broken
tiles – must find a way to get there. Operate the lever by the hot
stove. Shaman of Time room –
Drop watch on stand beside the Shaman and he lowers his arm to allow
passage. Enter and get trapped. Pick up the key that does not
fit the locked door behind the little Prince. Go farther in and look
at keystone, starburst deactivation stone, burning
hot coals, stamina potion – pick up when needed and one
of the 3 rings of escape protected by an electrocution device.
Operate the lever at the bottom wall and open the Shaman of Holy Trinity
room. Drop key in burning hot coals to get liquid metal. Drop
liquid metal on keystone and get the key. ‘Shall we try it?’
Insert newly made key on locked door.
Exit to main hallway by operating lever to open door to main hallway by block of ice. Turn left in hallway, left again and read the
red book about the Sanctuary and deactivation stones. Drop the book.
Look at broken lever beside it. Go to the top until the end.
Shaman of Holy Trinity room – The room has sulfuric acid, Flame of Ruin, red chest and the Shaman of
Holy Trinity. Operate the interesting tile and take the green chest key. Shaman of Time room
- Insert green key on green chest and take tankard. Sundial room – Drop tankard on table beside the barrel
of ale. Move to the right side and operate the tap of the barrel of
ale. Take tankard of ale. Go to mold by the Flame of Phoenix.
Drop tankard of ale on mold and take moldy ale. Shaman of Impurity room – Place moldy ale on stand beside
the Shaman of Impurity and he raises his arm.
Go up and see glue. Operate the lever to shortcut. Walk down the
path and operate the interesting tile at the end. Take cold resist
potion. Go back up and note ropes spanning the gap on the right
and a stamina potion. To the right by a precarious path is a stand
with a circle carved on it with a key behind – stand of the ring
of escape. Go back, then up to the end and turn left. Pass by
a broken lever, stand with ink and another broken lever. Go down carefully
on lower path, left and the go down the main hallway. Drink cold resist
potion and take block of ice. Run to the Shaman of Impurity
room. Shaman of Impurity room
- Drop block of ice on hot stove and take Eye of Heaven. Sundial room – Drop the Eye of Heaven on sundial and
take Stone of Leo. Go up next hallway. Shaman
of Time room – Stand to the left of the lion statue. Drop
the stone of Leo on it and get a starburst gold symbol. Go
up the hallway behind the Shaman of Time. Place the gold symbol on
deactivation stone stand on the left. Big Bang!! Go down at the electrocution
device and see that it has been deactivated. Take the first ring
of escape. Go to the other side of the Sanctuary to the stand
of ring of escape.
Ring of Escape walkway – Drop the first ring of escape on
the stand and it drops to the floor. Take the key and note
the stamina potion. Go to the main hallway and then right on
hallway above the stand that had the block of ice. Insert the key
on closed door.
Second
Ring of Escape:
Shaman of the Moon room – In the room is bible, lever,
and collection box at the bottom of the screen. Operate lever
in between the bible and the collection box to open door to shortcut
to hallway below. On the right side of the room, take urn of ashes
on the Altar of Affluence. On top of screen is the Shaman
of the moon. Operate the interesting tile at the bottom of the
screen and take blue chest key. Operate another lever to open shortcut to the right
passage. Go to passage going down to the Flame of the Phoenix. Drop
the ashes in front of the Flame of the Phoenix and take the wooden
cross. Go back up to Shaman of the moon room and drop the wooden
cross on the bible to get gold cross. Shaman of Holy Trinity room – Drop the gold cross on
stand beside the Shaman. Get trapped. Operate 2 interesting tiles
and get blood and lavender chest key. Look at the Ambrosia. Go to the garden beyond;
take the deactivation gem from bottom of the garden and the Gem of the 4 Winds. Drop the deactivation gem on ‘dangerous’
thing that blocks the passage. Go to Shaman of Impurity room way down
the Sanctuary. Shaman of Impurity room
- Insert lavender key on lavender chest. Take door key and Arthur’s potion.
Go back up to the closed door right of the hallway where there is an inkstand
and above and left of the passage to the ring of escape stand. Insert
door key on door.
Sea of Tranquility room – Take broken stick and operate
lever. The room has the Sea of Tranquility and the Stone
of Change. Take the other bundle of wood.
Go down, left, down and left again to the pot of glue. Drop broken stick
on glue and take stick. Turn right and the look at the ropes
crossing the chasm.
Chasm – Drop a bundle of wood on the rope, step on it, drop
the other bundle of wood, step on it, turn, take the other bundle
of wood, turn and drop it until the other side. ‘Yup!’ Chasm room – The room has the blue chest and male symbol
deactivation stone. Operate the interesting tile and take wooden
symbol. Insert blue chest key on blue chest to get a deactivation
gem. Go down to the bottom of the room and see the second ring
of escape behind an electrocution device. Exit to the other side of
the chasm using the bundles of wood again.
Go up the hallway to the passage with ink stand and broken lever. Insert
the stick to hole of broken lever at the left side of the passage.
Enter the now open door above.
Rock of Selene room – Trapped again. Turn and drop deactivation
gem on ‘dangerous thing’. Operate interesting tile and take Rock
of Selene. Take the stick on the grate. Look at altar with
stamina potion and has a metal box at the other end on it.
Go to main hallway and left to where the red book is and the broken lever
close. Insert the stick on hole of broken lever.
Shaman of Wealth room – Trapped again. Pick up the red
key. In the room is the tree of sacrifice and
the Shaman of Wealth. Place the blood on the tree of sacrifice
and the doors are opened. Shaman of
Holy Trinity room – Insert red key on red chest and take gold
nuggets and the E wind charm. Shaman
of Impurity room – Drop wooden male symbol on soapstone and
an impression is made. Pick up wooden male symbol. Drop gold
nugget on symbol impression and take gold male symbol. Go to
Chasm room using the bundle of woods.
Chasm room – Drop gold symbol on deactivation stone and the
electrocution device is deactivated. Take the second ring of escape.
Go to ring of escape stand.
Ring of escape walkway – Drop the second ring of escape on
the stand and it drops to the floor. Take paper money. Go to
Shaman of the Moon room.
Third
Ring of Escape:
Shaman of the Moon room – Drop paper money on collection
box and take gold coins. Go to Sea of Tranquility room. Sea of Tranquility room – Drop the Rock of Selene on
the Sea of Tranquility and take werewolf talisman. Drop the
gold coins on the stone of change. The door above opens. Arthur’s room – Pick up stick. Consume Arthur’s
potion and take the Sword of Dilos (Solid) on the left stand.
Operate the lever at the bottom of the room and enter open door. Go
up one step and turn right. Drop the sword of Dilos on the chasm.
Cross to the other side. Drop the werewolf talisman on the Water of
Silver light. Take the crescent moon and note a locked chest. Dilos
backwards, he, he! Shaman of the Moon
room – Place the crescent moon on stand beside the Shaman.
The room beyond has Water of resurrection, cross deactivation
stone and the third ring of escape behind electrocution
device. Take deactivation gem from the interesting tile
on the floor.
Insert stick on hole of broken lever right of the inkstand.
Four winds room – ‘No, not again!’ Drop deactivation stone
on dangerous thing. Pick up money spider. Drop S and E wind
charms on their respective places. Operate lever at the bottom right
of the room – ‘Something happened!’ Let’s check what did happen. Go
to the room off Arthur’s room.
Arthur’s room – Cross the chasm using the sword again. Take
the N wind charm and the magnet from the chest. Cross
the chasm and then pick up the Sword of Dilos.
Go to the hallway with the inkstand and go up the hallway on the left.
Use magnet on altar in place of the stamina potion. Take the metal
box. Shaman of Holy Trinity room
- Drop metal box on sulfuric acid and take blank parchment.
Go to inkstand hallway and drop blank parchment on inkstand. Take suicide note. Place suicide note on Flame of Ruin at the Shaman
of Holy Trinity room. Take Skull of Death.
Shaman of the Moon room – Drop money spider on Altar of Affluence
and take gold bar. Drop the skull at the water of resurrection
at the room behind the Shaman of the Moon. Take the immortal chain. Shaman of Wealth room – Drop the gold bar on stand beside
the Shaman. Enter the room and operate the interesting tile at the
top of the room to get a book. Read the book about choosing which
key. Drop book. Look at ankh deactivation stone on it and the
Holy Grail behind an electrocution device. Stand to the top of the
4 blue door key and take NW blue key. Go east and operate lever
to shortcut. Go to the passage above and left of the passage with
the inkstand. Use the NW blue key on closed door. Eternal Flame room – Operate the interesting tile to
get the W wind charm. Take and read green book about the Shaman
of Immortality wanting the food of life. Drop the book. Look at the Eternal flame. Drop immortal chain on eternal flame. Take the ankh gold symbol. Four winds
room – Drop N and W wind charms on their respective places.
An opening to the top of the room opens. Drop the Gem of the 4 winds
on the square. Pick up the gold symbol of a cross. Shaman of the Moon room – Place the cross gold symbol
on deactivation stone and then take the third ring of escape.
Go to Shaman of Wealth.
Shaman of Wealth room – Drop the ankh gold symbol on ankh
deactivation stone. Take the Holy Grail from behind the deactivated
electrocution device. Go to room behind the Shaman of Holy Trinity. Shaman of Holy Trinity – Drop Holy Grail on the left
of Ambrosia barrel. Operate Ambrosia tap and take Holy Grail filled
with Ambrosia.
Take the 2 bundle of woods from the chasm. Go to Ring of Escape Path.
Ring of Escape walkway – Drop the third ring of escape on
the stand at the hallway. Passage gets unblocked. Look at Shaman of
Immortality. Place Holy Grail with Ambrosia on table beside the Shaman
of Immortality. Go up.
Shaman of Immortality – Use bundle of woods to cross the
chasm. Use Sword of Dilos and the take door key. Return and
insert door key on closed door by Shaman of Immortality. Door opens!
By this time you should have the bone, heavy
urn and the wooden male symbol left in inventory. Drop
heavy urn just opposite and below the existing urn. Door opens. Do
not pick up any gold coins. Enter and drop wooden male symbol on floor
before the closed door. Forward and drop the bone on the outline of
bone. ‘Infinity is no match for us!’ Forward.