Uru: Ages Beyond Myst – Uru Walkthrough
Now look
through this second device. Look at the intern pattern. Now have another look at
painting 1 in the room you where just a few moments ago again. You should set the inner
pattern corresponding to the center image. For this second device the correct
order of pressing the buttons is: the right button 3 times. Now the intern
pattern must look exactly like this:
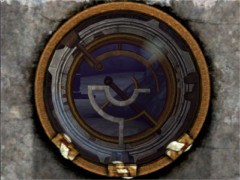
… and again…
Turn around and walk towards
the stairs leading down. Climb down the stairs. In the distance you’ll see the
third device waiting for you. Walk towards the device. Now
look through this third device. Look at the intern pattern. Now have another
look at painting 1 in the room you where just a few moments ago once more. You should set the
inner pattern corresponding to the bottom image. For this third device the
correct order of pressing the buttons is: the left button 3 times, the
center button 7 times and the right button 3 times. Now the intern pattern must
look exactly like this:
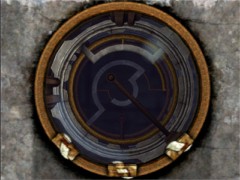
…and for the last time!
This time something is
happening. While you are still looking through the device you’ll notice that in
the distance something is moving aside. Now walk passed the device and notice that in
the distance is a device looking similar to this device. Walk passed that device
and enter the hidden door that you just opened. Exit this hallway through the
opposite door. Press the blue button. Turn around and re-enter the hallway. Walk
towards the closed door and press the third Journey.
Turn around and exit the
hallway. Walk onto the balcony at the end of the corridor. Turn to the right and
walk down until you reach the five balconies with a blue button on each and
every balcony. Now look at painting 2 in the room with all paintings. Notice
that there are five blue dots at the left side of the painting. Also notice that
button 2, 3 and 5 from top to bottom are lit. These represent the five buttons
on the balconies. Last but not least notice the red dot at the right side of the
painting. This represents the starting point of stepping on the tiles.
So on your
way down press the second, third and fifth blue button. Now walk all the way
down but make sure you stay on the outer rim of the floor. Turn to the right and
keep on walking on the outer rim until the angel of the camera changes. You’ll
see what I mean with that. Turn around and walk a little bit back until the
angel of the camera changes again. Have a good look at the outer rim and notice a little more
bright part on the outer rim. This is your starting point indicated with the red
dot on painting number 2.
Walk towards that brighter
part and the angel of the camera changes again. Now you’re standing in front of a dark pattern
of the tile floor. Walk across the dark pattern on the tilel to the center of the
room. Be sure not to step on any bright part of the tiles! When you’ve done this
correctly, the path you just walked will sink. This is the correct path:
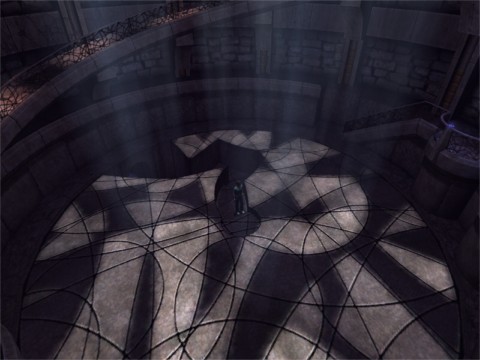
The correct path just sunk down…
Turn around and walk down
towards the just revealed door. Go through the door and climb the stairs. No
need to push the blue button. If you press the button it will reset the tile
floor puzzle. So… you better leave it alone. Keep on walking until you are
standing in the area with the purple lit lake. Turn to the left and keep on
walking until you reach the crevice. Notice that there’s laying something on the
ground in the distance. So run/jump over the crevice and pick up the Relto page.
Click on the image to add it to your linking book. Turn around and run/jump back
over the crevice.
Turn to the right and climb
up the stairs. You are facing a huge pyramid now. Walk towards the right side of
the pyramid and go around the corner. Halfway the pyramid turn to the left and
jump into the niche. Turn to the left and press the fourth
Journey. Walk back to
the entrance of the pyramid. Climb up the stairs to enter the pyramid. Climb up
the small center stairs and press the blue button. This will lit the room.
Turn around and climb down
the center stairs. Turn to the left and climb down the little stairs at the
right side of the center stairs. Turn to the right and walk all the way around
the room walking the outer rim of the floor. So don’t step on the floor tiles.
When you walked all the way around, climb up the little stairs. Climb up the
center stairs again and press the blue button once more. The tiles will lit blue
now. Step down the center stairs, turn to the left and climb down the little
stairs at the right side of the center stairs. Be sure not to step on the floor
tiles again!!! Because first you have to know the correct path. The correct path
is to step from one tile to another with a mushroom image on it. So the correct
path across these tiles is:
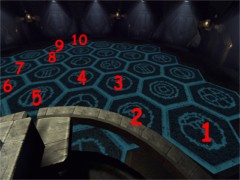
The correct order to step on the tiles…
When you stepped on the
correct tiles the last one turns out to be an elevator which takes you down.
When the elevator stops, just get out or it will take you up again. At the right
wall near the exit press the fifth Journey.
Turn to the left and enter
the next room. When you enter the room turn to the left and step on the little
platform with the levers so you are facing the center of the room. In front of
you there are four pillars sunk in the floor. Your goal is to raise the correct
pillars by pulling the levers in the correct order. The blue button at the right
side will reset the pillars. Number the levers from 1 to 4 from the left to the
right.
Pull the fourth lever 4
times to bring the last pillar into the highest position. Pull the third lever 3
times to raise the third pillar into the last but highest position. Pull the
second lever 1 time to raise the second pillar a little. Now walk towards the pillars and climb all the way to the
top and press the sixth Journey.
Turn to the left and climb
the stairs all the way down. At the bottom pull the lever to open a secret door.
Now you are back in the room with the little control panel. Push the blue button
to reset the pillars. Step behind the levers once more.
Explanation:
Some gamers
asked me how I solved the next puzzle. I must admit that I studied painting 4 in the room with the paintings for hours. First I thought that
the rotating ring would give the correct order of pulling the levers. Dead wrong!
It is far more simple. Notice that the four rectangles on the image represent
the four levers. Also notice that these four rectangles have different colors,
from the left to the right: red, white, green and blue. Four rectangles? But there are only three numbers on the
rotating ring with different colors corresponding with the rectangles. Also
notice that all these D’ni numbers are between 1 and 4. That can’t be a
coincidence! After having noticed that, I concluded that with each and every rectangle there is one number missing. You learned the
D’ni-numbers in the brown book at Relto in the right book case. When you study
all colored numbers on the rotating ring you’ll see:
Red: the
D’ni-numbers 2, 3 and 4. So number 1 is missing
White: the D’ni-numbers 1, 2 and 3. So number 4 is missing
Green: the D’ni-numbers 2, 3 and 4. So number 1 is missing
Blue: the D’ni-numbers 1, 3 and 4. So number 2 is missing.
So the correct order to pull the levers is: lever one 1 time, lever two 4
times, lever three 1 time and lever four 2 times.
So
pull lever one 1 time,
lever two 4 times, lever three 1 time and lever four 2 times. Climb all the way
to the top once more and climb up the steel ladder. Enter the next corridor.
Walk all the way to the end of the corridor until you are facing some sort of
room up in the sky. Be careful not to fall down from the edge. Turn to the left
and carefully walk all the way up towards the room up in the sky. Before
climbing up the room itself step on the little platform with some sort of device
at the right side.
Examine the device. Note
that it has six buttons. Also note that there are symbols above each and every
button. I’m sure they will remind you of painting 3 back in the room with the D’ni-numbers and the rotating images above. Now you "only" have to
figure out the correct order to push the buttons by the images above the
buttons. Please don’t shoot me because this is quiet o long explanation!
Explanation:
The solution to this puzzle is based on the same principle as the solution to the levers
in the pillar room. As the same in that puzzle the most important thing is which
numbers are missing. Because of all the symbols and because there are six buttons it’s all
a little complicated. First of all you have to determine which numbers
are present at each button and with that which numbers are missing with each
button. Number each button from the left to the right from 1 to 6.
These are
the numbers that are present above each button:
button 1: 2, 3, 4 and 6
button 2: 4, 5 ,6 and 6
button 3: 2, 5, 6 and 6
button 4: 1, 2, 3 and 6
button 5: 1, 3, 4 and 5
button 6: 2, 3, 4 and 5
so the
missing numbers are:
button 1: 1 and 5
button 2: 1, 2 and 3
button 3: 1, 3 and 4
button 4: 4 and 5
button 5: 2 and 6
button 6: 1 and 6
As you can
see there is the D’ni-number 1 on the first button. This means that the first
button has to be pressed the first. Thank God for that! So you can remove that
button from the list. Now remove the first button (number 1) from the other
missing numbers of the other buttons. That gives you the next missing numbers:
button
2: 2 and 3
button 3: 3 and 4
button 4: 4 and 5
button 5: 2 and 6
button 6: 6
Notice that
button 6 is the only button with one missing number now. And this number happens
to be number 6. So now you know that the the sixth button has to be pressed as
the sixth button. So this brings you to the still incomplete order of pressing
the buttons: 1, ?, ?, ?, ?, 6.
Now that you
found this out, simply remove the sixth button (number 6) from the other missing
numbers of the other buttons. That gives you the next missing numbers:
button
2: 2 and 3
button 3: 3 and 4
button 4: 4 and 5
button 5: 2
Notice that
button 5 is the only button with one missing number now. And this number happens
to be number 2. Now you know that the fifth button has to be pressed as the
second button. So this brings you to the still incomplete order of pressing the
buttons: 1, 5, ?, ?, ?, 6.
Now that you
found this out, simply remove the second button (number 2) from the other
missing numbers of the other buttons. That gives you the next missing numbers:
button
2: 3
button 3: 3 and 4
button 4: 4 and 5
Notice that
button 2 is the only button with one missing number now. And this number happens
to be number 3. Now you know that the second button has to be pressed as the
third button. So this brings you to the still incomplete order of pressing the
buttons: 1, 5, 2, ?, ?, 6.
Now that you
found this out, simply remove the third button (number 3) from the other missing
numbers of the other buttons. That gives you the next missing numbers:
button
3: 4
button 4: 4 and 5
Notice that
button 3 is the only button with one missing number now. And this number happens
to be number 4. Now you know that the third button has to be pressed as the
fourth button. button. So this brings you to the still incomplete order of
pressing the buttons: 1, 5, 2, 3, ?, 6.
Now that you
found this out, simply remove the fourth button (number 4) from the other
missing numbers of the other buttons. That gives you the next missing numbers:
button
4: 5
Notice that
button 4 is the only button with one missing number now. And this number happens
to be number 5. Now you know that the fourth button has to be pressed as the
fifth button. button. So this brings you to the complete order of pressing the
buttons: 1, 5, 2, 3, 4, 6. Okay, okay… I admit you could have determined this
last button also because it was the only remaining button. But I just wanted to
show the whole story of missing and remaining numbers! I hope you’re still with
me but I really couldn’t find a better way to explain this one…
So the correct order of
pressing the buttons is: 1, 5, 2, 3, 4 and
6. After you pressed the
buttons in this order you’ll see that a door opens at the room up in the sky. So
now walk all the way up to that room. Be careful again not to fall down. Go
through the opened door and climb down the stairs. Next to the dead body is a
note. Pick it up to read it. Turn around and walk towards the back wall. Jump on
the wooden crates and keep on jumping towards the wall and press the seventh
Journey. Jump down until you are standing on the floor again.
Have a look at the linking
book on the pedestal. It’s a linking book to the room with all the paintings. No
need to go back there, it would just be a waste of time. Exit the room by
climbing up the stairs. Go back to the little platform with the device. Go and
stand in front of the device. Turn around and face the door in the distance
where you entered this area.
Walk straight on to the end
of the platform and turn to the left. There in the distance you’ll see your next
goal… another Journey door. Also notice a big pipe beneath the platform
leading to that door. Jump down on that pipe and walk all the way to the end. Be
careful again not to fall down. At the end turn to the right and jump down the
platform near the Journey door. Walk towards the door and press the hand sign.
Enter the room and walk straight ahead into the darkness until you’ll hear
Yeesha again. After she
finished, wait a second until the figure on the wall stops glowing. Touch the
hand sign on the wall. This will make the totem disappear. Jump down form the
ledge into the darkness. You’ll end up at Relto once more. See what happens to the
Kadish Tolesa pillar. A better proof that you finished this Age couldn’t exist! Now
enter the house and take the fourth (red) book from the book case. Open it and click
on the image to go to…
The Eder
Kemo & Eder Gira Age
Turn around
and notice two little geysers and between them a large geyser with a lid
attached to it. Turn to the right and walk towards the large stand alone geyser.
Kick the pedal to close the lid. Turn to the left and climb up the path. Turn to
the right. Walk towards the first vase shaped plant next to the big rock.
Carefully walk to the side of the path and look down. You’ll see a very small
ledge beneath you. Carefully step down the path onto that ledge.
Turn around
and press the first Journey of this Age. Now turn around and notice another
small platform with a geyser beneath you. Your next goal is to land on that
platform without falling into the hot glowing lava. The best way to do this is
to line up with that platform and stand with your back against the wall. Do one
step forward and jump. On the platform kick the lid to close the geyser. Turn
around and make a run/jump to the next area. Close both geysers. Remember this
place with the two geysers because you have to come back later here.
Walk up the
path and go to the right. Cross the stone bridge over the ravine. Follow the
path and close the next geyser. Turn to the right and jump down to end up at the
area where you started. Walk towards the opened big geyser and step on it. Now
you know what the closing of the geysers is good for. By closing all of them the
pressure will rise to much. By that all geysers will be opened. By closing all
the geysers but one, the only opened geyser will have power enough to blow you
away. Because this is the only opened geyser now, you
will be blown away up to a small ledge. Press the second
Journey. Jump down from
the ledge. Now head back to the place with the two geysers you closed a while
ago. Open the one nearest to the back wall.
Return to
your starting point and close the other geyser. Head back to the place with the
two geysers once more. This time step on the opened geyser to get blown away to
another area. Follow the path all the way until you reach the area with the
waterfall and the lake. At the end of the path you’ll find a linking book to
Eder Gira at the right side. Leave it alone for now.
Look around
and notice a large bridge shaped rock crossing the river. Pan a little more to
the left and notice another huge rock at the opposite side of the river. Walk
towards that rock and cross the river. Walk towards the waterfall. Halfway there
you’ll pass another small rock. Examine it to find out it contains a Journey stone. Leave it alone for now but remember it is here… you’re going to need it
later. Now walk all the way to the end of the path to end up behind the
waterfall.
Go into the
cave behind the waterfall. It’s pitch dark in there. At the very right end and
at the very left end of the cave you’ll find some sort of generator. Switch both
of them on by pressing the lid to get some more light. Near the exit towards the
waterfall you’ll find some sort of buoy. Push it into the water and shove it all
the way to the river. You should place it into the river next to the big rock.
Later on you are going to need this as a bridge to cross the river dry-footed. You’ll
learn why in just a few minutes.
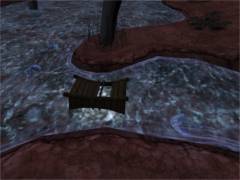
This is a good place to make your… bridge!
Walk to the linking book.
Link yourself to Eder Gira. Walk down the path until you reach the huge rock
sticking up at your right side. Walk towards that rock and press the third
Journey. Turn to the right and walk towards the little cabin. Get passed the
right side of that cabin and walk until you’re facing the rock wall. Turn to the
right. Walk all the way to the end and press the fourth
Journey. Head back to
the path. Turn to the right and follow the path. At the right intersection
you’ll see another Journey door. Leave it alone for now but remember it’s here.
Keep on following the path
and go passed the tunnel. At your right side and on your left side you’ll see
big brain plants. Keep on following the path to the left. In the distance you’ll
see big puffing plants. Climb down the stairs. Turn to the right and walk to the
left side of the cabin. Turn around and press the fifth
Journey.
Walk towards the tunnel
passed the puffing plants. Just in front of the tunnel head to the left and
climb up the tunnel. Pick up the blue book with the story of Shomat. Of course
you read the book. Now turn around and look at the right area with puffing
plants. There’s something laying on the cliff over there. Turn to the left and
walk halfway down the tunnel. Line up with the rock standing between you and the
cliff. Make a run/jump to that rock and jump on the cliff.
Pick up the Relto page and
click on the image to add it to your linking book. Jump down from the platform.
Turn to the right and climb up the stairs towards the brain plants. On top of
the stairs turn to the left and climb up the stone wall. Walk towards the lamp
on top of the wall and press the sixth Journey.
Jump or climb down the wall
and walk back towards the stairs. Walk into the right area with the brain
plants. Walk through the field of brain plants to find yourself a flying cloud
of fireflies. Walk through the cloud of fireflies a few times to get some of
them. Before you are going further you should know something about these fireflies. First
of all they hate water. As soon as you are touching water or water is touching
you, the fireflies will be gone at once. When you run or jump more then once,
the fireflies will be gone as well. Your goal is to get back to Eder Kemo with
these fireflies to lighten up some dark tunnels at the cave near the waterfall.
So now you have to go back there without getting wet and without running or
jumping!
So when you got some
fireflies gathered around you walk back towards the stairs and towards the
tunnel passed the puffing plants. Walk through the tunnel and cross the water to
the next cave. If you are surprised by a thunderstorm all the fireflies will be
gone. In that case you have to collect some new ones. Enter the cave and link yourself back to Eder Gira.
When you arrive there be
careful with that geyser in front of you. Why? Because from time to time it
spits steam and steam is… wet! Walk towards the river and cross it dry-footed
across your own made bridge the buoy. Walk to the end of the path towards the
waterfall. Line up with the cave. Now you can make only one jump/step into the
cave without the fireflies leaving you.
Walk to the left side of the
cave and step into the dark tunnel. It’s good you brought those fireflies around
because it’s pitch dark inside the tunnel. At the end of the tunnel you’ll find
another generator room. Switch it on by pressing the lid. Turn to the right and pull
the lever next to the door. Enter the next room. Here you’ll find another two
buoys. Drop them both into the water. Step into the water and push both buoys
over the edge into the lake below. Now make another bridge by using the buoys at
the entrance of the cave. You have to stash them at the spot where you jumped
into the cave before. After you placed the buoys see if you can walk from the
path into the cave without getting wet-footed and without jumping!!!
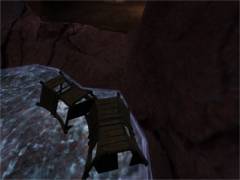
The correct way to stash the buoys.
When you are absolutely sure
about that walk to the linking book and link back to Eder Gira. Walk back to the
brain plants and get yourself some fireflies again. Go through the tunnel passed
the puffing plants and enter the next cave. Link back to Eder Kemo. Walk across
your own made bridge across the river and walk across the bridge you just made
at the entrance into the cave behind the waterfall.
Enter the dark tunnel once
more. In the generator room turn to the left and enter another dark tunnel.
Follow the tunnel until you are standing outside the tunnel. Follow the path
around the cliff until you are standing in front of the gap high above the
little waterfall. You can do only a one step jump across the gap without losing
your fireflies. So line up with the opposite side and make that one step jump.
Follow the path into another dark cave. Go to the left and walk into the
circular room. Find the generator and switch it on by pressing the lid. Look
around and press the seventh Journey.
Now head back to the cave
near the lake behind the waterfall. Exit the cave near the place where you
placed the two buoys. Walk towards the little rock next to the lake and press
the Journey stone. Press the image to end up in some sort of store room in D’ni-city. Read all the books and notes to learn lots more about
D’ni-kings and D’ni-habits such as marriage etc. When you are finished, link back to Relto.
Hmmm… nice carpet!
Take the fifth (green) book
from the book case and press the Eder Gira image. Go passed the large standing
rock. Walk the path to the right and walk towards the Journey door. Press the hand sign.
Enter the room and walk straight ahead into the darkness until you’ll hear
Yeesha again. After she
finished, wait a second until the figure on the wall stops glowing. Touch the
hand sign on the wall. This will make the totem disappear. Jump down form the
ledge into the darkness. You’ll end up at Relto once more. See that all four
totems will raise. A better proof that you finished all Ages couldn’t exist!
Congratulations! You just
finished Uru, Ages Beyond Myst!! Just kidding!!! Somehow you’ll have the feeling
that things aren’t finished yet. That’s correct! Remember that Yeesha just told
you that you have to bring back what is taken. If you wonder what this might
mean it’s easier said than done. You have to bring back all four totems you just
gathered onto Relto. I suggest you do this in the same order as you gathered
them.
So enter the house and take
the second (orange) book from the book case once more. Press the Journey sign to
link back to Teledahn.
Turn around and walk towards
the opened door. Go through the door and climb down the stairs. In the next room
climb up the metal stairs against the wall. Enter the opened door at the end of
the walkway. Walk straight on and press the hand sign of the Journey door at
your right side. Enter the room and press the hand sign on the wall. Make a note
of the symbol on the floor and step down the ledge to return to Relto.
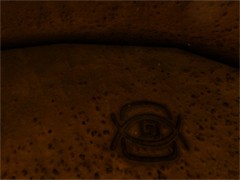
The Teledahn symbol
Notice that
the Teledahn totem has gone. And not only that… in the ground a blinking
fissure appears! Enter the house and take the first (green) book from the book
case. Press the Journey sign to link back to Gahreesen. You’ll end up at that
damned rock near the rotating buildings. Carefully walk towards the outer side
of the cliff. Line up with the rock down there and make a run/jump onto the
rock. Now line up with the rock with the Journey door and make another run/jump
to the Journey door. Walk towards the
Journey door and press the hand sign. Enter the room and press the hand sign on
the wall. Make a note of the symbol on the floor and step down the ledge to
return to Relto.
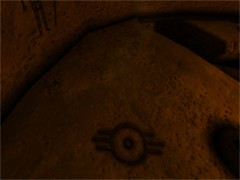
The Gahreesen symbol
When you are back at Relto
the Gahreesen totem has gone as well and the fissure in the ground is getting
bigger. Enter the house and take the third (purple) book from the book case.
Press the Journey sign to link back to Kadish Tolesa.
Turn to the left and enter
the pillar room. Climb up the pillars and climb up the steel ladder all the way
to the top. Walk to the end of the tunnel. Go to the left. Climb up the stairs
to the platform with the yellow buttoned control panel. Face the control panel
and turn around. Walk to the end at the left side of the platform. Jump down on
the pipe beneath. Walk all the way to the little platform near the Journey door.
Jump down and walk towards the Journey door. Press the hand sign. Enter the room
and press the hand sign on the wall. Make a note of the symbol on the floor and
step down the ledge to return to Relto.
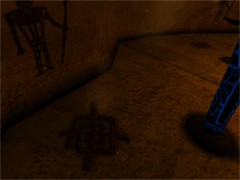
The Kadish Tolesa symbol
When you return to Relto the
Kadish Tolesa totem has gone and the fissure in the ground is getting bigger and
bigger. Enter the house and take the fifth (green) book from the book case.
Press the Journey sign to link back to Eder Gira.
Turn around and climb the
stairs towards the brain plants. Go through the tunnel passed the brain plants
and head to the left to the Journey door. Press the hand sign. Enter the room
and press the hand sign on the wall. Make a note of the symbol on the floor and
step down the ledge to return to Relto.
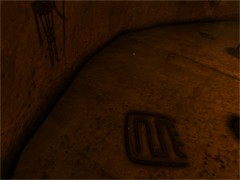
The Eder Gira symbol
Look around and notice that
the four ledges are all together now and all four totems are returned now. Jump
down the center hole. This time Relto is hit by a severe earth quake. The
fissure opens completely now. Jump down into the fissure.
Now you’ll come falling from
the sky into the dessert area. Walk around the volcano and enter the cleft once
more. Step on the bridge leading to Yeesha’s home. Walk the bridge and jump
across the broken part of the bridge. Enter Yeesha’s home. Climb up the stairs.
Walk towards the device
with the blue button at the left side of the room. Press the blue button. Now
you have to adjust the symbols on the plate of the device in the order you just
visited the four Ages. The correct order of the symbols is: the Teledahn symbol
on top, the Gahreesen symbol at the bottom, the Kadish Tolesa symbol at the left
and the Eder Gira symbol at the right. So it should look like this:
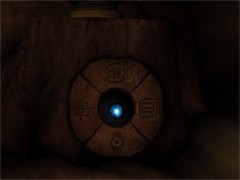
All symbols set in the correct way
Note: these
symbols where the same with me all the times and every time I played the game.
I’m not sure if this is the case with you too. So if the symbols on the floor
with the four ages were different you have to change these four symbols on the
plate in the corresponding way of course.
Press the
blue button. If Yeesha disappears in a few seconds, you didn’t set the symbols
correctly. In that case try again. When you set the symbols correctly Yeesha
will pop up once more with a long story. At the end of the story Yeesha offers
you another linking book. Touch the linking book in her hands. After that she
disappears but not before having made some changes to the weather. Outside a
heavy thunderstorm will start.
Now walk
towards the device at the right side of the door with the green button. Press
the green button. Take the Relto page from the device and click on the image to
add this one to your linking book also. Leave the room and exit the cleft. Enjoy
the view over the rainy dessert and watch out for the lightings!
Now you
really finished this great game…
If you
want play this last part again link back to rainy Relto. Enter the house and
take the most left book (with the fissure) from the book case and click on one
of the two images…