Uru: Ages Beyond Myst Walkthrough

All images are property of Ubi
Soft Entertainment ©
© November 2003
Bert Jamin
(www.gamesover.com)
This walkthrough may not be sold and may not be used for any commercial
purposes. Neither is it permitted to publish this walkthrough in any way without
the written permission of the author. Feel free to place this walkthrough on
your web site or on your home page, on condition that no part of this
walkthrough is changed and that the name of the author (Bert Jamin), the URL of
the owner of this site ( www.gamesover.com
) and his E-mail address are mentioned unchanged. For the most up to date walkthroughs always visit
www.gamesover.com.
If you have any suggestions
to improve this walkthrough, let me know by sending me an email:
.
In the
beginning
You begin
your quest standing in the desert. Turn around and walk towards the sign next to
the closed fence. Walk around the sign and you’ll see some kind of hand sign at
the back. Touch the first
hand sign and notice
that a part of the sign will blink.
Turn around
and walk towards the right side of the volcano. Notice that there’s a trailer in
the distance. Walk towards the trailer and speak with the man in front of the
trailer. It turns out to be a guy called Jeff Zandi. Listen to what he has to
tell you. If you want to hear his story again just speak to him. If you got
stuck you can also ask him for vital clues.
Walk around
the trailer and notice another hand sign. Touch the second
hand sign and now two
parts will blink. Turn around and notice a cleft nearby. Walk passed the cleft
into the dessert. You’ll see something lying around in the distance. Walk to
that part of the dessert. The first item you’ll see is a destroyed telescope
you’ve seen earlier in good old Riven. You can’t do anything with it. So walk
further into the dessert. Nearby you’ll find a skeleton of one of the sea
creatures out of Riven. Walk into the head part of the skeleton. You’ll discover
another hand sign. Touch the third
hand sign to activate
it. Now walk back to the cleft. Notice the windmill standing near the cleft.
Push the big lever and… nothing happens. Hmmm… could have imagined
that!
Walk around
the cleft and enter it by climbing down the ladder. Walk down the stairs until
you are standing on the platform with the two bridges. Notice that one of them
is missing some planks at the end. Walk to the other bridge and walk across the
bridge. That is as far as you can before it will collapse. Great… now you’re
standing at the bottom of the cleft. Turn to the right and notice another bridge
hanging down from the wall. Climb up that bridge.
Turn to the
right and enter the lit room. Read the letter that is laying on the bed. It’s a
letter of Artrus. Leave the room and enter the other dark room. Press the fourth
hand sign on the
wall. Leave the room. Turn to the right and walk to the end of the platform.
Look down and notice three wooden planks leading to the opposite side. Carefully
step down the platform and cross the wooden planks. Step down at the left side
of that small platform. Climb up the next hanging bridge. Enter the room.
You can push
whatever you want but nothing works yet. Walk down the stairs at the end of the
room. Notice the big shaft leading up through the ceiling. Remember that out of
use windmill next to the cleft. Pull the lever to set free the shaft. Climb up
the stairs back to the other room. Leave the room and just jump down from the
ledge to end up at the bottom of the cleft again.
Walk towards
the opposite hanging bridge. Climb up that bridge and leave the cleft by
climbing up the stairs and the ladder. Walk towards the windmill. Push the big
lever once more. Hey… it’s working fine now. Enter the cleft once more, Climb
down the hanging bridge. Turn to the right and walk towards the hanging bridge
at the right side. Climb up the bridge and step of the ledge at the left side.
Cross the wooden planks once more. Step down the ledge at the left side and
climb the hanging bridge at the left side. Enter the room.
Press the
blue button next to the door. The door will close now. Make a note of the sign
next to the door. Examine the room and notice some sort of device with a blue
lit button at the left side of the room. Make sure that the images on the device
correspond with the images you just saw on the sign next to the door. Then push
the blue button. Listen to Yeesha’s story. She will tell you a long story in
which she tells you that the hand signs are Journeys. You have to find seven of
these Journeys over here and seven Journeys in each other Age you are going to
visit.
When Yeesha
has gone, walk to the end of the room with the niches and push the fifth
Journey at the left
wall. Turn around and climb down the stairs to the other room. Push the blue
button to open the door. Step outside. Turn to the right and walk down the other
bridge. Jump over the part where the planks are missing. You can enter the room
at the opposite side if you want but there’s nothing of importance there. Walk
to the right side of that ledge. Kick the pedal on the floor. This will lower a
bucket.
Jump down
from the ledge and examine the lowered bucket. Push the sixth
Journey on the
bucket. Turn to the left, cross the water and walk to the second hanging bridge
at your right at the very other end of the cleft. Climb up the bridge. Turn to
the left, jump down the ledge and cross the wooden planks for the last time.
Jump down the ledge at the left side. Climb up the hanging bridge at the left
and look at the now closed door. Press the seventh
Journey and notice
that it is complete now. Jump down to end up at the bottom of the cleft.
Walk passed
the water at the other end of the cleft. At the very end of the cleft you’ll
notice a tree with another hand sign. Press the hand sign and the tree will
open. Enter the tree and climb all the way down. Follow the tunnel until you are
in a circular room with four different blue lit images. On the pedestal beneath
the light you’ll find an opened linking book. Examine the book and click on the
image inside the book to get yourself linked to…
Relto
Relto
actually isn’t a real Age. It’s more a kind of a bus stop. From here you can
travel to all other Ages. Whenever you get stuck you can always link back to
Relto to go to another Age. During your travels around the different Ages you’ll
find some Relto pages. By adding them to your linking book the outlook of Relto
will change a bit.
Look around
and notice four wooden pillars and a house. Walk towards the house and open the
door. Enter the house. Next to the door you’ll see a small handle. Push the
handle to open the shutters. When you examine the room you’ll see an empty book
case at the left side, a closet and another book case at the right side of the
room. When you open the closet you can change clothes if you want. You can
change your appearance every time you visit this room. Walk towards
the book case at the right side. Take the book and read it. It describes the
four Ages you have to travel to, the Teledahn Age, the Gahreesen Age, the Kadish Tolesa
Age and the Eder
Kemo & Eder Gira Age. Notice that the pages are numbered in D’ni-numbers at
the bottom of each page. Now you
have the D’ni-numbers from 1 to 8. Make a note of these D’ni-numbers with their
corresponding normal numbers. You are going to need this later in the game!
Leave the
house and walk towards the four wooden pillars. Each of these pillars contains a
linking book to one of the four Ages. First thing I did was opening all of the
pillars and get me linked to the corresponding Age and get me linked back to
Relto again. So I gathered all linking books at the same time. You can do this
in a different way if you like of course. Let’s start with the first one at the
left. Press the hand sign. It lights up green and it opens. Click on the linking
book and on the image. This will take you to the Eder Kemo & Eder Gira Age.
When you arrive there just click on the linking book at the left corner of your
screen to get yourself linked back to Relto.
When you
return to Relto you’ll notice that there is one book in the book case at the
left side now. Go outside again and now press the hand sign of the first pillar
at the right side. It lights up orange. Click on the linking book and on the
image to go to Teledahn. When you arrive there return to Relto again. Now there
are two books in the book case. Exit the room and press the hand sign of the
last pillar at the left side. It lights up blue. Click on the linking book and
on the image to go to Gahreesen. Link yourself back to Relto again. Now there
are three books in the book case.
Go out once
more and do the same with the last pillar at the right side. This one lights up
purple. Click on the book and on the image to go to Kadish Tolesa. Link yourself
back to Relto once more. Now you have all linking books for the Ages gathered!
From the left to the right you have a green book linking to Gahreesen, an orange
book linking to Teledahn, a purple book linking to Kadsih Tolesa and finally a
red book linking to Eder Kemo & Eder Gira.
Remember
the order of the Ages which are described in the book in the book case at the
right side: Teledahn. Gahreesen, Kadish Tolesa and Eder Kemo & Eder Gira. I
think it’s the best to keep this order in Ages. So let’s start with the Teledahn
Age. Take the orange book out of the book case. Open it
and click on the image to get yourself to…
The Teledahn
Age
You are
standing in a hut. Notice the manhole on the floor. You can try to open it but
it won’t budge. It’s firmly locked. And that’s just good because the room
beneath it is floated with water. So opening the manhole now would bring you
nothing but drowning. Leave the hut and walk along the platform to the back side
of the hut. There you’ll find the first
Journey of this Age.
Press it to activate it.
Walk back
towards the entrance of the hut. Cross the bridge and go to the left. At the
first intersection go to the right. Keep on walking and go the first
intersection to the left. Walk until you reach the platform with the antenna,
the telescope and a device with the yellow flashing D’ni-number 3 on it. So press that
device tree times to bring out the antenna. Now walk to the opposite side of the
platform and look trough the telescope.
Notice that
it has a metal ring at the center. Also notice that it has four buttons to
press. One at the left, one at the right and two at the bottom (up and down). By
pressing these buttons you can move the telescope in the corresponding direction. Your goal
is to find the sun and track it down in the center ring. This will power up the
surroundings. The best way to do this is waiting until the sun comes bye and
then simply "catch" it in the center ring. Once this job is done,
leave it alone and you’ll have power all the time.
Walk around
the platform and notice there are three big levers surrounding the platform.
Pull all three of the levers. One of them is broken but you don’t need that one.
Notice that there is another walkway leading down the platform. It’s broken
halfway, so no use to walk that way. In stead of that walk the walkway on which
you came to the platform. At the junction go to the left. Walk all the way to
the end.
Notice a
lever and a staircase leading down the walkway. Leave the lever alone!!! Also
notice that there is a huge bucket hanging next to the railing. Your goal is to
flip the lever (not yet!!!), run down the staircase and climb into the bucket to
get a free ride up. Is that all there is, you might think… Well… not quiet.
The problem is that you only have about five seconds to climb into the bucket after
you flipped the lever. After that the bucket will start it’s way up leaving you
behind at the walkway! I’ll bet you’ll have to give this a try more than once
(as I did :o). If you fail you have to pull the lever again to get another
bucket stopped at the correct spot.
Here’s my
golden tip. If the bucket left without you, walk towards the lever. See how the
buckets are going to the top into another building. You can also see how another
bucket will be lowered. As soon as a bucket has left the top building flip the
lever and the bucket will stop at the correct spot. When you finally entered the
bucket in time enjoy the view!
When you are
delivered by the bucket walk down the platform. Examine the room and see that
there are two other niches with a telescope. Between these niches you’ll find
the second Journey.
No need to say that you have to activate it. If you want you can have a look
through these telescopes of course.
Now
walk around the room and locate the elevator. Next to the elevator at the right
side you’ll see a pedal on the floor. Kick the pedal to release the brake of the
elevator. Turn to the right and walk towards the small control panel. Click on
the control panel to sit down. Examine the controls but don’t touch anything
before you know what you are doing. The lever and the button at the left side
are controlling the buckets. No need to change that so leave them alone. The
center lever will drain the water from beneath the manhole in the hut. So flip
that one. Notice that it is slowly going back to top position and that the
pointer at the left of it will slowly go down. Wait until that’s all done. When
it stops all the water beneath the hut has gone. Now flip the right switch near
the red light to unlock the manhole in the hut. With the most right buttons you
can switch on and off the lights over here. Leave the control panel.
Step into
the elevator. Press the blue button to go up. Leave the elevator and press the third
Journey next to the
window. Move the lever next to the window to get some light in the room. Examine
the table with all the papers near the window. Read all the papers. There are
two important papers. One is the manual about the fish tank. It says that for
the models III and IV the light switch has to be pressed for longer than three
seconds to open the lower portion of the tank. The other one is at the center of
the table, giving you some vital information about – as you’ll see later on –
seven pressure plates. Leave the table and walk towards the fish tank.
At the left
side of the fish tank you’ll find the first Relto paper. Pick it up and click on
the image. It will be added to your linking book. Now press
the red switch on top of the fish tank for at least three seconds. When you let
go, the lower portion f the tank will lower. If not, you didn’t press the switch
long enough. Click on the appeared linking book and on the image. You’ll end up
in another office. Turn around and walk towards the desk. Read all the papers
and if you have time enough also read the diary of Douglas Sharper to learn lots
more about the Teledahn Age.
Now walk
into the room with the telescope. Of course you can have a look through the
scope. Look at the left wall. In stead of the expected Journey you’ll find a Journey
stone. Click on the image to get yourself end up on some sort of platform
in some sort of swamp. There’s nothing to do there. Your only way out is your
linking book to Relto. So click on your linking book at the left corner of the
screen to get back to Relto. Notice that there is a new book added to the book
case. Take that fifth book and click on the image to get back to the office you
just left. Walk into the room with the paintings. Click on the linking book on
the pedestal and link yourself back into the office with the fish tank.
Walk towards
the elevator. If the elevator is not there, press the blue button. Enter the
elevator and push the yellow button to go down. At the first stop you are back in the
control room. No need to go there again so press the yellow button once more to go
further down. Now you are stopping in front of the hut. Enter the hut and open
the manhole. Climb down the manhole and go all the way down. You’ll end up in a
huge empty water basin. Notice that there is another ladder leading down. Climb down
that ladder.
You are now
standing in a water pipe. Walk through the pipe. After a while you’ll come along
a little lit area. Shortly after that there’s an opening in the water pipe at
your right leading to a staircase. Climb up the staircase. You’ll enter a sort
of prison cell. At the wall you find the fourth
Journey. Don’t forget
to activate it!
When you
examine the room, you’ll notice seven pressure plates on the floor and two
closed doors. Walk toward the right closed door and look into the next room. At
the wall at the back of that room you’ll see a sort of control that can open the
doors. The only thing is you can’t reach from here. Now have a closer look and
notice that there are seven signs on the control. Four of them are up, the
yellow ones. And three of them are down, the grey ones. Each sign corresponds
with the pressure plates. Now remember the piece of paper you saw back in the
office. You have to press down the plates corresponding to the four up signs.
With that earlier piece of paper in mind that must be number 2, 4, 6 and 7. So
in other words you have to press the two plates in front of each door…
Now the next
question is how to press four plates at one time! Well… that’s easier done
than said. Simply move a stone on the two pressure plates in front of each door.
When you’ve done that the doors will open. Enter the next room. Walk towards the
controls at the wall. You only have to flip one of the levers to get the next
door opened. It makes no difference which lever you flip. You never know if you
have to return here later so let’s flip the center lever which is easy to
remember. Go through the new opened door.
Walk to the
opposite side of the room and enter the little corridor. You are standing on a
wooden platform now. Turn to the right and walk down the wooden planks until
your way is blocked. Take a few steps back and run and jump against the plank
that is sticking up. Keep on walking and climb up the stairs. Walk towards the
wooden crates. Open the door and enter the room. Examine the room. It has lots
of crates, mushrooms and a few drawings. Notice that beneath the metal pathway
there is another Journey stone. Leave it alone for now.
Climb up the
metal stairs. open the door at the end of the pathway and enter the room. Keep
on walking until you pass the orange light on the floor. Walk to the left and
activate the fifth
Journey. Walk down
the corridor next to the Journey. Walk all the way until you are standing
outside. Go down the walkway. At the very end you’ll see a device similar to the
telescopes. The difference is: this one can shoot! Nice! Look through the
telescope and notice that this one goes the same as the normal telescope. It
however does have an extra button, the blue blinking button.
While you
are looking through the telescope find a hanging ladder on the opposite rocks.
Notice that this ladder is kept in place by some rocks. Aim the telescope on
those rocks and shoot them away. Now return to the place with the wooden crates.
Climb the crates next to the door. Climb further on the ledge next to the door.
Jump to the other ledge passed the door. Press the sixth
Journey.
Climb up the
ladder you just shot free and enter the room. At the right wall of this room you’ll find the seventh
Journey. Leave the
room via the opened door at the opposite side of the room. Climb down the stairs
and open the door. Enter the room and climb the metal stairs once more. Go
through the opened door and touch the hand sign on the circular shaped Journey door.
Enter the room and walk straight ahead into the darkness until you’ll hear
Yeesha again.
After she is
finished, wait a second until the figure on the wall stops glowing. Touch the
hand sign on the wall. This will make the totem disappear. Jump down form the
ledge into the darkness. You’ll end up at Relto. See what happens to the
Teledahn pillar. A better proof that you finished this Age couldn’t exist! Now
enter the house and take the first (green) book from the book case. Open it and click
on the image to go to…
The
Gahreesen Age
You’ll arrive in an empty
room. Only one ivy is decorating the place. Somehow I get the feeling this room
rotates. There is only one exit to the room. So exit the room by that way. Read
the sign that is standing next to the next door. It says where you can retrieve
your KI. It’s a device to open doors and elevators. That seems important to me
so let’s get one!
Go through the door and to
the right. Pass the next door. Walk until you reach the under construction sign.
Enter the room to the right. Notice that there are some cupboards hanging on the
walls. Walk towards the last cupboard to the right passed the orange light on
the floor. There are some books and a Journey stone inside the cupboard. Touch
the Journey stone and press the image to get yourself linked to a balcony with a
view over the city D’ni. When you’ve seen enough link back to Relto.
Walk towards the book case
at the left. Notice that a new book appeared in the right part of the bookcase.
It’s the blue/gold book. Open the book and page through to see the places you
just have visited. No need to go back there right now. So close the book and
take the green book. Click on the image to get back to the entrance room of
Gahreesen. Exit the room and go passed the next room.
Go to the right again until
you’re facing the under construction sign. Enter the room to the right once
more. Go passed the door to the left this time. Now enter the room with the
KI-device dispenser. Walk towards the machine with the blue lit sign. Press the
blue sign to get yourself a KI-device twisted around your hand.
Turn to the left and notice
another under construction sign. Walk passed that sign and enter the next room.
Be careful not to step down the crevice yet! In stead of that jump across the
crevice. Climb up the debris. Walk a little further until you are standing in
some sort of doorpost. At the right side you’ll find the first Journey of this
Age. Activate it of course. Climb back over the debris. This time jump down the
crevice. Pick up the Relto page. Click on the image to add it to your Relto
linking book. There is only one way out of the crevice and that is linking back
to Relto.
Notice there are now some
rocks and tree stumps added to the landscape. So that is what these Relto pages
actually do… adding things to the Relto place. Walk towards the book case. Get
and page through the green book. This time click on the Journey sign to get
yourself linked back to the room with the debris. Climb the debris once more and
exit the room through the door at your right side.
Go to the right and walk
through the corridor. Go passed the next door. Shortly passed this door you’ll
see a crack in the wall at your right side. Enter that room. Climb up the metal
pipes in front of you. Turn to the left and activate the second
Journey. Step
down and climb up the metal pipes on the opposite wall. Turn to the left and
climb up the steel beam. Jump up the next crack in the wall towards the two
orange cones. Jump al the way up.
Cross the wooden plank over
the gap. Go through the crack in the wall at your right side. Walk passed the
next under construction sign. Enter another crack in the wall. Notice that there
is a rotating part at the end of the crack. Stand in front of this rotating part
and keep on walking against it until you are taken to another dark pathway.
Immediate turn around and face another rotating part. This rotating part is made
of solid stone. When you’ll wait for a while you’ll see to rooms passing by. One
room is the small corridor leading to the under construction sign in the
corridor you just came from. The other is a bigger room with some sort of
device. As soon as this bigger room
appears quickly step into that room. If you make the mistake to end up in the
corridor with the under construction sign… try again!
Examine this room. There is
some kind of huge wheel laying on the floor. Notice that there are two pedals
next to the wheel, one at the left and one at the right. At the wall at the back
of the room you’ll see four signs and four buttons. At the left side from these
controls you’ll see a Journey attached to the wall. Passed this wall you’ll see
a grate on the floor. When you step on this grate a huge column will start
rising. Your goal is to power up this Age with this grate, the controls at the
wall and the pedals next to the wheel. It’s just a matter of being quick enough.
Let’s get started!
Step on the grate to get the
column into the highest position. Quickly run to the most left button of the
controls at the wall. Push the button and quickly run back to the grate and step
on it to get the column into the highest position again. Quickly run to one of
the pedals near the wheel and kick it down. Quickly run back to the grate and
step on it to raise the column into the highest position again. Quickly run to
the other pedal and kick it down as well. Quickly run back to the grate and step
on it to raise the column to the highest position once more. Now run to the
controls at the wall and push the second button from the left. After the wheel
has gone up press the other two buttons of the control.
If you aren’t quick enough
and the column goes all the way down before you step on the grate you have to
start all over again. After you powered up the Age press the third
Journey. Now
you have a good saved point. Turn to the left and walk passed the grate and the
column and exit through the door at this end of the room.
Walk through the corridor.
The first door to the right will lit green. Only blue lit doors can be
opened so walk passed this door. Go passed the next door in the corridor. Keep
on walking until you reach the under construction sign. Enter the crack in the
wall at your right side. Now you’re back in the room with the orange cones and
the wooden plank over the gap. Simply jump down into the room with the debris.
Jump across the crevice. If you end up in the crevice link back to Relto and
click on the green book. In that case click on the Journey sign to get back to
the control room where you powered up the Age and try again.
Exit through the door and
you’ll be back in the room with the KI-device. Go through the door opposite to
the KI-device. Walk straight on to the door with the green light. Push the green
light and enter the elevator. Once you are on top of the building, walk to the
left and step on the walkway that’s leading out. Enjoy the view but be careful
not to fall down! Wait until the black rock with another Journey is passing by.
Jump from the walkway onto that rock. Press the fourth
Journey. Now turn to the left and notice another rotating building. This
one has very long walkways sticking out. Your goal is to jump on one of the
walkways. If you fail you’ll be linked back to Relto. In that case click on the
green book and on the Journey sign to get yourself linked back to this black
rock with the Journey and try again.
When you made the run and
jump successfully walk all the way to the door of the building and enter. Climb
up the stairs and go through the next door. There are a few things to find in
this building. I can’t tell you exactly where you can find the different rooms
of this building. That depends on which walkway you jumped on and by that by
which door you entered the building… So look around until you find: the blue
KI data notebook, the Journey stone, the green Gahreesen data notebook and last
but not least another Journey. First find the room with the green Gahreesen data
notebook on the table. Page through the notebook to learn more about Gahreesen.
Walk to the opposite side of the room and press the fifth
Journey.
Now find the room with the
blue data notebook on the table. Read this notebook also to learn more about the
KI-device. Walk around the room and find another Journey stone on one of the
chairs. Activate it and you’ll end up on some balcony in D’ni city. Link back to Relto. I bet you think we are
going straight back to Gahreesen. Well no… first we go on a small side trip to
Teledahn. So take the orange book and click on the Journey sign. This will link
you to the room you entered via the ladder. Turn around and exit via the door.
Climb down the stairs and enter the next room. Turn to the left and walk towards the metal passage at your left. Stand between the wooden crates and
the little mushrooms.
Walk a little to the left
and touch the Journey stone. Click on the image to go to prison in Gahreesen.
Turn around and notice another Relto page laying on the bed. Pick it up and
press the image to add it to your Relto book. Turn around and press the sixth
Journey. Jump down the manhole. Turn to the right and walk to the inner
green lit corridor. Keep on walking until you reach the blinking green light.
Walk passed the next green light. At the next crossing turn to the right and
walk towards the steel ladder. Climb up the ladder.
Turn to the left and walk
through the corridor. Enter the door to your left. Walk to the center of the
room. Climb up one of the two steel ladders. You’ll end up on the roof of the
rotating building. Walk to the outer walkway. Walk around this walkway and press
the seventh Journey which is attached to one of the
pillars. Link back to Relto. Because you added another Relto page to your
linking book, the island now has a lake at the right side of the house. You can
go and watch it if you like.
Get the green book from the
book case. Click on the Gahreesen image to get linked back to the entrance room.
Head back to the room with the KI-device. Go through the opposite door and enter
the elevator once more. Stand on the walkway on your left. Wait until you face
the black rock with the Journey again. Make another run and jump to get on that
rock. Now be very carefully!!! Slowly walk to the edge of the rock. Look down
and notice a big rock is sticking up, Look to your right and notice a Journey
door deep down there.
I guess you know what your
next goal is. Yep, you have to run and jump down to the rock in front of you and
from that rock you have to run and jump to the Journey door. First press the
Journey once more to get yourself a good saved point. Let’s go!!!
Line up with the rock in
front of you. Walk backwards a little and run and jump down the rock. Walk to
the right edge of this rock and line up with the Journey door and repeat the
running/jumping trick. If you fail you end up at Relto click on the green book
and on the Journey sign to end up at the black rock and try again.
If you made it safely walk
to the Journey door and press the hand sign.
Enter the room and walk straight ahead into the darkness until you’ll hear
Yeesha again. After she
is finished, wait a second until the figure on the wall stops glowing. Touch the
hand sign on the wall. This will make the totem disappear. Jump down form the
ledge into the darkness. You’ll end up at Relto once more. See what happens to the
Gahreesen pillar. A better proof that you finished this Age couldn’t exist! Now
enter the house and take the third (purple) book from the book case. Open it and click
on the image to go to…
The Kadish
Tolesa Age
Turn a
little to the right and go through the small passage. Walk all the way to the
end. Climb up the stairs. Walk around the room until you face the gap in the
floor. Turn around and walk towards the last pillar. Press the first Journey of
this Age. Turn around and walk towards the gap in the floor. Line up with the
opposite side and make a rum/jump to the opposite side. Walk
further around the room and climb up the stairs at your right.
At this
platform you’ll find a strange shaped device to the left and a linking book to
the right side. You can have a look through the device if you like but don’t
touch the buttons yet! Walk towards the linking book and get yourself linked to
a room full of great paintings. And these aren’t ordinary paintings but also great
hints how to solve some of the puzzles in this Age. The 5 most important
paintings are the next.
Painting 1

After you link back to the Age you have to adjust three devices corresponding to
these three images. Click on the image to enlarge to have a better view.
Painting 2

Later on you have to cross a tile floor corresponding to this image to open a
secret passage. Note the red dot on the right side. That’s your starting point
to cross the tiles. Click on the image to enlarge
Painting 3
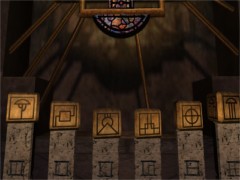
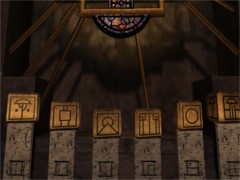
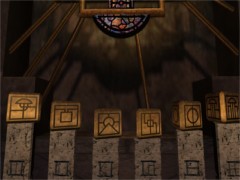
These three images are very important. Notice the D’ni-numbers and the rotating images above. You’ll need this to determine the
correct order of pushing buttons at a control panel at the end of this Age…
Painting 4

This one got me stuck for hours. The solution was very simple however… Click
on the image to enlarge
Painting 5

Here you can see the corresponding number for every symbol on the panel. Click to enlarge
When you
examined this room walk to the linking book on the pedestal and link back to the
platform. Now look through the device. Look at the intern pattern. Now look at
painting 1 in the room you where just a few moments ago. You should set the inner
pattern corresponding to the top image. You can change the intern pattern by
pressing the buttons in the correct order. For this first device the correct
order of pressing the buttons is: the left button 4 times, the center button 1
time and the right button 5 times. Now the intern pattern must look exactly like
this:
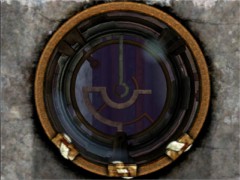
The correct intern pattern…
Hey… now you have set it
alright but nothing happens! That’s correct you need to set another two of these
devices in the correct way to get something happening! Climb down the platform.
Go to the left and leave this area via the stairs at the right side just besides
the gap in the floor. Keep on walking passed the arch with light attached to it.
Go through the circular door. At the intersection go to the left. Walk towards
the platform and climb
up the first stairs. Go to the right and press the second Journey at the wall of
the platform.
Walk back towards the stairs
you just climbed up. Don’t climb down but proceed further around the platform.
In the niche next to the next stairs you’ll find another Journey stone. Jump to
the Journey stone and click on the image to get yourself linked to another
balcony at D’ni City. Enjoy the view and link back to Relto. Take the purple book from the
book case and click on the Journey sign. Walk around the platform once more
towards the niche where you just found the Journey stone. This time climb up the
stairs to the platform. Walk towards the device.