The Messenger
open doorway. Turn around and look back at the dwelling of Anselme’s
descendant. Look up and close on the roof of the ruined tall building on
the right. Use crossbow with bolt on the copper ridgepole on top of
the ruined roof. Turn to the right and look close at a dark corner of the
ruin. Pick up a zinc tile. Go out of the ruins.
Courtyard:
Go back to the covered cart and
pick up the copper ridgepole found close to the wall of the ruin
after you shot it down from the roof of the ruined tall building. Go back
to the opposite side of the courtyard. Look close at a drunk that will
sing for you for some money. Looking at the map the only entrance
available is the Caryatid room.
Caryatid Room:
Talk to the man by the crate of
rolled up papers. He is upset because he is drowning in scores. His
muse, his goddess, Marchioness von Schoenhausen requests the music of
Austrian genius Mozart. Just the lady we want to meet.
Tribunal:
We find the Marchioness
lounging at the far end of the room. Click on her head. She complains
of the bore and the heat. We have to gain her favor as the alchemist
advises. How? Turn around and go through door to the ground floor service
area (with a stair on the right) and through the other door to the Queen’s
guard’s room.
Queen’s Guard’s
Room:
Go to the left side of the room
and find bottles of champagne in ice. Pick up the champagne
glass. Something cool for the Marchioness, hmm!
Tribunal:
Combine pearl necklace and
champagne glass. Give the champagne and pearl necklace to the Marchioness.
(Champagne alone does not gain her favor). She recognizes Morgan as a
woman. Morgan asks for help in getting in touch with Marquis de Nemours.
The Marchioness informs her that the Marquis loves the ladies and the
music of Mozart especially Bastien and Bastienne. She also gives Morgan a
key to the dresser. Pick up heart shaped key from side table.
Didn’t that upset man say something about Mozart and score in the crate?
We have to get him away from the crate. Go to courtyard.
Courtyard:
Use well lined purse on drunken
man. He will sing drunkenly, enough to drive the upset man
away.
Caryatid Room:
Pick up a score of Bastien
and Bastienne, Mozart’s first opera from the crate. We need to dress
up to see the Marquis. Go to the Queen’s guard’s room.
Queen’s Guard’s
Room:
Use heart shaped key on chest
drawer beside the exit door. Pick up gown. Use the score on the piano.
The Marquis comes in full of praises. Morgan asks for information
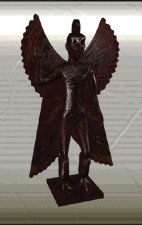
concerning the Assyrian statue of the Demon of the Wind, Pazuzu since the
Marquis has gone on an expedition to Mesopotamia, Brother. He also is in
search for the statue that was once lost. His travels are recorded in an
encyclopedia that also contains a picture of the statue. Many scientists
have tried to restore the statuette but the notes have disappeared. He
also advises Morgan to talk to a sculptor at the Bronze Gallery. He is
also a member of the same Lodge. Checking the map, the sculptor’s
workshop is on Level 0 under the square room. The square room can be
accessed by way of Apollo’s Gallery on the same floor. The room adjacent
but one floor below the Apollo’s Gallery is Diane’s room. There might be a
way there. Pick up the key to the library from the table by the
windows. Go to Diane’s room.
Diane’s Room:
Inventory needed – general
purpose formula.
Pick up the generator crank
handle from the picture stand. Look close at left double door, this
might lead to Apollo’s Gallery. It has fancy copper knobs. Turn left and
look close at the statue. Use general purpose formula on grill the boy is
holding and pick up flask full of acid (sulfuric). Go back to ground floor
service area and climb the stairs.
First Floor Service
Area:
Look close on cabinet
containing flask and use flask full of acid on the lock. Open the cabinet
door and pick up sulphate flask. Open drawer and pick up sheet
of copper and sheet of zinc. Enter door on the right.
Science Academy:
Inventory needed: general
purpose formula, key to library, magic formula for revelation, generator
crank handle.
The inventory chest is on the
right side of the room. Time to empty and pick up some inventories. Look
close on the fireplace and note that the 4 keys are depicted. Use the
general purpose formula on it. We find ourselves down to St. Louis room.
That is nice to know as an exit. Go back to the science academy. The
tables have experiments and reagents laid out. By the door are the
bookcases. Look close on right bookcase. Use key to library on lock of the
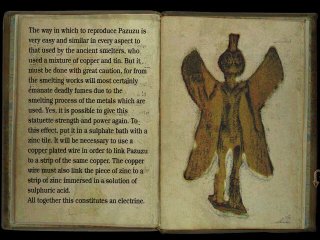
bookcase. Pick up notes from a scientific expedition in Persia.
Read it and look at the picture of Pazuzu. The page on the left has
indistinct writing on it. Combine it with magic formula for revelation. It
is a procedure to reproduce Pazuzu. So, that is what we have to do make
another and then what, destroy it? We have to make a statue and then give
it life. Getting to that sculptor is now more important not just for
information, but to make a statue for us.
Look close on left bookcase.
Pick up memorandum on electricity. Read the book. There is
instruction on how to make a Leyden jar. Look on the table closest to the
bookcases, there is already a set up for making Leyden jar. Use generator
crank handle on the cylinder. Pick up Leyden jar. Let us now see to
getting to that sculptor. Go to Diane’s room.
Diane’s Room:
Short-circuit the lock on the
double door with the fancy copper knobs. Use Leyden jar on knobs. Wow! It
worked. Enter.
Apollo’s Gallery:
Inventory needed: notes from a
scientific expedition in Persia, copper ridgepole, gas mask.
Talk to the painter on the
right. His name is Joseph Duplessis. Turn left and go down the
hall, pick up the stepladder on the way. The inventory chest is at
the end of the hallway. Enter door on the right.
Square Room:
We’re getting closer to finding
the sculptor’s gallery. This is a room full of paintings. Look but don’t
touch!! (If you want to touch a painting, go right ahead. Don’t say I
didn’t warn you!) Go to the other end of the room and pick up
exhibition catalogue from the Square Salon sitting on a desk. Read
it. Look at that! #18 is our friend Mr. Duplessis’ painting of
Christophe Gabriel Allegrain, Sculptor. Go down the stairs.
Sculptor’s
Workshop:
We are here. The inventory
chest is just in front of the open door. Pick up the bag of coal
from down the hall. That was heavy! Enter through the open door. Talk to
the sculptor. Morgan asks that the sculptor make a mold of a statuette
for her. The sculptor will do it immediately if Morgan can get the picture
of Christophe Allegrain for him since he cannot afford it. It would be
better if there were a picture of a chisel and mallet on it. That is
the picture done by Joseph Duplessis. Give the notes from a scientific
expedition in Persia with the picture of Pazuzu to the sculptor. Go to
square room.
Square Room:
The picture is on top of the
second panel of paintings to the right of the stairs. Use stepladder on
the floor in front of the panel of paintings. Pick up the portrait of
Christophe Gabriel Allegrain. It does not have a chisel and mallet on it.
Let us go talk to Mr. Duplessis at the Apollo room.
Apollo Room:
Talk to Mr. Duplessis. Use
portrait on canvas. Pick up the portrait. Go back to the
sculptor.
Sculptor’s
Workshop:
Use the portrait to the
sculptor. The sculptor shows Morgan how he made the mold. Use bag
of coal on oven. From the secret writings on notes from a scientific
expedition in Persia, we need copper and tin. Use copper ridgepole on
melting tank on top of the stove. Open cabinet by the door and pick up the
pewter crockery. Marquis de Nemours arrives and has a gun
pointed at Morgan. He has been observing her and suspected her from the
beginning because of her interest on Pazuzu. He tells her to finish her
researches and they will talk later. Place pewter crockery on the
melting tank on top of the stove. Remember what the instruction said –
that the smelting process would release deadly fumes. The tin and
copper melted and poured into the mold. The fume starts to thicken.
Use the gas mask. Why do we end up killing these men!! Above the door,
pick up the sculpting mallet. Use it on the mold. Pick up the
reconstruction of the Assyrian demon Pazuzu statuette. Let us now
energize the statue. Go back to the science academy.
Science Academy:
Inventory needed – sulphate
flask, Pazuzu statuette, zinc tile, zinc sheet, copper sheet, copper wire,
general purpose formula.
Look close on the table at the
center of the room. Following the instructions from the secret writings on
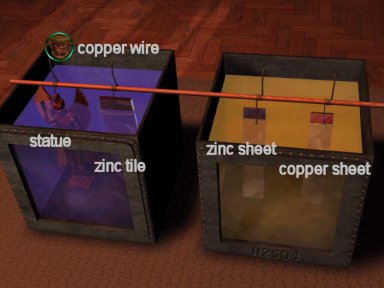
notes from a scientific expedition in Persia, we need a sulphate bath. Use
the sulphate flask on the empty tank on the left. Use Pazuzu
statuette on the left side of the left blue tank and the zinc tile on the
right side of the blue tank. Then use sheet of zinc on the left side of
the right yellow tank and the sheet of copper on the right side of the
yellow tank. Use copper wire on the top left of the left blue bath.
Pazuzu’s statue is now energized.
Pick up Assyrian demon Pazuzu.
Watch the sculptor comes towards Morgan. Use the general purpose
formula on the back of the fireplace that has the drawings of the 4
keys.
Morgan goes down to St.
Louis Room and meets the ghost. She told him she has all 4 of the keys and
that they should go to the 21st century and destroy them. Sombreval
told her that he is the leader of the Black Templars and used her to
collect the keys since he cannot do it himself because he is dead but not
as dead as the men Morgan killed – the True Defenders of the Faith. He
will send Morgan back to the 21st Century so that his manservants can take
the 4 keys from her. In 1314, while on the stake the devil has given him
the mission to wreck death and destruction.
Cd 1
21st
Century
St. Louis Room:
Inventory needed – Crossbow
with bolt, magic formula for revelation, general purpose formula, magic
formula revealing some of Anselme’s basic secrets.
Now what? Look for a way out
before Sombreval’s men come. We are locked in. Go to the grilled door
under the stone arch and use crossbow with bolt on lock, which might open
it. Oh! The other 3 pedestals/plinths rise up in the room. The bolt on the
lock triggered the rising of the plinths. The inventory chest is on the
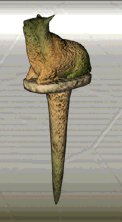
end of the room by the exit to the museum proper. Use lion shaped perfume
burner on pedestal found on the left of the inventory chest. Go to the
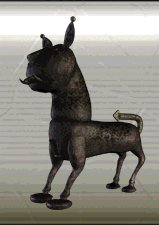
other side of the room and use the bull-shaped foundation Assyrian
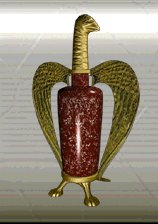
statuette on the pedestal. Go to the arched end of the room and use vase
with a Roman eagle on top on the right pedestal. Go to the opposite empty
pedestal and use Assyrian demon Pazuzu on the last empty
pedestal.
Ghosts of the 3 defenders of
Faith, the Papal Legate, Jesuit priest and the Mason, Marquis de Nemours
appear. The 4 plinths are the forces of Satan and Sombreval tricked
Morgane to activate them. If she places all 4 statues on them, she will
invoke the apocalypse – death and destruction. They became ghosts because
of the practice of black magic on their bodies by the descendants of
Anselme. Sombreval tricked everybody for centuries in the pursuit of the
brotherhood. In fact, he acted alone and the brotherhood of the Black
Templar did not exist. Anselme stole the lion and King Philippe’s men
stole the other 3 from the Templars. He tortured Anselme to reveal the
hiding place and he died without talking. He used Anselme’s magic to
become a ghost and the magic brooch to go back in time. He waited for
Anselme’s prophecy to come in order to collect the 4 keys and activate the
4 plinths. Sombreval has become immortal as the devil himself. Morgane has
to find his grave that is in this room’s foundation. With the use of the
magic brooch, Morgane has to go back in time, to 1314, to destroy him
while he burns at the stake.
You are death,
Morgane!
Go to the middle arch and use
the magic formula for revelation on the faint rectangular outline on the
floor. It revealed a grave. Use the general purpose formula to open it.
Pick up the magic brooch – magic fibula made by Anselme. Combine it
with magic formula revealing some of Anselme’s basic secrets.
1314
Tower of the Prison:
Inventory needed – knife,
crossbow with bolt.
Inventory chest is found
opposite the door. Look close on the window to the right of the door. Use
knife on window. Use crossbow with bolt on Guy de Sombreval .
21st
Century
Morgan holds her head,
thinking that she dreamt it all while the magic brooch shoots out
lightning.
This walkthrough will be
updated frequently.
This document may not be distributed without
express written permission of the author
MaGtRo
The context may not be
altered in any way and all reference/links must be provided to this
site:
GameBoomers
For Questions or
Comments on this Walkthrough,
Please write to: MaGtRo
Copyright © 2/2001
GameBoomers

View this guide raw, exactly as the archive holds it