The Messenger
The Messenger
(Louvre: The Ultimate
Curse)
Index+ – France Telecom Multimedia – Canal+
Multimedia
Walkthrough by
MaGtRo
February 18, 2001
version 1.1a
My dear
daughter Morgane, I will probably be dead when you discover this message.
During the excavation of the Louvre, I’ve discovered a lion shaped ewer
and some engraved ivory tablets. It has taken me years to decipher them.
It would seem the author was Anselme de Beauvais a 14th century wizard.
Listen to me carefully. At that time, Philippe the Good destroyed the
order of the Temple. He seized their treasures and burned the Templars at
stake. Some of them, the Black Templars swore to avenge themselves and
sold their souls to the devil. They forced Anselme to cast a spell on four
objects, based on the four elements of the Apocalypse which they called
Satan’s Keys. A bull, a vase with an eagle on top, a statue of an Assyrian
demon and a Persian ewer in a shape of a lion. Once brought together,
these cursed objects will bring chaos and destruction to the earth. Such
is the Templar’s revenge. It seems that Anselme stole the ewer from them,
the one that I discovered. I know that the Black Templars Brotherhood is
still in existence. They are looking for the four objects and they want
the ewer that is shown in Louvre. I always said that it was dangerous to
leave them in a simple glass cabinet. These fanatics are always seen as
harmless cranks. Morgane, you now have a risky job. Go to the Louvre, get
the ewer and destroy it. You’ll at least have done one thing for me in
your life.
Game Play: The game always
starts using CD1. The left mouse button is for general movement and the
right mouse button access the inventory. Pressing the space bar stops
animated scenes. You can carry only 8 items at a time; the rest can be
placed and accessed in an Inventory chest found in different locations in
the game. There is a hand icon for use and an eye icon for looking closer
on an inventory. Some objects can be combined (linked chain icon) or
separated (broken link) in the inventory frame and the icons on the left
side will light up if that is possible for that item. This is useful when
you run out of space in inventory. The map and the taped descriptions of
Louvre (done by Morgan’s father) at different time periods can be accessed
at the bottom right of the Inventory frame. The Map is very helpful in
knowing what places can be entered and the levels of the rooms they are
found in. Once you have explored a place, you can jump directly back there
by clicking on that location in the map and save a lot of walking or do it
the old fashioned way and backtrack. At the bottom right of the Map frame
is the button that changes the floor level of the map. At the bottom right
of every frame is the Return switch to a previous frame or to the main
game play.
Walkthrough:
Morgan Sinclair climbs the
wall and drops down on the roof of the Museum. She sets an explosive on a
block on the floor that opens a hole to the Men’s room, climbs down and
enters the Museum proper. At Napoleon’s Hall, she sees 2 guards on the
level above.
Standing at Napoleon’s Hall at
the Pyramid, turn right and use the escalator. Facing the double doors,
turn left and look close at the panel. Use magnetic blue identity pass
from inventory on the slot on the panel. Enter Sully’s corridor. Check the
map and see that before you will be Vau Wall room and to the right is the
St. Louis room. Go forward and the surveillance camera sets off the alarm
and seals the gate. Go forward up the stairs. Turn right at St. Louis
room.
St. Louis Room:
Go forward and turn right. Look
close and pick up the Lion shaped
perfume burner.
A coughing ghost appears and
is surprised to see that the one Anselm has foretold in his prophecy who
will save the world from the Black Templar’s revenge is a woman. He, Guy
de Sombreval sacrificed himself to be burned at stake. Due to Anselme’s
necromancy he returns as a ghost after waiting 600 years. So that he can
teach Morgan how to destroy the 4 keys. He wears a magic brooch made by
Anselme that allows him to open doors to time. He will send Morgan to 1377
at the reign of Charles the fifth to collect the other keys: the bull, the
lion and the daemon, Pazuzu at the Royal Treasury and warns that the
Pope’s Legate, one of the Black Templars is there to collect the keys.
Anselme has hidden the plinths and thus neutralized the 4 keys.
Middle Ages
(1377)
St Louis Room:
Inventory needed –
knife.
Check map for accessible areas
on different levels especial attention to the royal treasury where the
keys are. Listen to Dictaphone of the Louvre.
We arrive carrying nothing in
inventory. Inventory chest is found in the right corner by walled end of
the room. Click on chest and then click on item and then click on empty
box on the right – a hand will transfer the items from the chest to your
inventory. Get the items you will need. Click the bottom right switch from
right to left. Turn left. Go forward and go to the white flakes on the
wall on the left. Use knife (in inventory page, click on knife, then click
on open hand/use icon on left) on white flakes of saltpeter on left
side (double gears icon). Turn right and go up the stairs. Let us check
all the places that are accessible.
Large King’s Bedroom
(counsel):
Go forward, look at throne, use
knife on fabric and find an Arabic parchment. Let’s leave it for now and
just collect data until we know what to do. Go towards the fireplace at
the other end of the room. Nice fire going. Look close on the furniture in
front of the fireplace. There’s a mechanism on one end. Go to the window
close to the fireplace. Use knife on window. Look out the window and see a
guard standing between the Cup-bearer’s room and the dungeon that holds
the Royal Treasury. Go to the door by the throne and enter.
Large Room:
Look up to your left and go the
gallery. Go forward to end of gallery and hear snoring. Look close on
chandelier. There is a guard snoring. We need a disguise to roam. Maybe we
can get his uniform. Use knife on rope on the left side of the frame.
Konk! Go down the stairs and to the end of the room and pick up the
bronze key, which fell off the guard. Turn right and climb over the
table and find the inventory chest. Turn around and get the guard’s
uniform. Climb over table. Look close at the open dish cabinet and pick up
the jug full of water. Now we can go out the door to the courtyard
in our disguise. (If you do not have a disguise, you will be
caught).
Courtyard:
Look around, guards to right,
dungeon at center, go left towards Cup bearer’s room. Look around and up
and see a ramp that connects the castle to the royal treasury on level 1.
Talk to the guard seen from the king’s bedroom window. He said that the
King and the Pope Legate is holding important talks. Let us find where
the king and the legate are talking. Use bronze key from formerly snoring
guard on the cup-bearer’s door. Enter.
Cup-bearer’s
Room:
Inventory needed – crossbow,
bolt, reel, hook, knife.
It is a room full of jugs, cups
and barrels. Move forward and see a window and 2 barrels close to it. Pick
up bottle of alcohol between the 2 barrels. Turn to the end of the
room and find the inventory chest. A fountain at the center and another
chest on the other side. Look at other chest. (Don’t you just love that
music that tells you that it’s an object to be inspected or used)? It’s
locked. Combine crossbow and bolt in inventory. Use loaded crossbow on the
lock of the chest. Pick up the saffron from the chest full of
citrus fruits. Click on inventory chest and unload items in the
inventory chest. Place bronze key, saltpeter and jug full of water in
chest. Look and then use knife on window. See the Garden of the King and
Queen and a hut at the left side. In inventory, separate crossbow and
bolt, then combine crossbow, reel and hook. Use Hook launching crossbow on
that hut.
Garden of the King and
Queen:
To your right are guards (they
will catch you if you go there), enter the hut, turn right, turn left and
pick up Roses. Turn right and listen to the conversation between
the Pope’s Legate and the King. The Papal Legate, Robert de Tournefort
tells King Charles V, that the Pope pursues the Black Templars and wants
the 4 keys for divine protection. They have been in the Royal Treasury
since Philippe confiscated them. The King informs him that the eagle and
the bull are here but the lion is not and the secret behind the evil of
Pazuzu is unknown. There is a manuscript that might tell of such secret.
He orders the Legate to go to the treasury to pick up the daemon. The King
departs to look for the manuscript in the library. The Legate asks the
Master of the horse to bring St. Blaise’s relic and gift from the Pope to
the king and pick up the manuscript from the library. We have to stop
the master of the horse, find and get the manuscript and try to beat the
Legate to the Treasury. Go back to the cup-bearer’s room by shooting the
hook-launching crossbow on the lighted window of the castle. Exit the
cup-bearer’s room. Or click on the map and go to the courtyard.
Courtyard:
Inventory needed – rope, rose,
saffron, bottle of alcohol.
Check the dungeon area to find
another way aside from the ramp to get to the royal treasury. Go forward
2x. Turn left and see a well on the left side. Use rope on well. Climb
down and enter the Alchemist’s room. He, Anselme’s descendant was
expecting Anselme’s savior but was surprised in finding it to be a woman –
it is an ominous sign. He gives Morgan a spell to bring light because the
place is full of dark mysteries. Pick up the magic formula for
revelation. The inventory chest is in a corner of the room. Look close
on the skull over the door on the left. Pick up small furniture key set
with diamonds. Go out the door and see if we can find a way to get to
the treasury. Go out and look around the moat. Go back and click/talk to
the alchemist. He tells you that the Basileus the Great manuscript can
only be opened with a key that is rusty and needs to be cleaned with a
paste. In inventory, combine rose and saffron producing a red paste
and then add bottle of alcohol resulting in a blue paste. Look close at
key. Use blue paste on key and pick up red small key for manuscript
clasp. Let us go back to the Large bedroom, either by clicking the map
on level 0 or retracing our way back.
Large King’s
Bedroom:
Inventory needed –
torch/flashlight, formula of revelation, jug full of water, rope, small
furniture key set with diamonds.
The relic of St. Blaise is at
the center of the room and the master of the horse has brought in a big
crate close to the fireplace. Let’s get him out of here. Look close at the
reliquary and use torch/flashlight on it. He’s really got scared! Let’s
check that parchment on the back of the throne. Look close and use formula
of revelation on it.
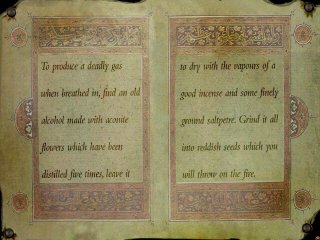
We’ll just have to look out for
those ingredients. Look in the crate that is the gift of the Pope to the
King and get an aconite flower bottle. Now that the Master of the
Horse is out of the way, we have to find the library and get the Basileus
manuscript. Look in the map at level 1; the access to the library is by
way of the King’s bedroom, which is right above and adjacent to the
fireplace. Pour the jug of water on the fireplace. Enter fireplace. Look
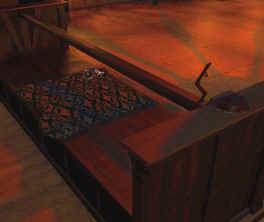
up at the grate. Go out of the fireplace. Look again on the mechanism on
the bench in front of the fireplace. Use small furniture key set with
diamonds on the mechanism. Click on on the rod close to the corner of the
seat cushion. The rod slides back and forth.
Back to the grate in the
fireplace. Use rope on the left of the open grate.
King’s Bedroom:
Inventory needed – saltpeter,
aconite, torch, small key for manuscript clasp.
Luckily, the fire is out on
this fireplace. Pick up the stool on the left side of the bed. The
inventory chest is at the foot of the bed. Open the armoire and get the
incense. We now have all the ingredients for the deadly gas.
Combine incense and aconite producing yellow seeds, add saltpeter and
produce red seeds. Still facing the armoire, look on the floor and
use stool on the hotspot. Climb on it and see the dark top of the armoire.
Use torch/flashlight and pick up silver key. Enter the curtain on
the corner of the room to go to the library.
Library:
The library is full of open
books and surrounded by paneling with astrological signs decorating the
top. King Charles V mistakes you for the help of the Papal Legate and
points to the encoded manuscript to be given to the Holy Father. Pick
up the encoded royal manuscript revealing the access to Pazuzu’s hiding
place. We have to decode this. We cannot look for the Basileus
manuscript until the king leaves. Exit the library, hear footsteps and
come back in. Look close on the book on right of the bookstand in front of
the King’s bench. Use the red small key for manuscript clasp. It talks
about pressing the 3 objects in the sky at the beginning of the new
millennium – the scaly one, the water carrying one, the goat like one,
then the snake will open up.
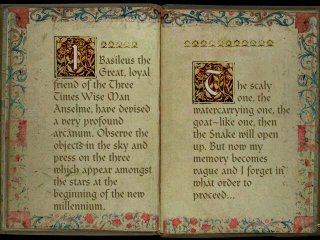
The 3 constellations seen at
the start of every year are Capricorn (goat like one, December 22 –
January 20), Aquarius (water carrying one, January 21 – February 19) and
Pisces (scaly one, February 20 -March 20). Look close on the panel on the
left of the doorway and click on the goat, then the water carrier (2
panels to the left) and then the fish at the center between the goat and
water carrier. The cabinet below the ourobourus/snake opens found at the
center of the wall of panels and pick up the ivory plate used for
secret royal missives. Now we can decode the manuscript. Combine
encoded royal manuscript revealing the access to Pazuzu’s hiding place and
ivory plate used for secret royal missives. Look close at the decoded
royal manuscript using the eye icon in inventory. With planetary signs
interspersed, the decoded message reads – Pasusu in treasure room is
hidden. Note the placement of the astrological signs. The treasure room is
where the eagle and the lion are also. Guess where we’re going! But the
only way we found is the ramp and it is guarded. Go to the King’s large
bedroom.
Large King’s
Bedroom:
Inventory needed – crossbow
loaded with bolt, knife.
Use knife on window (guess
someone fixed it) and see the guard again. There is no way we can get to
the treasury room without his catching us. Use loaded crossbow on guard.
Let us check what happened to him in the moat.
Moat:
Go around the moat and find the
dead soldier. Pick up the gold key.
Courtyard:
Inventory needed – combined
crossbow with rope and hook, gas mask, silver key, gold key, red
seeds.
Go in front of the door to the
cup-bearer’s room. Turn right and up. You will see a lighted torch on the
walkway from the castle to the dungeon and Royal Treasury. Use the
combined crossbow/rope/hook on the walkway by the torch. Look close on the
puzzle on the door to the Royal Treasury. Study the decoded message and
note the planetary signs from top to bottom, then click on the door
puzzle’s planetary signs in the same order. Sun, Mars, Jupiter, Mercury,
Saturn, Venus, Moon.
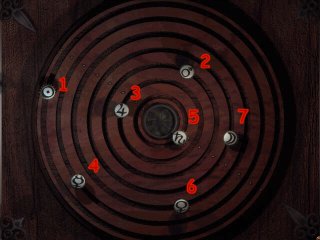
Insert the silver key found on
top of the armoire at the center of the puzzle. Enter.
Dungeon – Royal
Treasury:
Go towards the Throne. Face the
throne. The third alcove on the right contains the inventory chest. The
fourth alcove on the left of the throne has a small casket on top of a
chest. Use the gold key on it. Pick up the ruby from Charles V’s
scepter. The second alcove on the left of the throne has a tapestry
and a door opposite it. Look close on the eye of the horse in the
foreground of the tapestry. Use ruby on the eye. A click is heard. Look
close on the throne. Click on the right arm of the throne and pick up
Assyrian daemon
Pazuzu. The Papal Legate comes in
with a guard. Click on alcove with tapestry turn right, click on
door.
Dungeon –
guardroom:
The hall is filled with guards.
Turn around and look close at fire pit. Remember the translated Arabic
parchment. Okay, here we go, use red seeds in the fire pit. Use gas
mask.
Sombreval is upset that you
didn’t get all the keys and still do not know here the 4 plinths are. He
is sending you back to 1610 the time of King Henri IV. He warns you of a
Templar masquerading as a Jesuit who wants the keys.
Cd 2
17th Century
(1610)
St. Louis Room:
Inventory needed – knife,
torch
Check the map for accessible
areas. Listen to the Dictaphone to the Louvre; King Henri IV was murdered
by Ravaillac and note special mention of a clockmaker that made a
mysterious clock. Again, no inventory is with you. The inventory chest is
still at the same corner of the room. Go towards the middle arch, turn
right and pick up antimony tablet. Go forward, turn left and the
only way out of the room is the window. Exit.
Courtyard:
It is night and guards are all
over the place and we don’t have a disguise yet. Turn right and pick
stone close to the building. There’s a lighted window on the left
that we can go through. We have to distract the guard standing by the
cart. Use stone on cart, turn left, go forward and look close on window
and listen. A woman named Jacqueline is being interrogated. The
interrogator tells of their knowledge of the intrigue between Madame de
Verneuil and Ravaillac. Jacqueline said that the red headed man is raving
about being the God’s messenger and talking about keys. Jacqueline faints
and the interrogator leaves. Use knife on window. Enter.
Cup-Bearer’s
Room:
To the left are the inventory
chest and the same water fountain. Jacqueline lies on top of the table. Go
towards the bookcases. Turn right and look close on the shutter for upper
part of the door. Click on shutter and reveals a key for service
lift. Pick it up. Go to the cabinet with carved statues on both
sides. Open it and get our disguise. Use torch on floor of cabinet and get
the sideboard key. Turn around and look under table. Get gun
belonging to Mr. de la Force’s men. We cannot wake Jacqueline up. We
better look for this Madame de Verneuil or anything connected with her. Go
back to the courtyard.
Courtyard:
Go towards the honor guards.
Turn right and look close on the stacked barrel. Pick up hemlock.
Enter the Caryatid room.
Caryatid Room:
We see the young Prince, soon
to be Louis XIII, kneeling in front of the dead King. Turn left, go
forward and talk to footman standing on the left. Go up the stairs to the
tribunal.
Tribunal:
Listen to the Jesuit priest,
Ruggieri (the one the ghost warned
you about) telling Queen Marie de Medicis about the Black Templars and
their need for revenge using the Satan’s keys for the destruction of their
order by Philippe. The priest asks for 2 of the keys from the Queen, the
eagle vase and the bull statuette. The Queen tells the priest that the
eagle is a work of art and has a place of honor at the Ambassador’s room
and that she will not give it to him (with curses said). The priest
departs angrily. Click on Queen. She notes that Jacqueline has
escaped de la Force’s men. She wants Jacqueline to find the letter that
her good friend Mde. de Verneuil sent for M. le duc d’ Epernon. The Queen
is glad that it is written in invisible ink. So now we look for the
Ambassador’s room and the letter. Checking the map on level 0 for access
to the ambassador’s room, we see that the small ground floor gallery is
adjacent to it. On level 1, the small gallery is under the Kings portraits
gallery, which is close to the King’s bedroom. We have got to find a way
there. Maybe there is help like the alchemist on the previous age. On
level 1, there is a library on the north end of the building. Let us check
that way. The inventory chest is found on the end of the hallway.
Caryatid Room:
Inventory needed – combined
hook launching crossbow, antimony tablet, hemlock, key for service lift,
sideboard key.
Look close at the dead King. He
has 2 scepters planking him. Better not disturb the Prince in meditation
and the guards are around. Looking at the far end of the room, there’s a
balcony seen that might lead us to the library. Go to the alcove on the
left side. Look down on floor and click on brown tile.
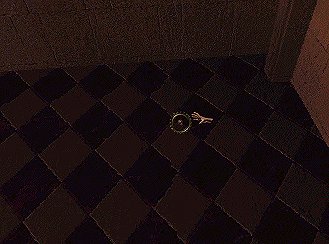
A door opens. Combine crossbow,
rope and hook. Turn around and look up on the balcony. Use combined
crossbow, rope and hook. Pick up hammer and chisel. Turn around and
enter the secret passage.
Library:
The descendant of Anselme
tells Morgan about the suspicions abounding due to the recent murder of
King Henri by Ravaillac. M. de la Force and his men tortures anybody
connected with the crime. The Queen herself is under suspicion that she
had a hand in it. Morgan looks a lot like Jacqueline that helped the
killer. He gives Morgan a spell invented by Anselme himself that can let
her pass through walls like a spirit and he is preparing a potion to put
to sleep the footmen that might get in her way but needs 2 ingredients, a
metal and a plant. Pick up the
general purpose formula found on stand, to the right of the
alchemist. Use hemlock and antimony tablet on the brew that the alchemist
is preparing producing a green bottle. Pick up flask of neutralizing
solution. The alchemist tells Morgan that potion will slow people
down and to beware of the demon Pazuzu because he is the god of the evil
wind that can rock the air causing deadly infections. Someone is
listening. Now to see how we can get to the Ambassador’s room
starting at the King’s bedroom. Go to the tribunal.
Tribunal:
Use sideboard key on door by
inventory chest. Climb the stairs.
First Floor Service
Area:
Look close on panel on the
right of stairs. Use key for service lift on panel lock. Click on lever.
Pick up basket. Enter the King’s bedroom.
King’s Bedroom:
The inventory chest is on the
wall across the bed. We can’t do anything in this room unless we get the
footman out of the way. Approach the footman by the door, and use the
green bottle on him. Look close at the footman under the bed and pick up
the royal signet ring. Examine the interesting clock (remember
Dictaphone narration). Look close at the cabinet at the far corner. Open
it, then the 2 right drawers. Pick up the royal note revealing
the entrance to a secret passage from the top drawer.
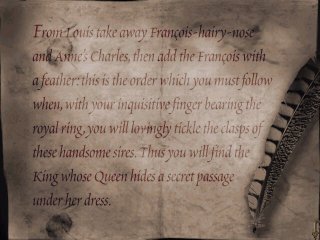
Great! That might be what we
need to get to the Ambassador’s room. Pick up the Holy Water from
the second drawer. Look close and open the window shutter on the left of
the cabinet. Lets take in the view. Pan to the right and click. There are
the windows of the Kings portraits gallery that is above the room adjacent
to our destination – Ambassador room. Use the hook-launching crossbow on
the windows across the way.
Kings Portrait
Gallery:
Inventory needed – signet ring,
general purpose formula, knife, crossbow with bolt, gas mask.
Turn around and see a throne in
front, fireplace on right and the portrait gallery on the left. The
inventory chest is at the far end of the room on the left. Might need to
empty the inventory of non-essentials. Go to the fireplace and turn around
and look at back of throne. There is writing on it but too dark to read.
Turn to the left of the fireplace and look close at chest, get log,
use log on fireplace. Now there’s light. Let us read the writing on the
back of the throne. “Follow the path shown by the huntsmen and you will
find the birth year of the greatest among them”. What is that for? Pick up
the fire tong from the right side of the fireplace. Now let us look
for that secret passage based on the royal note revealing the entrance to
a secret passage. Starting from the window we came in (L-R), use
signet ring on the H at the bottom of the pictures of Louis XI (third),
Francois I (fifth), Charles VIII (fourth), Francois II (seventh). A sound
is heard every time we use the ring. Go down the hall and look under Marie
de Medicis, the last portrait on the right. Enter the opened secret
passage. Use the general purpose formula on sealed brick door.
Enter.
Ambassador’s
Room:
Do not move! (There is a guard
on the left side hidden by the candle stand). Standing by the secret
passage, we look around. Wait, it is a room full of eagle vase in
different colors. The column closest to us has a plaque in Latin. “Ex
animis daimon rubram aquilam prospecter: tune potentior resurget”. Walking
close to the right side wall, go forward. Turn left. Go underneath the
scaffolding. Turn left, look close and use knife on scaffolding drapes.
There is the guard! We have to do something. Use crossbow with bolt on
guard. The Jesuit priest comes and talks to Morgan. If he calls the
guard, she would not be of any use to him because the guards have been
torturing suspicious people. He wants to make a deal. Morgan would give
him what he wants in exchange for the translation of the Latin
inscription. Morgan agrees. The translation of the Latin inscription is
“When the dead demon looks at the red and powerful eagle, he will come
back to life”. Look close on the purple eagle vase in front of the
priest under the scaffolding. Use the daemon on the opening on the
pedestal. He will then be facing the red eagle across the room. Remember
the warning of the alchemist, use gas mask. The priest suffocates and
the daemon statue is gone. The young Prince comes and says based on the
mask, he thinks Morgan is involved on sorcery and wants her to help him
shed light on the death of his father. He does not trust anyone and will
be grateful. Morgan agrees and asks him for information concerning the
bull shaped foundation. He asks that Morgan meet him at the King’s
bedroom. Pick up the vase with a
Roman eagle on top. Lose one, get
one. Go to the small ground floor gallery.
Small Ground Floor
Gallery:
Way down the other end of the
hall is a snoring guard. Look close and pick up the lead gun
bullets and the powder flask. The inventory chest is opposite
the snoring guard. Now let us see what we can do to help the young Prince.
Go see Jacquelyn again at the Cup-bearer’s room.
Cup Bearer’s
Room:
Inventory needed: Holy water,
magic formula for revelation.
Since she just fainted we can
try to revive her and ask questions especially about the letter the Queen
wants us to find. Use Holy water on Jacquelyn. Jacquelyn wakes up and
say that she is in the service of Marquess de Verneuil and saw her and M.
le duc d’Epernon plot the murder of the King and that she was carrying a
letter from her to him. She hid the letter in this room. Then she fainted
again. Turn right and look in window. Pick up royal books. Go
to inventory chest and then turn right to the floor under the fountain.
Place books on the floor. Climb on books. Pick up missive written with
invisible ink and combine it with magic formula for revelation
producing very incriminating missive. Written by Mde. de Verneuil
to M. le duc d’Epernon, she says that the Ravaillac has not failed in his
promise. Oh My! Let us find the Prince. Go to King’s bedroom.
King’s Bedroom:
Give very incriminating missive
to the young Prince. The future King is most grateful. The Prince
states that the bull shaped foundation can be found in a clock made by M.
Gauthier. His father placed great importance to it and a cow is part of
the family’s coat of arms. M. Gauthier also devised a secret mechanism to
open a secret drawer. As they speak, Mr. de la Force’s men in the garden
are questioning M. Gauthier. Garden, where is the garden? Let us try
the small ground floor gallery.
Small Ground Floor
Gallery:
Inventory needed – hammer and
chisel, fire tongs.
Listen, somebody is being
tortured. Maybe we can find them by following the sound. Here at the fifth
window from the end with the snoring guard, the sound is the loudest and
by the bench beside it are the sketches of the German clock drawn by
Mr. Gauthier. Use eye icon to look closer on the sketch. We need
Henry’s Birthday (around the 12th hour of the 13th of December), the
King’s scepter to test the mechanism and Bull shaped pendular key for
Zodiac.
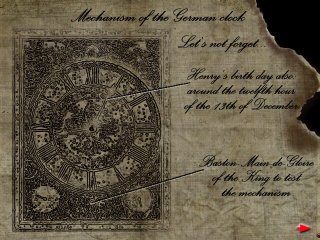
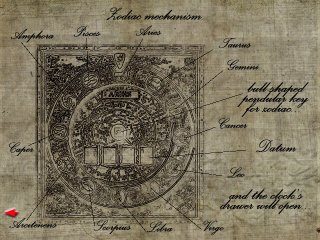
We need the year for the
birthday and based on the clues on the back of the King’s throne in the
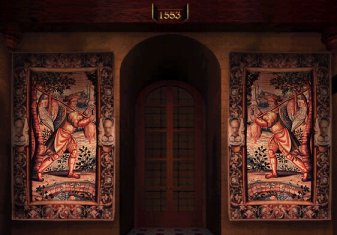
Kings portraits gallery, we need to look for huntsmen. Go to the other end
of the hall. There were tapestries about hunting. By flipping through the
pictures, produce a mirror image of a huntsman carrying dead birds. The
top of the arch shows 1553. Let us now look for the scepter and the bull
shaped pendular key. Go to the Ambassador’s room.
Ambassador’s
Room:
Climb up the scaffolding and
walk by the long wall to the far end. On the way back to the stairs, look
at the murals on the ceiling. There is one of a lady, a sheep and a bull.
Bull!! Let us check that. Use hammer and chisel on the bull mural and pick
up the bull shaped zodiacal key. (If you try to do 2 murals,
the snoring guard will wake up). Now, we pick up the scepter –
remember where we saw it?
Caryatid Room:
Let us pay homage to the dead
King. Look close and use fire tongs to get the Royal scepter on the
King’s left. (Try getting it without the fire tongs – save first). Time to
look at that clock at the King’s bedroom.
King’s Bedroom:
Look close on the top clock
face. Let us follow Mr. Gauthier’s instructions. Time should be around
12th hour. Use the bottom left round dial to move the hour hand and the
bottom right dial to change the minute hand. Test the mechanism by placing
the royal scepter at the bottom center hole – it will not fit if it is the
wrong time. The right time is 1:55 and the scepter will rotate. Look at
the bottom zodiacal face. Place bull shaped zodiacal key at the center.
Turn bull until Aries (ram) is on the top. Place the year 1553 at the 4
squares by clicking the + and -. The secret drawer opens at the bottom of
the pedestal. Pick up the Bull shaped
foundation Assyrian statuette. Now
we have 3 but the daemon is destroyed.
Courtyard:
Inventory needed – Gun powder,
lead bullet, gun (combined).
Combine gun with gunpowder to
produce gun full of powder and then combine lead bullet to have a gun
full of powder and loaded, ready to be used. We hear the Queen
screaming to have us be captured. Go forward towards the crates/barrels of
gunpowder, turn right, use ready to use loaded gun.
Sombreval reprimands Morgan
for failing again. He sends her back to 1770 when revolution spirits are
stirring and murder and anarchy is at hand. The Black Templars have
attached themselves to a new order – Brotherhood of the Masons. He tells
Morgan to befriend the Marquis de Nemours that has traveled to Mesopotamia
and to learn from him. He warns that the Marquis belongs to the Black
Templars.
18th Century
(1770)
St. Louis Room:
Inventory needed – crossbow,
hook, rope (combined – hook-launching crossbow); bolt.
Again, we arrive with no
inventory. The inventory chest is in the same place. Listen to the
Dictaphone of the Louvre. Check the map for access areas. We only need the
daemon and that was destroyed during the 17th century. We have to find
information about it then.
Go under the middle alcove and
pick up copper wire. The only way out is through the window. Now,
we need to get a disguise.
Courtyard:
Go forward 2x towards the light
across the way. Turn right and go forward. Turn left to talk to a lady of
the evening. She will get some clothes for Morgan from one of her
costumers. Pick up clothes and the well lined purse from the
front of the covered cart. Turn left, go forward and turn around and look
close on the walls of the ruins of a freestone mansion. Use hook launching
crossbow on the top middle of the screen.
Ruins of a Freestone
Mansion:
Here is our friendly
neighborhood Alchemist. Alchemists surely have gone down on their luck –
from castle to a ruin. The Alchemist welcomes the beautiful traveler.
He states that Morgan will not recognize the Louvre. Materialism and money
taken over the world. Politicians and secret societies like the Masons,
Rosicrucian and others replace the last of the artists, painters, etc. He
might be Anselme himself but definitely his descendant. He advises Morgan
to gain the favor of a Marchioness von Schoenhausen and gives her a
precious necklace to help. He also gives her a new cabalistic spell that
awakens the dark forces because strange things are happening. Look
close on the chest by the left wall and pick up the magic formula
revealing some of Anselme’s basic secrets. Open the drawer and get the
pearl necklace.
View this guide raw, exactly as the archive holds it