
The Longest Journey

by MaGtRo about 61 minutes to read


By
F
UNCOM & Ragnar
Tornquist


Walkthrough by
MaGtRo     August, 2002


Game
play:   
TLJ is a mouse driven game. After installation
and hardware setup, the Game Menu shows the diary and several drawings –
game settings, credits, begin, continue and end the journey. The Book of
Secrets can later be opened when triggered in the game. This is an extra
treat and contains outtakes, additional music and images. The game
settings page has choices for the game and the volume settings. The main
game screen shows the toolbar when the cursor is placed at the top of the
screen. The toolbar has the inventory, options (diary) and exit icon. The
cursor during game play is normally blue, red at an exit and lights up
when on an active spot. The hotspot or active site will have a choice of
eye, mouth and hand icons. Double clicking will make April run. To combine
items in inventory, click on an item and the cursor will change to that
item. Place it on top of another item you want to combine with and if it
flashes the combination is possible. Click the item and it will combine.
Right click and the cursor will return to normal. Press the X key on the
keyboard and it will show all available exits in the game frame. To exit
first person view in case of examining and inventory or looking at the
map, move the cursor to an edge of the screen and when it turns red, click
and will return to the previous scene. To save or load a game, 1) either
use the F2 (save) or F3 (load) keys or 2) open the diary in toolbar or by
pressing F1 and then selecting the various options. Check the diary and
conversation log frequently for clues. During any conversation, exhaust
all the dialogue options
and possibly talk to them a second time to
see if there are new dialogues triggered. Press ESC to skip dialogues.


Prologue
– A Lion is in the streets


An old woman tells a
story of the Balance’s crucial turning point. It begins and ends in a
tower in a realm that is no more.


Watch a man awakened
by a force of light in a tower. In Newport at Stark, April Ryan dreams…
again. Find yourself in an alien landscape. Check the storm cloud, various
landscape and April herself. Go right towards the tree, the world shakes,
see an egg fall out of the nest and get caught on the roots of an old
tree. You have to save the egg. Check the egg. Look close (eye icon) on
the nest by the tree and see scales. Pick up (hand icon) the scale.
Look close (eye icon) and take the twig-branch from the tree and
the tree or the wood spirit complains. Exhaust all dialogues and learn
that the tree is dying because of the battle raged by Mother and Chaos.
The water that fed the tree was diverted away. Go right and look at the
stream. To divert the water of the stream to the tree, in inventory,
combine the scale and branch to make a funnel. Use the funnel on
the stream. Return and talk to the tree. Mother, White of the Kin arrives
April, daughter I have been waiting for you. I am the
mother of what is. You are the mother of a future that may yet be and I
will guide and protect you.


Chapter
one – Penumbra


April’s
bedroom
– April wakes from her nightmare. A cash card is
automatically placed in inventory. Look around the room. Take the
photograph and diary from the table at the foot of the bed.
Look close at the diary in inventory and take the timesheet. Read
the diary and learn about April’s past and her feelings about her family.
Open the closet and note the drawings. Take the toy monkey and look close
in inventory. Turn the screw of Constable Guybrush and note what he does
and says. Take Guybrush’s eye that is falling out by clicking on it
2x. Open the window and look out. Note a rubber ducky under a grill,
clothesline, chain and a hungry seagull. Release the clothesline and it
drops close to the rubber ducky.


Border House
– At the hallway, talk to obnoxious Zack. Take an organic leaf from
the plant at the foreground. Look at the Free Access Terminal. Go
downstairs. Look at the items on the corkboard Take and read the pink
note
. A pushpin goes with the note. Give the pink note to
Fiona. Get the ‘sweet sixteen’ gold ring given to April by her dad.
Talk to Fiona and learn about Mickey’s nightmare, plumbing problems, how
Charlie brought her to the boarding house, Border House and other
background information. Take the matchbook from the coffee table.
Go outside. Check out the water pump machine at the left screen, murals on
the walls and Cortez sitting on the bench. Talk to Cortez and hear about
destiny and a reference to old movies. Go to the bridges (press X to see
all the exits), to the park and then to the academy. 


VAVA – Venice
Academy of the Visual Arts – Enter, take rubber gloves from trash
can and go upstairs to your studio. Take the paintbrush and palette
from the table and click it on the canvas to start painting. Emma arrives
with a message from Cortez – to meet with him where children visualize
their dreams. Emma leaves after asking you to meet her at the Fringe.
April experiences a waking dream of the holosculpture dragon taking solid
form. Exit the academy, go to the park, to the bridges and then to the
cafe.


The Fringe
Cafe
– While outside, click several times at the death star in the
foreground for funny dialogue. Note the mystery door and enter the door to
the cafe. Talk to Charlie – find about Cortez’ interests on the poster by
the jukebox, Cortez’ love of old movies and be reminded that today is
payday. Take some hard candies from the candy jar by Charlie. Go to
left screen and talk to Stanley in red sitting by the bar. Keep on asking
to be paid and give him the timesheet. Choose – You need
the money now
and Forget
it, I quit
. You can choose to work or not. Go to the poster by
the jukebox. Take a ticket for the exhibition of Growing Pains at
the Roma Gallery. Look close at the gallery ticket in inventory to
find the address to the gallery. Take some bread from the table in
front of Emma. Talk to Emma and find about Zack’s words about April. Go
back to Border House.


Border House
–           
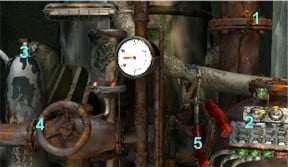
Machine: Go to the machine on the left screen by the door. Save
game here
.


1. Use the ring on the 2 separated wires
to get power to the machine.


2. Set all 4 levers to the horizontal
position by flipping the left and right screws. The left screw holds in
place any of the levers (seen with red light) and the right screw moves
the other 3 levers.


        a. From Left to
right – Keep the red light on #1 lever and click on right screw to have 1
and 2 levers similar in position.


        b. Click on left
screw to move red light to #3 lever and then move the right screw so that
1, 2, 3 are in the same position.


        c. Click on left
screw to move red light to #4 lever which should now be in horizontal
position (if not in horizontal position start over using the saved game)
and then click on right screw to have them all in horizontal.


3. Turn the valve of the tank on the
left and that will move the pressure gauge from 100 to 37.5.


4. Turn the wheel to drain the water.


5. Take the clamp off the tubing.
When you exit, April will take her ring back or take the ring
before exiting.


        Rubber ducky
(can be done on chapter 2): Enter the Border house and go to your
bedroom. Look out the window (if you have not released the clothesline
before, do so now) and use bread on rubber ducky. Watch the seagull eat
the bread, releases the rubber duck and the grate submerges. Pull the
chain up and get the clothesline. Go to the cafe and on the way see
the blue rubber ducky float by. In front of the death star by the cafe,
take the deflated rubber ducky. Look close at rubber ducky in
inventory and take the band-aid. Go to the subway.


Subway – Use
hand on Gene scanner. Buy a week pass, place cash card in front of the
lens and then get scanned. Enter the train, look at the subway map above
you and click on Watertown bridge
exit.        Roma Gallery
Enter the door on the right of screen. Talk to Cortez and learn about
Warren Hughes, truth vs. illusion, waking dream and to meet him tomorrow
for answers. Take the subway to the East Venice exit. If you are not
working tonight, go to Border House – Talk to Mickey and Fiona
until you watch TV and see another waking dream jump out of the TV. If
you’re working tonight, go to the Cafe Fringe – Go to Stanley and
tell him you’re ready to work. A waking dream jumps out of the
jukebox.


Chapter
Two – Through the Mirror


Border House
– Upon waking, April decides to look for Cortez to get answers. Go
downstairs and talk to Fiona. They discuss the waking dream/s that
occurred last night. Ask Fiona about Cortez. Go upstairs and knock on
Zack’s door. For a date at the Pavilion, Zack tells April that Cortez
might be at the Mercury Theatre at the East Gateway from Metro Circle. Go
to the subway.


 Subway
–         Iron Key: Go out
to the platform and look at the sparks by the rail at the left of the
screen There is a large key stuck between the rail and high voltage cable.
Save game here. In inventory, use mouth on rubber duck to blow it
up. Look close (eye icon) at the rubber duck in inventory. Then, while at
close up of the duck in the background, right click to get inventory. Use
clamp on inflated rubber duck to open the clamp. Combine this with the
clothesline. Immediately, click this makeshift fishing pole on the spark
to get the iron key. If not fast enough, the clamp closes
because the rubber duck is deflated again and have to start
over.         East Gateway
– Take the subway and select the Metro circle exit. Take the right
exit to East Gateway and then take the right exit to ‘down the
street’.


Mercury
Theatre
– Look around and talk to Freddie, the fat guy. Note that
Freddie is upset about the marquee and that the whole
world wants to know where Cortez is
. Talk to the conspicuous
guy and find out that he ate an hour ago but missed his ‘sweets’ but
doesn’t have the urge to go. To remove the cop out of the way: Note
that the trash can has some glowing green yuck underneath it. Push the
trash can. Use the candy on that virulent green ooze to get a stinky
candy
. Give the stinky candy to detective. Watch the fast-acting
virulent candy work and Freddie’s chase. Freddie laughs about the cop and
says that he dropped his hat. Go to the left
screen and pick the detective’s hat at middle of the street. Go
back to the theatre.


To get Freddie out of the way
: Look at the fuse box by the post. Use
hand icon on fuse box to get a close-up. Use the iron key on lock and see
a loose connection. Use the band-aid on the torn rubber glove and then use
the patched rubber glove on the sparks of the loose connection. Watch
Freddie open the door to the alley to get a ladder to fix the
marquee. Follow Freddie into the alley beside the theatre. He goes to the
theatre through the fire door. The fire door is locked.


To get in the fire door to the theatre:
Note the shadow on the wall
and the garbage heap. Place Guybrush, the toy monkey on top of the garbage
heap and the hat on top of the garbage bag. Hear Guybrush do
his spiel. Look at the shadow now – looks like the detective with the gun.
Open the trashcan by the fire door under the fire alarm. Use the matches
on the opened trash can and watch. When Freddie does the monkey, enter the
door to the theatre.


Talk to
Cortez. I will show you the truth. I’m sending you through
the looking glass. It’s a mirror to reflect your dreams.
Whatever answer you give, you cannot go forward unless you
agree to go through the looking glass. Go through the swirling light
portal. Cortez remembers to tell you to visit Brian Westhouse when ready
to go back.


Temple in
Arcadia
– Go to the right until the priest. Talk to the priest and
realize that you can not understand him. To understand the priest:
Use these dialogue choices and use the scroll arrow to check for hidden
dialogues – Shake head, listen (note some English words are now
interspersed), listen (more English) and listen again to completely get
all English words in the conversation. The priest is Vestrum Tobias
Grensret. Go down and look around. Go back to the temple and talk to
Vestrum Tobias. He explains about Balance, one world, magic and science, 4
Draic-Kins, Sentinels, tower, tower, disc, Arcadia and Stark, Vanguard and
the missing guardian. Talk to Tobias again and ask about Brian Westhouse
until Tobias gives his name as Rolling Man. Go to any of the
stalls.


Marketplace
Talk to the map merchant at the right of the screen. Ask about Brian and
then rolling man. Talk to him until he fires his delivery boy and then get
the job as delivery person. He gives the delivery list and
map to be delivered to a Captain Nebevay of the White Dragon. Get
the Captain to sign the delivery list. Exit to the city at either north
roads. See framed destination points. Click on City Gates.


Docks – A
musical instruments stall is to the left of the city gates. Go to right
screen. Go to the ship at the right of the lighthouse. Talk to the sailor
standing by the ship – Captain Horatio Nebevay. He is not out to sea
because there is no wind. Roper Klacks, an alchemist stopped the winds.
Give him the map. He gives an aren-coin as tip. Give him the
delivery list to sign. He goes on about not signing and will place his X
mark only if the Mo-Jaal is distracted by music. Go to the music
instrument stall by the city gates. Talk to the instrument merchant and
buy a flute for one aren. Go back to the Captain and give him the
delivery list again. After the music and signing, go back to the map
merchant.


Marketplace
Note the blackbird in a cage at the stall across the mapmaker. Talk and
give the delivery list to the map merchant. The next delivery is a
map for Westhouse, the rolling man. After a very long, very
confusing and unnecessary direction, go to the city exit and select the
Westhouse bungalow.       
Westhouse – Talk to Westhouse and then give him the map. After
talking to him, get him to sign the delivery list. Try to leave the
bungalow and Westhouse remembers that Manny-Cortez gave him a broken
pocket watch. He made a reference about Manny saying that
when his heart started beating again, he would know – a
beacon.
Look close at the pocket watch and note that the winder
is broken off. Use the pushpin on the pocket watch and a portal opens.


Theatre alley
– After passing through the portal, talk to Cortez. The way to save the
world is to – Find the lost Guardian, find the gateway to
the Guardian’s realm, find the key to the guardian’s realm, defeat the
Vanguard and fight Chaos
. Exhaust all conversation. Yes, let’s
save the world. Find about the Vanguard by talking to Warren. Father Raul
at Cathedral in Hope Street will help to find Warren. They will meet at
the Cathedral tomorrow.        
Fringe Cafe – Talk to Charlie and then go sit down in the cafe
lounge. Emma comes in and talks about Zack. A decision about going on a
date with Zack or to stay in the cafe is yours to do.


Chapter
3 – Friends and Enemies


Border House
– April decides to look for Warren at Hope street and hide from Zack. Exit
the room and talk to Zack. Either decision last night will end with Zack
being mad at April. Take the subway to the Hope street
stop.        Cathedral – Go to
cathedral exit at right of screen. Go to the confessionals at the right
side of screen. Talk to the priest, Father Raul and he says that Warren is
down the street at building 87. Exit the
cathedral.        Building 87
Enter and talk to the boy sitting on the steps. To help April, Warren
wants her to break into Newport Police Department, get information about
his family, erase his criminal record and possibly find some information
about the Vanguards in the archives. Agree and ask for directions to the
police station. Take the subway to Metro West.


Police
Station
Outside: After a news broadcast of a shuttle accident
in front of the police station, enter the station. Talk to the actor-cop
and find out that only cops, prisoners and garbage can enter the building.
Exit and go back to the left screen by the subway exit. How to get in
the police station
– Look at the garbage truck that passes every now
and then. Look close at the street sign – Calavera crossing MCW and street
ID 0092. Look close at the roadblock on the street and then change the
display panel by using hand icon on roadblock. The road block will move
and a light will flash in the container by the pavement. Climb in the
container and a garbage truck will take the container-dumpster. Find
yourself inside the station.


Reception area: Talk to the sergeant about the archives and
eventually learn that the door is broken and the workers are there to fix
them. How to get through the broken door at the police station
Talk to the workers in red on their extended lunch break until they say
they will need a signed and in triplicate work order of the Short Term
Suspension of Union Benefits to get back to work. The form can be found
from any office they perform services. Look at the red toolbox by the door
and take the paper-petition. Look close at the petition in
inventory. It’s an old copy of Form 09042 – the ones the workers needs to
get them to work. Give the old work order to the portly guy. Talk to the
sergeant and ask for form 09042. Give the Union Petition #09402 to
the workers and April will fill it up first. Now ask the sergeant for form
09042-A and then give it to the workers. The workers then stands up
and open the panel by the door. The workers are taking forever to fix the
door. Look at the left vidphone in the foreground and learn that its
number is 099-12090. You can call home if you want and learn something
about April’s family. Use the right vidphone with a broken camera and
screen to dial 099-12090. While the phone is ringing, tell the portly
worker that there’s a phone call for him. If the phone stops ringing
before you talk to the workers, dial it again. The fat worker goes to the
phone. Try to put the wires together and April will say that she needs a
distraction to get the workers away from there. Tell George, skinny worker
that there’s a phone call for him also (will not occur if you don’t try
the wires first).  Both of them will now be by the vidphone. Connect
the loose wires hanging from the panel and the doors open. Enter the door
and the sergeant will stop you. You have to distract her then. Look at the
shelves behind the sergeant and April will select a form that is hardest
to get to. Ask the sergeant for that form #31366. While she is distracted
connect the wires and enter the door to the
corridor.        Corridor: Use
cash card to get a soda can from the soda machine. Go to doorway at
left exit and be at a locker
room.       


  Locker Room: Hear somebody getting sick. Look at the lockers
and read all the names on the locker doors – only one female. Go to the
stall on the left and talk to the man there. It’s Minnelli, the cop you
gave the stinky candy to. Tell him you are Sgt. Hernandez. He gives his
locker key for you to get his stomach medicine. Use the key to open
Minnelli’s locker. Look close at open locker. Take his medicine and
see a receptacle for a synthetic eye. Look at the mirror and take the
mirror shard
at bottom right of the mirror. Read the note behind the
shard – Archive access login: fminnelli. Password: wife’s birthday. Give
the medicine to Minnelli. Talk to Minnelli about Mrs. Minnelli. Learn that
tomorrow is her birthday and other things. Minnelli sneezes once too often
and drops his synthetic eye. Flip the light switch at right of the stall
to turn it off. Take Guybrush’s monkey eye from inventory and click it on
dropped synthetic eye on the floor to replace Minnelli’s glass eye.


     Archive: Exit and go to the door at right
of the pop machine. Use Minnelli’s eye on retinal scanner. In the Archive
room is a printer, computer and control panel. Use the computer and search
for Warren Hughes. Click on ‘Erika Hughes’ to remember her colonization
number. Click on ‘delete’ and then ‘print’ on the screen. Click on ‘Main’
and search (scroll down) for the col#0050123185353260 (if you search for
Erika Hughes or Vanguard, there will be no info available). Print the info
about Erika Drake. Click on ‘main’ again and search for Church of Voltec.
Click on Jacob McAllen’s name on the screen. Search for Jacob McAllen and
after the warning, click continue and look close at the code at bottom
right (make note of it). Go back to ‘main’ and select Log off. Take the
printouts from the printer. Look at and use control panel. Enter
the code seen on Jacob McAllen’s search. Click on buttons 11, 16, 1 and 8.
Look at the Vanguard folder automatically placed in inventory and
find the Vanguard datacube.


  Reception area:
Exit archive and go to the reception area. Pick
up the screwdriver on the floor by the toolbox. Exit at bottom of
screen and out to the streets.    Outside: Talk to
the cop guarding the crash and notice that he coughs every once in a while
because of the dust. Look at the hanging blinking thing at the crashed
shuttle and April says it’s an intact Antigrav control unit. Go to subway
and take the Hope street stop.       
Building 87: Talk to Warren and will automatically give him the
printout. Warren will give the directions to Burns Flipper. Take the
subway and Newport Docks stop.


Burns Flipper
– After the subway, go upstairs, right at the construction yard and
then to the garage. Knock 3 times on the garage door. After a long and
rather loaded with not socially acceptable words ‘discussion’, enter the
garage and go down into the pit. Talk to Burns Flipper – he has really
flipped. Give him the datacube. Watch Jacob McAllen on the screen and
listen to Burns talk about Gordon Holloway, who sounds like one of the
altered new guardians Cortez talked about. The Vanguard is behind the
Malkuth Technologies – MTI found at Grendel Avenue. You need a proper ID
to go to Grendel Ave. Talk to Burns again to fix some fake ID. Something
went wrong with his chair. A working anti-grav unit is accepted as
alternative payment for a fake ID. Remember where we saw one but there was
a coughing cop guarding it. Exit the garage and look at the machine under
Burn’s ‘loudspeaker’. It’s a paint shaker. Idea!! Place the soda can in
paint shaker. Go back to the police
station.        Outside the Police
Station
– Give the ‘volatile’ soda can to the cop. He leaves to get
cleaned up before he short-circuits because of the soda shower. Use the
mirror shard on the laser fence. Use the screwdriver to take the
Antigrav unit. Go back to Burns at Newport
dock.         Burns Flipper
– Give Burns the AG unit and he will try to get a fake ID by tomorrow
night. Go meet Cortez at the Hope St. Cathedral.


Cathedral
Go to the confessional and eavesdrop on Father Raul and Cortez. They
talked about the situation in Arcadia, the Vanguard’s influence on the
Tyrens and about April. Talk to Cortez about Arcadia and the plans for
tomorrow. The Vanguards are hunting for
Cortez.         Go back to
Border House
– Go to your room and see Zack by your door. Emma and
Charlie are in the room. Explain the situation to them and Charlie
believes you. April asks them to look out for suspicious people after her
and Cortez. April gets ready to rest. Watch the Vanguard get
Cortez.


Chapter
4 – Monsters


April wakes up with
a light coming from the closet. She gets pulled in and comes out in
Arcadia in her underwear.


The Journey Man
Inn
– Enter the building where the sound of a party is coming out
from. Talk to the woman, the innkeeper. It is the Feast of the Balance.
Learn about April being a ‘wave’ and the different practitioners of magic.
See and talk to the strange creature that came out of the room where the
dancing is held. Abnaxus of the Venar doesn’t perceive time as common man
does. The Venars perceive time in the past, present and the future at the
same time. A veil created by Chaos is in the future and obscures the have
been and will be. April is to be and was and is invited to visit him in
his place at the Marcuria City Green tomorrow. When he leaves, click to go
to the dancing room, realize you’re tired and then click to sit down in
the comfy chair. Watch things being done to Cortez. April is wakened up by
the innkeeper. Try to exit the inn and the innkeeper dresses you up in
exchange for help to clean up the place. The innkeeper gives you some
coins after the cleanup. Exit, go to the alley (city exit) and
select City Green.


City Green
Time to visit Abnaxus.     Book of Secrets:
After April steps down, look at the flower bed and she says there’s
more room to plant in there. So plant the organic plastic leaf taken from
the corridor at the Border House. Watch it grow into a purple flower and
hear April say that The Book of Secrets is now open – check it out later
when you quit the game using CD1. The Book of Secrets will also open after
completion of the game.        
Back to the game, enter the stone tree house. Talk to Abnaxus about
everything. Learn about his perception of time, dark veil and prophecies.
He mentions about Silver Spear of Gorimon, a
book that talks about the white dragon. A god that fell from the sky might
be a clue about the other draic kin. As advised, we have to visit Vestrum
Tobias to learn more.


Temple: Talk
to Vestrum Tobias. Ask about going home, the disc, entrance of Guardian’s
realm 2x and the 2 Draic Kins. All of the above questions can be answered
by researching at Great Library at the Sentinel Enclave and each book must
be mentioned by Tobias. Check with Minstrum Yerin, the keeper of the
books. Read the Scriptures of the Balance to
find out about the 4 magical people that was given a part of the key -disc
to enter the guardian’s tower. Read the Histories of
Arcadia, of the Divide
, the Scriptures to learn where the
guardian’s realm is, which may not be in the ground. Check The Secrets of the Draic Kin written by Minstrum Elneak
to find where the 2 Draic Kins in Arcadia might
be.         Westhouse
Bungalow
– Talk to Brian Westhouse. He advises to check about the
people with wings ‘flying people’ that record stories. Time to read up on
things and go to the library at the Enclave.


The Enclave
Look at the stone dragon and the medallion mark on the floor with 4 outer
hollow and a central circle. Go downstairs at the bottom right side of the
tower. Talk to priest, Minstrum Elneak. After the long commentaries, say
I’m looking for some information, but I’m not sure which
book to ask for
and then about flying people. Read the book
about Alatien – April should say Island of Alais – maybe I should go
there
. Ask Minstrum Elneak for and read the Silver
Spear of Gorimon
, a book on the history of
Marcuria
and Arcadian folktales.
Look at the pool at the center of the library with wheel to control the
water gates of the sea water. Time to find a way to get to the island of
Alais and find the flying people.


Pier – Talk
to Captain Nebevay about the island of Alais. To get to Alais, you have to
pass through Ge’en. No wind, no navigator and no women on the White
Dragon, really!         Old
Sailor
: Go to the small pier just in front of the galleon. Talk to the
old sailor and ask about the chest. Eventually,
talk about the bird and learn that it is now a
prize on a game of cups in the market. Ask about passage
going south
and about cash in the favor with
Nebevay if I get your bird back
. If you want to fall asleep,
you can ask about maritime stories. Go to marketplace.


Marketplace
Look at the black bird in the cage at the left stall and learn that it
talks.    Cups Game: Talk to cups handler. Learn
about his feelings on the situation in the city, sentinel and vanguard. No
magic used in playing the cups game and the bird is the top prize. Place a
coin (Arcadian iron coins) on the table. A cup is placed over it.
Cups are shuffled and guess where the coin is. Win 3xs and get a prize.
Use the screwdriver on cups and the cup with the coin will move. He gives
a calculator to let him be. Give him the screwdriver in exchange
for an exotic prize. If you haven’t talked to the sailor about “cashing in
favor’ April will need to take the time to decide what to get. If the
‘cash in favor’ dialogue was done, ask for the talking bird. Talk to
bird and name him Crow.       Map
Merchant
: Talk to the map merchant and give him the delivery list. The
map merchant gives you the map of the Northlands for Tun Luiec at
the Journey Man Inn where you stayed overnight.    


The Journey Man
Inn
– Ask the innkeeper about Tun Luiec, a navigator looking for work
and find out she is not
there.         Pier – Give
bird-Crow to old sailor. Go to Captain Nebavay and talk about Umber Ianos.
He cannot sail because Roper Klacks, alchemist captured the winds and has
no navigator. Go to city gates and choose The Road North
destination.


Northland
Forest – Lucky, you have the map of the Northlands or else you
cannot get here. When you click ‘into forest’ exit, Crow flies in panting.
Click on forest frame. Walk the path and Crow finally lands and gets
together with April. To catch Crow’s attention, April will use the flute.
Go deeper in the forest and meet a Banda-mole, Ben-Bandu looking for his
brother. April asks Crow to be on the lookout for the lost Banda. Look at
the bridge that is out. Go back, talk to and help an old lady sitting on
the ground. Pick up the old woman and then take her
home.    Old Woman-Gribbler: Enter the hovel and the
gribbler leaves. Check the door, find yourself lock in and hear a noise.
Notice a loose floorboard-plank under the table. Pick up the small
skull
from the table. Look at and try to open the chained cabinet.
Pick up the broom on the right side of the cabinet and use it on
the cabinet. The cabinet falls down and releases Bantu-uta, Ben-Bandu’s
brother. Throw the skull on the window and push Banda-uta out the window.
The gribbler comes back and gets mad. Immediately, push the plank
from under the table and it will tilt the wood trunk by the door. The
trunk hits the gribbler throwing it to the fire. Exit, Ben-Bandu arrives
and invites April to his
village.        Banda village:
Talk to the Elder sitting on the hammock in the foreground about the
prophecy and gets invited to sleep at the Spirit Dig. Talk to Crow on the
tree trunk, Ben-Bandu and his brother. Go to the Spirit Dig cave behind
April. Lie on the bed and sleep. April talks to her other self,
Charlie-the spirits. Learn about April’s family, Cortez the red, Bak-Baar,
and new Banda name.


Chapter
5 – There and Back Again


Go out, talk to
Ben-Bandu and then the Elder. Talk about her new name – April
Bandu-embata. The elder gives her one of the 4 disk stone – Banda
stone
. May there always be soil between your
toes!
Wake up Crow. Go to the swamp at bottom right of the
screen. Cross the swamp
bridge.         
Meadow: April says that she dropped something. Your inventory is
lighter now. Pick some of the moisturizing purple flowers on the
left foreground. Go up the hill at the background. Up the Hill, see a
floating castle. Go down to the plains.    Plains:
Look and touch statue. Use the moisturizing flowers on petrified man but
doesn’t work. Since April can not get the berries in the foreground, call
Crow by blowing on the flute. Pick Crow up and click him on the
berries. In inventory, take berries and click it on the
moisturizing flowers to get moisturizing cream. Use moisturizing
cream on petrified man. Talk to Lorhan, the sailor. April must break the
crystal-soul stone that keeps the souls of the people captured by Roper
Klacks. The soul stone is in the study. The petrified man lowers the
mountain. Climb up.       


Floating
Castle
–         Bottom
ramp gargoyles
: A voice harasses April. Look at the gargoyle at bottom
right of screen with his hand out like a beggar. Place coins on his hand.
The pillar turns to show a gargoyle with his hands on fire. Blow out the
flames on both hands. During the whole process, note the door at the
center of the labyrinth turns from stone, to glowing eyes with the
gargoyle above holding a flame and then, a face with glowing eyes with
gargoyle above with both flamed hands. The pillar turns back to the
begging gargoyle. Place coins again on the hands and pick up the
salt and pepper from the flamed hands gargoyle. A complete
face is now seen at the center door. The upper part of the ramp is now lit
up.


Hourglass gargoyle:
The gargoyle at the left foreground is holding an
hourglass. When the hourglass is turned upside down, the stairs rises up
to reach the top ramp but goes back down when the hourglass automatically
turns over. So – turn the hourglass, immediately place the cursor on the
top ramp (end destination), immediately double click (once not
continuous) to make April run while the steps is still moving
upwards and then double click again with cursor still at top ramp when
April reaches the end of the bottom ramp to make her climb the
stairs.       


        2 doors at top ramp: The
first mirror door has a parchment at the steps. Your mirror image stops
you from picking the parchment up. Knock on the other door and it will
turn to show another hourglass. When you turn this hourglass it will raise
a missing ramp in front of the door on the left of the screen. The stairs
at the center of the labyrinth is blocked by a painted wall. Now, click
the hourglass and run by double clicking once with cursor placed on the
ramp (not door) just in front of the left door. Enter through the
door and face the stone gargoyle face. Use the pepper shaker on the face.
Go through the ramp that goes down when it
sneezes.        Hall: Climb the
stairs and Klacks appears. Talk to him and he mentions about April’s real
parents. Tell him to prepare to be defeated and
a proper challenge. Use the calculator on
Klacks. He fails, takes the calculator and gets sucked in the calculator.
Climb up and go to the tower.


    Study: Look at the crystal-soul stone. Look at
the big book (Tome of Alchemy) on a stand at middle of the screen. Look at
the first spell – cloud, spider net plus catalyst (magic finger) =
invisibility spell. The rest of the page is torn up. Take the white
vial
at the bottom of the shelf on the left side of the big book. Move
the curtain by the window and get the green vial on the floor
hidden behind the curtain. High above the left shelves at the ceiling is a
red vial which we cannot take yet. Go to the right side of the screen and
click on the skull. Take the blue vial that is hidden behind
it.  Look at the cauldron. It is where the potions are made. Take the
yellow vial.


Look close at the white essence
in inventory: smell – ozone; touch – fluffy; listen – distant thunder
(clouds). Look close in inventory at green essence: smell
like pearl of morning dew; touch – texture of thin strand of hair; listen
– rustling of tiny legs (spider net).


Look close at the blue essence in
inventory: smell – sharp decisive, earthy; touch – like ice; listen –
tingling sound like crystal bells (water-catalyst).


Look at the yellow essence in
inventory: smell – like fresh flowers; touch – feels soft like satin and
fragile; listen – rapid flapping of rapid wings (butterfly). 

Let us make the invisibility
potion
. Click the white essence-clouds, green
essence-spider net and blue essence-catalyst, in that order on the
cauldron. April automatically pours the invisibility potion in a vial and
takes it in inventory. Go back out to the mirror door at the labyrinth.
Take the invisibility potion from inventory and click it on April. Take
the parchment-torn page now that April is invisible. Go back to the
big book, look close and place the torn page on the book. Read the 4 new
spells that we need to make. Go back to the cauldron.


 Light as a leaf
potion:
Click yellow essence-butterfly, white
essence-clouds and blue essence-catalyst, in that order on the
cauldron. Go to the left shelves, behind the crystal and click the light
as a leaf potion on April. Click hand on red vial to take
it.      


Look at the red essence in
inventory: smell – like sulfur; touch – burns; listen – like something
burning (hot
coals
).        


Wind Potion: Click
white essence-cloud, red essence-hot coals and blue
essence-catalyst, in that order on the
cauldron.          
Big Bang potion: Click red essence-hot coals,
red essence-hot coals and blue essence-catalyst, in that
order on the cauldron.        
Bind Magic potion: Click green essence-spider net,
yellow essence-butterfly and blue essence-catalyst, in that
order on the cauldron.


Time to help the
trapped souls and break the crystal. Go to the crystal on the desk. Use
the Bind Magic potion and then the Big Bang potion on the crystal. Watch
the petrified statues and gargoyles come to life. The castle floats. Open
the window and call Crow with the flute. Since there is no wind, give the
wind potion to Crow to release up in the clouds. Pick Crow up and click
him on the window. The castle floats to the edge of Northland and drops
down.


Pier – Talk
to Captain Nebevay and he doesn’t believe you defeated Klacks. Show him
(click it on him) the wind potion. Finally, for the use of your wind
potion, he agrees to have a female navigator and take you to
Alais.        The Journey Man
Inn
– Click the map of the Northlands on the woman. Talk to Tun Luiec
and tell her about the job with Captain
Nebevay.        Marketplace
Tell the map merchant you delivered the map and get
fired.        Temple – Talk to
Vestrum Tobias by the murals. Tyrens are coming to make war with the
Marcurians. Tobias thinks that April is the 13th Guardian of the Balance.
Tell him you will leave to go to Alais. Tobias gives April the Talisman
of Balance
mentioned in Scripture of Reunification. They say their
goodbyes.         Pier
Captain Nebevay waits for you before sailing.


Chapter
6 –  The Chaos Storm


April gets seasick.
Go to the apple barrel on the right side of the screen, look at barrel and
get an apple. Go up to the bridge and look at orb-compass. Talk to
Tun Luiec and the Captain. Ask Tun specifically about the compass. Spirit
compass points to a magical north except when affected by a strong magical
source. Go to the main deck and this will trigger the arrival of a chaos
storm. The Captain orders to change course. Talk to Tun again about
everything and learn that you will not get to Alais. You have to try to
change the course back to Alais.


Worm – Go
downstairs. Look at empty chest. Take the axe to the right of the
flour sack in the foreground. Look at the sack and see a worm come out of
one hole and go in the other hole. Try to take the worm but it is too
fast. Use mouth on candy in inventory to get sticky candy. Place
sticky candy (leaves a candy wrapper in inventory) in between the 2
holes on the sack to catch the worm. Pick up the worm.


Go back to the
bridge. Since the Captain is worried about his apple shortage, let us give
him something to distract him away from the bridge. In inventory, combine
worm with apple and then show the apple with worm to the Captain.
Now, Talk to Tun about relieving her of the wheel. After Tun leaves to
stretch her legs and since the compass is affected by magic, use the
Talisman on the compass. April calls Tun back. Talk to Tun about straying off course so that she changes the course and
about the storm getting closer. Talk to her
again and she tells of the possible dangers ahead if they where on course
to Alais. The storm gets nearer. Take the talisman from the compass. The
irate Captain takes the talisman to hide it away from the Spirit compass.


Go downstairs to the
hold and see that the chest now has a padlock. Use the axe found by the
flour sack before, to open the chest with the Talisman. Ooops! April hits
the deck with the axe and water burst in. The ship sinks!


Chapter
7 – A Deep Blue Mirror


April on a makeshift
raft is awakened up by Crow. The captain and the crew left on a magic
lifeboat headed south. April asks Crow to look around for the nearest
island. When he flies away, a head pokes up at the right side of the raft.
Look at it, talk to it and finally touch it. They pull you down to a city
at the bottom of the ocean. Crow comes back and his words came
true.


Giant polyp
breathing house
– Look at all the drawings on the wall. The drawing on
the left shows a man mixing some green moss with his own blood, applying
the mixture to a black pearl and then eating the pearl. The drawing on the
middle shows the man able to talk to the mermen. The drawing on the right
shows a man sticking a polyp down his throat and is able to breathe water.
Look at wall, use mouth on wall and take a polyp. Take polyp from
inventory and click it on April. Exit at the center of the floor. Look at
the shell at left of screen. Use hand on shell to open the shell and then
take the black pearl. Swim to the city.


Merperson – Try to talk
to the merperson. Try to take the spear by the merperson and she gets
angry. Look at and take the first blue crystal on the wall. Look at
and take the glowing green stuff on the wall. Go back to the
breathing house.


Breathing House – Use
the pushpin on April to get blood. In inventory, combine green
stuff and the blood to get green stuff with blood. Click black
pearl on green stuff with blood to get golden pearl and then click
golden pearl on April. Exit the breathing house and go back to the
merperson in the city.


Queen of the Maerum
You are able to talk to the Maerum now. Learn about the Tanyenn,
harvest-fishes, winged demons and snapjaws. Talk to her about everything.
Show the first blue crystal to the merqueen. Try to take the spear again
and get the waterstiller dialogue. Ask the queen all the dialogues about
the waterstiller. Exit and swim towards the breathing house.


Swim to the left screen of the
breathing house by the big rock. Remember the queen said that the first
crystal was found by the seaweeds by the rock. Examine the seaweeds and
get a second crystal. Examine the seaweed again and see a crack.
Push the seaweed aside and see a cave. Enter the cave.


Cave – Pick up a
third and a fourth crystal from the seafloor by the stone
altar. Look close at the stone altar.


Stone Altar: It has an inner pot ring, maerum ring, bird ring and
outer fire ring. Each of the four corners has a slot and a tag. Look at
each tag and they will be labeled after April looks at them. Bottom left
tag is a harpoon, bottom right is one eyed pyramid, top right is fish and
top left is wave. Examine pictures on the sides of the 4 crystals in
inventory.


The object of the first part of the
puzzle is to place the crystals on each slot so that a drawing in one of
their facet (example: fish) faces the same or matches the tag at the
adjacent slot (example: fish tag). The back facet drawing of the crystal
matches either the opposite tag or the tag where it sits.


Place the first crystal (taken from Maerum) that has fish on the
left and harpoon on the right on the one-eyed pyramid slot at bottom
right
. Click and turn the crystal so that the fish side faces the fish
tag to the right and the harpoon side faces the left harpoon tag. Note
that the third side is one-eyed pyramid and it matches the one-eyed
pyramid tag on where it sits.


Place the second crystal (taken from seaweed) that has harpoon on
the left and fish on the right at the waves slot at top left. Turn
the crystal so that the harpoon faces the harpoon at the bottom, fish
faces the right and the waves face back to match each own slot.


Place the third crystal that has harpoon on the left and waves on
the right at top right slot. Turn the crystal so that the harpoon
is turned back which matches the opposite slot, waves face to the left and
the one-eyed pyramid to the right.


Place the fourth crystal that has fish on the left and one-eyed
pyramid on the right at bottom left slot. Turn the crystal so that
the one-eyed pyramid faces right, the waves face left and fish faces the
back which matches the opposite tag.


The object of the
second part of the puzzle is to move (use hand possibly several times) a
ring tag to the front of a tag with an opposite properties (example – fire
with water). Move outer fire ring in front of waves. Move Maerum
(merpeople) ring in front of one-eyed pyramid
(their God). Move
bird ring in front of fish. The pot is already in front of
harpoon
. The central mountain like object opens up to reveal a light.


Look at the drawing
on the walls. The Maerum arrives in a living dragon spaceship, the Maerum
splits into water maerum and winged maerum and tanyenn depletion caused
war between them. The prophecies show that they will reunite and tanyenn
gets plentiful. Look at the symbol on the left wall and note that the
markings are the similar to the lost talisman.


Queen – Go to
the queen and tell her about the cave. The queen examines the ancient cave
but still would not believe that April is the waterstiller because she has
not fulfilled all the prophecies. Back in the city, talk to her about the
waterstiller. She wants a proof of the mission to the balance – the
talisman and to kill a snapjaw. Take the spear-harpoon to kill a
snapjaw. Ask the queen where the shipwreck is.


Shipwreck –  Swim
to the right edge of the breathing house.
       To kill a snapjaw: Take the
harpoon from inventory even though you see April carrying the harpoon. Go
to the shipwreck and the snapjaw goes out.  Place the harpoon cursor
on the snapjaw and when it becomes active (flashes) click. After you
killed the snapjaw, use the hand icon on it to get the snapjaw
tooth
as proof. Go inside the shipwreck and take the talisman.


Queen – Go back to the
queen. Show her the snapjaw tooth and then the talisman. More proof, huh!
Go back to the ancient cave and use the talisman on the symbol on the left
wall. It opens to show a niche. Take the shard of stone. It is half of a
piece of the disc. Go back to the queen and give her the maerum stone. One
more prophecy to fulfill – to unite the maerum that is the winged and
water maerums. Talk to the queen again. April will explain about the
Maerum and Alatien. After a while she believes that you are the
waterstiller and asks you to talk to the Alatien for a meeting in a place
of your choosing. They will bring you to Alais.


Chapter
8 – Reunification


April finds herself
on the shore of an island. Take the rope on the debris at the
beach. Go left up the path.


Old City
Ruins
        Hole: Look at
the hole in the ground by the leafy tree. Use the rope on tree. Go down
the hole. Look at the Alatien nests. Climb down again. Look at the rubble
and get the stone key. Look at the city and April notes it is a
Maerum City. Climb up out of the hole. Take the rope.


Statue: Look at the statue-pillar. See the top half depicts a big
mouth creature calling out and the bottom half depicts a large eared
creature listening intently. Hmmm! Look at the statue base. The bottom
layer shows a large eared head, an icon-marked grey wheel, a layer with a
triangular slot like a keyhole, another icon-marked grey wheel and the top
layer with a big mouth head. Use the stone key on triangular slot. Turn
right and the bottom wheel turns and turn left and the top wheel turns.
There are broken parts. Note down the different icons on top and
bottom wheels. Looks like a communication device with the base as the
dialing system. Take the key back.


Go back to the beach and then
through the arch on the right. Look at the crab and see that it is in
pain. Go up to the cliff and see another of the pillar statue. Look at the
statue’s base, use the stone key and note down the different icons on top
and bottom wheels. Take the key. There is an old fire ring. Look at
the water and note that it is good spot for fishing. Go back to the beach.
Try to go to the jungle but April is afraid to get lost (trigger for
Crow). Stand close to the jungle, use the flute to call Crow. Talk to Crow
and then pick him up and click him on jungle. Crow flies off and will
direct April if she gets lost in the jungle. Go to the volcano.

Volcano
There is a strong rumble that moves the earth. Look at big head with a
wide open mouth. Enter the big mouth. There is a triangular slot similar
to the pillar statues, an aperture and a wheel with icons. Use stone key
on triangular slot. Turn the key once and see the mark changed to one
similar to the ones at the wheel of the statue pillars. The aperture lit
up. Look through the aperture. Do the procedure of turning the key and
looking at the aperture repeatedly and note the icons and the
corresponding place seen in the aperture.


old city cliff large trees volcano

 This setup
looks like telephone central. Take the key and exit. Look at the
large tree in the background (trigger for large tree destination) with a
large object (?loudspeaker) in the tree crown. Go to the jungle and click
on large tree destination.


Large trees – Look at
the pillar statue and note the different icons in the dialing system. Go
to the foreground and hear voices. Talk to the stickman. You nearly sat on
Grouchy Wick, the smallest stickman, Willow is the middle-sized stickman
and Woody, the youngest and supposedly the stupidest of them all. The
rumbling noise is the snoring of  Q’aman, the giant who was banished
by the Orlowol, the crabs from the village. So, we have to wake up
Q’aman.

           
To wake Q’aman using the communication system: After looking around
the 3 pillar-statues, we can deduce that the top wheel of the statue’s
base-dialing system is for sending a message and the bottom wheel is for
receiving  a message. All the statues have damage on the wheels and
only the large trees statue has an intact icon for itself at the bottom
wheel to hear from that same location. The end call should be at the
volcano, so that the message can be broadcast all over the island and be
heard by Q’aman wherever he is. Only the old city statue has a volcano
icon at top wheel. After noting what icons are intact in all statues, the
best route to send a message is from large trees – cliff – old city –
volcano.


Use the statue key on the statues. Then
click on the left arrow to move the top wheel and the right arrow to move
the bottom wheel. Take the key after the correct icons are placed.


        Large trees
statues: Top wheel to send to cliff. Bottom wheel to receive from itself –
tall trees.


        Cliff statue: Top
wheel to send to ruin. Bottom wheel to receive from large
trees.


        Old city statue:
Top wheel to send to volcano. Bottom wheel to receive from
cliff.


Use the mouth icon on the tall trees
statue’s ‘ears’.


Watch April’s shout go
throughout the island and wakes Q’aman. Talk to Q’aman using the large
trees statue’s ears. Go to Quiet Giant Glade and talk to Q’aman face to
face. Talk to him until you ask him if he wants to live back in the
Orlowol village and to help the crab in pain. Watch Q’aman help the
Orlowol and be invited back to stay at the cliff, so that he can enjoy his
favorite pastime of fishing. Go back to the stickmen in the Large trees
destination.

Climb the tree. Look at the
mountain path and the wooden crossbow. Go back down and talk to Wick about
the crossbow. They go back to work on the lunar cannon. Follow them and
talk to Wick. They need a bowstring preferably from animal guts. Go to the
cliffs.

Cliff – Talk
to Q’aman. The fish are not biting today because he does not have a lure.
Give Q’aman the candy wrapper. He will lend you the fishing rod after he
catches fish. Exit and come back. See that Q’aman had finished eating his
catch. Take the fish bones and the line from the fishing
rod. Go back to Large Tree.


Large Tree – Give the
fishing line to Willow (middle one) first and April will say show it to
Wick. Click the fishing line to Wick. (The game will not let you give it
first to Wick). They continue to work and when finished, talk to each of
the stickmen. Wick will tell you to go ahead and test it. Combine the fish
skeleton and rope in inventory and then click it on the lunar cannon.
Click on the lever by the fish skeleton. The fish skeleton is propelled to
wrap around the tree at the mountain path. April gets across using the
tightrope.

Mountain path chasm
Talk to the Alatien guard. He will not help you get to the village of
Tama’a. Look at the updraft on the chasm and notice the leaves and dust
caught by it. Hmmm! Use the wind potion on the updraft and then use the
light as a leaf potion on April. Watch April leap across. The Alatien asks
if you are the Windbringer. Go through the tunnel entrance.

Village of Tama’a – Talk
to the old Alatien sitting by the entrance. Go to the castle. Talk to the
Alatien child, Sa’ena who had learned her first tale early than the other
children. Go to extreme right of screen and talk to young Alatien woman,
Neema about Isam, the chasm guard. Talk to the castle guard about being
the Windbringer. He will give a test about the 4 tales from the 4 corners
of the world. Ask to prepare. Go back and talk to the Sa’ena about the
tales of Stars, Neema about the tale of Homecoming, old man about the tale
of Sea and Isam, the chasm guard about the tale of Winds. Talk to Isam
again about Neema. Go back to the castle guard and take the test. Tale of
winds – the mountain is Mount Bak’taana, the tower of light. Tale of Stars
– Mo’naa saw the spirits of the 5 tellers. Tale of Sea – the creature is
Octa’wo. Tale Homecoming – a broken pot. Enter the castle and talk to the
Teller. Exhaust all dialogues with the Teller. There are 4 Draic Kins –
The White and the Blue in Arcadia and the Red and the Green in
Stark.

Find yourself and the castle
guard at the city in the hole by the Old City ruins. Watch the
reunification of the Maerum and Alatien. They give you the combined stone
disk – Alatien stone. The Maerum brings you to their sleeping God
under the ocean.

You  face a large rock.
Look and touch large rock. The sand covers the lower portion, use hand on
sand to uncover a small blue orifice. Talk to the small orifice-sensor and
the large orifice opens up on top of the live rock. Enter the large
orifice. Find yourself dry and in a room with air. Examine the circular
protrusion (eye) – I know you! Talk to
the blue dragon. He wants to rest until the Day of Ascension. He gives the
blue dragon’s jewel. Guardian realm had a doorway and it moved to
the sky. The Dark people prepared a map for the entrance to the Guardian’s
realm. The Ancient Blue Dragon brings April to the ship of the Dark
People.  Talk to the cloaked Dark Man. Who are you? He gives
the star map of the entrance to the guardian’s realm and the
dark people stone. One mission done – to find the way to the
guardian’s realm. Sleep.


Chapter
9 – Shadows


The Dark People
delivers April to an empty port of Marcuria. Smoke rises from the city.
Try to go to the city to check. The dark Chaos cloud rises and comes
towards April. A shift appears and April escapes.


Hope St.
Cathedral
– Talk to Father Raul. Cortez has not been seen for a week.
He is  Sentinel. Go to Border House.


Border House
– Enter, find Fiona crying and Emma shouts for you to run. Before you can
do that, a Vanguard arrives. Talk to Gordon Holloway. He knows what you
did and have taken from Arcadia. He eventually orders Emma shot. When
Mickey arrives, automatically run upstairs. Tell Zack to get out of the
way. Zack is the one who brought them here and also gets shot. Enter your
room, open the window, look and jump to the river.


Find yourself by the
water pump machine and a Vanguard is at the door. Take the invisibility
potion and click it on April. Run to the bridges and then, now visible to
the Cafe. Before you get to the Cafe, the Vanguards have you surrounded.
See the mystery door opening and a Shift occurs. Run to the mystery door
and enter.


Mystery door
– Talk to Lady Alvane. This is the House of all Worlds – a place that is
between and everywhere. Emma is not dead. Adrian the Guardian is being
held by the Vanguards. April goes through the door to Arcadia.


Chapter
10 – Rebirth


Back in Marcuria,
check the Inn. Go to the city, find the marketplace empty and the doors to
the temple locked. Go to City Green and talk to Abnaxus, the Venar. He
gives you the Venar stone. One of the missions accomplished – to
get all 4 stones. The future is veiled for him now. Go to Westhouse
bungalow and talk to Brian. Go to the Enclave.


Enclave
Library: Talk to Minstrum Yerin. Vestrum Tobias was murdered. Go
downstairs to the pool and look at the wheel. Go back up and ask Yerin
about the wheel.


Enclave entrance: Look down again at the medallion engraved on the
floor. Now to do one of the missions – to combine the 4 disc. Take stones
and place them on each of the four circular hollow. The stones will flash
over the correct hollow. Something happened but did not to
completion.  Look at the dirty stone dragon. Something is blocking
the mouth of the dragon. Call Crow with the flute. After listening to Crow
gripe, pick him up and click him on the stone dragon. Hahaha! Crow cleans
the bird droppings and the stone dragon release fire. The 4 stones melt to
form a stone disk. The hot stone disk drops into the pool below.


Go downstairs and
talk to Minstrum Yerin again to unlock the wheel. Go down and turn the
wheel. The water drains out. Take the stone disc. Now, we need the
4 Dragon jewels to complete the key to the guardian’s realm. Go to the
city and see an army heading to the city and has blocked the roads. After
much effort, April succeeds in making a shift.


Chapter
11 – Kin

April finds herself
in the studio at the Academy. To create a shift, get April to do what she
does best. Take the paintbrush and palette and click it on the canvas.
Mother is dying. Who am I? April is Kin. April takes her blue eye, the
White dragon’s jewel. Mother dies, April mourns and Sister comes to
life.


Time to find some
one to decode the star map, defeat the Vanguard, get the 2 Stark
Draic-kin’s jewels and find the Adrian, the Guardian. Go to Burns Flipper
to get the ID.


Burns Flipper
– Talk to Burns and get the fake ID card. Give him the star map.
Burns will get a friend to check the age of the map. He needs the time the
map was made so that he can get the correct coordinates of the cross in
the star map. Exit and take the Metro Circle stop on the subway. Time to
check out MTI at Grendel Avenue and see if the fake ID works.


Metro Circle
– Go to the elevators on the left of the screen. A cop stands by the
entrance. Go through the elevator doors. As soon as April gets off the
elevator, see a kid throw a pizza box at the garbage bin at the foreground
of the screen. Go to the subway but they would not let you in because of
dirty, stinky clothes. Go to the Fashion Boutique – clothing store at left
of screen. April comes out in her new clothes. Take the pizza box
at the trash bin at the foreground. Take the shuttle.


MTI – Ask the
cop for directions to MTI. Take the street exit. Inside the MTI building,
talk to the receptionist, Gerold-Jerry. Ask to see Jacob McAllen. Jerry
won’t let you in until you show him the pizza box. April gets in the
elevator and out to McAllen’s office.


McAllen’s
office
– Look (use hand icon, yes! hand icon) at his desk. An alarm
sounds and McAllen enters. After a while, April tries to escape. McAllen
has the 2 other Stark Dragon’s jewels. McAllen’s master plan is based on
Gordon Holloway.


Vanguard
laboratory
– They enter a room used to make warrior shifters. April
gives the disc and jewels to McAllen. McAllen uses the computer at the
middle of the room and places the jewels and disc in a lit containment
chamber at the center of the room. He insists on finding about the gateway
to guardian’s realm. He leaves. Immediately, look at the computer that
McAllen used. A Vanguard experiment-creature comes in and goes for April.
Use the hand icon on the computer and the left door opens. April runs out
automatically.


Run to the walkway
at bottom right of screen. When April cries for help a blue light hits the
creature and it falls off the building. Talk to Cortez. He escaped his
prison last night. Gordon Holloway is the next guardian but the Vanguard’s
experiments on him split him into 2. Logic in Stark and the Chaos vortex
in Arcadia. McAllen comes out – Family reunion! Listen to Dragon
talkssss.  Yes – the red kin is Cortez and the green kin is McAllen.
They fight and drop off the tower. April mourns Cortez. Go back to the
laboratory and use the computer 2xs to open McAllen’s containment chamber.
Automatically, take the complete stone disc with all 4 dragon
jewels on it. Take the elevator at bottom right of room. Exit the area and
go to Burns Flipper.

Burns Flipper
– The Vanguards with Holloway shot Burns and took the map. They threatened
Burns and he told them about April coming back. Burns made a copy of the
map and showed it to April on a screen. The anomaly not found in any star
map is close to Morning Star, a transfer space port. Holloway is taking
the guardian on the space port. Burns dies. Go back to Metro Circle and
the elevator.


Metro Circle
building
– Enter the elevator. Go to the Tubes exit at center of
screen. Talk to the colonization representative. Register as a colonist.
There is a ship bound for Bokamba 8 that will transfer at Morning Star.
Watch the shuttle leave Earth to land at a big colony ship.


Chapter
12 – Dreamland


Look around and see
a guarded terminal exit, a lot of colonists and a locked ladies room.


Men’s room
Enter the men’s room.  Look at the dispenser on the left wall. Use
hand on dispenser and then use cash card to get  Instant heat
for manly vigor. Push the left trashcan to reveal the grill behind it. Use
the coin from a lighter inventory on the grill. Open the grill and enter
the passage.


Passage – As
soon as you enter, look at the lit screen on the left. Study the map.
There are 3 lit green circles connected by lit lines – men’s room, service
duct #1 and #2. Click on Service duct #2 and see a guard drinking coffee
in a room full of surveillance monitors. Click on hatch to go back and
click on Service duct #1. Come out of a duct to a passageway with a
surveillance camera. Pull on cable of surveillance camera. The monitor
goes out in the guard room. A guard comes out. Immediately enter the duct.
Go to the map and click on service duct #2. Place Instant heat on the
coffee mug of the guard. The guard comes back and brings you back out to
the lobby. Go back to the Men’s room. Enter passage and click on service
duct #2 again.


Monitor room
–  Watch the guard drink the loaded coffee. He has an emergency!!
Check the computer screen at the corner.  Cell #5 has ref. G.
Holloway – the Guardian is there. Check the coat to the right of the
computer screen and get a magnetic key. Look at the security map on
the left wall. The cargo bay, airlock and cell block have a guard. Click
on cell block guard’s red button and select ‘order off-duty’. Note that
the rest area now is lit red and the cell block is green. Only one guard
can go off duty at any one time, maybe the room is small and can only
handle one guard at a time. Go outside to the far corridor in the
background.


Cell Block
Look at the electronic lock on a stand outside cell #5. Open the panel of
the electronic lock and use the magkey on the lock. Adrian, the Guardian
comes out. Talk to him and he will follow
you.           
Exit left and go back to the monitor room. Go to the security map
and get the guard at rest area ‘order to off duty’ to go on duty at the
cell block (got that?). Then, order the Airlock guard off duty. Go back to
the far corridor, pass the cell block and continue to the right. Go down
the hallway and right – remember Adrian is slow.

Airlock
April talks to Adrian and she will prepare. Go to the red Load pad button
on a panel at the foreground. Press the red button and the pod opens at
right of screen. Examine the pod. Look at the red light on the pod and
learn that an oxygen filter is
missing.            
Go back to the monitor room. At the security map, order the rest
area guard to go off duty and then cargo guard to go off duty. Go outside
and take the left corridor, left of security camera at left of screen. Go
to cargo bay.

Cargo Bay
Look at and then use the computer terminal in the foreground. The oxygen
filters are at L-10-9. Go to the upper part of the room and look at the
far cabinet facing forward (even more boxes) and April will read the
shelve bin numbers. When she finds L-10-9, click on the cabinet to get an
oxygen brick.


Go back to the
monitor room. Order the rest area guard to go off duty and then air
lock guard to go off duty. Go back to the Air cargo.


Air Cargo
Place the oxygen brick on the pod. A yellow button lights up on the Load
pad panel on the left foreground. Press the yellow button. Adrian gives
warning of the 3 trials before the Well of Making. April has to prove her
worth to the Balance. Trial of Might – to defeat a powerful enemy using
might and magic. Trial of Spirit – to face that you fear the most. Trial
of Matter – cross an insurmountable barrier. They may get separated and
April must go to the Tower by herself. Watch them float towards the
anomaly followed by another life pod with Gordon Holloway, enter the
wormhole and then a shift.


Chapter
13 – The Longest Journey


April finds herself
in alone in a barren wasteland. Check the broken pod. See the long tower
reaching the sky far off the horizon. Walk towards the tower at the center
of the screen. See the second pod but Adrian is nowhere. Click towards the
tower.


Trial of
Might
– Face the even larger Chaos vortex. In inventory, combine the
bind magic potion and the talisman. Click the enhanced Talisman of Balance
on the Chaos vortex. The Chaos vortex gets sucked in the Talisman. Click
on the other side of the chasm and April will automatically find a way to
the other side. Go towards tower.


Trial of
Spirit
– April finds herself in the kitchen of her home when she was 8
or 9. Watch her father call her to come. Talk to daddy. Give him the gold
ring. Watch and learn what happened when she was a baby. April passes this
trial when she forgives her daddy. Go towards the tower.


Trial of
Matter
– There is a large canyon circling the base of the tower. Look
at the cone structure at the base of the tower. Look at the canyon and
April wants to have a look down there. Maybe, we can call our faithful
reconnoiter. Use the flute. Crow comes out of a shift. Listen to crow
express his feelings. Talk to Crow and find out what happened in Arcadia.
Pick up Crow and click him on the canyon to check what is underneath the
fog. He finds nothing – absolutely nothing. Pick Crow again and click him
on the cone structure. He finds a magical well on the other side on top of
the cone structure staircase under the floating tower. It is the Well of
Making. April says that Crow has a good idea of using the Well of Making
to create something. Pick Crow up again, click him on the Well of Making
and ask him to get some water from the well. Don’t swallow! They made a
deal of a year of flea plucking. He comes back with a beak full of water.
Hahahaha!  Pick him up again and click Crow on the canyon. A bridge
forms from the tower base to the cliff. Crow disappears.


Well of
Making
– Cross the mist bridge. Use hand icon on the Well of Making.
Place the stone disk on the Well of Making. A hand appears. Touch the
hand. Nothing happened. Another hand appears and touches the hand on the
well. The disk turns over and they rise to enter the tower. Gordon
Holloway clings to the bottom of the disc.


Tower – April
feels cold. April accepts her fate to be the thirteenth guardian. She
walks towards the edge of the disk and the tower should accept her.
Nothing happened again. Adrian believes that she is not the 13th Guardian.
Gordon Holloway enters and states that he is the next guardian. He feels
hot. His mood fluctuates, he hears someone call his name and he gets upset
that April brought something with her. He advances towards her and Adrian
stops him. Use the Talisman of Balance on Gordon. The chaos vortex is
released and enters Gordon. The logical, orderly Gordon is joined with the
magical Chaos. He is in balance. I am Balance.
Gordon accepts his destiny as the thirteenth Guardian. April is at a lost
as to what she is now. Adrian will stay for the changing of the guard.
April crosses the mist bridge and walks away from the tower. Crow arrives.
A light comes out of the tower. April looks back before going into the
light.


Epilogue


Lady Alvane ends the
telling of her tale. Gordon Holloway was the Last guardian. The Worlds
were reunited during his reign. When the listeners departs, see an equally
aged Crow enter to join Lady Alvane. Strange to remember… April
Ryan.


Well, you’ve got
me, Crow. Isn’t that something?


This
document may not be distributed without express written permission of the
author and the content may not be altered in any way.


For
Questions or Comments on this Walkthrough,
Please write to: MaGtRo


Copyright © 8/2002  MaGtRo

Other guides for The Longest Journey