The Legend of the Prophet & the Assassin
a
By Paulo
Coelho and arxel tribe
Walkthrough by MaGtRo
October 1, 2001
Game
Play: Right click of the mouse will show on top of the page – “Bag”, that
contains things that are collected during game play; “Actions”, has
objects needed for fast action, “Shield of the Templars”, contains the
possible dialogues and the “Main Menu Icon”. To move back from a close-up
view, move the pointer at the bottom of the page and click the closed eye
icon. Save often, especially on action scenes because you can die. If you
cannot move the cursor to go to another frame, right click the
mouse.

Background
Tancrede de Nerac, a former Knight of the Templars has become a
lawless desert pirate and has taken the name As-Sayf derived from the
sword he carries -the Arabian scimitar. After years of being a mercenary,
he becomes disillusioned. He heard of a prophet, Simon de Lancrois who is
supposed to have collected a following of people of different races and
religions to build an ideal city away from the world. Impressed by this
dream, he leaves his companion in arms, Caradoc and goes in search for the
city where the followers of Simon the prophet is supposed to
be.
Jebus
Tancrede de Nerac aka As-Sayf wants to see the prophet’s dream in
the city of Jebus.
As-Sayf arrives in front of the chained gate of Jebus riding on his
horse, Phorbas. On the left side of the gate, a plaque can be seen.
Clicking on areas around or in the plaque will hear how the people joined
together and the dreams they have for the raising of the city of Jebus. On
the right side of the gate, a little behind the horse, is a wall
inscription charging Simon de Lancrois of being a “murderer”. Note the
bricklike protrusion.
An oasis with a well is seen to the left and beyond that is
a discarded caravan. Inside the caravan, pick up the rope, adze and tineul/metal bar. Look inside the
chest and get the big key.
Go back to the gate and place the tineul on the center of
the chains. Click the rope on top end of the tineul. Click Phorbas on the end of the
rope. Enter the city.
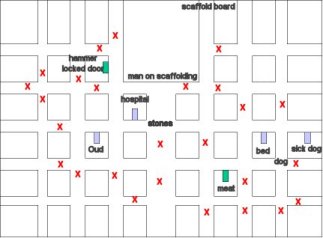
Map
of Jebus
Explore
the city at leisure and enter doors, listen to the memories of the
inhabitants and learn the progress of the prophet’s dream.
Tie
Phorbas to bar. Sawing and hammering can be heard. Turn left, move forward
3x, turn left, forward once and turn around.
See a hungry dog. Turn right, move forward 2x and turn left.
Enter door and get meat from barrel at corner. Go back and feed the meat to the
dog. Follow dog – Turn right, forward 5x, automatic right, forward once,
automatic right, forward 3x, left, forward 3x. Look up and look close at
the scaffold board. Use sword on board. Now, how to get up
there.
Turn back, forward 3x, right, forward once, right and see a man on a scaffolding. Let’s talk
to him. Click on man 2x. Look down on the left and pick up stones. Click
stones on man. He dropped something. Forward, turn around and look down,
pick up oil gourd.
Turn right, forward once, right, forward once, left and
enter door. Pick up hammer. Turn left, go to locked door. Click Big Key on oil gourd
to get oiled key.
Use it on locked door. Enter and get ladder.
Go back to the scaffold door
that the dog showed you. Place ladder against the wall. Climb
up. Walk the scaffolding until the next ladder. Look up and see the
old man ready to clobber you. Prick him with the sword. Save
game!
Climb up and turn around to
see the man try to break the planks with a pail or rocks – immediately,
cut the rope of the pail with sword. He is really unfriendly!
Walk forward using only the
sturdy brown planks. Climb up and walk forward until the cliff edge. Look
up and place rope on ring on the bar. That’s showing
him!
Move forward until cave entrance on the left. Poke curtain
with sword. Click on old man and then select dialogues on shield –
Theodore, Jebus, Simon. He goes to sleep on us, must really be tired. Pick
up bucket. Go back
to cliff edge. Pick up plank on the right side and place on cliff edge. Cross plank and
get rope again. Walk
the scaffolding 3x and pick up the mass/hammer wedged between the
planks.
Go to well at the oasis outside the city. Combine bucket and
rope and use it on the well wheel. Click on rope and pick up the
bucket full of water.
Go back to the wall inscription outside the gate. Combine
mass and adze and use it on the protruding brick. Pick up Pearl Box.
Go back to sleeping Theodore. Click bucket of water on
him. Click the Simon dialogue on Theodore. Pick up nail. Click nail on Pearl Box.
Click on letter and read the words of Simon de Lancrois. He explains his
actions. Click on Theodore again.
As-Sayf burns the dream named Jebus. Theodore tells As-Sayf about
one man who might know where Simon is – Qamar who lives at the Street of
Four Pearls in Jerusalem.
So,
As-Sayf looks for Simon, embittered because of destroyed Jebus and his own
broken dream.
Cd
2
Jerusalem
Souk
As-Sayf goes on search of Qamar to lead him to Simon.
You
cannot take the horse in the souk. Click the selection of dialogues on the
boy. Give him the dinar to
take care of Phorbas.
Turn around, forward 2x and left to the souk. Talk to the
man in the blue robe on the left. He wants the chest that the goldsmith
has. Go to the Goldsmith – He asks – Are you clear-sighted in
spirit? He asks for your help about a coded message and you say
Yes.
Talk to the herbalist and he will give you a puzzle to solve
– say Yes.
Herb puzzle – He asks that you
place the five herbs on the parts of the drawing that it will cure.
Chelidonia – with
the master of the skies, light enter where there’s only darkness,
reveals hidden senses and unties the most tangle hanks – place on
eye area.
Artemisia – bruises
her father (Mars) gives her like a ram, is a good antidote – place on
top of head.
Green anisen – kept
by the man of the moon, planet of childishness – place on abdomen. St. John’s wort – recommended to
weary travelers – place on leg. Mallow – keep their voices harmonious – place on throat.
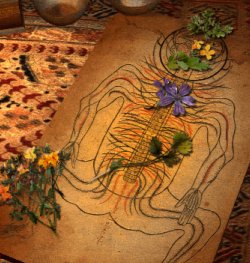
Note the hanging herb – it looks like Chelidonia, the
herb that reveals the hidden senses. Aha! The herbalist will not give a
cutting of it. When the herbalist bends down, use dagger on hanging herb
and Chelidonia will
be in the bag. Combine chelidonia and coded message to get
uncoded message.
Talk to
the other merchants on the street. You can get a lemon from the fruit
seller. You gather from the talks that Iblis, the tea drinker can help,
was wounded on the leg and was previously a horseman of the ousted sultan
of Jerusalem. Iblis greets you as a soldier under Ubak Khan, the new
leader of Jerusalem, asks if you are a soldier guarding Jerusalem and if
you get his medicine from the herbalist he will be your guide. When you
give him his medicine, he will ask to have a drink with you. If you
refuse, he will not help you. If you agree and drink, you will be
poisoned.
Give the uncoded message to the goldsmith and get the
small box in return.
Give the small box to the man in the blue robe and he will take you to the
Street of Four Pearls.
Street of Four Pearls
As-Sayf finds out where Qamar is.
Enter the street to the right. Enter the brown gate on the left
where the sound of a blacksmith can be heard. Talk to Taleb, the
blacksmith. Walk to the table and look at different metal objects and go
back to Taleb and talk to him again. Isaac will come out. Walk to the
fireplace and look at the metal rod on a stand. Talk to Isaac, the
cabbalist using the shield dialogues. Then talk to Taleb and he states
that they are making a golem to get Qamar out of prison. You find out
about their plan to free Qamar from prison. Go to the table opposite the forge and pick
all the parts that
are not spear points. Let us see how well this plan is.
Golem puzzle
– Go to the metal rod on a stand at the fireplace and
construct a golem. Place the torso, head, then the first right
part, second right
part, right
button and then first left part, second left part, left button, third left part, fourth left part, fifth left part.
Isaac is proud of his
work, so let us see how well. Pick up the bucket of water by the right side
of the forge and a sword by the left side of the table that had the metal parts.
Save game!! Place
the sword on the golem’s hand. Whoa! Heeding Isaac’s words to
remove the inscription – pour bucket of water on his head. It was an
interesting plan anyway! Now, it is As-Sayf’s
turn.
Souk
As-Sayf sets out to free Qamar.
Go forward to the cart. Pick up the iron stick on the cart and the
oil lamp on the ground. Click iron
stick on the lock of the herbalists shop. Enter.
On the floor, see mouse and pick up glass flasks and the brown pot of hawthorn
pollen. On the
shelf, pick up measuring
glass. Open the
left cabinet and pick up the brown vase like container of water of bistorte. Examine the parchment on the right and see the
formula for something – a.b.a.b – brown pot, brown vase like
container, brown pot, brown vase like container. Now, lets mix one up and
see what we can come up with.
Formula puzzle – Place measuring cup on the counter. Click on the measuring cup –
hawthorn pollen once, water of bistorte once, hawthorn pollen once more
and water of bistorte once more. Wow – smoke! Click a glass flask on the
mixture. Now let us test it! Click filled glass flask on mouse. It is now
a narcotic
flask.
Jail
As-Sayf meets Qamar.
Turn left and look up. Click dagger on icicles. Combine icicles and
narcotic flask to get narcotic
icicles. Inventive! Turn right and go
forward. Turn left and pick up the sling hanging on a rafter.
Combine the sling and narcotic icicles to make sling with narcotic icicles.
Look close at the guards and see them drink from a water reservoir
filled by a drainage pipe. Click the sling with narcotic icicles on the
light at the middle of the watchtower. Save Game!! Click sword on guard
that is ready to skewer you. Go to guard and click dagger on his left
shoulders to get 10 keys.
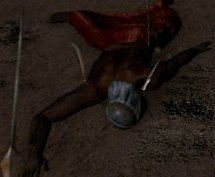
Enter watchtower and use first silver key to open door. Go to
the third cell on the right and use the second blue key to open the door. Talk
to Qamar using the shield dialogues. He says that he maintains an active
link with Simon through An-Nab, a caravan driver. To find him, Tancrede
must do some calculations in his library and observe the stars when Sirius
looks at himself. Also, Qamar expects that As-Sayf will be of help to his
prophecy. Picking up a small crystal
ball, Tancrede
departs.
Back
at the blacksmith shop, talk to Taleb. Isaac will take you to Qamar’s
library.
Library
As-Sayf looks for the location of An-Nab, Qamar’s link to
Simon.
Talk to Isaac. He says that Sirius is a star in the Great Dog
Constellation and is connected to end of winter and coincides with
high waters of the Nile. He tells you to find a map of the skies. Turn
right and go to the bed and a get key. Turn left and remove fruits
off a bowl on a stand and see a star map with animals and other drawings.
At the center of the bowl are the different constellations.
Pick up the large crystal
ball and toothed wheel from the bookcase
across the room and the small
case from the shelves on the long wall.
Click the key on small case and get the
sky map frame and disks of
the cat, boar, knights, dragon, stag,
stork, hare, hawks, mermaid, peacock, donkey and sheatfish.
Star map puzzle – Place the sky
map frame on the desk. Starting at the one o’clock position going
clockwise, place boar, stag, hare, knights, donkey, mermaid, dragon,
peacock, hawks, stork, sheatfish and cat on the holes making a
metallic star map.
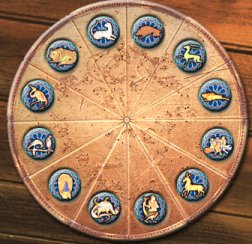
Go to
the ornate brown door with the inverted triangle. Place the metallic star
map on the gold knob below the triangle. Turn the map until the triangle
points to the knights and the wooden triangle protrudes out.
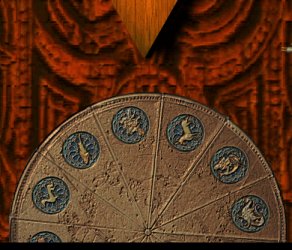
Click
on triangle. Place the small crystal ball on the eye socket of the
robot.
As-Sayf pushes the robot out to the veranda, under the starry sky.
Place the toothed wheel in the back of the robot and turn the rectangular
box to winter.
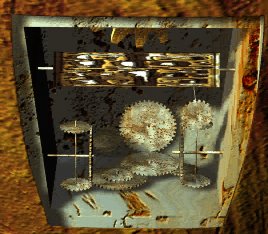
Go to
the front of the robot. Place metallic star map and large crystal ball on
robot’s hand. Turn the star map until the reflection of the stars above
caused by the crystal ball coincide with the indentations of
constellations on the star map. An inscription is reflected on the sash of
the robot.
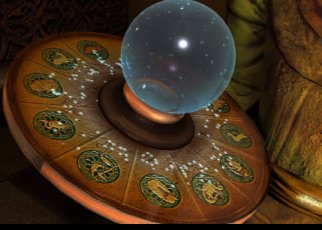
Click on inscription –
Jerusalem. That is where An-Nab is.
Palace
As-Sayf fulfills Qamar’s prophecy.
Walk
to the guards and talk to the left guard, Madrus. Give him the sword and
dagger. Talk to Rajib, the chamberlain. Ambitious! Enter the door and see
Ubak Khan and dancing girl. 3 Puzzles are to be done to prove royalty in
order to face the Khan in battle.
Wax doll puzzle (soul
-magnanimity and insightfulness test) – turn left and look up to the
hanging lamp. Click on lamp and click wax doll on
it.
Scale
puzzle (mind –
equity and good judgment test) – place equal weights on each pan of the
scale. There are a total weights of 52 made up of 18, 10, 10, 9, 8, 7, 5,
4, 1. Each pan should have 36. Place 36 on the right pan – one variation
is 18, 10 and 8. Open the drawer and get lighter. Saved Game
here!!!
Speed puzzle (body – coordination
test) – Turn around and pick up the bow
and arrow lying on the carpet. Turn to
left and face Khan. Immediately click bow and arrow on
bird.
As-Sayf kills Ubak Khan. Talk to Rajib about Qamar. Free Qamar and go with him to the
caravanserai to look for An-Nab. Madrus is still As-Sayf’s loyal
follower.
Caravanserai
As-Sayf meets An-Nab.
Move forward, turn left and note the rag/robe on the ground.
Talk to the sitting man behind the camels. Turn around and pick up the
torch on fire.
Talk
to other man selling a falcon. Turn around and note the falcon on the
stand with eye cover and leg shackle.
Move forward and talk to man standing in front of tent. He
says that An-Nab is tending his goat. Enter the goat pen and see Isaac,
Tahib and a man tending a goat. Talk to kneeling man – An-Nab. He says
that Simon went to Ayn as Sarrah and gives you a brooch as instructed by
Simon. Exhaust all dialogue with An-Nab. He said to look for a map to find
out what and where Ayn as Sarrah is.
Exit pen and go to the last tent and talk to Qamar. Pick up
iron needle
lying on the ground. Note reclining “Lady”.
Go to vats behind the goat pen. Pick up dung pancakes and
mouse.
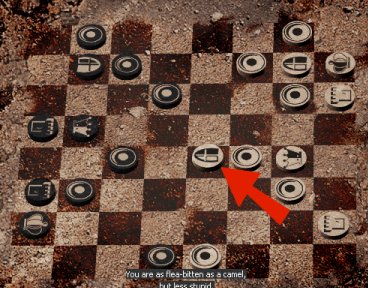
Go to 2 men playing chess. Pick up magnifying glass. Talk to
the man on the right about maps. He will give you the map if you win the
chess game.
Chess puzzle – Move shield on second brown row to fourth brown row from
the right.
Take
map from bag. Look at brooch – it is made up of 2 parts of similar
design that is opposite each other. Use magnifying glass on
brooch.
Brooch puzzle – Look at it with your mind’s eye (1) and your real
eye (2), flatter it with your strongest hand (5) and you will
understand. Use iron needle on numbers and depress numbers 1, 2 and 5. The
brooch closes and becomes an eye.
Click brooch on map to pick up map. Click brooch on close-up view of map
and note the position of Jerusalem, Cairo and
Alamut.
Talk
to Qamar again. Qamar talks about Ayn as Sarrah, the old man of the
mountain.
Go to
the goat pen and talk to Tahib and An-Nab. Say yes to the requests of the
caravaneer to rid an oasis of ghouls as payment for taking As-Sayf with
him to Alamut where Simon is. Talk to Tahib again. He needs black, white
and red sulphur to make a weapon to protect from ghouls. Qamar said that
he saw black sulphur where they were before.
Go
back to the last tent and talk to the reclining “Lady”. In exchange for
the black sulphur, she wants a bird of prey and gives conditions on how to
get it .
Falcon puzzle – Go out of the
tent and click mouse on bottle outside the tent. Go back to the rag/robe
outside the first tent near the gate. Combine dung pancakes and torch on
fire to make dung pancakes on
fire. Place dung pancakes on fire on the
rug. Go to the falcon and click on the leg strap and eye cover.
Talk to the lady again and get the black sulphur. She also says that
Rajib has other colored sulphur.
Palace
As-Sayf goes in search of the red and white sulphur.
Rajib
advises As-Sayf to learn more about his enemies and in front of him is the
text to do so.
Puzzle to learn about the ghouls – Get carafe from table. Open case and get ink bottle. Fill
empty metal pot with the ink and click carafe on ink. Click on the words
and learn the ghouls want of water and how to fight them with 3 stones
with the color of Tradition.
Rajib
gives the red sulphur. A soldier that went in search of ghouls thinking
that they have a jewel in their forehead stole his white sulphur from him.
He also advices to use the white stone only on daylight for ghouls hate
sunlight and possessing the 3 stones, fight ghouls only if there
are more ghouls than you.
Blacksmith shop
As-Sayf gets protection for the fight with the
ghouls.
Back
at the blacksmith shop, click on Tahib and give him the sword. In order to
help, Isaac will make a talisman with the mark of As-Sayf’s personal angel
and a parchment to be burned in case of danger and a miracle will
occur.
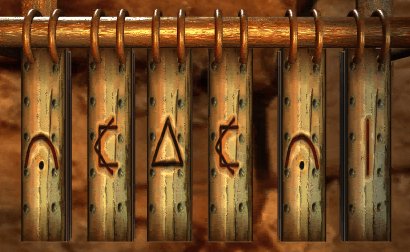
Sign of angel puzzle – The
sign of your angel begins on the right by a sign without angle or curve,
does not end in a circle, has two ligatures which do not join, and a
triangle between the two parts of an octagon. Find the seal…. From
right to left – line, arch, part of octagon, triangle, part of
octagon and then arch.
To
aid in fighting the ghouls, Isaac gives the parchment and talisman and Tahib gives the sword.
Qamar adds his wishes.
Cd
1
Oasis
As-Sayf fulfills his promise to An-Nab.
Ride Phorbas. Once at the oasis, turn around and cross the river.
Turn left and use sword on the bush. Turn around and pick up the
turban. Go back to the other side of the river to the horse. Turn left,
forward 2x. Turn around, look down and pick up the wooden branch in
front of the rock. Turn around again
and move forward 2x. Turn left, look down and see a rock. Combine wooden
branch and turban to make a torch. Place bush on rock and use
lighter on bush. Click torch on bush on fire to make a burning torch.
Look
up and go forward. Go down the stairs. It is good to have a (sun)light
here.
Turn left and go to the far pond. Look left and down. Use
sword on water plants at center of the pond. Look close on hand. Use sword
on hand and get white
crystal. So that is what is left of the
greedy soldier. Go back to the waterfall. It is getting desperate here!
Click the parchment on the waterfall.
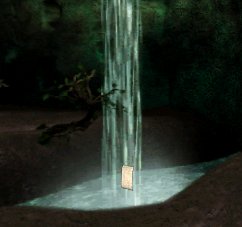
Ghoul
fight – Move
cursor to the brown circle on the ground by Ay-Sayf’s right on top of the
screen. Herd the ghoul to the other side of the water to join the other
ghoul by clicking on the brown circles, rocks and the brown circle on the
other side of the water. Once face to face with the ghoul, click on the
ghoul.
As-Sayf kills the ghoul. Promise fulfilled.
Meet
Kyot, the poet. He wants to immortalize As-Sayf.
Sounds of horses are heard. Attack coming? Meet Caradoc, As-Sayf’s
comrade in arms.
Talk
to Kyot, An-Nab, and Caradoc about the old man of the mountain.
As-Sayf dreams and faces a Jinni throwing fireballs.
Dream
fight puzzle –
Click on his old friend Caradoc, the one that can help him fight.
The
End
of
The Legend of the prophet & the assassin, Part 1.
(The
story will be continued in Secrets of Alamut, Part 2)
This
walkthrough will be updated frequently.
This document may not be
distributed without express written permission of the author and the
content may not be altered in any way.
For Questions or Comments on this Walkthrough,
Please
write to: MaGtRo