The Forgotten
THE
FORGOTTEN WALKTHROUGH
THE BEGINNING
written by N. Kuderna, Ozma, and Linda Shaw
November 22, 1999
SYSTEM REQUIREMENTS:
Windows 98/95
Pentium 133 MHz
16 MB RAM
8X CD-ROM drive
This is not a step by step walkthrough but it will give the
necessary steps to finish the game. There are many interesting things to
look at and read in this game which helps to involve you with the excellent
storyline. After watching the introduction you will see 3 cards.
Click on the middle one to begin the game. The left one gives you
instructions and the right one will give you more history of the story.
While playing the game you can access your options by using the space bar.
It is helpful while playing the game to move some of your inventory items
to your inventory storage to make more room to be able to pick up more objects.
BEGINNING:
STUDY: You will begin the game in
a study. Look around the room and then head toward the desk. Look
in the box and read the letter from Richard. Click on the pages to read
more of the letter. Pick up the items in the box. Look in the desk
drawers and read the note that you find there. Click on the card lying on
the desk pad. Once you do that you will end up on a deserted NEW ORLEANS STREET. Explore this street and check
out the dumpster. Go into the building across the street from the hotel
and dumpster. Look around that room and play with the drum, the bones on
the bar and try to enter the Fortune room. Find the red rug on the floor
and click on it. Solve the puzzle. See picture below:
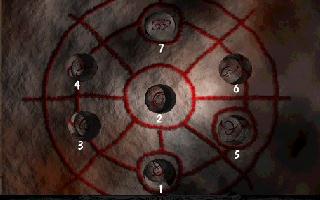
Once you click the symbol buttons in the proper order a panel will
open and you will be able to enter the SEWER.
Go down and forward until you come to an open area and turn left. Go
forward and to the left. You will find a table with an anvil. Go to
the left a little more and find another table above some tools that are on the
wall. That table has a drawer so check it out. You will get a key
for one of the doors. Use it on the left door and look around that cell room. Look at the book on the bunk and get
another key. Read the book by turning the right page. Exit the room
and head over to the other door. Use the key and enter the wine cellar. Look around the wine cellar. Is there a
way out? Can’t seem to exit the door at the other end because a brick
wall comes down. Look at the bottle of Merlot, vintage 1948. [a good
year :-)] Check out the dumb waiter. Open by moving the switch half
way, then climb inside. With your cursor try to get a hand by moving it
along the right side of the dumb waiter where the switch is located. When
you get the hand cursor, pull the switch some more and you will be moving up.
OLD ABANDONED LOUNGE
Explore this room and then go through the alcove to the hallway
and turn right. Open the door at the end of the hall. Enter the
Lobby and after looking around click towards the desk. Click on the book,
pick up the pen and fill with ink. Register in the log guest book.
This room will now come alive! Get the envelope from the mail slots
behind the desk. Read the letter from Richard and pick up the key to room
814. Head to the lounge where a key is hidden. You may want to make
room in your inventory by moving some of the items into inventory storage.
That will allow you to pick up more items.
LOUNGE: Click on the right side
of the player piano to get a side view. You will notice a slot. Look
at the tables and pick up a player card. Use the player card on the player
piano. Get the key to floor 8 from behind the picture. Use the
key in the elevator and go to room 814. (end of the center hallway)
RICHARDS ROOM : Look in the
drawers of the night stand to the left of the bed. Get
the record and look at the other objects. Look in the music box and
pick up red stone. Read the note from Richard that is tucked inside the
music box. Go to the bathroom and turn on both faucets over the bath tub.
Pick up key to Lobby. Go back down and find the phonograph in the
lounge.
LOUNGE:
Use record on the phonograph and get another key and read
the note with it. The missing number will give you the floor number.
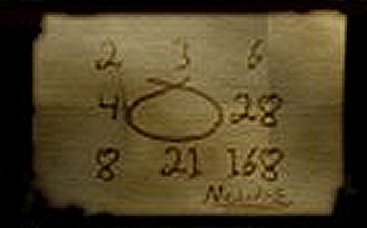
7TH FLOOR: Take the left hallway
to the end. Enter the UTILITY ROOM. Turn
the wheel to the boiler unit. Move the crate so you can reach and open the
vent. Pick up card, key, and Southern Pacific Railroad tickets. Go
back to the elevator and go down the right hallway until you see a door on the
left with Romanov crest instead of a number. This door is about 2/3 the
way down that hall.
ROMANOV ROOM: Look at the statue
to the right and notice that it is missing an eye. There is a lot to look
at and read in this room. Towards the back of the room look at the lamp
and move the right lamp shade. Move the left shade and take the bulb from
that side and put it in the right socket. Pick up the red gem and use it
on the statue to get another card. Use the card on the egg held by the two
winged creatures on the dressing table. Pick up another key and use it on
the door that connects to the next room.
ADJOINING ROOM: Explore this
room. On the desk you will notice a box with a slot where you can use that
card with the holes in it. A secret passage will open. Take the
book of matches that are on the box. There is nothing more to do in this
room once you have looked around and gotten the matches. Go back to the
elevator and look for a little door near the floor beneath the elevator handle.
See picture below:
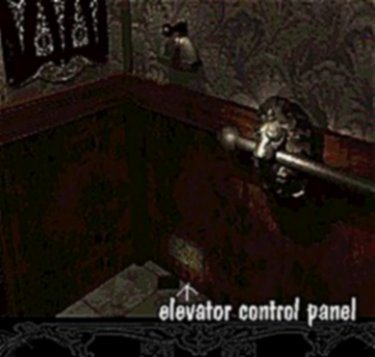
Open it and turn the key. You will now go all the way to the
top of the elevator shaft. Follow the up arrow to go through the top of
the elevator. Go to the motor room by clicking on that round button to the
right. Go forward through that exit and click on another round button on
the brick wall that will open a door to your right. Look around this area
and then go over to the candles. Use your matches to light the big candle
in the center. Click on the box below and use the round stone in the left
side of your inventory on that card with the hole in the middle. The card
will become complete, click on it and you will end up back at the old abandoned
hotel bar/lounge. Click on the mirror and then read the entire note
on the bar. Click on the card and you will see the credits.
The story will be continued in THE FORGOTTEN
2.
To e-mail for specific questions or comments, click
View this guide raw, exactly as the archive holds it