The Feeble Files
The Feeble Files
Walkthrough
MINISTRY OF GALACTIC
UNCERTAINTY
Listen to the (three) messages on
the HoloMail Machine. The 2nd message advises you that
your Bike is repaired, and activates it’s return to the outside
the building. Pick up the Doll and then
place it in the Broken Teleport to enlarge it. Take the Leather Jacket off the enlarged Doll. Open the Locker Door and remove the Helmet. Wear the Leather Jacket
– your Lab
Coat is retained in ORACLE. Go
outside and get on the Bike.
DAVE’S SPACE BAR
Enter the Bar. Speak to the
Protestor – he tells you about a petition to ban the music
of a group known as ‘The Loyal Citizens’ (TLC). Take the Protest Leaflet from him. Speak to the Pilot – he
tells you that he is a freighter pilot transporting musical discs
by TLC. Talk to Delores – she offers you 400 credits to
deliver a package to METRO PRIME (in the Alleyway near the
NewsStand). Accept the offer and get the Package.
MINISTRY OF GALACTIC
UNCERTAINTY
Remove the Doll from the Broken Teleport. Put the Protest Leaflet in the Broken Teleport and enlarge it.
Pick up the enlarged Protest Leaflet.
METRO PRIME
Go to the Alleyway near the
NewsStand. Knock on the Door to deliver the Package and get paid with Credits. Go to the Observation Dome. Insert Credits in the Vending Machine (on the right). The
Vending Machine is faulty. Repeat three times until you kick the
Vending Machine – this activates access to the Omni Brain
Centre enabling you to confess. Go to the Omni Brain Centre. At
the Confessional confess to kicking the Vending Machine–
this activates the Traitor Alert Station. Insert the Protest Leaflet (it must have been enlarged) into the
Traitor Alert Station – a new Directive Update is activated
with the Enforcer in Dave’s Space Bar.
DAVE’S SPACE BAR
Talk to the man in the Vid-Phone
Booth – he asks for a Light Wave Soda. Enter the Bar. Talk
to the Enforcer and ask him about Directive Updates. Tell him
about the Pilot’s freight. The Enforcer wipes out the Pilot,
who drops his Docking
Pass. Pick up the Docking Pass. Talk to Dave, the barman, and order a Light Wave Soda.
METRO PRIME
Give the Docking Pass to the Pilot and Docking Controller in
order to resolve their argument. This also enables the shipment
of chemical supplements to arrive at the Pill Shop. Go to the
Pill Shop and talk to the Shopkeeper. Buy Charisma X and Old Pills from
the Shopkeeper.
DAVE’S SPACE BAR
Put the Old Pills into the Light Wave Soda, and then give the Light Wave Soda to the man in the Vid-Phone Booth. He becomes
aggressive with his lover and leaves.
METRO PRIME
Go to the Vid Phone Booth and try
talking to the Unhappy Citizen (the woman who was talking to the
man at DAVE’S SPACE BAR). A HappyBot appears and
obliterates the Unhappy Citizen. Go to the Ministry Headquarters.
Swallow the Charisma
X and then talk to Molly (the
receptionist) who tells you to enter at any time. Return to the
Vid Phone Booth and change into the Lab Coat
(first try to ‘wear’ it and then ‘use’ it on
the Vid Phone Booth). You are now able to enter the lift in the
Ministry Headquarters. The Minister sends you to CYGNUS ALPHA
for personality restructuring.
CYGNUS ALPHA
You find yourself inside a Cell.
At short intervals you are hypnotised and transported to the Mess
Hall, Work Area, Recreation Room and back to your Cell. This
cycle is always repeated. The only locations that you are able to
do anything in are your Cell and the Recreation Room. Pick the Directive Charter from the table next to the bed in your
Cell – you will need it later. Remove the Poster from the wall in the Recreation Room, together with
the Tacks that pinned it to the wall.
To escape from your Cell:
1) open the Sanitation Unit;
2) put the Tacks on your bed (this will wake you from your sleep);
3) sleep on the bed – you
will wake when an attempt is made to hypnotise you;
4) remove the Tacks and lie on the bed again – the Prison Warden
(droid) thinks you are asleep;
5) the Prison Warden (droid) will
enter your cell to investigate, leaving the door open;
6) the Prison Warden (droid) will
go to the Sanitation Unit to close it;
7) leave your Cell and exit to the
right.
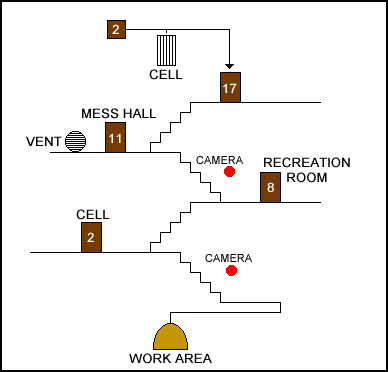
You need to get to the Work Area.
The Prison Warden (droid) will attempt to find you and must be
avoided. Go to the Mess Hall (through Door 11). Fill one of the Bowls at the Dispenser – you now have some Gunge. On the way to the Work Area throw the Gunge at the Cameras (see Map) – this makes it
harder for the Prison Warden (droid) to find you.
Once inside the Work Area, also
use the Gunge on the Camera in this location. Go to the
Chute to the right of the conveyor belt. Examine the Chute and
talk to the ‘person’ (Delores) down below. You can pull
the lever to start the conveyer belt, but the Prison Warden
(droid) will arrest you if you do. A way must be found to
deactivate the Prison Warden (droid). Continue talking to Delores
(through the Chute) until she tells you about the Rebel VidScreen
Channel – this activates the channel on the VidScreen in the
Recreation Room. Return to the Recreation Room (through Door 8).
Open the cupboard to prepare a
hiding place. Switch the VidScreen on by turning the TV Knob
– the alarm goes off. Turn the TV Knob again to set the
VidScreen to the Traitor TV channel. Pull off the TV Knob and then quickly hide in the cupboard. The
Prison Warden (droid) will enter and try to turn off the
VidScreen. With no Knob he will be unable to do so – causing
him to malfunction. Go back to the Work Area.
Pull the lever in front of the
Chute to start the conveyer belt. You are now able to go down the
Chute.
Delores will update ORACLE with
the Freedom Fighter’s Database. Pick up 5 Traitor Dolls. Talk to Delores and ask her “What’s
that thing you’re fiddling with?”. She gives you a Reworked Doll. Return through the Chute and go to the
Vent.
Put the 5 Traitor Dolls next to the Vent – then put the Reworked Doll on the Vent. This causes the Vent to
explode open, allowing you to crawl through it.
THE COLOURED TILES PUZZLE
Read the Directive Charter to get the solution to this puzzle:
” the path
of enlightenment is not an easy one…
it starts
out white, to lighten the
night,
red
comes next, for with yourself you are vexed,
yellow
is humble, for that you must be,
green is
clean – eventually,
never look blue
or we will shoot you “
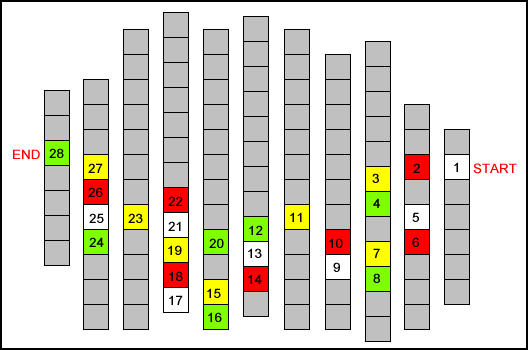
Follow the sequence (white, red,
yellow, green) to cross the tiles. Initially each coloured tile
has a distinctive shape.

As soon as you step on the first
one, the tiles continuously change colour – although the
shapes remain the same. You must only jump onto a tile when it is
both the correct colour and shape. Follow the map below to cross
the path.
THE SPACECRAFT
Open the Cover near the seats in
the front of the Spacecraft. Pull out the Wires inside the Cover. Open the Ignition Circuit next to
the Cover, then examine it. On the left of the circuit board are
4 Input points, and on the right are 3 Output points. Attach the Wires to the Inputs. The correct Output point for each of
the Wires is randomly generated. Begin by connecting
Input 1 to Output 1, Input 2 to Output 2, etc. When all 4 are
connected 4 ‘beeps’ will be heard. A short ‘beep’ signifies an incorrect connection, while a
longer ‘BEEEP’ means a correct connection. Therefore, for
example, if you connect Input 1 to Output 1, Input 2 to Output 2,
etc. and you hear ‘beep’–‘BEEEP’–‘BEEEP’–‘beep’ then you know Input 2 and Input 3 must be
correctly connected – but Input 1 and Input 4 must be
changed.
PLANET FILB
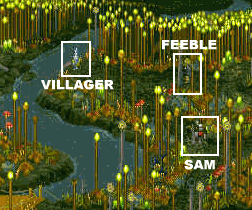
Delores gives you a Remote Control to operate SAM. Follow SAM to the gate at
the entrance to the Village. Note that the villagers drop a Spear
when they close the gate. Pick up the Spear. The little blue villager who ran away has to be
captured. To do this he must be trapped between FEEBLE and SAM.
The area between the bridge and the mountain path is the best
place to trap him – more specifically, where the Log was.
First get SAM to destroy the Log so that the villager cannot get
across the river at this point.
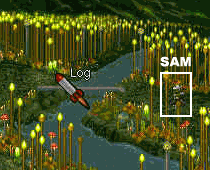
Next, position SAM on the bridge,
and FEEBLE at the foot of the mountain path.
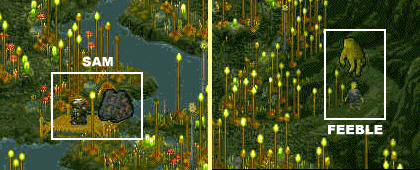
Follow the villager (as FEEBLE)
and manoeuvre him to go to the area where the log was. When he is
near this area, move SAM into position – then FEEBLE.
THE LABORATORY
During the conversation with
Filbert you get 2 important bits of information:
(1) Filbert controls the villagers
with his drugs
(2) He puts the Directory on the
table
Try to ‘pick up’ the
Rope – ORACLE will untie it. Use the Chemistry Set.
THE CHEMICALS PUZZLE
First, have a look at the FORMULA
PAGE:
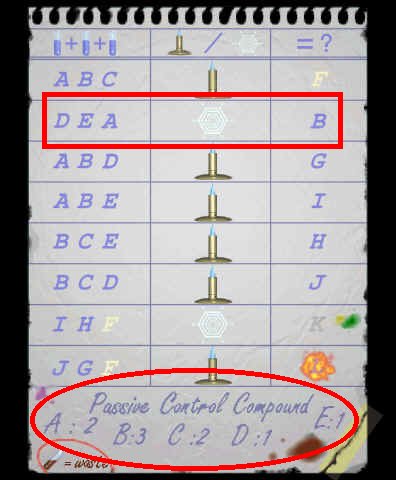
Passive Control Compound
formula is:
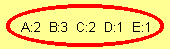
The only combination that gives
A(2) B(3) C(2) D(1) E(1) is: (ABC) = F and (ABE) = I and (BCD) =
J
Waste: Any mixture
of chemicals resulting in a wrong mix:

Pre-mixed Chemicals:
A, B, C, D & E are the only available pre-mixed chemicals.
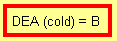
is the only formula that uses only
pre-mixed chemicals in it.
Using a process of ‘trial and
error’, only one combination produces a successful result:
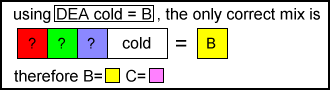
Chemicals B and C are now
known
Now work out what A, D & E
are.
Again using ‘trial and
error’ attribute all the different combinations to the
various formulae:
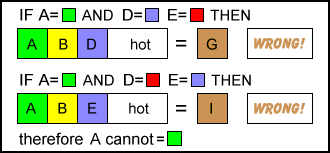
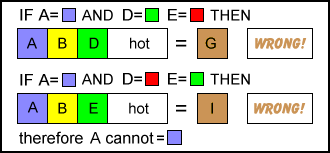
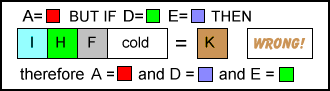
Chemicals A, B, C, D and C
are now known
Now work out what F, G, I, H, J, K
& L are.
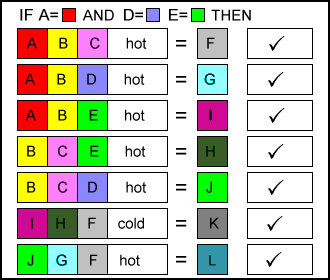
You know that the formula for
making a Passive Control Compound is F, I and
J – but you don’t know whether to use a ‘HOT’
or a ‘COLD’ mix.
By trying both you get the
following results:
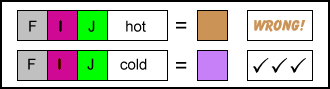
Chemicals F, I and J –
with a COLD mix produce the correct mixture
You now have the Chemicals, which is the correct mixture to use as
the Passive Control Compound. Pour the Chemicals into the water supply via the Water Cover
– this gets the villagers to become passive.
THE LABORATORY
Use the Remote Control to activate SAM, and move him to inside
the village.
THE VILLAGE
Use SAM to analyse the Great Big
Statue – this reveals a Gem in
the statue’s one eye. SAM uses his tractor beam to take the Gem.
THE LABORATORY
Press the top button (next to the
Teleporter) to open the statue door.
THE VILLAGE
Manoeuvre SAM into the Teleporter.
THE LABORATORY
Press the bottom button (next to
the Teleporter) to engage the Teleporter, getting SAM inside.
Examine the Directory – finding out that the operator can
change a listing status. Call the operator on the Telephone and
select the “I
want to cancel my unlisted number status” option. Filbert enters to answer the
phone, and is overpowered by SAM. Delores tries to use the
Teleporter and is changed into an octopus.
MOUNTAIN TOP
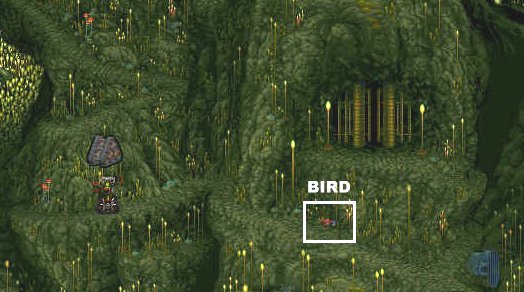
Send SAM to the top of the
Mountain. Get him to destroy the Bird
– it falls to the ground down below. On his way back get SAM
to pick up the Bird.
THE LABORATORY
Pick up the God Costume. Use the God Costume in the Projection Machine – the villagers need
a Lesser Spotted Tragic Bird for a sacrifice. Go to the broken
bridge.
PLANET FILB
Put the Bird on the rock near the bridge, and then leave the
area.
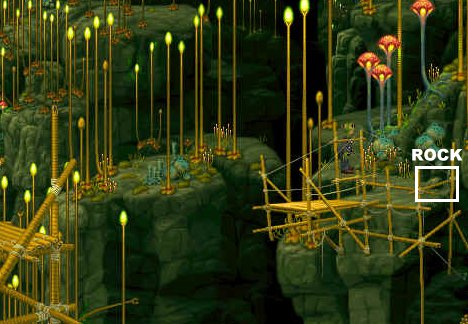
The villages build the bridge in
order to get across and fetch the Bird.
Cross the bridge and return to the Spacecraft.
Delores gives you Del’s Book, which has instructions for making a
‘Do It Yourself Emergency Transmitter’:
(1) a power source
(2) a focusing crystal
(3) a laser relay
(4) various electrical parts
(5) a high place
Open the Cover on the Spacecraft
with the Spear, revealing a Battery (power
source). Pick up the Battery. Go back
to THE LABORATORY.
THE LABORATORY
Look at the Directory – it
now has an advert for ‘FreeCell Laser Relays’. Call the
operator on the Telephone and select the “Connect me to
FreeCell Laser Relays” option. You will get immediate delivery of a Laser Relay. You now have all the components to build
an Emergency Transmitter (the Gem that
SAM got from the Great Big Statue is a focusing crystal), so go
to the MOUNTAIN TOP.
MOUNTAIN TOP
Give the Battery, Gem and Laser Relay to Delores. She tells you to get SAM to
the MOUNTAIN TOP as well. Delores makes the Emergency
Transmitter and the 3 of you are rescued and taken back to METRO
PRIME.
METRO PRIME
You are at the Rebel Headquarters,
the room in the alley past the NewsStand. Take the Old Newspaper off the wall. Look at the Filing Cabinet
– there’s a Dress inside,
which you take. You are unable to walk past the NewsStand –
your picture and the story of your escape from Cygnus Alpha are
on the front page. Go back to the Rebel Headquarters and wear the
Dress as a disguise – the Prison Uniform is retained in ORACLE. You can now go to
the NewsStand.
Take a New Newspaper from the pile of Newspapers. When the
Newspaper Seller tells you to put it back – replace the Old Newspaper in the pile. Read the New Newspaper –
3 sets of Adverts and a Newspaper Article (about you) drop out.
The Docking Controller, due to
overdue parking, has clamped your Bike to the Docking Pad.
Go to the Arcade and speak to the
assistant in the Kiosk at the entrance. Select the “I’ll just
have some tokens, please” option – he gives you some Tokens. Go upstairs and play the Arcade Game. Putting in a
Token activates the Game.
THE PUZZLES:
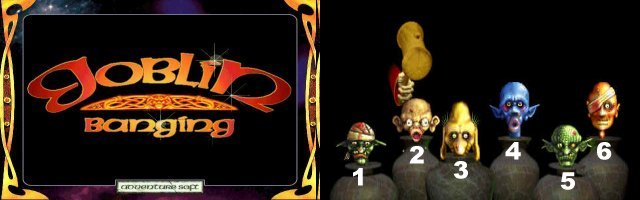
This is like ‘Simon
Says…’ The sequence in which the Goblins are hit on the
head must be repeated. If you ‘number’ the Goblins 1-6,
the sequence is relatively easy to follow.
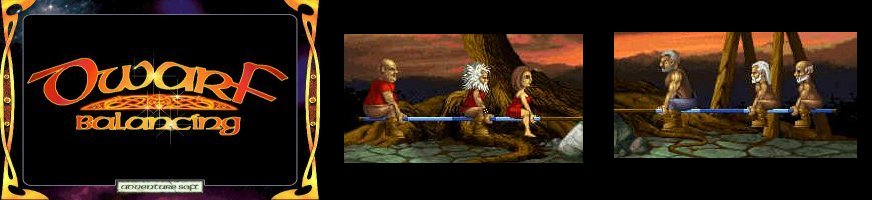
The solution to this puzzle is
always the same. Begin with all the red Dwarfs on the one
end of the seesaw, and the brown ones on the other. A
little bit of shifting around should do the trick.
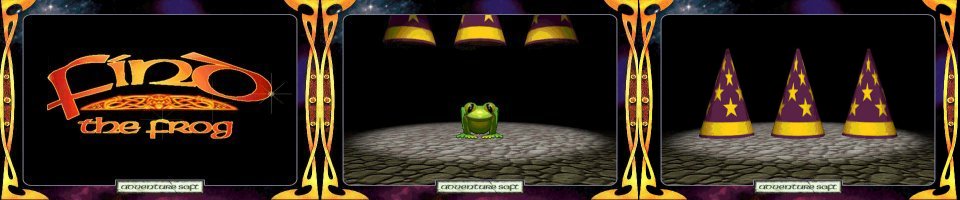
This is a variation of 3-Card
Monte. Hold a pen or pencil up against the screen to
‘trace’ the movement of the hat under which the frog
is.
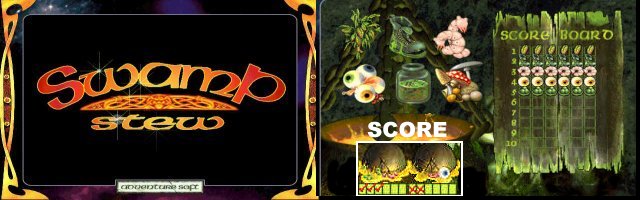
A puzzle based on
‘Battleships’. You have to find the right ingredients
and the order in which to put them.
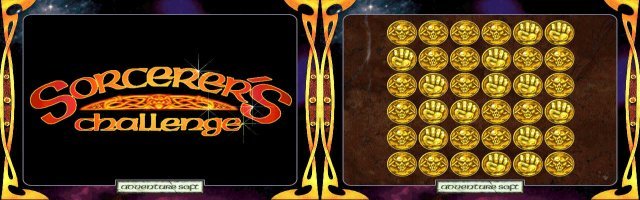
One of the near
‘impossible’ puzzles. All the gold coins must be the
same way ‘up’.
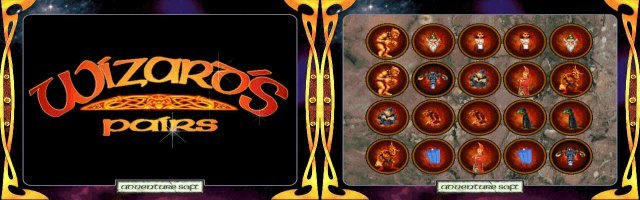
A memory game. You must flip over
all the identical pairs; one at a time.
For the 1st
‘win’ you get 5 credits; for the 2nd you get
20 credits and for the 3rd you get 100 credits. You
need a minimum of 240 credits to complete both the remaining
games in the Arcade. Go back downstairs to the Grabber Machine.
THE GRABBER MACHINE
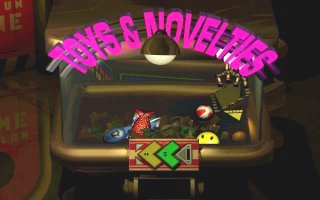
Each game costs 20 Tokens. The ‘grab hand’ must be moved to the
left (directly above the Fish) then down
and eventually dropped to ‘grab’ the Fish. Repeat to get the Wild Cat.
- A SAVED
GAME AT THIS POINT IN THE GAME IS AVAILABLE
CLICK HERE TO CONTACT ME FOR THE SAVED GAME
Go back and talk to the assistant
in the Kiosk (you must have at least 200 Tokens remaining) – select the “What’s
that big new machine there?” and “Can I have a go at that Super Virtua
Challenge 4 machine, Citizen?” options. He takes you to the Super Virtua Machine,
you play and win. Return to the assistant in the Kiosk who will
give you a Zoo
Ticket.
Enter the Zoo and talk to the
Tourist. He gives you his Camera and asks
you to take a photograph of him. Set the Flash Control to maximum
before pressing the Button. While the Tourist is blinded you
quickly leave the Zoo, taking the Camera
with.
Return to the Rebel Headquarters
and talk to Del (and SAM). Select the “My space bike
has been clamped. What am I going to do?” option. This activates Gardum – who is
hiding outside the Ministry Headquarters.
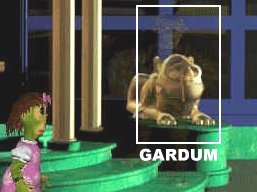
Talk to Gardum – he tells you
he’ll create a diversion and you must watch for a Cargo
Freighter (KICK A55) to arrive.
Got to the Airlock, which is at
the extreme left inside the Observation Dome. The Airlock
controls work as follows:
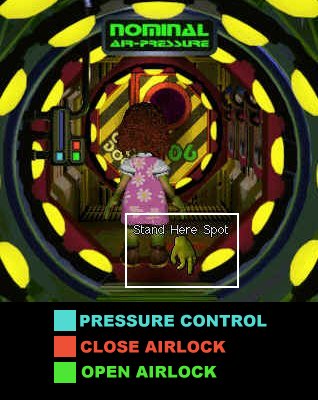
Note the ‘Stand Here
Spot’ – it is important for later. Turn off the pair
pressure (blue button) and the open the airlock (green button).
Use the Camera to look through the porthole – you
see KICK A55 docking. This will activate the Wurbles’
Freighter in the Docking Area.
Go to the Docking Pad and open the
Saddle on your bike – there is a Wurble hiding inside.
Read the description of WURBLE in
the ENCYCLOPEDIA function in ORACLE:
HIS PET WURBLE
KILLED CITIZEN INAMULA 452-11-69
WILD CATS ARE
THE MAIN PREDATOR OF THE WURBLE
WURBLES
DON’T LIKE DARKNESS AND CONFINED SPACES
Go to the Docking Administration
Office. Open the Locker Door and put the Wurble and the Wild Cat
inside the Locker. Note that if the Docking Controller interrupts
you, return to complete this task. Close the Locker Door –
the Docking Controller enters; opens the Locker and is killed by
the ‘now-multiplied’ Wurbles. Pick up his Keys that are lying on the floor.
Unclamp your Bike with the Keys.
MINISTRY OF GALACTIC
UNCERTAINTY
There’s a Guard (Bounty
Hunter) at the entrance. Talk to him – he tells you that
he’s under orders to capture Feeble. He gives you his Bounty Hunter’s Card.
JUNKSHIP
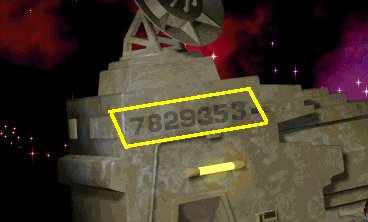
Open the Trunk – you get a Space Hopper and a Bicycle Pump. Try using the Bicycle Pump to inflate the Space Hopper – the Bicycle Pump
breaks leaving a Tube, a Metal Bar and a Valve.
Take note of the number above the door – 7829353
(needed later).
BROKEN DOWN BIKER / DAVE’S
SPACE BAR
Go to the aid of the Broken Down
Biker (SonTwo) and tow him to DAVE’S SPACE BAR. Talk
to him – he will give you a bottle of Miracle Mud and enter the Vid-Phone Booth to call the
SVA. Read the description of MIRACLE MUD in ORACLE’S
ENCYCLOPEDIA (FREEDOM FIGHTERS DATABASE):
…leaves
a huge unremovable mess on anything it is applied to…
Look at the Salesman’s Bike
– the alarm goes off and he switches it off. Repeat this (3
times) and SonTwo will believe the alarm is faulty. He leaves it
off and goes to the Bar for a drink. Now look at the
Salesman’s Bike – the Tow Cable
is visible and you can take it.
THE OMNICLUB
Use the Metal Bar to open the Doors, and enter the OmniClub.
Switch on the DJ Console as follows:
1) pull the Master Control
2) insert the Tube into the Broken Handle to fix the Bar Light Master
Switch
3) pull the Bar Light Master
Switch
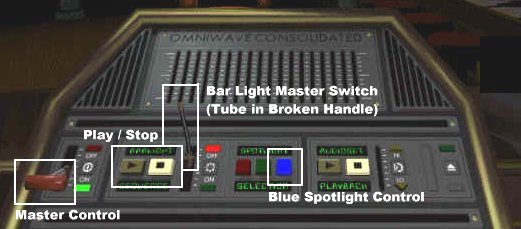
Pressing the Blue Spotlight
Control turns the blue spotlight both on and off. Note that the
spotlight appears to be faulty. Keep turning it on and off until
the Blue
Filter falls out. Pick up the Blue Filter. Press the ‘Play’ button (on the
barlight sequence) – the light moves from Stool to Stool.
Press the ‘Stop’ button to freeze the light on a
particular Stool. Keep trying different Stools until you freeze
the light on the Loose Stool, i.e. the 2nd from the
left.
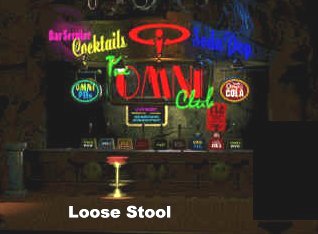
Pick up the Bar Stool.
METRO PRIME
Go to the Omni Brain Centre to
confess. Select the “I’m the wanted escapee, Feeble and
I’m NOT turning myself in” option – this activates a new
announcement from the Omni Brain (see later). Go to the Air
Supply unit – attached to the wall of the Arcade. Fix the Space Hopper with the Miracle Mud. Attach the Valve to the Space Hopper, then fill the Space Hopper with air from the Air Supply.
Listen for the new announcement
from the Omni Brain – that FEEBLE has won a prize for the
‘confession of the cycle’. If you have not yet heard
it, walk around METRO PRIME until you do. Don’t collect the
prize; walk around until you hear that your deaf friend Phoebe)
has collected the prize.
Go to the Confessional in the Omni
Brain Centre and pick up the Jumper.
Go to the Airlock to make a
replica of Feeble on the ‘Stand Here Spot’.
1) Put the Bar Stool on the ‘Stand Here Spot’ – legs
2) Put the Space Hopper on the Stuff – head
3) Wipe the Stuff (the messed
Miracle Mud on the Space Hopper) with the Jumper
4) Put the Prison Uniform on the Stuff – body
5) Put the New Newspaper on the Stuff – face
6) Press the red button to close
the Airlock
7) Press the blue button to
de-pressurise the Airlock
8) Put the Blue Filter on the Porthole to give the Feeble replica
true colouring
Use the Bounty Hunter’s Card on the Vid Phone Booth to telephone the
Bounty Hunter and tell him about Feeble in the Airlock.
MINISTRY OF GALACTIC
UNCERTAINTY
Listen to the 2 new messages from
you mother on the HoloMail Machine. In the 2nd message
she tells you that your Grandfather’s ‘place of
rest’ is coming by.
TOMB
Examine the Coffin. The
holographic projection of you Grandfather tells you that in order
to get your full inheritance you must [prove yourself
worthy]. Open the
Drawer – you get Paper and Spray Paint.
METRO PRIME
On the wall outside the Rebel
Headquarters is a Symbol. Put the 3 sets of Adverts on top of the
Boxes. Use the Spray
Paint to paint the Symbol. Use
the Paper to get a copy of the Symbol.
TOMB
Copy the symbol on the Paper onto
the Symbol on the floor. The holographic projection of your
Grandfather will appear again and give you the wrong inheritance
– a Magnetic
Swipe Card and a Screwdriver.
MINISTRY OF GALACTIC
UNCERTAINTY
Open the Drawer with the Magnetic Swipe Card to reveal a Coin and Photo. Pick up both
the Souvenir
Coin and Photograph.
METRO PRIME
Study the Exhibits in the Zoo
carefully – there are clues to the ‘current
stardate’.
Go to the Observation Dome. Insert
the Souvenir
Coin into the Vending Machine
(on the left) – this will release the jammed Credit in the Vending Machine. Insert the Credit into the
Vending Machine (on the right) to get a Starmap and Activity Pack.
CALCULATION OF CURRENT STARDATE
Get the following information from
the ENCYCLOPEDIA function in ORACLE:-
MEASUREMENT OF
TIME
1 Click = 100
MiniClicks
1 Cycle = 20
Clicks
1 Period = 460
Cycles
1 Millennium =
1000 Periods
at the start of
each millennium the 3 primary planets are in
alignment
STARDATE
NUMBERING SYSTEM
the 7-digit
stardate consists of the cycle number and period
number in coded form
SPECIAL DAYS
the first
cycle of each period is called New Periods
Cycle
OmniFest
is 15 cycles earlier (in the previous
period)
Get the following information from
the exhibits in the Zoo:-
HYBRID EXHIBIT
Discovered in the 2nd
Millennium
Introduced into the community on
Stardate 1240912
Known: Millennium = 2
Stardate 1240912
FILB EXHIBIT
Started monitoring the planet in
the 250th Period of the 6th Millennium
Further ¼ Millennium (250
Periods) settling in period
Permanent post established on
Stardate 0102536
Known: Millennium = 6
/ Period = 500 (250+250) Stardate 0102536
MYTOPIA EXHIBIT
Discovered on New Period Cycle
Discovered on Stardate 1020416
Known: Cycle = 1 or
001 Stardate 1020416
STARDATE is in the form P3–C1–P2–C2–P1–C3–M,
where:
C1 C2 C3 is the 3-digit Cycle
number
P1 P2 P3 is the 3-digit Period
number (in reverse order)
M is the Millennium
Read the Newspaper Article to get the following information:-
Sent to Cygnus Alpha 34
Cycles ago
Cell discovered empty 13
Cycles later
Escaped 101 Cycles
after last period’s OmniFest
CURRENT CYCLE
Escaped on cycle number 086
(101-15)
This occurred 21
cycles ago (34-13)
Current Cycle is 107
(86+21)
Get the following information from
the STATISTICS function in ORACLE:-
Feeble’s S.O.B. (Stardate of
Birth) was 7104728
Current Millennium = 8
Examine the Starmap.
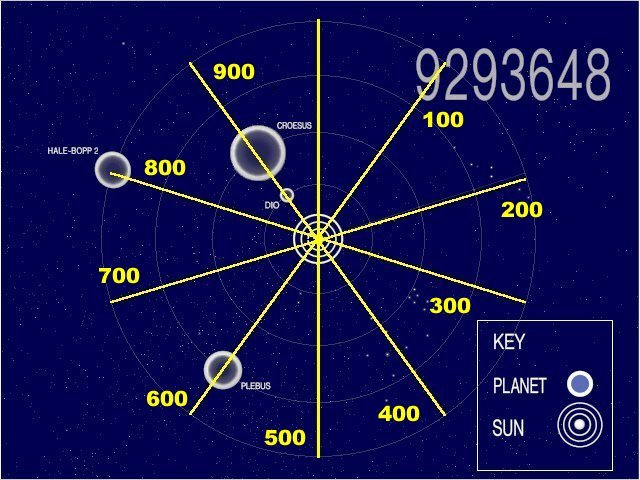
Known: At the start of each
millennium the 3 primary planets are in alignment.
1) The Starmap (if you look carefully) is divided into 10
segments.
2) The planets PLEBUS, CROESUS,
DIO and HALE-BOPP2 are at 600, 900, 900 and 800 respectively.
3) The stardate on the Starmap is 9293648 – therefore the period is
699 (600, 900 and 900).
4) PLEBUS, CROESUS and DIO are the
3 primary planets and indicate the period.
Analyse the Photograph in the same way.
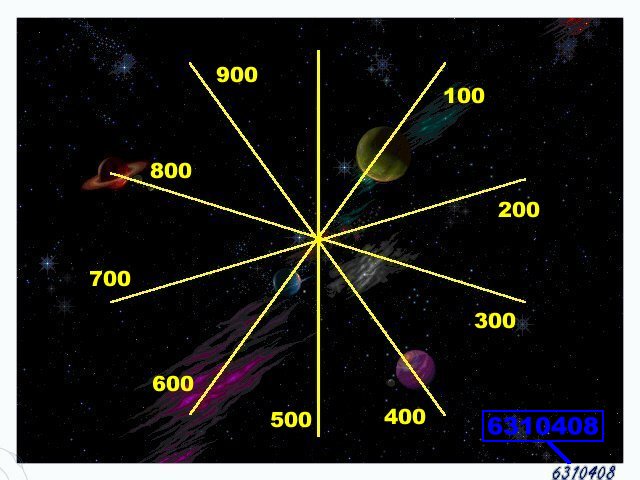
1) The stardate on the Photograph is 6310408 – therefore the period is
416.
2) PLEBUS, CROESUS and DIO at 400,
100 and 600 respectively.
3) Note that HALE-BOPP2 has not
moved.
Now use the Telescope to look at
the galaxy as it is at present.
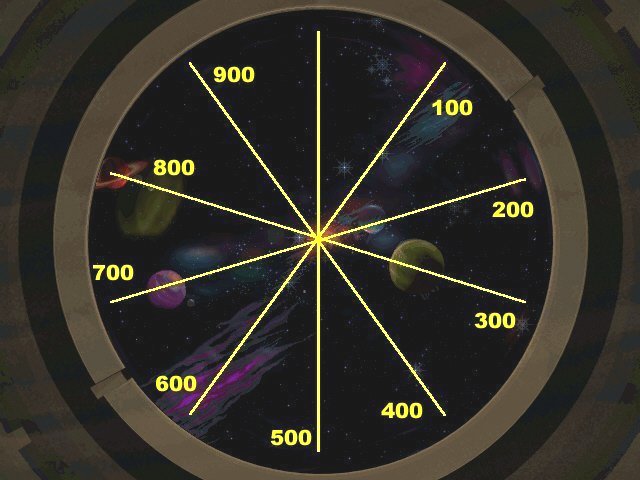
1) The 3 primary planets (PLEBUS,
CROESUS and DIO) are at 700, 300 and 200
respectively.
2) Therefore the current period is
732.
3) Calculated previously: The
current cycle is 107 and the current millennium is 8.
4) THEREFORE THE CURRENT STARDATE
IS 2130778.
METRO PRIME
Go to the Ministry Headquarters.
Use the Intercom on Molly’s desk to talk to the Minister
– he wants a cup of OmniCofe. Pick up the OmniCofe Cup and pour some Miracle Mud into it. The Guard can be distracted by giving him
the Activity
Pack. Enter the lift to get to
the Minister’s Office. The Minister will drink your prepared
concoction; he collapses and you send him to Cygnus Alpha in the
same way as he did to you. Slide the Magnetic Swipe Card through the Encoder.
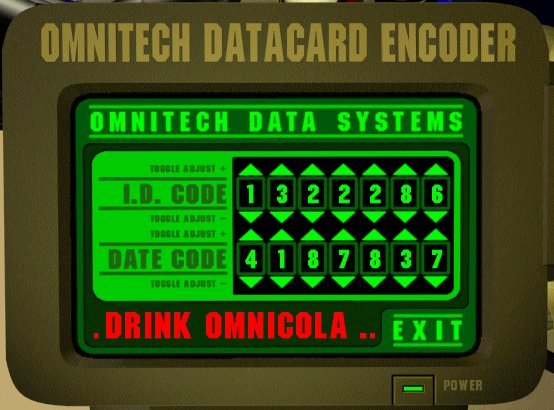
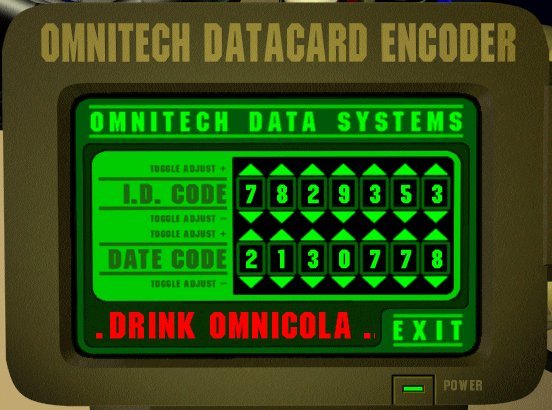
Enter the JUNKSHIP NUMBER (7829353)
as the I.D. CODE and the CURRENT STARDATE (2130778) as the
DATE CODE – as per the graphic on the right. The Magnetic Swipe Card is now encoded for access to the JUNKSHIP.
JUNKSHIP
Attach the Tow Cable to the Car to
secure it to the JUNKSHIP. Use the Magnetic Swipe Card to open the door, and enter inside. Pull the Lever
to disengage the Big Magnet. When you exit you are able to drive
off in the Car. Note that there appears to be a need for some
sort of repair to the Car.
DAVE’S SPACE BAR
Unscrew the Numberplate on the Salesman’s Bike with the Screwdriver. Now put the Numberplate onto the Car. The SVA (previously called by the
Salesman, SonTwo) will arrive to repair the Car. Fetch Delores
and SAM and head off to intercept the Prison Coach.
THE PRISON COACH
In order to capture the Prison
Coach Delores must:
FREEDOM FIGHTERS’ BASE COMPLEX
Major Benson talks about the
attack on the Company Central Command Compound (CCCC) situated on
the planet Aldoria Major. Go through the door on the left to get
to the Icy Bunk. Sleep on the Icy Bunk. When you wake everybody
but SAM has already left.
Try to open the door on the right
– SAM fires at it, leaving some Small Metal Discs on the floor. Pick up the Small Metal Discs.
Go to the Strange Machine (Burpy
Liquid Machine) through the left door and insert one of the Small Metal Discs. After drinking the Cola you are left with
an Empty Can.
ALDORIA MAJOR
Try to walk to the front of the
CCCC – you hide and watch the 2 Apprehender Droids having a
conversation. The left droid, PEG, will eventually go on patrol.
When PEG has passed, go to the posts and put the Empty Can on one of the posts.
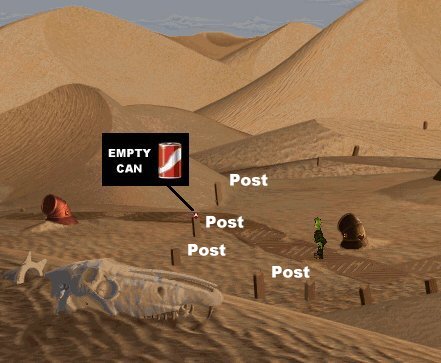
Also, close all 3 the outside
vents (needed for later).
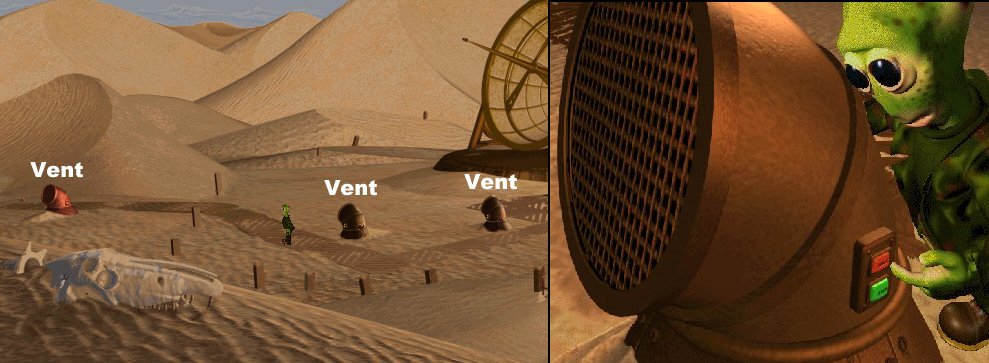
Keep trying to walk to the front
of the CCCC until PEG goes on patrol again. Seeing the Empty Can on the post, PEG thinks it’s a shooting
range and fires at it. While PEG is occupied, use the Screwdriver to disable her. Look at the disabled
Company Robot (PEG) – her circuit boards will be visible.
Remove the blue Circuit Board (PEG’S Personality Board) and the green Circuit Board (PEG’S CPU Board). Now use the Screwdriver to disable SAM. Look at SAM and remove the 2 same
corresponding Circuit
Boards.
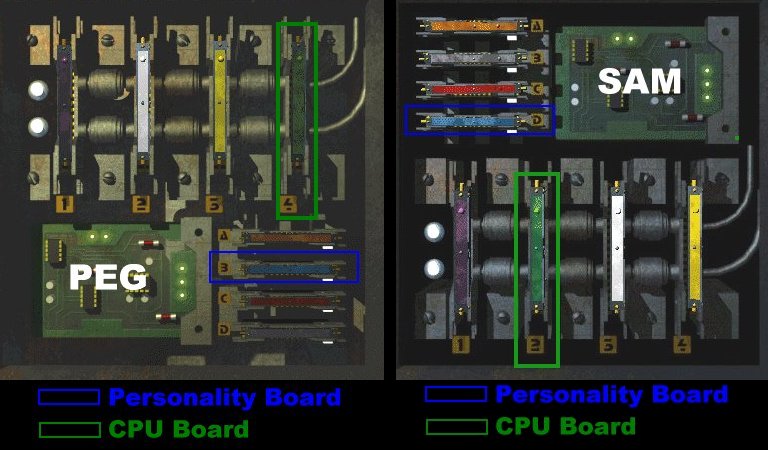
Insert the blue Circuit Board (SAM’S
Personality Board) and the
green Circuit
Board (SAM’S CPU Board) into
the empty slots in PEG – making a Newlook SAM. Activate the
Newlook SAM. Talk to him and tell him to find a way into the CCCC
– he goes to the front entrance of the CCCC. Manoeuvre him
into the Turbolift and select the Maintenance Area destination.
INSIDE THE CCCC
Get the Newlook SAM to push the
lever (inside the Maintenance Area) 3 times – the flow of
the air ventilation being blown to the outside vents will be at
maximum.
ALDORIA MAJOR
The force of the air ventilation
(at maximum) causes the closed vent (nearest to where you
arrived) to burst, leaving a Deep Hole.
INSIDE THE CCCC
Get the Newlook SAM to pull the
lever (inside the Maintenance Area) 3 times – the flow of
the air ventilation being sucked from the outside vents will be
at maximum.
ALDORIA MAJOR
Go down the Deep Hole to the
ventilation shaft. ‘Move forward‘ twice, ‘Turn
left‘ then ‘Move forward‘ twice to get to
the Maintenance Area.
INSIDE THE CCCC
The Newlook SAM and WCDF (the
other Apprehender Droid) engage in battle. After the battle turn
SAM off. Cross the metal walkway. Examine the Grenades and note that they are miscellaneous
explosive devices.
Pick up (a few) Grenades. Take
the Jacket – you get an Engineer’s Jacket and a Class B Pass. The Class B Pass enables you to use the Turbolift. Use the Screwdriver to remove the Metal Plate from the Mangled Robot.
Take the Brain Slime (pink liquid) from inside the tank in the
Brain Room – you will also get a Chain.
Talk to the Gokky Rebel in
Interrogation – he tells you that Gardum is on the surface.
This will also activate Mandrin. Talk to Mandrin – he drinks
the Brain
Slime and in appreciation
gives you a Key.
Examine the Fire Extinguisher in Research and Testing – it’s for
use on dry ice. Take the Fire Extinguisher.
Switch off the Antimatter
Weight, then take it.
ALDORIA MAJOR
Go to the Car – Gardum will
be standing there. After talking to you, Gardum turns himself
into a liquid metal form.
FREEDOM FIGHTERS’ BASE COMPLEX
Open the Cabinet (next to the
Burpy Machine) with the Key – you
get a Stretchy
Rope.
THE RESCUE PLAN
By examining the Grenades you know that they are miscellaneous
explosive devices
– perhaps some of them contain knockout gas. If so, a way
must be found to use the gas on the Interrogators. The
Ventilation System runs throughout the CCCC, as well as to the
surface. Vents are visible on the surface, in the Brain Room and
in Research & Testing. Therefore, assume that there is
similarly a vent (or vents) in Interrogation. You also know that
the lever in the Maintenance Area controls the Ventilation
System.
THE VENTILATION SYSTEM
The Surface
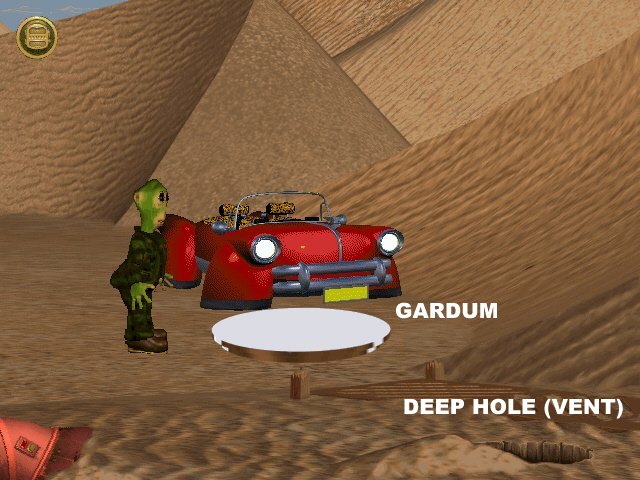
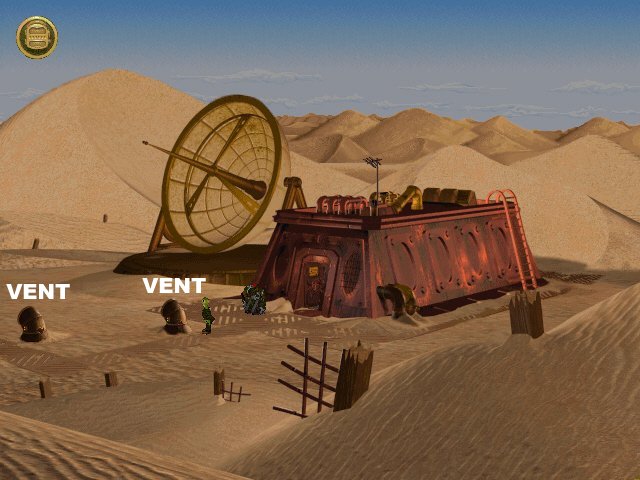
2 of the vents were closed
previously. Use the Fire Extinguisher
on Gardum – he freezes up. Roll the Frozen Gardum onto the
Deep Hole to close it.
The Brain Room
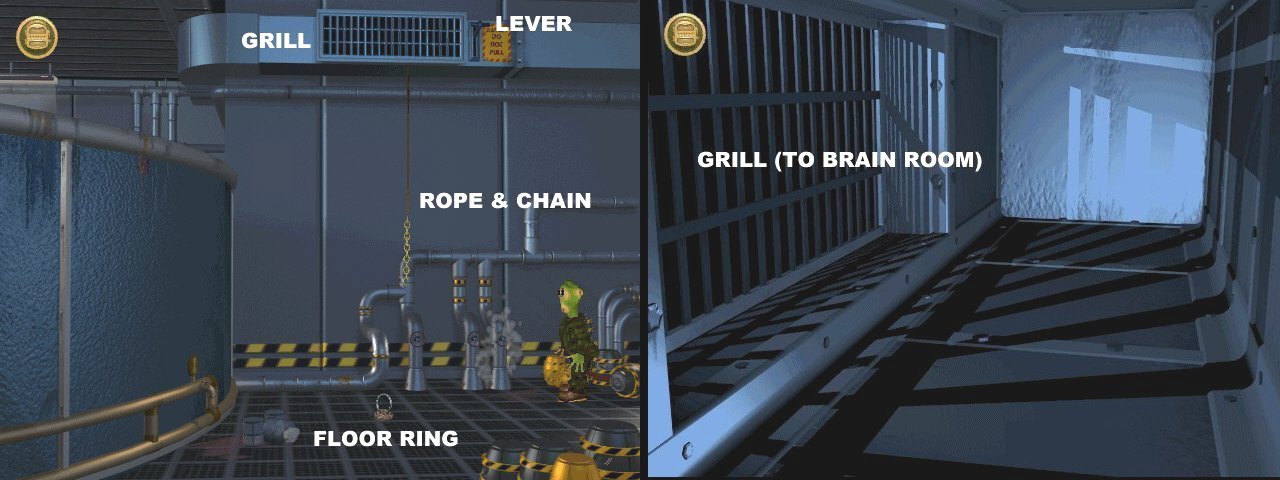
The Ventilation Shaft is accessed
from the Maintenance Area (to the right of SAM). To get to the
Grill ‘Look up’, ‘Move up,
‘Turn left’ twice then ‘Move
forward‘ twice. Tie the Chain to
the Stretchy
Rope – then lower it
through the Grill into the Brain Room. To return to the
Maintenance Area ‘Move forward, ‘Turn
left’ then ‘Move forward‘ twice. To
reach the lever in the Brain Room first pull the Rope & Chain
and tie it to the floor ring. Attach the Antimatter Weight to the Rope & Chain, then switch it on
– the Rope & Chain becomes a Bungee Rope. Pull the
Bungee Rope, then switch the Antimatter Weight
(Weight) off again to release the Bungee Rope and ‘shoot’
yourself up to the lever. Lastly, pull the lever to close the
Grill (vent).
Research & Testing
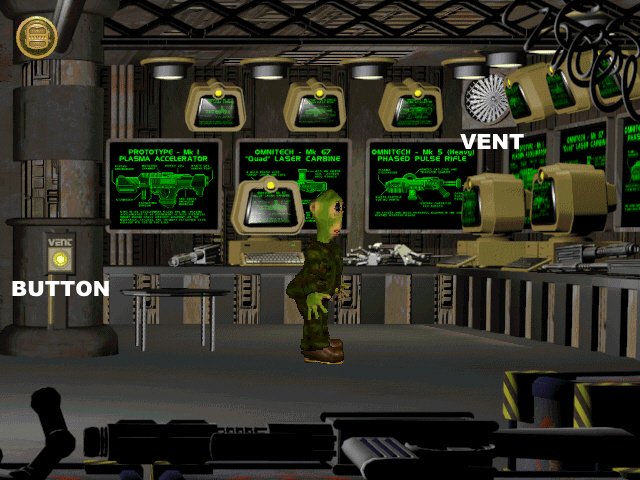
Pressing the Button closes the
vent.
Interrogation
It is assumed that any vents in
this area will still be open.
Maintenance Area
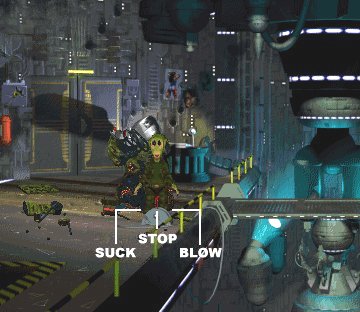
Set the Ventilation System to
‘SUCK’ mode by pulling the lever.
Research & Testing
Throw the Grenades at the Firing Range. Continue doing this
until one of the Grenades releases
gas instead of exploding.
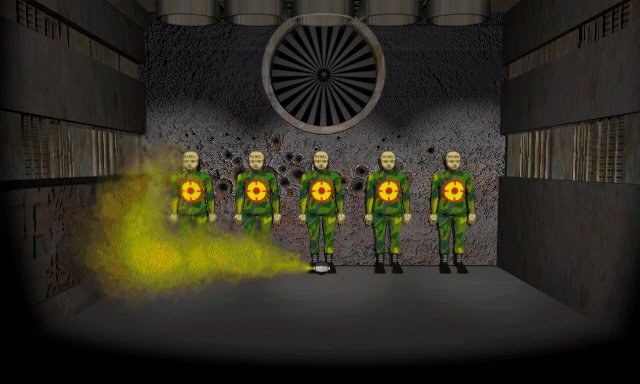
Research & Testing
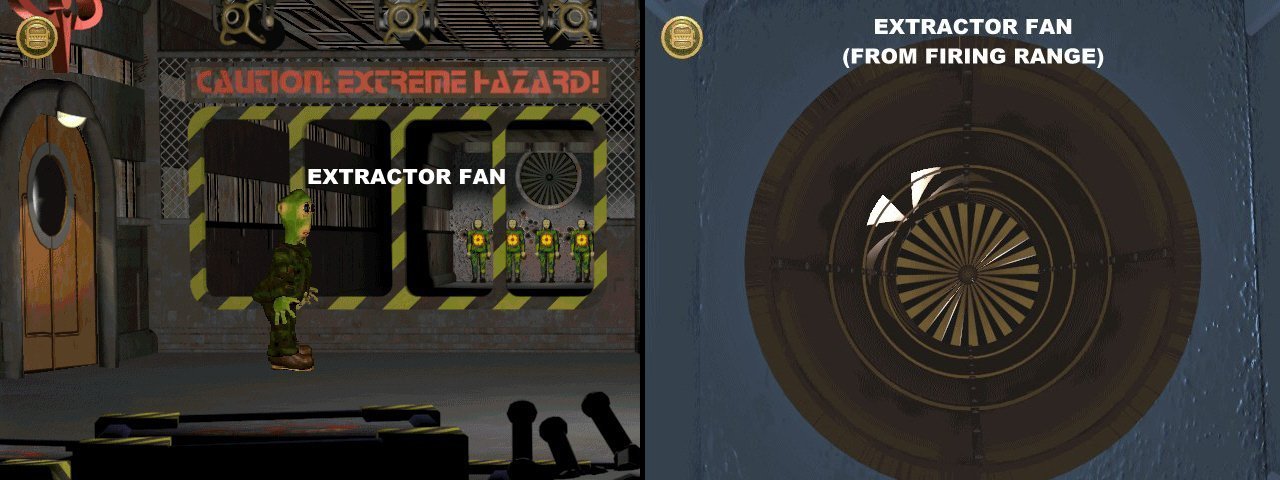
The gas from the Grenades will be ‘sucked’ into the Ventilation
System through the extractor fan in the Firing Range. The
extractor fan must be sealed – it is also accessible from
inside the Ventilation Shaft. To get to the Fan in the
Ventilation Shaft (from the Maintenance Area) ‘Look up’,
‘Move up then ‘Move forward‘.
Attach the Metal
Plate to the Fan. To return to
the Maintenance Area ‘Turn right then ‘Move
forward‘ twice.
Maintenance Area
The gas will be visible here. Set
the Ventilation System to ‘BLOW’ mode – the gas will now be
blown into Interrogation (the only place to have open vents).
Interrogation
Take the Class A Pass out of the pocket of one of the
Interrogators. THE TEMPLE is now be accessible from the
Turbolift.
THE TEMPLE
Read the Book on the Chest –
it’s a History
Book and gives some story
background. Open the Chest – you get an Axe. If you try using the Axe on
the OmniBrain, Major Benson appears. Before Major Benson can kill
you – jump behind the OmniBrain. Major Benson will kill the
OmniBrain by mistake. Push the OmniBrain off the stand and go to
the ETERNITY CAPSULE.
ETERNITY CAPSULE
Talk to the Body (The Founder)
– this activates the Computer. Use the Computer:
A Walkthrough by Malcolm Schmidt
Courtesy
of Malcolm Schmidt
Back to Mystery Manor Home
View this guide raw, exactly as the archive holds it