THE CAMERON
FILES
By
&wanadoo
Walkthrough by
MaGtRo March, 2002
Game
Play: The game is mouse
driven. The main menu (new game, load, save and quit) is accessible by
pressing ESC. There are 8 save game slots and can be written over. Moving
the cursor over the game scene will show active spots and will alert the
gamer to areas that needs an action then or later in the game play. Right
click of the mouse will bring up the inventory. Items in the inventory can
be combined. Click on first item, the link chain on the left of the frame
will flash and then click on the second item to be combined making a new
item. At the bottom right of the inventory frame has the “notebook” that
shows the past events and also gives hints what to do next, the “wallet”
that contains documents or pictures picked up and the “map” that allows
you to jump to a location in the area around Loch Ness. The locations will
be accessible in the map when discussed or previously accessed in the game
play. Pressing the space bar skips cut scenes. The game is linear and
needs certain actions to move forward or end the day. Game loads only with
CD1.
Private Investigator
Allan Parker Cameron reminisces after finishing the case at Loch Ness in
Scotland.
Day 1: Monday,
December 17
Devil’s Ridge
Manor
Sitting
Room – After being greeted by the majordomo, he
brings you to the sitting room. Move forward and meet Lady Mac Farley. She
gets distraught because Lord Mac Farley was kidnapped. She is taken away
to rest after fainting and you notice that she dropped something on the
couch (not accessible now). The majordomo says that your things are now in
your room. Go to the guestroom prepared for you.
Exit the sitting room
through the door you entered from. Turn right and climb the stairs to the
second floor. Turn left and enter the second door on the
left.
Guestroom
– Move forward and read the note on the desk to
the right the window. A Bruce Mac Grab offers more money for your services
and the Cameron crystal. Turn left and move forward close to the bed. Pick
up the bag (which is the inventory) on the bed and items
(flask, knife, rope ladder, camera, copper
oxide powder, ink and blank paper) can now be seen in
the inventory.
Time to search the
manor.
Exit the room and go
back to the sitting room downstairs.
Sitting
Room – Look at the desk on the left and read the
newspaper about the theft of the Kelia and amber disks from the Edinburgh
museum. Note also a book about Electricity and Magnetism. Look around the
room and see a chess game that was unfinished. Note the liquor and glasses
on the table close to the fireplace. Go to the couch, look close, move the
cushion and look close at the necklace. Open the necklace and the get the
small key and pills. In the wallet in inventory, read the
telegram that Lord Mac Farley sent to you.
Exit the sitting room
using the door to the left of the couch. Turn slightly to the left and
move forward to the right hallway with the white hutch. Go forward, turn
right and enter the kitchen through the white door.
Kitchen – Upon entering, turn right,
forward, turn right and open the small cabinet on the wall. Pick up the
passkey. Turn around and go to the fireplace seen on the left of
the screen. Look close on the sink beside the fireplace and pick up the
rag. Turn around and go back close to the door you entered in.
Right across the small cabinet where you got the passkey, note a
dumbwaiter. Go forward and look close at the drawer of the dark brown
worktable on the left. Get the matches and candle from the
drawer – this action triggers Lady Mac Farley’s bell to ring. Go back to
the dumbwaiter and pull the handle on the right to bring Lady Mac Farley’s
tea to the second floor. Turn right and climb the
stairs.
Laundry
Room – Upon reaching the second floor, turn right
and enter the laundry room. Go forward to the dumbwaiter and pick up Lady
Mac Farley’s cup of tea (triggers entry to Lady Mac Farley’s room).
Note a ladder at the corner of the room (not accessible) going to the
attic. Exit the room.
Turn right, forward to
the main area and enter the door close to the stairs to the left of the
screen.
Lady Mac
Farley’s room – Upon entering, turn right and go forward. Right click
to open inventory, get pills (link chain flashes) and then click on cup of
tea – to get cup of tea + pills. Give cup of tea + pills to Lady
Mac Farley. Watch as she rambles about – 3 crystals
and the banshee waiting for them. The banshee could help and she can be
found walking at the park close to the Celtic cross. Look at her
chest of jewels if you are really the man to help. Turn left and open the drawer of the dresser close to the door.
Pick up the chloroform. Go to the other side of the bed and open
the drawer of the marble/mirror table by the door. Get the picture
of the banshee with her arms spread forming a cross like position with 2
orchids on the left and a carafe on the right. Turn around and climb the
stairs to the bathing area. Open the jewelry box found on the table using
the small key from inventory. Pick up the attic key. Exit the
room.
Upon exiting Lady Mac
Farley’s room, turn left, forward and use the passkey to enter the next
door on the left.
Lord Mac
Farley’s room – Upon entering the room, turn left
and approach the bookcase. Open the bookcase and pick up the
memorandum. Read the memorandum on how to use the telegraph device
found in the wallet in inventory. Turn right and go to the desk close to
the window. Open the drawer of the desk and note the appointment with Mac
Grab at the distillery. Move the cursor to the left and click to look
close on the top of the table. See fingerprints. Use copper oxide powder
on fingerprints, then ink and then the blank paper to get an impression of
the fingerprints. Exit the room.
Upon exiting the room,
turn left, forward, turn left and climb up the stairs to the attic. Walk
to the very end of the set of corridors to a locked door. Use the attic
key to open the door. Enter.
Attic storage
room – Uh Oh! Somebody locked Cameron in! Go
forward to the candleholder stand. Turn left and place candle on
candleholder. Use matches on candles. Turn a little to the left to get
active cursor and go forward 2x. Turn right and get the crowbar
from an open box. Turn to the left and go forward to the cabinet with a
candle on top. Open it and pick up the map. Look at the folded
paper at bottom right in inventory and study the map. The places are still
inaccessible. Turn right, forward, right, forward and right. Look close at
box on table. Look at the picture album. Hey, your father is here also –
Sean Cameron – so that where you got your looks from. Get the picture of
Lord Mac Farley and note his cane. Turn right and climb steps to the round
room. Turn back and go down the steps (triggers the cut scene). Use
crowbar on boards blocking the window. Look close on window – WOW!!! – use
camera on the monster to have this photograph for posterity. Go
back down the steps and forward to the locked door by the right wall. Use
crowbar on locked door. Enter, forward to trap door and open it. Eeek! I
don’t think my heart can take this! First a monster, now a banshee. The
banshee is beckoning to you. Cameron’s advice seems the best to follow.
Exit and go down to the sitting room at the first floor. Use either the
kitchen stairs or the main stairs.
Sitting
Room – Go to the liquor glass table by the
fireplace. Look close at table, use flask of bourbon on glass. Pick up the
blue Cameron’s crystal from the glass. Exit the room using the door
by the main staircase.
Meet the
Banshee
Now fortified by that
bourbon, it is time to prepare to meet the banshee. She beckoned to us,
didn’t she. Open the door across the sitting room and enter. We need the
things that are in the picture given by Lady Ursula.
Ballroom – Upon entering the room, move
forward to the liquor cabinet at the far corner of the room. Open it and
get the Mead carafe (looks like the picture). Turn right and go to
the display cabinet at the other end of the room. Use the knife on
cabinet, open the box found inside. Get the Auld Alliance Treaty
dated October in the year 1295. Exit the room and now to look for the
flowers – where else but the greenhouse.
Looking at the map in
inventory we see where the greenhouse is situated. Exit the manor through
the main door, which is now accessible. Go down the steps, right, forward,
right and forward 5x to the greenhouse on the left side of the
screen.
Greenhouse – Enter, forward and turn left.
Use knife on Phalaenopsis orchid flowers. Now all the items needed
are here – time to meet the banshee. Exit the greenhouse and go back to
the front of the manor.
Park –
Checking the map, the Celtic cross is right across the manor and by the
water’s edge. From the steps of the manor go forward 4x to cross. Place
the flowers and the mead at the foot of the cross. The Banshee appears and
greets the last of the Camerons from Inverness. She
explains the legend of the crystal of Sirdach and more information can be
found in the book of Kelia. The crystal was stolen by a woman and divided
into 3. They were given to the Mac Farleys, the Mac Grabs and the Camerons
for safekeeping. The combined crystal has great power and a man in this
century wants to reunite the crystals for a sinister plan. The banshee
gives a warning – to beware of women and whisky.
Day 2: Tuesday,
December 18th
Search for clues on
the disappearance of Lord Mac Farley
Devils Ridge
Manor:
Exit the guest room. Go
forward to the hallway by Lord Mac Farley’s room, forward again and hear
voices. Look for the source of that voice. Turn left and down the stairs.
Enter the room on the left of the stairs.
Library – The gramophone is stuck making an
unpleasant noise and the voices we are trying to follow cannot be heard.
Go forward 3x, left and turn the gramophone off. Now listen for the
voices. Go to the spiral staircase at the other end of the room. Climb up
and look close at the ceiling close to the wall. Open the
trapdoor.
The cut scene shows
Moira Mac Farley and Mac Grab talking about the crystal. Mac Grab wants
access to Mac Farley’s office to look for the crystal. Go down the steps,
turn to the left and go forward to far end of the room passing the
fireplace. Look close at the niche with a candle in it. Note the dragon
engraving on the oval frame. Exit the library.
Turn left, forward to
the end of the hallway, left and open the door on the right to get to the
foyer.
Foyer – Go forward 1x, turn around to the
right and look close at the briefcase sitting on a bench between the
lighted statue and suit of armor. Open the briefcase and pick up the raven
signet ring and letter. Mac Grab comes down the stairs and
wants to meet you tonight at the distillery. The distillery can be reached
via the river. Read the letter that is in the wallet in inventory. Alban
Arthuan?? Let us follow Cameron’s advice to go to the distillery now.
Before you do, face the main exit door, turn around and make note of the
Mac Farley coat of arms hanging on top of the door between the 2 suits of
armor. Exit the manor.
Boat
Ramp – To get to the boat, you can either use the
map or walk there. To use the map, click on stone bridge in the map, and
find yourself facing a stone bridge. Turn around and move forward 1x on
the path. Turn left and go forward to the inlet. Turn left and forward to
the landing. To walk to the boat ramp from the manor stairs, go forward,
left, forward, left, forward 2x, right and forward 2x to get to the
landing. Turn left and pick up the oars. Turn around and place oars on the
boat.
Distillery:
Outside the
distillery – Upon arriving at the distillery,
Cameron sees the watchman carrying a gun enter the building. Knock on the
door to see if you can get in. Turn left, forward, right, look in the
window and see the guard in the office. Turn around, forward to the
barrels, (Cameron talks) turn right and look close between the 2 center
barrels. Pick up the pliers. Turn left, forward, right and see the
waterwheel. Go forward, right, forward to the chained door. Use pliers on
chains and then enter.
Storage
room – You might want to save game
here. There are 2 ways to get to the door on the right. One is by turning
right, forward, step on a bottle making a noise thus alerting the guard
and he shoots you – game over or upon entering the room, go
forward, turn right, forward and open the door.
Main distillery
room – Move forward, turn right, forward, right
and enter the office. In inventory, combine chloroform and rag to make
rag + chloroform. Use rag + chloroform on guard. Look close at bag
hanging on the back of the sleeping guard’s chair. Open the bag and pick
up the Grand Book of Kelia. Read the book found in the wallet and
turn the page using the arrows on top of the screen. Note the
illustrations that show the power of the crystal and the second to the
last page that shows letters with corresponding lined icons. Turn right
and pick up the cane. It is Lord Mac Farley’s cane with the dragon on the
handle. He has been here then. Turn the dragon handle and pick up the
chest key. Back up from the handle scene and then pick Mac
Farley’s cane up from the floor again. Exit the office and go back out
to the waterwheel area.
Waterwheel
area – Cross the ramp to the other side to look
close at the waterwheel. Use Mac Farley’s cane on the round stone closest
to you of the waterwheel setup. That stops the water flowing! Go back
inside to the storage room.
Storage room to
cellar – Go forward, turn left and open the cellar
door. Climb down. Turn around and go forward to the electric chair by the
right wall. Look close at the small chest on the floor beside it. Open the
small chest and pick up 2 amber disks and 2 mirror disks.
Click the electric chair away from the door behind it. Use the raven
signet ring on the door. Click on the door.
Underground – Move forward 3x and reach an
area with 3 exits in front of you. The left exit has a blue raven on top,
the middle exit has a Celtic cross on top and the right exit has the Mac
Farley coat of arms on top. Take the right exit. Move forward, pass the
grill gate and look around. The dark brown chest by the door has diving
shoes and helmet. The dark brown cabinet has the diving suit. Exit the
underground using the wood door and find yourself facing the greenhouse
outside the manor. Go inside the manor via walking or the
map.
In search of Mac
Farley’s crystal
Devil’s Ridge
Manor:
Go to the library.
Starting from the manor’s main door, go forward, open door, turn left,
forward, right, forward, left, forward, right and open the
door.
Library – Go to the niche at the far left
corner of the library. Look close at the dragon engraved on the oval –
looks familiar. Use Mac Farley’s cane with the dragon-etched handle on the
niche’s dragon engraving. Voila! You found Lord Mac Farley’s office. Enter
the office.
Lord Mac
Farley’s office: Turn a little bit to the left and
go to the glass-enclosed bookcase. Use the chest key to open the
bookcase’s bottom right cabinet. The door swings open. Note the Latin
words meaning – the Scottish treaty and the year of the Lord. Now, where
did we see that before? Open the wallet in inventory and read the Auld
Alliance Treaty. Change the numbers on the safe to that of the year of the
alliance – MCCXCV. Pick up the armchair directions paper that shows
a glove and a diagram of a chair. Climb the stairs. Note the Mac Farley
coat of arms. On the way, see a chair that is similar to the drawing that
was obtained from the safe. Move forward 2x from the chair and turn right
to the window. It is not accessible. Continue to climb up and enter the
tower laboratory.
Tower
laboratory – Go forward, turn right and pick up
the metal glove and window handle from the worktable. Turn
left and note the equipment at the end of the worktable. Now that we have
the glove let us check that chair that we passed by on the way here. Exit
the laboratory.
Chair – Look close at the chair. Save
Game. Follow the armchair directions in the wallet. Push in top
left metal button, push in right metal button, lift right armrest, lift
left armrest, pull down right metal rod and then pull down left metal rod.
Using the metal glove from inventory, pick up the pink/red Mac Farley’s
crystal. Move away from the chair. There are a lot of electric chairs
around here! That maid locked you in!! Timed Puzzle – turn
left, forward 2x, turn right to window and then use window handle on
window.
Arrrgh! The maid cut the
rope! Fergus Mohr fished you out of the moat. Moira speaks of her father’s
worry about the crystal of Sirdach falling into the wrong hands. Lord Mac
Farley sent some documents to Scotland Yard and it needs only the Book of
Kelia to compare it to. She says for you to telegraph Scotland Yard all
the documents you have so that they can send back the document sent by
Lord Mac Farley.
CD2
Contacting Scotland
Yard
Day 3: Wednesday,
December 19th
Lord Mac
Farley’s office – A new item is added to the
inventory, Moira’s code (Sirdach Chapelle). From the guest room, go
to the library on the first floor. Open Lord Mac Farley’s office by using
the cane on the niche’s engraving. Go to the desk at the center of the
room and look in the drawer. Pick up the Indian dagger and
observatory key. Turn around and look at Lord Mac Farley’s portrait
on the wall.
Climb the steps to go to
Lord Mac Farley’s laboratory. Upon entering the laboratory, see the metal
door on the left with the Mac Farley coat of arms. Use the observatory key
to open the door.
Tower
Observatory – Climb steps and look close at the
telegraph machine in front of you.
Telegraph
machine – Look in the wallet for the memorandum
you obtained in Lord Mac Farley’s room and follow the directions. 1.
Press the lever on the top right of the machine to turn the power on. 2.
Enter the number 75436 by flipping the switch of the specific numbers on
the panel to contact Inspector Pukkabrain of Scotland Yard. The green
light comes on. 3. Enter Lord Mac Farley’s ID number 65 on the machine.
The red light turns on. Pull back from machine and look close at right
gray metal deck of the contraption on the right of the machine. 4. Place
the documents from inventory – Moira’s code, fingerprints and photograph
on the right deck. Each item will be scanned and the next item can be
placed on deck. Pull back from right deck. 5. There are already blank
papers on the machine. 6. A ring is heard. Look close on the left bronze
deck of the contraption. Pick up Scotland Yards answer and read
it in the wallet.
Pull out of the machine
and turn to the right of the tower observatory. Look close on the cabinet
to the right. Open the cabinet and pick up the files and the
raven statuette. Study the file in the wallet. So, Lord Mac Farley,
Mac Grab and the majordomo, Avit Kumar Shastra did crystal experiments to
make holograms. Note the positions of discs, statuette and pink crystal on
the machine.
Hologram
experiment – Go down to the laboratory and look
close at the machine at the left end of the worktable that is similar to
the diagram in the file. Click the amber discs, mirror discs, raven
statuette and Mac Farley’s crystal on the hologram machine. Watch the
production of a raven hologram. If you seize the Celtic triskel,
only the raven will know how to open the path. Pick up
the Mac Farley’s crystal and the raven statuette. A ring is
heard. Go back to the tower observatory.
Pick up 2 Scotland
Yard’s answer (drawing and letter from Chief Inspector Pukkabrain) and
Mac Farley’s message from the left deck of the contraption. So the
fingerprints are Mac Grab’s and the “monster” is possibly a submarine. The
game’s afoot!! Based on Mac Farleys message, we have to get the Celtic
triskel and the key to the chapel.
In search of the
Celtic triskel
Lord Mac
Farley’s office – Go down to Lord Mac Farley’s
office and look behind his picture situated on the wall directly behind
his desk. Use Indian dagger on box. Pick up chapel key and
poem. The poem states – I am the stones of power but also
the messenger of the gods. I will half open the passage to the one who in
the proper order will know how to write my name. Use the
map to go to the chapel or walk over there.
Chapel – Use the chapel key on door of the
chapel but it breaks. The banshee appears to give you clues – In
search of the cursed triskel; there are 2 paths – one of the flesh and
earth (key) that is already destroyed and the other of knowledge
and sky. The key is found in the book of Kelia. Cameron wants a rope. Go to the boat ramp
via map (stone bridge) or walk.
Boat
ramp – Open the chest that previously had the oars
on top using the pliers. Pick up the rope and grapnel. Go
back to the chapel.
Chapel – From the chapel door, turn right,
forward, left and forward. Look up at the corner of the chapel. Combine
the rope and grapnel in inventory to get rope + grapnel. Use rope +
grapnel on active spot of corner of the chapel close to the roof. After
the climb up, look close on the round metal drawing. It has the Celtic
triskel at the center and familiar lined icons.
Celtic
triskel puzzle – Based on the poem and the
banshee’s hint, the solution is apparent. Copy the lined icons of the
round metal. Open the book of Kelia to the second to the last page.
Translate the lined icons to make – RCDSAIH. Press the lined icons on
the roof of the chapel to spell – SIRDACH. Numbering the lined icons
from left to right as 1-7, press 4, 6, 1, 3, 5, 2 and
7.
Inside the
chapel – Enter the opening using the rope +
grapnel. There are 3 stones with face carved on it around the central part
of the chapel. Look around at the side chapels. In one you will see an
inscription on the wall – Risen from ancient times, king, queen
and knight will cross glances and discover the path of the inexpressible
power. Go back to the center of the chapel and click each
of the carved stones so that they face the center (cross
glances). Steps to go below the chapel appear. Go down to
the crypt.
Crypt – Go forward and pick up the Celtic
triskel off the pedestal. Locked in again!! The door has the raven
marking on it. Based on the raven door and the hologram raven inscription,
place the raven statuette on the pedestal of the Celtic triskel. Go out
through the now open raven door. Now, you are in familiar ground. Go to
the manor via the map or walk over.
Manor – Cameron talked to Shastra, the
majordomo. The collaboration between Mac Farley and Mac Grab has been
going on for 5 yrs. and involves electricity. Last year, there was a
disagreement between the two concerning the usage of the experiment and
the collaboration ended. The people of Loch Ness thought the monster has
returned and further opinion will wait for Lord Mac Farley’s
return.
Day 4: Thursday,
December 20
In search of the
monster’s hiding place
Sitting Room
– Exit the guest room and hear a strange sound. Go
to the sitting room. Go to the window close to the billiard table and look
close. The monster is back. Go to the greenhouse.
Greenhouse – In front of the door to the
greenhouse, turn left and look close at the wheelbarrow. Pick up the hose
on the wheelbarrow. Cameron brings the wheelbarrow and hose to the Manor
underground.
Manor
underground – Place the diving suit found in the
cabinet, the diving shoes and diving helmet found in the chest close to
the grilled door in the wheelbarrow. Go to the air pump wheel/box
contraption found at the opposite wall across the cabinet. Click on the
air pump and realize it is too heavy and need Fergus Mohr’s help to carry
it.
Go inside the greenhouse
and ask Fergus Mohr to help you. Cameron informs Mohr that he wants to
explore underwater and needs his help to pump air to the diving suit.
Underwater
maze –
Use broken bottle on
moss-covered door. Note the Ravens on the door. Turn around and move
forward. Realize that the air has been cut off! Return to shore
immediately. Timed puzzle.
Turn right to climb up
and then turn left. See that Fergus Mohr has been knocked unconscious. Go
forward and hear Moira scream. Go to the manor and Lord Mac Farley’s
office.
Lord Mac
Farley’s office – The office has been ransacked!
Look around. Lady Ursula says that Mac Grab has taken Moira to the
distillery. There is a pistol upstairs in her dressing
table.
Find
Moira
Lady Mac
Farley’s room – Go to Lady Ursula’s room and get
the revolver from the mirrored dressing table by the left side of
the bed. Use the map to go to the Distillery.
Distillery – Go to the waterwheel area. On
the way to the door, pick up the bag of sawdust by the right side
wall beside a wheelbarrow and gray barrel. Go through the door to the
storage area and to the other door to the main distillery area. The maid
locks the door behind. Go out the main door. Ouch! The maid hit Cameron
unconscious. Wake up in the cellar.
Cellar – Check the inventory and realize
that the 2 crystals and the triskel are gone. Turn left and forward to the
opposite wall. Pick up the leather strap. Turn right, forward, left
and look up to the barred window. Use the leather strap on the bars – this
attaches one end of the leather strap to the bar. Turn around, go forward
and use leather strap on winch, thus attaching the other end of the
leather strap. Click on motor to pull the bars off the window. Exit
through the window.
Outside
distillery – Save game here. Look
down and pick up your bag. The maid comes out of the distillery and
is about to shoot you. Get revolver from inventory and shoot the bag
hanging over the maid. Go to the maid and look close. Pick up Mac
Grab’s blue notebook. The banshee appears and says that tomorrow is
the shortest day of the year, the day of the Alban Arthuan.
Day 5: Friday,
December 21st
Guest
Room – Read Mac Grab’s notebook and note the
access code to the Triskel room is 532 and the access code to the
underground dock is 421. Also note the other members of the cult and that
today is Alban Arthuan, winter solstice and Capricorn is the sign. Go to
the manor underground via walking or use the map to the greenhouse and
walk across to the manor.
Raven icon
underground – Enter and go to the
underground with the raven drawing at the top of the entrance. At the end,
note the stone with the triskel symbol. Turn to the left and look close at
the wheel. Note the light streaming from above to a cardinal point, in
this case S – south. The sign closest to you is N and Alban Arthuan. Since
today is the day of Alban Arthuan move the outer wheel so that N is
lighted from above. Since today is the winter solstice and the zodiac sign
is Capricorn, move the Capricorn sign  to the right side of N (Alban Arthuan) by to the right side of N (Alban Arthuan) by
turning the inner wheel. A grinding sound is heard. Turn back to the
triskel stone and now we can enter the opening when the stone moved.
Mac Grab’s
hideout – Climb up and look around. Turn to
the left passage and look at window to one of the inner rooms and see Lord
Mac Farley tied to an electric chair and cables. Go forward and go left
and up the stairs to see the door to the triskel room. Go down, out of the
right exit and turn right and go forward 2x. Look in the next room’s
window and see a chemical laboratory. Go forward and turn right and see
the hatch to go down to the submarine. Save Game here –
timed puzzle coming.
Go out to the right exit
and look at the window. See Mac Grab and hooded conspirators. He talks
about the power of Sirdach. By midnight his diabolical plan for London is
to happen. He presses a button and the generator sends electricity to the
triskel and it is turned on. Timed! When the meeting ends,
immediately move to the right and hide from the departing conspirators. If
they catch you – Game ends.
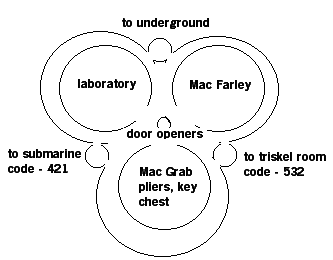
There are 3 exits:
1. Stairs going down to raven underground where we came from. 2. The
stairs going up to the Triskel room, access code 532. 3. Hatch
cover/stairs down to submarine, access code 421. The inner area has 3
rooms: where Mac Farley is, Mac Grab’s office and the chemical laboratory.
At the very center is a column that has buttons to access the 3
rooms.
Stop Mac
Grab
Mac Grab’s
office – When they leave, you have the freedom to
roam the place. Enter the inner chambers and go in Mac Grab’s room – the
only door open. Look close at the apparatus on the wall. Click on it to
switch the power on, this allows the door openers to be used. Turn around
and pick up the Triskel chest from the desk. Open the drawer and
get the platinum key and the metallic pliers. Exit the
room.
Go to the center pillar
and click on the 2 upper buttons to open the other rooms. Go to the left
open door of the laboratory.
Laboratory – Turn
right and look close at the book on the bookshelf. There are 2
formulas.
Go to the cabinet across
the room. Open it and get glycerol (5 ml), sulfuric acid (20
ml) and nitric acid (30 ml). You will also get a pipette
somehow. Go towards the door and turn around and note the beaker at the
end of the table. Exit room and go to Lord Mac Farley.
Release Lord Mac
Farley – Look close at power source attached to the cables on Lord Mac
Farley. Save game here! Flip the center switch (head
cables), then the right switch (hand cables) and then left switch (foot
cables). If you make a mistake – poor Lord Mac Farley and Game ends. Pick
up the bottle of water from the right side of the table and give it
to Lord Mac Farley. He is revived and you inform him of Mac Grab’s plan.
He will go to the Tower observatory to get the laser ready. You have to
prepare dynamite to be placed in the submarine, save Moira and retrieve
the triskel. Timed Puzzle – Save Game here! You can either
save Moira (timed puzzle will end) and come back up to prepare dynamite or
do dynamite preparation and then save Moira (there is ample time for both
of these puzzles).
Dynamite/nitroglycerine preparation –
Immediately exit and go to the beaker in the laboratory across this
room. Mix the dynamite following the directions: 1. Click nitric acid 4x
(4 x 30 = 120) on the beaker. 2. Click sulfuric acid 4x on beaker. 3.
Click glycerol once on beaker. 4. Pour beaker mixture to the distilled
water in wide mouth beaker on the left. 5. Place pipette on water
mixture. 6. Place sawdust on green bottle on the right. 7. Pickup
pipette containing the precipitated nitroglycerine and click it on
sawdust in the green bottle on the right. Pick up the nitroglycerine
kept stable (not jarred) by the sawdust. If wrong procedure is done
BOOM!- Game ends.
Saving
Moira – Exit laboratory; turn right to the exit
and then turn left. If you are coming out from releasing Mac Farley, go
across to the exit behind the central column. Enter the exit to the
submarine and enter code 421 on the access panel. Open hatch. Turn left
and enter the dock area. Turn left and forward to small bucket on the
floor. Pick up the starry key. Turn right, go forward and see
Moira inside a cage hanging over the water. Notice that the hoist cable
that is attached to the cage is connected to a lever panel on the right
wall. Go to the black panel by the right wall. The active cursor is at
the bottom of the panel. Place starry key on left of the panel and then
click below the lever to pull down the lever to raise Moira’s
cage. Time puzzle ends. If you click above the lever the cage is
submerged in water and there goes Moira – Game
ends.
Go to Moira and look
close on chain of cage. Use pliers to cut the chain. Send Moira to her
father.
If you have the
nitroglycerine now, go to the submarine, turn left on the submarine, forward and place nitroglycerine on
?ballast/torpedo on the left side of the submarine.
Now the triskel –
Go back up to the rooms above. Go to the exit to the triskel room. Climb
up and enter the code 532 on panel on the right wall by the door. Click is
heard. Go forward and left to the triskel chamber door. Use platinum key
to open the door. Open the door, place triskel chest in chamber, use
metallic pliers to pick up triskel, place triskel in chest and then pick
up the triskel chest.
Now, go back to the
underground exit you used to get up here – the one with the triskel stone
in the raven chamber. You can use the map to go to the manor now. Go to
Lord Mac Farley’s office (use cane on dragon in niche) and climb up to the
Tower observatory.
Tower observatory
– After the talk with Moira, look close at action/right window. You
see the submarine rise from its underwater hiding place, Mac Grab on the
wheel and the hologram of the monster envelope the submarine. Timed
puzzle – center the target on monster and click/shoot. The
submarine sinks and the legend of the monster is at rest again. Moira
expresses her gratitude. One more stop to see the “person” by the Celtic
cross in the park.
Park – Walk to
the Celtic cross or use map. Place the triskel chest with the flower and
mead at the base of the cross. The banshee appears and she says that she
never doubted you. The triskel and the lady will go back in legend. She
will return when summoned by circumstances. She disappears and it is THE
END!!
This document may
not be distributed without express written permission of the author and
the content may not be altered in any way.
For Questions or
Comments on this Walkthrough,
Please write to: MaGtRo
Copyright ©
3/2002 MaGtRo |