The Arrangement
The Arrangement
by
Michael B. Clark
Walkthrough by
MaGtRo June, 2004
Gameplay:
This is a first person point and click game. The Main Menu shows new game, Load,
Help and Quit. There is also a Turn on/off subtitles. Pass the cursor on
inventory at top left to lower the inventory bar. Pressing the ESC key skips the
introductions. Right click of the mouse during game play shows the in-game menu
to exit, options, load and save at top left of the screen.
See a hallway and a woman
knocking on the door. She is calling for Annie. Annie is talking to a man. Annie
and Rick get married. 5 years later…..
Office
Rick’s cubicle – Click
twice on phone to get magnifying glass cursor. Click on messages. Annie tells
Rick to meet her outside the new house to meet the realtor before they go to the
cabin. The other message is Rick’s boss, Johnson. He wants the Waverly report on
his desk on Monday.
Back out and look at the
calendar to note that Annie’s 35th birthday is on Thursday, the 4th of June.
Click on computer. Read all the
e-mails. Note that the year is 2000. Paul saw Johnson sitting at Rick’s desk.
The copier key is kept by the department head. June 19th, today is Rick’s 5th
wedding anniversary. Johnson wants 2 copies of the Waverly report. Paul sends
the Waverly report as an attachment.
Print Attachment – Waverly
Report – Open PWright – ‘your report’ e-mail.
Click on attachment. Click on
File. Select Print. Click the arrow on Copies to get 2 copies. Click OK. See
‘check on condition of printer’ and click OK. Back out of close-up.
Turn around from desk. Click on
bottom right of green printer to pull out tray.
Go back and look close at
computer. Click on OK of ‘check condition of printer’. See the Waverly report.
Close the screen by clicking on X at top right of the screen. Pull back from
computer and go back to the printer.
On the printer, press the black
button at top right to start printing. Red light comes on showing that it is
out of paper.
Go left, go forward 2 times
towards the elevator. Turn left facing a door, move cursor to right of
Johnson’s door and click the diagonal arrow cursor.
Turn on the light switch on
right wall. Look close at top box of Copy King. Move cursor on top of box and
take a paper.
Go back to the printer in
Rick’s cubicle. Check the nameplate on the left wall before entering Rick’s
cubicle – Richard Sullivan. At the printer, move cursor over inventory, then
click-hold the paper and drop it on the paper holder of the printer. It prints
the rest of the report.
Red light comes on again. Look
close at red printer button and see that it is out of ink. Rick needs 2
copies.
Take the printed report at
bottom tray. Look at it and click on report to check if you have all 5 pages of
the Waverly Report (1 copy). The first page of the second copy is where
it runs out of ink. Click the hand icon on first page of second copy and hear
Rick crumples that copy.
Johnson’s Office – Turn
left and go to Johnson’s office door. Enter, turn around and click on light
switch. Turn around and look close at ‘corp. dept.’ card behind the monitor.
Click hand cursor to take copy key.
Look at the waste basket left
of the desk and pickup a crumpled note about Fortrey.
Check the rolodex on Johnson’s
desk. Flip through the cards and note that Fortrey is to be called only in
extreme emergency and to see files.
Pull back and look close at
file cabinet. Take-click twice on the letter opener on top of the file
cabinet. The cabinet is locked and the lock can’t be opened. Turn left and look
at the picture on the wall. Exit the office.
Make a second copy of the
Waverly report –
Go back to the copier, diagonal
right of Johnson’s door. Switch on the light and go to the copier.
Insert the copy key on slot at
left of the machine.
Place the Waverly report on top
tray on the right.
Press the pad beside the copy
key.
Pick up the original report on
middle tray and the copy at tray on the left of the machine to get 2 copies of
Waverly report. Take or leave the copy key, it doesn’t
matter.
Go back to Johnson’s office.
Turn on the light. Without zooming in on the desk, place the Waverly report on
the inbox tray, left of desk.
Exit and go to Rick’s cubicle.
Look at the newspaper on the printer table about Vance Webb. Look at the
briefcase on the floor. Click the 2 locks to open the briefcase and read Haytown
Homes. To open to the next page, click on top right of the magazine. A $215, 500
house is circled.
Go to the elevator and click on
down button. Enter (end of demo) and see the location menu. Since Anne
wants Rick to meet her at the New House, let us go there.
New House
Enter the house by clicking on
door knob and go up the stairs. Hear a phone ring. Climb the stairs and enter
the bedroom on the right, left of the bathroom. Pick up the cell phone from the
floor. Click the phone to open it and press TALK. Annie is kidnapped. Close
and take the cell phone. We better follow the kidnapper’s instructions.
He knows your every move. Close phone and click to take cell phone. Exit the
house.
Office
Check the message on the phone
and listen to Fortrey. Look at the computer screen and read Fortrey’s ‘Your
Worst Nightmare’ e-mail. He wants Rick to go to 3735 Howard St. Annie’s birthday
will gain entrance. Exit by using the elevator.
3735 Howard Street
Look close at the ashcan beside
the door. Look close at Dreema’s matchbook.
Door lock – Enter
3735’s door. Look close at arrow lock.
We have to key in Annie’s
birthday.
The calendar at the office
states June 4th is Annie’s 35th birthday and the computer states it is the
year 2000. So Annie was born on June 4, 1965.
Enter Annie’s birthday – 060465
by cycling the arrows.
Enter and read the note on the
wall. Sit on the chair and click on box overhead to go to a virtual puzzle
hall.
Puzzle hall
Fortrey wants Rick to go
through the place to the other side. Look around and see 4 doors. Three doors
are locked. To get to the other side, all three doors must be passed.
US Flag puzzle room –
Enter the first door on the right by pressing the button and see a room with a
US flag and panels with colored buttons on three walls.
Face the left panel closest to
the flag, click on red circle and click the red circle on the top hole.
Turn to the middle panel, take
the white circle and place the white circle on top hole.
Turn to the right panel, take
the blue circle and click blue circle on top hole.
Turn to middle panel and press
the bottom bar to open the door.
Fish tank hallway –
Enter, hear whispers, turn left and go forward 2xs. Turn right and left to look
at the fish tanks. On the left fish tank, see a spider crawl at bottom right of
the window. Move cursor at bottom right and look close at a hole. Uhmmm… You
can ignore the whispers. Go down the hallway 2xs and turn left at the end.
Pink door room –
Enter the room and see a pink door with a pink knob on top of the door. Turn
right, click on middle bottom of the table to open the drawer. Look close at
note. Take the key of knowledge. Close the drawer by clicking at bottom
right of the open drawer.
Memory puzzle – Turn
to the opposite wall and look close at memory puzzle.
The object of the puzzle is
to find and click on 2 identical colored shapes. The memory puzzle is random.
Click on a black rectangle and see a shape. Look for the matching shape and
color. Then click both those matching pair and they will stay lit. The puzzle
is completed when all the shapes are matched and lit up.
When the puzzle is completed,
a bottom panel opens. Press the button and the pink door opens. Exit and the
door closes again. This pink door needs to be left open.
Click on the other doors and
they stay closed. Exit puzzle hall by going through the white portal at end of
hall. Exit Howard St and go to the cabin.
Cabin
Fireplace – Enter the
cabin and go to fireplace. Look close at left side of fireplace and take
poker by clicking the hand icon above the poker.
Go to the kitchen, look close
at the bowl on the counter and see Tommy’s note. Pull back and click the
diagonal cursor to look close at kitchen sink. Take blue cup.
Look close at the table set for
2. Enter the door right of the dining table.
Bathroom – Click the
lamp pull cord to get light. Enter, look down and look close behind right side
of the toilet seat. Take the neophetomine bottle. Look up and exit the
bathroom.
Bedroom – Go to the
front door, turn around and enter the bedroom door behind the
sofa.
Box:
Click on light switch by door to get light. Go forward and turn around facing
the open door. Look down, click on box hidden under the bed and it will slide
out. Look close at box, use the gold key of knowledge on lock and read Fortrey’s
letter to Annie. Move the cursor to right of pages to read the other pages. So
that is the start of the Arrangement. Close box, back out and click it (hand
cursor) back under the bed.
Look up, turn left and go to
the dressing table. Open, check and close the drawers. Look at the bottles on
top of the dresser.
Turn right twice and look close
at the cabinet. Open and read the bill for Neophetomine from Petie and Sons.
Close cabinet door, exit the cabin and go back to Howard Street.
3735 Howard Street
Enter the building and go
through until the virtual puzzle hall. Enter the first door on the right by
pressing the button. Press the button below the colored circle on the middle
panel. Go left on the dark hallway. Enter the pink door puzzle room at the
end of the hallway. Press the red button below the finished memory puzzle. The
pink door opens. Place the poker from the cabin on hole above the open door.
Exit and press the button right of the red door.
Red door puzzle room –
It seems that to open this next puzzle door, the pink door should be open. Enter
and turn left.
Red Herring Checker –
Look close at machine and read the sign. Let’s check it out. Look down, and
open bottom drawer. Place the blue cup or any other item on open drawer. Close
drawer. Press the red button and see the reading. The blue cup is a red
herring and the rest of the inventories are valid items. Back out
Trivia puzzles – Go
forward to the 3 starburst stand. Look close, click on the right top button of
any starburst panel and see multiple choice questions. Click the top button
again to stop the puzzle.
Click on any answer and
eventually you’ll get them all correct. The puzzles are very forgiving.
Do all 3 stands correctly and a
door will open on the left wall. Back up from the stand and turn left. Enter
the next room.
Cardboard puzzle room –
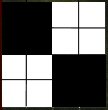
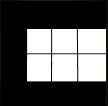
Take the 9 cardboard squares from the table. Turn left and look at the 4
pictures on the wall framing the green exit door. There’s a blue circle at end
of the hall.
Cardboard puzzle – The
aim of the puzzle is to duplicate the 4 pictures on the wall on the 4 large
panels in the room. The pictures on right wall should be duplicated on the
panels on the right wall and the wall pictures on the left on the left panels.
Click the the first picture
on the right to reveal a clue:
Two-Four-Six-Eight-Ten in a row,
One is missing, wouldn’t you
know?
Reproduction is the key,
Man’s invention you will
see.
The glowing portal leads
the way,
Rescue Annie and save
the day.”
Place the cardboards on the
squares on the panel to duplicate the picture. When correctly done, the panel
changes to black and white picture. Click on panel to get out of that puzzle.
Front left wall
Back left wall
Front right
wall
Missing cardboard
square – The back right panel C puzzle needs another cardboard to
complete. Now what? We should make one then. Be sure you have a cardboard
square in inventory. Exit through the green door, the portal and out of
the building. Go to the Office.
Office’s copy machine
– Go the copy machine area, turn on light and go to copier. To open the
copy area, click on lid at top right of copier. Place a cardboard square on
copier glass. Close lid. Place (if it is not present) the copy key on slot at
left side of machine. Press the panel beside it. Pick up the copy of the
cardboard square from left tray. Raise the copier lid and take the
original cardboard square.
Go back to the cardboard
puzzle room and complete the C cardboard puzzle.

The blue circle changes into a
tunnel when all the panels are correctly done. Enter the tunnel. Press the red
button on the glass dome at center of the room. See a view of Annie combing her
hair at the cabin. Listen to Fortrey. Turn around, exit puzzle hall and Howard
Street. Proceed to the cabin.
Cabin
Listen to Tommy’s account of
Annie’s running out of the cabin. Take the Motel 3 key that Annie
dropped.
Enter the cabin and go to the
bedroom. Turn on the lights at the bedroom and go to the dresser. Read Annie’s
note. You can take the hairbrush if you want to. Exit the cabin and see a new
location. Go to Motel 3.
Motel 3
In inventory,
click-hold-drop the magnifying glass on Motel 3 key and see room 15 on the back
of the key. Go close to door 03 and turn left. Go forward to room 15. Turn right
and see a cola vending machine just outside of room 18.
Room 15 – Use
the motel key on lock and click doorknob to open the door. Enter, turn right and
see the cursor change to a cell phone. Click the cell phone, press ‘talk’ and
listen to Fortrey tell about an abandoned shed at Millers Lane.
Look around the
room, the bible on the side table and the bathroom. With your back to the
bathroom door and facing the curtains, look close at the piece of paper on the
floor under the curtains. Take the 23567 yellow paper. Exit the motel by
going forward with your back on room 03 and go to the old shed.
Shed at Millers Lane
There’s a No Trespassing
sign on the shed. Look close at the white buttons on the left of the door knob.
We need more clues.
Office
Rick’s
cubicle – Go to Rick’s cubicle and see a red-haired man in the elevator.
That must be Fortrey.
Look at the computer
and read the latest e-mail from Fortrey.
Cryptogram Puzzle – Solve the cryptogram.
The message reads
–
TO OPEN THE SHED
PRESS THE FIRST
BUTTON,
THE THIRD
BUTTON,
AND THE LAST
BUTTON.
Johnson’s
office – Let’s see what else Fortrey did in the office. Enter Johnson’s
office, turn on the lights and go to the file cabinet. Click on the files and
read Fortrey McAllister’s letter. The letterhead is from Dreema’s Boarding
House. See a handwritten note, when you click at top right of the blackmail
letter of Fortrey to Bert Johnson. So Annie’s marriage to Rick was
planned. Close folder and close the file cabinet. Exit the office and let’s
follow Fortrey.
Dreema’s Boarding House
Look close at
Boarding House sign.
Front door
lock – Go to the door and click on the door knockers and doorknobs. Hmm.
Nobody answers. Turn right and see a door code panel.
Look close at top
left of the panel and note BAR7551. Look close at the buttons and press the
numbers from the yellow paper found at the motel – 23567 as the access code.
Press Enter and see ‘approved’.
Back up and enter
the boarding house. See a window close. Meet and talk to Dreema. Check the
clock.
Lounge – Enter the
double doors. Look around. Inside the vase on the table is a note from Dreema
about smoking, lottery ticket behind the lamp and cigarettes on ashtray.
Exit the room and
try to enter Fortrey McAllister’s office. It is locked. Turn around and enter
the door at the other end of the foyer. Enter the door on the right.
Basement – Go
down the stairs. Hear the familiar whispers. Look around and see the crates.
Click on bottom right space of the double stacked crates. See that it is from
the Petie and Sons Pharmaceuticals, the source of Neophetamine. Go to the desk
right of the stairs.
Look at the drawings
of the boarding house and a floor plan of a room. There’s a closet with ‘enter’
on a circle by back wall. See also a paper with red on top, white at middle and
blue at bottom written on 3 rows with 4 squares each row. Below the squares is a
sketch of a hallway and an arrow pointing to the right wall.
Open the drawer and
look at the picture of Annie and Fortrey. Read the news account of the
disappearance of a 12 year old Fortrey and the recommendations of the clinical
psychologist. Close drawer.
Circuit Control
Panel – Back out of the desk and look at green cabinet on left wall. Open
the cabinet and look at a circuit panel.
Deactivate the
front door code lock – Read the paper on cabinet door. It has the Circuit
ID Guide. It states the X# is made up of the first letter of 3 letters and the
number comes from the average of sum rounded up. Look at the numbered buttons
of the circuit control panel.
Remember that the
number noted at top left of the front door code lock is BAR7551.
Based on the Circuit
ID Guide, use the first letter and the average of the sum rounded up.
The circuit for the
front door lock is B and 7+5+5+1= 18/4 = 4.5 or 5 rounded up.
Press B and 5. Press
Enter. Disable Circuit? Press Y. Now the front door lock is disabled and we
can come and go at the boarding house. Close cabinet door and go back to the
foyer.
Upper level
hallway – Climb the stairs by standing facing close to the front door and
turn left. Go through the door. Open room 2C across from the table – oops!
Turn around and look
down on the table under the mirror. Open the drawer. Look at the dinner menu.
Note that the daily desserts have a number beside them. Monday – 8, Tuesday – 4,
Wednesday – 2, Thursday – 7, Friday – 5 and Saturday – 3.
Crystal ball
memory puzzle – Pick up the crystal ball. Place the cursor right of the
crystal ball to get an arrow cursor and then click. The ball turns around.
Click on single button at base to activate the puzzle.
The object of the
puzzle is to click the buttons in the same sequence shown when the buttons
light up.
Numbering the
buttons left to right, top: 1-4 and bottom: 5-9.
Press any button and
see lights come up.
#1 lights up red,
press #1. Then #1 and 4 lights up, press 1 and then 4. Continue pressing the
buttons in the same sequence they light up always starting at the beginning.
If correct, the crystal ball turns white.
The sequence of the
lit buttons: 1 4 1 5 8 3 8 9 2 9.
The ball flips to
open the base. Look and take the syringe. Close the lid and then the
drawer.
Click up, turn
right and enter room 2B.
Room 2B –
Talk to Alec, Annie’s father and learn about The Arrangement. Take Fortrey’s
office key from Alec. After talking to Alec, move forward once, turn
left, forward once and see a locked door. Turn left and check the writing table.
Open the orange diary of Annie by using the letter opener on the lock.
Read Annie’s diary and learn about Fortrey’s demands. Exit and go down to
Fortrey’s office.
Fortrey’s
Office – Use the office key Alec gave on the lock of Fortrey’s office. Enter
and look around.
Stand right of desk
and then face the desk with the bookcase on the right. Check the phone on the
desk. Click on left black button to listen to the messages. Listen to Dreema’s
messages.
Look close at the
leaflet on top of the yellow pad on the book case. It’s Photo Magic – dare to
explore. The event is on Friday, October 30. Click on top left of the close up
view of the Photo Magic to see a drawing underneath. The drawing on the yellow
pad is of a spider that is separated to 3 parts – head, middle and bottom parts
and a drawing of a geometric shape.
Spider puzzle
– Turn right and take the spider from the bookcase.
Spider
segments – The object of the puzzle is to separate the spider into 3 parts
as shown by the drawing on the yellow pad.
Click the bottom
left large segment down once and once to the left. This separated the bottom
large segment from the rest of the body.
Click the head down
once and click the head to the right once. This separates the head from the
rest.
Geometric
shape – See 3 squares, one each body segment.
The object of the
puzzle is to form the geometric shape seen on the yellow pad drawing.
Click once on each
squares to see lines. Click once more on each square to form the geometric
shape seen on the yellow paper.
If done correctly,
see a blue panel with a hole in the shape of the drawn geometric shape. Use
the letter opener on the hole. Take the spider key (looks like a rolled
paper) from top of the middle segment of the spider.
Pull back from
puzzle to return the spider to the bookcase. Turn around, forward and turn
around again to face the bookcase. Click at bottom of bookcase and open the
bottom cabinet. Read Annie’s letter to Fortrey to learn more about The
Arrangement. Open the green box and see a clue ‘Tuesday’s Treats times 12, then
day to explore’. See 10 black circles on top of the clue. Pull back and close
cabinet.
Spider Safe –
Look at the spider collection on right wall. Click on right side of the frame to
see the safe.
Spider safe
code – Note that the circles are in the same position as that of the
circles on the green box. The clue was Tuesday’s Treats times 12, then day to
explore.
The menu seen on the
drawer at the second floor hallway showed that Tuesday’s dessert has number 4.
4 x 12 = 48.
The leaflet on the
bookcase of Photo Magic – dare to explore shows it be on Friday, October
30.
Press 4830. Click on
handle.
Take the red
disk and colored paper 1. Read the notes. So Fortrey wants Rick’s
blood for its enzymes.
Close the safe and
exit the room by clicking on the door knob. Watch a cutscene of someone –
Fortrey smothering Alec. Go upstairs to Alec at room 2B. Talk to a dying Alec.
‘Follow the spider’. The phone rings. Click the phone cursor. Press Talk and
listen to Fortrey.
Move forward once
and turn left. Click on doorknob to enter the next room. Ouch!
Dreamworld
Click, wait for a
while to wake up and see Annie use a syringe. Wake up in a black and white place
with a stone fence and a spider on a roof. The spider prevents entry to the door
in the building. There’s a sack in the corner wall.
There are 2 balls on
the stone fence. Click the left ball three times and hear a sound each time.
These are sounds of bricks moving on the fence.
Turn left and look
close at left stone fence and see that a brick is removed. Press button at
second from bottom level of the fence and hear another sound.
Turn to the right
fence and look close at the space where a brick was. Press the button on
second from bottom level on right fence. Now hear a closer sound.
See a hole under the
right ball. Click on hole to get a gun.
Take gun and then
focus the crosshair on spider. Click to shoot the spider dead.
Go forward, turn
right and look at the man. It’s you… I mean Rick!
Dreema’s Boarding House
Alec’s storage
room – Wake up back in the room next to Alec’s bedroom. Look around.
Turn left and look
close at the hourglass on top shelf. Look and take colored paper 2 beside
the hourglass. Look at the picture on the wall and Alec’s bowling trophy.
Turn right and look
close at the table on the right. Look close at spiders.
Go forward towards
the far door and turn left to the shelves. Take colored paper 7.
Colored paper
reader – Turn around and look close at the machine on the floor.
Place a colored
paper to be clipped in front of the box.
Press bottom bar to
turn the machine on.
Press red and blue
button to make purple light. See words that are readable on the paper.
Press bottom bar to
turn off machine and take the colored paper. Do this procedure for the other
colored papers collected and to be collected.
Colored Paper 1 –
Collect all five
Colored Paper 2 –
discs and
Colored Paper 7 –
random arrows (red herring).
Pull back and open
the door of the closet. Move cursor to hunt for the light cord on top screen.
Click to get light. Click the clothes to reveal a hidden panel. Look close on
panel and click on button right of panel.
Secret
hallways – Go down the ladder. See ‘Annie will die’ on the wall. Look around
and see a black closed door on each of the side hallways. The main hallway ends
on a door with a spider, red button and 5 slots that would fit the colored
discs. Based on the colored papers already read and the slots we need to have 5
discs. Time to go a-searching. Go back to the ladder and to Alec’s bedroom. Exit
Dreema’s boarding house. Now that we have disabled the circuit on the door, we
can come back anytime.
3735 Howard Street
Alec with his dying
breath said to follow the spider. Where did we see a spider? Yes, at the virtual
puzzle hall.
Enter the building
and go to the virtual puzzle hall. Enter either the pink door or the flag room.
Go to the fish tank. You might see the spider crawling again on the fish tank
wall. Look close below the bottom right part of the window. Insert the spider
key (rolled paper) on the hole.
The fish tank
changed to a ladder going down. Go down and go through a yellow hallway. Go to
the very end and turn right to a furnished room separated by a hallway.
Furnished room
puzzle – Click on the red button and a panel goes down. Clicking on the
next screens shows that 4 panels surround you. Each of the panels faces the
right, left, front and back of the room.
Going back to the
first panel shows that clicking the central red button raises the panel again.
The first panel shows the right side of the hallway. Pressing the green
button shows the floor plan of the furnished area behind the panel. The red
button turns off the light of the panel. Clicking the arrows scrolls the
choices.
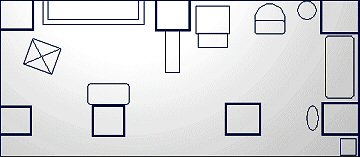
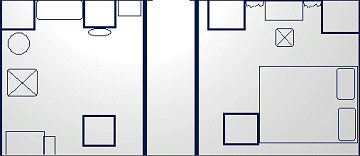
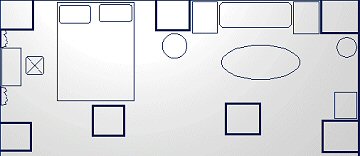
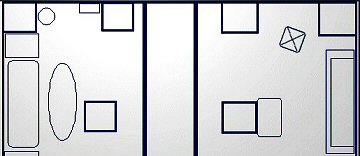
The object of the
puzzle is to choose the correct floor plan for all sides of the room based on
the positions of furnishings.
Be sure to check the
open door of the front (where you came in) floor plan and the closed metal
door of the back of the hallway floor plan.
When done selecting
go to the panel facing the closed door and press the green button. If
correctly done, the metal door opens up.
Right
Front open entry door
Left
Back closed metal
door
Go through the
opened metal door. Pick up the green disk and colored paper 4. Go
through the glowing portal, pass through the sliding door and end up in the
secret hallway under Alec’s storage room. Go through the tunnel and turn right
on the main hallway. Go up the ladder and back to Alec’s storage room.
Alec’s Storage
Room – Use the colored paper reader and clip on colored paper 4. Press the
red and blue button. It reads – red, green. So far the collected colored papers
read: Collect all five discs and…….. red, green.
Time to check the
shed.
Shed at Millers Lane
Look close on the
door and based on the cryptogram puzzle in Fortrey’s e-mail. Press the first,
third and bottom buttons. Pull back and click on door. Enter, look close at red
monitor and press the button. Enter a new virtual world.
There are 4 domed
buildings – green, blue and red around a central silver domed building.
Enter the Silver
dome and go down to a sealed star door. Exit and look around at the 3 domes.
Green domed
building – Turn around and press the light button. Read Fortrey’s note
beside the button.
Lights puzzle
– There are 8 buttons surrounding a disk. The object of the puzzle is to get
all of the buttons to light up. Press buttons to see which buttons light up.
It is an easy puzzle. Once done, click the revealed button. It tilts to the
right.
Blue domed
building – Enter the building and see a panel that shows 2 domed
building. Click on the pictures and see that the left is green and the
right is red. Since we finished only one of the domed buildings puzzle, only one
of the pictures gives a green light.
Star puzzle –
Light up the left drawing to show the green light. Click the red button
counterclockwise and see the slider move to the left. Pull back and turn left.
Take the left half of the star.
Now we have to do
the red domed building to get the other half of the star.
Red domed
building – There are 9 screens on the wall and a central stand. Turn around
and press the red light button by the door. The screens show the different
places in the game.
Game sequence
puzzle – The object of the puzzle is to arrange on the screens, the
sequence of events leading to this time in the game. Click the buttons under
the screen to scroll through the pictures.
1. Rick’s office.
2. New house door.
3. 2 rows of arrows
keypad at Howard St.
4. The memory puzzle
in the pink door room at puzzle hall.
5. The globe that
showed Annie at the cabin seen after the cardboard room puzzle.
6. Motel 3.
7. The double door
at the foyer of Dreema’s boarding house.
8. Fortrey’s
office.
9. The hourglass on
the shelf in Alec’s storage room.
Go to the central
stand and press the button. All the squares light up correct. Press the
revealed button.
Blue domed
building – Click on the right drawing.
Light up the right
drawing to show the green light. Click the red button clockwise until the
slider move to the right. Hear another sound. Pull back and turn right.
Take the right half of the star.
Silver domed
building – Go to the front door, enter and go down to the star door. Place
the left and right half star on the star on the door. Click on the star twice to
enter the star room.
Star room –
Go to the cabinet. Look at the picture with Annie’s head cut out. Read Fortrey’s
note. ‘Annie’s is in a sticky situation’. Open the cabinet and take the white
and blue discs. Take colored paper 3.
Turn around and go
to the blue portal. Turn right and look close twice at right side of the cobweb.
Insert the spider key on the hole.
Enter through the
now white portal. Look close at the cardboard box and take the yellow
disc and colored papers 5 and 6. Now we have 5 discs. Go through the
fuzzy doorway and back to the secret tunnel. Turn left on the main hallway, up
the ladder back to Alec’s storage room.
Alec’s storage
room – Use the colored paper reader and read colored papers 3, 5 and 6. The
words on the colored papers now make a sentence: Collect all five discs and
put in this order: red, green, blue, yellow, white.
Spider door –
Go back down the ladder and go to the end of the main hallway. Go to the spider
door and insert going from left to right: the red, green, blue, yellow and white
discs. Press the red button and enter.
Wall with colored
squares – Go forward and turn right to see a wall made up of three rows with
4 squares in each row. Where did we see that before? Ah, the paper on the table
at the basement of the boarding house. That paper also showed the passage to
this wall. So following that clue – click and change the top squares to red,
middle squares to white and bottom squares are already blue. Enter the spider
lair.
Cave
Go down the stairs
and turn right at the ground floor. Turn right to a green door. Open the shed
door and take the hatchet. Back up and then turn around to the cave wall.
See a cocoon. Turn right and see an exit to go to different location. Go
back to the cave and go forward to the other end.
See a control room,
go there but you find Annie hanging on a spider web in a cage! So this is what
Fortrey meant as ‘sticky situation’. Talk to Annie.
Turn left to the
control box and see that it needs a key. Look close at top of box and see
DDA5843. Talk to Annie again.
Turn left and enter
the control room. Press the green button to turn the monitor on. Press the
different cameras and find out how Fortrey knows where and what Rick is doing.
Exit the cave and go
to Dreema’s Boarding house.
Dreema’s Boarding House
See the window close
again. Go down to the basement and to the circuit panel. Open the circuit
control panel.
Deactivate the
grilled door at the cave:
Based on the Circuit
ID Guide, use the first letter and the average of the sum rounded up.
The circuit code for
the cage door is DDA5843. After calculation, it ends up D and 5.
Press D and 5. Press
Enter. Disable Circuit? Press Y.
Now the cage door is
disabled. Close cabinet door and go back to the cave.
Go back to Annie and
click on the cage door. It opens.
Now let’s get Annie
down. See active spots at around eight o’clock and 5 o’clock areas of the outer
ring of the web. Use the hatchet on those active spots.
Eek! Meet Fortrey!
Another EEK! Really
loud EEK! Meet Spiderman!
Gift? Ebony spider?
Good luck charm? What’s that on the table? Another phone call?
The End
Some Easter Eggs
found – once you have the hatchet:
1. Go to Rick’s
office. Zoom in on the phone and use the hatchet on the message button. Listen
to Mr. Johnson.
2. Go to lounge at
Dreema’s boarding house. Look close on the ashtray. Use the hatchet on ashtray.
Listen to a Russian cleaning lady.
3. Go to Fortrey’s
office at the boarding house. Open the bottom cabinet and read Annie’s
mail. Use the hatchet on the last mail with ‘I won’t do it’ and hear a
different version of the mail. Hahahahaha – I thought this one is the best!
4. Go to the now
deceased Alec and use the hatchet on him. Listen.
3. Go to Annie
hanging on the web. Open the grill door and use hatchet on Annie. Listen to
Annie.
Gee, these are
wonderful! Thanks for the laugh!
This
document may not be distributed without express written permission of the
author and the content may not be altered in any way.
For
Questions or Comments on this Walkthrough, please write to: MaGtRo
Copyright ©
6/2004 MaGtRo