Shivers II: Harvest of Souls – Lobby Vending Machine
JulieAn130’s
Shivers2: Puzzle Solutions
(Thanks to all the people on the message boards
both at Sierra’s site and on AOL who made these solutions possible)
Lobby Vending Machine:
You need to buy batteries. You are short one coin. The
coin is in Phil’s Market on the floor next to the soda machine. Combine
your change by looking at your change, when it’s big, click and drag the
extra coin on it so it combines. At the vending machine, click in the battery
code, click your change on the machine, and the batteries should appear
for you.
TV’s:
You need the chewing gum from the Lobby desk. Click the
gum on every tv you see on the red dot on it. Then you won’t be transported
to the Canyon and you’ll be able to see all the videos.
Your Hotel TV/VCR:
There’s a video cassette in your trunk. And there’s also
one in the safety deposit box in the vault at the bank.
Your First Bahos:
Here’s a quick runthrough of what to do with your first
bahos stick. All the fun puzzles in the game will not show up until you
successfully place your first bahos in the kiva on the altar. So, take
the bahos, run to the canyon, run through the canyon till you find the
picture that was near the bahos stick. Click the picture, complete the
tanagram puzzle, run through the canyon again till you come to a blue ladder.
Climb the ladder. Go through the door that has a blue door in it. Click
the flat rock with pictures on it. It will open and reveal a blue skull.
Click the skull. The blue door will open. Go forward a few times till you
come to the altar. SAVE your game here. Now click the bahos stick on its
picture on the altar. Your lifeforce will return. Use the Map feature to
warp out of the kiva. Now, your fun puzzles will show up throughout the
game.
Bakery and Barbershop Doors:
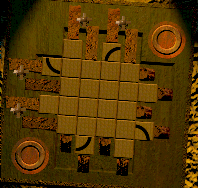
Number the top two levers, from left to right, 1 and 2.
Number the left-hand levers, from top to bottom, 3 and 4. Restart the puzzle
by walking away and coming back until you have the circle or letter parts
next to the 2nd lever, next to the 3rd lever, with the other two at the
very bottom left and farthest bottom right. So all the parts should be
kind of at each separate corner of the puzzle. Just keep resetting the
puzzle until you have this configuration. Now, move the levers this way:
3, 4, 2, 1, 4, 3, 2, 1. That’s it. This solution works for both doors as
long as you reset the puzzle to the right configuration.
Barberpole:
The decoder for the message is in the oven in Pearl’s
House. It spells Lyle’s Cymbols. This is a clue to click on the cymbols
in the Warehouse.
Pearl’s House Spider Puzzle:
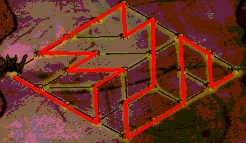
Here’s the gif of the solution.
Cemetary Picture Puzzle:
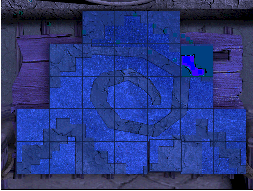
Here’s the gif of the solution. The picture itself can
be found in the cafe behind a wall picture.
Warehouse Door/Cemetary Statue:
In order to get into the Warehouse, you have to watch
a video that shows you the angel and talks about touching left to right
one by one. Once you’ve seen that video, go to the cemetary and place the
flower from the cafe in it’s holder on the statue. Now click the toes from
left to right, one by one. The base of the statue will open and you’ll
get a cd case. The paper in the case is the solution to the warehouse door
puzzle and the bar in the case is the missing bar on the door.
Warehouse Marble Solution:
You have to get all the marbles in their proper colored
spaces, like all the blue in the blue spaces and so on in only about 38
moves. To use this solution, click the ball directly to its destination,
don’t click it square by square, that way you should get the correct number
of moves. Number along the top, left to right, one through seven. And letters
A through G down in the side, top to bottom. And move the marbles this
way:
6G-3G, 1F-1C, 2A-5A, 7F-7G, 7G-6G, 7B-7F, 6E-7E (free),
7E-7B, 2C-2D (free), 2D-1D, 1D-1F, 5D-5E, 5E-7E (free), 2B-2D (free), 3B-3C
(free), 5B-2B, 2B-2A, 5F-5B, 5B-2B, 4C-4B, 3F-5F, 6F-6D, 6D-5D, 6C-6E,
3C-6C, 3D-3B, 2D-3D, 2E-2C, 4E-4F (free), 6E-1E, 6C-6F, 6B-6E, 6E-4E, 4B-6B,
5A-5B, 2C-6C, 2F-2C, 2C-4C, 4F-2F, 3G-3F, 1E-2E, 1C-2C, 7E-6E
Phil’s Market Cash Register:
Click on the snake, leave the market, come back, when
the snake is gone, click its cage. The solution is in there.
Phil’s Market Soda Machine:
The token is under a tile on the window ledge. It’s refered
to in a video, I think it’s called Get A Grip and you see a window in it.
Take the token, put it in the machine, click the soda buttons and the letter
decoder will appear. You use it on the bank computer puzzle.
Phil’s Market Egg Puzzle:
Number the tray at the top, left to right 1 to 7. Upper
left to Lower left A to G and jump the eggs this way:
1A-1D, 1D-2D, 2D-7D, 7D-7B, 7B-1B, 1B-3B, 3B-6B, 6B-6E,
6E-6G, 6G-3G, 3G-3D, 3D-3A, 3A-5A, 5A-5E, 5E-2E, 2E-7E, 7E-7G.
Here’s another way of doing the egg puzzle:
If you look at the little dots on the spaces, those are
the number of moves you can make when you click on a space. Like if there
are two dots, your next click will only move you two spaces over. So, here
is a solution.
Space 1, click straight down as far as you can move it.
Click right, click right again as far as it will go, click up, click all
the way left, click right, click right again, click straight down as far
as it will go, click down again, click left, click up, click up again,
click right, click down as far as it will go, click left, click right (you
should be one space above the end now), click down. That’s it. Below is
a rough sketch of the moves.
1<<<<<<13<<<<<14
6<<<<<7<<<<<<<<<8<<<5
2<<3<<<<<<<<<<<<<<<4
<<<16<<12<<<<15<9<<<17
<<<<<<<11<<<<<<10<<18
Bakery Doughnuts:
Number the doughnuts from left to right 1-10.
Move #4 to #1, Move #6 to #9, Move #8 to #3, Move #2 to
#5, Move #10 to #7.
Safari S &L Bank Door:
You can find the solution in one of the videos. It’s 11,
12, 13. You have to click three numbers that add up to 11 (8,1,2), now
click three numbers that add up to 12 (7,5,0), and click three numbers
that add up to 13 (6,4,3). That’s it.
Safari S &L Wall Safe:
Look around the bank at the pictures of zebras, and such.
Note how many there are. The safe is behind the desk on a wall, click the
newspaper clipping to get to it. Now, here’s the solution from top to bottom:
1 tiger, 5 hyenas, 4 elephants, 3 impalas, 5 zebras. Now click the handle
to open the safe.
Safari S & L Vault:
You need the decoder from Burt’s trailer for this one.
Once you have it, look at the vault door and notice the number and letter.
Now, go to the wall safe and place the decoder in it on the page number
that’s on the vault door. Click the zebra on the decoder to turn it to
the direction that’s on the vault door, like S for south or N for north.
The three numbers you are given are the combination. Read them top to bottom.
The same with the letters. If you are given LLR, just click Left, Left,
Right. This safe doesn’t require passing a number or anything. Just click
directly to your numbers. If you have trouble with this, enter and exit
the bank until you get a N or S number, then repeat the above steps for
reading the combination. You can also try the three numbers in different
ways, such as, LRL, RLR, RRL. Those three numbers are all you need, so
just keep at it with those.
S &L Picture Puzzle:
Number the tiles from top to bottom, 1 through 6. U and
D represent ‘Up’ and ‘Down’. L and R represent ‘Left’ and ‘Right’. Here’s
how to move the pieces:
5RU, 6URD, 5D, 4DD, 3DD, 1R, 2DDRUU, 3UUU, 4UUURD, 3DR
Here’s the strategy. You want to flip the picture tiles
over so you have the same picture but with different colors. You get a
Hammer when you’re done. Use it to smash the kachina on the desk.
S & L Computer:
The floppy disk is in the Cafe under the menus. Watch
the video that says Spell It Out. The user name is LYLE, the password is:
AIVILO. You get a bunch of letters. Use the decoder from the soda machine
at Phil’s Market. It spells something like DAY OF HER ACCIDENT REPORT.
That’s the clue for Max’s cave stick puzzle.
S & L Trash Can Letter:
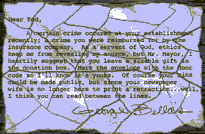
This one you just have to look at the pieces and fit them.
It’s annoying but you can do it. If you’re really stuck, use the solve
feature or try this gif of the solution.
Church Bingo Puzzle:
I haven’t tested this solution yet, so don’t hold me to
it. Click the balls this way:
6, 3, 8, 6, 3, 7, 5, 3, 7, 5, 3, 2, 1, 4, 6, 7
Here’s one that has been tested:
6, 3, 8, 6, 5, 7, 3, 5, 7, 2, 1, 4, 6, 7
Church Donation Box:
The key for it is under the car at the Garage. The solution
to the Library door puzzle is in this box.
Library Door:
The pieces to the library door can be found in: Lobby
drawer, Market cash register, Church drawer, Bank safe.
Once you have all the pieces to the door, the bottom lock
solution from the church donation box can be used. However, I was
able to open the door without it. Here is the solution: Press the top left
button, don’t press the top right button, don’t press the button under
the top right button, press the next four buttons clockwise, leave the
last button that’s under the top left unpressed. That should open the door.
Barbershop Spider Puzzle:
An asterick* indicates when a switch is stepped on.
F, R, L, R, F, L, F, R, L, *R, R, R, R, L, L, F, R, F,
F, R, R, R, L, F, R, *L, L, F, F, L, F, *F, L, L, L, R, L, F
This one is alittle hard to explain so bare with me. Blue
bridges trigger red bridges. Yellow triggers blue. Red triggers yellow.
A blue bridge starts and ends the puzzle. You have to get the green button
first, then the red button, then the blue button, and then go straight
to the yellow button. So, go left first to the green button, then come
back and go up, before you come to the blue button, to the red button.
Then you have to get the blue button, which is alittle tricky because you
have to trigger different bridges. Once you have the blue one, just go
straight up to the yellow.
Sheriff’s Office Cards:
There is no set solution for this one, just strategy.
On a piece of paper, number the cards like this:
A……….K………..Q
J……….10………..8
6………5………….2
Now draw a blank grid of nine space on the paper. Watch
how the cards are switched and write them down on the paper. It also helps
if you number the cards 1 to 9 from left to right, top to botton on the
grid. If this really doesn’t work for you and you are really stuck, get
a real deck of cards, and lay them in front of the game and try and switch
them yourself.
Jail Cell Door:
You need the book from the locked desk drawer for this
one. The key is in the next room in the horns of the animal head. Once
you have the book, look at the page number on the cell door lock. Now turn
to that page of the book and look at the combination of symbols on it.
Turn the pieces that way on the door and it should open.
Max’s Cave Door Sticks:
This one is easy. You want to do the date of Norah’s death
backwards. 8/22/1992, but backwards. So turn your sticks like this: First
tile is 2, second and third are 9, fourth tile is 1, fifth and sixth tiles
are 2, and the seventh is 8.
Gas Station:
You won’t be able to raise the car till you do the chess
puzzle.
Gas Station Chess Puzzle:
You can find the clue to this puzzle in the warehouse
in a notebook. Label the board the way it’s done in the notebook, A-H from
left to right, and 1 to 8 from bottom to top. When you get your chess pieces,
look at the bottom of the pieces, their positions are on marked on them.
So this puzzle is easy, you just have to find the pieces. You can find
them: Library drawer, Jail Cell table, Pearl’s bedroom in the bird’s mouth,
Motel room next to yours in a drawer.
You must watch the video with the license plate in it
for the clue to raise the car. You have to set the pressure to 230. Since
it’s not marked on there, you have to click past it and go back till you’re
where it should be. Then turn around and click the handle to the right
to raise the car. As soon as the handle depresses to the right, the car
is raised. Look under it for the key to the donation box in the book.
Mine Enterance:
After you’ve done the chess puzzle, you can open the desk
drawer with the screwdriver. Take the gas can and fill it with gas. Take
the full can to the Mine.
Mine Directions for Torch and Back Kiva Door:
You need the torch for the bees in Burt’s trailer. It’s
in the mine. Go down in the elevator. Forward once, left (towards the dark
area), left, down, left and forward, forward and right to (S)south tunnel,
forward, right to (W)west tunnel, forward again to (W)west tunnel, go forward
you should see the torch on the ground, turn all the way around and you
should see the ladder to the back kiva door puzzle. The ladder is next
to the (E) tunnel. You won’t be able to do the picture puzzle up the ladder
until the skull at the front kiva door is broken and Nora gives you the
combination for this puzzle. You can find which picture is what by looking
at a book in the Library that has Symbols and Masks in it.
Burt’s Trailer/Cafe Candle:
The matches are behind the picture of Nora in Burt’s trailer.
Light the candle and take the piece of paper from the kachina in the diner
and hold it over the lit candle. Use the other match to light the torch
and use it to open the wardrobe in the trailer and ward off the bees. This
puzzle is easy. Just turn the blocks over, but get them so that there is
no block in the middle. I don’t have a set solution for it. If I get one,
I’ll post it.
Final Crystal/Light Puzzle
I don’t have a set solution to post here, but here’s the
strategy and the gif. Sorry about the mouse cursor in the gif, but you
can still see where the light has to go. Start at the bottom left, work
your way straight up, now straight across all the way to the right, straight
down, now straight left into the crystal thing 🙂 There are Four endings
to this game: The Max ending, The Nora ending, The Evil Spirit ending,
and The "Correct" ending. Don’t forget to try them all.
View this guide raw, exactly as the archive holds it