Sherlock Holmes The Awakened

by MaGtRo about 60 minutes to read


Sherlock Holmes: The Awakened


by Frogwares


Walkthrough by MaGtRo   January 2007

Warning: This game
has explicit gory scenes.

Gameplay:    This is a first
person game. The main menu has new game, load,
save, return, options, controls, credits and exit the game selection. During
gameplay, press ESC to access the main menu.

To save a game, click an empty square for a new save
or a square with a picture to overwrite a saved game. Then press ‘confirm’ to
enter the saved game. The options menu has video and audio settings. The video
setup selections are for resolutions, color depth, vertical synchronization
(refresh rate), antialiasing, anistropic filtering and gamma. The video settings
are for graphics, texture, water quality, water reflection and shadow quality.
The sound setup is for master volume, voice, music, effects and ambiance
adjustments. Under preferences: subtitles, mouse and camera sensitivity
selections are seen. If any changes are done from the default settings, press
the ‘validate’ button to enter the changes.

Gameplay movement can be played using the mouse or
keyboard. Press and hold of the left button makes the character walk where you
orient the mouse. Double left click will make the character run. Right click
accesses the portfolio that has the items, dialogues, documents,
reports-personal notes and the navigation map. If an icon is seen at top right of screen
during gameplay, which means something in the portfolio has been updated. Be sure
to check the item or the document taken by right clicking to open the portfolio.
This is important in the investigation. Review the documents, dialogues, notes
and reports for clues. The mouse wheel can scroll through the documents too.

At the bottom of the screen is an icon that shows the
position of the character, whether standing or crouched down.

Press ESC key to skip cutscenes.


Dr. Watson is having a
recurrent nightmare. He calls for Holmes to help him. He recounts the story of
what happened to bring him to this state.


London 6th of September, 1894

At 221b Baker St.,
Dr. Watson arrives to eat breakfast. Holmes is undergoing one of his ‘tedium’
moods due to lack of a mystery to exercise his brilliant mind. Watson mentions
that he should visit Barnes Bookstore and leaves.

As Holmes, look out the
window to see a newspaper boy. Turn to the writing desk left of the window and
pick up the matches. See that an icon appears at top right to show that a
new item is in inventory. Right click to open the portfolio and then select
items at bottom left. See a knife and the matches. If you
click on an item and then right click to exit the page, see that the item will
be at top right of the screen. To remove the item from the gameplay screen, go
back to the items page and click that item again and then exit. Look around to
get
familiar on game movement – left click-hold move forward where you direct the
mouse. Exit through the door on the left of the room. Go down and exit the
building.

Go to the newspaper boy,
one of the Baker St. Irregulars. Face him and click to talk to him. He mentions
the latest news about a Scandinavian princess. Holmes gives him an errand. A
newspaper is placed in the portfolio. Read the Strand in documents to learn
about an event that will happen soon, an alignment of 7 stars. In this event a
mysterious 8th star known as Formahaut might be observed.

Turn around and walk
toward Sergeant Rufles. Learn that Barnes Bookstore is right and then left
from Baker St. Go forward and turn right at Melcombe St. Talk to Miss Fleming, the
flower seller standing at the corner of Glenworth St. Take a left and enter the
bookstore on the left.

Barnes Bookstore:   
Go close to the ladder and click the eye icon. Holmes will state that someone
must have fallen off after seeing the scuff mark. Talk to Barnes at the counter.
He mentions what and where the books for Holmes are. Go left of the counter to
the table in front of the bookcases. Take the book on underwater fauna-fishes
and to the right, take the Desperate Pirate book. Read both of them in
documents. Go back to the counter and look at the flower on the window display –
it is a sorry sight. Talk to Barnes again. Watch Holmes’ brilliant deduction at
work. Exit the store.

A
mystery unfolds:

Capt. Stenwicks’
house:
    Walk back towards Baker St. but get hailed by Dr.
Watson at Melcombe St. Talk to Watson and then enter the gate of his patient.
Talk to Capt. Stenwick and learn about his missing Maori manservant, Baowpa.
Talk to Sgt. Rufles twice to learn that this is just one of the cases of missing
poor immigrants and his thoughts about the case.

Shed:   
Go left of Rufles and go around to the back. See a shed that is the living
quarters of the missing manservant. Look at the door and see that it is not
forced. Look up to the lintel of the door and take a piece of cloth that
got caught on a nail.

Enter and check the Maori drawing on the ground. It is of
a man escaping waves that have flying fishes. Look close at the bowl at far wall.
Zoom in and use the magnifying glass to see a ball. Take the ball. Read
Holmes’ observation under report in the portfolio. Exit the shed.

Grounds:   
Check the back of the shed close to the wall. Look down and see footprints. Look
close at the footprints. Use the magnifying glass and examine the prints.
Measure the footprint. Take note that the right footprint is missing a nail. Move the lens to see and
take a fish scale at top left of the prints.

Look up and see
something caught in one of the twisted metal on top of the wall. Go around to
the front, exit the garden, go left and around the corner.

Go forward and look at
the other side of the wall with the twisted metals. Look down and see the
footprints. Follow it to a gate that Holmes would say ‘he doesn’t need to go
there’. Take the ladder. Use the ladder on the broken metal above the wall. Click
on ladder to climb up and then take the fibre.

Go back to talk to
Stenwick. Holmes deduces that there were 2 men; one of robust size and a young
Hindu that kidnapped the Maori.

Analysis:   
Automatically be back to Baker St. After ordering Watson to talk to the
newspaper boy, he should go to the book store to find information about Maoris
customs.

Click on the chair to
start the analysis and get a close up of the table.

Piece of cloth
– Take the piece of cloth in items and then click on the microscope with the
gear icon. Once in close up view, click on the piece of cloth and Holmes will
say ‘interesting’. Right click to exit the scope view. Read reports to learn
what Holmes observed about the cloth. The cloth is now gone from inventory.

Fish scales
Take the fish scales from items and click it on the microscope. Use the
tweezers on the fish scales. Holmes will say that it is from a perch, a
saltwater fish that is good for commercial sales. Read the report and see that
it is now gone from inventory.

Plant fibre
Take the plant fibre from items and click it on the microscope. In close up,
use tweezers to get a piece of stained rope. Holmes says
to check it for the origin of the stain.

Place the stained rope on small plate
of the analysis setup on the left. Take the bottles of water,
solvent
, acid and spirit of alcohol from the table. Click
the solvent on the fibre on the plate and see it dissolve. The machine starts
to analyze the dissolved fibre. Read the report and learn that it is coal
soot.

Ball – Take the
ball from item and place it under the microscope. Use the scalpel to cut it in
two pieces. Holmes makes a comment that the mustard seed didn’t completely
ignite. Use the tweezers to get compound from ball.

Place the compound
from ball on the plate of the analyzer on the left. Use acid on the compound
from ball that is on the plate. See it dissolve. Use the match to light the
candle and heat the dissolved compound. Watch the analysis. Read the report
and learn that it is opium with some morphine and some unknown elements.

Click the chair to
finish analysis. Holmes will now say to look for Watson.

As Watson:   
Talk to the newspaper boy and learn that the Scandinavian princess’ big
bodyguard disappeared on the first day she arrived. After Watson tipped the
newspaper boy, proceed to the bookstore.

At the bookstore, talk
to Barnes and get reprimanded about patient confidentiality. Go to the middle
bookcase and take the People at Earth’s End from the table. Read it under
documents to learn that notable dreams are drawn on the soil and that Maoris
place significance to those dreams.

Go back to Baker’s St.
either by walking or use the map to jump from one point to another. See that the
points are labeled. Talk to Holmes.

Quiz –
From what part of London does one of the two kidnappers of the young Maori come
from? Type using your computer’s keyboard – Docks or Wharf or Thames. Click
arrow or press enter key.

Find the kidnappers:   
Open the map and jump to Wharf #13 by the river Thames.

Cursed Mermaid Pub:   
Enter the bar on the right. Talk to the bartender about a sailor on boat with a
coal fed boiler. He says to talk to Harper; his house with an anchor sign is
after the bridge. Find out what ails the man drinking at the bar. His package of
a wooden hand should have been delivered yesterday and it didn’t come.

Harper’s house:   
Exit the bar and turn left. Go forward pass the bridge, down the stairs and
forward to a brick building on the left. Check the door and see that it is
locked. Go to the sacks at right of door and take the rope.

Nepalese house:   
See a boy peeking out the window on the house across Harper’s house. Enter the
house and talk to the crying Nepalese woman. Harper went on a boat last night.
Her 16 yrs. old son is missing and last seen with a man who works here and has a
silver eye. Look close at the altar and take the silver Pelican medallion.
Exit the house and turn to the other end of the road.

Postman:   
See a man stagger and gets sick by the crates. Talk to the deliveryman and find
out that he was forced to drink a bottle of something by a group of thugs. He
woke up with his package gone. The bottle of moonshine is in items.
Holmes says that the moonshine is made from turnips.

Cursed Mermaid Bar:   
Use the map or walk back to the bar. Talk to the barman about the man with
silver eye. Find out that it is ‘Dirty’ Sommers. He was hiring men for his boat
to leave last night. He was edgy and had a knife in hand. Enter the first
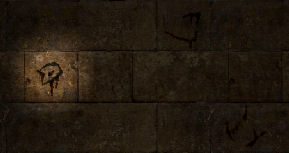
private curtain in the back of the bar. Look close and take note of the etching
on the table.

Where are the
kidnapped victims:

Smugglers:   
Use the map to jump to Nepalese house. Go forward pass the sick postman. Turn
right from the tower. Go forward and up the stairs. Enter the alley between the
2 buildings at the end of the path. Walk on the plank that is on top of a hole. See the yard littered with bottles and turnips under tarp. Holmes
makes a comment about hiding under the left tarp.

Take the moonshine
bottle from items and then click to open the door. Talk to the moonshiner.
Click on door again to get parcel.

Take the medallion from
items and then click on the door. This time the moonshiner says that Brannoch
was given one by a dockworker with a red cap and harelip. Brannoch has now gone
missing. The dockworker is at warehouse 12.

Cursed Mermaid Pub:   
Use the map or walk back to the pub. In items, combine the knife with the parcel
and get a fake hand with scraper. Give the fake hand to the drunken man.
Take the hook he left on the bar.

Warehouse 12:   
Go back to the tower close to the mailman who is now gone or use the map to go
to the Nepalese house. Take the path left of the tower and right of the ship
with the big wheel. Go forward to see a green door. Check the warehouse
number at top right of the building. Turn right, forward and again turn
right to the next path. Go forward to the 2 green doors across each other. Try
to open the left green door – #12.

Open the door
While standing close to the door, look up and see a destroyed screen above the
door.

In items, combine the
hook and rope. Click the rope on the hole on the screen. The active spot of the
broken screen is a bit touchy. Move around to get the hand cursor.

Now, it’s Watson’s turn.
Talk to Holmes.
Go to the right side of the building, around the corner and see dirty windows. Click-hold and move to
wipe the window clean. See the green door inside the building.

The puzzle appears. You
should see a padlock on the floor, the rope and hook and the lever lock of
the door.

The object of the puzzle
is to hook the padlock that is on the floor. Then click-hold-move the caught padlock to
hit the lever of the door lock. The lever flips up.
Enter the green door.

Note: I had a video
glitch here even with the patch installed, game options and computer
adjustments. I did not see the rope and hook. I moved the mouse down and then
up. After the third try, I saw a floating padlock. I moved the padlock to hit
the lever and I got through.
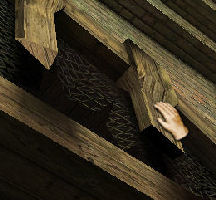
Take the iron bar
on the floor at right. Go forward and look close at the items on the floor
between 2 crates-boxes. It is an American passport for an Amos Colby. There’s a
demon drawn with blood. Check documents. Look close again and take the hatpin on the left. The
point is bloody. Use the iron bar on the 2 crates.  The right box has
sails. Take Bullseye
lantern
from the left crate. Holmes makes an observation that Watson caught
on; the boxes are used as coffins.

Big door on the floor
– Go to the big door on the floor. Examine the footprints below the big double doors on the floor.
Click on the doors and note that there is no way the 2 heroes can
open it. How can we open that?

Look up to the hanging
things and around the room to see the makings of a possible solution. There is a
rope over 2 pulleys, hanging cauldron and a faucet beside it.

Climb up the planks
below the hanging cauldron. Move the cauldron to be under the faucet. Check by going down
and see where the cauldron is positioned.

Go to the wall behind
the metal contraption right of the door. Turn on the faucet close to the floor.
This fills the cauldron with water.

Climb the plank, move
forward and that pushes the cauldron as close to
the ramp at far wall.

Climb the ramp by
far wall and click on the rope hanging on a pulley. Then click on the cauldron
and this ties the rope to the water filled
pot.

Go to the door on the
floor. Click the end of the rope and then click on the door. This ties the other end of the
rope to the door on the floor.

Climb up the planks
where the cauldron is located. Use knife on the rope that is hanging vertically. The
cauldron drops and the
door opens.

Temple:     Climb down and go
forward until a chamber with a stand at the center.

Open temple door:   
Use the lantern, place a hand over the stand at the center. See the cursor
change to a glyph. On the walls are several written glyphs.

Move the glyph cursor
over each of those 3 glyphs on one wall. See if the superimposed glyph looks
familiar. If not, go to the other side of the stand and place hand over stand.
Again superimpose the C looking glyph on the 3 glyphs on the wall.

One of the glyphs,
bottom left of left wall when combined with the cursor glyph looks like the
third symbol etched on the table by Dirty Sommers. So the wall drawings
have only part of the glyphs.


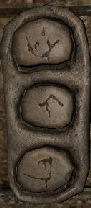
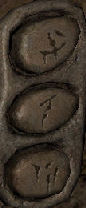
Go to the door of the
temple. On each side of the door are 3 glyphs. They are also incomplete glyphs
etched by Dirty.

Press the glyphs in
sequence etched by Dirty:    

Press the middle glyph left
(half of the wing of the first glyph) of door.

Press the top glyph (part of Sommers second glyph) right of
door.

Press the bottom glyph (part of Sommers third glyph) right of door.

Press the top glyph
(part of Sommers fourth glyph) left of door.
The door opens.
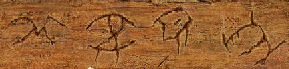
Inside temple – Look
around the temple. See bizarre drawings on walls, mattresses of prisoners and strewn labels or pieces of
paper.

Go to the left of the
door and see pelican trinkets on the table. Holmes says they are decoys.

Go to the other side of
the door and at the corner beside a mattress is a box of coal. Take some coal.

Walk the center aisle
and at second to last right column, click and look close on the floor at
the black drawing in the dust of a square with a cross inside.

At the other side of the
column see clothes. Look close at the clothes and get an advertisement for
Northwood Agency. It has a fingerprint on it.

Turn around and go to
the corner at other side where there is a work bench. Check the spilled powder
from a flask and Holmes says it is opium. Take the metal box with flower
(Edelweiss) from the table. Holmes will investigate the contents later. Check the pitcher of water on the other
bench and Holmes will say the water contains opiates.

Altar – Go up the
steps and see a naked body on the sacrificial altar. He was tortured. Click the
eye icon on the neck.

Look close on the right
hand and use the magnifying lens to see that one of the fingers has dust on it.
Looks like the fingerprint on the advertisement from the clothes below.

Look close on the left
hand and use magnifying glass on the tip of the finger. See a puncture mark done by a hatpin and used to draw the picture on the American passport.

Pick up the broken statuette on
the floor by his head. It is similar to the big one.

Look-click on either
stele by the wall. Holmes wants to make a copy of the
message. Use the advertisement on the drawing. Then use coal to get a tracing of
the message. Listen to Holmes summarize what has happened.

After all are done here at the temple,
see what happened to the victim’s body. <shivers>

Baker St.:   
Automatically be back at Holmes’ apartment. Holmes sends off a copy of the
message on the stele to brother
Mycroft at the Diogenes Club.

Analysis of the black
box with flower
– Click on chair by the work bench to start analysis.

Open the box with flowers
with the knife to get white powder. Use white powder on the microscope. Use the tweezers on the powder to get
compound.

Place the compound on
the plate on the analyzer on the left. Use match to light candle and Holmes says that it is similar to the compound tested from Stenwick’s place –
opium with
morphine.

Holmes talks with
Watson. Watson gives a clue about getting medical supplies and how they are
delivered from other countries. Customs passes the crates-boxes with
medical label and does not look closely on the contents. If they can get an
intact label they
will know which country sends these medical supplies.

Look for labels of
illicit drugs:

Cursed Mermaid Pub:   
Use the map to go back to the Pub at Wharf 13. Talk to the bartender about
custom agent. Learn that Beddoes is usually at the pier near a ship.

Customs House:   
Jump to the Nepalese house and turn around. Go to the Customs house on the left
pass the house with anchor. Go to the middle aisle and take the letter tacked on the
box from Philo to O’Reily as to why he is not there. Look at the register and learn that the
special import goods are stored
in Warehouse 16.

Warehouse 16:   
Use map to jump to the pub or wharf 13. Go to warehouse 16 at right side of
the dock. The door has ‘general strike’ and ‘factory closed’ signs on the door.

Look down and close on
the footprints on the tar. Use magnifying lens at top shoeprint
to see that it is missing a nail. Look close again and measure the footprint. It
is also size 7 like the one at Stenwick’s place. Use lens on the key at
right to take it.

Follow the tracks of the
footprints. Go down the stairs to a door close to the water. Use the key on
door. Enter and then look down to take a crate tag-label. It has the
Black Edelweiss Institute on it. Check documents to see the label.

Baker St.:   
Go back to Baker St. There’s a letter from Mycroft on the table. Holmes
summarizes what happened and who the victim is at the temple.

Quiz – Where
should you go to continue your investigation? Type in using your keyboard – Switzerland.
Click arrow or press enter key.

Watson is to book 2 for
the continent and check if there is a Black Edelweiss in Switzerland. The game
is on.

Train:   
Holmes tells Watson that they will part company in Lyon. Watson is to continue to Black Edelweiss Institute and Holmes will investigate from the other side. If Watson
needs help, contact Superintendent Bilger at the Valley.


Black Edelweiss 11th of September, 1894

Watson arrives at Black
Edelweiss in a carriage. Knock on door and Kuntz welcomes Watson. You are to
talk to Fraulein Muller. See a female patient meet her visiting parents. Talk to
Fraulein Muller.

Watson, while talking to Dr. Gygax about learning their treatment procedure,
sees a man approach the desk
and announces himself as Amos Colby. Watson tells Gygax that that Amos is a fake
and as an explanation admits to Dr. Gygax his reason for coming here – to check
for an employee that is dealing in dangerous trade. Watson was sent off to come
back tomorrow. Watch how Gygax in a few moments diagnosed the fake Amos to have
a personality breakdown and related paranoia. The man was taken away by the male
nurses. This event has untoward effect on the female patient.

Examination room (Leitung):   
The female patient is on the table and is being treated. You as fake Amos are
leaning forward on a table. Take the bottle of sedative. Take the
syringe with sedative
and then use it on the glass of water.

Learn
if the London kidnappers have accomplices here:

Cell:   
Holmes says to learn if the London kidnappers have accomplices here. Holmes has removed his Amos disguise. In items, see the hat,
topcoat

and hairpiece. In Documents, read Answer from Mycroft and Strange Poem, the
translation of the temple stele message.

Check the other occupant
of the cell. Take the meal tin and spoon above the sleeping man.

Make a fake body
– Go to the empty mattress. Place the yellow jug and bolt of blanket on the mattress. Place hat
on ‘head’ and coat over the ‘body’.

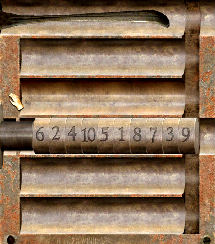
Lock – Use the
spoon on the lock. See the lock on close up

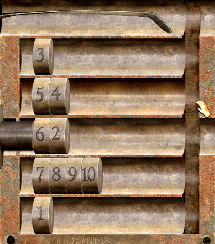
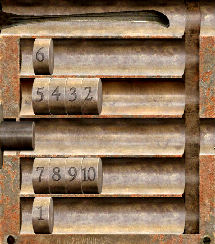
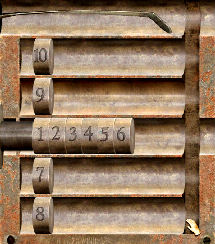
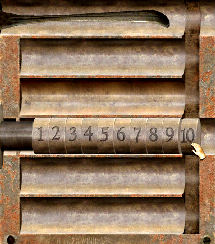
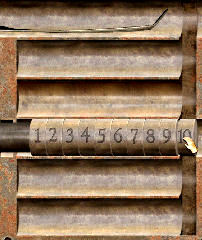
The object of the puzzle
is to arrange the numbers in the right order from 1- 10.

The rows immediately
above and below the numbers allow insertion of multiple numbers. The top and
lowest rows allow only one number.

The numbers have to be
inserted in sequence. Click hold and insert a number in a row. Below is one
solution. Door opens.
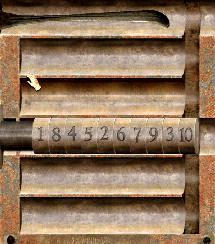
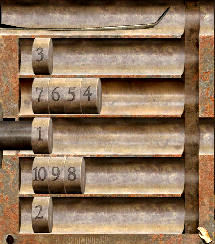
Laboratory (Labor):   
Exit the cell. The door on the left is locked. Turn to right and go forward pass an archway on the right. Turn left on the corner and see a note on the
left by the laboratory door. Read the note by Dr. Gygax. Enter the lab and
Holmes warns about being careful or finding a way to neutralize the nurse, maybe
put him to sleep. Press
the Ctrl key to crouch down as seen by the silhouette at bottom left of screen.

Crouch forward to the first
workbench on the right. At the bottom shelf, take 3 syringes: 12mm, 15mm and
18 mm
in diameters. Crouch around and see a scale on the top of this work
bench and a doll on the left by the wall. The male nurse is in the grilled
chemical-drug
room. Exit the room.

Maurizio:   
Go left – you can uncrouch now; press the Ctrl key again. Maurizio got hold of
Holmes. Talk to him; he wants the crowbar left by the workman that fixes the
pipes at the maintenance room at end of corridor. If you do not give him the
crowbar, he will announce your presence. The key to that room is on a crack by
the door.

Maintenance room:   
Go forward to end of the corridor. Read the note by the door. Click on the
crack left of the door to get key. Use key on door and then enter. See an
anvil on the floor on the right. Pick up the crowbar from floor.

Something to
neutralize the male nurse in the lab
– Go to the box right of door and pick up the
caliper
.

Go to other corner of
room and see 4 pipes on top of boxes. You can only pick up one pipe at a time.

Measure each pipe using
the caliper and see that there are a 10, an 18, a 16 and a 22 mm in diameter
pipes.

You have a 12, a 15 and
an 18 mm in diameter syringes. You need a bit of space to place the syringe in
the pipe. Take the 16 mm in diameter pipe.

Combine the sedative and
the 15mm syringe. Then combine that 15mm syringe with sedative with the
16 mm pipe to get a blowpipe. Exit the room.

Maurizio:   
Go back to Maurizio and give him the crowbar. Watch as he breaks the lock and
warns Holmes not to get caught or they will take you down below, to the
depths of Hell.
Hear the male nurses spot Maurizio.

Laboratory (Labor):   
Enter the lab and crouch down. Take the blowpipe from items. Crouch to the middle of the workbench closest to
the nurse. Automatically, Holmes uses the blowpipe. The nurse goes down for the
count.

Enter the drug-chemical
room. Look close at the sleeping nurse and take the note-letter from his
body. Read the letter in documents and learn about Gygax and stones. Look at the
2 canisters right of the nurse. The one on the right is potash which can be used
to make a spectacular smoke.

Look at the shelf and
see pink crystals. Take the Black Edelweiss metal box similar to the ones
sent to London behind the pink crystals. So, this confirms the source of the
drugs in London. To the right of the shelf are chlorine
bottles. Turn around and read the ledger-book left of the gate. It has a letter from Schnitzer of Grasshopper Company
of Zurich to Dr. Gygax concerning a discount of items usually ordered by Gygax
that they

overstocked for future transactions with the doctor. Exit the lab.

Take care of the
men in white:

Examination room:   
Time to check to see what happened upstairs after Maurizio’s incident. Go right
to the corner and take the stairs on the left. Pick up the bunch of keys
on the floor by the left door. Go to the other door across the stairs. Holmes
warns about needing to not be noticed. Go to the cabinet on the left and see
that it is locked. Use spoon to open the cabinet. Take a white coat and
automatically be wearing it.

Aviary-garden:   
Exit through the door right of cabinet and enter the aviary-garden on the left.
See talking birds in a cage at center of the room. Talk to the female patient –
Gerda. She is upset because Bauer has taken the bird feed and the birds have not
been fed for 2 days. Listen to Bauer, he says he wants to free the birds so that
the men in white will run around and not notice him. Hmm…

Look around and see a water fountain on
the corner left of the door to main reception room. To save time later, use the
meal tin on water to get a meal tin with water. The other exit has a male
nurse standing reading a note on the wall. Exit out of garden and look at the
doors across the corridor.

Read the name above the door on
the left and see that it is Fraulein Muller’s room. Exit back to the examination
room through the door at end of the corridor.

Check other patients:   
Go down back to the lower patient cells and turn left. Use the bunch of keys on
the door left of your old cell. Talk to Gerda twice at far left cell. Heidi left
her. The door to the laundry is not accessible.

Go back through the door
and turn left pass the lab. Go left pass the maintenance room and use the key to
unlock the door at end of the corridor. Go pass the first left
aisle and go forward. You might see a male nurse going around. Holmes says to
take care of the nurses so that he can freely talk to the patients and go
around. Let’s see if we can put into action what Bauer at the aviary wanted.

Becker – Go left
to first cell on the left of the second corridor. Talk to Becker. He’s wearing a
straightjacket! He wants pink
crystals. Go to lab and now you can take some pink crystals. Go back to
Becker and he says that pink crystals needs to be dissolved in water. If you
haven’t yet, go back to the garden aviary and use the meal tin on the water at
the fountain. Combine the pink crystals with the meal tin with water to get
Becker’s medicine
. Give Becker his medicine.

Talk to Becker and Becker says that the
girl that wants the doll knows where the key to the aviary is located.

Gerda – Go back
to the lab and now you can take the doll. Go back to Gerda that wants
Heidi. Her cell is through the door left of Holmes’ old cell. Go right of the
lab and pass through the door and talk to the patient at far left.

Give Gerda
the doll. Learn what she did to the bad man and why. Find out that the aviary key is
in the bad man’s room across the aviary. But it is the female’s room now. The key to that room is hidden in Heidi’s stomach
so that the bad man will not come back.
Heidi gives Holmes a present – the key to the female’s room.

Fraulein Muller’s room
Go back up the stairs and out to the corridor across the garden. Look up to read
which room is Frau Muller’s.

Use the key to open
door. Look around the room. Take the hanging macramé pot holder right of
desk. Take the macramé wrapped bottle, paper on desk and
spectacles
. Read the
paper-note in documents. Go to the last room with
the cabinet. Take the key from the white shirt hanging in the cabinet.

Time to free the birds
Go to the aviary and use the key on the lock on the cage left of Gerda. Oh My –
what a ruckus!
At least Bauer is insanely happy!

Search
the rest of the asylum:

Holmes says that it is
time to search the rest of the asylum.

Kitchen:   Go around to the other corridor
across the garden. Read the note left of the door to the kitchen (kuche). Seems
like they have problems with fire here. Try entering and Holmes says
something about a making smoke to cause Frau Mayer to leave.

Make a smoking device
– Go to the fountain and fill blue bottle with water of fountain at the
garden.

Go down to the lab and
enter the chemical room where the nurse is.

Use the meal tin on the
potash to get meal tin with potash. Take bottle of chlorine from
shelf.

Go to the workbench
close to the door. Use the meal tin with potash on the scale. Now that has the
correct amount.

Place the bottle of
water on the scale to know the capacity of the bottle.

In items, combine the measured bottle of water with
chlorine to get bottle with chlorine.

Combine the measured
meal tin with potash to the bottle with chlorine water to get smoking device.

Go back to the kitchen
and click the smoking device on the door. Hear the cook yell ‘fire’.

Enter and
look around. Take the truss for roast beef on the table and the note
on the table by the left wall. Read the note to learn the bell signal for the
tray – 3 short then a long will send the lift back to the doctor’s office. It
will be blocked at the first basement and have to go down to pick it up.

Second basement:   
Go down to  first basement and talk to Becker. Learn about the foreigners that arrive and
disappeared. They speak different dialects and not understanding each other.
None are mad. Later when they were downstairs, they would speak one language
repeatedly.

Enter through gate – Go to the gate at end of corridor. Study the 2 levers: the left one
opens the near gate and the right one opens the far gate. It needs 2 people to
get through to hold the levers.

Go to the maintenance
room and pick up the anvil. Take the trolley right of Becker’s
cell.

Hold down the right
lever
– Place the trolley under the right lever. Use the macramé pot
holder on the right lever. Use the anvil on the pot holder. Now they are
supported by the trolley.

Use the truss on the
trolley and it will automatically be stretched out on the floor to the inside of the
gates.

Pull the left lever to
open the gate here. Enter through and then pull the truss rope on the floor to
pull out the trolley holding the anvil up. The anvil drops and pulls the lever
to open the far gate. Voila!

Go down the winding
stairs.

Wolff:   
Try to talk to Wolff, another patient in a straightjacket at first cell. He does multiplications. He talks only to a
Professor Schwartz. Holmes says maybe seeing his medical files would be helpful.

Go to the corridor on
the right and forward to the end. See Dr. Gygax’ office is locked.

Disposal Room:   
Go back to the nearest intersection of corridors and turn right. Right to
another corridor and try to enter the room after Sigmund’s.

Lock – This is
the same principle as the lock in Holmes’ cell. Use the spoon and see the
numbers.

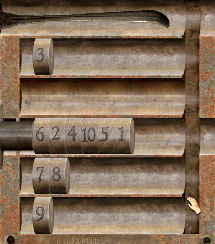
The object of the puzzle
is to arrange the numbers in the right order from 1- 10.

The rows immediately
above and below the numbers allow insertion of multiple numbers. The top and
lowest rows allow only one number.

The numbers have to be
inserted in sequence. Click hold and insert a number in a row. Below is one
solution. Door opens.


Enter and look at
gruesome things. Look down the well and see where the victims are disposed. Take
the key on the ground left of the door. Exit and go back to Dr. Gygax’
office at the end of parallel corridor.

Dr. Gygax’ Office:   
Use the key on door. Enter and take the poker left of the fireplace. Go right of
door and see a table close to the sink. Check the ‘Worship of Ghouls’ book and
the skinned head.

Open the cabinet left of
the head and read Wolff’s record. Get a photo of Prof. Schwartz.

Go to the other side of
the desk. Take the classroom key and the note. Read the Burgher’s
letter to Dr. Gygax in
documents to learn about the Swiss bank’s auction of Gygax’ jewels and the
amount collected. Use the poker to open the top right drawer of the
desk. Take and read the notes in documents: Letter from various banks concerning
more stone transactions and about a handwritten letter concerning the master. It
smells of iodine. Read the personal notes of Holmes.

Experiment room:    Use the poker on the
door left of the cabinet. Enter the room and look at the blackboard. It has
phonetic lessons.

Look at the surgical
bed’s head brace. Go to the other side and see the battery with crank starter to
stimulate patients.

Go to the table at the
corner and read the notebook that has Gygax’s experiments’ notations. Check the
bird used for experiment. Check the documents to update what is seen. Exit this
room.

Go to the back side of
the desk and take the telegram by clicking on the microscope. Read it in documents
to see the delayed connection to New Orleans.

Go out and exit this
place, climb stairs and press the lever on the right wall to open the gates.

Becker:   
Talk to Becker about Wolff and learn that Prof. Schwartz died long ago. Holmes
refers again about Wolff’s medical files.

Classroom:   
Go down the corridor away from Becker’s cell. Turn right at the corner and use
the classroom key on the door at right.

Look around and go
forward to the corner. See the punishment corner where stocks are located.

Go to the book case and
take the false beard from the middle shelf. Take the paper from
the desk and read it in documents. The letter from Prof. Herzog refers to an
anonymous patient. Holmes says to check Gygax’ medical files to find out.

Dr. Gygax’ Office:   
Go down to second basement and then to Gygax’ office. Look in the file cabinet.
Take the file with an unlabelled tab. Read about a patient that was found by
riverbank and is mute and amnesiac. The patient has an aptitude for lessons.

Wolff:   
Take a look at the photo of Prof. Schwartz in documents. See that he wears
glasses and has a beard. In items, combine the false beard and the spectacles to
make Prof. Schwartz disguise. Go and talk to Wolff. Talk about the
foreigners and where they meet.

Where the foreigners
meet
– Wolf says that Dr. Gygax has the code: Fire near his office, fire in
front of me and fire behind me.

Go to the corridor
outside Gygax’s office and push the unlit torch left of the door.

Go to the wall in front
of Wolff’s cell and push the unlit torch left of the door.

Go to the corridor by
the torture room and push the unlit torch left of the door.

The secret wall recedes.

The crazy hermit:   
Enter and see the hermit that is referred to in the handwritten letter found in Gygax’ drawer. Recheck it in documents.

The hermit expounds on
reverence to ‘One’.

Quiz: – After
talking about the eminent arrival of the ‘One’, the hermit asks: Who am I?

Review the handwritten
letter and the Strange Poem that is the translation of the message on the temple
stele.

Type – Light of Abyss.
Press enter key or arrow.

He talks about the Great
one. The Great One returns! He is so loud that it
alerts the male nurses. They are coming!

Escape:   
Immediately go to Gygax’ office at the parallel corridor. Enter the office.

Go to the right far
corner left of a curtained wall. See 2 bell pulls. The one on the left is
short and the one on the right is longer.

Remember the note taken
from the kitchen about the lift – recall the code for calling the lift.

Pull the left short bell
pull 3 times, pull the right long bell pull once.

The lift opens. Enter
and be at the laundry room. A male nurse is at top of the stairs.

Meet Holmes’
archenemy
:    Pan right and go to the cell of the anonymous
patient referred to by Prof. Herzog and has the unlabeled medical file.

Use the spoon on the
lock of the cell. Enter and try to talk to the patient. Moriarty. The one Holmes had the struggle with at the waterfall in Reichenbach.

The male nurses are
alerted by Gygax. Gygax wants the intruder caught so he can take care of his
memories.

Holmes urges Moriarty to
remember his archenemy — Sherlock Holmes. This causes a rage that makes Prof.
Moriarty chase the men. The men flee from the raging madman.

Go forward and right to
climb the stairs. Go forward to the far shelves. Turn right and take the Amos’
disguise of hat and topcoat.

Exit through the door.
Watson and Supt Bilger arrive. Watson takes the fake Amos in custody. He finally
recognizes Holmes, who is white as a sheet as though he met a ghost. He did.

Train:   
Holmes still does not know the when, where, how of the matter and needs to
pursue it further.

Quiz:   
Type in the answer to the question – Where should you go to continue your
investigation? New Orleans. Click arrow or press enter key.

A young boy enters with
a puzzle box. Holmes opens the box and hands it back to the boy. Watson says ‘it
is often necessary to use all of one’s little gray cells to solve great
mysteries. Mrs. Poirot calls for the young boy, Hercule.

New
Orleans

Watson and Holmes walk
down the ramp to the City of New Orleans. They need to change some currencies.
The items has knife, matches, bill of exchange, money
and broken statue.

Look around the Port
District and see the Louisiana Nymph riverboat-pleasure boat. The Sheriff’s
building is on the left side road. Go to the right road and forward to the
bank.

Bank:   
Talk to the bank guard and learn that Mr. Blackman just had a jewel sale and
will be back in 3 days. Use money on guard to get him to talk. Learn about
Champagne, a Cajun that knows what goes on around here.

Champagne hut:   
Follow the Cajun Quarters arrow signs. Enter the gate right of the sign and left
of the stairs of the port. Enter the warehouse left of where the dog is located.
Go outside and forward until the Saloon archway. Cross the boardwalk over the
swamp until the end.

Talk to Champagne
guarded by Napoleon and Lafayette. Give him some money to help him talk. Learn
about the gems bought by Ashmat and the silent partner in the jewel sale named Arneson. 5 days ago, there was a ship
that arrived at night and met by many boats from the swamps.

Walk back to find
Arneson.

Thief:   
Right after crossing the Saloon archway, a thief took off with the suitcase carried
by Watson. The chase is on.

These are just basic
description of where the chase occurred. The thief usually waits and you can
see where he goes.

– Enter the warehouse
and out the other door.

– A tractor blocks the
path. Climb the steps on the right and open the side gate. Walk around the
tractor to follow the thief.

– Cross the ramp with
hanging bales and board the boat. Go pass the crates and boxes and right to the
planks. Look left and up to climb the waterwheel.

– Go right on the
balcony and jump down to the ground through the broken railing at end
of balcony.

– Go to the balcony
behind the dog and around to the other side. See the planks fall to the water. Look up and grab
the net with green stuff inside to get to the other side.

– Enter the warehouse
with the sailor sweeping the floor and out the other warehouse door.

– Enter the Chinese
Quarters gate. Climb the ramp and jump down to the ground.

– Climb the other end of
the scale with boxes on it. Push the 2 boxes off the platform of the pulley
setup and the platform rises to the
next level.

– Go around the room of
the building pass a sleeping Chinaman and down to the ground on the other side.

– Climb the stairs at
other side of the yard to go up the balcony. Turn right and cross the green roof
of an archway to get to the next building.

– Look left and climb
the slats to the top balcony. Go forward to enter the building.

– Be inside the sleeping
rooms of Chinamen. Exit to the left, take the left corridor to the end and see a
closing door.

– Go through the door
and then another door to be in the next building where a man is cleaning the
floor. See the thief outside.

– Go outside, jump
over bales and right over a ladder to go to ledge of next building.

– Go forward, cross the
bridge that span the road below. Go forward on the
ledge of the building and left to go inside.

– Jump down and see a
black man working on the left. Go up the stairs.

– You are now in a big
room with a man working by the wall. Climb the metal ladder at center of room.

– At top, turn around,
forward
and see the thief cross planks to go to the other building. The plank breaks.
Turn around and click on the sack suspended on a pulley to cross to the other
side.

– Go forward on covered
rollers and planks. Climb the ladder on the right at end of the ledge.

– Go down to the floor
of a room with a giant fan rotating on the left. A man is cleaning the banister
of the stairs on the right. Climb up to the rotating fan. Push the rusty metal
structure on the fan to stop it. Walk on the right side of the fan to get to the
other side.

– Go forward and down
the chute to end up in a yard where there’s a sleeping man.

– Exit through the door
on the fence at right.

Sheriff:   
Go forward and meet the sheriff and his deputies while the thief behind them
runs away. The sheriff recognizes Holmes and Watson. A woman on the top of the
riverboat looks down for a few moments. The sheriff is definitely interested.
Holmes and Watson are told to be out on the same ship that took them here. With
open arms, Watson?

Look for Arneson:   
Use the map to jump to the French Quarters.

See a woman in front of
a gate down the road. Walk there and she leaves. See the gate with bison. Ring
the bell. The maid Eulah shyly comes back and talks to Holmes and Watson. Her
brother Davy has not been seen since 5 days ago. He does not talk and they make
contact at the stables.

Stables:   
Use the knife to open the door. Enter and see a horse dying of thirst. There are
nails on the table. Exit through the other door and be at the side of the house.

Gardens:   
Go to the front and note the well taken care of flowers. The front door is
locked. Go back to the side of the house and pick flowers: Incan Lily,
Bluebell
and White Lily from the left side. Continue to the back and
pick metal rod from the flower bed left of the fountain.

Go near the steps to the
back door and see a raccoon.

Tracks and blood
– Look down on the ground
before the steps or porch. Use magnifying lens to see blood from superficial
wound and a trace of mud. The hunt is on.

Follow the footsteps
through the path in the garden. Before the gate, see footsteps. Use magnifying lens to note
that someone came in and then came out dragging a body of great size. There are
traces of mud by shoes with thick soles.

Go out the gate and get
swarmed by mosquitoes. Turn back to house.

Arneson’s House:   
Go back to the porch and enter the back door. Look down and see blood. Enter and
note foul stench of death.

Kitchen – Enter
the door across the back door. Look around and see ham on the table. Holmes will
tell Watson to use the basin on the sink.

Horse – As
Watson, go outside and use the basin on the water in the fountain.

Take the basin with
water
to the horse in the stable. Click the basin with water on the horse’s
head.

The horse stands up
after drinking. Pick up the hammer under the horse. Go back to Holmes.

Servant’s bedroom
– Exit kitchen and go left. Go forward to the hallway by the doors. Look down on the floor and use the
magnifying lens on the footsteps. Move it around until fingers marks are seen on
the footsteps. Holmes will note that a youth picked up something from the floor.

Enter the room and look
around. See the clothes on the bed are from a small servant. Look at the picture
on the wall of Arneson with servant. Check the Hindu posters. Look at the muddy footprints at foot of bed. Move
the bed to see something on the floor. Use knife to open the wood board. Take
the ruby. Exit the room.

Closed door –
Follow the footsteps towards the end of hallway at right.

Midway see footsteps.
Examine footstep to note that a person of small stature walked with stealth.

Go forward to the door.
Look at the blood in front of the door. It came from a deep wound.

Try to
open the door, hear something and Watson says it is useless.

Dining room-parlor
– Enter the room across the hallway.

See a body on the floor.
Examine the right hand with magnifying lens and deduce that it is the gardener.

Check the liquor cabinet
left of the entryway. Take the champagne bottle.

Look at the picture of
Arneson with cigar and a dead bear.

Look at the fireplace
and see burnt paper that will not help.

Check the candelabra on
floor with blood close to dining table.

Check the
table with ashtray to note a man likes cigars.

Check the toppled chair
and note that a big man was dragged from here.

Go towards the door
right of the fireplace. Look down at baseboard close to first window. The blood
is made by a sharp blow.

Exit through the door
right of the fireplace. Look down at the blood in front of the door.

Climb the stairs and
enter the first door.

Master bedroom
Look at the writing table on the right. Take and read the paper in items. It is
a letter from L. Lakofka about Davy. Davy’s muteness is caused by psychological
trauma. He has great memory for figures.

Go to the bookcase.
There are 2 books that are of interest. Check documents to read about Tales of
Fantastic Hunts by D. Niles that talks about a beast in the swamp and mutilated
bodies. Read Flora and fauna of Louisiana: pg. 12 that talks about mosquitoes
and the use of lemon, pg 54 that talks about raccoons that nest in branches of
trees and likes carrion.

Go left to the table by
the window. Open the box and take the 40 cm L x 18 cm D metal tube
without defects.

Exit the door and look
at the lemon tree.

Go to right of the bed
and take-read the New Orleans Star clock puzzle from 5 days ago. Look at puzzle
in documents and study the numbers.

Safe – When all
items have been examined and picked up, the safe is revealed.

The clue to this puzzle is
based on the newspaper clock puzzle.

Check the relation of the inner
numbers to its corresponding outer numbers.


The inner numbers are the
numbers the outer number can be divided.

1 is divisible by 1 only = 1

2 is divisible by 1 and  2
= 2

3 is divisible by 1 and 3 = 2

4 is divisible by 1, 2 and 4 =
3

5 is divisible by 1 and 5 = 2

6 is divisible by 1, 2, 3 and 6
= 4

7 is divisible by 1 and 7 = 2

8 is divisible by 1, 2, 4 and 8
= 4

9 is divisible by 1, 3 and 9 =
3

10 is divisible by 1, 2, 5, 10
= 4

11 is divisible by 1 and 11 = 2

12 is divisible by 1, 2, 3, 4,
6 and 12 = 6

Enter on the safe:

1 2 2 3

2 4 2 4

3 4 2 6

Click on the cross
shaped handle.

Take key. Look at
gun.

Just a reminder: Study
the outside of the house and what rooms have been found inside the house so far.

Trophy room
Exit the bedroom and go to the other door. Use the key taken from the safe.

Enter and hear someone
screaming. Watson says it’s coming from the stables.

Stables – Go to
the stables. The doors are barred from inside. Turn around and take the log
to use as battering ram. Use log on stable door.

See the maid hanging
from the ceiling. Watson helps Eulah down. There’s a note pinned on
her. Read the menacing note in documents. It’s a warning.

Go back to the trophy
room and look around.

Table with a hole at
center
– Go to the table left of the sofa. See a hole at center. Place the
metal tube taken from the bedroom on the hole. See a reflection made by the
doily on the tube. It’s the picture of the fresco with words – Only the best
gunman can earn the finest arms.

Goat’s head
Take a look at the goat’s head on the wall. The plaque states ‘My Best Trophy’.
The goat’s head is missing a horn.

Go to the desk by the
window. Take the horn and look at the picture. Arneson is not there.

Place the horn on the
goat’s head and it opens to show a picture of Arneson with a lady.

Fresco – Look at the
sinister fresco. The eye of the beast on the rock is a hole.

Go back to center of
room and hear a click. You are standing on a pressure pad.

Go back to the master
bedroom balcony and pick up the lemon tree. Go back to the trophy room
and place lemon tree on the pressure pad seen above.

Go to the beast on the
fresco and use the metal rod on the eyehole. The secret door opens.

Secret room
Enter and look at the barred gun cabinet on the far wall. Take and read in documents
the 2 paper on the desk. One is Arneson’s note about Ashmat and the foreigners and
the conversation the
gardener overheard. The other is Northwood Agency letter showing collaboration
with what is investigated in Europe and the jewels.

Take a look at the
picture
on the desk. It is a signed picture of Lucy. Exit the room.

Davy – Go down
the stairs and see Davy. He immediately bars himself back in the room.

Go to the stable and
talk to Watson and Eulah.

Eulah talks to her
brother through the door. They enter the room. Watson treats Davy. After Holmes
summarizes what happened to Davy, Eulah says he’s a Hoodoo man! Davy writes on
the chalk board the numbers he saw on the paper that saved his life. See the
numbers in documents.

Pier – After delivering Eulah
and Davy to the Gallaghers, Holmes and Watson venture out the back gate but are
stopped by mosquitoes. Go back to the trophy room and take a lemon from
the tree. Go back to Watson and give him the lemon.

Go down the path until a
large pool of blood. Look at it for Holmes to do his deduction. Arneson right
hand was cut.

Go forward until end of
pier. Look down at the rope tied to the post at end of pier. How can we get to
the swamp? There’s an old man… We also need to visit a lady. This happens only
after everything has been done in the house.

Use the map to go to the
Port District and see the sheriff with his deputies menacingly advance outside
the Arneson house. Run, Watson, run.

Port District:   

Madam – Go talk
to the Madam at the Louisiana Nymph riverboat. <choke> She won’t let anyone
without money talk to her girls.

In inventory, combine
the 3 flowers to make a bouquet of flowers like the picture of Lucy. Give
the bouquet to the madam.

Lucy – Lucy comes
out. If only one flower is given, she will not talk to Holmes. If the bouquet
was given, she recognizes that it came from Arneson and she will talk. Learn
that Eroll arrived in N’awlins 2 years ago to hunt something in the swamp. They
met and they will be married as soon as her debt to madam is paid. He has a
secret room that you already found out behind the fresco and that there’s a safe
that can be accessed in the gun cabinet using Eroll’s signet ring on his right
hand.

Champagne’s hut:   
Use the map to jump to Champagne’s hut. Talk to him and he would not take the
two to the swamp at night. Give him the champagne bottle and that payment only get
planks
and a bullseye lantern; not a boat. Find a way to pay this
man.

French Quarter –
Arneson’s House:
    Watson questions Holmes’ intent.

Quiz – Who has
Arneson’s signet ring? Raccoon or racoon. Press enter or click on arrow. It’s
simplicity itself.

Raccoon – Go to the kitchen and take a ham slice. Go to the steps of the back
porch and look at the raccoon footsteps just across the big tree. Place the ham
slice on top of the raccoon paw steps. Watch the raccoon and find out where its
nest is located.

Go to the stable and
take the nails.

Go up to the balcony off
the master bedroom. In inventory, combine the planks with nails. Then add the
hammer to make a ladder. Click the ladder on the settee by the wall.
Climb up.

See the raccoon nest.
Click on – get the signet ring.

Secret room – Go
to the room opened by the fresco puzzle. Use the signet ring on the initialed
lock of the gun cabinet. Take the money from the red box and an
elephant gun
. Now, there’s money to pay the fisherman.

Exit and go down the
stairs. See the sheriff and his deputies.

Escape – Enter
the master bedroom. Go out the balcony. Take the ladder. Click the ladder
on the railing of the balcony across the fountain. Watch the escape.

Champagne’s hut:   
Arrive at Port Quarters. Use map to go to Champagne’s hut.

Talk to Champagne and
give him the money. Holmes asks about Rich parish. He says to stay close to shore
at the river. Holmes also request to tell the ship to wait for them until 8 AM.
Old Sam’s racks have blue and white ropes.

Swamp:   
(This part took long to load – wait if you have the same experience.)

Boat trip – Be
sure to review Arneson’s note in documents: Search among branches near Old Sam’s
racks. Pass in front of demon rock. Left in front of the jellyfish.

See Holmes holding a
lantern and Watson on the oars. Stay close to the left
shore and take a left at the first intersection. Row forward and follow
Arneson’s note.

Old Sam’s rack devil rock Jellyfish

At jellyfish tree,
Watson notices crocodiles. To get the crocodiles out of the way, use the
elephant gun on the body hanging on the right (see yellow arrow in the picture).

Row left of the
jellyfish tree. Forward until shore that has boats, skulls and totems.

Sacrifice area
Go ashore and see Arneson on the slab at left. Look around at sleeping huts on
water and other gruesome things. A crazed man comes out. Watson takes care of
him.

Enter the main hut and
see the idol. Look down on its base and place the broken statue on small round
pedestal. Get an idiom book.

Go back to Arneson and
click on him. They automatically go back to Champagne’s hut.

Watch Lucy sees Arneson,
Madam is convinced by Holmes and Champagne is to take care of the things at
Arneson’s house.

 London

Sail back to London:   
Holmes is interrupted by Watson. Holmes told Watson to decipher Davy’s ciphers.

Baker St.:   
Holmes got a message from Mycroft. Read the message in documents. Learn that the
investigation at Black Edelweiss showed what Holmes reported. Gygax took
cyanide. No trace of the Hindu. It also explains where the gems came from and
describes what happened to Lord Rochester’s family. The employer of Northwood
detective agency investigating the gems is a female. She might be the late Lord
Rochester’s American wife that died recently.

Davy’s cipher – The
first 9 numbers with a backslash at the end is an example of how the rest
is decoded.

687954312/ – See that numbers
1-9 are present.

Start separating numbers until
a number gets repeated. Then check which number is missing from that set.

21467983 – 5 is missing
93421758 – 6 is missing
812365497 – none is missing
52761938 – 4 is missing
57986421 – 3 is missing
24538971 – 6 is missing

56436

597248613 – none is missing
37589214 – 6 is missing
82974365 – 1 is missing
96752481 – 3 is missing
98256371 – 4 is missing

6134

Quiz – What is
the solution to the code written by young Davy? Type on your computer keyboard
56436 6134.

 Click enter key or the arrow.

Holmes is having
problems interpreting the idiom – Accursed book text taken from the
swamp. See it in documents. According to the book, if one is to make this mark
with human blood and with conviction, recite this verse.

Barnes Bookstore:   
Holmes has the idea to check with Barnes to help interpret the accursed book
text. Give Barnes the Kgwhman Kadwlun book. Holmes pointed out the 2
pages he wants translated.

Newspaper:   
Go to the newspaper boy and get a copy of the Strand. Read about missing
ships on coast of Scotland and Ireland. Read also on the second newspaper page
about an heiress in France robbed of a fortune in gems. She showed the thief a
secret passage in her house that leads to the train station.

Where to go to get a
chart of the Scottish coast?

Wharf 13:   
Jump to Wharf 13 and talk to the bartender about the Scottish coast. He gives a key to the backroom where
there is a chart of the Scottish coastline.

Use the key on
the door on the side of the bar. Go to the very back and look at the paper and
chart. The picture of a young Lord Rochester is taken.

Scottish coast chart
– Look at the chart.

Scroll the chart by left
click-hold and move the mouse.

Use Davy’s decoded
cipher as longitude (vertical) – 5.6436 and latitude (horizontal) – 6.134.

Click at the point of
intersection. Use the shape of the islands in the picture below as reference.

The point of
intersection is at the coast of Ardnamurcham.

Talk to the bartender
about Ardnamurcham. He says that the lighthouse at Scottish coast was above a pirate’s hideaway. The lighthouse
was made by a Stevenson and that it has strange symbols and statues.

Barnes Bookstore:   
Go back to Baker St. and the newspaper boy says that Barnes wants Holmes
immediately.

Go to the bookstore and
learn what Barnes has translated. He described a terrifying sect and an ancient rite that worship a
leviathan, asleep in a strange city under the sea. The sect is going to waken the
destructive leviathan when
the stars are in alignment. Each nation of the world shall be represented,
recite the invocation in a
place that is natural rock and surrounded by water. The intent is to swallow the
earth – the end of the world.


Scotland, Ardnamurcham Lighthouse December 1894

Amidst stormy waters, Holmes and
Watson arrive at the lighthouse. See people thrown down the top of the
lighthouse to the sea. There’s a Bullseye lantern in items.

Check the area:    
Go to the lighthouse and climb up the steps. Check the 2 sphinxes and see that
their faces have been smoothened and blackened as the messenger in the
translation. Take the iron bar on the base of the
right sphinx. Try the door and note that is closed from the inside.

Turn around and see a
structure straight ahead by the cliffs. Go there and see a destroyed structure.
There is a barrel of fresh water on the right and a pail on the left outside of
the building. Inside, pick up a worn rope on the floor.

Go to the right side of
the area while facing the lighthouse to be on the coast. See wrecks of ill fated
ships. If you have not gotten the destroyed building’s rope, there is another
worn rope here to be taken. You can only take one or the other.

Pirate’s hideaway:   
Remember that the bartender at Wharf 13 state that there’s a pirate hideaway
under the lighthouse.

Three geysers –
From the water side, face inland and go forward to opposite side and see 3
geysers. Holmes says to remember what MacGrinty’s man said before they slit his throat. Review Desperate Pirates book in documents. There are 3 pages. "From the
middle of the three throwing mouths, 30 steps toward ram’.

Stand at the center of
the 3 holes, face the ram like rock and walk forward until Holmes says you’re
there.

Rock – Use the
iron bar on the rock and see a hole. Pan left and use the rope on the other
rock. Automatically enter the hole leaving Watson above ground. Holmes falls
down when the rope breaks. Holmes asks for the iron
bar and Watson throws it down. The iron bar got caught on the wall.

Entrance to pirate’s
lair
– Go forward, see a slab on the wall and a skeleton. Take the old dagger
of the dead pirate. Use the dagger on the stone slab left of skeleton. The
dagger breaks. Click on the slab again to open it. Enter and see the pirate’s
hoard ahead.

Lair – See
scaffoldings, crates and entrances to other caves.

Still – After
arriving here, go right and forward to the hanged skeleton. Touch it and it
drops. Take the empty flask. Look up and see the hook that held the
skeleton. Follow the rope to the wall at right and see that a panel is active for
later use.

Go forward and enter the
still room. See that the gate is broken off. Look close at the skeleton on the
right. Take the hipflask with rum. Ugh – Holmes took a taste. Go forward
and take the big funnel from floor. Go to the other side and pick up the
rusted piece of gate that can be used as ladder.

Exit the cave and go
back and around to the scaffolding.

Scaffolding area
– Go to a crate on floor by middle of the scaffolding and left of the
giant boulder at the center. Use the broken dagger on crate and take sails that
can be used as rags.

       
Barrel – Go forward and see 2 beams or planks at right. Click on
them and Holmes will say it came from above. Look up and vaguely see something
up the rock ledge. Climb up the planks to be at a closer ledge. Look up and move
the cursor to get Holmes say ‘there is something here’.

Light up the barrel
– Go back to the hook holding the skeleton. Now that you have clicked on
‘something here’, use the lantern on the hook. Go to the panel at the end of
the rope and click it to turn and face the ‘something up there’.

Go back to the
planks-beams. Click the gate-ladder on the ledge above it and climb up. Look up
and use the empty flask on the barrel to get flask filled with powder. Go
down and go back and get lantern by lowering the hook.

Walled in area
Go forward to the left of the scaffolding and see a cave that is partially blocked by boulders.
Climb up and over the boulders. Walk over a plank bridge to the other side. If
you have done everything in the main cave, the planks break and also the
lantern.

Go forward once and see
that there’s a way to the left as well as forward.

Go forward and Holmes
will wonder about Watson. Look up and see hole above. Use the big funnel on the
hole above. Holmes calls Watson and asks for matches.

Go back, turn right and then see
that there’s a way to the right as well as forward. Take the right and see where
the pirates congregated. Take bones. In items, use the rags with hip
flask to get rag soaked in alcohol.
Use that with bones to get bone torch. Light it with the matches.

Exit and go right to the
end. See a crevice to the other side where something red is on the ground. Click
on the boulder on the left side and Holmes says something like it needs to be
moved to go further. In items, use rag on flask filled with
powder to get bomb. Use bomb on the rock on
the left wall of the crevice.

Crank machine
Walk over to the other side and take the red leather belt of the
skeleton. Go forward. See a closed gate and a machine on the left.

Look close at the
machine and see a button on top left, 4 small circles (one is lit) and the big
circle with 4 rings.

The rings have 4
different pictures. The aim of the puzzle is to light all the 4 circles.

Turn a ring and click on
the top left button to see how many circles are lit.

Leave the center ring
with the skull as is – with the skull upright.

Turn the next inner ring
twice and then press the top left button. See 2 lights.

Turn the outer ring
three times and then press the top left button. See 3 lights.

Turn the third ring from
the center twice and then press the top left button. The puzzle is solved with 4
lights.

The picture below is
before the top left button is pressed.

See that the lever on
the right is padlocked. Take the big stone from the ground and use it on the padlock.

Place the leather belt
on the wheel at bottom left of the machine. See it makes a belt for the 2
wheels. Pull the lever and the gate rise.

Take the leather belt
again. Go through to the next cave.

Holes on the ground
– Look down at the holes on the ground and he will say that there is an
underground river down there.

Drop a lit torch on each hole. Find one that Holmes
comments on as ‘yes, there is something here’. It is the top right hole with your back on
the entrance.

Use the leather belt on
the rock at center and automatically go down the hole.

Watery cavern
Make another torch. Go forward and walk on the shallow water. Go left and see an exit blocked by a
rock. Take the wooden leg caught by the rock. Go back to center of the
cavern and go between the protruding rocks. Go to the left and forward to a gate.

Gate – Look down
and see a footprint on the left and a hole on the right. Holmes comments that
only a peg legged man can open this gate. Take the wooden leg from items, step
forward to stand close to the gate and then use the wooden leg on the hole. The
gate opens.

MacGrinty himself
– Holmes makes a typical comment. Go forward and click on a chest in front of MacGrinty
on the throne.

Take the saber
held by the right hand of the skeleton. Turn around and go through the right cave.

Lighthouse way:   
Holmes reaches the end of the path. A ledge is across the river. Look up and click on the hole above. Holmes calls to
Watson and then asks for the mast from the wrecks by the coastline.

As Watson, turn around
and go to the right to the coast. Pick up a log and bring back to the far
hole on the ground. Drop the log and see it make a bridge. Click to go across the
log.

Go forward to and climb
the metal rungs on the wall. Exit to horror. See
a crazed Ashmat.

Lighthouse:   
Go forward and see buckets all around that emits poisonous gas. Go to the door
and open it to let Watson in.

Poisoned gas
Exit the lighthouse and go to the broken building at far end of the clearing.
Before the building, turn left and take the bucket. Go to outside
right of the building and see a barrel with fresh water. Use bucket on barrel to get
bucket with water.

Go back inside the
lighthouse and use the bucket with water on the poisoned gas buckets. Ashmat
starts shooting at Holmes and Watson shoots back.

At far left of the
circle close to a poisoned bucket, see a lever on the stone column right of the stairs.
Pull lever and a crate drops on Ashmat. If you have not finished all
the poisoned gas, do so when Ashmat runs up the stairs.

Sign of the Great Old
Ones
– Climb the stairs and at the landing look down. See the pentagram and
the leviathan at the center. Go up to the next floor
and Holmes says that ‘belief is his strength, perhaps it is also his weakness’.

Pick up the white
panel
on the left close to the stairs. Holmes needs blood. Use the white
panel on the pool of blood at top of stairs.

Sign puzzle – See bloody squiggles on
the left and blank space on the right. Click on a squiggle and it is reproduced
on the blank space.

The aim of the puzzle is
to draw the sign of the Great Old Ones. Click the squiggles that were in the
yellow X of the picture below.

Go forward towards
Ashmat. Watch Holmes use the sign and chants. Ashmat collapses.

Go to the top of the
lighthouse
– Climb up and be blocked
by a door. Use iron bar on door.

Enter and a Hindu goes
down to meet Watson. Meet
Dirty Sommers. Dirty taunts Holmes that while his friend the Hindu is alive, no
one can find the key. Before Dirty falls through the window, he says ‘He has it deep and safe in his own’.

Climb up and take the paper on the table. Read the
Directive of Sect in documents.

Climb up to the top and
check the door. Automatically, Holmes and Watson are back down to the lower
level.

Quiz – Where did
the Hindu hide the key? Type in – stomach. Click enter key or the arrow.

Holmes talks to Watson
about the key. Sword! Watson did the deed and
gives Holmes the key.

Top of lighthouse:   Climb
up again.
Use the key on the door. Exit and meet Lord Rochester. Watson cannot delay the
hooded men.

Light – Light
destroys darkness.

Review the Directive of
the Sect in documents – …turn off the lighthouse so that the light of the
master replaces it. Otherwise, the dream will not be fulfilled.

Face the light source of
the lighthouse. See a green bottle on the left and blue bottle on the right.

Pick up the empty
bottle
from the floor.

Face the blue bottle and
put the empty bottle at the bottom ring. Turn the wheel to upend the blue
bottle. Take the blue bottle.

Face the green bottle
and place the blue bottle on the bottom ring. Turn the wheel to get the blue
bottle on top.

There is light.

Watch Lord Rochester be
taken by the Light of Abyss.

Back at Baker St.,
Holmes summarizes what happened.

Did genius create evil
or evil create genius?

What troubles me more
is the future. A ticking bomb, waiting.

A danger wearing a
face I know far too well.


This document may not be
distributed without express written permission of the author and the content
may not be altered in any way.


For Questions or Comments
on this Walkthrough, please write to:

MaGtRo


Copyright © 1/2007   

MaGtRo