Sentinel: Descendants in Time
Shell puzzle summary:
Press the button on the
shell in sequence based on the notches on the rod.0 shell – found at hut
in front of the giant shell at center of village.1 notched shell is found
in the tower.2 notched shell is found
at the hut after completion of the 3 ropes puzzle.3 notched shell is found
at hut farther on after the completion of the 5 ropes puzzle.4 notched shell is found
at the platform after crossing the spine bridge.5 notched shell is found
at the hut farther down the boardwalk (see graph) after completion of the 4
ropes puzzle.
Shells completed: Time to do the rest of
the shells. Go to the 4 notched shell across the spine bridge and press the
button. Then go to the 5 notched shell via the 4 roped puzzle bridge. Go forward
to the first hut on the right. Press the button on the 5 notched shell. Now all
the 6 shell stands have been activated.
A building comes out of
the water and the windmill starts. See the crystal appear at outside wall. Take
the crystal. Cross the newly risen bridge and forward to the teleporter.
Tomb 35:
Go back to the teleporter stand and crystal at top level. Note that the teleporters to the 3
worlds we went through are now gone and no other teleporter is active.
Waystone:
Click the waystone-big crystal on the teleporter stand and the 3
crystals collected are placed on the waystone. Dormeuse talks to you again – ‘you might find your way out of here’.
Look across the balcony.
See that the lower balcony and lower level teleporters are activated. Go back
down to the teleporter at lower balcony.
Corabanti
The crystal in this
world is obtained by accessing the volcanic pumps and identifying them with
their corresponding lights.
Listen to Dormeuse. Look
around the lava encircled volcanic island. Look through the telescope and see
glyphs marking bridge segments across the lava.
Cross the bridge, go
left and see that 4 of these outlying bridges with glyphs surround the
island. A very active volcano is off shore. Talk to Dormeuse at one of the
clearing.
Building: Enter the central
building-tower. Look around and note the drawing in the open book on the table. The
crystal is behind a fence across the exit stairs. A giant wheel is on one
side.
Climb the stairs and stand
on the ramp that has a red button stand. Press the red button and rise to the
top of the tower.
Tower:
At the top of the tower, look out to the 4 lava bridges. At the center of the
room is a console that has 4 panels of glyphs.
Lava bridge puzzle:
The object of the puzzle is to build
paths to all 5 volcanic pumps. These paths
rotate only when they can make a connection with an already built path.The central console has
all the glyphs that are found on the lava bridges. Each glyph is found on a
segment of the bridges outside. There are no duplicated glyphs on the bridges or on the
console.1. Study a group of
bridges that you are going to connect by looking out the window. Plan a path from the
start to the volcanic pump that looks like a tower on one of the outlying
island. Make note whether the segment is straight or angled.2. Go down, out of the
building and go to the telescope to view the glyphs closer on the targeted
bridges. Use the telescope and
note-draw the glyphs that are on the bridges that you plan to rotate to make a path
to the volcanic pump.3. Go back up to the
tower and start at the bridge segment closest to the main island. Using the
console, look for the glyph for the segment you want to rotate. Press that glyph
until you have turned the bridge segment according to your plan. Cycle the panel of
glyphs using the arrow at the base of the panel. Turn the bridge segments as
necessary until there is a path to the pump tower.4. There are 5
pumps. The last pump is hidden behind the hill and is a continuation of the
bridges that are left of the hill.Solution:
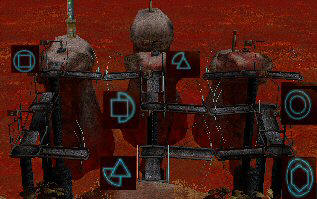
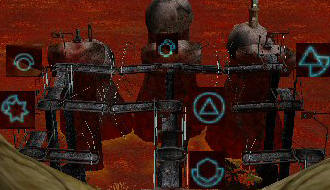
Bridges left of teleporter Bridges by teleporter Volcano bridges Left of hill bridges Volcanic pump
puzzles: The object of the puzzle is to place-frame the appropriate colored light on
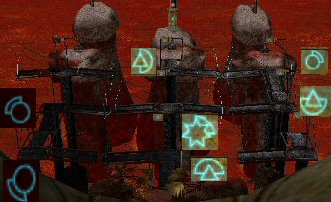
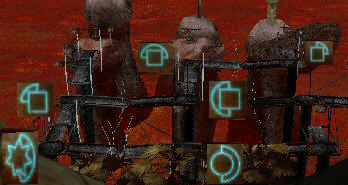
the pump’s base.A volcanic pump is found
on one of the outlying island off a set of bridges. The volcanic pumps look like
towers with 5 covered colored lights on the length of the base. At the base of the pump is a
movable frame-window that shows the
colored lights. In front of each pump is a wheel that
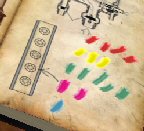
raises or lowers the tower to show or hide the colored lights.1. Inside the building
is a book that gives a clue to what color is to be selected for the volcanic
pumps at the end of the arranged bridges. The lines are the placement in the
sequence, ex: 1 line blue means blue is in #1 position.2. The position is from
top to bottom, i.e. 1 is on top and the last one is the 5th position. It can
also be done bottom to top i.e. 5 is on top and the last one is the 1st position
(Dennis).3. Go to each
volcanic pump and move the wheel to see all the lights at the base of the pump.4. Find the light
that corresponds to the book clue’s position and place it on the frame-window. Ex: If
you move the wheel and see that the blue light is at top #1 position then place
the frame-window to show the blue light.Do all the pumps.
Position Light color Bridge location 1 blue volcano 2 pink-purple left of teleporter 3 yellow left of hill 4 red 5th pump 5 green teleporter
Once the volcanic pump
colors are set, it is time to arrange the lava bridge to reach the 5th volcanic
pump.
5th bridge arrangement
and 5th volcanic pump: The object of the puzzle is to arrange
the bridge segments left of the hill in order to access the 5th volcanic pump.The hill hides more
bridge segments and the 5th volcanic pump.1. Rearrange the ‘left of
the hill bridge segments to access the segments behind the hill.
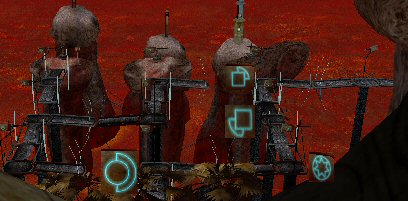
2. Walk the bridge and see
that 2 bridge segments behind the hill are not arranged for access to the 5th volcanic
pump.3. Study the 2 segments to
see how many turns are needed for them to make a path to the pump.
4. Go to tower and move the
unseen bridge segments using the console. Go down and check the segments.5. When the path is
completed, go to the 5th volcanic pump and place the red light that is in the
4th position on the frame.If all volcanic pump
lights are placed correctly, see the wheel inside the building turn and the
fence to the crystal goes down.
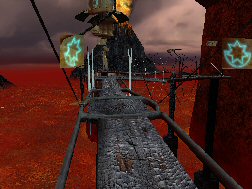
Go the building and take
the crystal. Go to the teleporter. Talk to Tamara. Hear her
ask why an advanced civilization of millions that disappeared is replaced by a
less sophisticated culture. Why are there only 85 Tastan tombs?
Tomb 35:
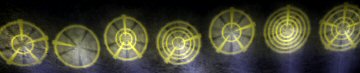
Look up and see the 3 crystals on the waystone projected as yellow lined circles on
the ceiling. Go down and step on the activated teleporter by the stairs.
Sanselard
The crystal in this
world is found at the central base at ground level.
Just looking at the snow
covered sky station of Sanselard gives one the shivers. Let’s check Sanselard by
going around the perimeter clockwise or to the left:
1. Teleporter island,
where you first arrive has a mill and a totem. While facing inward the area, cross the bridge to the
left.2. Island A has totem on the left and a mill on the right. Cross the snow covered bridge.
3. Island B has Tower 1,
2 totems and a mill. Cross perimeter bridge.4. Island C has a totem, Tower 2 and
a mill. Cross the perimeter bridge.5. Beacon Tower island has
one totem. Cross the perimeter bridge.6. Island D has Tower 3,
2 totems and a mill.7. Island E has 2 totems,
Tower 4 and 2 mills.8. Central island: Cross
the inner bridge from Island E and see a mill and a totem. See a manhole
cover with marks on it. Look close and take note of the marks.9. Bridge under Central
Island has a totem.
Mills, totem and tower
association puzzle:
The object of the puzzle
is to match each tower with
two mills then match sounds of those mills with two totems. Look for the
visual clues.’There are 4 towers.
There are 8 small mills. 2 of those mills are associated with a tower. Each mill
makes a sound when the circular mesh is clicked. There are brown totems that match the sounds of the mills. Each
totem has glyphs.A. Find the
mills associated with each tower.The clue here is
found on the marking of the manhole cover at the central island.
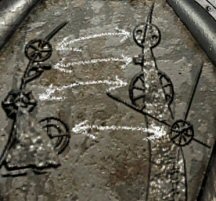
1. Note that each
tower has 3 single rotating wheels and a set of rotating wheels on the side.
Each mill has 4 rotating wheels. Based on the clue on the manhole cover, they
are associated from top to bottom. I only took note of the 3 top wheels.2. While facing the
tower, note the rotation of the wheels. The top and third wheel turns going up
or going down hi.
The second wheel goes left to right or right to left
fg.3. Go to the 8 mills. While facing the wheels and the circular sound mesh is at
the rear, note the rotation of the wheels.
Location
Tower rotation
Mills rotation
Teleporter Island
i
g
h
Island A
i
f
h
Island B
#1
i
g
i
h
f
h
Island C
#2
h
f
h
i
g
h
Island D
#3
i
f
h
i
g
i
Island E
#4
i
g
h
i
f
h
h
f
h
Central Island
i
g
i
4. Match 2 mills to
a tower.Tower 1 has similar
rotation as mills at Island D and Central Island.Tower 2 has similar
rotation as mills at Island B and one at Island E.Tower 3 has similar
rotation as mills at Island A and one at Island E.Tower 4 has similar
rotation as mills at Island C and Teleporter Island.B. Find the
totems that match the mills.Find the totems that are associated with a mill
based on the common sound produced. Note the glyph on the totems.1. Click the
circular mesh in front of each mill. Note the sound produced.2. Go around the
island to find the totem that has similar sound. Click on the totem to hear the
sound.2. Note the glyphs
of the matching totem.3. Do this until
all the mills are matched to a totem.C. Go to each tower and
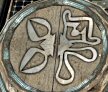
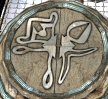
enter the glyphs of the associated mills on the stand.Click the tower
stand to form the glyphs seen on the totem that match the sound of the
associated mills.If correctly done, the
elevators are activated.
Tower 1 at Island B Tower 2 at Island C Tower 3 at Island D Tower 4 at Island E
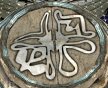
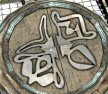
Flashing beams alignment
puzzles:
The object of the puzzle
is to synchronize all the beams. All beams synchronized would release the piston
and activate the elevator.Climb up any of the
activated tower elevator. Go to the stand at end
of the platform.Look at the beacon tower
and see beams flash out from all sides in a random burst.Wait for a beam you want
to synchronize with and click the metal clasp on the outer rim of wheel on the
control stand to get a flash of beam shut towards the tower you are on. Time it
to synch with the other beam.Do this to all the
towers until all 4 flashing beams are in synch.Once the beams are in
synch, the base of the beacon tower drops, the beams stop flashing and the manhole
at the central island opens.
Go to the central island
and climb on the platform with railings – formerly the manhole. The platform
goes down to ground level. Exit, walk
to the left and around the rim of the enclosure. Pass under a tree root and face a metal
door.
Windows-Doors puzzle:
The object of the puzzle is to line up windows first and then try to open the
entrance.Activate the puzzle by
clicking on the stone stand in front of the door.Rotate the wheel and see
that there are metal panels, a window and a door that are cycled in
the opening.The knob on the right
adjusts the layer of the cycling panels. The bottom position of the knob is the
closest layer and the top position of the knob is the farthest layer.1. With the knob at
lowest position, click on the wheel to get the glass window.NOTE:
Be sure to note that windows have middle metal bars while doors have
top bars.2. Click the knob to the
next highest position.3. Click the wheel to
get the next layer of glass window, so that now 2 windows are aligned.4. Do this until 4 glass
windows with middle metal bars are aligned. The knob should
be on the second from top position.5. Click the knob to the
top position.6. Turn the wheel to get
the door with top metal bars in view.7. Lower the knob to the
second from top position and cycle the wheel to get the door.8. Do this until the
door is the closest layer.
Enter the building and
talk to Tamara. The average lifespan is now ~550 yrs and the tombs were designed
as traps. Take the crystal. Exit the building ride
the elevator and go to the teleporter.
Tomb 35:
Poor Carrie! Go to the lower level and stand on the transporter left of the
platform.
Goda
The crystal in this
world appears only after accessing the bottom central level.
Wow! We’re underwater!
Look around and enjoy the turtles and whale songs. ‘What about those 85 that
didn’t become you? Because it matters!’ She wants us to study
each level.
Go forward and enter the
tower. Look up and see that we
are at the 6th level – floor 0. See a central stand with 4 levers and 0-5 numbers on the
right panel of the set up.
Drawbridges puzzle:
The object of the puzzle is to open
your way to the lowest level by lowering appropriate drawbridges.Find out which lever
lowers a gate to the platform and which lever lowers the drawbridge.Click on the #5 button to go to the very top. Look around at the conservatory.
Look down the railing and see that each level has a walkway. The end of the
walkway has a drawbridge (can’t be seen now) that prevents access to the next level.Go to each successive
floor via the elevator and pull a lever and see if it is the lever that lowers
the drawbridge. This is done by going up to the top-5th floor after pulling a
lever and see if the drawbridge has been lowered.Once that lever is
determined – Then pull the other levers to see if it is the correct lever to
open the next level walkway. Again check if it is the correct lever by going up
to the top-5th floor, walk the walkway and see if the next level is accessible.This puzzle tired me out
but I needed the exercise.5th floor:
L-R, pull lever 2. This opens the gate to access the walkway. Enter the
elevator.4th floor:
Pull levers 3 and 4.3rd floor:
Pull levers 1 and 4.2nd floor:
Pull levers 1 and 2.1st level:
Pull lever 3.Go back to the 5th
floor. Go to the walkway and walk down to the lowest level.
Lowest level:
Go around and see 12
control stands with a switch and a lever. There is a stand that is covered by a
plastic hood. Across this covered stand are 2 pumps with lights on rods. There’s
a floating bridge on the moat that separates the outer path where you are to the
inner platform.
Raise the bridge: The aim of the puzzle is
to raise the water level so that you can use the bridge to go to the central
area.Flip a switch on one of
the control stands and see
that one of the 2 pumps lights up.The clue states
two pumps make water level too high. Exactly seven levels are all you need to
start.1. Find the stands to
use. Since we need only one
pump to use, turn the knob on (my, how big that knob is) and check which stand
is connected to which pump. The light will come on one of the 2 pumps at the
central area. Turn the knob off and go to the next stand on the
left.Going left from the
plastic hooded stand:Left pump is lit by:
Stands 1, 3, 5, 6, 8, 9, 11.Right pump is lit by:
Stands 2, 4, 7, 10, 12.2. Since we need 7
levels
of water – pull the levers of stands (going left from the covered stand) – 1, 3,
5, 6, 8, 9, 11.This opens the plastic cover of
the stand with the tremendously big lever. Pull the lever and see water on the
moat rise
up. Go left and see the floating bridge rise up. Walk across.Bolts puzzle:
The object of the puzzle is to line up all the bolts in middle position.There are 2 panels (left
and right) with 5 switches each. Each switch can be flipped right or left.There are 10 bolts that
need to be aligned at the center of the rods. Study which bolt is moved by
which switch and in what direction. Deduce the correct sequence.Left panel:
left, left, right, left, right. Right panel:
right, left, left, right, left.If correctly done,
the metal door with the bolts rises and entry to the central area of lowest
level of the tower is now possible (which is the elevator when we
first got here).
Enter and the elevator
automatically rises to the top level. Take the crystal. Go to the
transporter at the other
side of this level. Talk to Tamara. Why these traps? Stand on the teleporter.
Tomb 35:
The teleporter in the room at the lowest level is not activated. Go back up to
the teleporter stand at top level and click the crystals collected on the
waystone. See that 6 yellow circles are projected on the ceiling from the
crystals. Go down to the room at the lowest level and see that the teleporter is
now activated. Stand on teleporter.
Argannas
The crystal in this
world is found inside the main building with the red framed door.
This is the land of
Tamara’s adulthood. Look around the town. Go down to the lower level and peek
through the gates. The town is in the middle of the prairie. See blue mice
eating grains from a sack. See the area dotted with birdhouses. Some doors have
keypad locks and areas not accessible – yet.
Go to the main
building with red framed door at the middle of the town. The ultimate aim at
this Western town is to open this door.
Panels:
See 4 panels on the sides of the door. One panel is now open. The rest will open
when the previous panel puzzle is solved. Each panel is made up of 2 sets of 4
wooden shapes in slots. The shapes can be cycled by clicking on them. Click on the red button
to hear a bird sound.
Bird houses:
Around the town are birdhouses. They come in various shapes but some have
duplicates. Some birdhouses have drawings on the posts that show similar shapes
as that found on the door panel. Some of these posts with drawn shapes have
buttons underneath them. Press the button and hear bird sounds.
Open all closed
sectors:
Closed sector keypad
puzzle: The object of the puzzle is to find the codes to
open the keypad locks.
Find similar objects and listen to their sounds. Find the same sounds, associate
them with symbols, figure the correct order and open door to the next sector.1. The keypad locks are
found beside a locked door to another area of town. Only one will be accessible
at one time and that is the keypad puzzle to be solved.2. Each keypad is made up
of several glyphs.3. Search for
objects that has the same glyphs around that specific area.4. These glyphed objects
will produce sounds. Some of the other glyphed objects have similar sounds. Take note
or draw the glyphs on the objects that have similar sounds.5. Note
distinguishing features of the glyphed objects (like numbers, size, location)
that will show the sequence.6. To open the door to
the next sector, press the glyphs in a certain sequence on the keypad.7. These keypad
puzzles are random (Thanks, Jenny100).Crank – Closed sector
keypad puzzle 1:Turn left from the main
building. Go forward to the door and see a keypad that is open.Look for objects that
have similar glyphs. Turn right from the open
keypad and go forward. Pass underneath the dragonfly and turn right at the end
of the street.Go forward to the
church. Enter and see cranks at base of the posts.Turn the cranks and
listen to the sounds made. Make note of the glyphs of the posts with similar
sounds.Then count the
number of sides the posts above the identical sounding cranks have.Go to the open
keypad and enter the 3 glyphs that have common crank sound.The sequence is
based on the number of sides the posts above the cranks have.The door opens to
another sector. See a keypad open on a
red wall. This is the next keypad puzzle.Ring the bells – Closed
sector keypad puzzle 2:Enter new area and turn
right. See bells on both sides of the street.Ring bells and take note of the glyphs on the bells that made a common sound.
Count the number
of knots on the rope holding the bells.Go to the newly opened
keypad at end of the street, left of a red swing door.Enter the 3 glyphs
that have similar bell sound on the keypad in sequence based on the number of knots on the
ropes.See another keypad
open beside a brown door.Roll the barrels –
Closed sector keypad puzzle 3:Enter and see 7
barrels.Roll (push) the
barrels to hear the sounds made. Note the glyphs on one side of the 4 barrels
that have a common sound.Note the size of the barrels
with the common sound.Go outside via the
side opening and note the far birdhouse. Exit the barrel house.Go to the newly opened
keypad. Go down the street with the bells. At the end of the street are steps.
Go under the steps and go through the opening close to the wall. Go forward and
right to
the keypad.Enter the 4 glyphs
from barrels that made similar sounds. The sequence is based on the size of the
barrels.See another keypad opens
– right of a glassed door.Footsteps on stairs
– Closed sector keypad puzzle 4:Enter, climb the
stairs and listen to the sound of your footsteps.Take note of the 5
glyphs on side of the stairs that makes similar sounding footsteps.Take note that the last
flight of stairs (separated by a landing) has 2 glyphs.At the attic, note the birdhouse close
to the steps at one end of the room.Go to the newly opened
keypad at other side of the main building at town square that has the panel-sound puzzles.Enter the building with
open doorway right of the main building.Enter the 5 common
footsteps glyphs on the keypad. The sequence is based from lower level to the
top level.See another keypad opens
beside a red framed door.Creaky doors – Closed
sector keypad puzzle 5:Open doors throughout
the building and make note of the glyphs on the doors that make similar sound
when opened. You might need to back up to allow some doors to open.Go down the red stairs
to an open air area. Note the birdhouse here.Enter the door into the
next building. Turn right and see the newly opened keypad. Wait! We’re not done
yet. Go to the passage on the left and go out the door. Go back inside the
building through a door at side of the building. Go forward through the building
opening more doors.Go back to the newly
opened keypad.Enter the 6 glyphs
found on similarly sounding creaky doors.The sequence is
based on the order the doors are opened.Enter and climb the
stairs. Look at the birdhouses on this green painted balcony.Exit this area, back to
the open air area and up the red stairs. Pass through the creaky doors and out to
the main building.
Time to do the panel
puzzles.
Panel-sound puzzle:
The object of the puzzle is to find the correct shapes to enter.
Listen to bird
sounds from each panel. Find the birdhouses with the same bird sound and look
for symbols plaque.1. Press the red button
to hear the sound that is needed to be matched. Try to remember or write
down a composite of that
sound.2. Look for a birdhouse
that has buttons on the post. Press the button to hear if the bird sound matches that of the
panel being solved. Once found, make note of the drawn shapes on the post.
Equally important, make note of the shape of the birdhouse itself.3. Now, search for the
duplicate birdhouse. Once found, make note of the drawn shapes on the post.4. Go back to the panel
puzzle on the door. Enter the 4 shapes found on the birdhouse with button on the
top and enter the shapes found on the duplicate birdhouse at the bottom.5. If done correctly,
the panel closes and another panel opens.Panel – sound puzzle 1:
Press the red button,
listen and take note of the bird sound.The birdhouse with
button that matches the sound is found close to the town gate below the
transporter. Press the button to listen to the bird sound. Take note of the
shapes on the wood panel on the post and the birdhouse itself.The duplicate birdhouse
to this one is at the back of town wall, end of the street right of the
main building with the pane puzzles. Make note of the shapes on the wood panel
on the post.Enter them on panel 1 of
the red framed door. Solution below.The second panel opens
and the first door of the entrance opens.Panel – sound puzzle 2:
Press the red button,
listen and take note of the bird sound.The birdhouse with
button that matches the sound of panel 2 is found at the top of the’ footsteps on
stairs’ puzzle. Turn left, forward and go down the street with the bells. At the
end of the street are steps. Go under the steps and go through the opening close
to the wall. Go forward to the keypad and left to enter the door.Climb up the stairs to
the top-attic. Press the button on the birdhouse close to the steps to check if
this is the matching birdhouse. Take note of the
shapes on the wood panel on the post and the birdhouse itself. Go down the
steps and out of the building.Once out the door, go
forward to the narrow alley and climb the stairs at the end. At the top of the
stairs is the duplicate birdhouse. Make note of the shapes on the wood panel on
the post.Enter them on panel 2 of
the main building. Solution below.The third panel opens
and the second door of the entrance opens.Panel – sound puzzle 3:
Press the red button,
listen and take note of the bird sound.The birdhouse with
button that matches the sound of panel 3 is found at the end of the street with
bells. Press the button and listen. Take note of the shapes on the wood panel
on the post and the birdhouse above.The duplicate birdhouse
is found outside the barrel house. Make note of the shapes on the wood panel on
the post.Enter them on panel 3 of
the main building. Solution below.The last panel opens and
the third door of the entrance opens.Panel – sound puzzle 4:
Press the red button,
listen and take note of the bird sound. Listen carefully because the background
bird sounds are similar to the puzzle sound.The birdhouse with
button that matches the sound of panel 4 is found at the open air area of the
creaky door puzzle. Turn right and enter the building. Go through the
building, down the red stairs and see the birdhouse at the open air area. Press
the button and listen. Take note of the shapes on the wood panel on the post and
the birdhouse above.The duplicate birdhouse
is found by turning left and entering the door. Climb the stairs and out to
green painted posts on the balcony. Look at the birdhouse next to the green post third from the
end. Make note of the shapes on the wood panel on the post.Enter them on panel 4 of
the main building. Solution below.
Panel 1 Panel 2 Panel 3 Panel 4
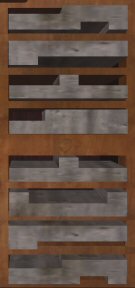
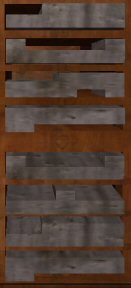
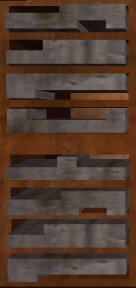
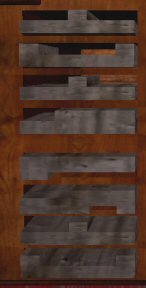
The last panel opens and
entry to the building is now possible. ‘Yes! This must have been what Ramirez
felt!’
Enter the building and
the elevator rises. Go around the corner, down the stairs and enter Tamara’s
home. Talk to Tamara and see circles spelling Ramirez’ name on the wall. It is similar to the
projected circles on the ceiling at tomb 35. Look around the house.
Go back out, climb stairs and go around to the elevator. The elevator rises. Go
around the corner and take the crystal. Go back out of the building and
use the transporter.
Tomb
35
Waystone:
Place the last crystal on the waystone at top level. See a building rise at
bottom level. Go down.
Bottom level: Enter the building,
go forward and see faded pictures line the passageway.
‘I’m back at the
beginning… What if he never returned?’
Podium:
Climb the podium and look close at the last puzzle.
Podium puzzle:
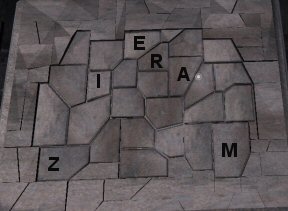
The object of the puzzle is to enter something on the stone pads.What to enter? Tamara
gave us the clue in her home. Ramirez wrote his name on the wall.Enter Ramirez on the
stone pads.How? Study the name
Ramirez wrote on the wall of Tamara’s room or check the projection on the
ceiling in the tomb.The podium setup has the
spokes on the left and circle on the right.Balls come out from
either side when a stone pad is pressed.Press each stone pad to
see how many balls come out on either side.Correlate the stone
pads’ number of spokes and circles with the projection of Ramirez’ name on the ceiling.Then press the keypads that
correlate to letters of Ramirez’ name.
Spokes Circles R 4 2 A 1 1 M 3 3 I 2 4 R 4 2 E 1 5 Z 5 4
That’s it, little
hunter.
This
document may not be distributed without express written permission of the author
and the content may not be altered in any way.For
Questions or Comments on this Walkthrough,
Write to:
MaGtRo
Copyright © 12/2004
MaGtRo