Secrets of the Luxor
Secrets of the Luxor: Game Guide
Written by Aaron DeSoto
Most walkthroughs give solutions but rarely explain how they
were determined. Everyone can use a little help now and then but
it’s more rewarding to figure it out yourself. In this guide I
have tried to include both the answers to your possible questions
and how I came to know them.
Hotel Room
Pick up backpack (used for inventory items), hat, shoes,
journal, portable VCR, toothbrush, and letter under the door.
Move your cursor beneath the viewer screen in order to access
inventory. Look at the videos by selecting the VCR, read the
journal and exit the room. A cut scene ensues and you are then at
the pyramid.
Elevator
Use the keycard in the keypad then enter the access code which
is found on the letter (2411#). Read the sign next to the
elevator, enter then close the door. When the explosion begins,
push the middle button on the panel which then allows you to push
the bottom left toggle switch (manual controls as explained on
the sign). Exit the elevator and find VR goggles in the open
crate. Enter the King’s room.
King’s Room
By using the VR Goggles, the 4 secret doors you need to open
will be illuminated. The goggles come in handy throughout the
game to help uncover hints on how to proceed. Read all the files
in the desktop computer to which you gain access by inputting,
you guessed it, the code you used earlier (2411). In the center
of the room is the Egg Puzzle.
Egg Puzzle
You must find clues to determine 1) which buttons to push, 2)
the position of the handprint and 3) which tiles of the
concentric lines must be flipped. The answer to 1 is in the
journal. The answer to 2 is in the Reflector room which can be
entered after you push the protruding brick stone on one of the
blank walls. The answer to 3 is revealed by climbing down a stone
ladder at the left side (when facing the Egg Puzzle) of the
bridge . When near the bottom you can see the floor pattern. It’s
hard to see the whole thing but at the Egg Puzzle, flip every 4th
tile beginning at the 2 o’clock position. Solving this puzzle
allows water to flow in the Water Room so go back down the stone
ladder and find the Water Room.
Water Room
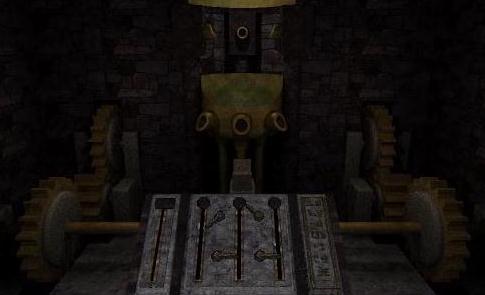
The control panel flippers must stop the sliding buttons at
points corresponding to the diagram on the last page of the
journal. It’s confusing so I’ve included the picture below.
Solving this puzzle unlocks all the previously locked doors in
the King’s Room. Proceed to the wall with the triangle.
Triangle Room
Inside is a device with 7 buttons you can push. The device
controls weights connected to a door in the alcove behind you. A
pattern on that door gives you a hint on how to activate the
device. If you have problems solving the puzzle, beginning at the
left, push the first, second, fifth and sixth buttons in that
order. The yellow squares revealed indicate the 2 safe openings
in the room with the spikes. Go to the Sun Room.
Sun Room
On the way you come across a room with close-ups of 4
constellations and later a console to input these in sequence.
This isn’t necessary for game completion as you can walk straight
to the Sun Room but if you do, all openings are now accessible
back at the spike room. Try them later just to experience various
way to die. On the wall past the sarcophagus is part of the
solution to the Sun Wheel Puzzle: outer ring at 10 o’clock,
middle ring at 2 o’clock and inner ring at 6 o’clock. Look below
the sarcophagus and point the dial towards the Sun. This makes it
possible to open the door in the Reflector Room.
Reflector Room
Turn the mirrors so they face the rear wall. Click the crystal
in the center so the point is up. A door will open. Enter, listen
to the Guardian of Time then turn around and pick up the ankh (it
looks like a cross with a loop at the top and is the Egyptian
symbol of life). Exit to the King’s Room and click the wall with
the ram’s head on it. These passages lead to the Sun Wheel Room.
Sun Wheel Room
The goal here is to find see the 3 symbols on the Queen’s head
in order to open the sun wheel. Look left at the first tee, go
forward 2 clicks and look left again. Forward 2 more clicks and
go down the stairs to the Queen’s head. Now remember the 3
symbols and go back up the stairs. Look left, go forward 4 times,
look right, go forward once more and look left again. You’re at
the top of the stairs leading to the Sun Wheel Room. In the room
you must rotate the rings on the wheel to get the symbols from
the Queen’s head into the positions from the Sun Room wall. Once
done, enter and descend all the way to the bottom and pull the
lever. The spool that the chain is wrapped around should move
clockwise and then you hear the sound of grinding rock. Now the
huge rock slab in the room near the Water Room can’t crush you.
Go to it now via the stone ladder in the King’s Room.
Rock-Crushing Room
Use the ankh in the lion’s head on the far wall to get the
white crystal. Go back to the King’s Room and click the wall with
the sun on it. This is the way to the Cavern.
Cavern
Look right at the tee then forward and you will eventually
enter the cavern. Put the white crystal in the organ stone holder
as this activates the wheel which operates the stone bridge.
Behind the wheel are 3 other crystals. Pick them up and retrieve
the white one and cross the bridge. Put all four crystals in the
receptacles and a door opens. You only need to note the symbols
on the chair and exit via a passage to the right. Now on to the
Chamber of Wise Ones.
Chamber of Wise Ones
Pass your cursor hand over the symbols using the sequence
found on the chair. Go up the stairs which just appeared and when
presented with 3 hallways, choose the one on the right to enter
the Teleportation Power Room.
Teleportation Power Room
Turn on all of the 6 small control panels on the walls. Click
and hold down your cursor on the right side of each panel and
slide the light from bottom to top. The main power panel can now
be activated by pushing the center button. The corridor overhead
lights are now on and the various doors will open. Exit and then
take the left hallway of the 3 (the one without the obelisk).
Hexagon Puzzle Room
This room has a hexagon on the floor surrounded by 4 statues.
The hexagon has 4 squares connected by lines which corresponds to
the clockwise sequence to click each statue base triangle. When
done correctly, the hexagon rises and you must click and drag the
3 slider lights to receive your body scan. Now you can pass
through the teleportation doors. Return to the Teleportation
Power Room and enter the door opposite the main power panel. The
door with the ankh leads to the Embalming Room.
Embalming Room
Lots of stuff to see here but all you need to do is activate
the inner door latch of the vault by moving it quickly until you
hear a click. It opens the vault-looking teleporter door which
shares the same corridor as the Embalming Room door. Once through
the door, go left to enter Link Room.
Link Room
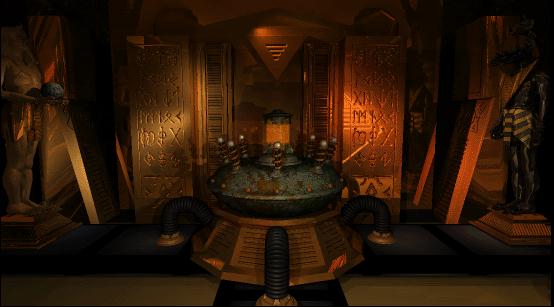
There is a generator at the top of the stairs (pictured below).
Begin by clicking the 3 small white bulbs on the right side and
see the right strip on the floor light up pointing towards Anubis
(patron of embalming and guide of the dead). This statue (man
with a jackal head) is like the one off the Hexagon Puzzle Room.
Before returning there, explore the vault on the lower level of
this room just for fun. Return now to the corridor off the
Hexagon Puzzle Room and push the purple snail button near Anubis.
Walk up the stairs and enter the Hologram Room.
Hologram Room
The only thing to note here is the hologram with the symbols.
There are 3 different symbols which flash in a certain order.
Once you write these down return to the Link Room, click the 3
small white bulbs on the left side and see the left strip on the
floor light up pointing towards the statue with the sphere in its
hands. This statue matches the two off the Hexagon Puzzle Room.
Return there as the door will now open.
Mummy Room
Hit the buttons in the order you saw in the hologram room.
They will flash and then stay a constant purple when the sequence
is correct. The corkscrew staircase (near the Link Room) will now
ascend from it’s circular platform. Proceed there and at the top
of the stairs are 2 doors which each lead to a puzzle. On the
left is a room with 6 obelisks and the goal here is to have them
all shine blue. If you have trouble, one solution (starting as
you just enter the room) is to click the closest right, closest
left then middle right. The door at the farthest end of the room
is now accessible so enter and push the large round screen to the
right. Return to the corkscrew staircase upper landing and go
through the other door. As in the Embalming Room, you must
activate the inner door latch of a vault by moving it quickly
until you hear a click Your next destination is all the way back
to where you first entered the Chamber of Wise Ones. A new long
staircase is now present and further on, a vault-like portal near
the scarab beetle is open. More to see but nothing that
determines game outcome until you make your way to the Grid
Puzzle Room.
Grid Puzzle Room
The solution is in the journal on page 63. Make sure the x
numbers are counted horizontally and the y numbers vertically. A
long video section follows as the Guardian of Time lets you
through the Portal of Time to stop Osiris. You are then asked to
insert Disk 2 and once loaded, you find yourself near the atrium
elevator.
Disk 2
Atrium
You are at "Start" pictured below in the Outer Ring.
You can only walk in the lighter green areas. The primary goal is
to reach the elevator on the Outer Ring marked "End".
You must rotate the 3 rings at each tower in sequence (Tower 1,
Tower 2 then Tower 3) in order to align the rings correctly. The
uppermost ring is the Outer Ring descending to Ring 1, Ring 2 and
lastly Ring 3. To get to the control panel below, all I did was
go down the atrium elevator to Ring 1, walk the corridor and go
up the other elevator. A tram vehicle then takes you up to T1 (Tower
1) marked below with a red dot. While you’re ring-hopping,
explore all the hallways and rooms throughout this entire
building; my favorite is the jail. If you still need help to
finish this section, read on.
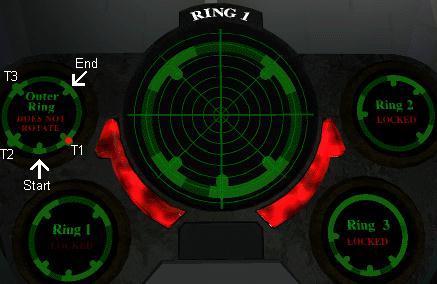
From T1: 2 rotations clockwise (2RCW), descend to Ring 3 (D3),
walk to the other elevator (WE), ascend to Ring 1 (A1), walk to
the other elevator (WE) and ascend to Tower 2 (AT2).
From T2: 2RCCW, D1, WE, D2, WE and AT3.
From T3: 3RCW, D2, WE, D3, WE and up to "End".
In Osiris’ office, take the travel pod on the right. It takes
you to the center of the Rings with an incomplete obelisk at the
center.
Obelisk
There are 4 forcefield beams preventing access to the obelisk.
You must turn off each one by pulling down 4 levers in 4
perimeter rooms. Use the catwalk rotation control panel to align
the bridge to access each room. A tunnel leads to an elevator
where you will find the lever. One elevator takes you to the
atrium but the others are inoperable. Now simply return the top
of the obelisk and use the catwalk rotation control panel to
position the large blue electrical anomaly over Osiris. Sit back
and enjoy the end.