Just Adventure original
Secret Files 3 Walkthrough
Now the Guardian’s gesture becomes clear. Nina saw numbers written in the dust. She needs to write them down herself but apparently is too debilitated from her ordeal to do so herself.
As Max, take “pen and paper” (pencil and paper in the picture) from the desk over at the left with a left-click and use it on Nina. She’ll jot down four numbers. Activate the computer terminal at the rear with a left-click and use Nina’s note on the “input field” and click on the little magnifying glass to perform the search.
The numbers turn out to be coordinates pointing an undersea location near the Greek island of Santorini.
Odds & ends: Oddly, the pictured “note with coordinates” displays slightly different coordinates than the ones that appear in the input field.
“Bingle” is a conflation of the Bing and Google search engines.
Google Earth seems to take issue with Secret Files 3’s geography. In that program, those coordinates take you to a patch of open sea northwest of the Greek island of Anydro. (Anydro is in the Santorini municipality, according to Wikipedia, but it’s not the location displayed in the game.)
You can read about Santorini here: http://en.wikipedia.org/wiki/Santorini.
Santorini
We now find Nina, Max and Cunningham aboard a mini-sub exploring an undersea ruin between the islands of Thira and Thirasia.
Just head diagonally down and right. At the end the entry path is an amphitheater (lit by filtered sunlight) that serves as a handy reference point for your explorations. Just to the right of the theater is a dark spot that conceals the entrance to the Guardian base (currently closed). And slightly above and to the right of that entrance, you’ll find a circular recess in the cave floor — with four distinct wedges.
These wedges will be occupied by four green crystals. Each crystal is concealed under a “heap of stones” in discrete mazes in the four corners of the ruin. Three crystals are comparatively easy to reach — the top, left and right ones even in the “difficult” version, in which currents either block the sub’s progress or whisk it along. (In the “easy” version, the currents are just eye candy.)
The instructions below are geared to the currents of the “difficult” version, but will work for both “difficult” and “easy.” I’ve described the paths below in order of complexity.
Upper crystal: From the amphitheater, head diagonally up and right and then up and left at the first opportunity. You’ll see several channels above and right of the sub, each with its own current. Use the third one and disregard any comments Max may offer about the current. You’re doing fine: There are helpful currents and this is one.
When it drops you off, move up a bit, hit the spacebar to display the hotspots and you’ll see the “heap of stones” up and to the right. You can move there directly. Once you have the crystal, head down and right and pick up a current that will take you back toward the amphitheater.
Right crystal: From the amphitheater, head straight right across a large open space. You’ll cross the closed entrance to the Guardian base and, farther right, a large recess in the ocean floor with an orange-ish light in its depths and two passage entrances nearby — one above it and one to the right.
You want the upper one. Once inside, head diagonally down and right and follow the third (last) passage up and right, up and left and then up and right again to a large oblong chamber with a current heading down and left in the middle.
Let that current take you down a flight stairs. When it drops you off, continue down and left to another current and another flight of stairs and then follow the winding corridor up and to the right to the heap of stones. Once you have the crystal, just use the current in the corridor down and to the left to start you on the way back to the large central area.
Left crystal: From the amphitheater, head a short ways diagonally down and left and then, at first opportunity, up and left. At the top of this passage, a current will pick you up and carry you to the left. When it drops you off again, move down and left to the next corridor and follow this down and right.
Use the exit on the left side of this passage to drop down and left. Head up the passage beyond and, at the top, head down and left again. Then head up and left just a touch and a current should pick you up. Just below where it drops you off, you’ll see a passage in the shape of a backward “C.” Follow this down to reach a large open region. Just right of the entrance to this region is another passage with another current. Let it carry you down and right and then you’ll be able to travel directly to the heap of stones and its green crystal — then up and right for a current that takes you back to the amphitheater area.
Lower crystal: Here you’ll need to move especially cautiously, in small steps, paying careful attention to the currents.
1) Below and to the right of the amphitheater mentioned earlier is a circular plaza. And just below this plaza are two tunnels. You want the upper of the two. Follow it down and right to the end.
2) Here a current will take you a short distance down and left. When it drops you off, move up and left to another down-and-left current.
3) Use it. When this one drops you off, head up and left until you can’t move any farther in that direction. Let the down-and-left current pick you up here.
4) And this is especially important: When this current drops you off, move down and right. Don’t let either of the first two currents you encounter pick you up — if they do, you’ll be swept back to the start and have to start over — but use the third one to move down and left.
5) When the current drops you off, hit the spacebar and you’ll now be able to see the “heap of stones” just beyond the wall. This should be easy enough to reach without additional help. When you have the crystal, head down and let the strong current here sweep you back to our starting location and the recesses.
When you drop in the final crystal, a door opens in the sea floor nearby and the party resurfaces in the Guardian base.
Guardian Base
With Max and Nina staring zombie-like at the scenery, Cunningham handles the effort to open the base door. You’ll have to figure out a password (input via the terminal at the left) using the hieroglyphs, “Indian ornaments” and stone figures at the base of the three far pillars. In each case, you’ll want to identify what’s distinctive about the respective displays.
Hieroglyphs: Right-click on the hieroglyphics and Jane ventures that each symbols occurs a different number of times.
But note that there’s only one of the lion in the middle.
Indian ornaments: Two of the symbols beneath the relief of the Indian god Ganesha (here using the alternate spelling “Ganesh”) are missing.
But they’re also present. That is, letters are arranged in a repeating four-character pattern and you’ll quickly recognize that the second and fourth symbols from the left are the two that have been removed.
Stone figures: Twelve figures — 11 of them with letters above their heads.
Apostles? Possibly, but that would rely on out-of-game knowledge — rarely a good game-design principle. The letters actually represent the 12 months of the year, with December missing.
Terminal: Enter “D” for December in the first slot (four presses on the button below), the two missing Ganesha symbols in the second and third (five presses on the second and one on the third) and the lion in the fourth (three presses). Push the button at the right, the green light glows and the door opens.
Enter and Cunningham instantly reverts to her old self. She pulls a gun, injects Max with a slow-acting poison, reveals that the whole stolen anti-matter thing was a bluff and tasks Nina to disable the forcefield protecting the lump of deterrium that powers the base.
Move left to a multi-handed clock and a mural. This is the entrance to the chamber with the forcefield controls. Mastering the elaborate lock requires that you connect the images on the eight hands to related images in the mural. (Which should feel weirdly familiar: These are all characters from our story.)
Some of this should be obvious right off the bat. For instance, the “pistol” hand should point northwest, as per Cunningham in the second drawing from the right. (Just click on this icon four times to swing it into position.)
The “paint brush” hand should point west, as per Da Vinci in the fourth drawing from the left. (Four clicks.)
Some are a bit vaguer. For instance, the “compass” hand should point south — as per Archimedes in the leftmost drawing. He’s pointing down at a circle, which can be drawn perfectly using a compass. (Five clicks.)
The hieroglyphic flourishes on the “eye” icon connect that hand with the drawing of Cleopatra, who is pointing east. (Six clicks.)
And if you recognize the rightmost drawing as the “Four Horsemen of the Apocalypse,” it can correspond only to the “skull” hand. This should be pointed northeast, as per the sword of the leftmost rider. (Four clicks.)
And sometimes the description or icon is misleading. The “dagger” hand, for instance. This corresponds to the picture of Menis Ra outside the burning Alexandria library. He has a dagger — the shaft pointed vaguely southeast and the curved tip east. But the hand should be pointed southwest (seven clicks) — as per Menis’s extended right arm.
And what do you with hands labeled “Venus” and “Mars” when no representations of those Roman gods of love and warm appear in the mural?
Well, you could get the “Mars” hand tangled up in your head with the “Four Horsemen” image. I guess that was the idea. But in this case, focus on the icons on those hands: the universal symbols for “women” and “men” — corresponding to the comparatively generic drawings of Nina pointing up at the sun — hence north (six clicks) — and Max puttering archaeologically down and to the right, hence southeast (four clicks).
When all eight hands are in place, the face recedes and slides away and Nina can enter the chamber beyond. Things go on automatic for a while here: an agitated walkie-talkie message from Cunningham and a telepathic or dream encounter with a Guardian, who finally explains the Guardians’ mission (protecting humanity against its own destruction) and the machine’s purpose. It’s effectively the four horsemen of the mural — a kind of doomsday device to prevent the expansion of mankind into the stars. If you build it, everything will go.
This would be a good place to save your game. Once you right-click on the console to the left of the central tank, you’ll find another decision point like the one back on Alcatraz.
1) “Deactivate the force field and save Max.”
Pick this one and you’ll get an extra puzzle — a sliding-block affair that involves clearing a path for the single red block over to the right edge of the playfield.
It’ll look like this at the start:
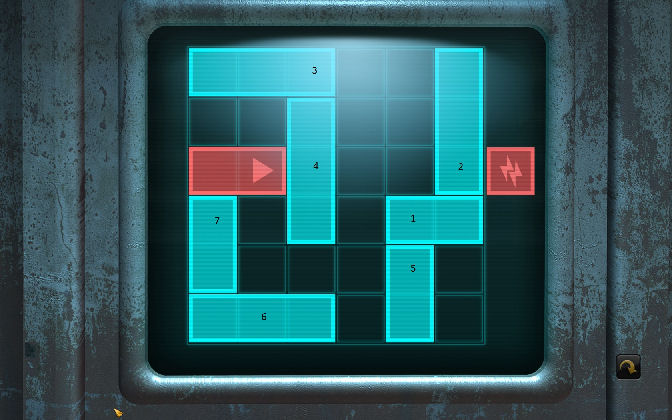
– Move piece #1 left one square.
– This clears the way for piece #2. Move it down one square.
– And this clears the way for piece #3. Move it three squares to the right …
– … which then allows you to move piece #4 up one square. This may seem counter-intuitive — ultimately, #4 needs to go down — but it’s just a temporary measure.
– Back to piece #1: Move it left one square …
– … which now clears the way to move piece #5 up one square, so it no longer blocks piece #6 in the bottom row.
– Now, move piece #6 three squares to the right.
– This permits you to move piece #7 down one square …
– … and that allows you to finally get bothersome piece #1 out of the way entirely. Move it left two squares.
– And that allows you to move piece #4 down three squares and out of the way of the red piece.
– Almost done. Move the red piece right three squares.
– Now it’s just a matter of mopping up. Move piece #4 back up one square to the left of the red piece, piece #6 left onto the square just vacated by #4 and piece #2 down two squares into the square just vacated by #6. Then move the red piece one square to the right and you’re done. Cunningham says “thank you” in Russian (a reminder that this is Nina Kalenkov) and heads back the CERN with the deterrium.
2) “Leave the forcefield on and save the world.”
No puzzle. Try to exit the room. Cunningham marches in, decks Nina and deactivates the forcefield herself.
In either case, leave the chamber, grab Jane’s left-behind bag beside the exit, empty it in inventory with a right-click and use the antidote it contains on Max.
Odds & ends: The Guardian’s disclosures invite a number of questions — few of which are answered here. Why connect computers with interstellar travel?Why assume such travel is a bad thing? Why sequester the blueprint inside “pi” and thus seem to invite mankind to its own destruction?
If Nina declined to buy Cassandra extra time back on Alcatraz, you’ll find Cunningham’s CERN keycard in the bag. It’s effectively useless and, by the time you take control of Nina again at CERN, it’s gone. Presumably this is the same elevator card that she hands off to Max in the “CERN III” sequence below — but Nina does this anyway even if she didn’t find it in the bag.
The second walkie-talkie is here just so Nina can automatically hand it off to Max in the next segment.
CERN III
Things go automatic for a while. When you resume control, you’ll find yourself switching back and forth between Nina (working with a programmer to shut down the deterrium-powered machine) and Max (bound for the transformer building on the surface to shut down the power).
First off, Nina and her unnamed assistant must address the newly-activated security system. You need to use a particular keycard (i.e. not the one Nina gives Max for the elevator) on the wall console just to the right of the entrance to the data-center hallway.
This can be found on the table in that same hallway (i.e. not the empty table next the door back to the control room).
Alas, you can’t just pick it up. The hall is blocked by an invisible laser grid. You’ll have to find a way past it.
Nina’s helper indicates you can’t see the beams because you’re in a dust-free room. It’s a mis-direct. I suspect the stubby pencil (in the waste basket back in the control room) and makeup in the lab coats hanging here were provided just to get you thinking along these dusty lines. But, no, there’s no makeup powder and no way to crush the pencil lead.
But perhaps smoke would work as well. There’s also keyring/lighter in the lab coats hanging to the left of the locked door to the hospital ward. And van Rijn left a cigar in an ashtray to the left of the central chair in the control room. Use the lighter on the cigar and then the lit cigar on either the overhead sensor on the right side of the data-center hallway entrance or the empty table beside the door back to the control room.
And there’s your grid. It’s not one of those intruder-friendly laser grids you see in the movies, either. No ready gaps. No one’s getting past it.
But perhaps something small could. The assistant has a radio-controlled UFO model stowed in the file cabinet back in the control room. In inventory, equip it with the sticky poster strips from the trash basket at the left side of the room and this task no longer looks quite so impossible.
Alas, if you now use the saucer on the keycard table, you’ll find it’s too large to pass undetected through the gaps in the laser grid. You’re going to have to open up a path.
The mirror from the lab coats is just the ticket. Again, this might have been a nice little mirrors mini-game — I get the sense that SF3 had a very frugal budget — but it’s just another inventory combo: Use the remaining poster strips on the mirror, then the re-purposed mirror on the laser grid to open up a gap near floor level and finally the sticky UFO on the keycard table. The assistant takes over piloting duties (again, no mini-game) and the keycard is yours.
No opportunity to use it just yet, though, as the action switches over to Max — stuck in the elevator. Retrieve the elevator keycard from the slot on the control panel, use it on the hatch (“slab”) at the upper left to unscrew the fastenings, climb through the gap and try the ladder at the right to set off the elevator’s rapid descent. To stop it, take the metal pin in front of the right-hand set of cables and use it on the left guide wheel.
Back to Nina. Use the keycard on the console on the wall to the right of the hallway entrance and make for the data center.
The entrance turns out to be guarded by two burly soldiers and and none of the leftovers from the laser-grid affair allow Nina to MacGyver her way past them.
Happily, it also turns out the keycard also gets you into the hospital ward where van Rijn awakened Max back in CERN I. Use the keyring/lighter to unlock the top cabinet at the far right. Dressings, disinfectant, laser pointer and defibrillator all in one blow.
The first two never find a role in the game — so what else is new? — but the pointer does a nice job of setting off the sprinkler over the left guard’s head and once his comrade has checked out, the defibrillator, used on the resultant puddle, does a nice job of shocking him into unconsciousness.
Enter the data center. The assistant sets about reprogramming the experiment while Nina is tasked with heading off the folks who soon begin cutting their way through the door.
You won’t have far to look. Use the defibrillator to break open the locked fire cabinet to the left of the door, take the axe within and use it on the liquid-nitrogen pipe above the door. The first guard through goes down and Nina evidently holds invisible others at bay with his dropped gun.
At which time we return to Max — still in the elevator shaft. Climb the ladder at the right to reach the surface and try the door to the transformer over at the left.
Locked. Use the walkie-talkie on Max to consult Nina. She says they can unlock it electronically from the data center but requests an ID code for the door.
Again, simple: Just above the door handle is a steel plate. Right-click on the plate for a close-up view, undo any of the four screws using the keycard, right-click on the reference number at the bottom and, back in the full view, use the walkie-talkie on Max to radio the number to Nina.
Shouldn’t there be some kind of final puzzle here?
No, apparently not. The experiment, suddenly uncontained, envelopes both Cunningham and the newly-returned Van Rijn and …
Epilogue
… well, actually, that’s pretty much it. Kind of abrupt, no? The game jumps first to an afterword where you learn which of the four endings you’ve unlocked. Without giving away too much, here’s how it plays out:
Option #1 at Alcatraz (help Cassandra) + option #1 in the Guardian base (save Max) = The “Partner” ending. (“What would the world be without someone at your side?”)
Option #1 at Alcatraz + option #2 in the base (save the world) = The “Good Samaritan” ending. (“Give help when asked.”)
Option #2 at Alcatraz (blow off Cassandra) + option #1 at the base = The “Party Animal” ending. (“Invite everyone to come to the wedding.”)
Option #2 at Alcatraz + option #2 at the base = The “Hero” ending. (“What good is a partner without the world?”)
Stick around for a followup devoted to the fate of lesser characters — don’t be thrown off by the first reference to Emre (he appears here twice) — and, after the credits, a series of “outtakes” — some of them quite funny. (If the outtakes don’t appear, you haven’t installed Update 1.3.)
You’ll also be able to visit a “Bonus” section that also includes your achievements and a long scroll of hand-drawn artwork from the early stages of the game — with photos of the game’s creators at the end. I’ve already outlined certain of the achievements in the course of the walkthrough. The ones I haven’t touched upon refer more to your general conduct of the game than specific events. I’ve seen coverage of these at http://guides.gamepressure.com/secretfiles3thearchimedescode/guide.asp?ID=16551 and http://secretfiles3walkthrough.blogspot.com/2012/09/achievements.html
View this guide raw, exactly as the archive holds it