Scratches: Director’s Cut
Scratches
( Director’s Cut )
(A Walkthrough by
Zurreen Zubairie)
Copyright © 2007.All rights reserved.
(Please,
note that this walkthrough is copyrighted.Hence, any attempt to
reproduce anything from this
walkthrough will be severely punished
to the maximum extent of the law.)
Introduction
The developers of "Scratches" have delivered
this special version of the game with a promise of better graphics, an
alternate ending to the original game, and a brand new chapter which is
actually a kind of Epilog to the Blackwood saga.Unfortunately, however, you need to install a
rather large patch to enjoy both the better graphics and to trigger that
alternate ending.While there are plenty
of patches available online, I am not sure if they will all work, especially to
trigger that elusive alternate ending.Personally, I had to install the one patch that is provided by GameSpot,
under "Scratches: The Director’s Cut."It was a very long file (about 500 MB) and,
even with broadband, it took me three hours to download it.An English friend of mine tells me, however,
that you can get the exact same patch from The Patches Scroll and download it
in just 30 minutes.(Thanks, Roy.) So feel free to try there first.
Note: You can certainly play both the original game (entitled,
Scratches: The Director’s Cut) or the Epilogue (entitled, The Last
Visit) without the patch.As I mentioned, however, you will not be able
to get the better graphics nor trigger the alternate ending.Moreover, you will run into one major computer
error: the hand icon on the front door
appears on the left side of the door,
even though the door handle appears on the right, when you approach the door
from the outside.The problem is
reversed when you are trying to step outside the house: the hand icon appears
on the right, even though the door
handle appears on the left side of the door.The patch corrects both these errors.
Some General Notes about this Walkthrough:Again, as in the case of my walkthrough for
the original Scratches, this one has no graphics (i.e., screenshots) either.As I mentioned then, that was not by my choice.The developers of the game appear to have
used a platform that was either so
sophisticated that it blocks any attempts to take screenshots, or not sophisticated enough to allow
them.Whatever the reason, I personally
found it to be rather unfortunate, because I believe that a picture does speak a thousand words.I have tried to compensate for the problem by
providing as much detail as possible, hoping to ensure that anyone would be able to enjoy the game,
regardless of their particular level of expertise in game-playing.I have also supplemented my efforts to
illustrate by using diagrams, wherever possible.Please, note, however, that these diagrams
are by no means "to scale."As
I indicated, their sole purpose is to provide the quickest and the simplest means
of finding your way around the house as well as in its environment.For your reassurance, please note [Warning! Spoiler] that you will find the "actual"
blueprints of the house at least, somewhere in the middle of the game.
Well, that is all that I can think of by way of an introduction
both to the game and the following walkthrough.Please, do feel free to ask any questions, make any comments, or just
talk about the game, by contacting me at .Thank you.
The Walkthrough
Generally
The Icons:There
are only three icons in this game.The
Open Hand indicates action — for example, opening the door, picking up an
object, etc.Click on the open hand
every time you are told to perform an action in this walkthrough.Clicking on the icon with the hand pointing sideways, will allow you to step out of a close up, etc.Finally, the hand with the finger pointing straight
ahead, indicates that you can go in that direction.
The Inventory:Right-click
to open the inventory.Click on the item
you want, and then right-click again to close the inventory.You will see the item out on the screen
now.Apply it to where you think it
should go.If you are right, the item
will brighten up.Click on the spot
where it does and a cut scene will usually do the rest.
The Slideshow:You
will find this feature in the Setup.Turning
it OFF allows you to explore your surroundings in the normal way. However, using this mode also has two
disadvantages.First, you are likely to
miss a critical clue as your cursor speeds right past it.Also, it might make you rather dizzy,
especially if you happen to have a mouse with the tracking ball on top, which tends
to make things move really fast on the screen.Thus, your eyes might actually "appreciate" it if you turn the
"slideshow" ON.You can then
examine your surroundings more carefully, on a frame-by-frame basis; and the
chances of missing a pertinent clue are also less.The downside of it, of course, is that it
does tend to be a bit more laborious than the natural mode.
Saturday, October 12th (Day One):
You arrive at the Blackwood Manor and are automatically brought
out of the car.Turn to your left though,
and click on the car door to open it and get back inside.Now open the glove compartment and retrieve the
car keys.Step out of the close up, and
then click on the door to get out of the car again.
Step directly towards the mansion now.You will have to go around the fountain to do so.As you reach the front door, open your inventory and bring out the large
key.Place it on the door handle and click
to unlock the door.Click on the door handle
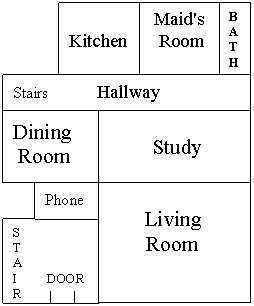
itself then to open the door and enter.You will find yourself in a small hall, with the stairs to your left and
a small room in the front.(See diagram
below)
SHAPE* MERGEFORMAT
|
S T A IDOOR R R |
Phone
|
Study |
|
Dining Room |
StairsHallway
|
B A T H |
|
Maid’s Room |
|
Living Room |
|
Kitchen |
Remember, you are lugging around two rather large cases,
so it would be best to take the load off first.So go directly up the stairs. [Notice
the silent remark at the bottom of your screen just as you reach
the top of the stairs.It is important
to pay attention to these remarks, because they will often give you some clues.]
Enter the first room on your right. This is your bedroom.Turn around and try to flip the light switch next
to the door.It is not working, however,
as the comment at the bottom will also confirm.Move towards the large desk across the room.Open the inventory to bring out the second case, and place it on the desk.Open the case.Now click on the papers inside, to see them
automatically come out and neatly placed on the right side of the desk.Now click on the type writer, to see it also
come out and be placed in the center of the desk.Click on the case twice then, to close it and
then to put it away.
Step out of this close up and approach the small table to
the left of the desk.Bring out your suitcase from the inventory this time, and
place it on this table.Open the
suitcase.Click on the pen, then on the
matches (between the pair of shoes), to deposit them both in your
inventory.Next, click on the battered little
brown notebook that was under the pen.Click
on it again to open it and reveal your secretary’s phone number. Click on it yet again, to put the notebook
away.Now click on the business card, in
the center of the suitcase, to reveal the phone number of your friend, Jerry. [Now that you have seen the numbers, you can
call either of these people whenever you consider it appropriate to do so.]Click on the envelope to the right in the
suitcase, open it and then click on to read the four pages inside.Click on the blue hard cover book to see the
hero’s latest work in print.
Step out of this close up.Now click on the top drawer.Click on the papers inside, and repeatedly to see that they are all
drawings and sketches on human anatomy.Close this drawer and open the next one, to find some bottles
inside.Close this drawer also and open
the last one at the bottom.It is
empty.Close this drawer too and go to the
right of the desk.Close up on the
wastebasket on the floor, and pick up the piece of paper lying inside.Read it.Step out of this close up then.Click on the two shelves of the bookcase to your right, to find nothing
of interest to the hero.So move towards
the fireplace now, on the other side of the bed.Close up on the little black bag, sitting on
the floor, to the right of the fireplace.Open it and pick up the stethoscope.Click on the papers, and "flip" through them as well by
clicking repeatedly, to find more drawings on anatomy.Step out of this close up.You might want to look at the doctor’s
certificate up on the wall to the left of the fireplace, indicating that this
had been the doctor’s bedroom as well, and explaining all those drawings and
sketches on anatomy.Close up and click
on the fireplace itself, to find "remnants of a previous fire."
You are done in this room for now, so come downstairs
again.The phone should be ringing in the
Phone Room.[Refer to the earlier
diagram.]If not, give it a few
seconds.As it starts ringing then, close
up on it and answer it.
It is a call from Jerry.The conversation will continue without your having to do anything
further.As the other guy hangs up, your
hero will do the same.Now call your
secretary, Barbara.[As you pick up the
phone, three choices will appear at the bottom of the screen.Just click on the second choice, with her name in it.]This conversation will be just cheerful and
casual, and the only important thing you will learn is that she is studying
"tongues," i.e., different languages.Step out of the close up, and towards the front door.Click on the door handle to open the door and
step outside.Go to the main gate (where
your car is parked).As you reach the
main gate, read the comment that will appear at the bottom of the screen; and then,
close up on the little black mailbox situated to the left of the barred gate.Click on the mailbox to open it and then, on the yellow note inside to
pick it up and read it.[Note: the note
disappears altogether once you step out of this close up so either save your
game on this note or read it as carefully as you would like the very first
time!]You learn that you have missed a
visit from the electrician.
Step out of the close up and return to the house.Go to the phone and call Jerry (just click on
the first choice, the one with his name in it, at the bottom of your
screen).Again, the conversation will
carry on and conclude without your having to do anything at all.As the two guys hang up, step out of the
close up and move towards the door on the other side of this room.Click on its handle to enter the Dining Room.Turn left and click on the cabinet to your
left.The only clickable area is the top
shelf, filled with bottles.There is
only one bottle at the very back (second from the left actually) in the top
shelf where you get a message at the bottom of the screen that is different
from the ones you get by clicking on the other bottles: about J.B., etc.[But there is no significance to this.Perhaps the game designers intended to use
this for some purpose, and either forgot to do so or decided to drop the idea
altogether.]
Go around the dining table.Click on the two pots by the window, to find
that the plants have long died because they had not been watered.Move to your right, still around the dining
table, and click on the objects on the small table.It’s "useless junk."Click on the drawer of a larger table to the
right.Click on its contents and you
will find that it is full of napkins, etc., nothing of use to the hero.Come around the dining table now and move
towards the double doors in front of you.Click on either door handle to enter the Study.
Move towards the large desk right in front of you, across
the room, and come around it.Close up on the desk, then on the red journal
lying on the top, and read it (flipping the pages by clicking on the page to
the right until you have reached the
blank page at the end).Click on the
last page then to close and put the journal away.Step out of the close up on the journal now and
click on the top drawer, on the left
side of the desk, to open it.There is
nothing "clickable" there, meaning nothing of interest.So close it and click to open the second drawer from the top.Click on the white envelope to deposit it in
your inventory.Close this drawer also and
open the one right under it.Click on
the "boring" (i.e., piercing) tool, to deposit it in your inventory
as well.Close this drawer as well.Click to open the bottom drawer now, and
again there is nothing clickable, i.e., of interest.So close this too and now try to open the top
drawer on the right side of the
desk.It is locked.Step out of the close up on the desk.
Go to the fireplace to your left and close up on it.Click on it, to find the remnants of another old
fire.Feel free to click on objects on
the mantel, and then move towards the door to your right.Click on the small
table to the right of the door, to find that the little drawer would not open.You are done in this room now, so click on the
handle to the door on your left, to
enter the Living Room.
Go to the left, to the coffee table in front of the
fireplace.Close up on the coffee table,
and then on the dark red journal
lying on top, on the edge of the table closest to you.Again, read it, flipping the pages by
clicking on the right page until you
reach the blank page at the end of this journal too.Click on this last page then, to close the
journal and put it away.Step out of the
close up and turn around to face the fireplace.Close up and click on it to find that there is "a generous amount
of wood" there that you can use to light up a fire should you need
one.You are done in this room also, for
now, so leave the room and head back for the Dining Room, through the Phone
Room again.
Go straight forward to the door on the opposite side of
this room, and click on its handle, to enter the Hallway.Step towards the table to the right of the door in front of you.Click on the two drawer handles on either
side to find that the drawer is "stuck beyond hope."Move towards the door on your left now, click
on its handle, and enter the Kitchen.Move to the sink on the opposite side of the wall.Close up on the sink and click on the taps to
see that there is no water.Step out of
the close up and click on the cabinet, to the left of the sink, to open it.Click on the top drawer inside, to find it empty.Close it and then click to open the drawer under
it.Click on the large knife, on your
lower right, to deposit it in your inventory.Step out of this close up now and move towards the green door to the right of the refrigerator.Click on its door handle to enter the Maid’s
room.
Go to the desk to the right of the wall across the
room.Close up on the top of the desk
and then click on the papers there, to remove the topmost sheet from the pile. Step
out of this close up and click on the top drawer to your right to open it.Click on the pencil in the lower left side of
the drawer, to deposit it in your inventory.Now open your inventory, pick up the pencil and put it on the sheet of
the paper, to reveal a letter written in Italian. [Note for those who may not be familiar with
this old technique:whenever we write on
the top sheet of a writing tablet, we leave an imprint of our writing on the page right under the one we use.By using the edge of the lead of a dark
colored pencil, you can gently shade across the page and a white image of the writing will appear against the gray shading we
etched, revealing everything that was scribbled on the page above.Thus, the game designers have actually erred
by showing a dark writing against a white page in the inventory, because in
reality it would be the opposite.Nevertheless, the idea is that this is how the hero gets his hands on
what had been written on the topmost sheet now obviously removed.The problem now, however, is to get the
message translated so that we can understand
what had been written on the missing page.]
Step out of the inventory and close up on the
black-and-white photograph that is lying under some writing tablet that was
under the pencil you just picked.As you
get the close up, click on the picture again and read the comment at the bottom
of the screen indicating that it was an old picture of the kitchen you just
left.Notice the large key hanging on
the wall to the left of the door you had used to enter the kitchen.There is a large urn right under the key in
this picture.However, neither the key
nor the urn is in that place in the kitchen now.[The clue here is that the key had fallen in
the urn that has apparently been removed.So you must now find the urn, in order to find the key.]
Step out of the close up on the desk now and move towards
the large chest of drawers against the wall on your left.There are two small drawers at the top and
two large ones under them.Open each of
them, click on the contents, and then close to do the same with the rest of the
drawers.There is nothing of interest in
any of these drawers, however, except that the contents of the small drawer on
the left indicate that the room had been used by someone quite interested in
photography.
Turn to the door on your right now and click on its handle,
to enter the bathroom.Turn around and close
up on the sink to your left.Click on
the taps, to find that there is no water running here either.You are done with this room, as well as in
the maid’s room (for now).So return to
the Hallway through the Kitchen.
Go to the corner on the other
side of the stairs and to the right
of the door to the Dining Room.You will
see three urns placed under the window there.Click on the drapes to open them.Now close up on the little urn on the left.You see a key lying inside.Click on it, to deposit it in the
inventory.Step out of this close up and
return to the Kitchen.Head directly for
the gray door to your right.Open the inventory and pick up the
"golden key" you just retrieved from the urn out in the Hallway.Close the inventory, and place the key on the
keyhole.Click on the key to unlock the
door.Now click on the door handle to
enter the Basement.
Go down the stairs.Turn left and you will see the top half of a rusted fuse box up on the
wall in front of you.Click on the box
to open it.Click on the
magnifying-glass icon on each of the handles inside, and the comment at the
bottom will indicate that there seems to be nothing wrong with the fuses.Click on the two handles anyway and nothing
will happen.Close the fuse box.You are actually done in the Basement for now
but feel free to explore.Move towards
the furnace on your right, and click on it to read the comment at the bottom of
the screen about its size.Move a step
further right and close up on the furnace’s little door.Click on the door to open it, and then click on
the dark interior to read the hero’s comment at the bottom of the screen.Step out of this close up and look to your
right.Close up either on the valve on
the wall or the drain cover on the ground, and you will get a close up
both.Clicking on the drain cover, however,
will do nothing but to give you a message at the bottom of the screen that it
is a drain cover.Click on the Open Hand
icon on the valve, to find that it does not budge.Click on it again, to learn that the hero
cannot move it with his bare hands.
Spend some more time clicking on boxes under the stairs and
in the center of the Basement, until your hero reports feeling a sudden breeze
on his neck.Step out of the basement
then and make your way back to the Phone Room.Call Jerry first.Again, you
don’t have to do anything further but to listen to the conversation.When the two men hang up, pick up the phone again
and call Barbara, the secretary, now.Again, listen to the conversation, as the hero asks her to translate a
letter written in Italian and she tells him to send it to her.As the conversation ends, step out of the
close up and open your inventory.Pick
up the letter you had found in the maid’s room.Place it on the envelope you had retrieved from the study, to seal the
letter.Now put your pen on the
envelope, to write the address on it.The letter is all set to be mailed.So step out of the house, and head for the main gates.Close up on the mailbox to the left of the
main gates.Click on it to open it,
bring out your sealed letter from the inventory and place it inside the
mailbox.Close the box again, step out
of the close up, and return to the house.
In the last conversation with Jerry, he had told the hero
to find some candles around the house.We have already searched and found none on the ground floor.So go upstairs now.(See the diagram below.)
SHAPE* MERGEFORMAT
|
Guest Room |
|
Gallery |
|
Main Bedroom |
|
S T A I R S
S T A I R S |
|
B A T H |
|
S T A I R S |
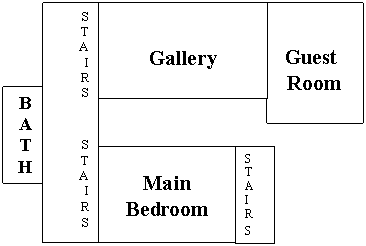

We had already searched the guest room also.So as you reach the top of the stairs, turn
to your left this time.Move forward and
click on the handle of the door to your left, to enter the Main Bedroom.As you enter, go straight forward and turn
left to face the chest of drawers.Click
on the Open Hand icon to open each drawer, check out its contents, close it and
move on to the next one, until you have searched all four drawers.You find nothing of interest here.So turn around and try to click on the dresser
drawers to your right.But the hero
doesn’t even want to open these, expecting them to be filled with just trinkets
and perfumes.Step further right, turn
around, and try clicking on the dresser drawers on that side; but you will get
the same response from the hero.So
return to the door and step to the right
side of the room now.
Turn around (away from the bed) and close up on the little
oval mirror sitting on the table to the right of the bed.Click on it and it will change its angle a
little bit.Step out of the close up and
look to the right of the large mirror at the wall.There is a picture of a woman holding some
kind of a crystal ball.Close up on the
picture and then click on the Open Hand icon that now appears around the crystal ball in the woman’s
hands.The picture will fling to your
left, and reveal a hidden safe behind it.Click on the safe and read the hero’s comment at the bottom of the
screen, about not knowing the combination or anything about cracking
safes.You are done in this room for
now, so exit and click on either handle of the double doors immediately in
front of you, to enter the Gallery.
Turn left and step to the little table in the
corner.Close up on the top of the table.Click on the piece of paper almost hidden
behind the hat, to pick it up and read a letter by a museum director.Step out of the close up and turn to your
right.Step forward towards the window
in front, turn to your left and close up on the upper part of a large glass
display.Click on it to learn that the
display is one of a pair of huge carved tusks.Step out of this close up and click on the brass handle right under the
glass part of the display.The comment
at the bottom of the screen indicates that the display does not move.Close up at the base of the display then, and
click on the magnifying glass icon on the thin
panel strip running along the length of the base, stopping just short of
the very corner at the left end.[Note:
You can confirm that it is the right spot by referring to the comment, at the
bottom of the screen, about the bottom of the case having some kind of a panel.]After having clicked on it once, an Open Hand
icon will appear on that strip.Click on
it but the panel appears to be stuck in place.Bring out the large knife from your inventory, place it on the strip,
and click to remove it from the display.Click on the little wheels now revealed at either end of the display, to
read the comment at the bottom of the screen that the panel had been hiding
these wheels.[Hint: The display can be moved.]
Step out of the close up and look at the display to your
right now.Feel free to look closely at
the four objects on display here, clicking on the magnifying glass icon to get
a close up of each.You don’t get any
comments at the bottom of the screen, however, indicating that there is nothing
of interest.So step out of the close up,
head back towards the door, and step towards the window on the right side of the room now.Turn right to see yet another display, this one
of some exotic masks.Close up on the
mask on the extreme left, and click on it to read the hero’s comment about it.There seems to be a mask missing to the right
of this one.So step out of this close
up and close up on the third mask from the left, and then on the fourth one
right next to it.Step out of this close
up and turn around.Step towards the
door and close up on the necklace you see on a display to the left of the door.Click on the large, white, claw-like object
hanging from the center of the necklace, and read the comment at the bottom of
the screen, about something like a lion‘s
claw having been firmly attached to the necklace.You are done in this room, for now, so exit.
As you step out of the room, move to your right, and click
on the handle of the door at that end of the corridor, to enter the bathroom.Close up on the sink to your left, and click
on the two taps to find that there is no water here either.Step out of the close up.There are three small drawers on either side,
under the sink, and one large drawer in the middle at the very bottom.Search all of these drawers.[Note: all you have to do is open one drawer
and then click on the Open Hand icon on the other one, to automatically close the first one before the second one is opened
for you.]Click on the white piece of
cloth you find in the large middle drawer at the bottom, to deposit it in your
inventory.You are done in this room
now, so exit.
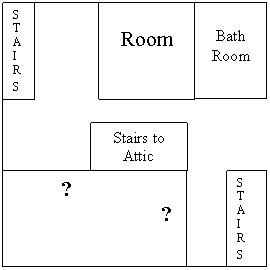
Step forward, turn to your left, and go upstairs to the
next floor. (See diagram below.)
As you come upstairs, move up to and click the handle to
the door right in front of you, to enter the bathroom on this floor.The room seems to have been under
construction, however, and is therefore not really a finished room.There are bricks and wooden planks
everywhere.Just as you enter, turn
right and click on the magnifying glass icon on the bricks there on the
ground.You will get a close up of a
brick, with a small metal rod sticking in the center.Click on the rod to deposit it in your
inventory.You are done in this room
now, so step forward and click on the handle to the door on your left, to enter
the adjacent room.
This room seems to have been under construction as well,
with bricks and all kinds of "trash" around.Step forward, turn to your right, and click
on the small stove sitting on a plank that has been placed as a makeshift wooden
bench. The close up of the stove will show you a metal rod on its left side,
but merely a hole on the right.Bring out of your inventory the small metal
rod you just picked from the adjacent bathroom, place it on the hole on the right
side of the stove, and click to see it fit into place.You are done in this room also, at least for
now.So step out of the close up, turn
around and exit through the door to your right,
to get back in the hallway on this floor.
The stairs to the attic are immediately to your
right.Step forward, however, and try to
open the door to your right (the one marked with a "?" in the
diagram, appearing to the left of the
stairs you had used to come up to this floor).The comment at the bottom of the screen indicates, however, that the door
seems to be stuck.So come around the stairs to the attic and try
to open the door to your left (the other
door marked with a "?" in the diagram).The comment at the bottom of the screen tells
you that the door is locked but that the hero can see a key, on the other side of the door, in the
keyhole.Turn to your left then, and
click on the newspaper on the ground, to deposit it in your inventory.Bring the newspaper out of your inventory and
place it under the door.Now bring the "boring tool" out of
your inventory, place it on the keyhole, and click to read the comment at the
bottom of the screen that the key has been knocked down (and has thus landed
onto the newspaper).So pick up the
newspaper from the floor, only to read the comment at the bottom of the screen
that the key got stuck on the other side of the door.Click on the door handle to find that there
is no way to get the key now.
So come around to
the stairs to the attic, and go up
the stairs to the attic now.Open the
door and step towards the wall in front of you.There is a pile of newspapers on the ground, right under a small
circular window.Click to get a close up
of the newspapers, and then try to pick one up, only to find (from the comment
at the bottom of the screen) that the pile of newspapers is too huge and that you
would need a specific date to find a particular newspaper.Click on the little green chest, to the right of the newspaper pile, to get its close
up.Once you get this close up, click to
open the chest.Click to pick up the
lantern on the left side of the chest, to deposit it in your inventory.Now click on the papers in the left side of
the chest and, as you get a close up of them, click repeatedly to see them one
by one.Click on the papers in the right
side of the chest then, and similarly look at them one by one as well.Step out of the close up and click on the
magnifying icon on the right and left sides of the room, and read the comments
at the bottom of the screen to find either nothing of interest or the hero getting
eerie impressions.You are done in the
attic, for now, so exit and head back for the Phone Room.
Call Jerry now, and listen to the conversation between
the two men.Since the hero couldn’t
find any candles in the house, he must now drive over to town and buy
some.So, as the two men hang up, step
out of the house through the front door and head for your car standing by the
main gates.Get in the car, bring out
your car keys from the inventory and place them on the "car starter,"
i.e., the ignition (in the little white circle, right under the red one, on the
right side of the steering wheel).Click
to place the key in the ignition, and then again to try to start the car.The engine purrs a little and dies out, as
the red bulb above the car starter starts flashing.The comment at the bottom of the screen
indicates that the hero had left the lights on when he had first gotten out of
the car.Click on the ignition again,
and the comment at the bottom of the screen will tell you that the car battery
is dead.So step out of the car and
return to the house, to call Jerry again.
Jerry will tell you now to go to sleep, but the hero
won’t be "allowed" to do so (by the game designers) until he does
three more things, two of these being to call Jerry again.So as the two men hang up the first time,
call Jerry again.You will have a choice
of two topics, as indicated at the bottom of the screen: the previous
inhabitants of the house and the safe.Click on the first topic.Jerry
will tell you then about a murder that took place in the house back in May,
1963.As the two men hang up again, call
Jerry once more.This time, you won’t be
given any choices at the bottom of the screen, as the hero will automatically
start talking about the safe. As it will
turn out, Jerry does have the information but not readily available, so he will
end the conversation promising to give the information tomorrow.[Note: the reason that the two men keep
hanging up is that the game is designed so that you can call Jerry up as soon
as you discover something that you can relate to him in order to receive some
information from him in return.Rather
than running back and forth to and from the phone, however, we are taking care
of a few things at the same time.The
downside, of course, is that we need to keep calling Jerry until all the
necessary information has been exchanged between the two men.]
As this last conversation ends, go back up to the attic and
try to pick up a newspaper.A single
choice will appear at the bottom of the screen, relating to a news story in the
date of May, 1963.Click on this choice
and you will get a close up of a news page detailing the account of the murder
Jerry had mentioned.You are done for
the day now.So go to your room
downstairs and towards the bed.As you
see the Open Hand icon on the bed, the comment at the bottom of the screen will
confirm that it is time to go to sleep.
While the day may be over, however, the night is not – as
the hero wakes up, in the middle of the night, by the sounds of a hammer
"banging away" . . .
Try to open the inventory, but you will not be able to do
so.So step out of the room, walk down
the corridor and enter the Gallery.Look
on the left side of the room, where that large glass cabinet, with the huge
carved tusks, stood.You had not been
able to move the cabinet earlier that day, but it is not there anymore.Instead, you see a boarded-up door that might
have been behind the display all along.Move towards that door, look down and close up on the hammer lying in
front of you.Pick it up and . . . you
will find yourself back in your room.
Apparently, you had just been having a dream (or a nightmare).But you are up now, and out of the bed.It is still night time, and you have
apparently been awakened by some other strange sounds – this time, more like
that of scratching – coming from somewhere.Go to the fireplace.As you
approach it, the comment at the bottom of the screen tells you that the sounds
have grown louder.Close up on the
fireplace, and place your stethoscope inside.Yes, the sounds seem to be coming from there.But you are still not sure of the source; and
you won’t be able to go back to sleep until you do.So go down to the Living Room now, and close
up on the fireplace there.Put your
stethoscope, not on the logs but on
the piece of the wall right above them.Yes, the sounds must be coming from below . . .
Return to your room now and, just as you enter, the comment
at the bottom of the screen will inform you that the scratching sounds have now
stopped.So go back to sleep now.