The Immortals of Terra: A Perry Rhodan Adventure – Rhodan: Myth of the Illochim
Look up and
see the 4 planets of Tiga Ranton – Arkon 1-4.
Invasion
exhibit: Enter the Invasion exhibit behind Thora and go
forward to the other end.
See a
similar map of the 4 planets of Tiga Ranton. This was activated by Dagor’s
sword.Click on the circular map and hear Mondra scream. Click on the circular map again and the transmitters are
deactivated.
Look around
the museum and search for Mondra:
Museum
Cathedral (Tower 1): Enter the room at right.
See a
colossal robot.
See-click on a hole at the bottom of the robot. It is the exact shape of the supran lens.Enter the
transmitter at right. Go to top level and be on a ramp that has a door that can
only be opened from the other side. Enter the transmitter and go down to the
lowest level.The lower
level has 3 doors. Check the left door, click on the first step and see that it
is a contact tile. The middle door needs a key to open it. The right door also
has a contact tile. The giant robot’s stand is surrounded by water.Use the
transmitter to go back to middle level.
Invasion exhibit: Go back to the Invasion exhibit at
bottom screen.
Take the
transport frame from the right display case, the Arrachieda stick and
miner’s hat from the left display cases. Right click each of the taken
items to know more about them.
Arkonides exhibit: Enter the exhibit right of Thora’s
statue. Take the laser pointer from the right display.
Storage
room: Go to the other end up the stairs to the storage room.
Look at the
containers and realize that they contained weapons. Check the open crate at the
end of the stack and get the object jack.Click on
the broken stained glass window at the right wall. Be at that side of the room
close to the windows. Pick up the blue shard of glass from the floor.
Water
tower (Tower 2): Exit through the other end up the stairs. Walk the
bridge to the tower.
Click on
the dirty water twice. It looks like there’s something like a glider down there.Enter the
lift and see that it can not go down because of the water.
Go back to
the statue of Thora and then enter the Illochim exhibit at her left.
Get
close to the giant robot at the museum cathedral:
Illochim
exhibit: Enter the room on the left (while facing Thora).
Ylohim:
Click on the clear stand made up of 6 hexagonal plates. Learn about the game of
the Illochim, the Ylohim. The display game tiles are floating in water.Use the
object jack on the floating tiles on the water. The ylohim game pieces
and the how to play Ylohim is now in inventory.
Reproduction of Illochim: Check the other clear stand
showing the bone of an Illochim.The hologram of the Illochim is projected by
the stand at the center. Push the stand and see that the display can be lowered
but the stand needs something used as wedge to be able to get the wing bone.
Museum
Cathedral: Go to the cathedral at other end of the
Invasion exhibit.
Use the
universal remote control on the floor in front of the giant robot. The battle robot arrives here.Enter the
transmitter. Go to bottom level.Use the
universal remote on the door on the left. The battle robot arrives and steps on
the contact plate.Go to the
right door and step on the contact plate or stairs. The door opens.
Pump
station: Enter the room and see the control panel of the
pump station.
At present,
the wheels are (left to right): horizontal, vertical and horizontal. The center
is opened and the other 2 closed. Presumably, the left wheel is the museum
cathedral, the middle wheel is the water tower with the glider and the right one
is still for an unseen tower.Click to
turn the wheels to (left to right): vertical, horizontal and horizontal; opening
the left wheel for this Museum Cathedral tower.Exit the
station and use the transmitter to go up to middle level. Exit the cathedral and
be in the map room.See a lever
at bottom wall. The lever is down or closed. Pull the lever up to open the pump.
This also jams or locks the pump station control panel. Water should rise at the
Museum Cathedral.
Museum
Cathedral: Go back to the cathedral and see water has
risen around the base of the colossal robot. The bottom level is now submerged
in water.
Ylohim
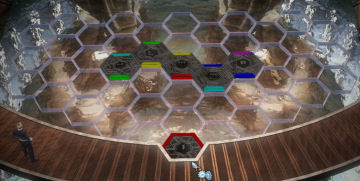
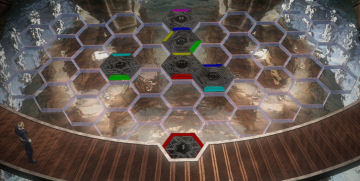
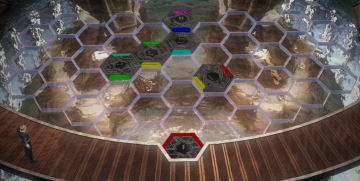
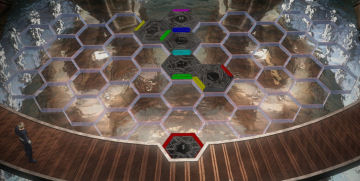
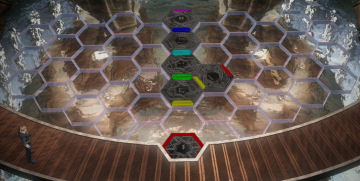
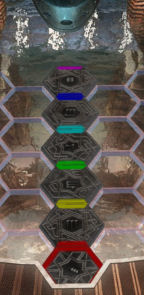
tile puzzle: The object of the puzzle is to make a
straight path to get to the colossal robot.The tiles
must be arranged based on the color of the rainbow: (top to bottom) violet, dark
blue, light blue, green, yellow and red.Each tile
has 2 colored edges. The colors touching each other must match: Blue to blue,
green to green…The tiles
can be moved only if they are touching another tile or if they will not produce
mismatched color combination.Place the
tiles in the water in front of the colossal robot.Click to
turn each tile. Check how many turns make it upright to the color wanted. Then
move it to the correct place based on that number.To reset
the puzzle, go to the center close to the red tile and click on the hotspot on
the floor. Perry will pick up the tiles.
This is only one solution and
is not the shortest either. 🙂1.Move violet-dark blue tile to top left.
2.
Move the green-yellow tile to top right.3.Move violet-dark blue tile up once.
4.Move violet-dark blue tile to top left.
1.Move dark blue-light blue tile up once.
2.
Move green-yellow tile to bottom left.3.
Move yellow-red tile to bottom right4.
Move dark blue-light blue tile to bottom left.5.
Move dark blue-light blue tile up once.
1.
Move light blue-green tile to bottom right.2.
Move green-yellow tile to bottom left.3.
Move light blue-green up once.4.
Move green-yellow tile up once.5.
Move green-yellow tile to top right.6.
Move light blue-green tile to bottom right.
1.
Move green-yellow tile to down twice.2.
Move green-yellow tile to bottom right.3.
Move yellow-red tile to up once.4.
Move green-yellow tile to top right.5.
Move yellow-red tile to bottom right.6.
Move yellow-red tile to down once.7.Move green-yellow tile down once.
8.
Move yellow-red tile to top left.9.
Move green-yellow tile to top left.
1.
Move light blue-green tile to bottom left.2.
Move yellow-red tile to top left.3.
Move yellow-red tile to top right.4.
Move light blue-green tile to top right.5.
Move yellow-red tile down twice.6.
Move yellow-red tile to bottom left.Piece of cake!
Solution by Bert Jamin: (Thanks, Bert!)
- purple/blue 2 x left up
- cyan/green up
- cyan/green right up
- purple/blue up
- cyan/green left down
- cyan/green down
- blue/cyan left down
- blue/cyan left up
- yellow/red down
- yellow/red left down
- blue/cyan right up
- blue/cyan up
- green/yellow
down
- cyan/green right up
- green/yellow left down
- cyan/green right down
- green/yellow right up
- cyan/green down
- yellow/red right down
- cyan/green up
- green/yellow right down
- yellow/red left up
- cyan/green right down
- green/yellow left up
- yellow/red right up
- cyan/green down
- yellow/red down
- cyan/green left up
- purple/blue right down
- blue/cyan right down
- green/yellow right up
- cyan/green left up
- green/yellow right down
- blue/cyan left down
- green/yellow left down
- blue/cyan right down
- cyan/green right up
- blue/cyan up
- cyan/green up
- purple/blue left up
- cyan/green down
- blue/cyan left up
Automatically,
Perry goes to the base of the robot and inserts the supran lens in the hole.Oh my!
Battle of the robots: David versus Goliath.Someone
drains the water from the robot pool. A technician comes out and picks up the
fallen lens.Use the
transmitter to go down to the bottom level. See the overturned battle robot.Pick up the
piece from the Illochim game right of the transmitter. Perry says it’s
the right size to hold the holoprojector in place.
Illochim
exhibit: Go back to the Illochim exhibit left of Thora’s
statue.
Go to the
holoprojector stand. Push the stand. Then click the piece from the Illochim game
on the stand to hold it in place. The projection is lowered. Take the bone
from the wing of an Illochim.Go back to
the bottom level of the Museum cathedral.
Find
Mondra:
Museum
Cathedral: Go back to the cathedral beyond the Invasion
exhibit.
Use the
transmitter to go to the lower level.Enter the
open left door by the robot. See an opened big hatch. It’s dark in there.Use the
thermo glasses on the darkness and then enter. Go left to the next room.Illochim
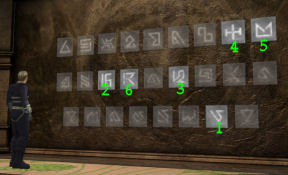
script puzzle: Be in a hexagonal room. The center of the room
is a transmitter. Perry wants it activated.Look at the
Arkonide script on the wall. The script tiles on the wall react to colored
light.In
inventory combine the laser pointer with the blue shard of glass.Use-click
the colored laser pointer on the tiles on the wall.See that
one tile at bottom row lights up.Check
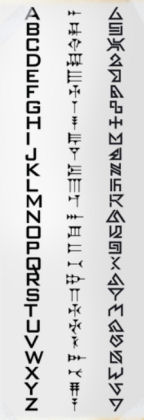
Mondra’s notebook. Open to script table. See that the lit tile starts with a Y.What word
do we know that starts with a Y here? Ylohim, the tile game.Click the
letters in order to make up Ylohim on the wall. If correct, they stay lit up. If wrong,
the light goes out and you have to start over.The
transmitter rises.
Secret
service office (Tower 3): Enter the transmitter.
Be in an
office. See a space shuttle exit from the other tower outside the window and departs.Scan and
check the room.Pick up the
Tu-Ra-Cel badge from the crate at bottom left of the room.Check the
Vialon-Trona, truth serum machine at bottom of the room.Take the
pen-metallic object on the shelf in front of the monitors. Check the
monitors.Talk to
Bully. Bully updates Perry on what has happened. Perry has been cleared and back
as Regent. Mondra was taken to Gom Calleadus, a former penal colony now
quarantined. It is held by the Tu-Ra-Cel.
Water Tower 2:
Where did we see that glider?
Check to
see if you can use the transmitter. No. Exit through the door. Cross the bridge.Enter and
be at the top level of the museum cathedral. Use the transmitter. Go to middle
level.Go to the
Arkonide exhibit. Go pass the storage room to the tower.Enter the
tower and then enter the lift.Be at the
lower level. Enter through the hatch and the door shuts close.Pull the
lever down on the stand at middle of the ramp. The pump is stopped now.Go to the
door ahead. It is locked. Use the metallic object taken from the office on the
door. It is a programmable positronic key. Exit the room.
Pump
station: Go to the pump station at right.
Go to the
control panel and now change the settings (left to right): vertical, horizontal
and horizontal. This would drain the water at the water tower 2 where the glider
is located.Go back to
the middle hatch. Pull up the lever to turn the pump on.Time to go.
Enter the door at end of this ramp at left. See the shuttle that Bully states will
be a bumpy ride. Enter the
shuttle.
Gom Calladeus – Elmo Dater
Outside
Elmo Dater: Look at the shuttle. Perry is not leaving here
anytime soon.
Pick up the
plasma converter from the open shuttle door. Pick up from the ground: the
beam collar used to focus plasma jets, water tank and crowbar.In
inventory combine the plasma converter and beam collar to get an improvised
plasma beamer.Exit at
right. See a pink, greasy, foul substance.Go forward
and look around as you go. Look at Elmo Gater, the mining colony at end of the
path.
Elevator: Go to the platform of the steel structure.Use the
crowbar on the top of the box. It needs fat or grease to make it run better.Go back to
that pink greasy foul substance at side of the road.Use the
water tank on the pink substance to get jelly-like lichen.Go back to
the elevator.Use the
pink lichen on the hotspot at top right side of the platform.Use the
improvised plasma beamer on the box by clicking it on the yellow area of the box.Click on
the top right side of the platform to start the elevator.
Elmo Gater
middle level: Perry goes incognito again.
Blues:
Try to talk to the 2 Blues arguing at the entrance at left. They are arguing
about a doll.
Ijgarsha
Store: Go to the lit exit at right. Go forward and look at
the sign on top of the archway. Enter the store and look around.
Talk to
Ijgarsha. Use the miner’s hat on her. She gives 24 hour Eldo-Ram credit. After
getting some of Perry’s items, she gives back 24 Tontas and the energy pack for
the miner’s hat.Show her
the jelly-like lichen. If combined with Sheed at 2:1 ratio, it becomes a strong
corrosive acid.Exit the
store and enter the next building.
Blues:
Talk to the Blues at left by using Kato’s icon. Learn that Toregent, the medic
might know.
Echodim
Bar: Go through the entryway left of the Blues.
Enter the
bar with the neon sign at left. Look around and then talk to the bartender.Learn that
this is an odor bar not drinks bar. Exit the bar.
Kesnar
Clinic: Go right and then down the right ramp until the very
end.
See the
clinic sign and door at the end. Enter the clinic.Get a check
up and find out that Perry is very healthy.Get to
see the Ara medic by getting sick: Go back to the
Echodim bar by going forward until the neon
sign.To order,
click on one of the opening in front of the bar.Listen to
the 2 other bar patrons talk about a sick hunter and Mad Hamilton.Order
another odor. Listen again to the other bar patrons concerning the control of
the quarantined zone. They mention a hacker. Mad Hamilton and Lower Level
are now in inventory.After the
third or fourth odor intake, wake up in the clinic.Toregent: Talk to Toregent, the Ara medic. He knows that Perry is
the Regent.Remember
what Huber stated about Aras, they are very scientific and wants answers. Show
him the Illochim bone.Now that he
cooperates, ask about Kato, Mad Hamilton and then lower level. Get information. Learn about antiserum for the plague. He leaves to
get it.Ullban
Krems: Talk to the patient at right. Ask about Kato and learn that Kato is known as Skorgon here. Whoever controls Sheed controls
the place. Quotter Batt is now in inventory.Ask about
Mad Hamilton, Lower Levels and Quotter Batt. He wants eyes as payment to help
Perry get to the Lower Level.Toregent
escorts Perry out of the patient area.At the
reception area, see the 2 Blues are very sick. Try to take the little Blues doll
beside the Blues. They cried.Exit the
clinic and go back to the Trading Post.
Ijgarsha
Store: Take the exit across (right) the bar. Go to the
right lit entryway and enter the store.
Ask about
Mad Hamilton twice. Find out that she has a soft spot for Hamilton. She will answer all your questions.
Ask about
Lower Level, Quotter Batt and then eyes. She will lend the equipment to go to
lower level. She advises to go to the bar and ask for Mackro da Thrang.
Echodim
Bar: Go back to the bar by going forward until the neon
sign.
Click the eyes
on the bartender to ask about Mackro da Thrang.Climb the
stairs behind the bartender and right of the young man guarding the disco place.Talk to the
Naats guarding the door.Talk to Marko. Use the eyes on Marko. He wants the Blue
doll. The creature doll is now in inventory.Exit the
bar. Perry summarizes what has happened.Watch Kato,
the Ara cybernetician and E-frain talk to the boss. He orders for Tachio to take care of
Perry. E-frain calls the boss, Zhdopan. He wants Diamond’s notebook.
Kesnar
Clinic: Go to the clinic. After talk with the nurses, Toregent
talks to Perry.
Click the
creature doll on Toregent.Click on
Blues several times until Perry asks for the doll.Click the bone on Toregent.
He gives the creature doll of the blues and antiserum.
Echodim
Bar: Go back to the bar by going forward until the neon
sign.
Go to
Marcko in his private room. Give the creature doll to Marcko. Ah, it contained
drugs. That is why the Blues got sick. He gives the real eyes.
Kesnar
Clinic: Go to the clinic. Find out that the door is closed.
Open the
clinic door: Remember
what Ijgarsha said about the lichen. In inventory, combine the lichen with the
small bottle of poisoned that did Martel in. Use the corrosive acid on the door.Enter the
clinic. See that the nurses are androids. Enter the patient area at right.Krems: Talk to
Krems. Click the real eyes on Krems. He gives his eye implants.Ask about Quotter Batt and Lower Level. He gives an admission permit to the Lower
Level which Krems found in his things with a message to give it to the Terran
asking about Quotter Batt.
Entrance
to Lower Level: Go back close to the bar.
Take the left
pathway until a ramp that leads to a door. See Tachio, the assassin waiting for
Perry. Perry runs back outside the bar after Tachio fires her gun. Tachio da Xena
is now in inventory.Take
care of Tachio: Go inside the bar and talk to the bartender. Use Tachio icon on the bartender and he gives advice.Use the
antiserum on Zimbart, the other patron. Use Tachio icon on Zimbart.Go to Marko
and chat with him. Perry gets kicked out again.Go to the
bar and Zimbart comes back hacking. He puts Tachio out of commission and Perry
gives him the antiserum.Go back to Entrance to Lower Level: Exit the bar and go left until the
locked door.Talk to Tachio inside a bubble.
Use the admission permit on the door. Click to go through to the Lower Level.
Mines – Lower Level: Perry takes his disguise off.
Washroom: Go left until inside the washroom. Look
around and see the sinks and green lockers.
Lockers: Click on the lockers and see that there are codes
under the lockers.Use the positronic key on the left cabinet to enter the code on the key.
Then use the positronic key on the left green keyhole on top of the sink.
The left locker drops down and opens. Take the metal rod inside the
dropped locker.Do this to other lockers. Get tools and roll of tape from the
other lockers. The
positronic key breaks after the third locker.Exit the washroom.
Control Panel by entrance: Go back to the entrance door to
the Lower Level.
Look at right wall of the lit hallway. Get a close-up of a panel with levers. See that it is missing a lever.
Pull back and then use the metal rod on the panel. Look close again.
Pull the left and second from left lever up. The rest are stuck.
See that the panel across the hallway is now flashing.
Panel by stairs: Go up the stairs and see a car. Look
at left wall beside the car.
See a close-up of a panel. One hole is missing a bar.
Use the arrachieda stick on the hole at top right. Ouch, it’s live.
In inventory combine the arrachieda stick with the red roll of tape to get an
insulated arrachieda stick.While in pull back view, use the insulated arrachieda stick on the panel missing
a bar.
Bridge rail: Go to the now steady green lit panel
across the hallway.
Use the admission permit on the panel and see a bridge rail form by the car.
Enter the car and ride across the gap to the other side.
Prisoners quarters: Be in front of a closed door. Check
the light from above.
Read the sign hanging on the right. Jeffer-Zalem, Beol-Grant, Quintin Bartholomew (?Quotter Batt)…
Pick up the seat belt from the floor in front of the locked hatch.
Go to the right foreground exit.
Sewer pipes area: See 2 big sewer pipes on the wall and a
railing on the floor.
Enter the hallway between the 2 sewer pipes.
Ventilation system: See a ventilation fan with a
Tu-Ra-Cel emblem at the center. There’s a warning sign on the right.Use the emblem of Tu-Ra-Cel on the center of the fan. That stops the fan.
Go forward between the blades.
Mines:
Go forward the ramp. See an open cabinet at the end of the ramp. It is the Air
current Transforming Energy Generator.
Destroyed control panel:
Look at the small control panel just left of the entryway. It was deliberately
destroyed.Use the tool on the panel. Perry says that there are still some components still
missing and needs replaced.Go through the entryway and across the bridge to the next entryway.
Prisoner cubicles: Look at the cubicles-cells of the
prisoners.
Go forward to another dark hallway. You are looking from above.
Move Perry along the path to the right. Scan the path to know where to go.
See fresh blood on the floor. One click from the fresh blood is a door. Enter
the door at top
of path.
Cell: Use the miner’s lamp and then enter the room at
top of screen.
See Baldrin Mad Hamilton dying on the floor halfway pulled through the wall.
Talk to him about Kato, Mad Hamilton, Quotter Batt until Mad expires.
Exit the room. Hear sounds coming from the cell. Go back in.
Take Hamilton’s circuit board. The organ hunters have taken Mad. Exit the
cell.Continue to the right until the light coming from above.
Light collecting structure: Go close to the structure.
Click the eye implants on the base of the structure. See a beam of light
directed to the tunnel at right.Enter to the right to follow the light beam. Go forward until the platform.
Station:
See that the light beam ends at a bizarre structure. The structure has no
connection or bridges to the sides.
Get to the structure:
Use the transport frame on the nearest cable.
Attach the seat belt on the transport frame. It doesn’t fit.
Use the tool on the seat belt. Then use the seat belt on the transport frame.
Get on the seat belt.
Control station: Enter through the doorway at right. Look
around.Take the modulator-com unit from the control station. Click on the
control station and see that there is no power.Look at the dark doorway on the left. Perry says he needs light because of the
organ hunters lying in wait.Check the control panel on the left wall with the warning emblem. Get a
circuit board.Get power in the mines: Go back to the control panel
way back by the Air current Transforming Energy Generator. The one that was
partially fixed with the tool and left of the entryway.Use the admission permit, Hamilton’s circuit board and the circuit board taken
from the station on the panel left of the entryway now that it was fixed with
the tool earlier.After fixing and adding the components, be sure to click on the control panel
to activate it.Go way back to the station. On the way, see that light is back on.
Station: Enter the station via the seat belt on the
cable.See the control station is live. Flip a switch on the table.
Watch the reports of the video logs by the military down here. So sad.
The doorway on the left is still dark.
Get light to the dark hallway: Go back out.
See the crystal sphere that directs the beam of light on the landing area of the
station.Use – click twice the handle at the tripod base to redirect the beam of light to
focus down the round grill on the floor.Go back inside and enter the now lit doorway.
Quotter Batt: While traveling through the center of the
station, hear Quotter Batt.There! He’s here... Look up and see Batt hanging with wires attached to
him. He’s connected to and controls the whole information system.Ask about Kato and Quotter Batt.
Ask about the frequency spectroscopy. He answers about the Illochim.He asks what is the sign left by the Illochim. Click on the emblem left on the bottom row.
He asks what does a person need. Select Trust.
He wants Mondra’s diary. After asking about everything, click on him and realize
that because Mondra wrote her research on a notebook, Batt cannot access it
being on the electronic highway only.Then ask about the voice duplicator and then the com unit. Batt will then state
that he can give the way to Mondra if given the diary.Perry walks through the tunnel.
See a large transmitter. Click on the surrounding structure. Perry says the
Illochim uses it to extract Sheed.Step on the transmitter.
Jamondi’s Stellar Ocean – Asteroid Betha
Dimension gate: Look at the rocks surrounding the
dimension gate-transmitter. See ancient runes.
Betha:
Go right and see the spaceship of the Illochim. Look around.
Arkonide
research station: See the spaceship close-up. No windows or
doors.
Mondra:
Enter the station. Go forward until Mondra.See Mondra
encased in ice. Click on Mondra twice.Contact
Bully: Click on the hypercom stand on the right.Contact
Bully by clicking the com unit on the machine.Talk to
Bully. He wants a clue to help pinpoint where Betha is located.Go back to
the Dimension gate that brought Perry here.Click on
the stones with ancient runes to get ancient symbols in inventory.Go back to
the hypercom. Click the ancient symbols on the hypercom.Hear Kato
talk through the grill above Mondra’s ice crystal.Dissuade
Cato: Use Martel’s voice duplicator on the hypercom.
Listen to Perry’s ruse.
Drill:
Enter the transmitter on the right. Be at the drill control center.
See the
drill making a hole on the hull of the space ship already.Check the 2
monitors that control the drill.
Inside
the Illochim space ship: Go through the tunnel.
Illochim: See the
Illochim encased in glass or be in suspended animation.Go to the
left. See the head Illochim with an impression similar to the
Supran crystal on its head. A mounting place is also on its head.Go close
to the Illochim. Look at the broken supran lens on the ground.Contact
the Illochim: In inventory combine the frequency
spectroscopy and the voice simulator.Use the
voice simulator with the frequency on the Illochim. Do this three times.Watch the
contact between the Perry and the Illochim. A history of the race’s visit on the
planets is seen.Kato:
Kato and his minions arrive. Talk to
Kato completely.Use the voice simulator on the Illochim again. It startles Kato.
Drill
control center: Perry runs
back inside to the Drill control center.
Overheat
the drill: Use the 2 monitors.On the left
monitor, click the + of left column 4 times and the third from left twice.Go to the
right monitor, click the second from left + twice.Hear the
alarm. After a while protective clothing is dropped from somewhere.Take the
protective clothing that Perry cannot open. Use the protective clothing on
one monitor.Go to the
transmitter and use the hypercom. Someone is in contact with the spaceship of
the Illochim. That was the ultimate goal of Quotter Batt.Stop the
contact of Quotter with the Illochim: Go back to the monitors
via the transmitter.Use the
other monitor and raise all the bars to the highest point by clicking on the +
sign.Perry
automatically goes to the transmitter. Answer Bully’s call on the hypercom.
Watch what happens to the spaceship and the escape.
Listen to Quotter Batt.
This document may not be
distributed without express written permission of the author and the content may
not be altered in any way.
For Questions or Comments on
this Walkthrough,
Please write to:
MaGtRo
Copyright © 6/2008
MaGtRo