The Immortals of Terra: A Perry Rhodan Adventure Walkthrough by MaGtRo
Rhodan: Myth of the Illochim
Perry Rhodan: The Immortals of Terra
by Deep Silver
Walkthrough by MaGtRo June 2008
Gameplay: This is a third person
point and click game. The Main Menu has Load, Save, New Game, Settings,
Intro, Credits and Exit.
The save feature has 3 ways of savings: manually, when
you want to save at the point you want; automatically, which is done when
entering a new area and the quick save which is done by pressing F5 key. F8 key
loads the saved game using the quick save.
The settings selection has volume (effects, music and
voice), soundcard, preset settings, lighting, shadows, shadowmap, background
characters, anti aliasing, texture size and vertical synchronizing. Check the
manual for descriptions of each of these settings.
The inventory is at the bottom of the screen. Items
picked up and characters that are relevant are found in inventory. Left click to
pickup items and character icons and use with other items or other
characters. Right click on any icon in inventory bar gives information about
that item or character.
Multifunction wristband is at left of the inventory
bar. It has information gathered during gameplay and can give clues on how to
proceed with the game. Right click in the wristband also shows information.
The Main Menu is accessed by pressing the ESC key
during gameplay. The S key activates the scanner that
shows where all the active spots or items in the screen. The spacebar
skips the dialogues and cutscenes.
It is best to read the manual to know more about the
history of Perry Rhodan and description of different characters: his friend and
other Milky Way inhabitants.
Stellar Ocean of Jamondi: There is a
story that after teaching Technology to Humanity, Beings of Water and left
leaving only their story behind. Two Arkonides land in a desolate planet and stated that they have found what they were
looking for. To take command of it would give them control of the entire galaxy.
Looking down at Terrania, the capital of the Terran
Empire, Perry Rhodan contemplates his immortality. He has lived for 3000 years.
Reginald Bull was informed that the defensive shield
is partially deactivated. The Solar
Residence is attacked and penetrated.
Mondra Diamond fights her robot attackers at the
terrace. She twists off a robot’s head during the fight and was eventually taken.
Perry is informed by the Security Officer that the
magnetic field of the defensive shield has been partially deactivated. Perry
was also told that Reginald Bull aka Bully, his close friend and Resident
Defense Minister has evoked a communications blackout. Also that he was under information blackout and
confined to the Residence.
Solar Residence
Find out the damage caused by the attack:
Entrance Hall: Look around
the room and note the damage. Use the S key to scan the room.
Globus sphere: Look above and see the damage to the globus sphere.
Doors: Check the doors and see that
they are all locked. There’s no power to light the door numbers above the doors
and the doorplates. His office second from left and Bully’s office to his office’s right cannot
be opened due to damaged positronics. Atlan’s office to his office’s left is damage by the attack.See an inactive cleaning bot outside Bully’s office.
Go to the right and check Gucky’s office and see that
it is also damaged.Go to the left and enter the hallway.
Hall of Fame: No discernible
damage here. See that there are 10 holoprojectors used to depict Perry’s history
line the hallway. They are inactive
right now due to absence of power. Continue down the hallway.
Crystal Lounge: Scan the
room.
See an inactive cleaning bot on the floor.
Singing crystals: The hanging
crystals are quiet at the moment due to loss of power.Mondra’s office: The door to
Mondra’s office is also close but not damaged. The door number is placed too
high above the door.Transmitter: Enter the
transmitter on the left.
Terrace: Perry ended up at
the terrace and not the Surveillance Center. Look around the damage here.
Perry finds out that Mondra was taken by robots.
The soldiers stopped Perry from looking around because
of Bully’s order. Perry automatically enters the transmitter. Read the wristband
on the left and see that Perry needs to distract the guards.
Entrance Hall: Go to the
right pass the Hall of Fame to be at the Entrance Hall again. Enter the
transmitter beside Gucky’s office right of the room.
Platform: Perry ended up at
the platform. It seems that the transmitter sends the person to the last place it visited before the attack.
Mondra‘s icon is added to inventory. A soldier
exited from the transmitter and goes to the other end.Scan the platform and look around. See a magnificent
view. Follow the soldier to the right.
Hangar: Scan the room and
check everything.
Energy stations:
See that the left charging station is working and that an attendant is working
on the damaged right one.
Hangar attendant:
Talk to Yuri, the attendant and learn that this is Mondra’s hangar. He says that
the maintenance room is through the door on the right. Use Mondra’s icon from
inventory bar on Yuri.Go right and see Mondra’s glider. It is a way out of
here. But the guard stops Perry from accessing it.Go through the door to the maintenance room.
Open the different offices and check them:
Maintenance room: See 2
terminals on either side of the hallway. The Maintenance terminal on the left is
without power.
Power terminal: The terminal on the right can be used. Click on the
‘switch’ at the center and learn that you have restored temporary power to the Residence.Check the Maintenance terminal on the left and see
that it is used to activate the various maintenance units: holoprojectors and
cleaning robots. Perry needs someone to repair it. See the maintenance
terminal icon at the inventory bar.Door activations: Click on the
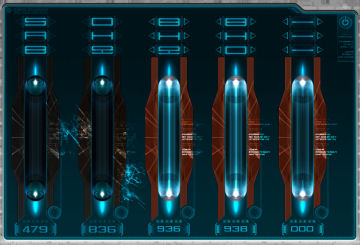
Power terminal again and see a new layout. 479 is Atlan’s office, 836 is Gucky’s
office and 936 is Perry’s office. The other 2 must be Bully’s and Mondra’s. They
need to be activated.Go back up to the Entrance Hall to check the door
number of Bully’s and Mondra’s.To exit the screen, click on the circle at top right.
Go back to the Entrance hall. Check the number of
Bully’s office and find out that it is 938.Hall of Fame: Go left to the
Hall of Fame. Perry is stopped by his own Hologram.Mondra’s Office: Go to Mondra’s Office and check her room number. It is too high to read.
Activate Bully’s and Perry’s office:
Go back down to the maintenance room and look close at the door activator
terminal at right.Using the known numbers of the 2 offices on the left
and their corresponding alien numerals on top, enter 936 of alien numerals at
top of tube (going top to bottom) on
Perry’s office tube at the center.If correctly done, see a flash of light and ray inside
the tube.Using the – and + above the numbers, enter the number
938 at the bottom of the tube right of Perry’s 936 for Bully’s office.Using the known numbers of the 3 offices on the left
and their corresponding alien numerals on top, enter 938 on top of tube (going top to bottom) on
Bully’s office tube.
Platform: Go back to the
platform and see a technician.
Bionic Technician: Talk to
him. He uses thermo glasses to check the organic plating of the structure. Click
on his thermo glasses to borrow it. He says later.Use the maintenance terminal icon on him. He will send
for another technician to repair it.Go back to the Entrance Hall via the transmitter.
Bully’s Office: Enter Bully’s
office. Scan the room.
Pick up the remote control (Wing Swing GT5000)
on the floor at left.Model Ships: Check the
different model ships on the left desk. See and click on the Marco Polo and the
Discovery. There is a blue ship that is missing a piece before the word Lercyi.Beside the inactive robot on the floor is the Stardust.
Positronic
computer: The positronic computer at center of room
needs a password. Bully usually uses the name of his model ships. Try the different
names of the model ships seen as password but none worked.Exit the room.
Perry’s room: Enter the
office left of Bully’s. Scan the room.
Check all active items.
Check the cleaning robot named Piggy that eats
everything that falls on the floor.Info terminal: Click on the big
screen on the right.There’s a message from Mondra. Learn that she found
something startling about the exhibition she is planning and is to meet Bully on
the Terrace to ask about Martel. She wants Perry to join them.The message from Martel states that he wants to
meet Perry at the Waringer Academy concerning a new robotic technology. Almo
Martel icon is now in inventory.Laotse, Perry’s positronic computer:
Go up the platform and click on the positronic to learn about it.Use all the inventory icons on the positronic to know
more about them.
Hall of Fame: Look at all the holoprojectors and learn about
Terrania’s history. Ulan Soso, designer of the Solar Residence icon is
now in inventory.
Two or 3 of the holoprojectors show a cryptic message:
Those looking for love must pursue their destiny… if you seek truth, you
must find the undying myth... Hurry!!! Hurry!!! Hurry!!!
The seconds that line your glance are moving away from you… others are
fleeing towards me while I stand here waiting senselessly… some go away, the
others stay… Hurry!!! Hurry!!! Hurry!!!
Perry’s office: Go back to Perry’s
office.
Use the Ulan Soso icon on Laotse, the positronic
computer. Learn that the Solar Residence is formed by an organism. Automatically
download the
code that he used on his calculations, the Swoon Omega decimal minuscule.
Crystal Lounge:
Go to Crystal Lounge by Mondra’s office.
Hear the singing crystal
sing in response to a technician.Talk to the technician.
Talk to him again and he whistles again to get responses from the singing
crystals. Use the maintenance terminal on the technician and he will try to
repair them.
Terrace:
Use the transmitter on the left. Find out that anti personal shield
capsules were used on Mondra and that some were left lying around. They were used to break down her personal
shield.
Platform:
Go down to the platform and see the technician talking to the Bionic.
Technician:
The technician says that he cannot fix the terminals because of outdated code.
Use the Swoonish Omega decimal minuscule on the technician.Bionic:
Talk to the Bionic working on the wall. See that he is not wearing the thermo
glasses. Click on the glasses on the bucket or the box on the floor to borrow it. He lends
the thermo scan glasses.
Mondra’s Office:
Go back up to the Crystal Lounge. Use the thermo glasses
on the door number above the door and find out that it is 256.
Maintenance room:
Go back down to the maintenance room through the hangar.
Take the lunch box.
Activate Mondra’s office:
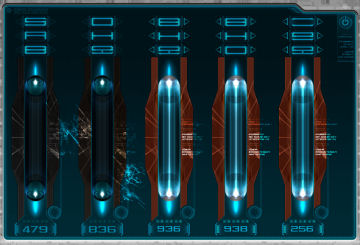
Look close at the door activator
terminal.Use the – and + above the numbers to enter the number
256 on the bottom of right tube for Mondra’s office.Using the Swoonish omega decimal minuscule code as
reference, enter 256 on top of tube (going top to bottom).
Mondra’s Office:
Go back up to the Crystal Lounge.
Enter Mondra’s office.
Scan the room. See a box protected by illegal military shield.Go left and be stopped
by the Carnivora, carnivorous plant.Pass through the
carnivorous plant: Go back to Perry’s office. Click on the
positronic. Tamira, the first Terran talks to Perry inquiring about what
happened.Use the Carnivora
icon on the positronic. Learn that it is best to approach the plant after being fed and
that Suurg flies has a calming effect on the flies.Perry recalls that
Mondra stated that she breed the flies up on the terrace.
Time to distract the guards up on the terrace:
Platform:
Go back to the platform to reach the maintenance room. The bionic wants his
thermo glasses back. Perry wants to buy them.
Maintenance Room:
Talk to the technician. The maintenance terminal is now fixed.
Maintenance terminal:
After he leaves to have a lunch break, check the terminal.To distract the guards
at the messy terrace, activate-select the cleaning robots to go to the terrace.
Terrace:
Go to the terrace using the transmitter at the Crystal Lounge. Scan the terrace.
See the cleaning doing
their job while creating havoc with the guards.Bully’s cleaning
robot: Click on the cleaning robot at right by the
transmitter. Take the Le-Clyi part missing from the model spaceship.Head of a combat
robot: Pick up the head of a combat robot at left
by the destroyed globus sphere.Dining table:
Check the destroyed eating area at left of the terrace.Upper terrace:
Suurg flies:
Climb the stairs at right. Use the lunchbox on the big bowl or the floor to get
flies. Gotcha! The flies are now in the lunch box.Pick up the yellow
anti-shield capsule on the floor at right of the upper terrace.
Check Mondra’s
office:
Mondra’s office:
Exit the terrace. Enter Mondra’s office.
Place the lunchbox with
flies in front of the Carnivora.Go left and check the
artifact right of the desk.Mondra’s notebook:
Take Mondra’s notebook from the desk. Read it by right clicking. Find out
about the Illochim that is part of the exhibition she is preparing. Learn that
an unknown Q.B. has sent her an artifact and photos. Mondra noted that she needs
to contact Kari Levian to get to Daellian. There is also a cuneiform chart
and more information on her research about the Illochim. She received a damaged
robot in one of her deliveries. Hmm…Chest with military
shields: Go to the chest at right. Use the anti shield
capsules taken from the terrace on the chest.Take the broken service robot
– it must be what was written in her notebook. Take the piece of glass (lens-unknown
artifact).
Exit the office and meet
the technician. The Perry hologram arrives too. Perry asks the tech to fix
the hologram.
Get in Bully’s positronic:
In front of the office,
the Bionic arrives and gifts Perry with his thermo glasses.
Bully’s office:
Go to Bully’s office.
Now that we have the
model spaceship from his cleaning bot, use the Le-Clyl piece on the broken model
space on the desk at left. Learn that the name of the blue spaceship is Le-Clyi-Lercyi.Perry’s office:
Go to Perry’s office. Use the Le-Clyi-Lercyi on the positronic. Find out that
the blue space ship is simply called Leclerc.Go back to Bully’s
office. Using your keyboard, type in Leclerc as password for the positronic. Press
your ‘enter’ key.Hear Mondra’s message
about meeting at the terrace and Martel.See a defensive shield
plan and Martel under surveillance. Get a blueprint-floor plan of Robotics
Institute.Bully breaks in through
his positronic and tells Perry some garbled message.
Hangar:
Go down to the platform and then the hangar.
Broken service bot:
Talk to Yuri, the attendant.Show him the broken
service bot. It was made by the Robotics Institute – RIWA 17-08.Yuri enters the serial
number and accesses the last vid the robot saw. See Martel meet with the 2 white
haired Arkonides.
Escape the Solar
Residence:
Maintenance room:
The technician says that the maintenance terminal is now fixed.
Use the terminal. Click
on the hangar to get the irritating holoprojection to come here.
Hangar:
Exit the room and see the hologram pestering the guard. Automatically, Perry
rides Mondra’s glider.
Waringer Academy
Rainbow Dome:
Arrive at Waringer Academy.
Go to the door and automatically,
Perry uses his DNA converter to transform to Laszlo Daikonu. Enter the building.
Shuttle platform:
Talk to the Unither with a trunk.
Look at the display screen on the
left and learn about Mondra’s exhibit of the Arkonides gift to be held at the
Thora’s museum.Check the other display screen and
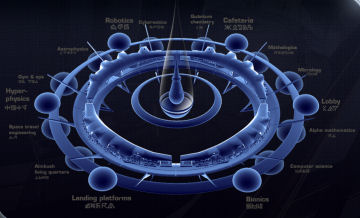
see the map of different shuttle stops. Perry needs an authorization to access
the academy. Click on Lobby and a shuttle arrives.
Lobby: Go
down the escalator.
See a public positronic beside the
escalator.Authorization:
Talk to the receptionist on the first desk. She gives a 24 hr chip card-day
pass to Waringer Academy. The access locations allowed are the shuttle and the cafeteria.Use Martel icon on the receptionist.
No one at Martel’s office knows Laszlo.Use Kari’s icon on the receptionist.
The receptionist realizes that Kari gave her permission for Lazlo to access her.
Malcolm Daellian’s Office:
Use the transmitter behind the receptionist.
Kari Levian:
Talk to Mondra’s closest friend.Click on the crystal on her desk.
Kari gives Mondra’s singing crystal to Perry.Use Martel’s icon on Kari. She
changes Lazlo’s ID to a member of Daellian’s scientist staff.Use the head of the combat robot on
Kari. She advises to find an expert on mobile android weapons systems at the
Robotics Institute.Show the lens artifact on
Kari. She
mentions that Mondra showed it Malcolm Daellian. She leaves to talk about
the artifact to Daellian.See a cutting of Mondra’s Carnivora.
Take the container with flies from Kari’s desk. Use it on the Carnivora. Take
the plant dung on the floor beside the Carnivora.Try to enter the transmitter and
Kari comes
back out. She asks for Perry to come back later. Enter the transmitter.
Find android weapons experts:
Lobby:
Receptionist:
Use the Robotics Institute icon on the receptionist and learn about the 2
cyberneticians.See 2 cyberneticians (Mobile android
systems employees): Brendan Huber and Ara Nar-Khol. She mentions that Huber
might be in the cafeteria.Positronic:
Go to the positronic right of the escalator. Use the plant dung on the
positronic. Learn that it has painkiller and sobering ingredients.
Brendan Huber:
Cafeteria:
Go up the escalator and out of building. See the holomap. Click on Cafeteria.
Enter the cafeteria.Go to the slumped human at the second
bar.Talk to the Blue standing behind
Huber. He gave Slugofro to Huber.Go to the counter at right and talk
to the attendant. Obtain an espresso.In inventory, use the espresso on the
plant dung to get flavored espresso.Give the flavored espresso to Huber.
Show the robot head to Huber. He
brings you to the Robotics Lab.Robotics Lab:
After being checked by the security guard, they enter the Robotics Lab. He shows
the area to Laszlo. The room on far left has explosives.Huber’s Quarters:
Scan the room and look around while Huber checks the robot head.Click the machine on the table on the
left
foreground and find out it is an energy charger. Use the Wing swing remote control
on the charger. Now the model space ship can be used.Check the experimental lab
at the
background large window. Huber leaves to call the Ara.Take the voice duplicator on
the white chair beside the charger.Scan the artifact:
Look at the machine Huber was using. Perry says that this controls the assembly
arms of the Experimental lab behind Perry. Click on the area Huber scanned the
robot head.Take the plastic box from the
counter with a monitor. Place the plastic box on the scanner Huber used.Place the artifact on top of the box
to scan it. It caused an alert and Huber and the Ara run back in. Huber says the
code is ancient Arkonide.While they are busy, exit the
quarters to the main hall of the Robotics Lab via the exit icon on the left of
the scanner.
Ara Nar-Khol quarters:
Enter the door at right of Huber’s quarters. Scan the room and look around.
Take the personnel ID-chip card
of the Ara from the desk at foreground.Click on the monitor at right and
automatically get a list of robot types.The 2 cyberneticians run in and
Laszlo gets kicked out.
Daellian’s office:
Automatically be at the Lobby. Enter the transmitter to go to Daellian’s office.
Kari informs Lazlo that Daellian is ready to meet him.
See
the Ara back in his quarters reporting to an unknown man about the head;
tells him about the scanned Supran and learn that the location of the key is
taken from Mondra.Daellian: Talk to Malcolm Daellian, the Dean of
the Academy.Use Mondra’s diary on Daellian. Learn
about Quint Essence who believes the Illochim myth.Use the unknown artifact on Daellian.
Learn about Supran, an alloy of matter and anti matter. Supran lens is the key
that can communicate with all inhabitants of the universe at the same time. The
hacker Quint Essence is trying to get hold of the code which Daellian scanned to
Perry’s wristband.Use the blueprint of the Robotics lab
on Daellian. Learn his opinion of Martel.Kari: Exit
and talk to Kari. Learn about cryptologist and Gataser Blues.See a news report about Perry’s
disappearance and the hunt for Laszlo.Leave the
office and go to the
cafeteria.
Get to
Martel:
Cafeteria:
Use the escalator at the lobby and exit the building. Go to the cafeteria.
Cryptologist:
Go to the Gataser Blue, the one with a disk-shaped head at the back of the room.He doesn’t like the regent and
doesn’t want to help.As
Kari recommends, feed the Blue. Go to the counter at right and buy a
Blues delicacy. Get a
Muurt worm burger.Give the Muurt
burger to the Blue. Show Ara’s personnel ID to the Blue. He adjusts Laszlo’s personnel ID code.
Robotics
lab: Exit the cafeteria and go to the panel at right.
Click on the Robotics lab on the map.
See a
technician working on a display.Enter the
Robotics lab. Talk to the guard-porter. The card is scanned on the frame on the
porter’s desk and has identified Laszlo.Look at the
Round door on the left with a numeric panel. We need to
distract the porter.Distract
the porter: Go back outside to the entrance.Look at the
opened ventilation shaft; it is too small to fit in.
Ventilation shaft diagram: Take the
small box-data carrier on the floor close to the opened shaft. It is a diagram
and Perry automatically downloads it to his wrist band.In
inventory, combine the diagram with the floor plan of the Robotics lab. Right
click to check the overlaid plans.Guide
the model ship: Use the Le-Clyi-Lercyi
model ship on the opening of the ventilation shaft.The aim is
to get the model ship to the Explosive lab.Study the
remote control. Move the cursor to the right and see the overlaid map. Note that
the arrows at the center show the possible exits.
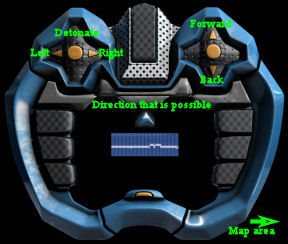
Count each
square in the diagram to make a path to the Explosive lab. One square is one
click.
Use the
forward arrow 3 times.
Turn right
once.
Forward 4
times.
Turn left
once.
Forward 7
times.
Turn right
once.
Forward 12
times.
Turn left
once.
Forward 3
times.
Perry says
that it is now directly above the explosives. Detonate.
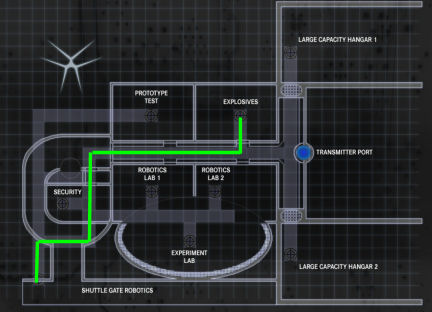
See the
door explodes. Go back inside.If you
haven’t yet, use the new coded Personnel ID on the small monitor on the porter’s
desk.
Surveillance room: Use the ID card on the glass door left of
the porter’s cubicle.
Get
Martel’s voice: Check the
monitors. Check the box on the desk in front of the monitors. Perry finds
something that can help him.Use the
voice simulator on the box. Watch the video of Martel about a new drill that he
had made. It is in a hangar. He needs confirmation from higher up to continue
with the project.The voice
simulator has 97% conformity. Exit the
room.
Entrance
to the Robotics lab:
Numeric
code: Use the thermo glasses on the numeric lock of the
Robotics lab.See that 2
4 6 8 0 are active. Note the intensity of the color (usage) of each pad. Click cancel button to pull back out.Click on
the lock again with no thermo glasses. Enter 0 6 2 8 4.
Ara Nar-Khol quarters:
Automatically, enter the lab and then enter the first door on the right.
Take the
robot torso on the floor by the monitor.Take the
multi frequency chip from the desk at foreground. Exit the
room.
Hangar
2: Go forward to the hallway and then go right. See the
door to the hangar open and close.
Use the
robot torso to block the moving door. Enter the hangar.See
Martel’s security machine. Click on the blue holoprojector on the floor in
front of the ‘drill’ to turn it off. The machine disappears.Exit the
hangar and meet Huber.
Martel’s
office: Go to the transmitter.
Use the
voice simulator on the voice recognition panel (blue circle) above the
transmitter.After 3
tries, Perry is allowed to use the transmitter.See that Martel
is dead, bled from the inside. Take the data crystal he is holding. Check
the small glass bottle from the table.Look around
and see that things are scattered.Go to the
desk and use the data crystal on Martel’s ancient positronic. Watch Martel’s
message to Perry. He states his reason for his cooperation with the Arkonides
and admits his involvement in Mondra’s abduction.There is
also a file about Kato daTrumont.Go to the
transmitter but do not go in or go in the transmitter and back up to the office. Perry has a feeling someone is here. A female Arkonide hits Perry.
Escape
the prison:
Prison:
Perry back to his normal self is in a locked room. Scan the room.
Check the
left wall. Perry can not identify what is left on the wall.Take the
tray of food, cup of water and plastic spoon from the table at
right wall.Use the
glass of water on the left wall and read: Take the pen in the light and close
the contact in the gap.Look down
at the gap between the wall and the floor. There’s something in there. Use the
spoon on the gap and get a small metal pipe.Go to the
bottom screen. Talk to the guard and learn about being imprisoned by his own
people on a lot of charges including the murder of Aimo Martel.3 cleaning
bots arrive and try to help but are too short.Scan the
big room and see Mondra’s crystal on the bench outside. See Perry’s things
floating inside the lit porthole.Use the
small metal pipe on the shield and hear the singing crystal react to the
electron catcher of the shield.Do it
several times until the guard places it on the floor for the cleaning bot to
pick up. The bot places it in front of the shield and it disperses the shield.Exit and go
to Perry’s things. Use the
button right of the lit porthole of Perry’s things. Take Perry’s
inventory.Exit the
room and see an open glider. Enter the glider.
Thora’s MuseumClick on
the Museum and see that this is Thora’s Museum where Mondra’s exhibit is
located.See also
that there are no other visitors. Go to the entrance and see that it is open.
Entrance
hall: Scan the hallway and look around.
See a giant
robot at the end of the hallway. Go down the hallway.Meet the
hologram of the Museum director. He says that there are limited access to the
display of the Myth of Illochim, (the Arkonide name is Yillod Zhymii). The door closes and locks
Perry inside.
Exhibit
foyer: Enter the room.
See a statue of Thora holding a helmet
with her arm raised. Press the button on the platform floor right of the statue.
It raises and lowers the statue.Check the
blue line framing each entryway and find out that they are transmitters. Perry
wants them off to find a way out of the museum.Go in each
entryway and listen to the Director’s hologram. The right entryway while facing Thora is
the Arkonides exhibits, the one behind Thora is the Invasion of the Yillod
Zhymii and the exhibit on the left is the Yillod Zhymii exhibit itself. To
listen again to the Director’s talk, click on the rotating lines on the
floor.
Deactivate the transmitters:
Arkonides exhibit: Enter the room on the right (while
facing Thora).
Listen to
the Director’s hologram. Scan the room and check the exhibits. Perry thinks it’s
worth to break through the shields.Break
through the display shields:Perikon
300 battle robot: Look at the lit information panel on the
left wall explaining about Perikon 300 Type 558025.Use (right
click) the List of robot types. Click the picture or the text frame. Enter
558025 using the arrows and then click OK. Learn that it is remote controllable
and its frequency is 849109.
Universal remote control: In inventory combine the remote
control with the multi-frequency chip to get a universal remote control.Right click
the now universal remote control and then left click the displayed remote
control or the frame. Enter 849109. Press the frequency button to exit out.Click the
remote control on any place you want it to go. Click the remote on the center
display of a sword. The battle robot doesn’t have enough momentum.Go back out
to bottom screen and be at Thora’s statue. Use the remote control twice on the
statue. The battle robot comes out to the statue.Go back
inside the Arkonides exhibit. Use the remote control on the center sword
display. Watch. Take the Dagor sword that has fallen out of the display.Go back to
Thora’s statue. Use the button on the floor and lower Thora’s statue.Place
Dagor’s sword on Thora’s hand. It produced a light.
View this guide raw, exactly as the archive holds it