Just Adventure original
Rhem 4: The Golden Fragments Walkthrough
Gentle nudges in the form of hints to guide you through the game’s plethora of puzzles
Page 1 of 2
Introduction
The Rhem series of games is all about puzzles. There isn’t any great eye candy waiting around the corner. There is no story line to move forward. It is just one large collection of devious brain twisters.
So there is little point in a walk through. It would be like working a crossword puzzle with the solution displayed right next to it. However, it is possible to miss a small detail or not quite understand what a clue is trying to tell you. So a gentle hint or two can be a life saver when you get stuck. That is what this hint-through is all about – getting you back on path while revealing as little as possible.
Note that this is a difficult game and is intended for advanced players. I assume that you have already explored every place available to you. I assume that if you find a paper taped to the wall with a five digit number on it that you know enough to make note of it. I assume that if you are truly stuck, then you are familiar enough with the area that I won’t need a lot of pictures, a simple description will do.
The puzzle hints are not presented in any special order. You should not just scroll down thinking that the puzzles are ordered like a walkthrough. You should first read the General Hints section. That might be enough to get you back on track.
After the General Hints is a list of all the major puzzles and their dependencies. Many of the puzzles found early in the game cannot be solved without clues or items found much later. This list will show you just what you should be able to solve depending on where you are in the game.
After the Puzzle Dependency List there are some maps with the different puzzles lettered. Simply find the link below the map to the puzzle is which has you stuck and jump there.
At the puzzle link you will find a series of gentle hints beginning with things which are easy to miss (M). No solutions are actually given, but the hints will progress to the point where they will explain how to solve the puzzle on your own. So even using these hints you will still get the satisfaction of having beaten the game yourself.
I would suggest adjusting your browser so that you can see only one hint at a time. That way you can still figure it out on your own without everything being explained to you.
General Hints
- Mapping is not an option. The issue isn’t getting lost, although after a while the scenery can get very repetitious. There are puzzles and clues everywhere and they are rarely together. You will want to take notes of what you have seen so you can match them up later. I would suggest using quadrille/graph paper. Most of Rhem maps well (each move advancing you one square) with only a few areas which don’t line up perfectly.
- Every puzzle has a unique requirement. For example, if a clue appears to be showing four patterns of five settings, then there will be only one puzzle which needs four patterns of five settings.
- Wires and conduits mean something. If a building/machine/door is dead, follow the wire to see what is supposed to power it.
- When you place an item in a device, can you remove it again? If you can, then you will need to sometime later, either to undo the action or to use the item again elsewhere.
- Whenever possible, close doors behind you. Kurt likes to hide clues on the backs of doors.
- If you press a button and hear a HONK, that indicates that a puzzle needs to be solved before it will work. But itwill work. If you don’t hear a HONK, then something probably just happened.
- When there is a row of things (buttons, lights, etc.) they are always numbered from left to right.
- Some puzzles require that you know the difference between the North, South, East and West walls in order to align the clues. The key is what direction you are facing. When inside a room you will face North to see the Northern wall. But on the outside of a building you will face North to see the Southern wall. The North facing clue will always go to the North facing puzzle, no matter which walls they are on.
- Be sure to move your cursor all over every screen. This can get tedious as usually there is nothing. But every so often you will be allowed to look up or down. And you will need to. Also, there is no indication of where the hot spots are until you move the cursor over them and it changes. It might also make a noise, but there are no guarantees.
- Most unfinished puzzles reset when you move away. Those which don’t can be manually set back to where they started. So it is always safe to play around with a new machine to see what the buttons do.
- If you have trouble differentiating colors, move the cursor over the color in question (do not click) and then hold down the “c” on the keyboard. The color’s name and RGB value will be displayed at the top of the screen.
- Kales has left a short diary on his bed. Be sure to read it when you are first there (it does contain a clue or two). Later, shortly after you start exploring beyond the Black Crystal Room, the diary will vanish. It will reappear, with more writing in it, at the very end of the game.
- Above all, take your time. This is not a simple game which you can dash through in a couple of evenings. You are expected to stop and think. I would suggest not playing for more than an hour or so at a time. Then sit back and think about what you have seen. Is there anything about the current puzzle or its surroundings which reminds you of something you have seen before? There are plenty of clues, but it is not always obvious which clue goes to which puzzle. In short – play the game as if you really were there and had all the time in the world (because you are stuck!)
Puzzle Dependency List
Even though there are many puzzles you can work on at any given time, most of the puzzles are layered and most of them require you to have solved other puzzles first. Otherwise you won’t have the critical clue or object.
Below is a list of all of the major puzzles in the order in which they are solvable and with all of their dependent puzzles under them. It is assumed that you have explored every place which is accessible.
Should you get stuck as to what to do next, check with this list to see what should be available.
1. Entrance and Hall of 6 Doors.
2. Black Crystal Room.
• Power Room
1. Button Puzzle in Kales’ Bedroom
3. Bell Tower (Fragment #1) (Self contained – can be solved as soon as you get to it and is not needed by other major puzzles)
• Entrance to Bell Tower Area.
• Activation Switch in Bell Tower
1. Toy Wagon Puzzle.
• Set the Bell Tower Medley.
1. Access the Vinyl Record.
• Access the Record Player.
4. Sun Hall (Fragment #9) (Self contained – can be solved as soon as you get to it and is not needed by other major puzzles)
5. Mound Garden off of Hall of 9 Doors ( Self contained – can be solved as soon as you get to it. Yields item needed in West Area)
6. Circular Tram (Solvable as soon as you can get to it.)
• Central Hub door codes.
1. Activating the Tram.
2. Cabinet in Kales’ bedroom.
7. West Area Silo puzzle (Red Ball)
8. West Area Northern locked Door (Fragment #6)
9. West Area Southern locked Door. (Fragment #3)
• Full access to North Area
• Mound Garden
10. North Area Six Sets of Six Buttons
• Locked door next to statues
11. North Area Three-Handed Clock (Fragment #5)
• Locked door next to statues
• Red Ball from West Area Silo
1. Locked door across from statues
12. North Area Alarm Clock
• Locked door next to statues
• Red Ball from West Area Silo
1. Locked door across from statues
13. North Area Color Puzzle
• Locked door next to statues
• Red Ball from West Area Silo
1. Locked door across from statues
14. East Area Six Digit Puzzle (Fragment #8)
• North Area Color Puzzle
15. East Area Squares Puzzle
• Full access to North Area
16. Entrance to Gallery
• Central Hub Door Codes
1. Activate the Tram
17. Candle Puzzle (Fragment #7)
• North Area six sets of six buttons puzzle
• Door 6 of 9
18. Portraits Puzzle (Fragment #4)
• North Area Alarm Clock Puzzle
• Door 7 of 9
19. Door 4 of 9 (Fragment #2)
• Metal Piece #4 (from Thatched Hut)
1. Metal pieces 1, 2 and 3
• Cabinet settings east of Portraits Puzzle
1. Open cabinet.
• East Areas Squares Puzzle
20. Door 5 of 6
• You need all nine of the Golden Fragments to open the door to the round building.
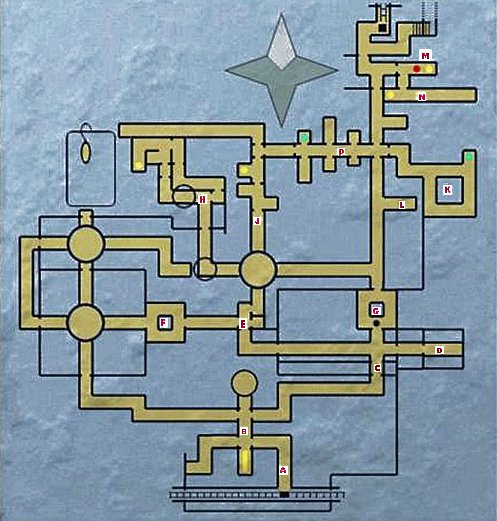
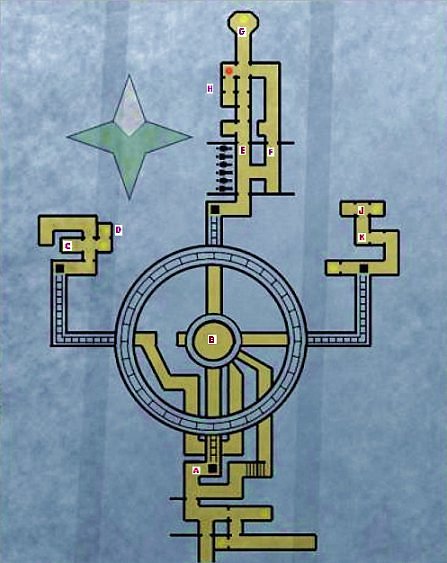
Entrance
- (M) Take one step into the building and turn around so that you are looking out through the archway. Did you look up?
- (M) In the Circle/Button viewer, did you notice you can look down?
- The buttons above the door must be set to the correct combination to activate the leftmost button. The leftmost button will then open the door.
- The row of six squares next to the door, with one square highlighted, identifies the door. I will call the left-most square door number 1.
- The combination can be cracked using brute force – there are only 120 combinations. But there is an easier way.
- Does the picture next to the door look suggestive?
- Note the pattern next to the door and then replicate it in the Circle/Button machine.
- Then look down in the machine.
- You did figure out that you had to put a light bulb in the bottom of the machine?
- Open the remaining five door the same way you opened the first.
- At the beginning of the game feel free to explore all the doors. You will need the clues from behind some of them, but only door #1 goes anywhere at that point.
- (M) Did you notice that each door opens in a different way? Make note!
- This door leads to further areas of Rhem. Puzzles here will have their own listing.
- This door leads to one of the paths from the revolving door behind the Power Room.
- The revolving door can only be entered from the direction it is facing.
- This area isn’t used until the end of the game.
- The box has compartments for nine objects.
- The viewer and its button will only work once the nine Golden Fragments are in the box.
- · Entrance into this fourth portion of Rhem (That is why it is called Rhem 4).
- The key to this room is found at the very end of the game – after you have found all nine of the Golden Fragments.
- After Kales talks to you, go to where he was standing.
- Be sure to close the door behind you before going down the stairs.
- Contains an important clue for the Thatched Hut.
- Will be used at the very end of the game.
- Did you watch the clock until the hand moved? What happened to the flowers?
- Take note of the flowers at each “hour.”
- Across from the flowers, don’t forget to take the fuse and note where the dial stops.
- (M) The clue to opening the Thatched Hut is hanging on the wall after going through Door 6 of 6.
- You must solve the puzzle with the two sets of buttons and the five crosses on the wall to enter the Thatched Hut.
- Press the first round button about ten times and note what it does. How does that relate to the clue found hanging on the other wall behind Door 6 of 6?
- The first three round buttons correspond with three of the patterns found on the clue.
- The rectangular buttons control what the fourth round button does.
- Use the rectangular buttons to make the fourth round button match the remaining pattern on the clue.
- (M) Move your cursor carefully over the child’s paintings to reveal some hidden clues.
- The clue for setting the patterns in the machine to the right of the fireplace is found by solving the other puzzle outside the Thatched Hut.
- The puzzle outside the Thatched Hut must be powered up by flipping the switch next to the door inside of the Thatched Hut.
- The outside puzzle has a round button, a screen for creating patterns and a large square button which changes color when pressed. The puzzle is solved by entering the correct patterns onto the screen.
- (M) Did you notice that there is a separate screen for each color?
- The patterns are in the child’s paintings. Float the cursor slowly over each one to identify the shape and color.
- Once the shapes are correctly entered, the round button will work and show you the patterns on the back wall needed for the machine inside.
- The diary on Kales’ bed has a clue for what to do with the fireplace.
- With the machine activated and all of the settings entered, you can now place the three metal pieces into the fireplace.
- Found behind Door 8 of 9.
- Found in the glass globe on the wall in the Northern Area.
- Found in the Tram tracks once the Squares Puzzle is solved in the Eastern Area.
- Press the button and the three become Metal Piece #4.
- (M) Note the drawing behind the curtain.
- The clue for opening the cabinet is found on one of the paintings in the Thatched Hut.
- The purple bird over the bed will tell you which painting has the clue.
- The monitor and the door across from it must both have their power restored.
- The power source can be found through the door to the left of the monitor.
- The door to the Power Room is opened by solving the button puzzle in Kales’ bedroom.
- The eleven buttons by the door must be pressed in the correct order.
- The clue to the button puzzle is in the tiny cabinet to the right of the monitor.
- The clue is telling you that the first button is the separate one not touching any other button (obvious, since that is the button which uncovers the other ten). The second button is the one which lights up the first button.
- The third button is the one which lights up the second, etc.
- Once the room is powered up, note what you see on the monitor.
- The switch in the small cabinet to the right of the monitor changes channels and will cause the monitor to show you a different video.
- Note the position of the switch for each video.
- (M) Later on in the game, after you open the back door in the Black Crystal Room, the diary will vanish off of Kales’ bed. Even later in the game, it will return with additional notes written in it.
- (M) Note the patterns on the four outer walls up towards the ceiling. Note both what the pattern is and which way you are facing.
- Those shapes relate to the clue given to you by Zatias which is in your notebook (next to your inventory).
- Note the patterns in the centers of the four inner walls. Note which way you are facing for each pattern.
- The puzzle in this room is quite easy. Just connect the two leads from the power source (small box with the High Voltage icon on it) to the two leads on the plug.
- Follow the two leads back from the power source and note how they are connected to which switches.
- Follow the leads back from the plug and note how they are connected to which switches.
- You have two switches next to each other. A power lead goes to one and a plug lead goes to the other. Set the two switches so the the power connects to the plug. Repeat for the other two.
- No, completing the puzzle does not open the door in the back.
- This is the Black Crystal Room. You did remember to place the Black Crystal into the machine? It fits right into that circular ring thingy.
- The numbers for the square cabinets are in the clue which Zatias gave you along with the Black Crystal.
- The shapes in the clue correspond with the shapes in the Power Room (outer walls, up high by ceiling).
- The patterns for the circular displays are also found in the Power Room. Center of inner walls.
- If you are facing West to view a cabinet or circular screen, then you must face West in the Power Room to see its clues.
- Once the numbers and patterns are entered correctly, the button next to the little blue box should work. Press it and the box should display a color. Note the color.
- The little box with the sliding switch causes a small light to change color (once all the numbers and patterns are set correctly around the room). Change the color so that it matches the color shown to you by the other box on the other side of the room.
- Once everything is correctly set, go to the corner to the right of the sliding switch and press the red button. Lights should flash, bell should ring and the back door is now open.
Rotating Bridge
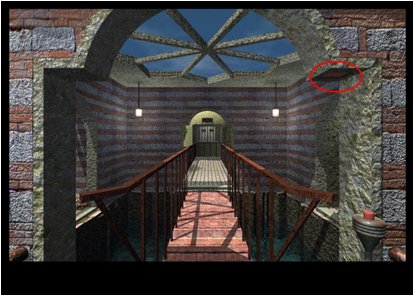
- (M) Exit the Black Crystal Room, turn left and you will come to the Rotating Bridge. The button to rotate the bridge is just under the right side of the arch. See picture below.
- The red button causes three patterns of four bars to display. These are randomly generated each time the button is pressed, so press it once and write them down.
- West of the bridge is a window. Above the window is the flashing pattern display. To the right (north) is a locked door to the Bell Tower. The puzzle for unlocking the door is on the other side of the window.
- West of the Rotating Bridge the path turns to the North and there is a locked door. This door is the entrance to the Bell Tower area.
- There is a window in the wall at the turn in the path. The puzzle for unlocking the door is on the other side of that window.
- To get back there you will need to explore (and map!) the area behind Door 5 of 9.
- You should have found a crossroad in the path. The button on the North side controls the doors. When the doors open to the N/S they block the E/W. And when they open to the E/W they block the N/S.
- Yes, that button in the North side is the only way to control the doors. But is is all you will need.
- If you mapped the area carefully you will suspect that the E/W passage is the way to get to the window and entrance puzzle. So all you have to do is push that button on the North to open the E/W and then walk around and through!
- The solution to this maze can be found by walking it backwards (on your map).
- The West entrance to the passage can only be accessed via the revolving door in the crossroad south of the E/W crossroad.
- So the solution is simple – go through the N/S passage to access the revolving door. Leave it in a position where you can return to it (either East or South). Walk around to the N/S passage and press the button to open the E/W passage. Walk back around to the revolving door and turn it to the West.
- Once at the end of the E/W passage you will be in a room with a window, the same window at the bend south of the locked door.
- There are three sets of four switches.
- Where did we see a clue of three sets of four-light patterns?
- The red button on the eastern side of the revolving bridge.
- Once the pattern is correctly entered into the switches, the button by the door will work and actually open it.
- This area is entirely self contained. You do not need any items or clues from outside and you will not find any items or clues to use outside (other than Fragment 1 of 9 for the final puzzle).
- Across from the Bell Tower proper you will find a building with two buttons, one on either side inside the door. The left button plays the bells. The right button plays whatever the microphone recorded of the bells. When the correct tune is played a compartment will open up under the microphone. This contains the key you need to unlock the case holding the fragment.
- To solve this puzzle you will need to…
1. Enter the Bell Tower and activate the bells.
2. Find the tune.
3. Program the tune into the bells.
4. Play the bells and play the microphone.
- You will need a round item to fit into the round cavity next to the hatch to enter the Bell Tower.
- This item can be obtained by solving the Toy Wagon puzzle.
- Once inside the Bell Tower you can press the buttons on the bells to hear what the each sound like. I had to turn my volume up full to hear the largest bell (it is not broken).
- To activate the bells you must enter a pattern in the four sets of six switches.
- (M) Did you shut the hatch behind you when you entered the Bell Tower?
- The pattern is on the back of the hatch.
- This is the puzzle in a box against a West wall with a picture over it of six colored lines and three color filters hanging from strings. Pressing the button on the top of the box lowers the sides and reveals the wagon.
- The wagon is on a track, but is blocked from moving by a set of pegs. The object of the puzzle is to remove the wagon to the left.
- The puzzle is solved by lowering the pegs one at a time and moving the wagon to the left over the lowered peg.
- Raising the sides reveals a series of lights and switches which correspond to the pegs.
- On the North wall there are two buttons. The button to the left of the door raises and lowers one peg. The button to the right of the door resets the puzzle.
- The button will lower the peg whose light is green.
- If I need to spell it out for you…
- Lower the sides and note the position of the peg on the left side of the wagon.
- Raise the sides and press the buttons to make that peg’s light turn green.
- Press the Raise/Lower button on the North wall.
- Lower the sides and move the wagon to the left over the peg you just lowered.
- Repeat as necessary until the wagon comes off the track.
- Remember to look down at the fallen wagon.
- On a North wall you will see a glass case with a black disk in it. This is an old style vinyl record. These were used to record music before CDs and MP3s were invented.
- The case is opened by entering the correct six digit code into the display beneath it.
- The clue to opening the case is the colored pattern on the record’s label.
- The key is the picture over the Toy Wagon puzzle of the six colored lines and the three hanging filters.
- The picture is telling you that when you place a filter over one color it changes to a new color.
- The record has a pattern of colored squares with two filters covering them. What would the colors be if the filters were removed?
- There is a panel outside which has a similar pattern and two filters.
- But the filters are rotated and so covering different squares.
- Enter what the colors should look like now with the filters rotated.
- Yellow over yellow remains yellow, etc.
- Nothing seems to happen when the pattern is correctly entered, but the locked cabinet on the other side of the fence will now open.
- Opening the cabinet outside reveals an old fashioned record player. So now we know what to do with the record.
- The record player has a hinged lid which can be closed.
- No, the six numbers on the record player lid are not the combination to the glass case. They must first be filtered.
- Just as you enter the Bell Tower area and turn right, there is a room with a machine which generates and filters six digit numbers.
- Set the dial on the East wall to the diamond. Then press the button to generate six random digits. Turn to the South wall and press the button. The display now shows what those same six digits would be in “diamond mode.”
- Did you notice that the six digits on the record player were surrounded by triangles and diamonds?
- Use the filtering machine to find out what the six digits on the record player should convert into.
- Set the dial to the diamond for those digits surrounded by a diamond. Set the dial to triangle-up for the digits surrounded by a triangle-up. Etc.
- With each digit individually converted, you now have the access code to the glass case.
- Before you can solve this puzzle you must activate the bells via the switch in the Bell Tower itself.
- Before you can solve this puzzle, you must know the tune which the bells are to play. You can find this tune on the Vinyl Record.
- The tune consists of eight notes. Which bell plays which note?
- Following the four cables from the four bells will lead you to the four control panels which program them.
- If the bell which is connected to the panel you are looking at plays the first and fifth notes, then turn on the first and fifth switches. You may press the button to test it and verify that you have the correct bell.
- Once all four bells are programmed, press the play button to the left of the door and then the microphone button to the right of the door.
- A secret panel should open revealing a key which is used in the strange container outside to the South of the colored pattern panel.
- First, having set the revolving bridge to North/South, thoroughly explore the hallway and take note of everything.
- From the bridge, take one step into the Hall and turn around. Did you think to look up?
- Three white streaks and five black streaks mystically divided into two groups of four streaks.
- Where else have you seen white rectangles on top and black rectangles below?
- The panels on the East and West sides of the Rotating Bridge. Enter the eastern pattern on the eastern side and the western pattern on the western side. This will activate the green button on the side of the Hall.
- Did you notice the moving dial through the hole in the roof? Which direction was it moving?
- Did you notice that the dial takes exactly 36 steps to complete a revolution? This indicates a strong Sumerian influence in Rhem and may even echo back to the Ancient High Civilization. But it has nothing to do with the game 🙂
- At the end of the Hall, turn around. What do you see through the hole in the roof?
- The Sun symbol is surrounded by sets of four lines each.
- Did you notice that the left and right sets have tiny arrows pointing to specific lines?
- These would line up with the sliding switches on the sides at the Hall entrance, except that the top position of the western slider is blocked.
- Once the green button is activated, you can use it to generate a different slider setting.
- Once the slider switches are set correctly, the door will be unlocked.
- =====
- The door in the back is locked with two hooks, one on either side.
- If you haven’t been there already, you can get to the back of the Sun Hall and unlatch the rear door by using Door 5 of 9.
- Did you notice another moving dial is visible from the outside back of the Sun Hall? (It can be seen from the enclosed intersection, one step away from the entrance.) Which direction is it moving?
- Did you note the four letters on the walls of the entrance hallway?
- Did you note the four letters on the walls in the back?
- Each letter has four attributes:
- Which letter of the alphabet does it represent?
- The pattern surrounding the letter (means the same thing as it did in the Black Crystal Room).
- The direction of the dial they are found near.
- The number of blocks it takes to make each letter.
- Setting all eight cabinets to the correct letter and number will activate the button out back.
- The button out back will yield Fragment #9
- The tram needs a round medallion placed on the control panel.
- Did you thoroughly explore the circular track area as much as you could?
- Did you thoroughly examine the Stick Man sign which warns you that the West bridge is out?
- Apparently not, because the medallion in right on the back of the sign.
Unlocking the four doors of the Tram Hub
- To solve this puzzle you will need the clue in the cabinet in Kales’ bedroom. You should have taken a picture of it.
- To solve this puzzle you will need the clue in the base of the Hub (10×10 square filled with numbers). You should have taken a picture of it.
- To solve this puzzle you will need the clues on the outside of the Hub doors (the doors you are trying to unlock).
- To solve this puzzle you will need to activate the Tram.
- Use the Tram to examine the outsides of the Hub doors.
- The Western door is in the tunnel under the Southern Tram stop.
- The Western door must also be activated with the two stick man settings.
- The patterns around the stick man switches mean the same thing as they did in the Black Crystal Room. And should be used the same way.
- To unlock a door requires more than just a correct letter and correct number.
- All five letters each require their own correct number.
- Just take all the clues listed above and overlay them on top of each other.
- When done correctly, each door pattern will overlay exactly one of each letter.
- When done correctly, all twenty letters will be overlaid by a clue.
- You have just associated each door via its pattern with five letters, each letter with its own number.
- To solve this puzzle you will need the Red Ball clue from the Eastern Area.
- The clue in the Eastern Area is a red ball on the rock wall. When you float the cursor over it a triangle will appear along with a number of tick marks.
- The circles in the triangles refer to numbers.
- Two separate circles in the triangle refer to separate numbers.
- Two overlapping circles in the triangle refer to the sum of the numbers.
- A crossed out circle in a triangle refers to a special number. Make note of it.
- From the lobby, use the door to the left. You will see four panels in front of the silo. Play with the four panels to determine what they do.
- Make the silo drop over twenty stones and note what happens and when.
- The Near Left panel generates two random digits.
- The Near Right panel causes the silo to drop stones. It will drop a number of stones equal to the sum of the digits on the Near Left panel.
- The Far Right panel counts the total number of stones dropped. Pressing its button resets the count.
- The Far Left panel will ring and flash when the special number of stones have dropped. Note this number.
- The Red Ball clue tells you how many stones to drop to get the red ball. Drop exactly this many stones and then go around through the far door to collect the Red Ball.
Western Area – Northern Locked Door
- Enter the door to the right from the lobby and you will face a device which generates random numbers. (A 23 means twenty-three, not two-three.)
- Follow the conduit and it will take you to a panel which allows you to enter four digits.
- The symbol over this panel indicates that numbers should be added.
- Enter four digits which add up to the random number in the previous device.
- Follow the conduit past the locked door to the panel which allows you to enter a single digit.
- The symbol over this panel indicates the special number revealed at the silo. Enter that number.
- The door will now open and yield Fragment #6.
Northern Area – Locked Door by Statues
- Everything you need to unlock this door is in the statues.
- Entering the six letter code in the panel to the left of the door unlocks the door.
- Sometimes you can learn more from something’s shadow than from the thing itself.
- Each statue holds six balls.
- Each ball has four attributes:
- Which statue is holding it
- Its position relative to the other balls
- The letter drawn upon it
- Whether or not it casts a shadow.
- Attribute #1 is irrelevant.
- Each statue has one ball which does not cast a shadow. Use the letters on these special balls to solve the puzzle.
- The first letter is not from the ball from the first statue.
- The first letter is from the ball which is in the first position.
Northern Area Six Sets of Six Buttons
- Where have we seen six buttons in a row just like these?
- Why, these were how the Hall of Six Doors were identified!
- Did you notice that each of the six doors opened in a different way?
- Solving this puzzle unlocks the cabinet connected to it and yields a pile of coins.
Northern Area – Locked Door across from Statues
- Everything you need to unlock this door is in the statues.
- There are three cabinets on the wall leading to the door. Each cabinet has four dials. Setting all twelve dials to the correct value will unlock the door.
- Each statue has a set of four letters near its base. Each dial has a letter at its center. How do the letters on the dials relate to the letters by the statues?
- The values on the dials, 0-3, should be a hint.
- The value indicates how many times that letter can be found with the statues.
- Do not include the balls in the count.
Northern Area – Three-Handed Clock
- Everything you need to solve this puzzle is there in the room with you.
- Enter the correct three digit code in the panel next to the door to unlock it. The door will yield Fragment #5.
- The device across from the clock generates random numbers each time you pull its chain.
- Did you notice the big plus sign in the middle of the clock?
- The random numbers on the device correspond with the positions on the clock.
- The solution to the puzzle is to add up the three numbers which the hands point to and enter that total into the panel.
- Of course, once the hands move that solution is no longer valid. So you must be quick.
- The chart next to the entrance shows the possible hand positions. You can use it to predict the next position and thus give yourself some more time.
- The alarm clock appears to be stuck at a certain time.
- Follow the conduit back and it takes you to another clock.
- This other clock can be stopped by clicking on the pendulum.
- Stop the other clock at the same time as the alarm clock.
- The button above the alarm clock will now open the cabinet and yield a key.
- Where did we see an image like this before?
- On the wall in the other room.
- Each square on the image is connected to one of twelve circles arranged like the hours on a clock.
- Did you notice the vase of colored flowers by the image?
- Where have we seen flowers like these before?
- Back in the Flower Garden south of the Black Crystal Room.
- Take the colored square pointed to by the circle at one o’clock and change its color to that of that flowers in the garden at one o’clock.
- This unlocks the cabinet and yields a paper scroll.