Return to Mysterious Island Walkthrough
Return to
Mysterious Island
by Kheops Studio
Walkthrough by MaGtRo
October 2004
With great
contributions by Mordack
Gameplay: Installation of the game
comes in 2 CDs. Gameplay does not require CD in the CD-Rom drive. The main menu
has new game, load, save, picture gallery, credits, options and quit. The
picture gallery replays cutscene and additional graphics are added as bonus
points are accumulated. The options menu has choices for rendering –
hardware or software, speed – slow, normal or fast, subtitles and volume
adjustment. At bottom right is the return or back to previous page.
The ESC key
accesses the main menu during gameplay where you can save-load games. You can overwrite on a
saved game by clicking on that saved game and replace it with a new one. Right
click skips the intro. There is a health bar at bottom left to show how much
energy the character has until full health is obtained.
Right click of mouse accesses the inventory
menu. Collect items by left click of mouse on the items. They will be stored in
the transit area (right top of screen) of the inventory menu and seen by a
graphic of the item at top right of the screen and description of the item at
bottom of the screen. The items have to be transferred from the transit area to
the inventory slot (top squares) in order to be used. This can be done
individually or all items by using the ‘auto button’. Once an item is selected,
it will change to be the cursor. Right click or click the back button to go
back to gameplay screen.
Move the cursor to show description of each area in the
inventory menu. At top left is return to menu, phone that can call, access news
or GPS and objective shows the journal entries. There is also an encyclopedia
available when the phone is functional.
The middle pipe like
area is used to combine items. Select an item
and click it over the combining item. It will be seen at this area. To separate
a combined item, place the combined item (shown with a wrench icon) on the
dismantling area.
Under the Auto transfer frame is the slot for
Jep, the monkey.
He can be combined with items in inventory to enable him to do certain actions.
Thanks also to
DrumBeat for additional help!
I’m alive: I’m Mina. I’m being watched. Notice the shadow over
Mina. I’m feeling weak. I need to find something to eat.
NOTE: The game is non-linear and steps can be
done at anytime with no dead end problem. There are instances that more than
one solution to the puzzle is available. I will try to note this as the
walkthrough goes along. I might miss some alternative solutions. The game counts
points for actions done.
Collect items needed to eat:
Right click to show the inventory bar. Click on phone at top
left white frame. Click on phone icon – the batteries are too low to send an
SOS.
Beach – Look down from sky, turn around 180 deg. and go to the cliff.
See a man ghost above the cliff. Climbing up is not a recourse yet. Look down and pick up
rusty key +1.
Turn right and look up to the nest on the ledge of the cliff. Take
bird’s egg+1. Right click to access inventory and click on egg. See a
description below that it is inedible raw – to be eaten cooked or used in other
dishes. Click hold of the items in the transit frame and place them in the
inventory square slots. Look up and see another bird’s nest that is ‘too high’.
Turn around, go towards arch and look at the wreck of a boat.
Click on the hull – biggest wood and it is ‘rock solid’. Pan right and pick up
the wet seaweed +1 on the sand.
Stone Arch area – Go forward under the arch, look down on the left and see a
trapped fish. We can’t get it yet. Look up and take 3 oysters
+3 from
the wall of the arch.
Go forward 1x pass the arch and see a turtle going back to the
water. Turn right and pick up lichen +1 from the rock. Turn around towards
the beach and look down. Click on sand at end of the trail marks on the sand.
Pick up 2 turtle eggs +1 and see a chest. Click on chest. Use rusty key on
chest. Wow! Take damaged telescope +1 and silver coins+1.
Let’s take a look at where the turtle was. Go towards the palm
trees and hear 2 thuds from the palm tree area. Look down to see a sand covered
turtle nest. Click on sand mound at end of the turtle trail and pick up 2 turtle eggs
+1.
Go forward to the palm trees and see a porcupine dead under the
coconut trees being eaten by 2 crabs. ‘Ouch’. Wait until the 2 crabs
+2 are
feasting on the porcupine and then click on the body to ‘gotcha’. Pick up the
dead porcupine +1. Pan left, pick up the palm tree
+1 leaves and the
green coconut +1.That’s the thud you heard. Look up and see coconuts that ‘need to be a monkey to get up
there’. Turn around and pick up the dried brown coconut.
+1. Let’s go back to
the arch. Thud! That was a near miss! Pick up the green coconut
+1 that just fell
in front of you.
Inland path – Go through the arch, pan left, forward and go to the inland
path. Stand on the large rock on the sand floor and feel the earth move. ‘What a
strange noise.’ Look at cliff on the left of the inland path and go forward to the small cave. Pick up the
flint +1 and sandstone
+1. Look at the blackened spot on the ground and
the soot on the wall.
Go back to the boat wreck. Take the sandstone rock from
inventory and use it on the wood hull. Take rusty metal
+1 and driftwood+1.
Place all picked up items in inventory slots by clicking on Auto button. In
inventory, click the sandstone rock on the rusty metal taken from the wood hull.
See the sandstone + metal = knife. Now we have a knife+1. Now we have the
essential tool in adventure gaming. If the knife breaks, you can always make a
new one with another metal later.
Go forward twice towards the inland path and look down. Pick up
metal plaque +1. In inventory, the description of the metal plaque states –
Nautilus 1860. Pan straight up and see a branch. It’s too high to reach. Pan up
and see thorny vine on the right. Pan up and see thorny vine on the right. Take the knife from
inventory and use it
on the vine to get Acacia thorns +1. Pick up the pink worms
+1 at
left side of path. Go up to the top and see a green vine hanging over a log. Use
the knife on the vine and get thin vine +1. See logs that prevent passage.
You need to eat first to get your strength back up. Take the Amadou
+1 (highly flammable fungus) from the
post on the left. Look down and pick up the forked branch
+1 from the base
of the left post.
Turn around to go back down to the beach. See rusty pieces of
metal embedded on the rock wall. Go to the place where the out of reach branch
is located. Combine forked branch + knife=knife with handle
+1. Use knife
with handle on the out of reach branch to get curved thorns
+1. Go down to the small cave by the beach.
Time to eat: Go back to the small
cave.
Fire – Let’s make a fire.
1. In inventory, combine flint + knife =
lighter +1. Combine lighter +Amadou + driftwood = ready-made fire
+1.2. In
inventory, use knife or rusty key on broken telescope to get lens
+1. Combine lens + Amadou + palm trees = ready made fire. Place ready made fire on blackened
ground.3. Any combination of
fire starter + items shown on #1 & #2 = ready made fire.
Fishing rod – How
about a fishing rod? Use the Acacia thorns on the fire –
‘it bends the acacia thorns’.
In inventory, combine forked branch + thin vine + curved Acacia thorns or curved
thorns from the unreachable branch + worms =
fishing rod +1. Now, a-fishing we will go.
Go to the pool under the arched stone. Use fishing rod on the
fish +1. Now, go back to the fire to cook and eat it. Yum! Cook the 4 turtle eggs
and the 2 crabs.
Dismantle the lighter on the dismantling area at middle left of
the screen. Use knife on green coconut to get stripped coconut
+1. Use knife on stripped coconut to drink the milk
and eat the flesh. If you use the sandstone on the coconut, the coconut breaks
and wastes it. Use knife on another green coconut to get stripped coconut
+1. Do it on the brown coconut. Use knife on brown
coconut to get stripped coconut +1 +
coconut fibers +1.
Use knife on oysters and
eat until full health points are obtained and the health bar frame is closed. If
you use the knife on the third oyster, it will break. You can always make a new
knife using the sandstone and the rusty metal. You should still have the bird’s
egg but another one can be picked up later if you eat this one.
Time to explore the island:
Go up to the inland path and click on the logs. Go through the
opening. The vibration and sound occur again.
Look down and take the young palm tree
+1 frond. Go forward
once and be standing on a crossroad. Look down on the left and use knife on
white flowered plant to get hibiscus fiber +1. Look up and see smoke rising
from afar.
Go forward to the smoke and see sulfurous water that is boiling but can be used to cook on. Turn around and see a snake.
Dismantle fishing rod and use forked branch to hold the snake. Then use knife to
take the medicinal plant +1 right of snake. Look up on the tree trunk above
the snake. Use the knife on the gash on the trunk. Take rubber
+1 from gash
and the forked branch from the snake.
Turn around and see 2 paths, one on the left and the other to go
back to the crossroad. Take the left path. See a broken bridge and one of the
posts that has the rope strung on it. Look down at left and see a dead
animal. Use knife on plant and to take narcotic plant
+1 that is useful for
big animals only. See a building and the volcano across the chasm.
Turn around from broken bridge and take
one click on the left path back to
the crossroad. Turn left and then forward on this crossroad.
An animal in distress:
Monkeys – Hear an animal in
distress. Go forward and see a scarecrow. Click on it to get 3 pieces of dirty cloths
+1. You are standing on
another crossroad. Pick up 2 oranges +2 and 2 lemons
+2
from the ground. Look up and see attacking monkeys. Standing by the
scarecrow, you will be out of range yet. There is no need to fight them
but in case you feel like doing so: combine forked branch or wooden fork, if
available+ rubber =
slingshot +1. Then you can shoot at them. Look right and use knife on plant to get wheat grains
+1.
Bamboos and clay
– Turn around from monkeys and go forward. Use knife to pick up
bamboo, small shoots +1. Use knife on broken tree above where the bamboo shoots
are to get 2 wickers, straw and willow bark
+1. Pick up 2
bamboos, large pieces +1. Pan right, use knife on bamboo plants to get
bamboo, medium piece +1. Pan right again, use knife on plant to get elderberry
pith +1. Take clay
+1 from the brown area by water that has big animal
tracks. Turn around and go back to the crossroad.
Windmill area – Go right and forward from crossroad by scarecrow. Let’s ignore those
monkeys, if they are still there. Go left on this crossroad now and forward to the end. Take the brick
mould +1 from the steps. The steps going up to the windmill is broken. There’s
a monkey up there sitting on the dead tree. Take 3 pine kernels
+3 from the
ground. Turn around and see a vine that
should be cut way up high.
In inventory, use brick mould + clay = unfired bricks
+1. Go back to the
fire at the beach by going forward, left, forward, left, forward to cave. Use
unfired bricks on fire to get 2 sets of bricks +1. Go back to the broken
steps by the windmill and use the newly made bricks on steps
+5. Climb up.
Take metal fork
+1, strong cloth +1 and copper
coins +1 dislodged from box under the strong cloth from the ground. Read the
inscription on the box.
Near the lake, your
eyesight so keenFound the red metal
tinged with green.The white metal, a
precious treasure,Buried on the shore on
the salty waterBetween the forest so
green and so richAnd the arch eroded into
the cliff.
Take wooden fork
+1 from ground and grapes
+1 from wall.
Look up on the windmill and see that one of the arms does not have any cloth on
it. Click the strong cloth on the broken arm but the monkey stops you from
fixing the windmill. Try giving the monkey any fruits but he still doesn’t trust
you yet. Click on ladder of windmill and look around inside the windmill. Look
up and notice that it is rusty at the top. Go down and ‘ouch‘ step on a
pickaxe. Pick up the pickaxe +1.
Jep – Go forward to where the other monkeys are/were. The monkeys run
away. Hear a cry. Go inside the broken shelter. See an injured monkey – you
named Jep. He needs a clean dressing on his wound. Combine straw + thin vine =
mattress +1. Click mattress on Jep. Turn around and see a pottery
wheel on the left. Pick up the brick mould from the far table.
Lake, post and Maple
tree – Go back to the fork by the scarecrow and take a left to go to
the next crossroad. Go right at this crossroad and note a pole that can has a
hotspot at the corner. Go forward close to the water.
See a maple tree on the right – a lizard scampers away from the syrup spout on the
trunk.
Go forward to the water’s edge, turn right and use dirty cloth on water
to get clean cloth. Do it to all 4 dirty cloth +4. Click on water to get a drink and click on it again to bathe.
Click on water again to note that you need a container to collect water.
Turn right and see
bricks on the wall. Use pickaxe on brick wall. Too dark in there, you need a
lamp or a candle. A lamp or candle can be made with seal fat and wick once a
bowl is made or another method later in the game.
Restore Jep to full health:
Go back to Jep. Use
clean cloth to bandage his head.
Pot making – Go out and
see that the kiln is broken. Let’s fix that kiln with some of the bricks left
over from the windmill stairs or make new ones with more clay + brick mold =
bricks. Look at the sealskin bellows
and see that it has a hole. Go forward to the scarecrow crossroad and forward to the end.
Go to bamboo-clay area. Take more clay
+1. Use clay + mould = bricks
+1. Take more clay +1.
Go back to Jep. Use clay on pottery wheel and click on wheel to
turn it. Take unfired pottery. +1.
Go back to beach. ‘Hey what have we here!’ Go forward and take the
dead seal +1 on the beach. The fire at the small cave is not hot enough for
the unfired pottery.
Go back to the kiln by Jep.
Pick up the logs +1 left of the kiln. Use knife on seal to get 2 seal
fats +1, sealskin
+1 and tendons +1. Use sealskin on bellows.
Make fire. Use flint + knife = lighter. Use lighter + lichen + dried
palm trees fronds = ready made fire. You can also try alternative method
of making fire as shown at the small cave part of the wt. Use ready made fire in kiln.
It’s vibrating again. Use bellows and then place the unfired pottery in kiln to
get pots +1.
Make remedies – Go to the lake where you bathe. On the way, use the knife (after
dismantling the lighter) on the maple tree gash. Use pot on spout to get 2
maple syrups +1. Go to the lake and use pot on water
+1. Use water in pot +
medicinal plant = remedy to heat up +1. Use pot on water again. Use water in
pot + willow bark = remedy to heat up +1. Use pot on water again to get
water +1.
Go back to the kiln. Place the 2 remedies to heat up in the kiln
to get 2 remedies +2. Give the 2 remedies to Jep. He will not eat until he
has taken these remedies. Jep is feeling well enough to eat. Give the 2 Oranges,
pine kernel and grapes to Jep. Use the knife on dried brown coconut to get stripped coconut
and coconut fibers. Use knife on stripped coconut to get coconut
strips +1. Give coconuts strips to Jep. Now Jep is restored to
full health.
Mina and Jep sleeps. Captain Nemo’s ghost appears –
‘find my
body and give me a proper burial’.
Jep is very helpful:
Jep is now in his special place in inventory. He can be used as
an item on active spots – alone or combined with another item.
Windmill – The monkey on the tree still
will not let you fix the windmill. In inventory, click on Jep + any food
available (pine kernel, coconut strips, grapes, oranges) = Jep offering
present. +1. Click Jep with present on monkey on the tree. The monkey won’t be
any trouble. Use the strong cloth on windmill. Climb the windmill ladder. In
inventory, combine Jep + seal fat. Use Jep holding lump of fat
+1 on the top of the post of the windmill. The
windmill now turns.
Cake – Use wheat
grains on container at base of the post. Take flour
+1 from the bin below. In
inventory combine: Flour + water + bird’s egg (another egg is available later if
this is not available now) +
maple syrup + lemon = ready to bake cake +1. Place ready to bake cake in
kiln = cake +1.
Rope ladders – Go back to windmill and go down the steps
to the right. Combine Jep + knife.
Use Jep holding a knife +1.on vine hanging on tree to get Mina to make 2 rope ladders
+1.
Hanging bridge – Go to the broken bridge at the end of the left crossroad with
the dead animal by going forward, left, forward, right and forward to end. Combine Jep
+ rope ladder and click Jep holding a rope ladder
+1 on post with rope.
Watch Jep make a rope bridge.
Volcano farm area
– Go across to the other side. Pick up the sulfur
+1 beside
the hot spring. Turn to the right and see a monkey with a stick. Jep might be
beaten with a stick. Take the bamboo, large piece and drop it on the hot
springs +5. It scares the monkey with the stick. Take coal
+1 and broken
cage +1 by the shelter. Go forward and take the iron sulfate
+1 on the right. Turn left
and take the potash +1 from the burned tree.
Snake in a cage – Turn around and
go to the snake by the other hot spring. In inventory: broken cage +
wicker =
cage +1. To catch the snake, use the forked branch on the snake and then
click the cage on it to get a caged snake +1.
Go forward until the
beach.
Fulfill Captain Nemo’s request:
At the beach, go to the
cliff side where the bird’s nests are
located. Click Jep on top nest. See an egg drop and a second later, feathers
float down. Take feathers +1.
Turn to the cliff. Combine Jep + rope ladder =
Jep holding rope
ladder. Use him on top of the cliff. Watch Jep climb and drop the ladder.
Climb up to follow Jep.
Granite House – Turn around and click on the inscription
– Granite House 1860. Take bird’s egg +1 left of the opening – you can use
the egg to make the cake. Take diving suit+1,
musical score +1 and mysterious key
+1 from ground. See Captain Nemo’s
body. Pan left and see a pulley.
Go forward, turn right and
see candle or lamp holder at corner of the wall. Go forward, turn left to the shelves
and take the planks +1 left of the shelving. Take 2 sets of iron fillings
+1,
screwdriver+1, hammer
+1, nails +1 and roll of wire
+1 from the
shelves. Turn
around and look down on chest. Click to open the chest and take the 2 cotton shirts
+1 and 3 wicks +1. A shirt can be cut with knife to get 2 clean cloths
+1.
Turn right, look at cannon
and take cannonball and hardened
powder in a barrel. Look at maps on each wall. Learn that you are on Lincoln Island and how
Granite house was built. Take photo +1 from bottom shelf. Take rods and
tubes +1 from cracked container under the map above the table. Make note that the rods are
made of zinc. Click on journal under the slab on top of the table. Read the
words of Captain Nemo. The right side is torn and missing some parts. He states
where he wants to be buried, repair his diving suit, …kill you, aim at
thruster… Read the left page and learn how to make several chemicals. We will do
that later. Now, let us take care of Captain Nemo’s last wishes.
Go to entrance. In
inventory, combine hammer + nails + planks = coffin
+1. Use coffin on Captain Nemo’s body. Click
the rope of the pulley and then click on the coffin. See Captain Nemo buried.
Mina! +2. Go to the stone arch. ‘A present for you’. Click on post to get
giant oyster +1. Use knife on giant oyster to see a large black pearl
+1.
Granite House:
Go to the palm tree area
and click Jep on the coconut up the tree +1. Pick
up the green coconut.
Go back up to Granite house. Let’s read more about the chemistry
notes. It has the procedure to make a Becquerel battery (potash, nitric acid,
zinc strips and glass tube closed by malleable material), Volta Battery (copper,
silver with cotton soaked in lemon juice), nitroglycerine (nitric acid
essential. Distill sulfuric acid over saltpeter) and Sulfuric acid (calcinations
of iron sulfate in closed vase).
Go to the front room and
place any light source (candle or oil lamp) on the corner wall of the room.
Seal fat + wick =
oil lamp +1. An alternative way
is if you come in from the lake area in the forest, you can place the oil lamp
there after breaking the brick wall.
Go down the passage with wire strung on wall and pick up
the gun +1. Turn around and pick up
lantern – not working +1.
Projector – Go back to front room and turn right to
the once dark area. Take another lantern – not working
+1, small amount of
sulfuric acid+1, sulfur
+1 and broken projector
+1 from the shelf.
Click on water to get bowl of water +1. Read the inscription on the wall. Turn
around, see a table and a makeshift screen on the wall.
Cavern -Hear the
voice of Captain Nemo from the past when he was hurt by the monster. Turn around and look down at the hole on the floor – entrance to
the cavern. Go down, pick air tank +1, helmet
+1. and saltpeter +1,
the white powder on wall behind the ladder. Click on water and a monster tries to swallow Mina
and Jep.
Go to the room after the
cannon room. Pick up steel chain +1 from floor and
charcoal +1 from bottom shelf. Look at the map on the wall. The closest land
is 1200 miles away.
Chemicals and weapons:
Still – Pick up the boiler
+1,
Amadou +1, tank
+1 and
coil +1 further down the room. Combine tank + boiler + coil = still
+1.
Place still on top of fireplace. Use knife and flint to make lighter. Combine
lighter or lens + Amadou + coal or log = ready made fire. Use ready made fire on fireplace.
Alcohol – Click maple syrup on boiler. Click on tap of tank and take alcohol
+1. The
alcohol is an alternative solution for the cake or snake with the irate monkey.
Always move the cursor
on the fire to make the fire blaze.
Nitric Acid – In inventory:
combine sulfuric acid and saltpeter +1. Place the
combined chemicals on the heated (fired) boiler of the still to get 3 batches of
nitric acid +1.
Sulfuric acid – Place iron
sulfate on the heated (fired) distiller and take sulfuric acid
+1 at the tap
of the tank.
Energy source:
Volta battery:
This battery can be done earlier in gameplay. In inventory, combine clean cloth
+ lemon + bamboo, medium piece + silver coins + copper coins = Volta battery
+1.Becquerel battery:
In inventory, combine
nitric acid + potash + clay + rods and tubes = Becquerel battery
+1. This is
an alternative to the Volta battery.
Phone – You recharge the phone when one of the batteries is first made. In phone frame,
click on news and click on left arrows to hear all the news about Mina’s
disappearance. The encyclopedia is now available.
Get more saltpeter
+1 behind the ladder at the cavern.
Ammunitions:
Gunpowder – In
inventory, combine charcoal + sulfur + saltpeter = (gun)powder
+1.Hardened powder can be
be used if it is processed in the windmill. Go to windmill, click the barrel of
hardened powder on the container at base of the post. Pick up powder+1 from
the bin on the floor.Pyroxylin – Combine clean cloth
or elderberry pith + nitric acid
+ sulfuric acid = pyroxylin +1.
Weapons:
Bow and arrow – In inventory, use knife + porcupine = quills
+1 +
porcupine carcas +1. Combine knife + young palm tree = incomplete bow
+1.
Incomplete bow + hibiscus fiber or tendon = bow +1. Feather + bamboo, small shoots +
quills = arrows +1. Bow + arrows = bow and arrows
+1.Gun – Combine gun + iron fillings + powder =
gun and ammunition +1.Nitroglycerin – Place dried seaweed in fire and get soda
+1. Combine soda with fat = 2
glycerin +1 + soap
+1. Combined glycerin and nitric acid = nitroglycerin
+1.
Don’t forget to use the soap on Jep so that Mina will give him a bath.Dynamite – In
inventory, combine wick + clay + nitroglycerine = dynamite
+1.Slingshot –
Forked branch or wooden fork + rubber =
slingshot.
Light source:
Oil lamp – Seal fat + wick =
oil lamp.Candle – Glycerin + boiling water = candle wax
+1. Candle wax + wick
= candle +1.Lantern – Charge
the lantern not working with either one of the 2 batteries
+1. This is the light
source for the diving suit.
Lightning arrester – Combine metal fork +
steel chain = lightning arrester +1.
Kite – Shirt + Wicker + Roll of wire = kite
+1. The encyclopedia states linked to the ground by metal wire, this kite can
attract a bolt of lightning. The kite can be combined with Jep and used on the
pole close to the Maple tree in the forest-lake area.
Projector:
Go to the table by the
hole to the cavern. Use the Volta battery on lantern – not working to get
lantern.
In inventory combine
charged lantern + broken projector + lens (from telescope) + photos =
projector +1. Place projector on table and then click on makeshift screen on
wall. Watch the slide show +2. Use the arrows to scroll the slides. They made
nitroglycerine, use Becquerel batteries and cannons.
Dive, dive dive:
Go down the ladder to the cavern.
Diving suit – In inventory, combine diving suit + air
tank + helmet + lantern (charged) = diving suit +1.
Laced bait – In inventory, combine porcupine carcass with narcotic drug =
laced bait +1.
Get more saltpeter
+1.
Monster – Either shoot the monster with your firearm or throw the laced bait on the
monster.
Click it on the water.
Dive in the water and automatically use the complete diving suit. See a vessel
in the cavern. Read the plaque – it is the fabled Nautilus 1860. Climb up, look
down on the red light. Click on red light on floor. The key stand rises. Oh no! Guardian robots!
You escape back to Granite House.
Look at the mysterious key in inventory and the encyclopedia
states that the crystals do not have energy and should be replaced. Use the
screwdriver to remove the spent crystal to get empty key
+1. Now where can we find the crystals?
Go to Captain Nemo’s journal at the second room. See a guardian
robot floating outside. Uh Oh! Read Capt. Nemo’s notes and see that it is now
complete. Learn why the island is invisible to the outside world and that the
shield is affected by stormy weather. To destroy the robots – aim at their
thrusters. The Nautilus panel code: 5401 (+1860) = 6261.
Guardian robots:
Going to the Nautilus
activated the guardian robots and they are out to get you. You need only 2
thrusters and 4 damaged keys. Each robot has to be killed using one of the
available weapons for more points but is not necessary for the completion of the
game. Any weapon can be used. The weak point of of the thruster is the middle part of each
body.
Robot at beach area
outside the Granite House – The robot outside the Granite House can only be destroyed
with the cannon. Open the cannon and place cannonball, lead fillings and pyroxylin
or powder (from firearm and ammunition or hardened powder). Look close at the wick and see the
target. When the robot enters the target and the thruster is at center, use the
match on the fuse. Gotcha! +10.
Go down the rope ladder.
See an irate money drop the ladder. Pick up the rope ladder +1.
Go forward on the beach and pick up the thruster
+1 (no
damaged key) by the robot destroyed by the cannon.
The phone will ring. Click on the phone icon and listen to mom.
The phone can receive but not transmit. Check the news and then the GPS –
W:150 deg 30 S: 35 deg 57.
Stone arch robot
- Go to the stone arch and get bow and arrow from inventory (or any weapon of
your choice). The robot is
just outside the arch. Fire at it. Once destroyed +7,
pick up the thruster +1 and
damaged key +1.
Broken Robot code
puzzle: Go towards the path and see a broken robot on the path. Click on the blinking
lights on its head. See a panel that has 2 sets of silver rectangles at top and
bottom and with numbers in between. The aim of the puzzle is to get the red
lights turn green. The top set of rectangles has letters on them while the ones
at the bottom will show the number of the buttons pressed. If the correct
numbers are pressed the lights at the bottom will turn green.
Solution:
Based on the position of the letters
in the word NAUTILUS, press 1 for N, 2 for A, 3 or 7 for U, 4 for T, 5 for I, 6
for L and 7 for S. Any other letters – press 0. For example: if the letters
above are V I N U, press 0 5 1 3 or 7.When correctly done the
red lights turn to green +10. Pick up the thruster
+1 and the
damaged key +1.
Taser panel puzzle:
Go up the path and see there’s laser beam blocking the way the inland-beach
path.
1. Use the lightning
arrester on the red laser blocking the path. You will use the it to pass through
safely +5. Then turn around and solve the next
puzzle.2. Solve the panel
puzzle: Combine Jep with screwdriver +1 and click him
on blinking red panel. The aim of
the puzzle is to get all the red lights green by making a continuous flow of
current from the source on the right to the lights.Labeling the top
vertical buttons (L-R) 1- 5 and horizontal buttons (T-B) 6-10. One possible
solution is to click once on buttons 1, 9, 6, 7. When correctly done, the blue
lights are off +10.
Roped bridge robot
- Go toward the hot spring area and see another robot close to the rope bridge. Go to pole by the
maple tree crossroad. Combine Jep + kite, click Jep with kite on pole
+1. Jep will fly the kite and the electricity
generated will run through the wires and blast the robot
+10. Go to the wrecked robot, pick up the thruster
+1 and the
damaged key +1. Or just use any weapon of your
choice.
Windmill robot – The next one is by the windmill, go from behind by going around
Jep’s shelter to go to the windmill and use the dynamite on robot from above
+10 (or any weapon of your choice). Don’t forget to take the damaged key
+1 and thruster +1. Gotcha!
Robot by lake area
- Get the firearm, ready to fire from inventory (or any weapon of your
choice). Shoot at robot. Once the robot is hit
+3, pick up the thruster
+1 and pick up the
damaged key +1. Gotcha! Do this to all the robots.
Nautilus:
Go back to Granite House
through the lake entrance.
Monkey with stick
– The irate monkey will block passage at the lake entrance. Give it either the
cake or alcohol or scare it away with the snake in the cage
+5. If you use the
snake, the snake will disappear and the cage is left in inventory.
In inventory, use the screwdriver on
5
damaged key to get 5 crystals +1. Place 4 crystals on the empty key to get a
repaired key +1.
Dive to go to Nautilus. There’s a remaining guard on the deck.
Get the bow and arrow ready, climb up and aim, fire! +7. Gotcha! Use the repaired key on the green slot of the key stand.
Submarine code puzzle:
There’s a slight
difference between the damaged robot code puzzle. See a panel that has 2 sets of
silver rectangles at top and bottom and with numbers in between. The aim of the
puzzle is to get the red lights turn green. The top set of rectangles has
numbers on them while the ones at the bottom will show the numbers of the
buttons pressed. If the correct numbers are pressed the lights at the bottom
will turn green.Based on Captain Nemo’s
journal, use the numbers after the addition of 1860 to the shown numbers on the
top panel. For example: 0013 (shown number) +1860 = 1873. Press 1873.
+10.
The hatch opens. Go down and find yourself in a
cage. Look to the right and see a lever. The floor between the cage and
the lever panel is broken. Click Jep on the lever but he might get hurt by
the rusty metal. You call him back. Combine a thruster with Jep to get Jep
hovering on a thruster +1. Click Jep on thruster on lever. The door opens.
Enter Captain Nemo’s
Inner Sanctum:
Go forward and down the stairs. The stairs is blocked by fallen
walkway. Use 2 thrusters on the fallen walkway and it is raised.
There are 2 door puzzles
– either one can be done and get in to the center of the submarine, but do them
both for score points.
1. Click on the fallen beam
on the floor to move it over the walkway supported by thrusters. Walk on beam to the door.
Middle Nautilus door
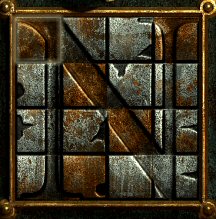
code puzzle: The puzzle on the door is based on arranging the tiles that are
in position and the fallen tiles to form an N. When correctly done, the door
opens and look at the hole on the floor. You can jump down but will not be able
to solve the other door puzzle. +10.
2. After finishing the
middle door puzzle, go down the stairs and see another code puzzle.
Lower Nautilus door code puzzle: There’s a
difference on this puzzle also. See a panel that has 2 sets of silver rectangles
at top and bottom and with numbers in between. The aim of the puzzle is to get
the 2 sets of red lights turn green. The rectangles are blank. If the correct
numbers are pressed the lights will turn green.
The numbers to be
pressed alternates from top and then for bottom
panel until all numbers are entered.
On the top 1860 should
be entered.On the bottom, click on
a letter found on the word NAUTILUS.For example press 1 and
then the buttons changes into letters. Look for a letter found in the word
Nautilus. Press that letter. Then press 8, then a Nautilus letter again, etc…The door opens and see a
robot. +10.
Captain Nemo’s quarters:
The robot mistakes you for Captain Nemo.
Before you talk any further with the robot, look around the room.
Display behind robot:
Combine Jep with clay +1 and click him on the display plaques that cannot be read.
After that you can read the weapons behind the robot for answers.
Desk – Turn around and walk to Captain Nemo’s desk. Click the map to see
our location. Note the layout of how Lincoln Island is set upped. Read the letter to Captain Nemo from Jules Verne. Read
Captain Nemo’s notebook. Find out more about the good Captain and the
island itself. Hey look, a Mysterious Island first edition book by Jules
Verne. If you could get that to e-bay.
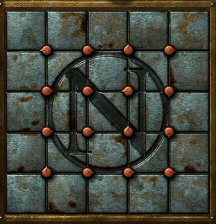
Safe puzzle – See
a safe at corner of the room. The object of the puzzle is
to form Captain Nemo’s insignia – N. Move the tiles by clicking on the red
pointed buttons. The points of the buttons show the direction of the movement.
+5.
There are 2 levers at bottom shelf of the safe. The left lever opens the view
ports at either side of the submarine.
Look at the picture of Captain Nemo and family on the door. The woman looks
familiar…
Robot – Talk to Robot and find out that the tremors have blocked the
entrance to the cave where the vessel is anchored. The rust has eaten the
steering cable and the available energy is directed to the shield. The robot
will lower the shield if you prove that you are Captain Nemo.
There are 2 possible ways to get to the ending, do the organ puzzle or do the
quiz:
Organ: The right lever at the bottom shelf of the
safe opens the organ at other end of the room. Go to the organ and see the musical score
that completes the music sheet that is in inventory. This is the music you hear
you hear in the background played every now and then while checking things out.
It is Captain Nemo’s favorite music.
Click the handle on the left side of the sheet of music to hear the organ play.
The music played is missing the end part if you listened to the clue-background
music.
You can reproduce the music played by the organ, if you want but not necessary
for the completion of the puzzle:Labeling the organ white keys (l-r) 1-9 and the black keys (l-r) 1-7:
5 6 4 2 6 rest
5 6 4 2(black) 6 rest
5 6 4 1(black) 6 rest
The last passage is translated as: 6 9 4 6 1 2 .
But as Mordack found out in his reasearch about Captain Nemo: passage in Chapter
21 of "Twenty Thousand Leagues Under The Sea" …."I
descended to the drawing-room, from whence I heard some chords. Captain Nemo was
there, bending over his organ, and plunged in a musical ecstasy….The Captain’s
fingers were then running over the keys of the instrument, and I remarked that
he touched only the black keys, which gave his melodies an essentially Scotch
character. "After the organ stops playing and the keys are revealed – play the missing part
that ends the piece but only on the black keys or one down from the translated
missing part keys:Labeling the organ’s white keys (l-r) 1-9 and the black keys (l-r) 1-7:
Click on 5 black, 7 black, 3 black, 5 black, 1 black, 2 black. +10.The robot will recognize you as Captain Nemo and will follow your orders.
Quiz: You can also take the
quiz. Click on the robot. Learn that if you pass a quiz the robot will think
you are Captain Nemo and will follow your command. The quiz requires you to get
7 correct answers and allows 1 wrong answer. The questions are random and vary
from game to game. Below is a list to help match questions to answers.
Go to the front of the pearls. Click to move the fallen beam. From inventory
place the pearl in its display position.
|
Floating in it shell… Captain |
|
Argonaut or nautilus |
|
All its twinkling sisters |
|
starfish at display case close |
|
What correspondence from so far |
|
18th century metal |
|
Cedar, laurel, ulmus, beech… |
|
aborigine club on left wall |
|
Gracing the oceans, its beauty |
|
coral at display case close to |
|
Its silvery surface which |
|
mercury barometer |
|
Captain, show me this strange |
|
sponge at display case close to |
|
Of all the creatures adorning |
|
swordfish on left wall |
|
Ivory daggers… |
|
shark teeth by pearl display |
|
When its contents turn misty… |
|
storm glass on the wall right |
|
Underneath the ocean, its |
|
seahorse |
|
A life saving animal… |
|
dolphin on left wall |
|
Found again after five hundred |
|
Chinese porcelain by left wall |
|
Rising from the water with her |
|
dragonfly |
|
This miraculous device. A |
|
sextant on the wall right of |
|
On a win-red case, it lies |
|
giant black pearl you placed on |
|
Treasured possession worth more |
|
picture of Captain Nemo and family on the door of the safe. |
|
When time and distance are |
|
chronometer |
| The respected master of the greatest conqueror… |
Aristotle’s The Poetic, 9th C Arabic Translation, rightmost top shelf at safe. |
|
|
It has 5 teeth… |
|
sea urchin |
|
This came from the sea, though |
|
white janthine-mollusk third |
The robot will recognize you as Captain Nemo and will follow your orders.
Mina asks the guardian robot to deactivate the shield.
Watch the departure of
Mina.
Note: This walkthrough
has a score of 340.
This document may not be distributed without express written permission of
the author and the content may not be altered in any way.
For
Questions or Comments on this Walkthrough,
Please write to:
MaGtRo
Copyright
© 10/2004
MaGtRo