Reah: Face the Unknown Walkthrough by Malcolm Schmidt
Reah Walkthrough
OUTSIDE THE CITY
THE SUNDIALS
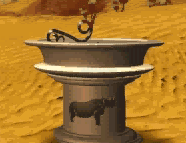
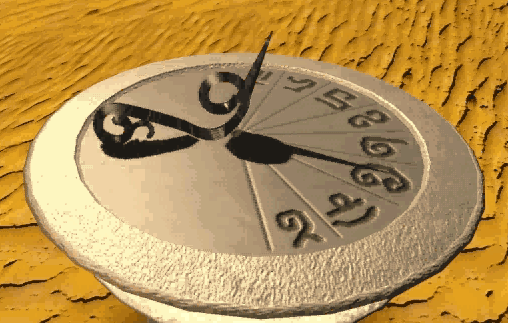
Examine the sundial at the rear of the city.
It is identifiable by the “Rhino” on it. Note the symbol under the
shadow.
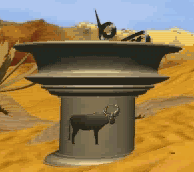
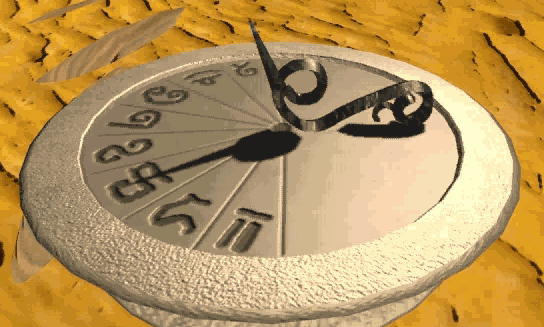
Examine the sundial to the left of the city.
It is identifiable by the “Buffalo” on it. Note the symbol under the
shadow.
The sundial to the right of the city
(identifiable by a “Kudo”) has no shadow.
OPENING THE GATE
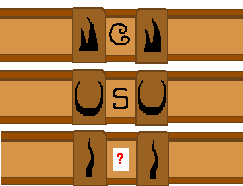
The gate has 3 beams, each with various
symbols on it. The symbols are the same as those on the 3 sundials. In the
centre of each beam is a “combination slot” identifiable by a set of horns. The
horns are those of the 3 animals on the sundials.
Slide the top beam until the symbol in the
“combination slot” corresponds to the one on the “Rhino” sundial. Similarly
slide the middle beam until the symbol in the “combination slot” corresponds to
the one on the “Buffalo” sundial. The correct symbol for the bottom beam is
found by “trial and error”.
INSIDE THE CITY
CITY ENTRANCE
In the corner (to the left) is a pig’s trough.
Take the PORCELAIN WEIGHT from inside the pig’s
trough.
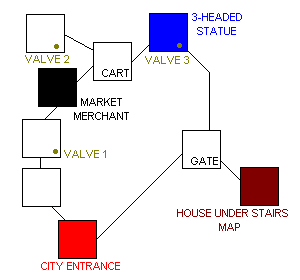
MAP OF THE CITY
THE LANGUAGE PROBLEM
The 3-headed statue in the fountain acts as a
universal translator. Approach the statue from the right (a loud ringing of
bells is heard in the background) and “click” the head facing you until the
BING BONG sound is heard. Next approach the statue
from the rear (the wind is heard howling in the background) and “click” the head
facing you until the SHOO sound is heard. The sound
from the 3rd head is set by “trial and error”. You are now able to
communicate with all the characters.
THE HOUSE UNDER THE
STAIRS
Knock on the door – the woman who answers asks
you to fetch her JUG from the MARKET.
THE MARKET
Take the JUG from
one of the containers outside the MARKET.
THE HOUSE UNDER THE
STAIRS
When you give the women her JUG she invites you in. Open the straw basket (next to a
table) and take the MAGNIFYING GLASS. Examine the map
on the table outside the house. Use the MAGNIFYING GLASS
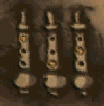
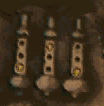
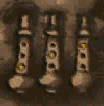
to get a close-up view of the 3 ancient musical instruments – they relate
to the 3 gas valves in the city.
THE VALVES PUZZLE
The valves can be turned either clockwise (to
the right) or anti-clockwise (to the left).
VALVE 1
The correct setting is HIGH, LOW then MIDDLE:
è LH çLM
VALVE 2
The correct setting is LOW, HIGH then LOW:
ç MMLèHçL
VALVE 3
The correct setting is LOW, MIDDLE then HIGH:
è MMML çMH
When each valve is correctly set you hear (and
smell) the gas.
ENTERING THE TEMPLE
You cannot enter the TEMPLE through the door
at the entrance. Set the 3 valves correctly to open the gas supply. The “smell”
of gas is most prevalent next to the wooden cart. Move the cart to create
friction – causing an explosion that blasts a hole in the wall behind the
cart.
THE TEMPLE
THE GLASS DOOR PUZZLE
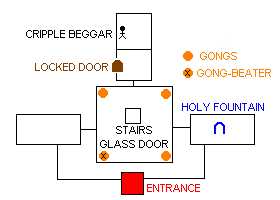
The stairs in the centre of the TEMPLE lead
down to a glass door. The door, in its present state, is shatterproof. You must
get it to vibrate in order to break the glass. Getting all 4 gongs (in each of
the corners) to ring at the same time will cause the glass door to vibrate. Take
the GONG-BEATER and go to the gong in the diagonally
opposite corner. Beat this gong with the GONG-BEATER
– causing a loud reverberating echo. MOVE QUICKLY to each of the other 3 gongs
and beat them while they are still vibrating. The glass door will now also be
vibrating, enabling you to smash the glass.
THE CRIPPLE BEGGAR
Talk to the cripple beggar – he asks for
water. This ‘activates’ a BOWL OF WATER at the HOLY
FOUNTAIN. Fetch the BOWL OF WATER and give it to the
cripple beggar. In return he gives you his CRUTCH.
THE WHEEL PUZZLE
In the area behind the glass door are a
pillar, a block and a large wheel. Insert the CRUTCH
into the hole in the pillar to activate the puzzle. Press the green arrow to
start. Complete 4 rounds of the puzzle. For each round there are a number of
strange symbols on the block. Similar symbols (but not all identical) appear on
the wheel. You need to ‘line-up’ the symbol on the wheel that does appear
on the block.
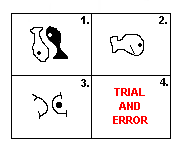
The correct symbol for the 4th
round is found by “trial and error”.
The correct symbols are:
After completing the puzzle the alchemist
tells you that the locked door (to the TOWER) is now open.
THE LIFT
Get to the lift through the door (on the left)
in the area leading to the cripple beggar.
The TOWER is on the 3rd level, so
pull the lever 3 times to get there.
THE TOWER
THE ‘STONES’ GAME
Start the game by “clicking” on the bowl
containing a number of blue stones. You and the alchemist take turns in removing
1, 2 or 3 stones. Whoever removes the last stone/s wins. You always have the
1st move. If the game starts with 8 stones on the table you cannot
win! If the game starts with 9, 10, or 11 stones – remove 1, 2, or 3 stones
respectively, leaving 8 on the table. Depending on how many stones the alchemist
takes – you next take enough stones to leave exactly 4 on the
table.
After winning 4 games the alchemist gives you
the PHILOSOPHER’S STONE.
THE TELESCOPE PUZZLE
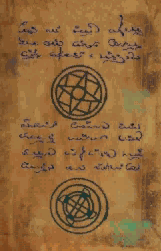
Read the book on the table – you learn that
the OASIS is visible through the telescope. The correct settings for the
telescope are recorded in the book in the form of 2 symbols. “Clicking” on its
base accesses the settings of the telescope. One of the symbols in the book
appears in the ‘outer ring’ of the settings – 3rd from the left. Note
that there is another similar symbol, but it differs very slightly. The ‘inner
ring’ has a badly scratched symbol. This symbol (2nd from the left)
bears a very close resemblance to the other symbol in the book.
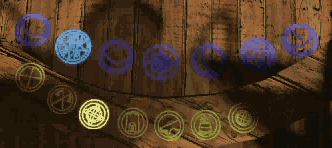
After setting the correct symbols the OASIS is
visible through the telescope.
THE LIFT PUZZLE
The lift mechanism must be adjusted to get the
lift to go down. The 11 red and green balloons control the mechanism. The
alchemist gives a clue to the settings of the balloons when he says “greens up…”. All the green balloons must be at the top, and
the red ones at the bottom. When “clicking” on a particular balloon, certain
other balloons will also move.
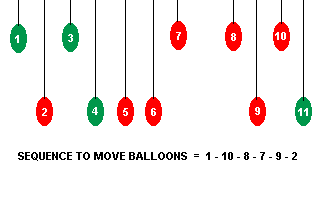
After setting the balloons as above the lift
can again be operated by pulling the lever. Pull it 3 times to return to the
ground floor.
INSIDE THE CITY
THE ‘HANGING STONES’
PUZZLE
From the book on the table inside THE HOUSE
UNDER THE STAIRS you learn that “the ‘hanging stones’ contain a great and secret
force called four and forty…”. The pages in the book contain certain
‘numbers’ – the only combination of which that add up to 44 are (4 + 8 + 32).
Note the shape of the frames around these ‘numbers’. The “hanging stones” are on
the walls outside the rear of THE HOUSE UNDER THE STAIRS. Only 3 have the same
shaped frames as those around the ‘numbers’ 4, 8 and 32 in the
book.
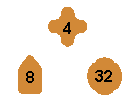
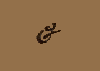
Certain of the ‘stones’ have strange symbols
on them. Only one symbol is common to all 3 these frames and does NOT appear on
the others. It is also the only symbol on the 4th row of the
‘stones’. Press the stone with this symbol in all 3 the frames – this activates
THE ALCHEMY WORKSHOP.
THE MARKET
Talk to the merchant – he invites you into the
MARKET. Note the WATER BOTTLE on the table in the
centre – the merchant won’t let you have it yet, he tells you that “its worth its weight in gold”. Swap the PORCELAIN WEIGHT for the LEAD WEIGHT
(also on the table).
THE ALCHEMY WORKSHOP
Put the LEAD WEIGHT
(and the PHILOSOPHER’S STONE) into the pot on the
fire – you get a GOLD WEIGHT.
THE MARKET
Swap the GOLD WEIGHT
for the WATER BOTTLE.
LEAVING THE CITY
The guard at the CITY ENTRANCE will now allow
you to leave. As you leave, he tells you to turn left to get to the
OASIS.
THE OASIS
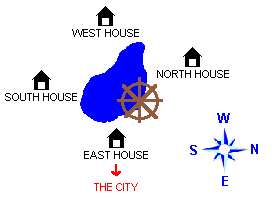
There is a house directly in front of you as
you arrive at the OASIS. Talk to the man outside this house – he tells you that
the city is to the east. This is therefore the EAST HOUSE.
EAST HOUSE
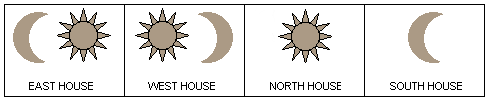
You know that the sun rises in the east – or
replaces (follows) the moon.
Therefore the symbol above the door is set to
MOON / SUN
Note that the shadows cast by the protruding
beams are short.
WEST HOUSE
The sun sets in the west – or it is replaced
(followed) by the moon.
Therefore the symbol above the door is set to
SUN / MOON
Note that the shadows cast by the protruding
beams are long.
NORTH HOUSE
The shadows cast by the protruding beams are
short (as at the east house).
Therefore the symbol above the door is set to
SUN
SOUTH HOUSE
The shadows cast by the protruding beams are
long (as at the west house).
Therefore the symbol above the door is set to
MOON
The portal rises out of the water and takes
you to the Second City.
OUTSIDE THE SECOND CITY
THE ISLAND WOMAN
Talk to the island woman. She tells you about
human remains in the HUT and an old TEMPLE nearby.
THE WOODEN CHEST PUZZLE
Inside the HUT are a skeleton and a wooden
chest. The piece of paper the skeleton is holding shows the symbols for the
combination to the wooden chest – but NOT the correct sequence. The correct
sequence is:
2nd symbol – 3 rolls (one at a
time) downwards
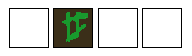
4th symbol – 3 rolls (one at a
time) upwards
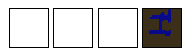
1st symbol – 5 rolls (one at a
time) upwards
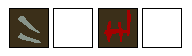
Open the wooden chest and take the GOLDEN SKULL.
THE ALTAR PUZZLE
There are 3 stone pillars along the path to
the old TEMPLE. Each pillar has a painted symbol on it. You will also hear a
feint sound at each pillar.
PILLAR 1
Just after the HUT on the left.

You hear the word ENLI.
PILLAR 2
Outside the TEMPLE on the left.

You hear the word
ENKI.
PILLAR 3
Outside the TEMPLE on the right.

You hear the word
NOSKU.
The altar is inside the TEMPLE. To the right
of the altar (as you face it) is a square column with a round pillar protruding
from it. Examine the round pillar and place the GOLDEN
SKULL on top of it – this activates the control panel.
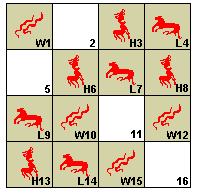
Press each of the “lion” buttons (L4, L7, L9,
L14) and note the words heard. For 2 or more of the buttons the word ENLI will be repeated. Next, press only the buttons that
generate the word ENLI. This activates the WIND
ritual.
Press each of the “worms” buttons (W1, W10,
W12, W15) and note the words heard. For 2 or more of the buttons the word ENKI will be repeated. Next, press only the buttons that
generate the word ENKI. This activates the WATER
ritual.
Press each of the “horse” buttons (H3, H6, H8,
H13) and note the words heard. For 2 or more of the buttons the word NOSKU will be repeated. Next, press only the buttons that
generate the word NOSKU. This activates the FIRE
ritual.
There is a 4th symbol (“crab”)
which is not needed to solve the puzzle.
To get all 3 rituals “up and running”
simultaneously, start with the FIRE ritual. Then fan the flames with the WIND
ritual. The increased flames will now be able to withstand the WATER
ritual.
THE PUZZLE OF THE ROCKS
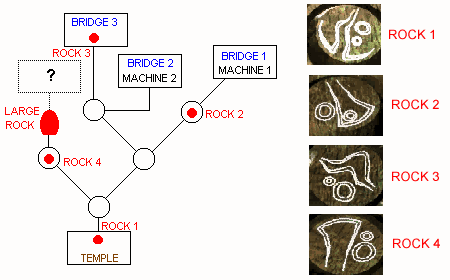
The large rock is blocking a pathway forward.
Note the white symbol (randomly generated) painted on it. Each of the smaller
rocks also has a white symbol painted on an embedded button – one of which will
be the same as that on the large rock. MOVE QUICKLY to that rock and “click” on
the button. Next (again MOVING QUICKLY), go to the other 3 smaller rocks and do
the same.
TIP: leave ROCK 4 till last.
The large rock will move – allowing access to
the pathway.
THE UNDERWATER BRIDGES
BRIDGE 2 (refer Map) must be repaired – the
machine (MACHINE 2) next to it has 2 parts missing. Remove the CRANK HANDLE from MACHINE 1. There is another machine in
the area beyond the large rock. Take the GEAR LEVER
from this machine. Attach the CRANK HANDLE to
MACHINE 2. Also attach the GEAR LEVER to MACHINE 2
(examine a spot just to the right of where the CRANK
HANDLE is fitted). Turn the CRANK HANDLE to
raise the BRIDGE – allowing you to cross into the SECOND CITY.
INSIDE THE SECOND CITY
THE BLONDE MAN (FIRST
VISIT)
When you arrive in the city, go directly to
the blonde man. He can be found by going up the stairs to the residential area,
turning right on the 1st level, take the stairs at the extreme right
to the 2nd level, then turn right and go to the end. Talk to the
blonde man.
THE BASKET LIFT
Turn the handle and examine the
padlock.
THE BLONDE MAN (SECOND
VISIT)
Return to the blonde man and ask him about the
key for the BASKET LIFT.
THE WOMAN WITH THE CLOTH (FIRST
VISIT)
The woman can be found by going to the extreme
left on the 2nd level in the residential area – then look down and
take the stairs. She gives you a CLOTH and asks you
to have it dyed for her.
THE DYE SHOP
Knock 3 times and speak to the apprentice – he
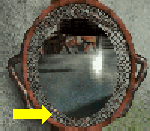
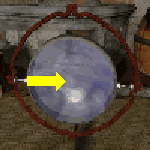
will eventually let you enter. To light the fire in the furnace adjust 2 of the
mirrors (the one on the wall next to the furnace and the middle one of the 3 on
the opposite wall) as well as the lens. “Click” on the points shown
below.
THE MIRROR ON THE WALL NEXT TO THE
FURNACE
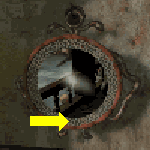
THE MIDDLE MIRROR ON THE OPPOSITE
WALL
THE LENS
Move the large carpet in the centre of the
room to allow the sunlight (from the window) to shine through. Next, put the
CLOTH on the wooden spike on the furnace. Remove the
DYED CLOTH. Take the bottle of RED DYE from the shelf.
THE WOMAN WITH THE CLOTH (SECOND
VISIT)
Give the DYED CLOTH
to the woman. She gives you a MEDALLION.
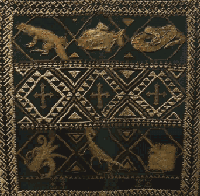
Examine the DYED CLOTH that she has hung up outside
her home. The creatures on it are a clue to a later puzzle.
THE BLONDE MAN (THIRD
VISIT)
Before going to the blonde man, return to the
BASKET LIFT and again pull the handle and examine the padlock. Also look up and
down in front of the BASKET LIFT. Next go to the locked gate, and turn the
handle twice (its double bolted). Also look up here. On the way, knock on the
doors on the 1st and 2nd levels. The blonde man should
appear for the 3rd time. He gives you a KEY.
THE BASKET LIFT PUZZLE
Take the KEY to the
apprentice in the DYE SHOP – he gives you a set of LOCK
PICKS. Unlock the padlock and take the BASKET LIFT (it’s operated by
turning the handle) up to the CROSSBOWS.
THE CROSSBOWS PUZZLE
Go to the crossbow along the right ledge (the
left crossbow when facing the target). Turn the crossbow to change the direction
it will fire at. Fire at the different “target” windows until the large wheel
above the windows turns. Next, go to the other crossbow. Repeat the firing
process until the 2 pipes on either side of the wheel rise and fall. The locked
gate below the windows is double bolted – therefore both crossbows have to be
fired again (as above).
THE LOCKED GATE
Pull the handle to open the
gate.
THE LADY EXPLORER
The lady explorer appears if you try to enter
the BATH-HOUSE. She tells you that the BATH-HOUSE is flooded, and also talks
about the CORE MACHINE.
THE FOUNTAIN PUZZLE
Cross the water surrounding the fountain by
throwing the MEDALLION into it. The 8 receptacles
around the fountain control the water flow to the various buildings along the
perimeter.
From one of the receptacles you can see the
BATH-HOUSE and the drain to the left of it.
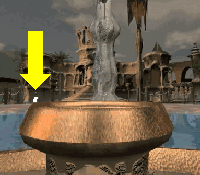
Pour the RED DYE
into each of the 8 receptacles (while they are empty) and check the water
flowing through the drain.
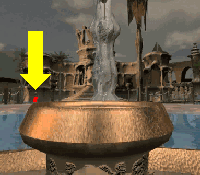
If the water changes colour (to red) then that
particular receptacle is connected to the BATH-HOUSE. Fill the receptacle with
water by turning the wheel below. The other receptacles must remain
empty.
THE WELL IN THE
BATH-HOUSE
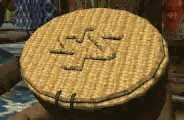
The large metal scoop above the well is
attached to a ‘balance’ – on the other side of which is a straw basket. The
strange symbol on the straw basket is a mirror image of the number
’22’.
Each of the millstones in the bath next to the
straw basket is double the size of the one smaller than itself. Therefore, if
the smallest one is ‘1 unit’, the next biggest is ‘2 units’, the next ‘4 units’
and so on. Only one combination of the millstones add up to ’22 units’, i.e. 2 +
4 + 16.
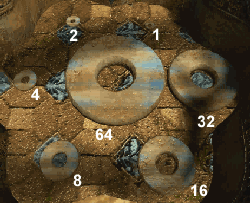
Put the ‘2 unit’, ‘4 unit’ and ’16 unit’
millstones into the straw basket. The scoop can now be used to remove water from
the well by “clicking” on the balance. Repeat 6 times (take 6 scoops of water)
to reveal a 2nd (lower) exit in the well.
THE UNDERGROUND CITY
THE ANIMAL SKULL
At the end of the skeleton rib cage bridge is
a HORN. On the slab (near the point where the 4
bridges meet) is an animal skull with one horn missing. Insert the HORN into the hole in the animal skull.
THE SCALE PUZZLE
The left side of the scale is marked with a
SUN symbol, and the right with a WATER symbol.
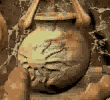
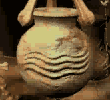
The scale has 3 weights on either side. Each
weight can be changed to depict one of 11 different creatures:
3 snakes
2 crabs
2 lizards
1 fish
1 crocodile
1 stingray
1 turtle
Some of the creatures are SUN creatures, i.e.
found on land:
3 snakes
2 lizards
1 turtle
Some of the creatures are WATER creatures,
i.e. found in water:
2 crabs
1 fish
1 crocodile
1 stingray
Certain of the creatures were on the DYED CLOTH that the woman in the city hung on her
wall.
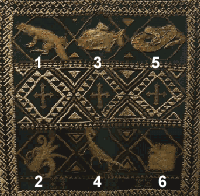
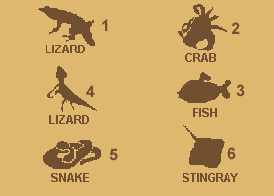
Set the weights on the scale as shown in the
above diagrams. After solving THE SCALE PUZZLE you take a canoe ride to a series
of metal walkways.
THE THREE LOCKED DOORS
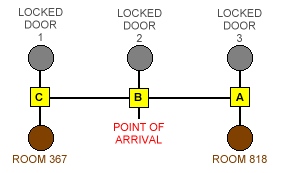
The area is divided into 3 sectors, namely A,
B and C. The yellow signs along the metal walkways indicate the sectors. There
are 3 locked and 2 open doors. The rooms through the 2 open doors are marked
‘818’ and ‘367’ respectively.
ROOM 818
Pick up the ELECTRIC
SCREWDRIVER that is lying on the floor. Note that a wall panel next to
the right-hand fan has been removed, allowing the adjacent room to be
entered.
ROOM 367
Use the ELECTRIC
SCREWDRIVER to unscrew and remove the wall panel next to the left-hand
fan. Lift the metal device lying on the floor in the adjacent room and take the
DATA CARD. Insert the DATA
CARD into the slot on the computer terminal.
The data will NOT be visible on the monitor,
but it can be transmitted to the terminal in the other room. Enter the
“destination” code on the keyboard – A818 (Sector A, Room
818).
ROOM 818
The monitor on the computer terminal will show
the correct sequence in which to press the panels on the 3 locked
doors.
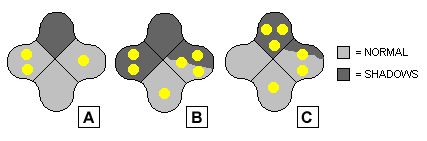
The ‘yellow dots’ signify the order in which
to press the panels, i.e. ‘1 dot’ is pressed first, ‘2 dots’ second and ‘3 dots’
third. The door to which each monitor display refers is identified by the
shadows. After all 3 doors are unlocked; you are able to enter through any of
them.
THE 4 LUMINOUS RODS
THE FIRST ROD
There are 4 night vision devices beyond the
locked doors – 3 of which are in front of the doors. Look at the middle door
through the 4th night vision device. One of the railings to the right
of the middle door is the FIRST ROD.
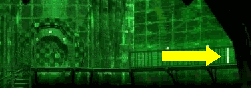
Pick up the FIRST
ROD.
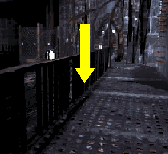
A stairwell (to the left of the middle door)
is also visible through the night vision devices.
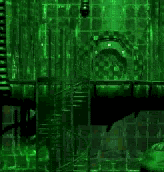
Go down the stairwell to the bottom
level.
THE OTHER THREE RODS
You get a ROD for
completing each of the 3 puzzles on the bottom level.
THE 9 BALLS
There are 3 rounds to complete. Duplicate the
sequence of the symbols shown on the large ball.
THE PEBBLES AND THE WHEEL
There are 3 rounds to complete.
Legend: L = a pebble holder on the
left
R = a pebble holder on the right
I, ll and lll = the ‘number’ of the actual
pebble holder
Round 1
Rlll Rll Llll Llll Ll Rll Rl
Rlll
Round 2
Ll Llll Rll Rll Llll Lll Lll Rl
Round 3
Lll Rlll Rll Llll Rll Llll Lll
Ll
THE WHITE SQUARES
There are 3 rounds to complete. The white
squares must be moved from the ‘right’ to the ‘left’ container, with the
smallest at the bottom to the biggest on top.
Legend: R = right container
L = left container
B = bottom container
Round 1

Round 2

Round 3
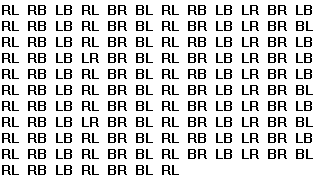
THE CORE PUZZLE
Insert all the RODS
into the holes in the CORE MACHINE. You are told that the access code is 30, 25, 9, 25, 20.
To enter the access code, type:

THE END
A Walkthrough by Malcolm Schmidt
View this guide raw, exactly as the archive holds it