Qin: Tomb of the Middle Kingdom – By Learn Technologies Interactive
By Learn Technologies
Interactive
Walkthrough by
MaGtRo September, 2002
Game
play: The game opens on
Options Menu that has New Game, Save Game, Load Game, Preferences, Help,
Credits and Quit. In Preferences: background music, volume, cursor speed
and brightness can be adjusted. The game manipulation is point and click.
The navigation can either be by the use of the keyboard or clicking on a
compass at bottom left of the screen. The green dots on the compass at
bottom right shows which areas are navigable. The compass at the bottom
left indicates the compass direction you are facing. North is up. When the
central point is yellow means that there are activities to be done at that
scene. The cursor changes to a single small circle during a ‘wait’ period
for completion of a task, a lit zigzag line over an active spot, a
crosshair for a closer examination and 2 circles over an item that can be
picked up. Items picked up can only be carried within an area and is
return to its original location when it is outside its range. The top bar
shows the 3 Data Visor icons and the rightmost Options icon. The Data
Visor icons are the interpreter that translates Chinese characters, the
map and the archive. The map icon shows the location indicator and the
transport nodes (black squares) that can move you from one place to
another in the same realm. Toggle-click second time the data visor
selection closes the data shown.
China, the year 2010. Read the
newsfeed that begins. An international conglomerate Mega Media headed by
Hal Davis is given the contract for the excavation of the Li Shan site
where the tomb of Qin Shi Huangdi, the first Emperor of China is located.
The First Emperor was buried in 210 BC. The tomb contains 6000 terra cotta
warriors standing guard. It is said that the underground city is filled
with booby traps. You volunteer for the excavation of Qin (pronounced
chin). A catastrophic earthquake is predicted within 6 months in China.
China is on the verge of a civil war.
Underground
Entry
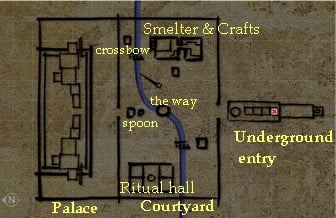
Entrance:
You fall in a deep hole with a view of the skies above the hole. Click on
the south arrow at bottom left and see a skeleton and some pottery.
On the west is a horned statue and at the opposite side is a bird. Go
forward to the closed entrance. Click the active icon on the characters
left of the doorway to highlight it white. Use the interpreter to learn
that it means ‘mercury’. Click on the door and
enter.
Walkway: The
walkway is lined by warriors on both sides. Turn around and click on the
character ‘fire’ on the right side of the doorway to highlight it red. Go
forward and enter the
door.
Inner chamber: See a large
black boulder drop down at the other end of the room and water starts to
flow. Turn around and highlight the ‘water’ character blue on the left of
the doorway. Turn around and go forward to the black boulder.
Black boulder puzzle – This puzzle is accessed by highlighting the
3 primary elements on the way here – mercury, fire and water. The panel
has 4 characters with the central ‘door’ character. Using the interpreter,
the symbols on left side of the ‘door’ character are the words: man-person
and bar-one. To the right of ‘door’ are the words: market and separate.
Complete the action sentence by clicking the ‘separate’ at far right and
place it under the ‘door’ character to get door separate or open. The
boulder moves down to close the entryway you came in and opens the way to
the courtyard. Read the transcript of Master builder Lu’s report to the
Emperor.
Courtyard
On the right side is a waterwheel
complex and a goose statue lamp (archive: Science and Technology) in front
of a red walled complex. At the center is the palace seen at a distance.
To the left is a building with a giant jug with dragons in front. Turn
left, go forward pass the Dragon Jug (seismograph) and go to the
bridge.
Bridge:
At the middle of the bridge turn right and see a small goose statue lamp
on top of a post. Click on the small goose lamp to turn it and it will
illuminate the giant counterpart across the courtyard. Turn left and over
the bridge to the building, the ritual hall.
Ritual Hall:
Translate the writing on the
right steps to the building. Go up and see a central ziggurat type
structure with 4 posts with characters written on them – north, west, east
and south. There are 4 doors that correspond to each posts-character.
Enter the North room.
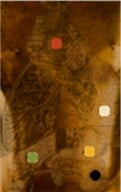
Acupuncture room – (archive: Daily life, medicine) To
the right is a table for medicine preparation. Go forward and see 5
colored acupuncture needles. To the left is a man representation with
holes on the torso. To the left of the statue is the colored
representation of the internal organs of the man. Place the needles on
the holes that correspond to the internal organ representation. Red –
heart (top hole). White – lungs (middle right). Yellow – stomach (lower
top right). Green- liver (lower left). Black – kidneys (lower bottom
right). If done correctly, the statue’s eyes light up. Exit and go to
the west room. Note that scripts are now written at bottom of the
ziggurat structure.
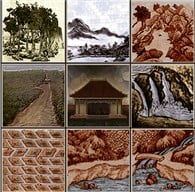
Feng Shui room –
(archive: Systems of Thought) There is a red dragon on the shelf. Turn
left and look at the tiles on the table. Arrange by click-hold-release
the tiles around the house following the Feng Shui guidelines described
in the archive. Top (L-R) – trees, mountains and rocks. Middle – road
and waterfalls. Bottom – fields, water and water with bridge. Exit and
go to the east room. Second to the top layer of the ziggurat structure
has scripts on it.
Astronomy room –
(archive: Astronomy) Move forward 2xs, translate the script and watch
the red and blue orbs cross each other’s path. Click on the armillary
sphere’s ring to see it work. Exit and go to the south room. Top layer
of the ziggurat structure has scripts on it.
Map room – (archive:
Cartography) Look close at the map on the floor. Check translation and
then move-click to get North character to the bottom of the disk.
Exit the room. Look at the
ziggurat structure which has scripts on 4 layers and a plate floating on
top. Translate the script – To open the gates of the palace
must first learn the secrets of the four rooms. The compass provides the
way. The spoon must be placed upon the emblem of heaven. The warrior waits
in winter; the spoon must find him. Take the gold plate. Go
down the steps and forward towards the palace. Place the gold plate
(emblem of heaven) on the small square in front of the giant spoon. The
character on the cursor changes to pink.
Crossbow:
Turn right 2x and forward to crossbow. Turn right, over the bridge,
forward and slight left to the warriors by the shed. Take an arrow
from the ground. Go back to the crossbow. Place the arrow on the crossbow
(character turns pink). Move the cursor down from the arrow until it
becomes active and click to fire the arrow. Watch the arrow hit the wall
and water pours from wall. Water flows on the dry bed in the courtyard.
Waterwheel:
(archive: Economy, public works) Cross the bridge and go to the closest
waterwheel. Move the lever that blocks the waterwheel. Go left and forward
to the water transport (rotating wood slats) to the left of the big
waterwheel. See a small boat released to the water. Take the bamboo
from the boat. Turn left, forward and see a portion of the bamboo pipe
water system is missing. Place the bamboo to fill the gap on the water
system. The water drips now to a tank that has the mercury character on
it.
The
way: Move forward once and
turn right. See the character denoting ‘the way’ on the wall. Look over
the wall and see a pool. This is the teleport to another realm.
Manufacturing and Crafts area:
Go to the lit giant goose lamp
and then turn left. Enter the gate, see the smelter, turn right and
forward 3xs to enter the Crafts area. Look around at the different stalls
and crafts: pottery, carpentry, weaving and casting.
Crafts area:
Weaving – Click on the
threaded loom and make a white dragon design.
Casting – Look close at the green bucket on the table. There are
wax seals on the right. Click on certain seals to form a message in the
bucket. Click on left white seal, middle orange seal, left green seal
and left red seal.
Smelter:
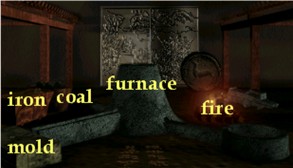
Go back to the smelting area. Place the following items into the central
furnace – coal from the left bin closest to the central furnace, fire
from the right of the furnace and iron from the left of the coal bin.
Molten iron will pour into a mold to make a spoon. Take iron
spoon.
Go back to the giant spoon and
golden plate in front of the gates of the palace by walking or using the
transport mode (black squares) on the map for immediate teleportation.
Place the iron spoon on top of the golden plate. The 2 spoons move and the
gates to the palace open.
Palace
Enter the gate to the palace. Move
forward until the central stairs between the 2 buildings.
Ground
Floor: There are 2 doors on
either side that are accessible. Turn left and enter the door.
Musical Instrument room –
(archive: Five Sounds) Check and play the flute, reed organ, drum, gong
and zither on the floor. Exit and enter the room across the
way.
Altar room – (archive:
Food for Sacrifices) Translate the characters on the altar – precious
offering and animal sacrifice. On the left are bells and a robe. To the
right is a statue carrying an umbrella. Translate the words on the wall.
We will come back here later. Exit and go to the stairs.
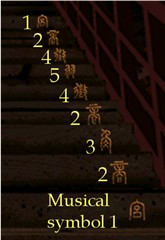
Stairs – Look at the
characters on the steps and translate them. Climb up and see the
seismograph and ritual hall with a backdrop of the mountain surrounding
the city.
Second
Floor: Turn right and
forward to the first door on the right.
Scroll room – Read the
scroll on the shelf on the left and on the table on the right. Click on
the divination tiles to see them transform into other characters. The
‘book’ character by the right side of the door burns showing the attempt
of the Emperor to stop knowledge. Exit and turn right to the next
room.
Emperor’s Bedroom –
Translate the characters on the table to show Ying Zheng, the Emperor’s
given name. Open the cabinet on the right and listen to different
opinions about the emperor given by the 3 statues. Turn around, forward
and climb the stairs.
Alchemy room – (archive:
Afterlife & Occult; Elixir of Immortality) Go to the table and see a
plate of cinnabar and a reaction pot. Take the cinnabar, place it on the
pot and see it flow out as liquid mercury and gaseous sulfur
oxide – one source of mercury for the elixir later on. Look at the altar
on the left and translate the sentence on the wall. Exit this room and
go out the bedroom door. Go to the last room.
Recreation room – Click
on the theatre curtain and watch the story of the archer, his wife, hare
and the moon. Look around and see game of Go. Exit, turn right and go
down the stairs. Turn right, forward and right. Enter the door.
Kitchen: The name of the
emperor is etched on the table. Exit, go back up the stairs and forward
to the other stairs at the end of the building. Turn left and enter the
last door on this side of the building.
Statue room – These are
the larger version of the statues in the Emperor’s cabinet. Listen to
Yang Po, wandering scholar; Li Chi, the Emperor’s concubine and Han Fei,
Emperor’s advisor. Exit and go to the next room on the right.
Administrative room –
Enter through a screened door to a room where the Emperor’s decisions
are made and carried out. Go up the stairs.
Divination-Oracle room –
Look around and translate to get clues on how to solve the rest of the
puzzles. The small bones on the barrel on the left – Lu, master builder
is sad because he did not know how to complete the circle. The tortoise
bones on the table – To progress, Attend the music of the steps. The
oxen bone on the stand – Immortality is achieved by one who starts with
a heart of Jade. Go back down, out and go to the next room.
Mathematics room –
(archive: Culture, mathematics) Enter and see a table with green gong
stand and numbered green bar. Look close at the green gong stand and
translate the questions on the bars. Select the answers from the
numbered green bars.
A) What is the number closest to the heart of the
emperor? (archive: Mathematics) Pick up Six, the rightmost bar. Look
close again at stand. Click six on the question on the side bar. A
gong sound is heard and the question disappears to be replaced by
another on the top bar.
B) What is the number of the cardinal directions?
(archive: System of Thought, 5 Cardinal directions) Five (N, E, S, W
and center).
C) What is the number of objects that must be
placed on the ritual altar? (archive: Ritual objects) Two.
An altar appears that has brown
vase, flower (precious offering), green jug and chicken (animal
sacrifice).
Altar Room:
Altar – Take the
flower-precious offering. Go down the steps to the altar room or
use transport nodes on map. Place the flower on the left side character
on the altar. Go back to the Mathematics room and take the
chicken-animal sacrifice, go back down to the Altar room and place it on
the right side character. The candles light up and the incense at the
center burns.
Bells – Turn to left and
look close at the bells. See that 5 of the bells have characters on them
which correspond to the musical symbols on the steps of the stairs.
Click on Musical symbols: 1, 2, 3, 2, 4, 5, 4, 2, 1 or bottom right,
bottom middle, left middle, bottom middle, top right, top left, top
right, bottom middle and bottom right. If done correctly a door opens to
the underground.
Underground of the
Palace
Well
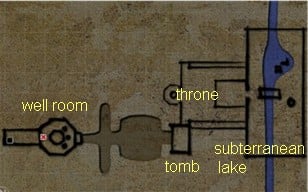
room: Enter, go down the
stairs and see a well with a ‘the way’ character on the rim. Click on the
sacred fungus floating on top – necessary for elixir of immortality
preparation and it will disappear. This ‘the way’ well is similar to the
‘the way’ by the waterwheel at the Courtyard. It is a teleportation device
to go from one realm to another that has been visited before. Around the
well with the stairs on your back, there are 3 sink holes. Go forward to
the left side of the well, then go right, see the sink holes and then
click right. Constant sink hole on the left of the well, an unlabeled sink
hole at the middle of the other sink holes and the ‘poison’ hole on the
right of the well. The only safe accessible one is the unlabeled sink
hole. Go forward to the unlabeled sink hole.
Sink hole
passage: Go forward, pass
the small bridge and enter a large chamber with potteries. Look on the
right and see ‘west’ on the wall. Go towards the large ornate door once,
turn right and translate the words on the wall – As he
proceeds through the fog, the explorer’s best friend is the steadfast
compass. It must turn as he turns, see what he sees, from feet to the head
to the right of Pangu. Go through the large door.
Tomb:
There is a sarcophagus with a jade body on top and a lit door with
inscription on the other side. Look at the map on the data visor on top
bar and note that the head is on the east, the right side is north and
feet to the west (as shown by the west character at the outside chamber).
Compass puzzle – Go right and then
forward to the compass map. Look at the map at the center and then click
to get a close view. Now position the points based on the words seen
outside – from feet to the head to the right of
Pangu. Place west (feet) on top by clicking twice on the upper
right, place east (head) on top by clicking 4xs on upper right and then
place north on top (right of Pangu) by clicking 2xs on upper right. If
correctly done, the view will go out of close view and a sound is heard.
Solving this puzzle will give you the jade necessary for the
elixir of immortality later. Turn left and the lit scripted door is now
accessible. Enter through the door.
Throne
room: Look around and see
potteries on shelves on both side of the room, a platform at the center, a
door on the left wall and the throne. Sit on the throne facing the dragon
with a sphere in his mouth. Turn left, push the lotus lever and see the
platform descend. Go forward passing through the sphere of the dragon,
down to a door at the descended platform. Go forward through the door to
the subterranean lake.
Subterranean
lake: Cross the bridge, look
left to the water and see tiles at the middle of the lake. Go forward and
see bamboo pipes leading to a furnace. To the left of the furnace is a
water system by the lake that goes up to the waterwheel at the courtyard.
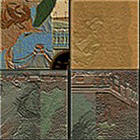
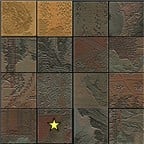
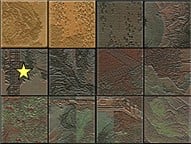
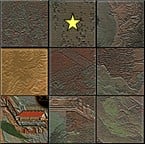
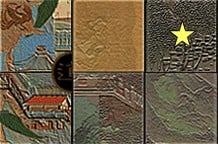
Tiles puzzle – Click on the tiles on
the lake. The 4 tiles are folded and the aim of the puzzle is to show
places in the next realm. First unfold the 4 tiles to 16 tiles. Click on
the second to the left at bottom row. Click on leftmost tile of the
middle row. Click on middle tile of top row. Click on right tile of top
row and see the 4 colored tiles.
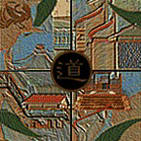
Philosophy and
Religion Realm
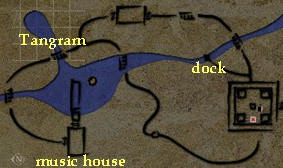
Walled area:
The walled area is made out of 4
halls at each corner with the well at the center. The ‘the way’ well can
transport you to another realm previously visited. Look at each hall
and read the philosophy inscribed on the walls. Bottom right hall (SE) –
Legalism room. Bottom left hall (SW) – Mohism room. Upper left hall (NW) –
Confucianism room. Upper right hall (NE) – Taoism room. Aside from
the way we got here (South path) there are 2 other exits shown by wood
slats on the wall: The East path to the docks is between the Legalism
(bottom right) and the Taoism room (top right). The West path to the
gazebo is between the Mohism room and Confucianism room. The paths will
meet at a crossroad. During the walk through the paths, read the writings
on the walkway. They are the words of Lu, the master builder.
East
Path: Exit, go forward once,
left, forward to the end of the dock.
Docks – On the right, there is
writing on the river. Look down to the water at the end of the dock and
see a fish-koi. If you watch long enough it will jump from the water to
the dock. Click on it and it will disappear – this gives the mother
of pearl necessary for the elixir of immortality. Go back to the
intersection of the bridge and forward until the house.
Poetry House – Read the poems
accessed by clicking on the pictures on the wall. Exit through the other
door. Go forward until an intersection on the bridge. The left path goes
back to the 4 halls walled area.
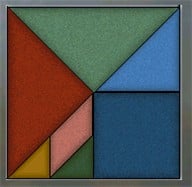
Tangram puzzle – Continue forward at
intersection until a raised area darkly shaded by the willow tree. Look
to the left and forward and read the inscription on the tree trunk
-the root in the form of a man helps give long life.
Turn around and see a floating tangram puzzle. Arrange the colored tiles
from the crane to fit the box. Double click to rotate the tiles.
Once the puzzle is finished, turn around
and forward to the words on the tree trunk and see a ginseng root
– another ingredient for the elixir. Click on it and it will disappear.
Go forward to the next building.
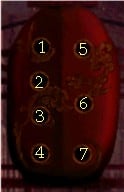
Music House – Go to the slatted door
at the other end of the house and do the vessel flute puzzle to open the
door. Reproduce the music played. To listen to the music again, click
outside the vessel flute. Click on 7, 2, 1, 2, 1, 3, 4, 5 as labeled in
picture.
Automatically enter and read the
inscription on the wall. Go forward until you see a telescope. This is
the house seen on the river while walking around. Turn right and read
the words of Lu, master builder floating on the river.
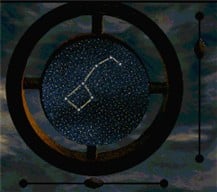
Big Dipper puzzle – Look close at
the sighting tube-telescope. The aim of the puzzle is to focus on the
Big Dipper by using the vertical and horizontal sliders. Move the
vertical slider up (see picture) and nudge the horizontal slider until
the big dipper is at the center. Immediately click on the constellation.
You will be transported to a snowy mountain realm.
Sacred Mountains
Realm
(archive: Myths and Rituals,
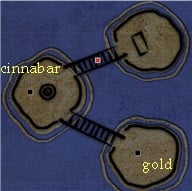
Sacred Mountains) Look around and note that the compass on the right does
not work. Turn right and click on gold. Turn around and cross the
bridge. At the end of the bridge, see the ‘the way’ pool to get back to
the other realms visited. Go forward, turn left and see 2 boats. Place the
gold on one of the boats. Turn left 2xs and take some cinnabar.
Turn right 2x and place the cinnabar on the other boat. Turn left and
cross the next bridge. Go forward to the small sacred mountains
reproduction. Watch the animation that showed the story of Yi, the archer,
his wife Chang E, elixir of immortality, hare and the moon. This story is
the same as the one seen in the theatre at the palace recreation room. The
snow on the mountain reproduction disappears and the snow around you also
disappears. Go back to the ‘the way’ pool and click on it.
Elixir of
Immortality
Click on ‘the way’ until the Underground of
the palace (sink hole area), then use the transport nodes in the map to
get to the throne room and walk down to subterranean lake.
Subterranean Lake at
Underground: Get the
bamboo on the small boat at the lake. Turn around, look at the
bamboo pipes by the furnace and see that there is a gap. Go back to the
furnace and place the bamboo on the gap of the bamboo pipes. Take the
cinnabar from the small boat and go back to the furnace. Open the furnace
and place the cinnabar in the furnace – the other source for
mercury for the elixir. Go back to the ‘the way’ pool via the
transport nodes in the map, jump in and go to the courtyard.
Palace
Courtyard: Go to the
left waterwheel and the water transport from the subterranean lake. See
the small boat with the gold get released to the river. Take gold
from the boat. Go to the smelter at the Manufacturing and Crafts area.
Make a gold spoon now by placing the gold in the furnace first, then coal
and then fire. Take the gold spoon from the mold, see a close up and then
click forward. You will get transported to the throne room.
Throne
room: See the dragon blow
fire and an ornate sarcophagus rises from the platform. The closed door on
the left of the platform is now open and lit. If you enter the door now it
is one of the possible endings (see 1 below). Go back to the throne and
turn around. See the jade circle at the back of the throne is now
accessible. Enter.
Elixir of Immortality
room: Read the words
of Lu, master builder – he wants you to prepare the elixir of immortality
and give it to the spirit of the Earth to restore harmony to the Middle
Kingdom. Look around the room and see the gold spoon floating at the
center of the room.
All the panels should have all the
collected ingredients for the elixir of immortality. If any of the panel
is empty, go back and get them. From left to right panel:
1. Mother of Pearl from fish at dock in the
Philosophy and Religion realm.
2. Jade is after solving the Compass puzzle in the
Tomb’s room.
3. Sacred Fungus is found floating on the ‘the
way’ well at the sink holes in the Underground of the Palace.
4. Mercury can be from placing the cinnabar in the
reaction pot at the alchemy room in the palace or the cinnabar taken
from Sacred mountains and placed in the subterranean lake
furnace.
5. Ginseng root is taken across the Tangram puzzle
after its completion in the Philosophy and Religion
realm.
If you have all of them click on either
arrow and the ‘elixir of immortality’ will be on your cursor.
Turn around and exit the elixir of immortality
room.
Throne
room: Read the words of Lu,
master builder. Now, decide how to end the game.
Endings
1. When you enter the door on the
left wall in the throne room without making the elixir. The newsfeed shows
that the Chinese Prime Minister made the capital a free-trade zone. This
benefits only Hal Davis. UN is about to be dissolved. The excavation of
the tomb of revealed only dust and all artifacts gone. Starvation, Ozone
layer getting bigger and an earthquake in China happened.
2. After making the elixir, go to
the lit door on the left wall of the throne room. Hear Hal Davis say
that if you have the potion to get out of the tomb area now because of
seismic activities and you maybe trapped here. With the elixir enter the
door. The newsfeed reports about the war in China, Hal Davis getting the
communication monopoly in China, Amazonian rain forest destruction and Hal
Davis showing signs of Immortality.
3. After making the elixir, go
right, forward to the end of the right wall, turn left and see the
sarcophagus of the Emperor with an earth sphere floating on top. Give the
elixir of immortality to the Emperor’s sarcophagus. Read the newsfeed
about a reclusive leader, consolidation of Taiwan and China, the Chinese
leader rise to world power, world disasters and Hal Davis.
4. After making the elixir, go
right, forward to the end of the right wall, turn left and see the
sarcophagus of the Emperor with an earth sphere floating on top. Give the
elixir of immortality to the earth sphere. Read the newsfeed about
democratic order in China, China’s rejection of Hal Davis’ offer to
explore the tombs a second time, peace among warring countries,
environmental good news and dying Hal Davis.
This document may
not be distributed without express written permission of the author and
the content may not be altered in any way.
For Questions or
Comments on this Walkthrough,
Please write to: MaGtRo
Copyright ©
9/2002 MaGtRo