Physicus: Save the World with Science!
PHYSICUS
Commentary and
Walkthrough by Soren Andersen
COMMENTARY
If physics and math turn you
off, then Physicus may not be for you. Solving puzzles based on elementary
Newtonian physics is at the heart of game progress in saving the world. (It
claims to be for ages 10-102.) It comes with fairly simple animated treatises on
optics, mechanics, electricity, heat, and acoustics that can be used as
reference at any time, at least after you master the game interface. However, I
must point out that it is a standard linear Adventure game in which something
must be found or done to find or do something else in order to do that again,
and if spoilers are used to answer challenging scientific puzzles, then the game
flows along in a very satisfying manner.
With regard to interfacing,
moving about is far from perfect. The scene shifts are abrupt (no panning), you
may have to advance as the only way to move out of one, or you may have to turn
to one side or turn around, and very frequently only one of these options is
available. All but one of the cursors are identified on page 9 of the
instruction booklet, the missing one is a reverse arrow that allows you to move
directly backward from the screen into which you have just moved, and at times
it is hard to locate it as it may appear only in a particular small area of the
screen. You will just have to learn with practice.
The game designers have chosen
to provide only eleven slots to store games, which is insufficient since the
Adventure gamer is always advised to save often. As you progress through the
game you will have to decide which stored games are important enough to retain,
and store over the others.
The inventory with its red and
green scanners as described on page 8 are devices that so far I have found to be
unique to this game. There are numerous objects to be acquired (green scanner)
but fortunately they are used (red scanner) before long, so the inventory is not
large at any one time. None of the inventory items are identified by
name.
The planet that is the locale
of this game has a rather cartoonish quality about it insofar as the structures
that you will find in it, and the limited views that are presented make it
sometimes difficult to identify what they are and their purpose. Carefully
examining scenes as you pass through them will help. However, the details of the
graphics are superb throughout.
As Mark Twain put it, “There
is something fascinating about science. One gets such wholesome returns of
conjecture out of such a trifling investment of fact.”
Soren Andersen,
Feb 04
WALKTHROUGH
The opening video sets up the
game premise, “Save the World with Science”, and is well worth looking at more
than once; for one thing, it gives a view of the island locale that you won’t
get elsewhere. There is a view of the windmill as you fly by, and it identifies
one of the strange buildings as an observatory. You must pay attention to
details about the planet saving impulse machine, both in the video and the
narrative.
The Toonerville Trolley
spacecraft in which you arrive has put you down on the edge of the sea at the
end of a pier facing a gate. Go through the gate and enter the beach cottage,
the first of the strangely contrived structures of this game. Turn left and
approach a wooden table on which is a laptop computer (so to be designated
shortly) of a type that you will never have seen before. Click on it to have it
unfold, and a list of the five science/engineering tutorials is presented.
At this point you can take the
time to run through any or all of these interactive treatises, and it will
indeed take time, but it is not time wasted. Depending upon your attitude,
however, it may get tedious. Immediately, or at any time you wish to do so, you
can return to gameplay by clicking on the red button at lower left.
Note: when viewing the tutorials,
the controls for them are immediately below the screen on the right. The left
one of these, an outline of a tape cassette, brings up a table of
contents (TOC) for the tutorial being examined, and from this you may choose a
subject subdivision to explore. Also, keep an eye on the interactive legends
immediately above the screen at the right, in the game as well as in the
tutorials.
Back away from the table and
the laptop is no longer there because you are now carrying it with you to use as
desired at any time by clicking on the green button at lower left. Turn left and
a communications device begins ringing and flashing. Go to it and press the
center arrow key to get a message that is a continuation of the one from the
introductory video. You are to locate three generators and associated equipment
that when placed in operation and properly adjusted will supply the impulse
machine with the correct voltage to place it in operation and set the planet
rotating again.
Nothing more to be found in
the cottage, so leave and go left into the rocks and trees. After several
forward moves the path leads to a stone arch and a butterfly flies across it.
Take that as a sign not to press forward, turn left instead, and you will see
two of the strangest buildings on this island: one looks like a large metal oil
drum and the other, a smithy, somewhat resembles a potbellied stove with three
large chimneys.
When you enter the latter the
most prominent item is another potbellied stove resemblance on which is cast the
legend 100 kg. This is a drop forge, with the hammer being the dark cylinder
below the cast value and in front of the corrugated tube opening. On the forge
is a black knob that when dragged to the right raises the white and tan notched
lever arm; bringing the arm back down raises and drops the hammer. What you want
to do is use one of the three calibrated weights to have the lever arm produce a
lifting force of 100 kg at the hammer, whereupon the arm is level and the hammer
remains raised so that something can be placed under it to be forged. One way to
do this is to try each weight in the seven notches along the bar until it moves
and remains level; however, what you are supposed to do is click on the legend
“simple machines” above the screen on the right, and this will take you to the
point in the Mechanics tutorial that shows how to calculate the solution, which
is to hang the 20 kg weight in the fifth notch (20×5=100).
Climb the ladder to the left
of the forge and find a furnace to melt metal that is fed down to the forge. The
red scanner indicates that something goes in the bucket atop the furnace, but
you have nothing in inventory. Go around to the back of the furnace to see the
valve to turn on the gas for it. Nothing to do up here since you have no metal
to melt, so return to the room below and look around before you leave. Resting
on a round forging you will find a red and green cylinder that you will learn is
a bar magnet. Click on it to put the green scanner to work and place the
bicolored cylinder in your inventory.
Leave and go to the other
building. This appears to be someone’s dwelling, and recently vacated since
there is a pot boiling on the
stove. Two items are to be
found for inventory: a mirror above the sink and a 2 kg clock weight. There is a
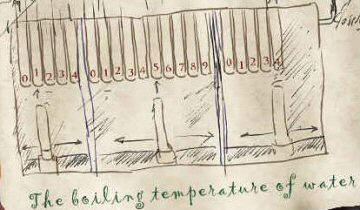
rolled up note in a jug on the table that must be read; it shows a puzzling
sketch and a reference to
the boiling point of water.
Above the screen are two references that will take you to tutorials for
magnetism and heat. Check them out.
 That’s it for this
area for now. Return to the pathway through the arch and proceed along it until
you come to a stucco house with a ladder leaning on it and a woodpile on the
left. Along the way be sure and note what appears to be a large trashcan
suspended from a curved girder high above the path. To the left of the woodpile
is a rickety wooden walkway ending at a stream that runs behind the house. On
the other side of the stream is a raised drawbridge with no way to lower it, so
turn around and go to the front of the stucco house. The door is locked, so move
around it to the right.
Here you find a barrel,
conveniently indicated to weigh 18 kg, covering a cellar entrance to the house.
Affixed to the barrel is a rope and pulley arrangement giving a mechanical
advantage of 3 (reference tutorial TOC Mechanics/Simple
machines/Pulleys). You can raise the barrel by pulling on the magnet at the
end of the rope, but of course it falls back when you release the magnet. If you
had an iron weight of at least 6 kg (18/3) to attach to the magnet you could
keep the barrel up and enter the cellar, but you only have 2 kg from the clock,
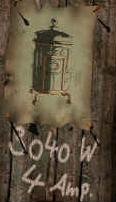
so you must find 4 kg more. Before starting to do this, look at the wood plaque
on the wall of the house, where you will see a
drawing of the trashcan and the notations 3040 W and 4 Amp. Keep this in mind.
 Go back to the
front of the house, then move to the right where there is a long walkway leading
up to what appears to be at least part of a ship, so identified by an anchor on
it, wrecked on top of a great rock. On either side of this walkway are pillars
on top of which are representations of the moon and sun. If you click on the
sun’s disk it will open to reveal illustrations of three moon phases, the
significance of which will appear later.
Proceed up the walkway to the
ship hulk. You can turn the handwheel on the entry hatch but the hatch won’t
open. You can, however, swing back the cover of the porthole on the left. Get a
closeup and lower the cover by pressing the red button, and you will see the
source of the sketch that you found in the oil drum dwelling. Moving the lower
magnets will force the numbered upper ones up. The red scanner indicates that
something is to be placed on the pedestal to the right, and this is obviously
the bar magnet that you have in inventory, so do that. (reference tutorial TOC
Electricity/Permanent magnetism/Magnet and magnetic field.)
There are three values for the
referenced boiling point of water, depending upon which temperature scale is
used. Fahrenheit is not used in scientific work, leaving Centigrade (Celsius)
and Kelvin. Go to the Heat tutorial TOC and choose Melting and Boiling from
Aggregation States, where you will be told that the boiling point of water is
100ºC. There will be a device for you to raise and lower water temperature so
that it boils or condenses, and there is a temperature readout in both
Centigrade and Kelvin. Watch these readouts and note the Kelvin reading when the
Centigrade reading momentarily is 100. Move the magnets in the unit in the
porthole to this Kelvin value and the hatch will open when you turn the
handwheel.
Enter the ship. To the left is
only darkness; you can turn around and go that way but it is pointless. Go up
the ramp to the right and into a room containing a telescope and an adjustable
frame with an oval opening in the center. A closeup of the frame brings up the
red scanner; if you look in inventory you will see that the mirror you got in
the drum dwelling has the right shape to fit, and indeed it does, so that now
light from the broken porthole is reflected down the ramp and the far end is no
longer dark. Go down there to find and pick up another 2 kg weight.
Return to the telescope. Get
close to it and you can then move to look out the porthole and see a tan tower
of stepped construction with trees at its base. Look through the scope and you
will see a very blurred image of the tower. Lift the cover on the top of the
scope to get a lens for inventory. Now when you look through the scope you see a
much improved image, but still blurred.
Look around for a glass
fronted cabinet. Inside above a yellow triangular high voltage warning icon is a
red tapered cylinder with three green stripes on it; this is a resistor, and it
goes into inventory. Leave the ship and head down the walkway. About half way
down you get a good view of the windmill high on a large boulder—-note that the
sails are not rotating–and near its base can be seen the suspended trashcan
(the black mark on the rock face is the can’s shadow). Continue moving straight
ahead toward the windmill rock and you will come to a metal box with the high
voltage icon in it.
Click on the tan handle on the
right side of the box and hold down the mouse key until a click is heard, then
pull the handle and the box lid will rise. Inside is an obvious location for the
resistor that you have just put in inventory, so place it there. These are very
special resistors that exist only in this game because their values can be set
by the switches in their holders. In the Electricity tutorial under the Current,
voltage, resistance section of the Electrical Circuit exposition you learn that
resistance is equal to voltage divided by current, R=V/A.
The voltage is right there on
the panel, 760 volts. The amperage value, however, takes a little intuition: you
are right under the suspended trashcan, and the plaque on the stucco house on
which was the can drawing showed 4 Amp. Using these values the resistance is
calculated to be 190 ohms. This is a total value, and since the resistors are in
connected series, their values can be set to any pair that totals 190. Push the
red ON switch, the red pilot light comes on and the resistance setting switches
are activated. Set them so the total is 190 and the green pilot light comes on.
Click and hold the tan handle, then push it back to close the box lid, whereupon
the trashcan descends and is revealed to be an elevator.
Enter the elevator, push the
up button, and click on the door to exit when the elevator stops at the base of
the windmill. (What is the energy source that runs the elevator?) The door to
the windmill is locked, of course, but you can go around to the shed at the
back, in which you find the first of the three generators that you are to work
with. It is not in operation. There are switches and transformers on the walls,
but with no electricity none of them work. In a corner behind the generator,
however, is another 2 kg weight. Now you have the needed 6 kg total, so you must
make a weight of that value.
Return to the elevator, take
it down, step out and turn right to go back to the smithy and the drop forge.
When you get there, move the black knob on the forge to raise the hammer lifting
lever, hang the weight on it so that it is level and the hammer is up, and go up
the ladder to the furnace. Put the three 2 kg weights in the bucket on top of
the furnace; the scale will register each weight as you put it in. Go behind the
furnace and open the gas valve, then push the FIRE button on the front of the
furnace to ignite the gas. The fire produced must be exceedingly hot because it
immediately melts the iron weights so that when you pull down the arm that is on
the right of the furnace the molten iron flows down to the forge. Go down to the
forge and click on the black knob to release the hammer onto the smoking hot
metal and forge the 6 kg weight. Use the 20 kg weight to raise the hammer once
more, and put the new weight in inventory.
It’s back to the side of the
stucco house where you can affix the weight to the magnet. Now when you pull the
magnet down it stays down and the barrel is clear of the cellar entrance so that
you can go in. It is pretty dark in there and the light does not come on if you
pull the switch cord; still no electricity. Try raising the trapdoor leading
into the house at the top of the ladder. Can’t be done, but you can find a key
hanging just to the right of it.
The
last place that a key was needed was to open the lock on the door to the base of
the windmill. Go through the routine with the metal box to bring down the
elevator, then go up and try the new key with the door lock. It works and you
can enter the windmill. Inside there is a shaft coming down to turn the
millstone and a power takeoff shaft toward the shed behind, undoubtedly to drive
the generator. You are not here to grind grain, so turning the millstone is
wasted energy. Slide the block that rests in the millstone shaft slot up the
shaft past the catches and the millstone is disengaged. Climb the ladder to the
floor above where you can pull a lever that releases the clamps on the windmill
shaft cam and the sails and shaft begin to rotate. Go to the shed in back to
find that the generator is running.
To the left of the generator
is a triple locked green door that may be unlocked by a switch to its left. On
the right of the green door mounted on the wall is a transformer with an
adjustable pickoff on one coil, a damaged voltmeter, and three triangular
colored lights that may be turned on one at a time. Tutorials are suggested on
magnetism and optical colors.
Turn around to the entrance
door, to the right of which is a switch with a drawing of a house tacked next to
it. Flip the switch to the 1 position. This drawing could well be the
stucco house, and flipping the switch on may supply electricity to it, but
rather than going back to check at this time, go out the green door for more
exploring. You emerge at the top of a trestle that has tracks going steeply down
to an inoperative railcar. Take a moment while at the top to examine what can be
seen, which is primarily the Observatory on the left and a village square on the
right.
At the bottom of the trestle
go left to investigate what may be found, including the Observatory and a
beached submarine with a bucket of ice on top of it and a large mirror behind
it. When you get behind this mirror it will be seen to actually be a parabolic
reflector and the red scanner appears on it. Inside the submarine is another
idle generator. There is nothing that may be done in this area now, but you have
noted several things for future action.
Return to the trestle and
proceed beyond it through the gate into the village. There are a number of
places to inspect around the square; start with the spoked wheel on the pillar
at the right. When you are facing the wheel, click on it and the drawbridge goes
down. Cross the drawbridge to the wooden walkway and onward around the house to
the cellar entrance. Raise the barrel and enter the cellar, pull the light
switch cord and now the light comes on. Apparently the switch in the generator
shed did indeed supply electricity to the house. With light you can now see
several items on a table in the corner to the right of the entrance, one of
these being a battery connected to a table lamp. Throw the switch on the top of
the lamp; the bulb glows briefly, then goes dark. Evidently you have exhausted
what little charge the battery had left. The green scanner indicates that you
should put the dead battery in inventory.
Return to the square and move
straight ahead from the drawbridge to the low stone steps and into the short
alley. On the left is a door with a lock for which you do not have the code, but
if you do examine it, click on the panel handle to raise it so the arrow cursor
to back away becomes visible. Across the alley from the door are some trash
barrels, one of which contains a hammer that will doubtless be useful.
Leave the alley and turn right
to see a house with a display window and a door on which is a mailbox-sized lock
(unless it really is a mailbox). Move to it and click on the lock,
raising the cover and showing four lens and reflector types below a display
screen. Press the red button to begin a rapidly changing random showing of the
lenses and their associated light rays, and which pauses briefly once in a
while. When this happens you are to click on the lens type displayed, and if you
do this correctly in the very short time allowed a red light turns green; do
this three times without making a mistake and the changing display becomes
static and you can click again on the red button to open the door. However, if
you make a mistake a green light becomes red. (The easy way to do this is to
pick a shape with the cursor and wait for it to show up in the pause.)
Items inside the house
indicate that this is an optical shop. You can find a crank on a pedestal under
a glass cover, but you can’t remove the cover to get it, though clicking on the
cover produces a pleasant note. On the desktop beside the crank the red scanner
indicates that something should be placed there, but nothing in inventory will
work. Get behind the desk to open the top drawer and get a green filter. Leave
the shop.
Across the square is a door in
which there is a red disk. Move to it and press the disk to open the door, where
there is a sandy courtyard and a stone paved walkway. At the far end of the
walkway is a wind driven device with wires leading to an electric meter on a
table next to it. To the right of the meter is a holder that activates the red
scanner, and the only thing electrical in your inventory is the dead battery,
which will remain when placed there. Throw the switch on the meter and the
needle moves to the upper end of the scale. You have recharged the battery and
the scanner is now green, so return the battery to inventory.
Back off and turn right. Here
you see pair of large double doors, locked of course, as you discover when you
get close to the handle to open them. In the crack between the doors you can
also the locking bar on the other side. The red scanner is active on the + sign.
Return to the village square.
You haven’t yet examined the
well in the center of the square. Do that, and looking down into it you will see
a ladder. (You will also see what appear to be snakes, but are only tree roots.)
Climb down the ladder, and before you get to the water at the bottom you can
enter a dark tunnel in the well wall. On the side of the tunnel is a cabinet.
Open it. [Here the programmers have made an omission: the red scanner is
supposed to show near the bottom of the cabinet, but it doesn’t.] Put the
battery in the cabinet and close the door. A light is now on and you can proceed
into the tunnel, which terminates at a brick wall. Drag the hammer from
inventory to the bricks, click on it, and in one blow it will break an opening.
When you go through the
opening you will be in the village jail, and in fact in a jail cell, as attested
by a bed in it. Move to the bed and turn right to the door; when you try to
leave the door opens a little, then swings back and locks. Not to worry, someone
has very conveniently left three dynamite sticks attached to the
lock(!). Get a closeup, then place
the lens from inventory in the light coming from the cell window and ignite the
hanging fuse; the dynamite explodes without injuring you (or destroying the
dynamite), blowing the door open, and you may leave the cell. Go left to find
the exit door, then up the stairs to a vestibule.
On the left is a door to
police headquarters. In it there is a desk that has a key in the lower left
drawer, and on top an arrest warrant for a thief at an address that you won’t be
able to find, though it indicates that it is on the square. He has stolen a
lens. On the wall behind the desk is a multitude of case files, and passing the
cursor over the black disks will show that you 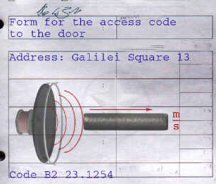 can examine two
in the middle row. The one on the left is irrelevant. The other one shows a
drawing of a sound source impinging on a bar with the m/s sound velocity
desired. Go to the tutorial Acoustics/Sound waves/Speed of sound which
shows three examples; of the three, the one in the drawing could only be iron,
and the value is given. The drawing also says this is the access code to the
thief’s address.
Go across the vestibule to the
door that leads to the police darkroom. Here you will find three photographs
hanging. Get closeups of all three and note the wallpaper pattern in #2. Now
find the light on the ceiling and place the green filter in the blank space
indicated by the red scanner. Click on this filter to have it replace the red
one, and under this light color, code numbers will be seen in photo #3.
Leave the darkroom, unlock the
vestibule door, go out into the square, and on to the alley where you found the
hammer. Click on the round lock cover, then on the panel handle to lower it.
Enter the iron sound speed value and again click on the panel handle to raise
it. Back off and click on the door latch to open the door. Inside the room are
the many objects that the thief has stolen, and from these you want to get a
golden sphere that is in a bowl of apples. On the wall is the lady’s portrait of
darkroom photo #1 and next to it the wallpaper pattern of photo #2. Click on the
right edge of the portrait to have it swing back and reveal the safe of photo
#2. Enter the code from photo #3, turn the handwheel to open the safe wherein is
the lens for which the arrest warrant was issued. Take the lens, close the safe
and the portrait, and leave the house.
Recall that you removed a lens
from the telescope in the ship, and that the image was not all that clear with
or without it. Now you have a replacement lens, so go over the drawbridge and up
the ramp into the ship and to the telescope, where you can put the thief’s lens
in it. The view is now clear, but much more magnified and limited. You can use
your mouse to move it around and you will find that you can look at the double
doors that are in the courtyard next to the battery charger. You can zero in on
the +
and a 5-place
code lock beginning with an F. Knowing what the scope is viewing is a good hint
that you should go there.
Return across the drawbridge
to the village square, go through the red disk gate beyond the well, and into
the courtyard where the locked gate is. When you get a closeup of the lock,
close scrutiny of the + reveals that it is a keyhole,
and you have in inventory a key that fits. Insert the key, turn it, and the
cover panel moves aside to show the lock. The first place is covered, but you
know from the telescope view that it contains an F. You are referred to
Mechanics and motion. Call up the tutorial TOC Mechanics/Motion/Force and
acceleration, click on the next page arrow below the screen, and the code
for the lock is right there as Newton’s second law, Force is equal to mass times
acceleration: F=m•a. With the last four of these
five characters in place in the lock code, pull on the lever, which swings all
the way over and back, the cover slides back over the code, and you are looking
at the doors with the locking bar no longer visible in the crack between them.
Use the right hand latch to open the door and go through.
Ahead you will see the tower
that you saw when looking out the broken porthole of the ship, and a couple of
spherical buildings. On the right is another generator, including a transformer
on it that is much like the one in the shed behind the windmill, except that the
buttons are square. Turn around to explain something that should have puzzled
you: how you could have seen the door code lock from the telescope, including
the reversed covered F, before you used the key to slide the cover panel back.
Proceed toward the water. If
you try the doors in the several buildings you will find all of them locked,
including the one in the tower. Note that this door has a sun icon over it.
Nothing you can do with the generator either, except break off a handle on the
other side. The sound of running water is quite pronounced whenever you are next
to the generator. When you get to the shore, go out on the pier at the right and
read a note in a floating bottle indicating the Observatory lock code as being
the density of chlorine. Call up the tutorial TOC for Mechanics/Force, mass,
density/Density and click on the next page arrow at the bottom of the screen
for the answer.
At the shore, instead of going
to the pier you can move to the left along a short walkway, and here you will
find a door that will open. Go to the puzzle built into the table on the left
and place the golden sphere from inventory into the hole at the bottom next to
the other two. The layout represents the sun shining on the earth and locations
of the eight phases of the moon, three of which are to be selected by placement
of the three small spheres. The key to this puzzle is the sun disk that is
on the right pillar of the walkway to the ship, which when opened showed 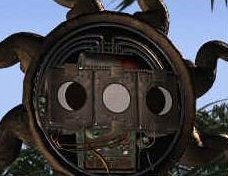 (1) a
(1) a
waning crescent moon, (2) a full moon, and (3) a waxing crescent moon. Access
the TOC of tutorial Optics/Light and shadow/Phases of the moon for an
animated display of the moon orbiting the earth, with the continual changing
illumination of the moon as this happens. Note the position of the moon in orbit
when the moon illumination is that of the above three shown in the sun disk, and
place the three small spheres in those positions around the earth sphere. If you
do it correctly the sun will spin. Do not press the orange button, which resets
the puzzle, unless the sun does not spin, in which case you must try again after
resetting.
The spinning sun leads you to
the door in the tower, since it has a sun icon over it. The door is now
unlocked, and upon entering it looks as though you have found something of a
shrine, with a tuning fork and a striker on the central altar. Use the striker
to tap the fork, and if you are musically adept you will recognize the note as
being the same as the one from striking the glass cover in the optical shop.
That is now the place to go after putting the tuning fork in inventory.
After you get to the shop and
go through the door lock opening procedure again, enter and put the tuning fork
on the desk next to the glass covered crank. Click on the striker to sound the
tuning fork and the resonance will shatter the glass and you can pick up the
crank. (Reference tutorial TOC Acoustics/Oscillation and
sound/Resonance.) There does not seem to be anything to indicate how to use
this item, but you have not as yet done anything in the area beyond the trestle
and Observatory that you explored earlier, so go there.
 On the back of the
parabolic reflector is a hole that accepts the crank, which when turned moves
the reflector to focus concentrated sunlight on the bucket of ice atop the
submarine. Climb the ladders to look at the bucket, and observe that the ice has
melted and the resulting water is agitated, presumably near the boiling point.
There is a piece of pipe on the bottom of the bucket under the hot water.
Climb back down and enter the
submarine. Turn left to a boiler, then look up to a valve. Turn the valve to the
drain the water from the bucket into the boiler and click on the FIRE button on
the front of the boiler, whereupon steam makes the generator operational. To the
right of the generator is a transformer differing from that the others in that
the buttons are round and the voltmeters are unbroken. Go back up to the empty
bucket to retrieve the piece of pipe that you can use to replace the handle that
broke off the beach generator.
While you are here near the
Observatory and you have the code for the door lock, you may as well investigate
that. Climb the steps and get a closeup of the lock, then click on the panel
handle to slide it down. Enter the number for the density of chlorine. (This is
the British version of a German game; Europeans usually use a comma instead of a
decimal point.) Raise the panel and click on the orange button to open the door.
Go up the stairs to the control room. Look over the control panel to see what is
there, and look out the window above it to see the impulse machine set to go.
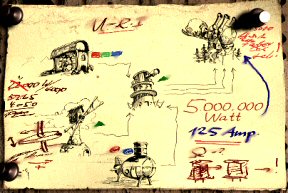 However, the most
important thing at this time is the sketch tacked to a panel; you have had a
glimpse of this drawing in the message left on the communications unit in the
beach cottage at the beginning of this game (review it?) in which the scientist
behind the rescue effort says it contains the exact figures to launch the
impulse machine, and that you must set the transformers to supply the few volts
that he could not. The information and formulas that you will need may be found
in the tutorial on Electricity TOC chapters and pages.
The basic data from the sketch
is that you will have to supply the impulse machine 5,000,000 watts at 125 amps
from the three generators. Using the formula at the sketch top: W=e·I, it may be
calculated that you must generate 5,000,000/125 = 40,000 volts. (Hardly a “few”
volts.) Now some investigation is in order.
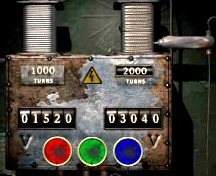
Go to the transformer in the
submarine, which shows that the steam driven generator is putting out 1520
volts as indicated by the voltmeter below the primary coil. The tap on the
secondary coil has three positions of 2000, 5000, and 8000 turns, or turns
ratios of 2, 5, and 8, and thus the transformer output is 1520×2=3040 volts,
1520×5=7600 volts, or 1520×8=12,160 volts, depending on the tap setting. These
voltage values are seen in the voltmeter below the secondary coil as the tap
is moved.
Go to the transformer in the
windmill shed, which shows that the windmill driven generator is putting out
5500 volts as indicated by the voltmeter below the primary coil. The tap on
the secondary coil has three positions of 1500, 2000, and 4000 turns, or turns
ratios of 1.5, 2, and 4, and thus the transformer output is 5500×1.5=8250
volts, 5500×2=11,000 volts, or 5500×4=22,000 volts, depending on the tap
setting. These voltage values must be calculated because the output voltmeter
is broken.
Go to the remaining generator
on the beach and put the pipe from inventory in the place where the 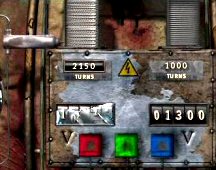 handle
broke off. Click on the pipe to move the large shaft below it and free the
waterwheel to rotate and drive the generator.
Go around the generator to the
transformer on the other side, which shows that the waterwheel driven generator
is putting out 1300 volts as indicated by the voltmeter below the primary coil.
The tap on the secondary coil has three positions of 2150, 4050, and 8000 turns,
or turns ratios of 2.15, 4.05, and 8, and thus the transformer output is
1300×2.15 =2795 volts, 1300×4.05=5265 volts, or 1300×8=10,400 volts, depending
on the tap setting. These voltage values must be calculated because the output
voltmeter is broken.
In summary, the available
voltages to be added, one from each generator, to equal 40,000 are
Submarine
Windmill
Waterwheel
Turns Volts
Turns
Volts
Turns Volts
2000
3040
1500
8250
2150 2795
5000
7600 2000
11,000
4050 5265
8000 12,160
4000
22,000
8000 10,400
With 40,000 being a nice round
number it is not much effort to select 7600, 22,000, and 10,400 as the ones that
you want and to set the secondary taps accordingly.
While you are at the
waterwheel beach generator, set the transformer secondary coil tap at 8000
turns so the output will be 10,400 volts. Click on one of the square buttons, it
does not matter which one as long as you note the shape and color. Go to the
windmill generator and set the transformer secondary coil tap at 4000
turns so the output will be 22,000 volts. Click on one of the triangular
buttons, it does not matter which one as long as you note the shape and color.
Go to the submarine generator and set the transformer secondary coil tap
at 5000 turns so the output will be 7600 volts. Click on one of the round
buttons, it does not matter which one as long as you note the shape and color.
Return to the Observatory
control panel and move the toggle switch on the left from 0 to 1. The displays
above the panel should show the numbers 7600, 22,000, and 10,400. Adjust the
colored push switches so the circle, triangle, and square shapes are the colors
you chose at the transformers. From the five resistors select the one that
produces 125 amps on the meter. Push the red TEST button, and if the green pilot
light flashes, you are ready to go. Move the handle on the right from bottom to
top and watch the concluding video.
SPOILERS
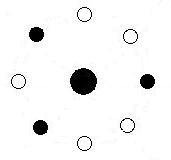 Moon phases puzzle solution
The boiling point
of water is 373ºK.
The velocity of sound in iron
is 5.170 meters/sec.
The density of
chlorine gas is 3.214 kg/cubic meter.