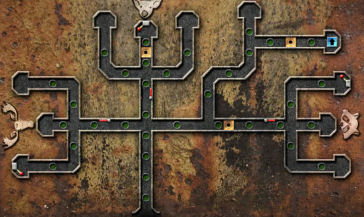
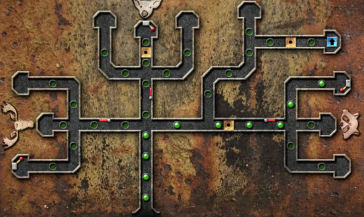
Nancy Drew: The White Wolf of Icicle Creek
Main desk – If you have time to waste before
lunch time, you can do this:
Check the birds in the computer and note that those
birds Lupe stated are not seen here during winter.Call the Sheriff and talk about Yanni.
Lunch: Cook lunch again.
Lupe and Ollie’s argument:
Go to guest rooms to see if anything is different.
Go to Lou’s room and check the paint tool kit. A tool is gone.Go to Bill’s room. Reread Bill’s angry crumpled
letter.On the way out from any guest room, hear an argument
between Ollie and Lupe. Lupe is the one that messed up Ollie’s rifle. (This
can happen earlier or later depending on: if you talked to Lupe earlier and/or
you cleaned Bill’s room earlier).
Easter Egg checked by gatorlaw: After hearing the fight
bewteen Lupe and Ollie, go to the bathroom and hear the mystico comment.Go to
the blown up fishing shack after passing Freddie and her snowball fight.Enter
the ‘intact’ fishing shack and fish for the Easter egg.Go back
to the lodge. Now you can enter the Chinook room and also get a dream by
setting the alarm to anytime. The dream can be anytime as long as Nancy
sleeps. Thanks, gatorlaw.Ollie – Talk to Ollie in the basement. See if
you can find Freddie’s note on the worktable – that read I will not throw Ice
Balls at windows printed 10 times. Thanks, catsmom.Note – Go to the bench by the main door and
see a note from Lupe. She wants Nancy to call her when she gets home.
Explore outside: Exit the lodge.
Trappers Dan’s Needle – Go left and straight
to Trappers Dan’s Needle. Turn around and follow the wolf tracks to the right.Crater – Check the crater. See that the
fossil rock is gone from the explosion crater. Go forward and left. Nancy will
not go ahead – No more avalanches for me. Turn around and head back to
the lodge. Enter the lodge to keep warm and get the top hypothermia bar to the
right.Avalanche Creek – Exit the lodge after
keeping warm. Go left, left at the corner of the lodge, left again at next
corner and right to the path that has no sign.At Avalanche Creek, Nancy will not go ahead because
of the avalanche, thick snow and too mush noise. She would need snow shoes.
Turn around and forward until the lodge. You can go inside with no problem
from hypothermia even if Nancy is shivering cold.
Back at the lodge:
Lupe – Call Lupe. Learn that she is a member
of Run and Grow free. Also learn about wolves and other things.Chantal – Call Chantal and talk about Lupe.
Ask about the snowshoes after going to Avalanche Creek and realizing you need
one. She wants you to do a guest survey done by Tino before she gives you the
combination to the snowshoes lock.Call Ned only if you have time.
Tino’s Survey – Call Tino and he will fax the
survey.
Look at Tino’s Guest Survey in inventory.
What? Side of the bed? Hometown? Planet? Paprika? Sherlock Holmes, he’s
not.Go around and talk to: Talk to Yanni at the
basement; Bill and Lou at the sitting room. Call Lupe to get information only
after talking to the male guests.The side of the bed can be checked during the
housekeeping duties or recall. Check where the slippers are located and where
the bed covers are turned over.Type in: GC (Guadalupe) – left; LT (Lou) –
(type in any answer – left or right or both), BK (Bill) – right;
YV (Yanni) – right.The hometown info is in the computer.
GC – Los Angeles; LT – Brea; BK –
Toronto; Yanni – Eladsaet.Planet can be found by asking the guests:
GC – Earth; LT – X; BK – Mars;
YV – Pluto.If you have too much time left before dinner. Use
the clock to advance the time for dinner at 6 or use the phone to call people.Dinner: Do dinner. Add paprika to the
salad after the croutons. Ozzie will say that Bill doesn’t like paprika
(senior) or Lou (junior level).Paprika can be added during cooking. (If you do the
paprika addition during lunch, add it to the burger fixings. If during dinner,
paprika can be added to the salad.) By default, Lupe’s can be any answer.GC – (type in any answer – best to type no);
LT – Yes (junior); BK – Yes (senior); Yanni – No.After typing in the answer, call Tino.
Automatically, fax the survey. Tino gives his analysis. Hahahaha.Tino gives the snowshoes lock code – 7669.
Sleep: You might need to sleep now. Go to
Nancy’s bedroom. Use the clock on the bedside table. Turn the white hand to 7
and then press the knob at top of the clock. The alarm rings and it is now 7 AM.
Breakfast – Go down to the kitchen and prepare
breakfast.
McQuade’s Shack: Time to check where the
wolf track goes.
Snowshoes – Go to the display table at the
sitting room. Enter 7669 on Trapper Dan’s snowshoe lock.Take snowshoes.
Avalanche Ridge – Exit the lodge. Go left,
left at the corner of the lodge, left again at next corner and right to the
path that has no sign.After the Avalanche Ridge sign, use the snowshoes.
See it at top left of the screen.Go forward following the wolf tracks. Hear a shotgun
blast and a wolf howl.After hearing the shotgun blast, look left at a dark
crater. Pick up the notebook left of the crater. Read it later when out
of the cold.Turn right and continue forward until the shack. You
might or might not need to use the toasty pack given by Freddie to keep warm.Shack’s lock – Look close at the lock on the
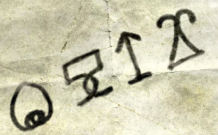
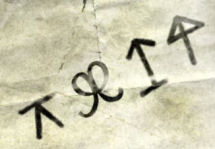
shack door.Enter the lock code deciphered from the note inside
the pocket of the coat given by the wolf.
Junior level
= 6 5 1 2Senior
level = 7 9 1 4Inside the shack – Go forward and look
around.Notebook taken from crater – Read the
notebook taken from the crater and see that someone has the taken pictures
of the dinosaur bones in the lodge and also the drawing of the missing rexes
bone.Diary – Take and read the diary of the man
that lived here in the shack – Julius McQuade.Learn about the wolf, Isis and how they
interacted. Isis follows commands. She can also sort objects by scents by
dropping the object near another object with the same scent. Isis saved
Julius’ life by bringing a heavy coat when he got lost in the storm; just
like what she did to Nancy. He got sick and went to Pinevale hospital.Isis – After reading the diary, meet Isis.
Click on Isis to calm her down.Toasty packs – Take a toasty pack
from the cupboard on the table.Pan right and get another toasty pack from
the cot. Take the weird thing from top of the sack also. It has a
phone number on it – 334 555 7625.Bone key – Go left of the cot and see that
there’s an indentation on the wall shaped like the rex bone in the lodge.Exit and hear an explosion. Go forward back to the
lodge. Use a toasty pack when needed.
Lodge – Read a note on the bench by the coat
rack. Someone wants to meet Nancy at the sauna.
Call Pinevale Hospital to find out what happened to
Julius McQuade.
Find out who owns the notebook with the dinosaur
bones pictures:
Collect objects from the lodge occupants –
Ollie – Go down to the basement. Go to
Ollie’s workbench and get a red rug.Go to where Yanni does his work. Pick up the piece
of paper in front of his work bench. It reads: Leave this place now or be
prepared to leave it forever.Go back upstairs and get the laundry bag
from the main desk’s closet.Go upstairs and do the housekeeping. Keep used
washcloths from each of the 3 guests or any that are availablePlace the laundry bag in the chute by the
bathroom.Isis test – Go back to Isis at the shack pass
Avalanche Ridge.Exit the lodge. Go left, left at the corner of the
lodge, left again at next corner and right to the path that has no sign.After the Avalanche Ridge sign, use the snowshoes.
Go forward until the shack.Give the notebook with pictures to Isis. She holds
it in her mouth.Then click Ollie’s rag and each of the guest’s
washcloths (Bill K, Yanni V, Lou T) on the floor or on Isis. The cloth is
placed on the floor. The positive scent is shown by Isis dropping the notebook
in her mouth on the cloth with the same scent.It’s Lou Talbot’s notebook. Go back to the lodge.
Tino’s report – Read the report found on the
bench by the coat rack. Tino said that Lou Talbot was arrested for digging up
dinosaur bones from private property.If there is time fix lunch, if past lunch time –
that’s okay.
Sauna time: Find out who sent that
mysterious note about a sauna meeting.
Go down to the basement. Enter the sauna.
See the missing pictures of a young boy. That mark
on his face. Very familiar!Locked in the sauna – The door to the sauna was
locked. Save Game here.Immediately turn around from the door and click on
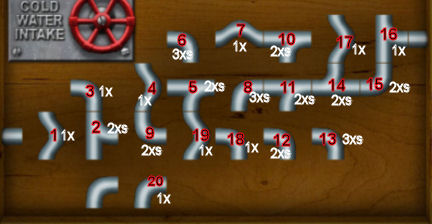
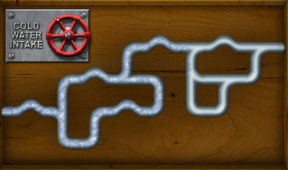
the top of the right bench to expose the pipes.Timed puzzle! Turn the pipes to form a complete
connection to allow water to flow.
Donna says: Face the sauna
door. Just keep
clicking as fast as you can on the locked door. Eventually the game will say "Nancy Faints".
But you are not knocked into second chance. You then have
unlimited time to complete the puzzle.
Thanks, Donna.
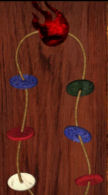
Red colored
numbers are the order of the pipes to be clicked on; the white colored
numbers are the number of turns or clicks.
Bill opens the sauna door. In the sitting room, Bill
talks about his past. His grandmother owned the lodge before Chantal’s father
bought it 2 years ago. He mentions that the pyramid by the display has a
secret compartment that would open when only pigs are seen. The compartment
has a master key that opens the Needle.
Call Chantal and ask about Bill’s grandmother. Find
out what really happened.
Pyramid: Go to the pyramid on the table by
the display and kitchen door.
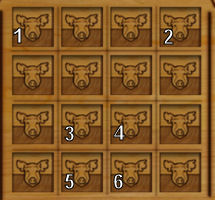
Pig pyramid puzzle – Look close at the
pyramid.The object of the puzzle is to have all the pictures
be turned to show only pigs.
Turn the squares in the order shown until a
pig is seen on the clicked square.The compartment opens. It’s empty – no master key.
Talk to Bill again. If he’s asleep, wake him up. He
mentions that his Granma Tilly said that if you turn the top of the pyramid 45
degrees and fill the outside with one kind of an animal until all 4 animals
are done, you will find Trappers Dan’s journal.Raccoon, Wolf, Pig and Moose puzzle – Go back
to the pyramid.Click on the top of the pyramid. Look close on the
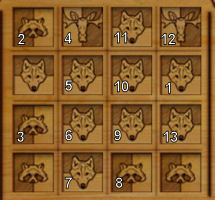
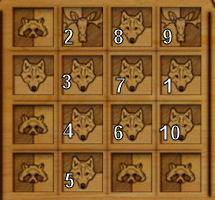
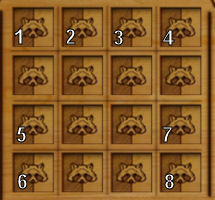
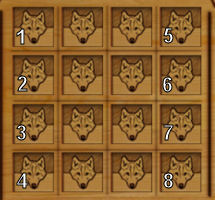
pyramid. See that the pictures of the animals are seen at the base.The aim of the puzzle is to light up all the
animals. It doesn’t need to be in order shown. But in our solution it is best
to start with raccoon, then wolf, then pig and lastly the moose.
First the
raccoon: Turn the squares in the order shown until a raccoon is seen
on the clicked square.Second the
wolf: Turn the squares in the order shown until a wolf is seen on the
clicked square.
Third do the
pig: Turn the squares in the order shown until a pig is seen on the
clicked square.Lastly do the
moose: Turn the squares in the order shown TWICE.All the animals at the base are lit, the secret
drawer opens. Take Trapper Dan’s journal.
Trapper Dan’s Journal: Read the journal of
Daniel Weisnitz. He mentions you need to have an intelligent creature like his
Mary, the pig to crawl through small spaces, jump and have paws or hooves to
move levers. See a picture of the maze to get to his vaults.
Trapper Dan gives clues on how to get inside his
Needle in case the magnetic key is lost.
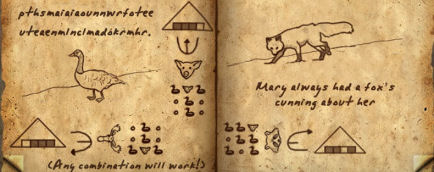
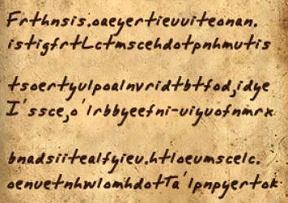
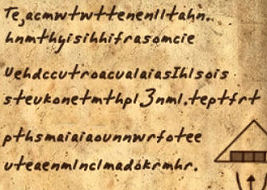
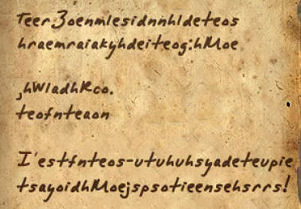
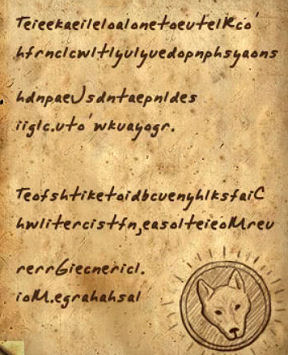
First thing to do is crack my cipher – Look
at the coded sentences.To decipher the code, take the first top letter,
then the letter below that, then the letter on the second column, the letter
below that second column, then the top of the third column…
First things first. Locate my
secret hide out up in the mountains.It’s so secret, you’ll probably never find
it – but if you do, find my rexbone and use it in the wall of my hideout.
That’ll open up my secret lock.Then, match my wits with the
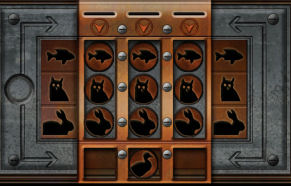
infernal slot machine.Use the duck counter to match up all 3
animals. It helps to firstput the same animals in a column and work
from there.There are 3 more animal keys
hidden in the lodge: the moosethe wolf and the raccoon.
It’s easy to find the moose – just push out
his eye and see the surprise!The fire necklace will tell
you all you need to open up the sly raccoon’shiding place. Just don’t wake up any
lodgers.The wolf is the trickiest to find because
only the likes of Marie Curie or Mr. Geiger can hear his call.
Find the keys:
Moose key –
It’s easy to find the moose – just push out his eye
and see the surprise!Go upstairs to Yanni’s room (Kalakala, the bird).
Enter and look at the moose head right of the door.Click on the moose’s eye. A secret compartment
opens.Take the moose disk and look at the radio.
Click the radio on and there’s a foreign talking man that sounded like asking
a question.Go down and talk to Yanni at the basement about the
radio.Raccoon key – The fire necklace will tell
you all you need to open up the sly raccoon’s
hiding place. Just don’t wake up any lodgers.Go back up and take a look at the fire necklace at
the display table.Take note of the colors of the disks.
Go back up to the guest rooms. Look close at the
colored wedges above the doorknobs. They can be changed to different colors.
Pish Pish – blue Ollalie – green Eena – red Kalakala – blue Chinook – white Kwel kwel – red Change the colors of the wedges above the
doorknobs to be the same as that of the fire necklace.Hear
a click. Look at the picture of the raccoon between Eena and Chinook door. The
eyes glow.Click
on the raccoon’s nose and get the raccoon disk.Lou
– Talk to Lou at the sitting room. After the talk, he gives his closet key
to Nancy.Go
upstairs to Lou’s room (Eena).Use
the key on the closet and take the rex bone.
Trapper Dan’s Vault: Go back to the shack past the Avalanche Ridge.Look
around. Take the Geiger counter under the cot that Isis uses as a chew
bone.
…find my rex bone and use it in the wall of my hideout. That’ll open up my
secret lock.
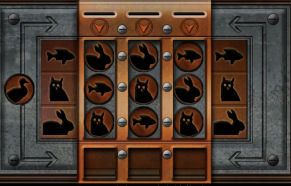
Fish Owl Rabbit (Slot Machine) puzzle – Go to the corner and place the rex
bone on the indentation.The
slot machine Trapper Dan mentioned in his journal is activated on the door on
the left.
Then, match my wits with the infernal slot machine.The
aim of the puzzle is to have all fish at top row, all owl on middle row
and rabbit at bottom row.
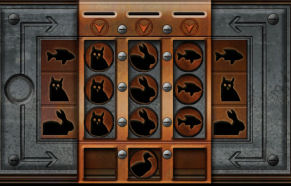
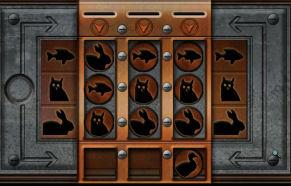
Use the duck counter to match up all 3 animals.There
is a duck disk on the left to move the disks down.It
helps to first put the same animals in a column and work from there.
Drop disk to start
to Row
how many times
take diskduck middle 1 fish fish right 1 owl owl left 2 fish fish right 1 rabbit rabbit middle 1 owl owl left 1 rabbit rabbit middle 2 duck
Drop
disk to startto
Rowhow
many timestake
diskduck right 1 fish fish left 1 owl owl middle 1 rabbit rabbit right 1 fish fish middle 1 rabbit rabbit left 1 owl owl right 1 fish fish right 1 duck
Drop
disk to startto
Rowhow
many timestake
diskduck middle 1 rabbit rabbit left 3 first
rabbitrabbit middle 3 duck Place duck disk back to left disk slot.
Door swings open.
Vault
Maze: Enter the secret mine passage until the end.Look
around and see a ladder at left corner that goes up to another level above and
a wood stand with metal lid on the right.
Open the
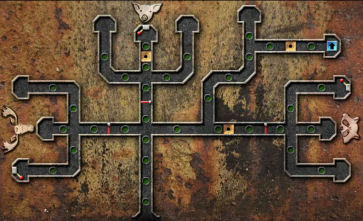
metal lid and see the map of the vault maze. Remember the entry in Trapper
Dan’s journal, it states that your animal should be able to jump over pits and has paws or
hooves.Study the
map: see the moose vault to the left, pig vault on top and raccoon vault to
the right.The gold
squares are pits and the red lines are bars. The red circle at each end must
be the levers.There is
one passage at top right that goes up. Where does that go?Pig
key – Remember another entry in the journal – that Mary (key) can be found
above the vaults. Let’s look for the pig key then.It is at
the end of the second floor. Mary helps hold the rope above the vaults taut
once she goes through the maze.That must
the passage that goes up at top right of the map.Pull back
and see Isis.Isis
commands – Isis is smart and can go through the maze like Mary.Study the path to upper right of
the maze map. The gold metal is a pit.Click on Isis and see a command
frame appear.Select the commands to give her.
Then end the command with ‘go’.Forward, right, left, right,
jump, go.See Isis enter the tunnel and her
progress in the map.Hear some machinery like an
elevator. That must be the up arrow at the end of the map.Top level – Go left,
forward and then turn around. Go to top left corner. Climb the ladder at the
corner.Go forward until the path goes
right and left.Needle door – The left
path goes to a door with the 4 animals and coin slots. It has the
needle pictured on top left.This must be the door to get to
the needle where we need the 4 animal disks.Turn around and go back. This
time let’s take the other passage. Go left when you see arrows on the
right wall.Rope – Go forward and
see Isis sitting by a rope. This must be the rope mentioned in the journal
to get to the pig (Mary) key.There’s a dumbwaiter at the
end. That must be the way Isis came to this level.Look up and see the rope on the
pulley. Click on the rope pulley and Isis holds the end of the rope taut in her jaws. That
must be how Mary did it too.Go back to the shack by turning
around, left, down the ladder, forward until the shack and out the door.Walk back to the lodge. If it is
late, Nancy will stay here for the night. You have to order Isis to do the
rope again the next morning.Boar’s head – Immediately,
go to the guest bedroom hallway. Do not stop to talk to anyone – Isis can
not hold that rope taut indefinitely. Hahahaha.Go to the end and see the boar’s
head mounted on the wall.Click on the open snout and take
the pig disk.Wolf key –
The wolf is the trickiest to find because only the
likes of Marie Curie or Mr. Geiger can hear his call.Geiger
counter – Click on the Geiger counter found at the shack. See the reading at
bottom left of screenGo down
to main floor. Go right and go to the left side of the kitchen door.See a
high reading by the dinosaur bones stool-decor beside the stand with the
lamp. Interesting.Another
positive reading on the display table is seen.Go down
to the basement, go forward after the stairs. Get another high reading, after
the stairs to the cellar door.Face
the stairs and get the highest reading. Click on the bottom step.Open
the bottom step and get the wolf disk.Talk to Ollie in the basement and
learn that you don’t need to cook anymore because Lou flew the coop. Happy
days are here again!Vault gates:
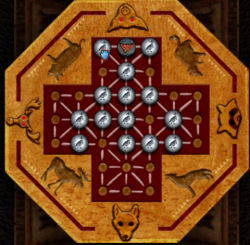
Fox and Geese Game –
Remember the vault maze map has red gates barring the animal passages. We need
to remove that.The clue to this is in the drawings
in the journal of the fox and geese.
Play the Fox and Geese game with
Bill.Use the pig disc to replace the fox
disk. Mary always had a fox’s cunning about her.You have to play and win the game 3
times: corner the fox-pig on the moose corner, pig corner and the raccoon
corner.Move the geese around until the fox
is cornered in the area you need.The strategy is to
herd the fox (pig) by surrounding him with the geese squares placed one square
away from the fox (pig).Move the
pig area geese down and slowly surround the opponent. Leave a space on the
area you want to herd the opponent in (usually the corners). The side area
geese that is not in play might need to be moved to the fox area to block the
opponent going-hiding back there.When you get close to
the opponent be sure
that it can not jump over the goose so that the goose is taken out.Some
sacrifices might need to be done to herd it in the corner though. Be sure to have the back and sides
of the goose covered.The win makes the eye of the
animals glow and the bars in the vault maze will be removed.
Isis
and the levers – Go back to the shack now that we have all 4 animal disks
and have lowered the bars.
Study the path to each animal lever.
Command Isis to go to each red knobbed lever.
Another command is needed in an intersection.Moose – forward, left, left, paw, go.
Pig – forward, forward, forward, jump, paw,
go.Raccoon – forward, right, forward, jump, left
paw, go.
Trapper Dan’s Needle:
Needle gate – Climb the ladder and go
forward. At the intersection, continue forward (not the lit path at right).Place the collected animal disks in the coin slots.
Click on the door and enter Trapper Dan’s Needle.
Needle – Look around. See a black snowmobile
outfit that has a tear.Check the UC Brea backpack ahead. Wow – it’s loaded
with plastic explosives -C4.Hear Yanni come in. He will go for help.
He dropped something. Ack! Isis brings the glove…
End chase: Ollie arrives in
his snowmobile.Click on the snowmobile and give chase to the
villain.Follow the villain’s snowmobile.
Keep him in sight and as close to him as you can.
You cannot overtake him or catch him.
Wait until he gets into an accident.
Listen to Nancy’s explanation of the case.
Next Nancy Drew Adventure – Legend of the Crystal
Skull.
This document may not be
distributed without express written permission of the author and the content
may not be altered in any way.For Questions or
Comments on this Walkthrough,
Please write to:
MaGtRoCopyright ©
6/2007
MaGtRo