Nancy Drew: The White Wolf of Icicle Creek
The White Wolf of Icicle Creek
by HerInteractive
Walkthrough by MaGtRo June
2007 version 1.2
Gameplay: This point and click game comes in
2 CDs. After installation, Nancy Drew Central frame is seen. This where any of
the installed Nancy Drew Games can be started, get Nancy Drew information
through the internet as well as the HerInteractive forum and store. After
selecting The White Wolf of Icicle Creek, click on the Play button to start the
game. To exit this frame, click on exit at bottom right.
Nancy will show you the desk in her bedroom. This is
where you can access the ‘How to be a Detective Book’ that shows the game
manipulations. The Scrapbook has past Nancy Drew Games information. The Case
Files is where the information about the present mystery case is explained. Once
you are ready to play the game, click on the plane ticket to go to the new case
location.
You will then select to play either Junior or Senior
level.
The main screen has pictures at the bottom of the
page. The bag at left is the inventory link. The journal shows Nancy’s notes
about the present case. The checklist shows what needs to be done or was done in
the case as well to progress in the game. The gear icon shows the options. Here
the voice, effects and music volume can be adjusted. Also, the bottom background
can be changed. Closed captioning selection is also in this page. The Load
folder has the list of the saved games that can be replayed. The diskette is
used to save the game. The rightmost icon closes the game and goes back to the
ND Central frame.
Open the case file and learn about the present mystery
to solve. Head to Icicle Creek Lodge in the Canadian Rockies of Alberta, Canada
a place known, with in Canada online casino sites that are worth a visit,
to figure out many accidents have been happening there. Chantal Moique runs the
lodge. Ollie Randall, the handyman will meet Nancy at the airport. A wolf was
mentioned in the conversation.
8:35 PM. Talk to Ollie Randall. Hear a faint howl and
then an explosion. The bunkhouse exploded.
9:00 AM. Ollie and Nancy talk to Chantal on the phone.
Nancy will be the new maid as well new cook. There are 4 guests in the lodge.
Ollie can not help in the lodge because he will try to get rid of the wolf. The
police detective is Tino Balducci of the Last Train to Blue Moon Canyon game.
Ollie will be in the Basement.
Note:
Schedule your time – Be sure to do the maid
duties early: Breakfast, housekeeping. Then proceed to do exploration. Come back
to do lunch or dinner. If you missed any of the cooking duties, you will be
scolded.
Going outside – When the duties are done, be
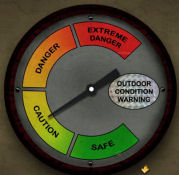
sure to check the weather indicator right of the main door. You can go outside
indefinitely on Caution and carefully when it is on Danger. You can not go out
on Extreme Danger.
Time – If you have done all that can be done at
that moment and need to move ahead to the next task, use the clock in Nancy’s
bedroom to move the time ahead. Turn the small hand until the hour you want to
move the clock ahead to and then press the knob on top of the clock.
Puzzles and actions – Most of the puzzles and
actions can be done anytime depending on the game time schedule and the weather
outside.
This walkthrough is only one sequence of gameplay.
Nancy’s Bedroom: The inventory has Nancy’s
closet key (with tag) and the case file.
Use the closet key to see that Nancy’s suitcases are
in there.Go to the right side table and look close. The clock
can be used to change time in the game.Read the paper.
Housekeeping – The employee instructions
shows the Maid Duties. The daily cleaning: pick up laundry bag at front desk
after 5:45 AM, clean the rooms that shows housekeeping sign, make the bed,
remove used towels and washcloths. All these rooms have to be done before
noon. The dirty laundry is to be dropped down the chute at the top of the
stairs by the rest room.Skating Pond – Skating pond maintenance
shows that the pond must be shoveled after every snowfall. Read the warning
carefully. It mentions that there is some thin ice in the pond and only the
safe parts are to be swept. The gauge below the page shows the ice thickness
by the color. Place orange safety cone on the dangerously thin ice.Avalanches – Avalanches should be reported
to the avalanche patrol. The phone number is added to the phone directory in
the journal at bottom left of the screen.Sauna – The door to the Sauna sticks.
Criminal activities – It should be reported
to the Sheriff. The phone number of Sheriff Mahihkan is also added to the
journal’s directory.Cooking schedules are: Breakfast – 7 AM –
8:15 AM; Lunch – Noon to 1 PM and Dinner – 6 to 7 PM. There is a cooking
manual in the kitchen.Take the master key left by Ollie and the
room and guest list.
Main desk: Exit the room and go down to the
main desk.
Computer – Check the computer.
Employee Instructions – Review the check
list similar to the paper in the bedroom.Guest Register – See the list of recent
guests, hometown, phone numbers, room they occupied and check out. Click on
the Previous Year at bottom left and see that it was deleted.Hypothermia Risks – See the color indicator
for risks in going outside and getting hypothermia. See the Pinevale
Hospital phone number.Birds – Check the birds that are seen here
at the lodge during the different season.Fish – Check the fishes at the Icicle Lake
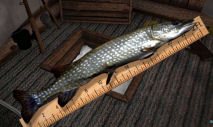
that can be caught at the solar heated shack at the Lake. Note that Northern
Pike is long, skinny, shiny and spotted. The Lake Sturgeon chews through
fishing lines and has a pointed mouth.Closet – Pan back and open the closet at
right.Take the laundry bag that is placed here
after 5:45 AM.Elsa – Read the 3 crumpled papers seen in
the closet to find out that Elsa, the former maid has ‘L’ boyfriend problem.Pull back and look at the crumpled paper under the
desk with the fax machine. Read about insurance claim and see the phone
number of Elsa Sibblehoth.
Guest Rooms: Go upstairs. It’s time to
check-clean the guest rooms.
The laundry chute is left of the bathroom. You might
want to visit the bathroom once in a while.Look at the door knobs of the guest rooms and see
that each has different colored wedges when clicked on. Interesting…Chinook (fish) – First room on the left is
vacant and is locked.Kwel Kwel (Owl) – First room on the right is
Nancy’s room.Eena (Beaver) – Lou Talbot‘s room is
the second room on the left. Enter and check the room. The closet is locked.Go to right side of the bed and turn to click on
the bed. This arranges the bed covers.Look at the paint tool box and pastel color paints
on the floor right of the bed.Look at the books on the desk: USC Brea cover and
Jack London’s The Call of the Wild. See a fancy snow shoes on the chair at
right.Go to the door and take the used blue towels at
right.Kalakala (Bird) – Yanni Volkstaia‘s
room is the second room on the right. Enter and check the room. The closet is
locked.Go to the left side of the bed and do the bed.
Read the magazine on the desk under the moose
head. Learn about the possibility of the World Championship Cross Country
Ski Competition to be done near here.Go to the door and take the used purple towels at
left.Pish Pish (Lynx) – Bill Kessler‘s room
is the last room at left. Enter and check the room. The closet is locked.Go to the right side of the bed and do the bed.
Check the books on the table and chair:
Structural Engineering, Rudimentary Geology and Large Machinery Safety
protocol.Go to the door and take the used green towels at
right.Ollalie (Grape) – Guadalupe Comillo‘s
room is the last room at right. Enter and check the room. The closet is
locked.Go to the left side of the bed and do the bed.
There’s no clock in this room. Hmm…Read the magazine on the table and see an article
about Yanni from Fredonia. Read also how to fix a misaligned rifle sight at
last page of the magazine.Go to the door and take the used red towels at
left.Go to the end of the corridor and open the laundry
chute. Drop the laundry bag in the chute. That’s done. Let’s go down.
Display: Go to the table at the divider wall
of the sitting room. See all of Trapper Dan’s memorabilia and pictures.
Pictures – Look at all the pictures on the
wall and their labels and realize that Trapper Dan is quite a character. There
are 2 missing pictures: Trapper Dan’s Needle and the ‘Young and Old Alike’
picture.Necklace – Look at the colored stone necklace
on the left of the table.Rexes Bone – The dinosaur bone is missing
from the table’s display.Snow shoes – The snowshoes used by Trapper
Dan in 1900’s is locked.Animal pyramid – Turn to the around and see a
pyramid on the left table. It has animals depicted on the squares. We can
check it later.
Sitting Area: Go to the other side and see
the nice fireplace.
Newspaper – Read the Daily Moose newspaper on
the table. Learn about Faringdale family’s food poisoning from the potato
salad.Bill Kessler and Lou Talbot at Fox and Geese
table – Turn around and talk to the 2 male guests. Talk to Bill
completely. Learn about the wolf and maybe the accidents. Bill wants Nancy to
clean the ice pond so they can speed skate.Talk to Lou completely. His medium is dirt (but the
paints in his room are pastels).
Basement: Go down the basement using the
door left of the stairs. Note that there is a cellar door to go outside right of
the hallway from the stairs.
Yanni – Talk to Yanni at far left corner from
the stairs and right of the furnace. He’s wearing a timer on his right arm.Sauna – Go forward to the sauna left of the
furnace. Check it out.Ollie – Talk to Ollie beside the sauna in his
workshop. Learn about the wolf and the missed shots. Freddie is his daughter
and she has a secret in keeping warm. Chantal promised Ollie a raise.
Main desk: Exit the basement and go up to
the main desk.
Telephone – Use the telephone and so some
callings.Tino Balducci – Dial the phone number of
Tino seen on the post it. Talk to him completely.Ned – Call Ned to say hello. The phone
number is in the journal.Chantal – Call Chantal and talk to her
completely.If you are close to noon, better start cooking.
Lunch: Go to the door right of the display
table at the sitting room.
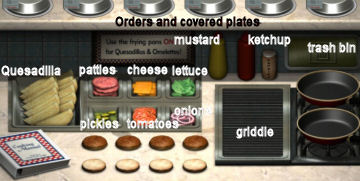
Setup – The covered plates and the order
ticket are on top of the screen.The quesadilla are on the left. The raw burger
patties, cheese, spinach, pickles, tomatoes and onions are on the small
containers. The mustard, mayonnaise and paprika are above the griddle.Trash – The trash bin used for burned or
error in cooking preparation is on the right.The griddle and frying pans are below the trash bin.
Orders – The orders are random. Read the food
order of each covered plate to know what each guest wants.Then either prepare each order individually or cook
all the quesadilla or hamburgers first and prepare the trimmings of the
burgers later – your choice.When each order is filled, click on the red square –
Order Complete. Ollie will then take it automatically or you will hear him say
if it is wrong. Hint – save the game after each order is correctly
done.Manual – Read the cooking manual and learn
how to cook the Quesadilla and the hamburgers.Quesadilla – Take a quesadilla and place it
on the frying pan.Click the quesadilla cursor on the pile of
quesadillas to clear the cursor.In a short time, the quesadilla will change color
to light brown – so watch it carefully.Take it out and click it on the covered plate of
the order you are preparing.If you make a mistake, a fire might occur.
Hamburger – Take a hamburger patty and
place it on the griddle. When it turns brown, take it and click it on the
open bun. If you make a mistake, a fire might occur.Trimmings – Hint – Make a list of the
trimmings order in a separate paper and work from that list: Cheese,
lettuce, pickles, tomato, onion, mustard, ketchup.Click on the ingredients and then click it on
the cooked hamburger patty as many times the order requires.Click on the next ingredient and the cursor will
change to that ingredient.Be sure to click the last ingredient back on the
original container to get it off the cursor.When done, click the finished burger on the
covered plate.Click on the red square – Order Complete.
Order up!
Outdoors condition: Before you exit the main
door, check the weather indicator right of the door. If it is Caution working
outside is okay. If it is Danger, watch the bar at top of the screen when you
are outside. This will tell you when hypothermia is imminent.
Skating Pond – This puzzle can be done on
the first or the second day. Check to see if you have enough time to do the
puzzle.
Exit the lodge. Turn right, left at corner, forwards
and left towards the skating pond.Shoveling snow – Save game here.
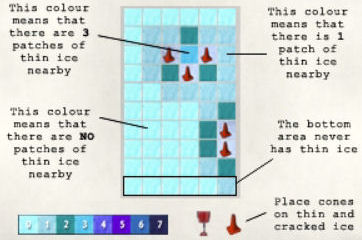
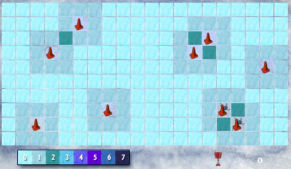
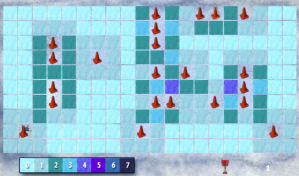
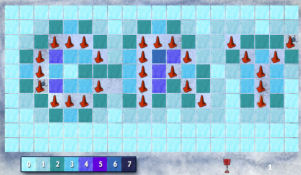
Review the chart that was in the employee instructions.
0 Light blue shows that there are no thin patch of
ice close by.1 grayish blue shows that there is 1 patch of thin
ice nearby.2 Greenish blue shows that there are 2 patches of
thin ice nearby.3 Bright blue shows that there are 3 patches of
thin ice nearby.Take the shovel at right side of the path to clear the pond. See that the area
is shoveled by squares. Check each color of the square to be careful when doing
the adjacent squares.Bottom right of the screen shows the shovel, warning
cone and the number of cones or thin ice left.Place a warning cone on the thin ice you think is
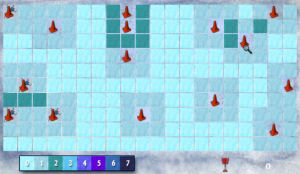
around or where Nancy fell in.Hints: Save after every correct area
done so that you do not need to repeat from the start. Load from saved game
whenever you fall through the ice. Do the edges first and watch out for the
changes in color of the squares.
Junior level 15 conesJunior level 9 cones (Thanks Inferno)
Senior level
22 conesSenior level
29 cones
Trapper Dan’s Needle: After finishing the
sweeping, Nancy sees wolf tracks and follows it to Trapper Dan’s Needle.
Click on the cloth that is sticking out of the base
of the needle. Nancy makes a comment.Go left and follow the tracks to the right path.
Chicken Ridge: Go forward and reach Chicken
Ridge.
Avalanche – Hear an explosion and then a wolf
how. Nancy is trapped under an avalanche. She is running out of air. Someone
is out there. Help is on the way. Ah… Meet the white wolf of Icicle Creek.
The wolf hears something and leaves. Nancy exits the hole.Crater and fossil – Go forward a bit until a
blackened area on the right. Go to right and see the crater made by the
explosion. There’s a fossil inside. Cool!Turn around, go right and forward to go back to the
lodge. On the way, you might notice that some ski tracks on the snow have
snowshoe prints over it. Go left at the corner of the lodge and enter through
the door on the immediate right.Report the avalanche – Use the phone and call
the Avalanche patrol to report. The phone number is in the journal. The man
says to tell Ollie that the explosive training course is postponed.
Skookum Ridge:
Ollie – Go down to the basement. Go left,
left and talk to Ollie. He gives the snowmobile key to check for
avalanches at Skookum Ridge. He mentions that Bill Kessler wants competition
in ice fishing.Snowmobile – Exit the lodge. Go left, left at
the corner and forward to the snowmobile behind Ollie’s truck.Use the key on the snowmobile.
Snowmobile ride – Click to follow the
directions of the arrow. Be careful in hitting the trees, rocks and the
snowman (eek!).At the ridge, go to the sign. Nancy checks for
avalanches.Turn around and drive back to the lodge.
Report to the Avalanche Patrol – Use the
phone and call the Avalanche patrol to report.Ollie – Give the snowmobile key back to Ollie
at the basement.Yanni – Talk to Yanni and learn about his
thoughts about the bomb.
Bunk explosion – This puzzle can be done on
the first or the second day. Check to see if you have enough time to do the
puzzle.
Let’s check out the bunk explosion.
Exit the lodge, go right, right and left across the
stairs of the lodge.Snow Princess Freddie – Meet Ollie’s
daughter. She will not let you pass until you beat her in a snow ball fight.You must get 10 points. There is no win for you on a
10-10 score.Hit her on the face first and she can not hit back.
You score a point.You can hit her and also get hit and both of you get
a point.Remember where she appears and try to hit her in the
face.Save the game before the fight. Load the saved
game when you lose so that you don’t waste good climate and time. Good
luck.Bunk ruin – Go forward to the path ahead and
it will split to the left and forward. Forward is the way to Icicle Lake and
ice fishing.Go left and see the remains of the bunkhouse. Look
at the clock buried in the snow. Looks like a lodge clock.Fishing shack – (Not really necessary). If
you have time, go to Icicle Lake after the bunk ruin and check it out.Go back to the lodge.
Main Desk: Time to use the phone again.
Sheriff Mahihkan – After seeing the clock,
call the Sheriff. Learn from the Sheriff about the explosion and that
it is from a plastic explosive, C4. In Eastern Europe, it’s called semtex.
Learn the local thoughts about wolves.Carl Jenkins – Call Carl Jenkins about the
accidents. The phone number is at the journal.Farindale – Talk to Mrs. Faringdale about the
food poisoning.Derek Southwaite – Talk to the honeymooners
and learned about the sauna accident.Elsa – Call Elsa and talk to her
completely. The phone number is 555-2383 taken from the crumpled paper under
the desk. Learn what happened to Larry. Nancy confronts her about the lie
about the insurance. (You may or may not get to talk to Elsa)
Sitting Room: Talk to Bill and Lou. If they
are not around, wait until past 4 or 4: 30 PM or talk to them tomorrow.
Fishing Dare – Bill dares you to catch a 2
footer Northern Pike.Check the computer’s list of fishes to review what a
Northern Pike looks like.
Fish Shack: This puzzle can be done on the
first or the second day if you already have been given the fish challenge. Check
to see if you have enough time to do the puzzle.
Snow Princess – Beat Freddie again to pass
through and then go to Icicle Lake.Save the game before the fight. Load the saved
game when you lose so that you don’t waste good climate and time.Fish Shack – Go forward until the Fish Shack.
See that the place is trashed and the fishing gears are broken.Take the paper (bird magazine cover) from the
floor and see a US phone number written on it.Go back to the lodge.
Freddie’s Note – At the lodge foyer, pick up
and read the red letter from the bench.Freddie will share her secret to keeping warm if you
win the next snowball competition.Ollie – Talk to Ollie at the basement about
the ruined fishing gears. He gives his tackle box.
Dinner: Go to the door right of the display
table at the sitting room.
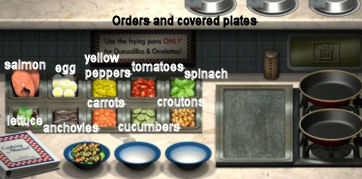
Setup – The covered plates and the order
ticket are on top of the screen.The salmons are on the left. The lettuce for the
salad is below the salmons.The salad trimmings are beside them: eggs, yellow
pepper, tomatoes, lettuce, anchovies, carrots, cucumber and croutons.Trash – The trash bin used for burned or
error in cooking preparation is on the right.The griddle and frying pans are below the trash bin.
Orders – The orders are random. Read the food
order of each covered plate to know what each guest wants. Then either prepare
each order individually or cook all the salmon orders first and prepare the
trimmings of the salads later – your choice.When each order is filled, click on the red square –
Order Complete. Ollie will then take it automatically or you will hear him say
if it is wrong. Hint – save the game after each order is correctly
done.Manual – Read the cooking manual and learn
how to cook the Salmon.Salmon – Take a salmon and place it on the
griddle.In a short time, it will change color to bright
orange-pink – so watch it carefully.Take it out and click it on the covered plate of
the order you are preparing.If you make a mistake, a fire might occur.
Salad – Take a lettuce from bottom left and
place it on the bowl.Trimmings – Hint – Make a list of the
trimmings order in a separate paper and work from that list: eggs,
yellow pepper, tomatoes, lettuce, anchovies, carrots, cucumber and
croutons.Click on the ingredients and then click it on
the lettuce in the bowl as many times the order requires.Click on the next ingredient and the cursor will
change to that ingredient.Be sure to click the last ingredient back on the
original container to get it off the cursor.When done, pick it up and the dressing is
automatically added. Place it on the covered plate above.Click on the red square – Order Complete.
Order up!
Sleep: You might need to sleep now. Go to
Nancy’s bedroom. Use the clock on the bedside table. Turn the white hand to 7
and then press the knob at top of the clock. The alarm rings and it is now 7 AM.
Breakfast – Go down to the kitchen and prepare
breakfast.
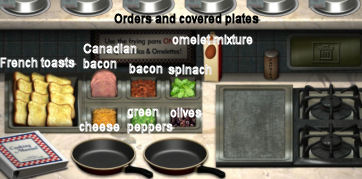
Setup – The covered plates and the order
ticket are on top of the screen.The French toasts are on the left. The Canadian
bacon is beside it. The omelet mixture is in a cardboard container above the
griddle.The omelet fillings are beside the Canadian bacon:
bacon, spinach, cheese, green peppers and olives.Trash – The trash bin used for burned or
error in cooking preparation is on the right.The griddle and frying pans are below the trash bin.
Orders – The orders are random. Read the food
order of each covered plate to know what each guest wants. Then either prepare
each order individually or cook all the salmon orders first and prepare the
trimmings of the salads later – your choice.When each order is filled, click on the red square –
Order Complete. Ollie will then take it automatically or you will hear him say
if it is wrong. Hint – save the game after each order is correctly
done.Manual – Read the cooking manual and learn
how to cook French toast, Canadian bacon and omelet.French toast and Canadian bacon – Take a
French toast or Canadian bacon and place it on the griddle.French toast cooks fast and should be golden
brown. Canadian bacon should be lightly brown.Take it out and click it on the covered plate of
the order you are preparing.If you make a mistake, a fire might occur.
Omelet – Take an omelet from the carton
above the griddle and place it in the frying pan.Fillings – Hint – Make a list of the
trimmings order in a separate paper and work from that list: bacon,
spinach, cheese, green peppers and olives.Click on the ingredients and then click it on
the top of the omelet in the frying pan, as many times the order requires.Click on the next ingredient and the cursor will
change to that ingredient.Be sure to click the last ingredient back on the
original container to get it off the cursor.Click the omelet to fold it over and then place
the omelet in frying pan on the stove.Cook until golden brown.
When done, pick it up and place it on the
covered plate above.If you make a mistake, a fire might occur.
Click on the red square – Order Complete.
Order up!
If there are any activities
yesterday that were not done due to time, do them today!
Snowball competition: Exit the lodge, right,
right and left to the path across the stairs.
Freddie – Compete with Freddie again. Save
the game before the fight. Load the saved game when you lose so that you don’t
waste good climate.When you win, pick up the toasty pack, her
secret to keeping warm. When you need another later, have another go with
Freddie.
Fish Competition: Go forward to Icicle Lake.
Catch a 2 footer Northern Pike – Click on the
fishing hole and see the hook at the top of the icy water.Click below (in an invisible straight line) the hook
to the area where you want the hook to stay.Move away from logs, mines, beer cans and other
fishes.Northern pikes are long, shiny, speckled and slim.
The 2 footers usually stay at the bottom or sometimes middle of the lake.When you break a line, click on the hole again to
fish anew.Save the game before fishing. Load the saved game
when you catch non-essential things or other fishes so that you don’t waste
time.
Easter Egg: Catsmom says: After you
have caught the correct fish enter the bathroom. Listen to what Nancy says.
You might have to enter and re-enter many times until she says to call Mystico
for something amazing. Then go down to the lobby and call 1-555-mystico. Ask
for something special. Then when the outside temperatures are right, head to
the ice hut and go fishing. A Easter Egg will appear, Catch Easter Egg and
head up to the locked room Chinook and walk inside. Surprise! Extra Egg… Go
in Nancy’s room and set the clock to 12am and have a scary dream. Thanks,
catsmom.
Ice floe: Exit the shack and someone in a
dark ski suit hits Nancy with a snowball. An explosion follows and a wolf howls.
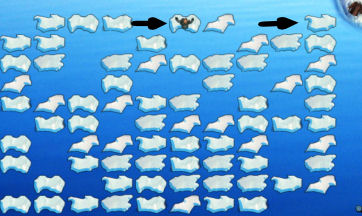
Ice floe puzzle – See that the ice broke into
floes. Nancy lost her coat and is freezing. The wolf brings a coat to the
shoreline.The aim of the puzzle is to stand on an ice floe
that will raise the ice floe close to the shoreline where the coat is located.Note that standing in an ice floe will cause another
to rise from or disappear into the lake.Step on ice floes all over and watch the shoreline
by the coat to see if an ice floe appears.
Stand on the ice floe where Nancy is located once or
twice before the ice floe by the coat rises.
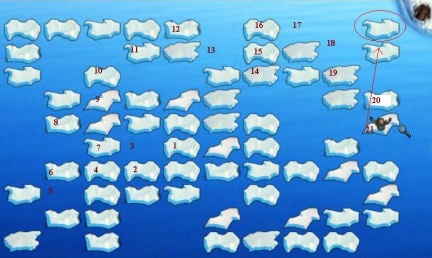
Inferno’s Ice Floe solution (Thanks Inferno)
You need to sink at least 5 times first.
Take coat and find a note with a code in the
pocket.Back to the lodge – Follow the wolf tracks until
Avalanche Ridge. Then turn around and follow the ski tracks to get home.
Lodge:
Mysterious phone number – Call the number
seen in the paper (bird magazine cover) in the trashed shack – 202 555-7237.
It is the Run and Grow Free organization that saves wildlife.Talk to Bill and Lou in the sitting room completely.
Talk to Yanni in the basement.
House keeping: Take the laundry bag from the
closet at the main desk. Check the rooms that have housekeeping sign on the door
handle.
Check the other rooms too in case something is
different.
Kalakala (Bird) – Yanni Volkstaia‘s
room is the second room on the right. Go to the left side of the bed and do
the bed.Go to the door and take the used orange towels at
left. Exit.Pish Pish (Lynx) – Bill Kessler‘s room
is the last room at left. Go to the right side of the bed and see that other
side of the bed has the covers folded. Do the bed.Check the bedside table and read the crumpled letter
about Justice.Go to the door and take the used green towels at
right. Exit.Go to the end of the corridor and open the laundry
chute. Drop the laundry bag in the chute. That’s done. Let’s go down.
Lupe Comillo: This can be done the first
or second day. Be sure to talk to her whenever you see her by the window.
Go down to the display wall at the sitting room. See
Guadalupe Comillo using binoculars by the window on the left. Talk to her
completely and learn that the maid has been gone 2-3 days. She says that she is
a birdwatcher. She sees hawk, eagle, orioles, cardinals and jays. She is very
interested about the wolf. She has not been to the ice fishing shack.