Nancy Drew: Secret of the Old Clock Walkthrough
Nancy Drew: Secret of the Old Clock
by
Her Interactive
Walkthrough by MaGtRo July 2005
Gameplay: The Main Menu has the new game, load-save game, continue,
second chance, game setup, credits, help and exit game. Game setup has voice,
music and special effects volume control and closed captioning. Help has directions on how to
play the game and other information. After clicking on New Game, select the
level of gameplay as senior or junior level. Click on Gameplay overview to learn
how to navigate throughout the game and the different settings in the game.
There are unlimited save game slot in this point and click game.
This
walkthrough describes both junior and senior detective. The sequence shown is
not necessarily the only way to get through with the game. The game is not
linear in most parts. The
junior detective gameplay has a task list while the senior detective does not
have.
The year is 1930; Nancy
Drew drives her roadster to Lilac Inn in Titusville. Nancy received an
invitation from Emily Crandall. Emily just lost her mother and she is left
running Lilac Inn. A car was parked by the road to the Inn.
Lilac
Inn:
A road map is in
inventory and there are $3.50 in the purse. Enter Lilac Inn and talk
completely to Emily’s guardian, Jane Willoughby. Nancy’s dad called and he wants
Nancy to return the call. Jane and Gloria, Emily’s mom were dressmaker together
in the past. Climb the stairs and turn right. Enter the last door and talk to
Emily. Emily wants a favor. Emily hears a noise. She wants you to place her
mom’s jewelry in her dad’s safe.
There’s an explosion. The kitchen stove
exploded. Talk to Jane completely. Hear Emily cry. The jewelries were
stolen from the box. Learn about Josiah Crowley, ‘time will tell’, Richard Topham, the will, the house, insurance and Jim Archer, the banker. Look around the room.
Look at and note the phonograph, The Rubiyat book on the bed and the sewing machine. Go down and talk to
Jane.
Parlor: Turn left and enter the
parlor. Look at the newspaper and Like magazine under the window. Learn about
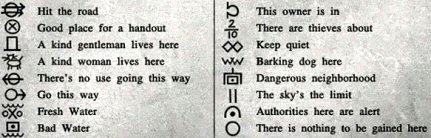
hobo language and ‘Clever Hans’, the horse who can pick up inadvertent cues. Pan
right and look at the clock on the fireplace mantel. Click on the handle to see
the bird puzzle.
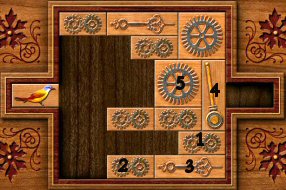
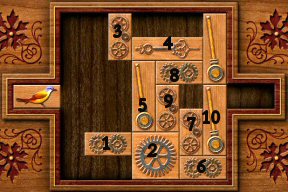
Bird Clock puzzle –
The object of the puzzle is to move the bird from left to the slot on the
right. The wood tiles can be moved to free a space from left to right.
Junior Detective
Senior Detective
Move 1 to the left. Move 2
and 3 to the left. Move 4 down.Move 1 to the right. Move 5
to the left and down.Move bird to the slot on the
right.Move 1 & 2 to the left. Move
3 down. Move 4 left. Move 5 up.Move 3 & 2 up. Move 6 left.
Move 7 up. Move 2 down & right.Move 3 & 5 down. Move 8 left.
Move 9 & 7 up. Move 10 down.Move bird to the slot on the
right.When correctly done
see the cuckoo tweets and the bottom drawer opens to reveal a mirror. Take
mirror.
Pan right to the other
side of the room and see a curtained ornate booth.
Bard Bounce – Turn the
heart shape handle to raise the curtain. Click on the coin slot to
automatically insert 5 cents to start the puzzle.The object of the
puzzle is to join the similar colored male and female characters of A
Midsummer Night’s Dream. The females are stationary and with in a box.
Junior Detective: Move yellow left. Move green left & down. Move yellow down.
Move blue left, down & right.
Move red down, right & up.
Senior Detective: Move blue left. Move yellow left, up and right.
Move blue up. Move green up,
left and down.Move blue down. Move yellow
left. Move blue up & right. Move yellow right.Move red up & right. Move
green right. Move red down & left. Move green left.When successful, hear a
trumpet blare and the word ‘Keen’ drops down.
Exit the parlor and ask
Jane about Bard Bounce.
Phone:
Exit through the
main door and turn left to the payphone. Note the cat etched at bottom left –
it’s a hobo language. Call Nancy’s dad now. Take the receiver, click on the
5 cents slot and talk completely with Carson Drew. Learn about the documents at
Tubby Telegrams and driving and flat tire advice. Discuss about the happenings at
the Inn. Learn about the will, guardianship and how the guardian will profit
from the sale of the Inn.
Paper – Turn right
from facing the payphone,
forward and take a left towards the bridge. Cross the bridge and catch the paper
floating in the air. If you missed it the first time, you can either catch it
again by going forward and turning back or turn around, cross the first bridge again
and go back. It is a key appraisal at Waddell Jewelries.
Josiah’s house or Topham School:
Go forward across the
second bridge and take the stone bridge on the left. There’s a building left of
the path. Go forward to the house and
look at the sign of Topham School. Enter the ‘school’.
Uri needs his mouse.
Pick up the mouse under the table with candles at far left. Give mouse to Uri
the cat by the fireplace.
Talk to Richard Topham
completely. Ask when he can talk to you and then take his ‘intelligence test’.
Logic test – Take the
paper from the table. Open the tools and click to look close at the
paper.Type in the answers
you deduce from what is typed in on the pages. Nancy will say ‘that looks
right’ or other comments if correct.1. All wet.
2. Doll up.
3. Double cross.
4. Dry up.
5. Big Cheese.
Talk to Richard again
after doing the test correctly. Continue to talk to him about Josiah Crowley and
about the explosion. Pan left and look at the clocks on the fireplace mantel.
Mouse memory puzzle –
Look close at the mouse squares. The object of the puzzle is to click open 2
identical pictures one after the other.Click on 2 tiles to see what lies under the tiles.
Continue to open tiles until you see a matching tile to what you have already
opened. Then click the 2 matching tiles one after another. The matching tiles will now stay open.
Continue until all the tiles are opened.When correctly done,
the side panel opens. Take the second mirror.
Pan Left and play with
the robot at the corner. Look close at the desk on the left of the robot. The
door on the right is off limits. Click on the elephant and read the ‘Lest I
Forget’ book. Take note of the pages that Nancy reads, as well as other pages.
Lock on Carriage
House:
What are you when
you win Bard Bounce?What poet is the
cat’s meow?What will par on my
miniature golf course get you?What’s Gloria’s
middle name?To open journal: (D)ecoder
is in the (t)rivet (2 to the right).To open the big tick
tock on top: Give Flute, Thisby and Pyramas their cues, Bottom’s cue is in
note to Gloria.Poem on golf course:
sounds like numbers to me!The typewritten note
at the end is about a trivet for a party at Twin Elms.
Pan left and read the
book on the table with parrot. Learn about the radiometer. Look at the picture
on the table with the candles. Josiah is Puck. Look around more and note the
musical instruments and Richard’s advertising leaflets. Exit the school-house.
Go forward and right to the carriage house. This must the one that needs answers
to the 4 questions on the journal. Go back and cross the stone bridge. Go left
to the miniature golf course.
Miniature Golf Course:
Note the giant
golf ball stand with a puzzle, the red booth to get the golf clubs, ball and
scorecard and the prize booth.
Giant golf ball – Read
the instructions for the golf ball game. The object of the puzzle is to figure
out the sequence of the colored golf balls hidden at the right panel. This is
a random puzzle.To play, move a
colored ball in the bottom row to a tee in the first column on the left. Do
this to all 4 tees. Then push the golf club button at lower right to see how
you guessed.If a stick with a flag
is seen – it means one of the balls in the column is in the correct order and
correct color. If only a stick is seen – it means one of the balls in the
column has correct color but in the wrong position. If no stick is seen, it
means one of the balls does not belong. The order of the clues is not
correlated with the solution.From here on – logic
prevails. You can deduce the correct color and position in subsequent columns.The ball can be
replaced by another one by clicking it on another colored ball before clicking
the golf club.When correctly done, a
poem appears. Note the highlighted words.Let’s play golf – Go
to the middle red booth. Click on coin slot to automatically insert 10 cents
and get a scorecard. Pull back and click on the button to get a golf
club and a ball. There’s a slot for old scorecard and get a new
one.Enter the miniature
golf area and see the score card. The difference between the junior and senior
detective is the course par. The senior is a less (21) than the junior
detective (30).The object of the golf
puzzle is to get a course par or under.Exit the score card to
go to a Hole and start the puzzle. The game can be saved after every hole. So,
if you get a good score, save and restart from the saved game if you get a
bogey or worse.The farther the golf
club is to the ball placement, the harder is the hit on the ball and longer
run of the ball. Angle the direction of the ball to bounce it on a wall to
enter another lane.Shortcuts:
Hole 3 – There’s a
hole-cave at the wall beside the tee box that you can aim the ball on and the
ball will
come out of the cave by the hole on the other side.Hole 4 – Aim to drop
the ball at the middle hole and see the ball take a plane and train trip.Prize booth – Once you
get a course par or less, insert the score card on the slot of the Prize
booth on the left. Take the pony.
Go back to the Inn and
talk to Jane completely. Climb the stars and talk to Emily in her room. Learn
that Lois is Gloria’s middle name. Time to go to town.
Titusville:
Enter Nancy’s car and
drive to Waddell Jewelry.
Driving information:
Nancy’s car – The lower
left shows the gas gauge and lower right shows the state of the tire.Nancy’s dad’s advice –
be careful about potholes, the muddy area and always fill the tank when it is
halfway. In case of flat tire always have it fixed as soon as possible.Driving – Click ahead of the car to steer it in
the correct direction. The farther the cursor is from the car, the faster the
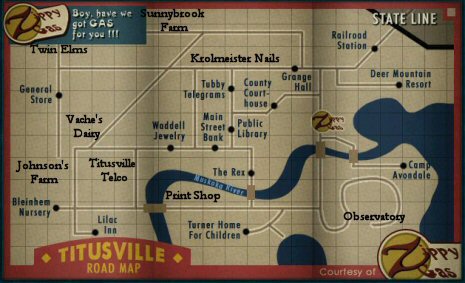
car goes. To park the car, press the space bar.Map – Consult the map and
look for the places you
need to go. If it is not on the map – save game, drive around and look for the
place you need to go. Then go back to a saved game and replay from there. So
there won’t be unnecessary driving and use gas.Out of gas – Nancy will
remind you to fill the tank when the gas gauge is half full. Drive to Zippy’s
gas station and buy either a quarter or 50 cents worth of
gas.Flat tire – It is best to
avoid getting a flat tire because it cost money to repair the tire.Click on the jack to
raise the car. Click on the lug wrench. Use the lug wrench on the tire to remove
the lugs. Click on the tire to remove the flat tire. Click on spare tire to
place it on the wheel. Click on bolts to place them on the wheel. Click again to
tighten the lugs. If you don’t tighten the lugs and drive off – game over.Take the flat tire to
Zippy’s gas station to have it fixed as soon as possible.If you don’t have enough
money to pay for tire repair, Zippy will ask you to place nuts and bolts in the
correct drawer. You are allowed only certain number of mistakes (2 for junior).
Waddell Jewelry: Take a
right on the road, left before the covered bridge and right at the intersection.
The jewelry store is the first building on the top. Nancy automatically asks Mr.
Waddell about the appraisal paper. It is for a key appraisal asked by Jim
Archer, the banker. For $1.50, Waddell gives the ornate key.
Main St. Bank: Drive and park in
front of the bank building right of the jewelry store. Talk to Mr. Archer
completely. The insurance policy lapsed and so the Inn is not insured. Learn about the
bank, Josiah, will, ‘time was right’ and Josiah’s makeup interest. Josiah has a
safe deposit box at the bank.
Look around Mr. Archer’s
office. Pan left and look close at the picture of the car and the woman.
Typewriter – Pan to
the right of Mr. Archer’s desk and look close at the typewriter. Click on the
typewriter ribbon to read what Josiah typed. Remember the entry in Josiah’s
Lest I Forget book – The typewritten note
at the end is about a trivet for a party at Twin Elms.October 9, 1929. Dear
Mrs. Sheldon, Here is the trivet I said that you could borrow for your party
at Twin Elms. Please take care of it because I would want it back someday.
Your friend, Josiah C.
Look at the portrait of
Clara Pickford with the dedication – To Jim Archer, my ace in the hole. Look close at the
clock at the corner. Look close at the keyhole.
Talk to Mr. Archer again
about the car on the picture and the key taken from Waddell’s Jewelry. He gives the
key as well as the old clock. Look close at the clock
again and use the key on the keyhole.
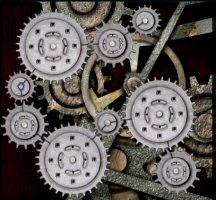
Clock gear puzzle –
After using the key on the keyhole, see gears on the right to be placed at the
correct pegs of the clock mechanism.Hint – Each gear has 2
lines on the edge. Align those lines to the adjacent pegs to see where the
gears go. Be sure the hole of the gears is sitting on the peg. Once the gear is
at its correct peg, it cannot be moved anymore.
Once correctly done,
the globe on top opens to reveal a mirror. Take the mirror.
Exit the bank and drive
back to the Inn. Exit the car and cross the 2 wood bridges, the stone bridge and
left to the Carriage House.
Carriage House:
Carriage House lock –
See letters at the Carriage House door. Remember the questions from Josiah’s
‘Lest I Forget’ book.
What are you when
you win Bard Bounce? Keen.What poet is the
cat’s meow? The book on the bed in Emily’s room is by Omar Khayyam.What will par on my
miniature golf course get you? Pony.What’s Gloria’s
middle name? Lois.Click on a letter of
each of the 4 wheels-openings to form Keen, Omar, Pony and Lois. After each correct entry, a red triangle
appears on the diamond at center of the door. The door opens when all 4
correct words are entered.
Look around and note
that each corner of the Carriage house has a metal holder for something. There’s
a domino puzzle on the left metal box and a radiometer at far wall above a
table.
Go forward to the table
across the door. Look at the Freshwater fish leaflet and note the different
fishes. Take note also of the notations about what places and baits the Bogart’s
Pond fishes like. Largemouth Bass likes grassbeds and minnows.
Blue Clock puzzle –
Look close at the blue clock on the table. It only has one hand. The object of
the puzzle is to enter the correct numbers to open the clock.The central button
resets the puzzle. To get the turn arrow cursor, move the cursor outside the central decoration. Enter the number by clicking the arrow cursor. This moves the clock
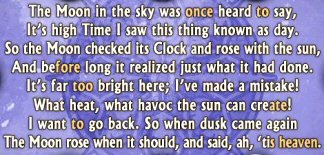
hand one blue circle per click.Remember the poem seen
after doing the Golf Ball puzzle and the clue in Josiah’s ‘Lest I Forget’ book
– Poem on golf course: sounds like numbers to me!
Note the colored
letters on the poem can be read as 1 2 4 2 8 2 7.Move the clock hand to
enter – 1 2 4 2 8 2 7 using the turn arrow cursor and pressing the
button at top of the clock in between each number entry.Take the 4th mirror.
Activate the
radiometer – There’s a radiometer above the table. It needs light to be
activated. Remember the book on the table in Josiah’s house.A. Place the 4 mirrors
at each corner of the carriage house.B. Go to the metal box
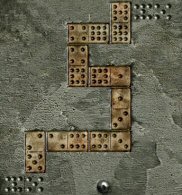
on the wall with domino dots on the cover.Domino puzzle –
Click on cover to open the metal box. Look close to activate the puzzle.The object of the
puzzle is the same as the domino tile game. Place one numbered end tile
adjacent to a similar numbered tile.The tiles can be
taken off their places and put on the side by clicking on it to get and
click to drop it on the side. Right click on a tile to rotate it. Be sure
that tiles placed are sitting inside their slots.The top stationary
number to be connected to is 7 and the bottom number is 5.From top to bottom:
Place 7-9 tile beside the 7, 9-4, 4-8, 8-1, 1-3, 3-6, 6-2, 2-5.
If done correctly,
the lever raises.Pull down the lever to
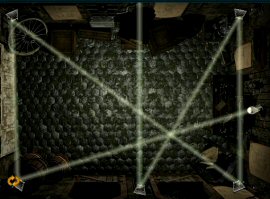
allow the light beam inside the carriage house.C. Adjust the mirrors
to get the beam of light to hit the radiometer above the table on the right.When the cursor is placed over the mirror,
it changes to a turn arrow. Turn the mirrors using the turn arrows.
When correctly done,
watch a metal stair drop from the ceiling.
Climb the stairs to the
room above. See a ham radio on the left and an old clock with hobo language
in front of it. Read the note by the clock – Forget where you put LWAT? Marcel’s
band, you old coot! Look close at the ham radio and read the note under the radio
– A new quartz crystal was ordered and delivered. The crystal needs to be cut by
Waddell.
Go back to Joshua’s home
or the now Richard’s
paranormal school. Talk to Richard about Marcel and the crystal. Marcel is
Josiah’s favorite hat. He would give the crystal if you take a telepathic test.
Telepathic card test –
The object of the puzzle is to pick the card that Richard selects by means of
inadvertent clues (like Clever Hans, the horse in the Like Magazine).Richard always uses
the same questions for a specific card. Write down what you can gather by
trial and error and eventually the puzzle will be solved.These are the
questions and answer that I got:This is which card?
StarWhat card am I
thinking of? StarWhat card am I looking
at? CircleWhat card is this?
CircleWhich card am I
thinking of? CrossWhat card am I
concentrating on? CrossCan you tell what card
this is? 3 wavy linesWhat card is this? 3
wavy linesWhat card am I
holding? SquareDo you know what card
I’m looking at? Square
Take the crystal.
Talk to Richard again.
Exit the school and go back to the Inn.
Inn:
Talk to Jane and learn
about Emily being upset.
Go to Emily’s room and
talk to her completely. The picture on the wall moved. Ask about the will, safe
deposit box key and Josiah’s hat. Open the bottom drawer under the window seat
and look at Josiah’s hat. Take the key tucked on the hat band. Note that
there’s another letter there that Emily stopped you from checking. Look at the
moved picture on the wall.
Go back down and talk to
Jane about looking around and the jewelries.
Secret passage: Go to
the parlor on the left. Go to the curtained seat left of the fireplace and click
on the cushion. See that the right curtain is caught under the cushion. Click on
the caught curtain. Aha – a secret passage. Enter and go forward. Flip the
lever on the right to get light in the passage. Go forward until the broken
piggy bank on the floor. Take the coins and have an additional dollar in
your purse. Continue forward 3 clicks and see a decorated slab on the right
wall.
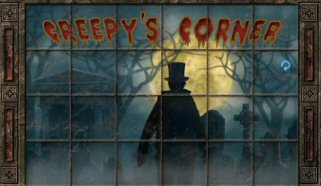
Creepy Corner picture puzzle –
The object of the puzzle is to arrange the tiles to form a picture.Click on a tile and then
click it over the place you want to put it. The tile underneath replaces the
tile on the cursor. The tiles can be rotated when the cursor above the tile is
moved and changed to a turn arrow.
If done correctly, music
will be heard. Take the phonograph record.
Continue left down the
passage until the end. Climb the ladder and hear Richard. The passage leads to
the living room of the school. We can back here later when he’s not around. Go
back, flip the lever to get lights and forward to the inn. Nancy automatically
turns off the lights.
Town:
Waddell’s Jewelry: Time
to go back to town. Drive the car to Waddell’s Jewelry and ask him to cut a
blank from the quartz crystal you got from Robert. He wants 2 dollars as
payment.
Bank: Talk to Mr.
Archer about the key from Josiah’s hat. He wants a favor before he will open the
safe deposit box. He gives the red dress he wants you to sew.
Trivet hunt:
Let us look for
the trivet lend to Mrs. Sheldon by Josiah. Get gas when Nancy says so. Remember
to be careful driving around muddy places and potholes.
Mrs. Sheldon at Twin
Elms – Drive the roadster up the road to the Krolmeister Nails, left to the end of the
road and right to the Arched driveway. Park and talk to Mrs. Sheldon. She wants
her bridge card from Miss. Jakowski at Titusville Telco.
Miss Jakowski at
Titusville Telco – Exit the driveway at Twin Elms. Drive south of the Nails
Factory and take the road
left of the bend of Muskoka River. Park the car at Titusville Telco and talk to Miss Jakowski. She wants you to get raffle tickets from Mrs. O’ Shea at the
orphanage.
Mrs. O’ Shea at the
Turner Home for Children – Drive south from the Titusville Telco, right and
cross the covered bridge. Turn at the first right to enter Turner Home for
Orphans. She wants 5 toys for the children.
Toys – You have one
already – the red pony. You can play more miniature golf to get 4 more ponies or
you can buy toys.
General Store – Drive
back to Twin Elms by taking the road by the Nail factory and instead of
right to Twin Elms, turn left and take the road down to the General Store. Use
the toy vending machine and buy any 4 toys by clicking on the coin slot at the
bottom and then pulling the lever by the toys. Take 4 toys.
Mrs. O’ Shea at the
Turner Home for Children – Drive back to the orphanage and give the toys to Mrs.
O’ Shea. Gee, the raffle tickets are at Phelps’s Print Shop.
Phelps’ Print Shop – Drive left to the first building after the orphanage. Talk to Mr. Phelps. He wants to go fishing to catch a 19 inch largemouth
Bass.
Fish for a largemouth
bass – Drive back to the orphanage driveway and take a right to Bogart’s Pond.Remember the Freshwater
leaflet seen on the table of the carriage house. It states that Largemouth Bass
likes to stay at grassbeds and use minnows as bait.Take the fishing rod.
Take minnows as bait from the tackle box. Cast the fishing rod on the reed area
on the right and when the white bobber moves, immediately pull-click the fishing
rod.Isn’t that easy. Keep
the 19 inch largemouth bass.
Give it to Mr. Phelps at
the Print Shop. He gives the raffle tickets. Go to Miss Jakowski at
Titusville Telco and get the bridge cards. Take the bridge cards to Mrs.
Sheldon at Twin Elms and get the trivet.
If you have a half full
tank of gas, Nancy will remind you to fill up at Zippy’s gas. You would need
money to get the blank from the jewelry store. Let’s earn some money and do an
errand at the same time.
Tubby Telegrams –
Go to the building above the bank. He gives Carson Drew’s papers. You can earn money by
delivering the telegram. Go back to the telegram office after each delivery to
get the money and a new delivery. Earn enough to have around 2.00 or more
in the purse and have a full tank of gas. Deliver the last telegram and no need
to get paid for the last delivery or you would get another one to deliver.
Waddell Jewelry – Ask
and get the blank if you have enough money.
If you have a full tank
of gas, go back to the Inn.
Inn:
Talk to Jane about the
dress for Mr. Archer. Hmmm. Go up, click on sewing machine and automatically ask
Emily permission to use the sewing machine. No needle. Talk to Jane downstairs
about the needle. Jane wants you to get the pies ready for delivery while she
looks for the sewing box. She gives a
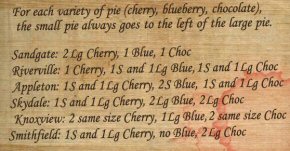
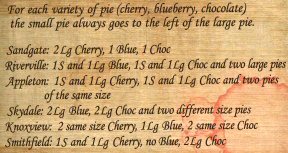
list on how the pies are to be arranged.
Pies puzzle – Go outside
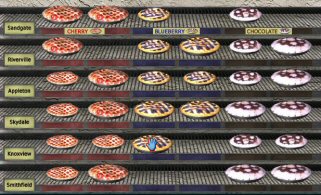
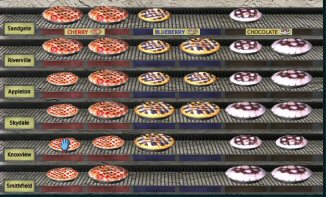
and turn right. Click on the curtain to see the pies.Arrange the pies
according to the list Jane gave.The correct pies have to be
under-over the label of that kind of pie. Red is for cherry, blue is for
blueberry and brown is for chocolate. The small pies are on the left of the
bigger pies.Click and drop the pies
in the places you want it to be.
Junior Detective Senior Detective Nancy will say when it’s
done correctly.
Enter the inn and see
that Jane is not in her usual place. Look close at the clock’s pendulum at
the corner. This looks like the layout of the mirrors at the 4 corners of the
carriage house and the sunray entrance. (Thanks, Cathy!) Go back and look behind Jane’s podium.
See a broken telephone and take the picture between the books. It is of the 2
brothers that made the 2 houses here. There a ladder on the left. Hmmm. Click on
the picture in inventory to turn it around and see ‘door in parlor window seat’.
Go left to the parlor
and click on the right metal curtain holder to open the cushion door to the
secret passage. Go down, flip the lever to get light and go forward once. Click
on the lantern on the right to open another secret passage. Climb up and look
close at the crack on the wall on the right. So, that is how someone makes that
picture move. Go back down, use the lever on the left to exit and go back up to
the parlor.
Talk to Jane and get the
sewing box. Take the needle. Nancy talks about the new secret passage and
the picture. Emily went to town.
Go up to Emily’s room.
Open the drawer under the window seat. Read the letter especially the last
sentence – I mean this from the Bottom of my heart: You are a kind lady who
sparkles like good water and makes me think that the sky’s the limit.
Sewing the red dress –
Place the needle on the sewing machine. Click the red dress on the sewing
machine.Sew following the lines.
Do it very slowly and in short series of lines at a time. Place the cursor right close to the
needle for straight lines.
Place the cursor at top right or
left on diagonals or curves, so that you can adjust the cursor better. At the
corners or angle points, be sure to do 1-2 stitches straight before changing
directions. The junior game is more forgiving than the senior
game as far as being off the line.Trivet-Phonograph record
– Click the phonograph record on the phonograph. Replace it with the record
taken from the Creepy Corner picture puzzle. Play the record by clicking on the
crank.Listen and take note of
the sound effects – Hoof beats, clap of thunder, clap of thunder, rain, door
opens, footsteps, clashing of swords, clashing of swords, clap of thunder, sound
of coins.
Bank: Drive to the bank
and talk to Mr. Archer about the red dress. Now, he will open Josiah’s safe
deposit box.
Pull the safe deposit
box. Take Josiah’s journal.
Josiah’s Journal – Look
at the design of the journal and note that they are similar to the design of the
trivet.Remember Josiah’s Lest I
Forget Book – To open journal: (D)ecoder
is in the (t)rivet (2 to the right).Trivet – Look at
the trivet taken from Mrs. Sheldon. Study the pictures and see that all the
sound effects of the phonograph recording is etched on the trivet – Hoof beats,
clap of thunder, clap of thunder, rain, door opens, footsteps, clashing of
swords, clashing of swords, clap of thunder, sound of coins.By checking the sound
effects in the recording in order on the trivet, the corresponding letters are: G O O D F E L L O
W.Click the G O O D
F E L L O W letters on the journal. Hear a click and the journal opens.Note the name and MHz on
each page.Flute – 7.025 MHz.
Pyramus – 7.057 MHz. Thisby – 7.050 MHz. It looks like some kind of record of
the people Josiah talked to on his ham radio.
Carriage House: Drive
to the Inn and go to the carriage house. Click
on the door to enter. Go to the domino metal box on the left and pull down the
lever to lower the metal stairs. Climb up. Go to the ham radio.
Ham radio: Look close
and place the blank made by Mr. Waddell inside the small door on top right. Look
close at the knobs.Using the frequencies
taken from Josiah’s journal, talk to each of the 3 other ham operators.Flute – 7.025 MHz. Enter
by turning the knobs to 7 on the left, 0.02 on the middle and 0.005 on the
right.Thisby – 7.050 MHz.
Enter by turning the knobs to 7 on the left, 0.05 on the middle and 0.000 on the
right.Pyramus – 7.057 MHz.
Enter by turning the knobs to 7 on the left, 0.007 on the right and 0.05
on the middle.Nancy will talk to each
of them after entering their frequencies and learn that you need a Shakespearean
cue for them to give another line.Remember Josiah’s Lest I
Forget book – To open the big tick
tock on top: Give Flute, Thisby and Pyramas their cues, Bottom’s cue is in
note to Gloria.
Where do we look for
Shakespearean cues? Remember there was a Shakespeare book on Richard’s table.
Shakespeare book: Go to Richard at the
school-Josiah’s old home and ask to see A Midsummer Night’s Dream. The request
is denied. Need a way to see that book. Go back to the inn.
Enter the secret passage
through the seat in the parlor by clicking the right metal curtain holder. Turn
on the light and go to the very end of the passage.
Open the hatch and hear
Uri meow. Immediately look for Uri’s toy mouse, take it and give it to Uri
before Richard comes out and calls the sheriff. The mouse can be under the chair
by the table or under the drawer or by the box of advertisements by the carousel
horse.
Read A Midsummer Night’s
Dream book on Richard’s desk. See circled quotes with the name of the 3 ham
radio operators. The quotes will be placed in Nancy’s journal. Turn around and
click on the rug by the corner to get back down to the secret passage.
Go back to the ham radio
at the carriage house.
Ham radio part 2: Call
each of the 3 ham operators and select the correct quote for each operator. Each
of them will respond with the line Puck-Josiah told them to memorize.Flute – 7.025 MHz. Enter
by turning the knobs to 7 on the left, 0.02 on the middle and 0.005 on the
right.Cue – Shall we their
find pageant see? Lord, what fools these mortals be.He answers with – Leave
by road when the owner is in, because then there will be thieves about.Thisby – 7.050 MHz.
Enter by turning the knobs to 7 on the left, 0.05 on the middle and 0.000 on the
right.Cue – If we shadows have
offended, think but this and all is mended, That you have but slumber’d here
while these visions did appear.She answers with – The
authorities are alert for bad water, so do not go this way.Pyramus – 7.057 MHz.
Enter by turning the knobs to 7 on the left, 0.007 on the right and 0.05
on the middle.Cue – Thou speak’st
aright; I am that merry wanderer of the night…He answers with – A
barking dog would do well to hold his tongue in a dangerous neighborhood.Old Clock: Go to the
big metal old clock at the end of the room. Look close at the squares with hobo
language.Click on the hobo
language glyphs deduced from the line given by each ham operator. Be sure to
press the glyph in the same order it is stated in the line.
Flute – Leave by road
when the owner is in, because then there will be thieves about.Press bottom square on
the second column from left, bottom square of the first column on left and
middle square of the last column on the right.If correct, the next ham
operator’s name will come up.Thisby – The authorities
are alert for bad water, so do not go this way.Press middle square of
the first column on the left, top square of the last column on the right
and bottom square of the last column on the right.Pyramus – A barking dog
would do well to hold his tongue in a dangerous neighborhood.Press the top square on
the second column from the left, top square of the first column on the left and
top square of the third column from the left.Bottom – This is not a
ham operator but remember the letter we read that was on the drawer under the
window seat at Emily’s room.Josiah wrote to Gloria,
Emily’s mother – I mean this from the Bottom of my heart: You are a kind lady who
sparkles like good water and makes me think that the sky’s the limit.Press the bottom square
of the third column from the left, middle square of the third column from the
left and middle square of the second column from the left.A slab comes out from
the bottom.Board Game: Your goal
is to reach the end of the path and to land exactly on the last spot on the
board. Each card can only be used once. You do not need to use all the cards. To
take a shortcut, you must be on a spot with a picture on it and use the same
picture to take the pathway. Good luck!Click on the
instructions to show the board game.The reset button is on
the right. Click on a picture-number and the peg will move automatically.There can be other set
of numbers to win. These are the numbers I got – Click on 4 8 10 6 1 7 2 9 & 3.If done correctly, a
golf ball will pop out of side of the clock. Take the gold golf ball and
read the note on the slot the ball came out of.The note says – Take
this to Tiny Town. And for oodles of fun, use it there to hit a hole in one.Miniature golf course:
Go to the miniature golf
course. Enter through and automatically go to Hole 6 – Tiny Town.Place the gold golf ball
as close to the hole that appeared after the brick was raised. Tap it to go in
that hole and see it go to the Part 2 hole. The ball released a key from the
water tower behind the sign. Take the key.
Inn:
Go back to the Inn and
hear Jane and Emily. Talk to Jane. Go up and talk to Emily. Emily thinks she’s
having a nervous breakdown. She will not listen to you at all. Go down and talk
to Jane. Go to the car and drive to the bank.
Be sure that you have
enough gas in the tank without needing to refill.
Bank: Talk to Mr.
Archer about the new key and ‘ace in the hole’. So it is Clara Pickford’s aka
Josiah’s key. Look at the contents of the safe deposit box. See the real Last
Will and Testament of Josiah Crowley. Take a look at the picture and —- Oh
Really!
Automatically be driving
to the Inn.
Car chase:
You are now in for a car chase. Be sure that you have the car in sight or the
baddie will escape. Click the cursor immediately to follow the car. Isn’t it
great to have a second chance. Once the ‘goes to state line’ is mentioned,
immediately take the closest way to go to the state line right of the railroad
station. Hear a crash and watch the end scene.
Congratulations on
solving Nancy Drew’s first mystery.
This
document may not be distributed without express written permission of the author
and the content may not be altered in any way.
For
Questions or Comments on this Walkthrough,
Please write to:
MaGtRo
Copyright © 7/2005
MaGtRo