Nancy Drew: Last Train to Blue Moon Canyon
Nancy Drew: Last Train to Blue Moon
Canyon
by Her Interactive
Walkthrough by MaGtRo
September 2005
Gameplay: This point and click game
comes in 2 CDs and need CD1 in the CD-Rom drive to play. The Main Menu has the
new game, load-save game, continue, second chance, game setup, credits, help and
exit game. Game setup has voice, music and special effects volume control and
closed captioning. Help has directions on how to play the game and other
information.
After
clicking on New Game, select the level of gameplay as senior or junior level.
Click on Gameplay overview to learn how to navigate throughout the game and the
different settings in the game. There are unlimited save game slot in this point
and click game.
This
walkthrough describes both junior and senior detective. The sequence shown is
not necessarily the only way to get through with the game. The game is not
linear in most parts. The gameplay puzzles are the same in both senior and
junior level. The junior level has a checklist and hints can be obtained by
calling Bess Marvin.
This
game can be played in any order. This walkthrough is just one way of
gameplay.
Nancy was invited by the Hardy Boys to join in a train trip
to Blue Moon Canyon. The other guests are John Grey, a ghost hunter;
Charleena Purcell, a romance book writer and Tino Balducci, a policeman. The
hostess is Lori Girard, who explains the reason for the invitation to go to
Copper Gorge in Colorado and her restoration of Jake Hurley’s train. Jake’s
wife, Camille died in the train. The train was found abandoned in Blue Moon
Canyon in the middle of Nevada desert. The engineer was found dead and no
traces of Jake. Lori wants the guests to find Jake’s lost mine. The train passes
through a tunnel and Lori disappears.
Find Lori and look around the train
The train comprises of the engineer’s car, coal bin, dining
car, sleeping car, Camille’s car, Jake’s car, the caboose and the lounge
car.
Dining car:
Talk to Charleena. She doesn’t remember Nancy at the Shadow
Ranch episode. Talk to Joe and Frank Hardy. There is a pencil in
inventory.
Kitchen – Go forward to the kitchen and use the phone
to talk to the engineer. Look at the stove and see a square and a duck on the
stove door. The exit is closed because the train is moving. Look at the pipes
and wheel right of door. It is a steam valve. Read the warning to not open
unless the pipes are connected.
Dining room – Open the trunk right of the entryway
and see a Salmon ad from Flippy Fin’s – Fresh from a hand from the deep and the
pictures of fins. Turn right and click on the picture of the eagle. We’ll get
back to this puzzle later. Look close at the shoes on the chair. The shoes are
both left feet and have a Sadie Crawford label.
Bar – Talk to Charleena and learn about Jake and his
wife. Turn right and click on Jake and Camille’s portrait left of the entryway.
Learn of Camille’s love of singing and dancing and her visitations after her
death. Exit to go to next car.
Cell phone – Use the cell phone and call Bess Marvin
– click ‘dir’ and select Bess Marvin. Then click ‘dial’. Learn about Lori and
update the girls. The cell phone has camera to take pictures and menu to view
pictures. In junior level gameplay, hints can be asked of Bess.
Sleeping car:
Look close at the mountain goat’s left eye – some kind of
gemstone. At the right wall is the emergency brake. If you pull the lever of the
emergency brake, game ends. Look close at the table on the other
side.
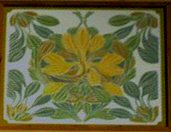
Floral tiles puzzle – Click open the drawer of the
table and see disarranged tiles that are a replica of the tile on top of the
table. The object of the puzzle is to arrange the tiles to be similar to the
one on top of the table. Right click to rotate tiles. Click hold a tile and
drop it over another tile you want to replace.
Take the paper and read: ‘Left pick ax and lamp
with Buell for safe-keeping. To open what’s closed, lead is the
key’.
Go to the other end of the car pass the sleeping rooms. Note
the framed ‘A Tale of Two Dolls’, a poem about Yawning Alice and Edna the
Terrible. Click on the grate close to the floor at other side of the train. You
need 4 numbers to unlock the tumblers. Another puzzle to get back to later. Exit
to the next car.
Camille’s car:
Go forward to the end of the car and enter room at right.
Talk to John Gray and learn about ghosts and Tino. Look around.
Yellow couch – Take the #7 slug and read The
Little Book of Samplers. Note the common motifs and their meanings. Turn
left.
Trunk on floor – Read the paper behind the trunk –
‘Sickly Sara caught a germ so new. It made one of her pretty green eyes to
blue’.
Camptown Races – Look at the horse jumping game on
the table across the couch.
Camptown horse jumping puzzle – The object of the
puzzle is to successfully get the horse to jump clear of the barricades. Click
on the key on the left to wind the game. Press the red button on the right to
make the horse jump clear of the barricades. Get the rhythm of click to jump,
wait, click to jump, etc…
When ‘I did it’ is said – take the Camptown Races music
sheet. Note the notes at bottom of music sheet.
Plaid box – Go left, turn around and look close at
the plaid box on the chair. Read the Krolmeister (I thought they’re a nail
factory) certificate for a doll named Teddy Eberhardt.
Piano – Place the Camptown music sheet on the piano
and try to play. Oops, we’ll wait until John is not here.
Corner table with box – Go to the corner and look
close at the locked box. Open the drawer and see the piano notes that identify
the keys. Look close at the blue hair ribbon – Thomasina O’Neill.
Ornate grill – Look close and click on the ornate
grill below the sampler and the different looking bolts. It needs a special
tool.
Sampler – Look close at the sampler and take note of
numbers associated with symbols-pictures. Note the train cars. The next car has
owl and cherries. A red headed Awful Ursula is sewn at the center of the
sampler. Exit and go to the next car.
Jake’s car:
Enter the room on the right. Talk to Tino. Take the #3
slug. Look around. Note that a pick ax is missing from the tools behind
Tino. Go left of the desk, turn around and click on the purple gem on right leg
of the cougar statue.
Periodic table – Look close at the things on top of
the table-bookcase at middle of room. Read through the Gemstone book to identify
the different gems. Click to look close at the picture of the 2 dolls beside
Camille – Hagar Anderson with suspenders and Chantilly Hildegard in a full
skirted dress. Look close at the cigar box with Ag above the ornate colored
petals lock. Hmm…, need more data. Look above and click close to read that Ag
is silver.
Go to the table opposite the periodic table. Look close at
the stamp on the right and note JH stands for Jake Hurley. There’s a Leaping
Lizard game on table. Go to the globe and see another gemstone on the base of
the globe stand. Look right of the sofa and read the certificate for Eliza
Sandberger, a doll with red ribbon. Exit the room and go to the end of the
car.
Scale – Look at the locked door right of the scale
built on the wall.
Open the caboose door using the scale and slugs –
The door has an owl and cherry on it. Look close on the scale and see that the
owl and cherry symbols are above red bulbs.
The object of the puzzle is to light up the bulbs under
the desired picture when slugs are placed on the right and/or left
pan.
The correct number of slugs is based on the position of
the symbol-picture. If the picture is in second position, 2 slugs are needed
or if the picture being worked on is on 4th position, 4 slugs are needed.
Each symbol-picture has a number connected to it as shown
by the sampler. This is the number that should be the result of the
subtraction of the slug numbers on the left and right pans. This is shown by
the number at the center between the pans.
Go to the sampler in Camille’s car and see that the owl is
7 and cherries is 10.
Place one slug on either pan to light up the first symbol.
Since the owl is the first on the row and the number on the sampler is 7 –
place the #7 slug on either pan. See that the owl is lit.
Now, we need 2 slugs on the pan to light up the second
symbol, the cherries. Since the sampler number for cherries is 10, place the
#3 slug to add to the #7.
Hear the door open. ‘That square and the duck look very
familiar’. Remember the oven.
Pull back and go through the now unlocked
door.
Caboose:
Tool chest – Look close at the tool chest on the
right. Open the drawers. Take the #8 slug from the top drawer. Pull back
to close drawer. Read the paper from the second from top drawer. It states:
Silver is orange, blue, green, red, purple, yellow.
Plan – Open the third from top drawer and lift the
base to get a plan of the machineries in the room. Steam is needed to
power the machineries. Also needed are spyglass, pickaxe and a map. The gems:
citrine, amethyst, zircon, peridot, tiger’s eye and tourmaline are also needed.
Keep a lookout for those items.
Open the bottom drawer and read both sides of the torn
paper. It mentions that Naughty Tina doll’s face was cracked.
Machineries – Look around at the different
machineries. See where the pickaxe should go. Click on the wheel and look close
at the machine that opened up. The lamp and the spyglass go on the 2 bowls at
end of the arms. Look at the middle machine with 6 arms. This is where the gems
are placed. Wonder what goes on the flat topped machine on the right. Open the
Chinese pagoda stand by the door and see 8 lettered squares. Another set of
puzzles for later.
Tile door puzzle – Look close on the left of the
ornate locked gold door. This is a memory puzzle. The object of the puzzle is
to depress all the tiles by pressing a sequence of tiles. This is a random
puzzle.
Find one tile that stays pushed in when clicked on. Then
look for the second tile that stays pushed in after the first tile is clicked
on. Find this by clicking on first pushed in tile and click on other tiles
until you get both tiles to remain pushed in. Then click on the first and
second tiles again to depress them and look for a third tile that stays pushed
in. Do this until all 9 tiles are depressed or pushed in.
The door unlocks. Go to next car.
Well, well, well. Look who’s here! Take Jake’s letter to
Ruth Kensington. Learn Lori’s version of this trip and about her guests.
Jake’s letter
Lounge car:
Read Jake’s letter. To get to the mine: need a map and the
projector has to be functional. The placement of the stones is known by someone
who holds a warm place in my heart. But to get to his name, the dolls have to
ordered. To order the dolls, the name of Camille’s dancing shoes has to be
known. Then do her favorite steps on the dance floor. Camille’s four words are
also needed to power the projector. Rub off – that’s a clue, eh.
Name of Camille’s dancing shoes – Turn around and go
right to the dance floor. Take the dancing shoes and look close. Call Bess on
the cell phone and ask about the maker of the shoes. Take a picture of the shoes
by clicking on ‘cam’ button, move the square to center on the shoe label and
then click. Press the ‘send’ button and then press ‘send’ again when Bess’ name
is selected.
Look around the room. See a hutch with glass door and a
locked drawer across from the dance floor. Look close and open the trunk left of
door. Take the socket wrench. Look at the head of the wrench and see the
familiar shape that was on the bolts of the grate in Camille’s car.
Get the map:
Letter stand – Look close at the Chinese pagoda stand
right of door and see letters on the panel.
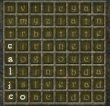
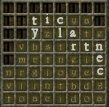
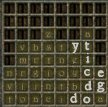
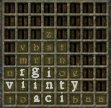
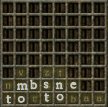
Word Search Puzzle – This is like the newspaper
word search puzzle. Look for words and then click on each letter to form that
word. The letters must be adjacent to each other. Then do the next word and so
forth.
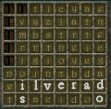
Based on Jake’s letter, we need to look for Calico,
Silverado, Central City, Dodge City, Virginia City and Tombstone. Click on the
letters until only 8 letters are left. If a wrong letter is pressed, press it
again to deselect it.
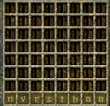
All that’s left is: n v r z t b a a. ‘Guess I’m
done’. Exit the lounge car to go to the caboose.
Nancy states ‘that must be the projector Jake’s letter
mentioned to Ruth’. Turn right and see the stand which also has a Chinese pagoda
decor.
Chinese pagoda stand – The letters from the Chinese
pagoda word search puzzle at the lounge car must be the letters to be added
here. Enter: n v r z t b a a. Wow!!!! Look at that – we got the
map!
Now we need to make the projector functional. For that we
need steam power and placement of jewel from a man we need to get the name from.
The name is from order of dolls and the doll order needs the name of the dancing
shoe maker. Call Bess and find out the name is Chaussettes Chatoyantes. Go to
Jake’s car.
Camille’s favorite dance steps:
Jake’s car: Talk to Tino. Nice job! Look close at the
cougar’s gem.
Cigar box – Look close at the cigar box under the
Periodic Table. Look for Ag on the periodic table and see that it is silver.
Remember the paper seen in the second from top drawer of the tool chest at the
caboose states: Silver is orange, blue, green, red, purple, yellow.
Look close at the colored petals wheel of the cigar box.
The colors can be rotated by the turn arrows when the cursor is place on the
side of the lock. Pushing the center gold part resets the puzzle. The color
under the arrow on top is entered when the arrow is clicked.
Rotate the petals to place the silver colors (orange,
blue, green, red, purple, yellow) under the arrow: orange under the arrow at
top, click arrow, blue under the arrow at top, click arrow, green under
the arrow at top, click arrow, red under the arrow at top, click arrow,
purple, click arrow, yellow petal under the arrow at top, click arrow.
Take the colored petal wheel.
Open the box and read the letter about the lamp from
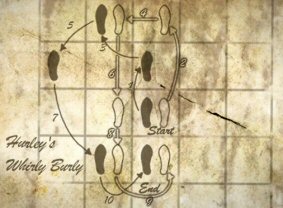
Thomas Willson. The lamp needs carbide. Take the dance step diagram of the
Hurley’s Whirly Burly.
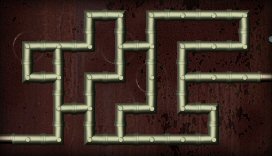
Grill pipes – Look close at the grilled cover on
the wall right of the entryway. Arrange the pipes so that all the pipes are
connected. There all done!
Take the tiger’s eye gem from the base of the globe.
Go to the lounge car.
Lounge car: Go
to the dance floor.
Dance step puzzle – Follow the Hurley’s Whirly
Burly dance step diagram by clicking on a shoe and then clicking the shoe on a
square you want it to go. Click on the dance shoes and then click on the dance
floor to start the puzzle. The hutch opens.
Pick up the tourmaline dropped from the hutch.
Order of Dolls:
Doll puzzle – Open the hatch and see the dolls. The
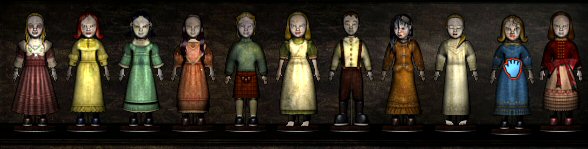
object of the puzzle is to arrange the dolls to spell the name of the dance
shoe maker. The first letters of the names of the dolls make up Chaussettes
Chatoyantes. The dolls can be identified based on the description of where
the name are seen and some other characteristic.
From left to right
Name of doll
Where seen
Characteristic
1
Chantilly
Hildegard
Picture with Camille at Jake’s car
Full skirt
2
Awful
Ursula
Sampler at Camille’s car
Red hair
3
Sickly
Sara
Drawing behind trunk at Camille’s car
Green and blue eyes
4
Edna the
Terrible
Poem at sleeping car
Crying and says ma ma
5
Teddy
Eberhardt
Plaid box at Camille’s car
Plaid kilt
6
Sadie
Crawford
Shoes at dining car
Barefooted and 2 left feet
7
Hagar
Anderson
Picture with Camille at Jake’s car
Wearing suspenders
8
Thomasina
O‘Neill
Hair ribbon on drawer at Camille’s car
Hair disarranged
9
Yawning
Alice
Poem at sleeping car
Wearing nightgown and asleep
10
Naughty
Tina
Note at tool chest at caboose
Cracked head
11
Eliza
Sandberger
Paper right of couch at Jake’s car
Red
ribbon
Open the drawer and take #1 and #2 slugs. Look at
some old pictures pasted on a paper. Go to Jake’s car.
Name of someone who holds a warm place in my
heart:
Jake’s car:
Scale for square and duck – The stove in the
kitchen has a square and a duck on the door. Based on the sampler, the
square’s number is 4 and the duck is 1. They are the 3rd and 4th light, so
there’s a need to use only 3 slugs and then 4.
Place 3 + 8 on one pan and 7 on the other. This lights up
the square.
Place 1, 2 on the pan with 3 and take out 8, leaving 7
alone on the other pan (1 + 2 + 3 on one pan and 7 on the other). This lights
up the duck.
Dining car: Go to the kitchen in
the dining car and on the way, you might see a ghostly figure in one of the
windows. What is that! Talk to Charleena completely. Talk to the Hardy Boys at
the dining room especially about the engineer and Buell. See the picture of
Buell’s shop at Copper Gorge. Go back to the bar but turn around first on the
entryway. Click on the button under the dining room table and see how the
bookcase moved and how Lori disappeared. Talk to Charleena again.
Stove in Kitchen – Click on stove door and read the
work pay receipt for James Thurston, the engineer. Thurston is the someone who
holds a warm place (stove) in my heart.
Phone – You might want to call the engineer every
once in a while. He might be lonely alone in his cab.
Talk to the Hardy Boys about Lori and Charleena. Look up and
click on the chandelier above the dining room table. Take the zircon gem.
Talk to Charleena and learn about a storyline taken from Lori’s idea. Talk to
the Hardy boys again about James Thurston.
Sleeping car: Take the olivine (peridot) green
gem from the left eye of the mountain goat.
Camille’s car: Look at the
picture of Jake and Ruth on the wall.
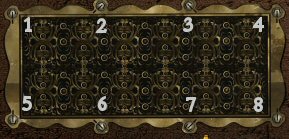
Ornate grill screws – Look close at the grill below
the sampler. Use the socket wrench on the screws to open the grill. The object
of the puzzle is to turn the screws to get the single line on the screws to
even up to the line on the grill.
Turning one screw might turn itself or up to 3 screws at a
time. Check which screws affect what other screws. Then turn the screws to
point to the line on the grill until all screws are done. Pull out of the
puzzle resets the puzzle.
Screw 1 turns 1 and 5, 2 turns 2 and 3, 3 turns 1 and 3, 4
turns 2 and 4, 5 turns 5, 6 and 8, 7 turns 7 only and 8 turns 7 and
8.
Turn screws 4 2 3 1 5 6 8 7 until the lines are aligned.
Grill removed.
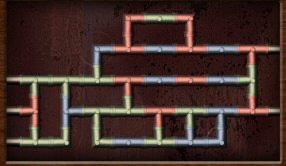
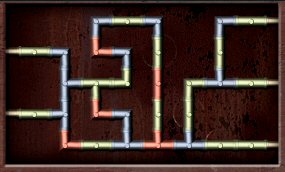
Ornate grill
pipes – Arrange the pipes so that all the pipes are connected.
Align the 5 pipes by the side outlets. Then arrange the
blue pipes (3 clicks), then do the red pipes (1 click) and lastly arrange the
light green pipes individually. Here we go!
Emergency Brake
mystery:
Talk to John especially about the glowing lights. Talk to
Tino at Jake’s car. Talk to Lori at the lounge car. Oops! Somebody threw the
emergency break (can happen earlier or later in the game).
Talk to the Hardy Boys. Talk to Charleena. Look at the
emergency brake at the sleeping car. Talk to John in Camille’s car. Call Bess on
the cell phone.
Talk to Tino at Jake’s car. He shows a thermometer that he
found and blames John for the emergency brake incident. Look at the Gem book and
see that peridot is a form of olivine. Talk to Lori.
Talk to John and hear a recording. Ask him about the
thermometer. Take a look at the packing material of the thermometers by the
trunk on the floor. Go back to Jake’s car and look at the same packing material
on the floor by the desk. Nancy should say something about the packing material.
Talk to Tino. If he doesn’t want to talk before you ask about the thermometer –
take a walk around and then comeback and ask him about the thermometer. He will
later admit to the emergency brake fiasco.
Talk to the Hardy Boys about James Thurston, the engineer.
This will trigger the arrival at Copper Gorge.
Copper Gorge
Buell’s Museum and Taffy
Shop:
Talk to whatever this miner is. He, she, it is a descendant
of the Buell that Jake knows. Look around and play the games.
Gold Rush – The object of the game is to get the
prospector up the mountain before the yeti. The prospector climbs up when the
released balls enter in the yellow holes of the donkey and dynamite. If the
balls go through the pink holes of the villain and snake, the prospector goes
down.
Click on start and pull the lever at right. I did this
puzzle using single ball (slow clicks) or shower of balls (fast clicks)
released. Either one works well on replays. Take the gold nugget
token.
Horse race – The object of the puzzle is to get a
horse of your choice to the finishing line. Selecting the winning horse is a
game of chance.
Select a horse by pressing a number, pull the start level
and watch. Play until you win.
Take the horseshoe token.
Happee Taffee – Insert the 2 different tokens and
take taffee on a stick.
Jake’s trunk – Look around and check the trunk by the
employee’s door. Talk to the proprietor about the trunk and Charleena’s
auto-graphed.
Train:
Talk to Charleena about Fatima. Now to look for a
pen.
Pen – Ask John and then Tino about a pen. Tino wants
you to best his score on the Leaping lizard game.
Leaping lizard game – The object of the puzzle is
to remove balls and to have less than 5 balls remaining.
Remove a ball by jumping a ball over that ball to an empty
space. Keep the remaining balls as close to each other so that they can be
removed later. Empty one group of balls at a time.
Take the pen.
Talk to Charleena and take the auto-graphed picture.
Go back to the museum. Before you can talk to Fatima, the
Hardy Boys talk about finding the descendant of James Thurston, the engineer.
Frank will work as a short order cook. The other characters left to look for the
mine and they are gone from the train. Go back to the train.
Note: Go to Camille’s car first and do the piano puzzle
before going to Jake’s car for the jewel.
Camille’s car: Go to the piano now
that John is not here.
Camptown piano puzzle – Play the music sheet taken
from the horse jumping puzzle.
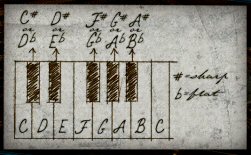
Review the scales on the drawing at the drawer on the
corner table. With the music sheet on the holder, click on piano keys. Click
on the keys: G G E G A G E E D F E D C.
Take spyglass.
Jake’s car: Go to the mining
tools behind the desk and look close at the Carbide can. Open the can and take
carbide. While at left of the desk, look close at cougar and take the
amethyst.
Talk to John in Camille’s car. Talk to Charleena. Go back to
town.
Cemetery:
Click on cemetery in the mountain left of the screen. Talk
to the creepy voiced caretaker. He dropped the crypt key on the grate. Look
close on the grate in front of the door and see the key. Pull back away from
grate. Use the taffy on the stick on grate and then on the key. Take crypt
key. Use crypt key on keyhole.
Crypt – Once inside, take the #6 slug from
left side of steps. Go down.
Camille’s tomb – Look close and note the word
Copper over the familiar indentation. Pull back and look up on the color table
above.
Click on Pb (lead) and note the colors: red, green, blue,
orange, yellow, purple. Nancy should say Pb.
Look at the Cu (copper) colors: green, red, purple,
yellow, orange and blue.
Look close at tomb and place the colored petals wheel on
the indentation.
Rotate the petals to place the copper colors (green, red,
purple, yellow, orange and blue) under the arrow: green under the arrow at
top, click arrow, red under the arrow at top, click arrow, purple under the
arrow at top, click arrow, yellow under the arrow at top, click arrow, orange
under the arrow at top, click arrow, blue petal under the arrow at top, click
arrow.
A secret drawer pulls out. Take the citrine
gem.
Look-click at the 4 posts at each corner of the room. Hear
Nancy talk about rubbing.
Museum: Talk to
Fatima. Hot dang!
Jake’s trunk – Remember the note taken from the
flower tile puzzle at the sleeping car. It states: Left pick ax and lamp with
Buell for safe-keeping. To open what’s closed, lead is the key.
So lead means the element lead or Pb. The colors of Pb are
seen in the color chart in Camille’s crypt.
Place the colored petals wheel on the indentation. Press
the center to reset the puzzle.
Rotate the petals to place the lead (Pb) colors (red,
green, blue, orange, yellow, purple.) under the arrows: red under the arrow at
top, click arrow, green under the arrow at top, click arrow, blue under the
arrow at top, click arrow, orange under the arrow at top, click arrow, yellow
under the arrow at top, click arrow, purple petal under the arrow at top,
click arrow.
Take Jake’s lamp and #10
slug.
Talk to Fatima about the pick axe. She wants you to do
something for her.
Taffy Sorting puzzle – Enter through the Employee’s
only door beside Jake’s trunk. Take some wax paper from the table after
permission is granted.
Look at the taffy machine on the left. The object of the
puzzle is to click-grab the good taffies and place them in their correct boxes
above. Allow the ‘rejects’ to pass through to the end of the conveyor
belt.
The taffy to be sorted are green apples, yellow bananas,
blue blueberry, purple grape, orange mango and red strawberry. The rejects are
smaller or have spots.
Press the start button and good luck! No eating taffy
while working.
Talk to Fatima again. Take the pick axe. Exit museum
and the cell phone rings. Talk to Frank at the Burger place.
Hamburger puzzle – The object of the puzzle is to
fill up the order seen on the order ticket hanging on the left. Make the
burger by clicking on an ingredient and then click it on the burger. When done
click the bell at top of the counter. The wrong ingredients can be thrown in
the ‘trash’ at bottom right.
Volcano Burger – Onions, jalapenos, hot mustard, bacon,
cheese. Ring bell. Listen to the old man talk about Jake Hurley.
Classic Burger – Lettuce, tomato, pickles, mayo, ketchup.
Ring bell. Listen to the old man talk about Jake’s wife.
Hayashi Burger – Avocado, tomato, fruit jelly, pineapple,
cheese, mayo. Ring bell. Listen to the old man talk about how James Thurston
died.
Colossal Burger – Everything minus the p’s: pickles,
peanut butter, pineapple, pickled herring. Ring bell. Listen to the old man
talk about Jake Hurley’s mine.
Chef’s choice – Make a burger that you want. Ring
bell. Listen to the old man talk about how to find the old mine. The eye
of the tiger is fixed on a star. Zircon lies in finger that scar. Amethyst
floats in a hand from the deep. Citrine is what the fowl mouth shall keep.
Tourmaline by a soft arm is ensnared. Peridot rests at the foot of the
mare.
Talk to the Hardy Boys about what Frank heard from the
engineer’s son. Jake is Mark Twain aka Samuel Clemens’ pen pal.
Jake’s machineries and location of the lost
mine
Steam Power for the
machineries:
The wheel in the kitchen requires that all the pipes are
connected. The pipes in Jake’s car and also at Camille’s car are now all
connected. The ones at the sleeping car and at the dining car have to be
connected.
Dining car pipes:
Unlock the eagle’s picture – Check the number of
the eagle on the sampler and find out that it is 2. Go to the scale at Jake’s
car.
To unlock the eagle picture, 6 slugs are needed that end
up with a math answer of 2.
Place 10 + 6 on any pan. Place 1 + 8 + 2 + 7 on the other
pan.
Go to the eagle picture at dining car.
Pipes behind eagle picture – Arrange the pipes so
that all the pipes are connected. Arrange the blue ones (2 clicks) then the
red ones (one click) and lastly arrange the light green pipes individually.
Pulling back out of the pipes resets the puzzle. ‘There that looks
right’.