Nancy Drew: Danger by Design Walkthrough
The Dodo Box puzzles
The object of each part of the puzzle is to move your horse from the starting position to the finishing position before the two predators catch you. Use the controls in the lower-left portion of the puzzle to move your horse. The round button in the center resets the puzzle. Clicking on any of the four “arrowheads” around the round button will move the horse in that arrowhead’s direction. Note that if the horse cannot move in a direction, you will not be able to click on that arrowhead. The following picture shows the solution to this puzzle.
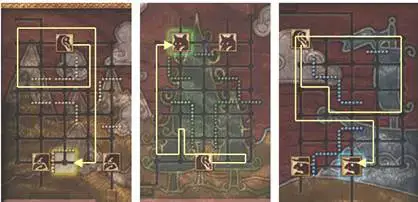
NOTE: In the second (middle) puzzle, you will step up and down along the same tile left of the barrier (to bring the predator down to follow you) before you step further left and dash up and in to the finishing position.
After you solve the last puzzle, you will get a close up of the dodo box. Press the egg-shaped button at the bottom of the box cover to open the box. Pick up and read each of the four notes inside. Nancy will comment on one of them.
Go to your desk and pick up the phone. Dial the Zippy Calling Card number. After three rings, you will now get a different “address book” at the bottom of the screen. Dial the phone number for Lynn Manrique and talk to her. After the conversation, leave Minette’s place.
PONT NEUF
Enter the park, open your inventory and click on the box of chocolates to let the cockroaches go free, as Minette had told you to do. Now go and see Jean Mi.
HOTEL DE VILLE (The Parfaits)
Ask Jean Mi about J.J. A dialog will follow. Proceed as follows to get the most information. Ask Jean Mi if J.J. has done modeling for any other designers in Paris. When Jean Mi refers to J.J.’s having been tricked, pretend to know what he is talking about by clicking on the choice: “Yes. Terrible thing, being tricked like that.” After finishing this topic, talk to Jean Mi about the cropped picture you saw in the magazine in Minette’s studio. Jean Mi will agree to show you the uncropped picture, but only if you will help him by making parfaits for the owner of the café. You have to agree, of course, but how you express this agreement does make a difference. Even if you know what a parfait is, I suggest that you ask, “What’s a parfait?” Jean Mi’s response is not important, but the owner of the café will then be more helpful and “introduce” you to the workings of the “parfait station.”
The Parfaits
After the owner finishes his “introduction,” Nancy will point out the ingredients necessary to make the parfaits. (See picture below)
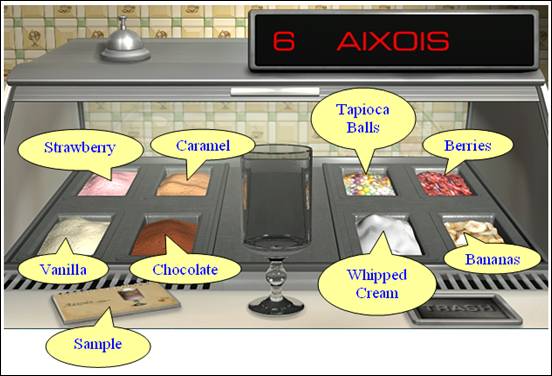
Note: Be sure to refer to what I have called the “Sample” (see the above picture) before you ring the bell “announcing” that the order is ready. That way, you can catch any mistakes you might have made and just throw away the contents into the “Trash.” Otherwise, the owner will catch the mistake for you and you will have to prepare an additional order as penalty!
Prepare the orders as follows.
6 AIXOIS: Whipped Cream; Strawberry; Caramel; Bananas; Caramel.
5 L’ENFER: Chocolate; Whipped Cream; Chocolate; Whipped Cream; Berries.
4 TROPICAL: Bananas; Tapioca Balls; Berries; Strawberry; Chocolate.
5 L’ENFER: Chocolate; Whipped Cream; Chocolate; Whipped Cream; Berries.
4 CORBEAU: Chocolate; Caramel; Bananas; Caramel; Chocolate.
3 MYSTIQUE: Tapioca Balls; Berries; Bananas; Whipped Cream; Tapioca Balls.
2 FANTAISIE: Berries; Vanilla; Tapioca Balls; Strawberry; Whipped Cream.
1. LOULOU: Bananas; Caramel; Bananas; Caramel; Bananas.
[Note of Possible Interest: Recall that the owner had told Nancy that the number before the order indicated the number of orders we were supposed to make. Thus, “6 AIXOIS” at the beginning of this puzzle meant we have to make six orders including that Aixois. But note that the numbers 5 and 4 repeat twice. Thus, either there is a mistake in the game or the owner tricked our poor Nancy into making two extra orders for him.]
As you finish the last order, Nancy will comment and we will be back with Jean Mi. He will show us the uncropped picture which shows the stone disks (or “dials”) before the paint had been splashed on them. Note the little arrows in these “dials” pointing at Roman numbers IX, V, and III. Don’t worry about jotting down the numbers or their order because they have been noted for you in Nancy’s “Case Journal” (the blue notebook at the bottom of the screen). Step out of the close up. Feel free to order something if you like, but you will have to pay for it yourself this time. Go to Dieter’s studio now.
RUE DU BAC (The Photos Assignment)
Knock on the Dark Room door. A dialog will follow. We must now take some pictures for Dieter. Step out of the close up and pick up the list (of pictures you need to take) from the top of the desk on your left, to find that the list is in French. Bring out the French-English dictionary from your inventory and look up the words to learn that
AGRAFEUSE = STAPLER
ARAIGNEE = SPIDER
BOUGIE = CANDLE
CRANE = SKULL
CROIX = CROSS
THEIERE = TEAPOT
Step out of the close ups, turn left and close up on the round table to the right of the Dark Room door. Pick up the camera on your left. Step out of the close up, turn around and go to the hole in the wall right of the bookcase. Use the clock to open the secret passage. (See the Clock Puzzle solution noted earlier.) Enter the passage and close up on the SPIDER (List Item # 2) on your right. Bring out the camera from your inventory. Click on the white, straight button in the top-right portion of the screen to activate the camera. Focus on the spider so that it will appear in the center of the frame. (See the set of six pictures later in this walkthrough.) Click on your left mouse button to take the picture. Go to Minette’s place.
ABBESSES (Photos, Heather, Zu)
Talk to Heather. Nancy will give her the stuffed parrot. Ask Heather about the threatening letter. After the conversation, turn around and close up on the left portion of your desk. Take a picture of the STAPLER (List Item # 1). (See the six-picture set later in this walkthrough.)
Pick up the phone. Call Zu. [As you may recall, that is the guy in the magazine article at J.J.’s place. Note that his phone number now appears in the Paris Address Book at the bottom of the screen.] Zu will tell Nancy that he will give her the information she needs, but only if she gets J.J.’s autograph for him.
After this conversation, go into Minette’s studio. Approach the tea center on your right. Nancy will refuse to close up on it, however, saying she won’t make any more tea. So just focus on the TEA POT (List Item # 6), making sure that it will appear in the center of your camera frame, and take the picture. (See the six-picture set later in this walkthrough.)
Go to Minette. As you approach the red dress display, close up on the dress and click on it. A dialog will follow. Step out of the close up, turn to Minette and talk to her. [Note: Minette will abruptly end the conversation as soon as you ask her about Dieter or tell her about Heather. So – if you are planning to tell her about Heather (and you don’t have to) – cover the other topics first, skip the question about Dieter for now, and just tell her about Heather.] Minette will tell you to go away, but at least you will get to see her reaction.
Leave Minette’s place. A new destination appears on the map. But, if you did tell Minette about Heather, return to Minette’s place (by clicking on ABBESSES on the map). Enter, to take a call from Heather. After that conversation, feel free to go to Heather’s desk and check out her “Fashion Portfolio” (lying to the left of her computer). Feel free also to go into Minette’s studio and now ask her why she broke up with Dieter. After the dialog, go to the park.
PONT NEUF (Photo)
As you enter the park, take a picture of the CROSS (List Item # 5). (See the six-set picture later in this walkthrough). Now go to J.J.’s place.
PLACE MONGE (Autograph)
Talk to J.J. about getting an autograph for Zu, but she will refuse to oblige. Well, there is more than one way to skin a cat (or get an autograph, in this case)! As we know, J.J. writes out every letter that we pick when we play Hangman with her. So ask her to play that game with you and “guess” the following letters, one by one.
Z. U. M. Y. L. O. V. E. J. I. N. G.
As you “guess” the last letter, Nancy will automatically ask for the piece of paper on which J.J. wrote the letters. Put the paper (“autograph”) in your inventory and feel free to play a “real” game of Hangman with J.J. Then go to the new place that had appeared on the map.
DENFERT ROCHEREAU (the Catacombs)
Step forward. After Nancy’s comment, take a picture of the CANDLE and the SKULL (List Items # 3 & 4, respectively). Our photo assignment is now complete! (See picture below.)
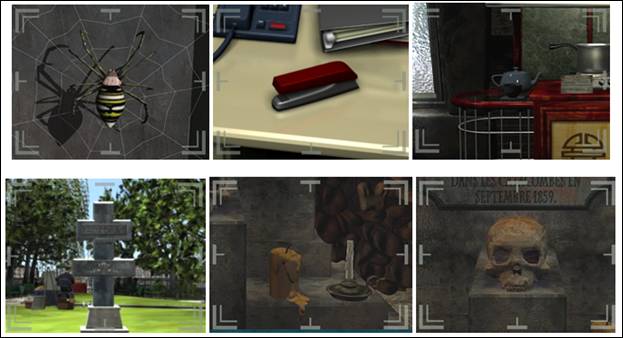
Now put J.J.’s “autograph” in the skull. [Note: The piece of paper will actually go into the skull’s eye. So I like to take these pictures first, just in case that paper sticking out of the skull’s eye might make these pictures “unacceptable” to Dieter.] Go back to J.J.’s place.
PLACE MONGE (Zu’s information)
Call Zu. After the conversation, go to the park.
PONT NEUF (Wetsuit & M380)
Go to Marchand in the center of the park. Buy the WETSUIT for 31 euros.
Note: You can also buy the book of “Common Codes and Deciphers” for 4 euros at this time, but I would advise against it. There is some kind of a bug later in the game (as explained in the next section in this walkthrough). The problem is easily solved, but you can avoid all the hassle if you just buy this book later. You don’t need it yet anyway.
Try to buy the M380 decoder from Marchand, but he will not sell it. He does agree to let you have it, however, if you get him a bottle of Mouton Fouette. Go to the catacombs.
DENFERT ROCHEREAU (The Tunnels)
Approach the skull and click on its top to remove it. Click on the red button. An opening will appear on your right. Go through that opening to arrive in a dark chamber. Move forward and step out of this chamber to arrive in what we will call the Central Hall. As you move further, you will hear the police in the background as the words “Police approach” will appear at the bottom of the screen. Turn around and go back into the dark chamber, all the way to the door. Don’t step out though! Rather, as you reach the door, just turn around and the police voices should stop immediately. At that point, go back out into the Central Hall, cross the plank in front of you and turn right. Take four steps forward, turn left and enter a chamber with a pool of water in it. Go forward and into the water. Nancy will comment.
Note: Nancy leaves her inventory by the “pool” before she steps into the water. In other words, you will not have access to your inventory until you return to this point. But don’t worry. You have everything you will need.
Move forward in the water. You will see the number 2 marked in front of you and the only way forward is down. Note that any time you spend underwater is timed. In other words, you must move fast or Nancy will lose her breath and it will be Game Over. It would therefore be a good idea to at least skim through each underwater section in the walkthrough before you dive, to get an idea of what you need to do below and thus to save yourself some time.
Note: In the following directions, “F1” means take a step forward; “F2” means take 2 steps forward; etc.
Mouton Fouette
Down, F1, Right, F3, Right, F1.
Pick up the bottle of “Mouton Fouette.”
Turn around, take 3 steps forward and come UP to breathe (at number 6).
The Hazelnut (“Noisette”)
Down,
Left, F1, Left, F1, Left,
F1, Right, F2, Right,
F1, Left, F2, Right,
F1, Left, F4, Left,
F2, Right, F1 which will automatically bring you up, stopping the timer.
The Tunnels Safe
Go up the ladder in front of you. Move forward towards the wall safe. Open the cover and close up. Nancy will translate the French words, but the clue actually lies in the French words themselves. Recall that the letter in Noisette’s red diary (that you had found in the secret passage in Dieter’s place) had mentioned devising a code using the Metro route names and numbers. The code used in this puzzle is just such a code.
Note the four colored French words/phrases written in capital on the safe cover. Does the word “PONT NEUF,” at least, ring a bell? Unfortunately, we can’t access the map from here. But if you go back to an earlier Save and check out the map, you will find that each of these words/phrases on the safe is the name of a metro stop. Indeed, the color of the words on the safe is the same as the color of the names of those stops in the map. (See picture below.)
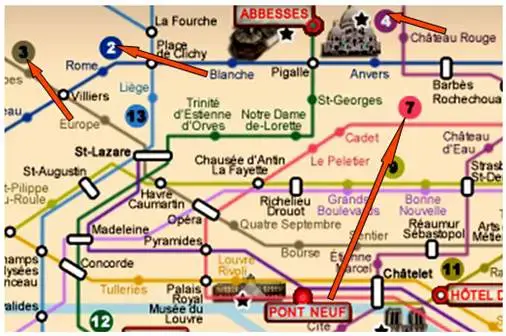
The trick to cracking this code is to determine the number in the map for each colored word/phrase on the safe; and then, click in the numbers in the same order as the corresponding word appears on the safe. Thus,
EUROPE = 3
PONT NEUF = 7
BLANCHE = 2
CHATEAU ROUGE = 4
So click in 3724 and the safe will open. Pick up the object inside. Nancy will comment. Click on the object again to deposit it somewhere (since you don’t have your inventory with you). Turn around and go to the manhole. Step in to get back on the ladder. Take four steps down the ladder, to reach the last dry point on the ladder before you go underwater again.
Down, Left, F2,
Right, F4, Right, F3, and come Up to breathe (at number 2).
Down, F1, Right, F2, Right, F1,
Left, F2, Right, F1, Left, F6 to come up to beginning of the waterlogged tunnel.
Go forward and come back up on the landing. Try to pick up your inventory from the floor on your left. A cutscene follows. (And I thought this game was for girls who weren’t afraid of rats…) Click on the hand icon and you will be able to pick up the inventory this time.
Note: I have played this portion several times and only once did the rat take the code book. So it doesn’t happen often apparently. The one time that it did, Nancy noted that she was missing the code book. I couldn’t find the book anywhere in the tunnels. I returned to Marchand in the park. I couldn’t see the code book on his table, but a hand icon appeared in the empty space where I had first bought that code book from him. I clicked on that icon and was thus able to buy the book once again, but had to pay the full price (15 euros) this time. [The fact that I couldn’t see the book on his table though indicates that there is some bug in this portion of the game.]
Step out of this chamber, turn right and take four steps forward. Turn left, cross the plank and go into the dark chamber. Step through the door to return to the outer chamber (the one with the skull). Leave the catacombs and head for Dieter’s place.
RUE DU BAC (Finishing up the Photo Assignment)
If you have taken the six pictures shown earlier in this walkthrough, you will find Dieter back at his desk. Approach him and a dialog will follow. Pick either response to have Nancy give him the camera and the dialog will continue.
Note: Dieter will end the conversation after you have exhausted the topic on Noisette. So be sure to cover the other two topics before asking him about her. As you start talking about Noisette, Dieter will show you a card with a lot of eyes on it. [We will therefore call it the Eyes card.] Click on the card to turn it over and continue the conversation.
Message on the Eyes card
After the conversation, bring out the Eyes card from your inventory. Click on the card to turn it over to the side with all the eyes on it. With the card still on the screen, bring out the grid (that you had removed from Noisette’s red diary when you first found that diary in the secret passage at Dieter’s place) from the inventory. Place the grid on the Eyes card.
Recall what Lynn Manrique had told you Noisette was saying over and over before she passed away: “RED LEFT … GREEN.” Note the color of the pupils on the eyes in the Eyes card: red, green or gray. Note also the different positions of these pupils: some are to the left, some are in the middle, and some are to the right in their eye sockets. Click on the five eyes that have RED pupils in the LEFT portion of the eyes. Then click on the five eyes that have a GREEN pupil, regardless of their position in the eye sockets. If you click correctly, Nancy will read the following message that has appeared at the bottom of the Eyes card: Sous Lorraine 4154. [Note: “sous” is French for “under.”] Step out of the close up and go to the park.
PONT NEUF (the park exhibits)
Step forward towards the Lorraine cross. Close up on the top of the cross and then, on the inscription. Note the date: 1940-5. Click only on the numbers that the message on the Eyes card had revealed: 4154. The cover below the date will drop, showing the order in which we must attempt the exhibit puzzles and the results we must achieve in the first two puzzles.
The Mouth Puzzle
Step out of the close ups on the cross. Turn left and step towards Malika. Instead of closing up on her, however, turn right, take two steps and close up on the Mouths puzzle on your left.
Click TEN times on the white handle on your right.
The mouths should “say” the following at the bottom of the screen:
Top Mouth: EEEEE
Middle Mouth: AHHHH
Bottom Mouth: OOOOO
Step out of the close up and, if you have clicked correctly, the mouths will not reset. Otherwise, they will resume their original/closed position and you will hear a sound in the background (like someone sticking out their tongue at you!). If that happens, try the puzzle again. When done, turn around and take three steps to reach what Nancy calls “the Windmill.”
The Windmill Puzzle
Click once on the white handle on your right. Turn around. Nancy will comment and a cutscene will follow. Step towards the windmill again and click on the red magnifying-glass icon left of the exhibit. Nancy will tell us that we need to put something there to scare that squirrel away.
We will have to buy a few things for this purpose. While we are at it, let’s also buy some other things that we will need too soon enough. So make your purchases as follows.
Go to Marchand. Nancy will automatically give him the bottle of Mouton Fouette and get the Decoder in return, just as he had promised earlier. Purchase the PIE TIN for 1 euro. [Note: If the rat stole your code book in the catacombs tunnels, be sure to buy that as well from Marchand by clicking on the hand icon in the empty space in the lower-left corner of the table and paying the full 15 euros. As noted earlier, you will not be able to bargain this time.]
Go to Malika then and purchase the following items.
· STAKE for 10 euros.
· STRING for 3 euros.
· “ICHIDO” book for 6 euros.
Finally, go to Monique and purchase the FLASHLIGHT for 3 euros.
Turn around and return to the Windmill exhibit, now on your left. Close up on the exhibit. Bring out the Stake, then the String, and finally the Pie Tin from your inventory and place them, one by one, in the space left of the exhibit where the red magnifying-glass icon appears. The squirrel will not bother us anymore. So
Click on the white handle on the right of the exhibit six times.
If you have done it correctly, the petal at the top should now be (technically, it is lavender, but some people call it purple), i.e., the same color as that of the top petal shown in the clues we got earlier from the Lorraine cross.
The Fish Fountain
Turn around and go to what I call the Fish Fountain, now on your left. Close up on that exhibit and press the red button on your right. A cutscene will show a grate opening under the fish. Step inside.
The Park Passage
Go down the ladder. Turn around, step forward and go down the second ladder. Turn around and go through the passage. Since you have already bought the flashlight, you will not have any problems. Nancy will merely note that it is time to get out the flashlight, but you won’t have to bring the flashlight out of the inventory yourself because it will come out automatically. A cutscene will then take you through the passage.
Caution: This is a very poorly structured cutscene, I think, because it is likely to make some, perhaps even most, gamers rather dizzy from the way it goes winding left and right through the underground tunnel. For those of you that find it unsettling, my advice is to just close your eyes and wait for the sound of a click that will indicate that Nancy has put away the flashlight. Open your eyes at that point and proceed as follows.
Approach the chest in front of you. Open it and retrieve the Key. Step out of the close up, turn around and go back into the tunnel. A cutscene will take you back to the beginning of the passage. [Once again, close your eyes if you find the cutscene unsettling. Open your eyes only when you hear that clicking sound that indicates Nancy has put away the flashlight. Then, proceed as follows.]
Step forward and go up the ladder. Step forward again and go up the second ladder. Click on the grate above to open it and then, step outside. Go to Minette’s place.
ABBESSES (The Final Visit)
Go to your desk. If you had told Minette about Heather (the fact that Heather had written at least one of those threatening letters), you will find a lavender note to the right of your computer. Read it. Nancy will comment.
Feel free to call Lynn Manrique. Exhaust both topics of the conversation.
Now go to the door to Minette’s studio, but DON’T OPEN IT! [Otherwise, it will be game-over and you will have to avail the Second Chance from the main menu.] Instead, close up on the mechanical gadget above the door handle on your right. A dialog will follow. Be sure to SAVE your game here because a timed puzzle is about to follow. Don’t worry though: you will have more than enough time to finish the puzzle if you follow the directions below.
Defusing the Bomb
Open the cover. Another dialog will follow, as the timed puzzle begins. Don’t pay any attention to Minette’s periodic interruptions. They are meant to only distract you and thus to make the puzzle a bit harder. Nancy will answer her for you. The good thing though is that you will be able to continue working through the dialog, unlike some other places in the game where you have to wait for Nancy to finish her comment before you can use the controls.
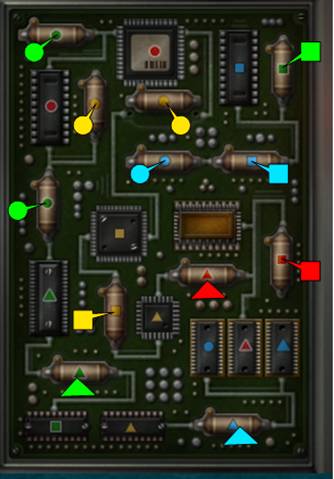
As you open the cover, note the little black-and-white diagram on the inside of the cover, to the left of the fuse panel.
Blackened O + O = (check mark, i.e., is OK)
Blackened O + Blackened Triangle = (check mark, i.e., is OK)
Blackened O + Triangle = (cross, i.e., is NOT OK)
The upshot of these cryptic instructions is that it is OKAY to put together two fuses with the same symbol, even if the color of those two symbols is different. (Thus, for example, it is okay to put a fuse with a red circle in line with a fuse with a yellow circle.) It is also OKAY to put together two fuses with different symbols, so long as they are of the same color. (For example, it is okay to put a fuse with a green circle in line with a fuse with a green triangle.) But it is NOT okay to put together two fuses with two different symbols that are also of two different colors. (For example, putting a fuse with a red circle in line with a fuse with a blue triangle will make an “explosive” combination.)
If this explanation is too confusing, don’t worry. Just follow the diagram below and you will have that bomb diffused in no time at all! Please note the symbols that I have superimposed on the screenshot. You see, I realize that the symbols on the fuses are a bit too small to see. I also realize that just knowing you are being timed tends to make some people uncomfortable. So I have used the superimposition in the hope that it will help make it easier to solve the puzzle. But please feel free to let me know if that technique distracts you somehow, and I will see what I can do to send you a “clean” copy of the solution – i.e., just a screenshot of the solution without the superimposition.
The solution to the puzzle is as follows.
A cutscene will follow the successful completion of the above puzzle. Step out of the close up and go into Minette’s studio. She is not there. Step forward to the pole in the center of the room. Note the indentation (like that of a windmill) at the base of the pole. Before we get to that, however, we need to crack a code with the help of the M380 decoder we just got from the merchant in the park.
The M380 Message
Bring out the Decoder from your inventory. Click on the hand icon that appears on the space bar at the bottom of the screen. The keyboard will flip up, revealing three dials under it. Feel free to refer to Nancy’s notebook to find the roman numerals we saw on the three stone disks in the uncropped picture Jean Mi had shown us after we made the parfaits: IX, V, III. So set the decoder’s left dial at IX, middle dial at V, and right dial at III. Click on the up arrow to come up directly to the typing area. Nancy will comment. Use our own computer keyboard to type the code under the picture of the M380 decoder in Noisette’s red diary. (See picture below.)
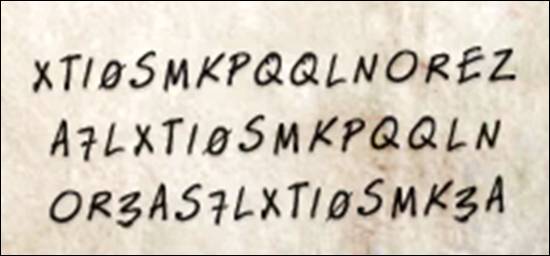
Note: Write the whole thing as one single line, i.e., do not leave any blank spaces or press “Enter” when you type the above three lines.
When you finish typing, Nancy will read the decoded message:
ROUGE, BLANC, ROUGE, BLEU, ROUGE
If you look up your French-English dictionary, you will find that the above is French for:
RED, WHITE, RED, BLUE, RED
Step out of the close ups on the decoder. Note that the indentation at the base of the pole in Minette’s studio looks like that of the object you found in the safe at the catacombs. So bring out that object from your inventory and place it on the indentation, to uncover a panel of five rows of colored bands. Click on the bands to set their colors in the order shown above. [Note: the white band on the pole actually looks grayish.] A cutscene will follow, opening a trap door in the floor on your right. Approach the trap door and go down the stairs.
The Secret Chamber
Go forward in the passage until you come across the metal door. Use the key (that you got from the chest in the park’s underground tunnel) to unlock the door. Enter the chamber. Nancy will comment. Step forward. Close up on the top of the stand in front of you; lift its cover and pick up the envelope. Open the envelope and Nancy will translate Noisette’s letter for you. Note the roman numerals at the end of the letter: X, IV, III.
Step out of the close up on the letter and close the stand’s cover. A cutscene and Nancy’s comment will follow. Close up on the metal box in front of you. Open the cover and close up inside to see the words: “Une Derniere Enigme, Cher Ami.” [You won’t find a translation for the words in your French-English dictionary, but the literal meaning is: “One last puzzle, dear friend.” However, it is the French words themselves and not their English meaning that will actually help us figure out the code we need to enter in the metal box.]
The Lock Puzzle
If you look up Noisette’s diary, you will find that “Cher Ami” is the nickname for the M380 decoder. In fact, the code applied here is the “Shift Cipher” (see pages 6-8 of your Code Book) and 380 is the shift number. The above French sentence is the message we must decode. As the Code Book tells us, such a code can require us to shift the letters either to the left or to the right of the alphabet. In this case, you need to shift to the right, as shown below.
|
U |
N |
E |
D |
E |
R |
N |
I |
E |
R |
E |
E |
N |
I |
G |
M |
E |
C |
H |
E |
R |
A |
M |
I |
|
3 |
8 |
0 |
3 |
8 |
0 |
3 |
8 |
0 |
3 |
8 |
0 |
3 |
8 |
0 |
3 |
8 |
0 |
3 |
8 |
0 |
3 |
8 |
0 |
|
X |
V |
E |
G |
M |
R |
Q |
Q |
E |
U |
M |
E |
Q |
Q |
G |
P |
M |
C |
K |
M |
R |
D |
U |
I |
We now have everything that we need to break the code. So bring out the decoder from your inventory, lift the keyboard and set the three dials to X, IV, III (the roman numbers that were noted at the end of Noisette’s letter). Click on the UP arrow to come up to the typing area. Then, using your own computer’s keyboard again, type the third line (shown in red) at the bottom of the above table. If you have done it correctly, Nancy will comment, as the following line appears on the screen:
DEUX . . . . . . . . . . . . . UN . CINQ . . SE.PT
Feel free to refer to your French-English dictionary to learn that the above words spell out the numbers 2157. Step out of the close ups on the decoder. Close up on the metal box and click in these numbers. The bars will go up. Leave the chamber and go to the trap door.
The Final Conflict
As you step on the gray stairs under the trap door, there will be a short cutscene, but no need to worry. Go up to the trap door and you will hear a dialog outside. Nancy will comment. Open the trap door and step outside. Go around the pole to the red dress on display to the right of the studio door. Close up on the dress. Bring out the “Ichido” book from your inventory and skim through the pages. Then click on the red dress. [Note: It might be a good idea to SAVE your game right after your “opponent” stops speaking, in case you have to replay the “battle.” Don’t worry though because you will have plenty of time to win.]
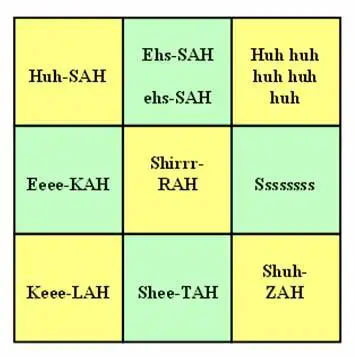
Listen closely to your opponent’s Ichido “cries.” Note that your cursor takes the form of a blue box, acting as a shield to block the attack. In the following diagram, I have listed each “cry” according to where you must move your cursor to block the attack that follows that particular cry. Thus, for example, if you hear “Ssssssss,” move the cursor just a bit off to the middle-right of your opponent. [Note: Don’t go to the extreme left or right of the screen or you will miss the attack altogether. Remember: you are supposed to be blocking your opponent’s blows. So stay within reach of those blows.]
As you will soon discover, you can be hit several times and still win! A cutscene will follow your success. So once you have won,
Just sit back and enjoy the ending!
* * * * * * * * * * * * * * * * * * * * * * * * * * * * * * * * * * * * * * * * * * * * * * * *