Nancy Drew: Curse of Blackmoor Manor
3. Brigitte’s 5 muses:
In Nancy’s room, look
through the telescope and see it focused on the Sun God mural.Insert the lens, look
through the telescope and see new pictures that are numbered.Move the lens around and
see 5 Muses that are numbered 1-5.4. Betty at Great Hall:
Remember what else Brigitte wrote – Betty will wager Penny’s keys. We saw those muses at Betty’s card game. Let’s go there. Click on Betty to play.
She stopped working. Look at base of card stand and click on hole. ‘I need
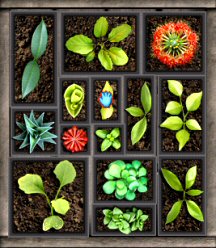
something to wind it up’.Seedling puzzle:
Talk to Mrs. Drake in the conservatory. She’ll look for the crank while you
arrange the seedlings to fit in the box. The object of the puzzle is to fit all
the seedlings in the box.Click to take the seedlings and place it on the box. Right click
to rotate the seedlings. There!
When done, leave the conservatory and then come back.
Mrs. Drake will be back. Talk to her again about Hugh and Jane’s mother. She
gives the crank.Betty’s card puzzle:
Brigitte wrote – Select each muse in order and Betty will wager Penny’s key.Use the crank on the hole at base of the card booth. Click on the cards to start
the game.Unlike any other regular
game with Betty, give Betty the code to play for Penny’s key.Click on the 5 muses in
the order seen in the mural through the lens: 1. Melponeme, 2. Erato, 3.
Terpischore, 4. Euterpe and 5. Thalia. Press red button. Betty then places the arrowhead as wager.The object of the game
is similar to Jane’s matching game. Complete more 3-identical cards than
your opponent, Betty.The right stack above is
the main stack of cards ready to be dealt and the left stack is Betty’s. Your
dealt cards are open on the table.Remember her cards that
she opens up in her left stack. Click on any of your open cards to see if Betty
has it in her hidden stack.If you click on your
card that has a match with hers, you will take those cards from her hidden stack
and it is shown on the table’s open cards. During her turn she will try to match
what you have.Every turn continues as
long as there is a matched card done. If not match is done, it will be the
opponent’s turn. Get 3 matching cards and the green light will show above. Good
luck!Take the arrowhead
for the Venus -cupid column from the cup at the base of the card booth.
Library: Talk to Nigel and he will say
goodbye. This manor is haunted. Hehehehehe!
One more key to go.
Preparing the forge
Unblock the oil flow
to the forge: Time to see where all these ancestors’ keys
fit. Also, remember what Penny wrote – The knights block
the passage of the oil to the forge.
Insert keys on the columns and a knight holding a shield is
seen. Turn the pipes on the shield to make a continuous pipe line surrounding the center of
the Great Hall. The clue to this is seen in Jane’s Mutus Liber book.
With the back to the stairs:
Mars column – Insert the helmet
key on headless knight closest right of the stairs and arrange the pipe to make an angle facing the center of the
hall.Jupiter column middle right of stairs: Insert the
lightning bolt on Jupiter’s hand and arrange the pipe to make a T.Saturn -Tempus Fugit
column: Insert the clock and arrange the pipe to make an angle facing the center of the hall.Mercury column: Insert the rod and arrange the pipe
to make an angle facing the center of the hall.Moon column: Insert the full moon and arrange the
pipe with the wide end sticking up – inverted T.Venus – Cupid column: Insert the arrowhead and arrange the
pipe to make an angle facing the center of the hall.If the columns are done correctly – <glup glup,
gurgle> It
sounds like I did something right.
Light the forge:
Based on Corbin Penvellyn’s
statement in the journal, there are 3 gargoyles and to touch Mercury’s wand to
the master gargoyle, 2 others and to the depository of the forge’s fuel.
Timed Gargoyle run:
The object of the puzzle is to activate the 3 gargoyles with the mercury wand in
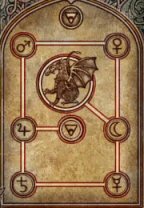
time to light the oil in the hole at center of the Great Hall. Penelope Penvellyn
made reference to lighting the athanor using earth in liquid form, air, water
and fire. See the graphic above of the page from Mutus Liber book. The center
has the earth sign (oil). The air was through the wind puzzle of Penny’s, water
through the well puzzle of John and this should light the fire in the forge.Go to the gargoyle
beside the West Hall secret passage, left of Linda’s room. Click the wand over
the head of the gargoyle. See the eyes light up.As fast as you can, go to the gargoyle on right wall just inside
the door of the room with the green dragon.Click the wand on top of the gargoyle. See the eyes light up.
Turn around and click the wand on the leaf like knob with the
cloth. The entrance to the slide opens.Slide down to come out to
Great Hall.Turn left to the gargoyle.
Click the wand on top of the gargoyle. See the eyes light up.
Back up twice until the center of the
Great Hall.Click the wand on the hole on the floor.
Poop!
Something tells me I succeeded in lighting the forge.
Making
the last key
It is time to work on that giant keyhole
on the wall of the alchemy lab.
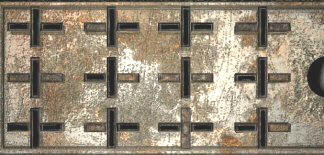
Mold: The mold picked up at the forge has 12
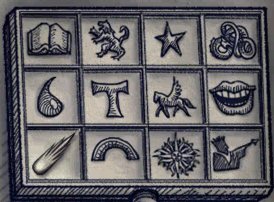
crosses, the lines of which can be removed. The picture seen in Jane’s Mutus
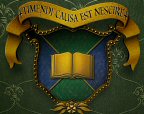
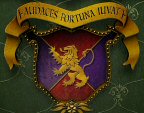
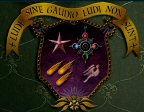
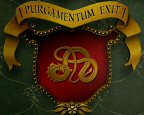
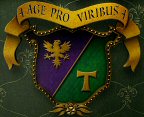
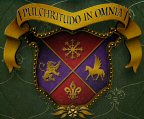
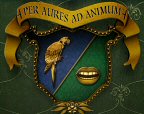
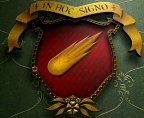
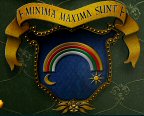
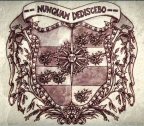
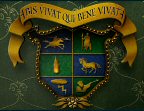
Liber book shows 12 squares with different drawings on it.Look at all the coat of arms
in the Great Hall. Notice that there are lines at the ends of the
Latin motto. Corbin’s coat of arms is in inventory given by Nigel.
Correlate the coat of arms to the drawings in the mold and then
to the lines found at the end of the coat of arms motto.Take the mold from inventory.
Based from the correlated lines from the coat of arms and the drawing from
Jane’s Mutus Liber, arrange the lines on the mold.Click on a bar to remove it and make a shape-line
hole similar to the
correlated Latin motto lines.

The
Penvellyn treasure
Alchemy lab: Enter either the east or west secret
passage by the gargoyle.
Enter the moving rooms and click but do not enter twice on Mars door. Turn
around and exit the Mercury door. Go forward to the Alchemy lab. Click on the
handle or click on the snake on the puzzle panel.
Forge: See the forge is lit and metal is
melted in the hanging pot. With the arranged mold in inventory, click on molten
metal in the pot. See the metal pour in the mold.If the mold was done
correctly, Nancy will say There that looks right. Take
the key.
Insert the key on the large keyhole on the wall by the wind
puzzle. See the Penvellyn treasure on a pedestal. The culprit arrives to take
it. Whoops! Immediately back up. The culprit is trapped in an airless chamber. To save the culprit,
go to the wind puzzle and move the giant warrior to the trap to save the culprit
from harm.
Listen to Nancy relate
what happens next.
Hey, Sassy Detective! Congratulations on cracking the case!
You’ve been awarded the title of Sleuthior Drewis for all-around sleuthing.
This
document may not be distributed without express written permission of the author
and the content may not be altered in any way.For
Questions or Comments on this Walkthrough,
Please write to:
MaGtRo
Copyright © 10/2004
MaGtRo