Nancy Drew: Curse of Blackmoor Manor
Nancy Drew: Curse of Blackmoor Manor
by Her Interactive
Walkthrough by MaGtRo October 2004
Gameplay: The main menu has new game,
load & save game, continue game, second chance, game setup, credits, help, more
Nancy Drew and exit game. The Game setup has the voice, music, special effects
volume, closed captioning and auto move. The help menu explains about cell
phone, notebook, tool box, exit, saving-loading games, second chances, hints and
more information.
The gameplay is the same
for junior and senior mode. In junior mode, Loulou
gives suggestions as to what to do, has a checklist and the game puzzles are easier.
In New Game, the game setup explains the game manipulation and
how to go about gameplay. There are unlimited saves but only 32 slots are seen
on load.
The game is mostly non
linear and you can play the puzzles as you see them or later.
NOTE: The sequence in this walkthrough is
based on following the dialogue clues given by different characters and arranged
by relevant puzzles. There might be actions that can be done earlier but found
later in the walkthrough. If you don’t meet some of the characters, set the alarm
beside Nancy’s bed for next day and look for them.
Nancy is on her way to Blackmoor Manor to check up on Linda
Penvellyn, the daughter of Nancy’s neighbor. Linda, newlywed to Hugh has fallen
ill since she came to live in the Manor.
Nancy is dropped off at Blackmoor Manor. Someone whispers
Nancy’s name. After knocking on the door, a growl is heard and burning red eyes is seen. Mrs. Drake
greets Nancy and tells that your room is the one with the moon on the door. Linda is
not quite ready to see Nancy. Mrs. Drake says to see her in the conservatory after
settling down in your room.
Nancy’s bedroom: Read the
game journal
for information. Use the cell phone. The speed dial under the directory has
home, Ned and Mrs. Petrov listed. Call Ned and Mrs. Petrov. Click on web
and check all your e-mails.
Use the cell phone again, click on web, internet browser and do a search. Learn
the connection about witchcraft and Blackmoor Manor.
Nancy’s suitcase is at right of the fireplace and left of the
window seat. Look close at the moon column at the base of the window seat. Look close at
the crest above the fireplace. Pan left and look at the gold book on the left side of the
mantle – Grenny and the Water Fairy by John Penvellyn 1937. Read the book about
a frog named Grenny and the red key the princess gave to the water fairy. Look
at the note tucked in one of the pages – it showed the 4 elements symbol, water,
earth, fire and air.
Look at the square box on the chair – we need more info on this.
Check the eternal play balls on top of the bookcase. A mural of Helios
(Apollo), riding the fiery chariot pulled by 4 horses covers the wall left of the door. The phone (cook and Hugh) and
the alarm clock are on the table left of the bed. The lamp switch is on the wall
beside the lamp. There’s a tripod by the window.
There’s a constellation chart behind the green stellar picture between the
windows. Use the web search again and read ‘Why the stars seem to move’. Learn
about the solstices: Solstitium and Bruma; and about the equinoxes: Aequinoctium
Vernum and Autumnalis. Press the circle at bottom left to see the star map.
Press the blue circles and the text to see the different star maps.
Time meet to Mrs. Drake in the conservatory. Exit the room and look left to see moon signs framing your
bedroom. A gorgeous stained glass window is at the end of the hall. Go forward
down the hall and listen through the next door and hear a girl and a woman talking.
There’s an alcove on the left with stairs
that sing going up.
NOTE: Don’t go up or solve
the puzzle up there yet or you will not see Mrs. Drake in the observatory or
Nigel in the library today.
Meeting the characters
Jane’s Bedroom: Knock on door right of the alcove where the child’s
voice came from. Jane, Linda’s stepdaughter says ‘to come back later please’. Look close at the red button
on the
right of the door. It needs a key.
We better not keep Mrs. Drake waiting and look for the
conservatory. Go down the hall and look close at the gargoyle at the
corner. Turn the corner and hear an angry woman. Go down the stairs and turn
left.
Conservatory:
Enter through the metal door on the left wall of the foyer and down the metal
stairs. Look around. Look close at the plaque of outstanding achievement given
to John Penvellyn on the urn pedestal. Look close at the drain and then the
water sprayer on the empty frog fountain.
Turn left, forward, right and see several potting tables. (Note: If you picked up
the key from the noisy stairs, you will not see Mrs. Drake and have to wait for
later in that day or the next day by setting the alarm clock.) Talk to Mrs. Drake.
Learn about Nigel Mookerjee, researcher and Ethel Bosinny, Jane’s tutor. Learn
about Linda, to order food from a local restaurant and water in well. She
talks about Loulou and proper food for the parrot. Look
close at the potting table on the left. Look close at Leticia Drake’s allergy
medicine and learn the effects on her.
Library:
Exit the conservatory and go across the Great Hall to the door across the room.
You might or might not see
Nigel depending on who you talked to before this. If you don’t see him, set the alarm to talk to him
the next day. But if you do, talk to Nigel Mookerjee, the
man typing on his computer. Learn about the Penvellyn scandalous history and
family treasure. Elinor Penvellyn is the family member tried for witchcraft.
Chimes heard in the manor. Learn about the Blackmoor beast and the portraits at
the Great Hall. Look close at the statue in front of Nigel’s
desk and learned how Elinor was adopted. Go to next room and look close at the
books. Nigel will give an ongoing commentary about the Penvellyn
ancestors. Look close at the desktop computer. Alan Penvellyn is learned in computers. It needs a password. Exit the library.
Check the cell phone browser and look up the Beast of Blackmoor.
Loulou and East Hall: Go back upstairs, turn right, go down the
hall and see a door with a flowered plate – Mrs. Drake’s room. Go to the corner
and hear a ghostly sound. Take off the cover and see a parrot in a cage. Meet
and talk to Loulou. Loulou is a great source of information! Turn right and see
a door with a big crest on it. We need a key to open that door.
Linda’s bedroom: Knock on the door left of the stairs. Enter and see a darkened room. Look around and see draped
furniture, pictures on the wall and a table with mirror, cell phone and lotion.
The curtain on the bed is pulled. Click on the curtains and talk to Linda.
Doors that should not never be opened…. Jane, Linda’s stepdaughter wants to come in
to meet Nancy but was refused. Leave the room.
Jane’s room: Turn right from Linda’s
room and talk to Jane now that her study time is done. Note: If you do this
later or after the library, Jane will be sleeping by then and have to wait the
next day for the opportunity. Jane’s is free after her study time that ends at
2PM. Enter the room and turn left to
see Jane in bed.
Matching game – She wants to play a game. The first game is a matching game
using Brigitte’s cards, the one with the telescope in her portrait. Jane wants you to do better than her 40
(junior) or 25 (senior) tries. The aim of the puzzle is to
flip open duplicate cards until all the cards are opened.Open 2 cards at a time. Once you see a card that is a duplicate of one you have
seen. Click on both to keep them open. You can write the cards down on a paper
to help you. That’s not cheating.
Talk to Jane after
winning the
first game and find out about the lady in black that left a note in Linda’s room.
That is when she started feeling poorly. Talk to her again and find out that the
lady in black resembles Elinor. Play games with her again using games from the
chest or just skip that dialogue. Talk to Jane again about animal, treasure and
password.
Skull and Bones game – She will tell you the password of the computer if you beat her
in skull and bones games. You don’t need to play this game for the password. Find out for
yourself by looking at the words under Arthur’s crest at the Great Hall. Arthur
is the second from the last (next to Hugh).Skull and bones
game’s
aim is to accumulate 3 of a kind card. The cards shown are yours. Click on a
card and ask if Jane has them. Remember the
cards Jane asks for and ask for them when you have them. This is practice for
another card game at the Great Hall.
Go to the window seat right of the bed and see a paper. Click on
the Penvellyn Family Tree and ask Jane about all of her ancestors (red
colored ones) – 4
pages long. Jane
does know about her family. If she wants to rest – look around and continue the
ancestor inquiry or you can continue asking her.
Look in the bookcase and
read the Introduction to Runes. Click and read the Monsters (note: lycanthropy) book that Nigel gave
to Jane. Go to the small kitchenette right of the bookcase. Jane makes
cake for Loulou here.
Look at the picture of Jane’s real mum, an opera singer in Paris on the dresser.
Mutus Liber – Study the book on the left given by Ethel, it belonged to
Jane’s grandfather.
There are several very interesting pages in this book. Take note of the cover
picture with tree, planetary signs and the 4 elements at the bottom. There’s one
with 6
columns-circles with planetary symbols and a dragon at the center. There’s one
with 12 drawings in a sort of handle and the right page shows it being placed in
a fire.Tapestry – Pan to the corner and read the words of Charles Penvellyn
on a tapestry.
Turn right of door to
Jane’s desk. Look at Brady Armstrong poster on the wall, guinea pig picture and
at Jane’s assignment for the month. Wow! Click on the teeth! <grin> Play another
game with Jane. She’ll tell you to select one from the chest. Have fun on
whatever you select. I recommend the puzzle. You can play any game anytime. Exit
the room.
Go utside somewhere in the
corridor and the cell phone rings. Talk to Mrs. Petrov, Linda’s mother about
everything.
Looking Around
Nancy’s Room: Go back to your room and
use the phone to call the cook. Talk to Tommy and order any food you care for. You
can try all by ordering them and have a fun time eating and reordering another –
Loop de loop; bangers and mash; pinky and perky or dogs eye. I highly recommend
Pinky and Perky. Say ‘okay’ to Uncle Fred and Johnnie Rutter.
Do a web search using the cell phone about Cockney rhyming slang. Rutter is butter.
Call Hugh and learn
about Linda, Mrs. Drake, 6 month
habitation clause and Jane.
Alcove:
Enter the alcove next to Nancy’s room.
Stairs that sing:
Enter the alcove
and climb the stairs. Ooops! each step makes a sound: bling, whoop, waah, bla-ding, whoop, waah, bang, bang. At top of the stairs is
a panel of levers.Each letter labeled lever represent the sound made by each step
going up. A- whoop, B – bling, C – bla-ding, D-waah, E – bang, F – steeeum and G
– tick tock.Pull levers: B A D C A D E E. Take the key from the opened
compartment.
Jane’s room:
Try the key on the red button right of the door. Um… needs grease.
Great Hall: Go down the main staircase. Directions
are based on the
stairs at your back.
Doors – There’s a
door on the right wall that leads to the library and 2 doors flanking the
stair that leads to a hallway. The metal door to the conservatory is on the
left wall.
Columns –
Look close at the 6 columns in the room. With the stairs on your back – The
‘looks like a piece missing’ are: knight’s head on the column closest to the stairs, something held by the God on the middle right column, a circle
on the right
‘Tempus Fugit’ column close to the door, an arrow head on the left column
closest to the stairs, full moon at left middle column and a ‘I need something
else for this’ on the Mercury relief.
Portraits – Look
around the walls of the Great Hall and see ancestral portraits with coat of arms below
them. Look close at Alan’s portrait, second to last and right of the clock.
Note the words under the crest – I Purgamentum Exit I.
Right of the door is Betty, a card playing automaton and on the left wall behind
the Mercury column is another gargoyle.
Main hallway: Enter the door at
right of clock. Turn
left and look at the Cricket trophy of Brigitte Penvellyn. Go to middle of hall and read
the note tacked on the do or of the kitchen. Fire, eh?
Conservatory:
If Mrs. Drake is around, talk about Cockney, book and Alan. Check the giant
carnivorous plant by the glass wall. Click once on the carnivorous plant. Don’t
click on the carnivorous plant again or you’ll end up… – well find out and do a second chance.
Once outside, do a web
search on Cockney rhyming slang. Learn that Rutter is butter.
Nancy’s room: Go back to your room and eat the
food ordered from Tommy. Loop de loop is soup. Pinky and perky is turkey. Dog eye is pot pie. Johnny Rutter is butter. Take the
butter (taken only after key is tried on Jane’s room’s keyhole). If you
ordered Pinky and Perky, a slice of turkey is taken.
Venus flytrap at the
Conservatory: If Mrs. Drake is not around, continue around the potting tables and see a letter under a
Venus flytrap. Try taking the letter – Guess we need to feed it first.
Feed the turkey from Pinky and Perky meal to the Venus flytrap. Take and read
the solicitors letter about the 6 months habitation clause.
Library: Nigel is gone. Look at his
computer and click on the To Nigel.txt. Best seller? Read the Notes and learn
more about the missing pieces in the Great Hall columns and family history.
Nigel made reference to the Mercury column at the Great Hall and the library
Mercury statue, in front of Nigel’s desk with the key in hand. Also note –
persuade Mercury to face north and lift his eyes to the sky will the wand be
released. Chapter IV mentions Charles and Jane’s tapestry related to the tiles
outside her room. Learn about Betty, the card playing automaton and the game
similar to Go Fish. Take note of the info about Edward’s coat of arms. Play the Finger Tips for typing for fun
or practice.
Go to the desktop computer and enter the
motto under Alan’s portrait -I purgamentum
Exit I or purgamentum. Press your computer’s enter button. There are 13 ghosts that come out from midnight and 4 AM at quiet
places like the hallway, conservatory and Great hall. Touch all 13 ghosts and
Arthur will give you a prize. If it is already after midnight, do the 13 ghost
puzzle, if not come back later or set your clock to 12AM to catch the ghosts.
13 ghosts hunt: Go to
desktop computer. Type in the password
– purgamentum or I purgamentum Exit I. Press your computer’s enter button. Click ‘I am’
button and start the timed ghost hunt. Find the 13
ghosts and click on them within the allotted time.Exit the library to the
Great Hall and turn right click on ghost
(1) on wall.Main Hallway – Turn
around, go through door and go to the hallway. Turn left and go
close to the cricket trophy. Turn around and click on ghost on the left (2) wall. Go
forward to the kitchen door, turn around and click on ghost left of kitchen door
(3). Turn around and go to the other end (picture) of the hallway. Turn around and click on
ghost at right (4) wall. Exit through the nearest door on the left to go to the
Great Hall.Great Hall – Turn around and click on ghost left of door (5).
Turn around and click on ghost on floor by middle column (6). Turn left and
enter conservatory.Conservatory – Go down the stairs and click on ghost on the urn
stand (7). Go back up and click on ghost right of the door (8). Exit
conservatory.Go to the stairs and click on ghost on left newel of the stairs
(9). Climb up the stairs.Second floor hallway – Turn right and go to the
East Hall by the
locked door with crest and click on ghost (10) at right wall. Turn around and go back to the
hall by Mrs. Drakes room. Click on ghost on left wall (11) across from Mrs.
Drake’s room. Go forward to
Nancy’s room and turn around and click on ghost by Nancy’s right of room door (12). Climb
up the stairs that sing and click on ghost above the levers (13).That’s it – 13 ghosts. Go back to Arthur’s computer in the library
and enter the password. Congratulations! The prize is a clue –
When you are
facing the GREEN dragon, look to the left and pull below the vase with the tree.
But if you’re wearing a hat hang on to it.
Second floor hallway:
Look at muddy footprints in front of Linda’s room (can be seen later in
the game). Talk to Loulou and find out that the manor wakes up at 6AM. On the
way to your room, look at the muddy footprints in front of Linda’s room.
Nancy’s room:
Set the clock for 2 PM, the time when Jane is done with her classes. Click on
ALARM, use the arrows to set the time to 8:00 AM and press SET. Good night!
Investigate the East Hall Secret Passageway
Wake up to hear chanting at 3:15AM. Go outside and hear laughter
(cackling). You can look around but find nothing. Go back in the room and set the alarm to anytime you want to wake. Let’s try
6 AM.
Jane’s room: Listen to Jane sing her lesson
at 6 AM –
Brigitte’s favorite time is midnight of the longest time of
the year or hear History lessons at 8AM.
Linda’s room: Talk to Linda about lady in
black and note. Click on curtain again to get Linda talking about awakened
something that refuses to rest, curse, passageway. Whenever, there’s free time
check back with Linda to see if she has anymore to say.
If nothing is happening
try talking to Mrs. Drake or Linda or order lunch. Knowing that Jane’s class ends at two, turn the alarm clock to 2 PM.
Jane’s room:
Talk to Jane about passageways. She will show you the passageway that ends in a
funny picture she
found if you play the Bul game – no Scarlet Hand here at the manor.
Bul game:
The object of the game is to conquer all opposing warrior by getting your warrior to land on the space
occupied by the opposing warrior. Click ‘roll’ to know how many square your
warrior moves. The shells’ dots show how many moves. All shells with no dots
mean 5 moves. Each player has 2 rolls. You can pass as a strategic ploy.
When you win, Jane says
the secret passageway is in the East Hall. Jane gives the green key to
the locked door.
Exit Jane’s room and
meet Ethel, Jane’s tutor. Go to the East Hall, the one with Edward’s crest on
the door by Loulou.
East Hall:
Use the green key from Jane on the door. Note the 13 Ghost hunt prize (vase with
a tree) clue on left wall by the door and a gargoyle
on the right wall. The green dragon is ahead.
Alan’s 13 Ghost hunt
prize: Based on the prize clue after winning the 13 ghost
hunt – When you are facing the GREEN dragon, look to the
left and pull below the vase with the tree: As you step through
the door and see the dragon, turn left and click on the leaf-like knob with the
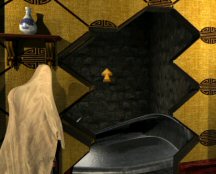
cloth. Enter the passage, have a fun ride down the slide, see a target on the
wall and out the crest at the Great Hall.Green Dragon puzzle:
Each of the 6 claws move in different directions – up down, left and right. Go
back out and look at the Edward’s big crest on the door. Remember what Nigel’s
note states also. The top left shows a jouster running to the right, middle left shows a castle and the bottom
lightning goes down. The right top is a guard with spear pointing up, the middle
horse faces left and crowned figure motioning to the right.Go back to the green
dragon and move the claws to a specific direction shown by the crest figures:Top left – right,
middle left – down and bottom left – down. Top right – up, middle right –
left and bottom right – right.The passage opens. Enter
and realize you need a flashlight.
Jane’s room:
Talk to Jane about flashlight or torch. She will give you glow torch if you win
the Petroglyph Punch.
Petroglyph Punch:
You can play easy or hard. The object of the puzzle is to make a minimum of 3
identical glyphs in a row. The 3 plus identical glyphs makes a higher score and
more time is added. To move a glyph to another square, click on it and then
click on the glyph you want to replace. If there’s no glyphs left to make 3
identical ones, click on shuffle to get new glyphs. Good luck!Take the glowstick
when you win.
East Hall Secret
Passageway: Go down the 3 flights of stairs and to the end
of the lowest level. Hint: Keep the cursor
at the center of the computer screen and click at every change of screen view until you see an eye on a locked door. Click on the
eye to see the word ‘barber’ and parrot. Go back to the very top until you face
a wall. Click on wall to get to the dragon room at East Hall.
Loulou: Talk to Loulou,
the only parrot in the game. She wants the ‘magic word’. Talk to Mrs. Drake
at the conservatory and she remembered that Loulou has to be told that she was a
‘very very clever
and beautiful bird’.
Go back to Loulou and tell her the magic word. She gives a word
back for barber – leech. Go back down to the eye door and enter leech* on the squares.
Now the word changed to ‘picture’. Back to Loulou and now she wants cake. Let’s make one at Jane’s
room.
Loulou’s cake: Check the cell phone web search and read the Healthy diet for parrots. Go
to the Jane’s room mini kitchen and make a cake.Click on the pan to ask Jane to make something. See-click all the
ingredients available – crackers, mixed beans, mixed nuts, salami, salsa,
lettuce, blue berries, meal worms, chocolate and avocado from carton.Be sure to
make the correct cake or Loulou will die and you will be fired! End game!Add to
the pan: crackers, mixed beans, mixed nuts, salsa, lettuce, blueberries, meal worms
and definitely no chocolate, avocado or salami.Click on microwave and then
press red button. Take the er… the ‘cake‘.
Talk to Loulou (Deeeelicious!) and she says book as the word for
picture. The hint given by Loulou about the bull’s-eye that was seen on the
slide is cricket has the ball.
East eye door puzzle: Go back down the dragon passageway and see you need another
glowstick. Back to Jane and play another Petroglyph Punch game. Take the
glowstick.
Go to parrot eye puzzle and enter book. The new word is baby. You can either
guess the word correlation or go back to Loulou. The baby word is bonnet. The
next word is hour. The hour correlated word to enter is glass. The next word is ant –
enter hill.
Sound of door unlocking.
East gargoyle door
puzzle: Enter the door and at the end, move the cursor to a
partly hidden gargoyle on the right. Look at the panel above the gargoyle. It has an upright
triangle similar to the fire element sign on the paper in Grenny’s book. Click
on it to see 6 triangles with fire depicted on the side. Arrange them to be similar to the fire element
triangle – upright triangle. Nancy noted that the rest of the grid is on the other side of
the wall. Let’s look for the other side of this panel. It should be in another
passageway.
Go upstairs and meet
Ethel at the hall door. Talk to her about the silent book.
Investigate the West
Hall secret passageway:
Linda’s room: Enter Linda’s room and tell her
about the passageway. Gargoyle… Oh, she’s talking about a different passageway, one
connected to the gargoyle around the corner.
Great Hall: Exit the room and look at the gargoyle in the corner. There’s
got to be an easier way to figure this out. Let’s look for clues. Remember when
we looked at the ancestral portraits, there was one with a gargoyle in the
background. It’s the one on the wall opposite the library door and between the
Mercury and Moon column. Look at the portrait and notice it has no
crest below it.
Library: Go to the library and talk to Nigel. The ancestor with the
gargoyle is Corbin, grandson of Elinor. Nigel will help you if you type his
memoirs only after a typing test.
Typing Test: Type up the letters that come up the screen as
fast as you can. The letters disappear and replaced with new ones.
Note that some letters comes up twice and that increases the score. Junior mode
has less letters/min than the senior mode.
Afterwards, Nancy types up a boring memoir. Take the
note and the Corbin’s coat of arms that Nigel left on the table.
Ritual: Leave the library and see Ethel and Jane do a ritual with
pouring something in a hole on the floor at center of the Great Hall. Go to hole and click on
it – smells like oil. No key without toil, no fire without
oil.
West Hall gargoyle
puzzle: Go back to the gargoyle. Study Corbin’s coat of arms
in inventory and see the
number of comets on the right and left of the crest. Let’s try it – turn:
2xs right arrow, 1 left arrow, 1 right arrow, 2xs left arrow and 1 right arrow. A
secret passage opens on the right. Need another glowstick. If it’s too late and
Jane is asleep, set the alarm for 2 PM.
Linda’s room:
Talk to Linda.
Library: Talk Nigel. Talk about being famous, runes, Ethel.
Jane’s room: Go to Jane’s room and play another Petroglyph
Punch to get
another glowstick. She denies knowing about the ritual that morning.
West Hall secret
passage – Open the secret passage by clicking 2R, 1L,
1R, 2L, 1R on the gargoyle. Enter, go forward 1-2 times and turn right to a beetle
like wall panel on the wall. Click on the circle and look through the peephole.
Oh golly gee, wow! Her hand is hairy and has claws.
Proceed to the eye panel at the end of the passage. It looks
like the eye at the West Hall passage. Click on the eye and see the Rune puzzle.
Rune puzzle: Look at the sign above
the eye and Nancy will read the curse. So that’s what caused Linda’s fear. The
curse was referring to Elinor.Back up 3 times from
rune puzzle, turn around and go to Jane’s room. In Jane’s room, look at the Rune paper on the bookcase and
note down the runes that spells Elinor.Go back to rune puzzle
and enter ELINOR in runic on the eye door.
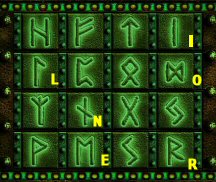
Chimes, peephole and hands: Enter, forward down 2 levels and the path goes right and left.
The right ends on an ornate door with a knight holding a sword inside. The
fingers are clickable. Elinor’s security system? Look up and click on the nose of the knight and see the
library and mercury statue. No info to help us here yet.
West gargoyle door
puzzle: Back up 2xs and turn around to go forward to
the split in the path. Continue down the stairs to the bottom level. Go right, forward, see a gargoyle on the wall, left,
until the end and see the other half of the wall seen at the bottom level of the
East Hall green
dragon passage. Look close at the panel above. It has the other half of the fire
sign plate. Turn all triangles right side up to signify the fire sign triangle.
Hmmm. Nothing happened.
Let’s see what happened
to the other side of this panel – go to the green dragon passage
now. Back up 2xs and turn around. Go up, follow the stairs at right on second
level (forward goes to the knight) and out. You might or might not need another
glowstick.
Finding the Alchemy Laboratory
East Hall secret
passage: Go to East Hall passage. Turn the green dragon’s
hands. Go down to the lowest level to the East gargoyle door puzzle. Arrange
again the triangles to the fire symbol (upright triangles). The door opens for
junior mode. For senior mode – go back to west gargoyle puzzle and redo it. Hear
a click sound and door opens.
Enter. Go forward to a door with a small metal compartment at
right side. Open the compartment and get a glowing stone.
Guess, I won’t
be needing Jane’s glowstick anymore.
Moving rooms puzzle:
Do a web search for the planetary symbols.
Click on metal door and go forward. See a door with
Mars (male)
symbol on it.Click to open Mars door. Enter and go forward to the to moon door.
The room is moving.Click to open Moon door. Do not go in. Turn around. Hear it move
behind you. Turn around again to Moon door.Click to open Moon door again. Enter to see a basin at center of
room. Take the map.Look at map and see that
you are at the center. You came from the fire sign symbol at the bottom. You
need to go to the angel door at top. Do not go to the devil squares or you DIE!Go forward to the door with
Sun symbol (circle with dot at
center).Click to open door and see a wall. Turn around.
Turn around again to Sun
door. Click to open and see Venus
(female) symbol on the door. Enter and go forward to Venus door. Check map and
see that you are now on white square under angel square.Click to open Venus door. Click to open and see a wall at far
end. Do not enter. Turn around.Turn around again to
Venus door. Click to open and see a
Mercury (female symbol with horns) symbol on the door. Enter and go forward to
Mercury door. Check map to see you are now in the white square that rotates
around the perimeter.Click to open Mercury
door. Click to open and see a wall and grilled floor. Do not enter or you
die. Turn around. See that you now face a Mars door.Turn around again to Mercury door. Click to open and see a wall.
Do not enter. Turn around. Go forward to Mars door.Click to open Mars door and see wall. Do not enter. Turn around.
Turn around again. Click to open
Mars door and see a room. Do
not enter. Turn around. Check map and see that it is across the devil square.Turn around again. Click to open
Mars door and see a wall. Do
not enter. Turn around.Turn around again. Click to open
Mars door and see a room. Do
not enter. Turn around. Check map and see that it is across the angel square.Go forward to the Mercury door, click and enter.
Alchemy Door – See the familiar eye on the wall. Click the eye panel and see
another puzzle with elements on the left, pot at bottom and tubings to connect
them. Click on the snake symbol at top center. Nancy should say
‘knowing what
the snake means should help knowing what the others mean’. We have to go back
out of the maze. <groan>Turn around and open the door. Open the
Mars door, do not
enter, turn around. Do it again and then go forward to the mercury door and exit
the maze. Remember this short cut.

Library: Talk to Nigel at the library about
Ethel and the snake-ouroboros.
The
secret of the Manor – Alchemy Laboratory
Go back to the alchemy
door. Go to either the East Hall or West Hall secret passage and through the
moving rooms. Enter the moving rooms and ‘click but do not enter’ twice on
Mars door. Turn around and exit the Mercury door. Go forward to the Alchemy lab.
Alchemy lab door
puzzle:See the chemicals and processes symbol at top left,
the pot at
middle bottom to combine them and the symbol result at bottom right. Above the
result is a set of lights to show if they are correct or not.
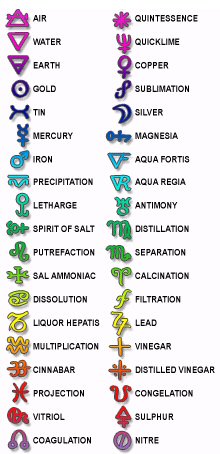
Do a web search on
alchemy symbols. Learn the formulae for different mixtures and the symbols.Look at bottom right
symbol to see what result is required to be made.The first mixture to be
made is Aqua Fortis. Click on vitriol and nitre. Click on pot and see the button
light up at top right.Second mixture is Aqua
Regia. Click 3 times on spirit of salt and once on vitriol and once on nitre.
Click on pot and see the button light up at top right.Third mixture is
mercury. Click on cinnabar and fire symbol. Click on pot.Fourth mixture is
distilled vinegar. Click on vinegar and distillation.Last mixture is Liquor
Hepatis. Click on sulfur, quicklime, sal ammoniac and distillation. Click on pot.The door opens. Enter
the forge.
Alchemy laboratory:
Look around and see a giant warrior statue at right.
Work table: Pan left and read the Albert Penvellyn notated parchment on shelf above the work table. On the work table is
a greeting from Penelope Penvellyn and reference to lighting the athanor using
earth in liquid form, air, water and fire. This is in reference to The Mutus Liber that was
seen on the dresser at Jane’s room. Read the Aeolus book and learn about the
need for air in the forge.
Journal of the ancestors:
Read the book above the Aeolus book and see folded papers that
show maps.Read what Charles says about the 6 columns at the
Great Hall.
The first key is at Jane’s door and the clue is the tapestry.Read the words of Thomas, 1580 –
The key is by the
staircase that sings and the forge cannot work without water. The lock
underneath the manor will add water.The words of Elinor tell about Mercury and the hands that move.
Corbin’s words states about fire on the forge, touching
Mercury’s wand to the master gargoyle and 2 others, and to use the wand to the
depository of the forge’s fuel.Penny’s puzzle is to control the wind in the forge and the key
is hidden by her playful companion. The knights block the passage of the oil to
the forge.Brigitte’s box that contains a telescope lens can be opened by
using the clues of her coat of arms and star charts. Use the lens to see 5
muses. Select each muse in order and Betty will wager Penny’s keys. The lens
also shows a secret panel in the moon column.Edward devised the Saturn column, the green dragon and the
target (slide).John hid the key to the Mars column using the frogs in the
conservatory pond.Alan used the computer as clue to the Saturn key and gave the
clue to the moving rooms.
Read the parchment written by Corbin, grandson of Elinor left of the worktable.
Forge: Pan left and look close at the forge.
Take the mold. Look close at the metal in the pot all set to be worked in the pit.
Corner table: Read the journal of Charles Penvellyn and the reference to a family instructing the first born of the
Penvellyn family. This verified what Ethel, the tutor stated – her family, the Bosinny have
always taught the Penvellyn heir. Read the folded decree at the last page
– the heir is taught no sooner than 12 years of age. Read the reference to the
machine that executed Elinor. Study closely the parchment that tells how to move
Mercury and to unlock the key. Remember that this was referenced in Nigel’s note
about the statue in front of his desk seen also through the peephole and the
knight statue with those hands at
the second level of gargoyle secret passage.
Read the parchment on the whetstone. Hmm… the Penvellyn
treasure is close by. Pan left and look close at the cabinet on the wall that
needs a key. Pan left and climb to the alcove to check the Wind control
mechanism.
Find
the column keys using the Ancestor’s clues
Time to follow all the clues and keys stated in the journal of the
ancestors.
Penny’s Aeolus – wind puzzle:
Penny’s words stated that she made a puzzle to control the air in the forge. The
Aeolus book stated the forge needs air. Go to the alcove left of the cabinet
with the large keyhole on the wall.
The object of the puzzle is
to catch all 4 winds
by landing on them (similar to the Bul puzzle).The control is at the
right panel. Press the blue button to
start the game and you (warrior) move to the center. The blue button also resets
the game during gameplay. Use the 4 direction arrows to move to one square or 2
squares during your turn.The game field is the
left panel. Note the
warrior (like the one by the door) at bottom. The 4 pictures show the 4
winds. The black squares are traps – so don’t go there or you lose.The 4 winds can blow you
to the trap, so watch out where you land. The north wind can blow you down, the
east wind to the left, the west wind to the right and the south wind to go up.My strategy was not to
be blown to the far left squares and to stay on squares that the target wind
cannot blow me away. ex: above or below the east or west wind as my target or
right or left of the north or south wind. Keep moving until the target wind is
within 1 or 2 non-black square – then land on that target wind. Take the east
wind first so there is no wind to blow you to the far left squares. Good luck!Nancy will say –
It sounds like air is going to the forge when the
game is won.
Thomas’ well lock: Study the map on the
ancestors’ journal and see that the well lock is just outside the moving rooms.
Exit the forge. Open and close the Mars door twice without going in. Turn around
and exit through the Mercury door. Immediately, turn left and forward to go to the well
lock door with the familiar eye. Click on handle to enter the bottom of the
well. Take the crumpled paper about and Uncle Roger’s (the one with the
toupee) item for Jane’s
guinea pig on the floor. Back
up to go out of the well and do the door puzzle.
Well lock door puzzle:
The object of the puzzle is to make 4 triangles in one compartment. Move the
triangles by clicking on the button under the source compartment and the click
the button under the receiving compartment.Press 8 triangles button
to 3 triangles button, 8 to 5, 3 to 8, 5 to 3, 5 to 8, 3 to 5, 8 to 3, 3 to 5, 5
to 8, 3 to 5, 8 to 3. The well fills with water.
Back up and go right or
left (east or west exit). Go back up and out to the second floor hallway. Cell phone rings. Talk
to Ned. Talk to Linda in her room.
John’s puzzle:
Go to the Conservatory. See that the pond is now filled
with water after doing Thomas’ well lock door puzzle and the frogs are merrily shooting out water. Talk to Mrs. Drake if
she’s working by the potting table.
Water pond puzzle:
Based on John’s story of Grenny read in Nancy’s room, move the frog from one end to
join the
princess while keeping away from crocodile (senior mode only). To guide Grenny, click using the
sprayer cursor on the tile in front of Grenny. Take the key from the
frog’s mouth. This is the helmet of the armored body on the first right column
by the stairs. This is the Mars column based on the picture on Mutus Liber.Talk to Mrs. Drake while
you’re here.
Charles’ Slider tile puzzle:
Go to Jane’s door. Look
at the tiles around Jane’s door. Remember what Nigel and Charles said about the tapestry and
the markings on the door.Try the key from the
stairs that sing puzzle (as clued in by Thomas) on the keyhole under the red
button. Hmm… needs
grease.Use the butter from
Nancy’s dinner on the keyhole – to loosen things up in there.
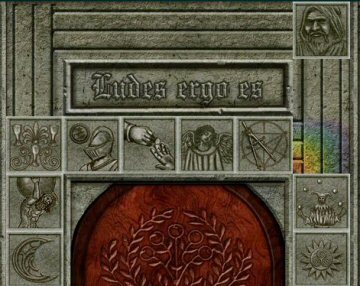
Now use key taken from stairs puzzle on keyhole. See a wood stand slide out.
Click on wood stand to reach the tiles.The object of the puzzle
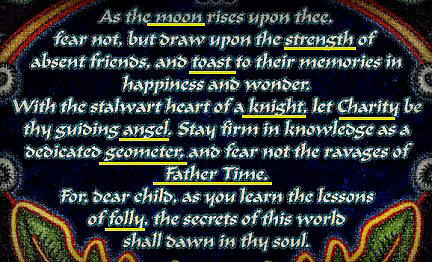
is to arrange the tiles in the order stated by the tapestry inside.
Moon, Strength (Atlas),
Toast (glasses), Knight, Charity (hands), Angel, Geometer, Father Time, Folly
(jester) and Sun.
1. Moon, Sun, hands –
up, right, down to join with angel.2. Atlas – left, down.
3. Father Time – left,
up, right.4. Glasses – left, down.
5. Jester, angel – left,
up, right to join with Father Time.6. Glasses, Atlas – up.
7. Moon – down, left,
down. (in place)8. Atlas – down. (in
place)9. Geometer – up.
10. Knight – up, left,
up.11. Geometer, Sun –
down.12. Hand – right, down,
left.13. Father Time – right
only.14. Sun – up.
15. Geometer – up, left.
16. Sun – down (in
place).17. Father Time – down.
18. Jester, Angel –
right, down to Father Time.19. Jester – left.
20. Father Time – up,
left.21. Angel – down.
22. Glass, Knight, Hand,
Geometer, Jester, Father Time – connect to top of Angel.23. Glasses, knight –
left (in place).24. Hand – down only.
25. Geometer – right,
down.26. Hands – left (in
place).27. Angel – up, left.
28. Geometer – down.
29. Angel – right.
30. Jester, Time – down
to top of angel.31. Angel – left (in
place).32. Geometer – up, left
(in place).33. Jester – down (in
place).34. Father Time – down
(in place).
Take the lightning
bolt from the secret compartment. This is the lightning bolt held by Jupiter
on the Jupiter column.
Edward’s target slide:
Go to the hallway on the main floor and take the cricket ball of the
trophy. Go to the dragon room and using the prize clue after winning the 13
ghost hunt – When you are facing the GREEN dragon, look to the left and
pull below the vase with the tree. As you step through the door and see the
dragon, turn left and click on the leaf like knob with the cloth. Enter the
passage, have a fun ride down the slide, see a target on the wall and out the
crest at the Great Hall. If this is your first time to slide down, Ethel will be
waiting for you with some hard scolding. Go back to the green dragon room.
Target puzzle: Using the
cricket ball, hit the target as you slide down.Do a practice run to see
where the target is located. You will come out of the coat of arms of Penny with
her playful companion. Turn left and oops! Ethel gives a stern, a very stern
scolding.Go back to the dragon
room and do the slide again.Open the slide passage.
Take the cricket ball
from inventory to get it ready to throw.
Position the ball-cursor at position slightly above the target by the slide.
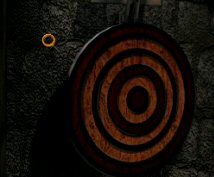
Determine this in test runs. I marked my monitored with an X. Do not move the ball cursor.Click to start down the slide. Just before the target
is seen at center of the monitor, click the ball.Once the target is hit,
pick up the clock key for the Saturn-Tempus Fugit column.
Elinor’s statue puzzle:
Elinor wrote about Mercury and the hands that move.
Go to the peephole at
the West Hall secret passage. Click on gargoyle (2xs right arrow, 1 left
arrow, 1 right arrow, 2xs left arrow and 1 right arrow) to open the secret
passage. Go forward and left of the now opened door. Go down 2 levels, turn
right and forward to door.Open the door and see the
knight statue holding a sword.Look close and press the
nose to open the peephole. Look through the peephole and see the Mercury statue
in the library. Hear Nigel typing.The drawing at the
alchemy laboratory showed what to do. The statue has to be turned to face north.Pull back and look down at the metal
fingers. The central jewel should not be pressed in or it will stop the movement
of Mercury.Click on the statue’s right
index and hear Nigel say the statue is moving.Click on statue’s left middle
finger and now Nigel screams.Go now to the library and take the wand from
Mercury’s hand.Time to go to bed. Have
a nice rest!
Cloaked lady:
(This event can be seen earlier or later.) Oh No! Nightmare! It’s 3:15 AM, go out of the room and see
the lady in black in the hallway. Follow automatically and stop by Linda’s room.
Flip the switch and see the eyes light up. Pick up the ‘red eyes’. Linda must be sleeping. Knock ONCE only on Mrs. Drake’s room. Do not
knock a second time or you will be fired! But try and see what happens and do
the second chance!
It is best to go back to bed.
Set the alarm to wake up at 2 PM.
Brigitte’s Puzzles:
1. Brigitte’s box
puzzle:
Go to Nancy’s room. Time to open the box.Clues – Based on the song sang by Jane, Brigitte’s favorite time is
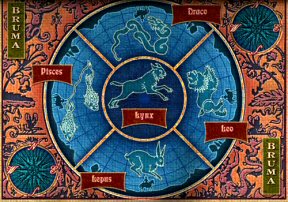
midnight of the longest time of the year. From the web search, find out that Bruma, winter solstice is the longest night of the year.Look at the star chart
and click on the right blue circle until the Bruma star chart is seen. Note that
Pisces is on west, Draco is on the north, Leo on the east, Lepus is at the south
and Lynx is at the center.
Look at Brigitte’s coat
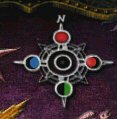
of arms above the fireplace. Note the colors and placement of the moons at
each cardinal point: north – red full moon, east – red waning gibbous moon,
south – green half moon, west – blue waxing gibbous moon and center is black new
moon.
Box – Click on
box and open any side. See colors at the center depicting the moon. The slider
changes the colors and the top left button adjusts the cover of the moon.Click open the Lynx side
of the box. Click to open. Click top left button to cover the moon.Click on Draco (dragon)
side of box. Click to open. Click top left button to uncover the whole moon.
Pull down the slider to get a full red moon.Click on Leo side of
box. Click to open. Click top left button to cover the right fourth of the moon.
Pull slider down to change the color to red.Turn the box and click
on Lepus (rabbit) side of the box. Click top left button to cover the left half
of the circle. Pull slider down to change the color to green.Click on Pisces side of
the box. Click to open. Click top left button to cover the left fourth of the
moon. Pull the slider down to change the color to blue.A compartment opens.
Take the drawing and see that it is a lens of a telescope that sits on a tripod.
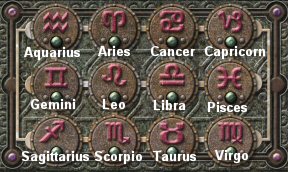
Take the lens.2. Brigitte’s moon column
puzzle: Go to the window seat right of the suitcase.Look at the base of the
window seat.Insert the lens on the
hole under the moon at the base of the window seat. Turn the lens. A Zodiac panel is seen.The
object of the puzzle is to press the green button of the Zodiac in the correct
order. Do a web search.Click on green button
under: Aries, Taurus, Gemini, Cancer, Leo, Virgo, Libra, Scorpio, Sagittarius,
Capricorn, Aquarius, Pisces.
See the panel recede.
Take the full moon key. Back out and the lens automatically goes
in inventory.
Depending on the time – go out the hallway and hear Mrs. Drake talking to Linda. She placed something on
the door. Look close and see it’s a charm.
Linda’s room:
Look at the raw meat on the table. Yum! Leave the room, she won’t talk to you.
Jane’s room:
Look at the mirror of the dresser and read the back of the Rome postcard. Hmm.
Jane’s mother is in Italy. Talk to Jane about the message,
telescope and red eyes.
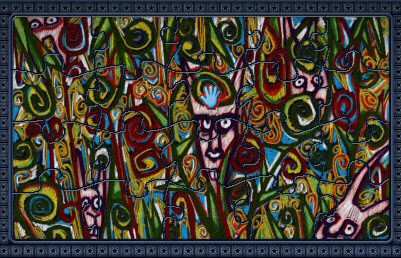
Jigsaw puzzle – Play the Puzzle game.
In senior mode, right click to turn the pieces.
After winning the puzzle game, go somewhere
else (maybe see if Linda will talk to you) and then back to Nancy’s room since
Jane has to place the telescope back later.
Conservatory:
Talk to Mrs. Drake about the charm.