Nancy Drew: The Creature of Kapu Cave Walkthrough
Nancy Drew 15: The Creature of Kapu Cave
by
Her Interactive
Walkthrough by
MaGtRo October 2006
Gameplay:
This point and click game comes in 2 CDs. CD1 is needed to be in the drive
to play the game. Check the game setup to adjust the voice, music and special
effects volume; the closed captioning and auto move selections and interface
design. There are 4 choices for graphic design changes of the frame of the game
screen.
The cell phone can be
used to call people using the (DIR) directory button (select person and click on
dial button) or as a camera by clicking on the camera button at top right of the
phone. Pictures taken can be deleted.
The junior and senior level are the same except that
junior level has the ‘to do’ checklist.
The introduction shows
Nancy’s room. The game manipulations and the previous cases can be reviewed
on Nancy’s desk. To learn about the present case, click and read the ‘case file’
brown folder.
The case file shows that
Nancy will join with Dr. Quigley Kim, an entomologist at the Big Island in
Hawaii to do field work. Nancy will take a bus to the southern coast and pick up
the vehicle keys from Big Island Mike at the Immersion Excursion Center. Nancy
will then drive to the rain forest by herself.
Click on the plane
ticket to start the game.
At Dr. Quigley’s Base
Camp, watch the destruction of the equipments outside and inside the tent.
Big Mike’s Excursion
Meet Big Mike:
Nancy is dropped off by the bus at Big Island Mike’s Immersion Excursion Center.
Look at the sign left of door. Enter and talk to Big Mike. Learn about the 2
mainland young men presently at the beach.
He will not give you the keys to the vehicle
until you collect shells and make a necklace. Look around and see 2 machines:
The Wiki Tiki game and Big Mike’s Excursion information. Both machines need
credits. Click on poster left of the orange machine to see the ‘Try it and Trade
it’ system.
Turn around and read the
newspaper on the chair. It mentions about the mystery infestation that
jeopardizes the pineapple crop at the Hilihili River valley. At the bottom of
the newspaper, read about a security breach at the Hilihili Research Center.
Shelters-huts: Exit the building and go right. See a Shave It setup on the left and a path to
the right and front. Go right and then left to see 2 shelters: one for the ‘turn
fishes to riches’ and the other ‘make jewelry’ setup.
Try it and Trade it –
See different baits, jewelry beads and souvenirs for sale.Jewelry Shelter – Click
on the booklet on the left to see how to make a necklace. Big Mike wants you to
make an Aloha necklace. Open the shell box on the right. You do not have
enough shells to make a necklace since your box only has 4 of 2 kinds of shells. Study the
shells needed on the box or the picture. Go to the beach to collect some
more. Turn around, right and left to the beach.
Beach:
Check out the closed beach house on the left with the surfboard. Go forward to
the pier and turn left to see the Hardy Boys. The phone rings. Nancy talks to Ned.
Nancy abruptly ends the conversation. The Hardy Boys say that they were hired by Richard Aikens, CEO of Aikens
Biotech to check if the Mapu’s are both squeaky clean. Learn about Kane Okala, the rough skinned man.
After the talk with the
Hardy Boys, call Ned to apologize.
Time to search for
shells: Look at the pool and pick up 2 shells. Go
forward to the dark sand on the beach and take one shell. Go
forward to the rock under the leaning coconut tree and take one shell.
Turn around, forward and left to rock with starfish to take one shell. Go
diagonal right or left before the stairs to go under the pier. Go forward
to the water’s edge and get one shell by the driftwood. Go back up the
dock and see a fishing rod at the end. Go back to the necklace making shelter.
Necklace Puzzle – Click
on the booklet on the left to see how to make a necklace. Big Mike wants you to
make an Aloha necklace. Study the picture of the Aloha necklace on the booklet.
Open the shell box on the right.Take a shell from the shell box and click it on
one of the needles at top of the strings.Follow the pattern on the picture to
the left. When correctly done, Nancy will say it’s done and the necklace is placed in the
box.
Go back to Big Mike. He
keeps the necklace. Before he allows you to take the keys, he warns about Kane
Okala and the Hilihili research people. Take the keys. Talk to Big Mike
about the pineapple crop problem learned from the newspaper. Exit and go to the
yellow jeep at the road.
Camp Quigley
Click on Camp Quigley on
the map. See the bridge destroyed. The jeep got stuck on the ditch. Listen to
message from Joe. See the camp destroyed.
Check the camp: Check the solar
panel at base of the tree.
Check the tape recorder left of the solar panel.
Rewound the tape and then click on right arrow to listen to Dr. Quigley. On
March 28th, Dr. Quigley is opening her chest while recording. Hear Blee, blah, blih, bluh,
bluh, blah, blah, blue of the chest being opened.
Check the winch and the
cable end of the winch right of the solar panel.
Tent:
Enter the tent and see a mess. Check the radio on the left. Take
the yellow note sticking out of the green folder on the right. QK is at frequency of
18.305. Check the radio and click on power button to see that there’s no power. Look around and see the
work bench with broken test tubes.
Turn around and see a
green chest left of tent door.
Green chest –
Interesting lock. Press each button to hear what sound each button makes.Based on the clue from
Dr. Quigley’s tape recorder, press the button to make the sequence: Blee,
blah, blih, bluh, bluh, blah, blah, blue.Solution: From left to
right, starting on top, press 6 4 5 1 1 4 4 and 3.Read 3 pages of QK
journal and learn all about Malachi Herbert Craven. Take note of 312 555-9634.Take the hook
and the Hilihili security pass level 3.
Before exiting the tent,
turn right and see a clipboard hidden between the boxes.
Jeep: It’s time to get the
jeep out of the ditch.
Get the jeep out of the ditch – Go to the winch
and attach the hook taken from the chest to the hanging cable left of the
machine. The cable might need to be lowered to eye level. Use the buttons on the
winch to lower it.Click-take the attached hook and click it on the
handle at the bumper of the jeep.Press the red button of the winch. There, it’s out
of the ditch.
Solar power: Open it
and Nancy will say that it is what powers the radio. Some of the photovoltaic
cells are missing. Now is time to look for some.
Hilihili Research
Facility
Click on jeep and then
the Hilihili Research Facility on the map. Look close at call stand left of
the gate. Swipe the security card on the slot.
Meet Dr. Craven: Talk to
Malachi Craven, head of the Facility. Nancy gets a decent conversation with Dr.
Craven. He will give photovoltaic cells if you harvest some seeds for him. He is
allergic to the plant. He gives a container for the viable seeds.
Harvest viable seeds –
Turn right and go forward until the bottom of the stairs. Go right, forward until the
windows and turn right to the plants on a trellis.Read the note at top
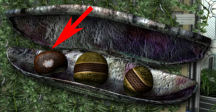
right. Viable seeds have a rich brown color and a distinctive white splotch.Click on a pod and
then open it to look for viable seeds. Collect 12 viable seeds. If there’s none,
close the pod or pull back.
Go back up the stairs
and talk to Dr. Craven. The photovoltaic cells are given. Go down and exit through the door on the left of the
stairs.
Camp Quigley
Solar Panel: Go to the solar
panel at base of tree.
Solar panel cells – Open the solar panel and
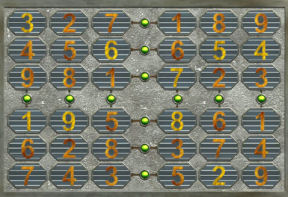
see the new photovoltaic cells numbered 1-9 on the right.The aim of the puzzle is to place these cells on the
correct empty slots of the solar panel.Each quadrant with missing cells should have cells
1-9.Check which numbers are missing from each quadrant and
place it on the slots. The light will turn green when a connection is made.
There it’s working.
Let’s raise the solar
panel – Attach the hook at end of winch cable to the handle of the solar panel. Press the red button
of the winch. The solar panel is raised to the tree top.
Radio: Enter the tent and go to the
radio. Review the yellow note in the green folder on the right.
Calling Dr. Quigley – Press the power button on
top left. Using the left knob enter the numbers. Move to the next red readout
using the right knob.Enter frequency of 18.305. Then go to the microphone
and pick it up to talk to Dr. Quigley.The location of where she is and what she wants are
unintelligible.
Find out where Dr. Quigley is located: Call the Hardy Boys using the cell phone.
Talk to Joe and he will try to find out what-where Green Trigger Rock is.
As Joe Hardy:
Enter the building and
talk to Big Mike. He gives the light brown shell collection box. You have
to see Pua
when there’s anything to trade. Big Mike will take time off if he gets 6 Uluas.
He gives a Zippy bait and fish basket to help catch the fishes.
Exit the building and turn right. Whoa, earthquake. Go to the beach and on the
way talk to Pua, Big Mike’s daughter.
Collect seashells on the
beach at the same places Nancy found shells: rock by starfish, pool, black part
of beach, rock under the tree and under the pier. Then go up to the end of the
pier and fish.
Fish – Click on the
fishing rod. Click on bait jar and the bait will automatically be attached to the
hook. Isn’t that grand – no icky fingers.Click the up cursor on top of screen.
Click on a spot on top of screen to automatically cast the rod.Place cursor on
the fishing rod to get it active and watch the bobbin. When the bobbin sinks
(usually after bobbing up-down 10 times), immediately click on the rod.Collect
as many fishes you can catch. This will ensure more Big
Island bucks. The best spot for the expensive Uluas are at top right area.
Go shell
collecting before going back to Big Mike. On the way, talk to Pua again.
Talk to
Big Mike at the building. Go to Pua and hear Big Mike drive away. Pua will trade the fishes for
Big Island bucks.The amount can be seen by placing the cursor on top of
the wallet at bottom of screen.
Search the office: Check the calendar and read the note about ‘JK’. Take the key on top of
the calendar. Go to the door behind the reception desk. Use the key to unlock
the door. Open the 4th from top drawer and see a map. The place Nancy asked for
is Three Finger Rock.
He gives the coordinates: North at 19 deg, 24 hrs, 42 min and west at 155
degrees, 9 hrs, 1 min. Joe calls Nancy and left the message. Ouch! Joe is clobbered.
As Nancy at Camp Quigley
3 Fingers Rock: Nancy receives the
message about the coordinates.
Place 3 Finger Rock on map – Ride the jeep and enter (type in, then tab, type…) the coordinates
given: N 19, 24′, 42" and W 155, 09′, 01".Click on white arrow. Click on 3 Finger Rock on the
map.
Dr. Quigley, I presume: Nice 3 Fingers (or toes)
are seen on the right. Go forward, cross a hanging bridge and forward until the dead end. On
the way, take note of different colored flags on side of the path. We’ll check
that later. Hear whispering sounds on the way.
Look up and see Dr. Quigley humming, whistling and
hanging up the tree. Talk to Dr. Kim. Where’s the clipboard?
Go back to the Camp
Quigley. Enter the tent, turn around to face the tent door and turn right. Take
the clipboard.
Go back to 3 Fingers
Rock and give the clipboard to Quigley. She wants you to collect all the frass
jars and baggies.
Clipboard assignments – Study the clipboard in
inventory. There are 6 colored traps. Turn the pages to read more. The plants
around the traps should be identified. Then sort and record the contents of the
frass baggies. The last is to analyze the samples.Identify the plants –
Walk away from the tree and call the Hardy Boys for help on this one. Frank
answers and get Nancy up to date.
Frank at Big Mikes
Enter the building. Pick
up the pawn shop invoice on the floor. Talk to Big Mike. Go to the monitor left
of the desk.
Big Mike’s Immersion
Excursion – Click once on the slot to automatically enter a Big Island coin
and activate the information monitor.Look close and select Hawaiian plants. Click on the
turtle on the right to scroll through all the plants shown.Return to menu, click ‘yes’ and pull back. Exit the
building and call Nancy with the result.
Nancy at 3 Fingers Rock
The info given by Frank
is at the case journal.
Collecting frass jars
and its contents – When Frank called, Nancy is at the start of the path.
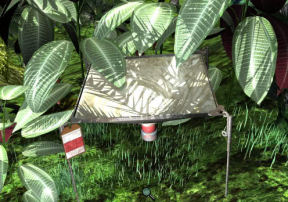
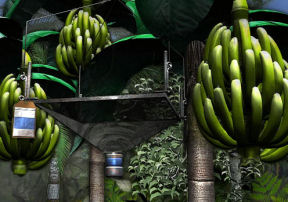
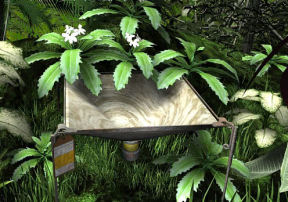
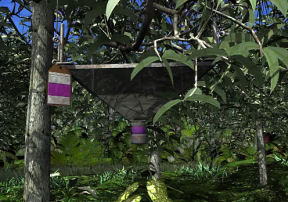
Walk the path and watch for those colored flags.1. Turn to the flag,
study and identify the vegetation around the trap using Frank’s description.
Enter the plant ID on the clipboard using the numbers at the bottom of the page.2. Then take a colored
baggie hanging on left leg of the trap.3. Click the baggie on
the collection funnel of the trap to get the samples.4. Click to place it in
inventory.Do this to all the colored flags on the path until
Quigley’s tree.There are red (big
green leaves), blue (bananas), yellow (half flowers) and purple (sickle shaped
leaves) traps.
Kapu Cave –
Check the second page
of the clipboard and it shows the coordinates to 2 traps at Kapu Cave.Go back to the jeep
and enter N 19, 20′, 30" and W 155, 05′ 33′. Click white arrow.Check-collect the green trap by the jeep and the orange trap close to the cave
entrance. No vegetation to be seen.
Enter and check out
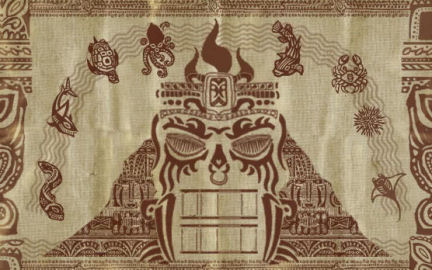
Kapu cave. Look around at the statues and the panels (teeth) with animals
etchings on the face at the end of the cave. There’s nothing to do here at the moment.
Go back to Camp Quigley to finish assignment.
Camp Quigley: Go to the microscope
bench inside the tent. Look through the scope and see that the lens is broken.
Where can I find a spare lens around here?
Hilihili Research
Facility
Use the jeep to go to Hilihili. Use the button on the
call stand to
‘press for assistance’. Nancy is sooo diplomatic.
Dr. Craven says that
to get a microscope lens, you need to fertilize the plants below. You are
given a key to the enclosure.
Go right from Dr. Craven, forward, right
and down the stairs. Turn right and go forward twice. Turn right and see an
enclosure right of the steps.
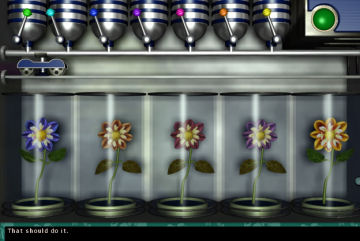
Fertilizing – Use the
key given by Dr. Craven on the keyhole. Click to turn the key and see the plants that need to be
fertilized.There are 7 colored
fertilizer vats on the top. Click to select one and the arrow will move to the
right.Press the green button
on the right to spread that fertilizer.The aim of the puzzle
is to get all the flowers in complete bloom and Nancy will say ‘that should do
it’.See that the 5 plants
are for better or for worse affected by the fertilizer. Study the effects of
each fertilizer alone or in combination with other fertilizer or double
application.Solution – Numbered from left
to right: click on 6 (orange), 2 (aqua), 2 (aqua) and 1 (green). Press the
green button to spread the fertilizer in between selections.
Go back up to Dr.
Craven to get the microscope lens. Go back down to exit and hear him
scream about Fiderman. Fiderman is fired. Exit and go back to the Camp.
Camp Quigley
Go to
the microscope bench and use the lens on the microscope.
Sorting and weighing
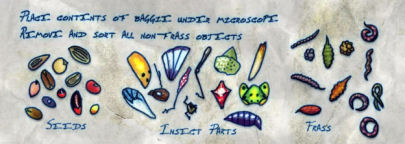
frass1. Check the third
page of the clipboard to learn what the seeds, insect parts and frass look
like.
2. Click a colored
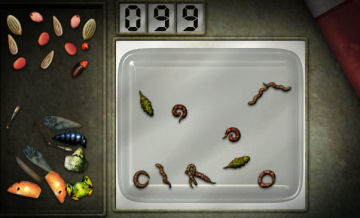
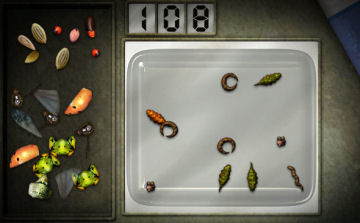
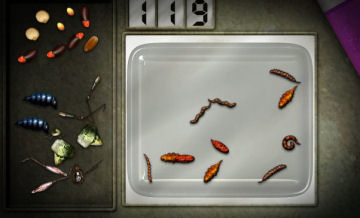
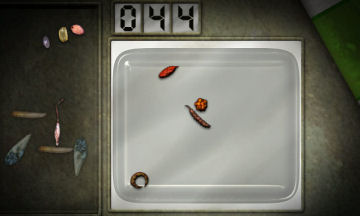
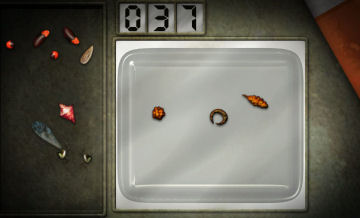
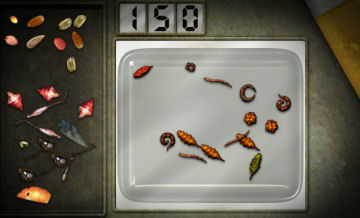
baggie on the microscope.3. Sort the contents
by click hold drop the seeds and insect parts to left side. This will leave
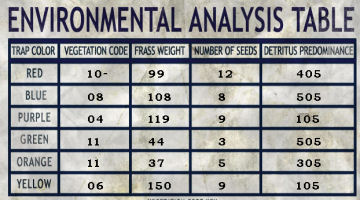
only the frass on the pan.4. Enter the weight of
the frass as seen on the read out on the first page of the clipboard.5. Count the numbers
of seeds, the number of insect parts and number of frass.6. Enter the number of
seeds on the first page of the clipboard.7. Use the codes on
page 4 of the clipboard to get the detritus predominance.8. Enter the detritus
predominance code on the first page of the clipboard.9. Do this to all the
colored baggies.
Analysis number – Enter all the data on the
first page of the clipboard.Insert the clipboard on the Formula machine right of
the test tubes by clicking on the slot and the clipboard will automatically be
inserted.Click on the on button on the right.
119,456. All right. Turn the machine off
and take the clipboard. Go to Quigley.
3 Fingers Rock
Talk to Quigley twice.
The next assignment is to analyze the frass to find out what they have been
eating. She also wants you to get in Craven’s plant area to get a comparison sample that
might be the source of food.
Hilihili Research
Facility
Use the call button and talk to Dr. Craven.
After a brief conversation, go down and go forward
to the lockers. Go forward to the door at the end and enter. Ooops – you need a
protective suit?
Go back up to Dr. Craven
and see that he is asleep. He finally took his antihistamine. Check the lab
coat’s pocket hanging left of his. Oh my! It’s the missing clipboard paper. Go
to his desk and see the medicine he took.
PDA – Click on the PDA
on Craven’s desk. It will buzz if you click to check info. If Craven wakes up
– you’re busted! Second chance time.Silence the PDA – As
soon as you take the PDA, click on settings at top right. Click on the
‘mute’ square at bottom right. Now, we can check the PDA.
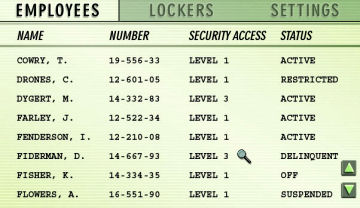
Employees – Click on the employees tab at top
left and scroll to look for the fired employee – Fiderman. Learn that his employee number is 14-667-93.Lockers – Click on the
lockers tab at middle top of screen. Scroll to look for employee #14-667-93.
His locker number is 13 and the locker combination is R4 L2 L7 R9.
Go down the stairs and
go forward to the lockers.
Locker – Go to Locker
13. Enter the combination seen from the PDA.Turn the dial arrow R or clockwise to
4, click on green button on top, L or counterclockwise to 2, click on green
button on top, L or counterclockwise to 7, click on green button on top, R or
clockwise to 9 and click on green button on top.Take the yellow suit.
Greenhouse:
Go to the door at end of
area. If you go in without a suit, you will be asked to leave. Click the yellow
suit in inventory, click on the door and see through the goggles of the yellow
outfit.
Computer search of
plant – Go to the back wall of the area and enter through the door.Use the computer. Using your keyboard, type in Fiderman’s employee’s number – 1466793. Press enter key
of your keyboard.Click on Shipping tab. Wow
– Fiderman shipped Fer C21 to Richard Aiken – the Hardy Boys’ employer.Click on Extract Codes
to find out which plant is the source of Fer C21. It is HH3333.
Exit the computer and
alarm is out for an intruder. That’s you! Immediately, exit the door and turn
right to hide. If caught, second chance – be fast from computer to exit and
right.
HH3333 – Go back to
the plant just outside of the computer room door and see pineapples planted on
the HH3333 plat.Click on plant to get a pineapple leaf sample.
Exit the greenhouse – To get
out of the room, hide using the green fog that is sprayed throughout the
greenhouse.Turn around from the
pineapple plants and go forward to right wall.Go forward to the front wall and see Waverly
patrolling the aisle where the exit door is.Follow him a bit and
then turn left to the middle plant area aisle.Go forward and see
another suited man spraying that green fog. Wait until he goes to the right
and walk forward to back wall.Turn right to go to
left wall. See that same man spraying. When he turns back to the middle aisle,
go forward to the front wall.See Waverly’s back.
Follow him and midway, exit through the door on the left. Go back to Camp Quigley.
Camp Quigley
Go to the test tube
bench in the tent.
Analyze the samples –
Read the last page of the clipboard for instructions.Click a frass baggie of any color on the table. See
the baggie and the pineapple sample on the table.Click the baggie at
bottom right to see the frass in a test tube.Click on Bq19 and
click the dropper on the test tube with the frass sample. It turns blue.Click the pineapple
sample on the table. See it in a test tube.Click on Bq19 and
click the dropper on the test tube with the pineapple sample.They do not match.
Better tell Quigley.
Talk to Quigley at 3
Fingers Rock. Take the samples from her backpack and go back to the Camp
to analyze
the samples.
At the tent, click the
samples on the table close to the Bq19.Click on each sample
and add Bq19 to the test tube containing the sample.Find out that the
Fritillated flag beetle larva is a match.
Talk to Quigley at 3
Fingers Rock. Fame and fortune are elusive. Open the backpack to get the ring
from Kapu Cave found by Quigley.
Kapu Cave
Enter Kapu
Cave and go forward to the big face with etched teeth at the end of the cave. Look up to the
nose. Use the ring on the nose. It activates the teeth puzzle.
We need more info here. Call the Hardy Boys.
Frank at Big Mike’s
Continue investigation
Talk to Pua. You need 30
Big Island bucks to rent snorkeling equipment. If you do snorkel now, there are
some nice shells down underwater.
Call Nancy. Then get
Nancy to call Frank to tell him about Richard Aikens. Now back to Frank’s snooping
here at Big Mike’s.
Use the cell phone and
call the pawnbroker. Find out about Johnny Kuto. Side info – kuto means head
lice in local dialect. Get the phone number and more info.
Call Johnny Kuto and
leave a message. Walk around a bit and get a call back from Johnny. Ah – Big
Mike!
Talk to Pua again about
her dad. Learn about the chamber and that the earthquake blocked the tunnel
entrance.
There’s a chart at the old trunk that can help know the current to the
underwater entrance to the chamber. The trunk code is the name of Mike’s favorite shave ice.
Talk to Big Mike at the building. He wants you to find
out what his favorite shaved ice is.
Shave Ice – Go to
shave ice stand outside. Save game here to save money buying shave ice.1. Open the ice lid on
the right. Click coin on ice to get a scoop of ice.2. Take a fruit syrup bottle on the left and click
it on one side of the ice.3. Take another fruit syrup and click it at center
of ice.4. Take a third fruit syrup and click it on the other
end of the ice.5. Give the shaved ice to Big Mike and he will tell
you how many flavors are there that he liked.6. Repeat this with other combinations until you
learn which one Big Mike’s favorite shave ice flavor.You can go back to your saved game so that you save
money.Hint: Make one of all
3 the middle fruit syrup. Then make one from the right fruit syrup bottles.Solution – Use middle fruit syrup at the first
row (mango) and second row (coconut). Then add the last syrup (lime) at right
row.Mike calls that
combination – Honi ‘awa which means sour kiss.Old trunk – Exit the building and go
to the patio right of the shave ice stand.Look close at the chest. Enter the
shave ice name by using the arrows to scroll through the letters – Honi ‘awa.Take the chart. Frank calls Nancy about the teeth.
Kapu Cave and Nancy
Go to the teeth.
Teeth puzzle – Now
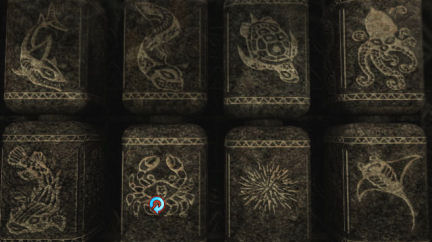
that the ring is placed on the nose of the face, the teeth puzzle is activated.The animals mentioned
by Frank are: eel, turtle, shark, manta ray, porcupine fish, octopus, crab and
urchin.Turn the teeth to show
all the animals mentioned by Frank.Hint: Check the chart
taken by Frank and the sequence is the same except for the top first two
animals.Arrange the teeth: Top
row left to right: Shark, eel, turtle and octopus. Bottom row: Porcupine fish,
crab, urchin and manta ray.The teeth recede.
Nancy calls Frank to tell him that she’s entering the
secret path. Enter
and the door closes behind Nancy.
Lava path: Go forward,
jumping from one section to another and see lava below the path. Click on
the statues. One of them will stick his tongue out to get a ledge out to the
other side. Go forward.
Elements path – Go
forward and hear trickling water. Look left and see dripping water. Continue
forward and hear whistling wind. Turn right and see a statue blowing air.
Continue forward and hear sizzling fire. Click on the red lid on the left and
fire will shoot up.
Climb the stairs to the right and hear crumbling rock. Look right to the shelf.
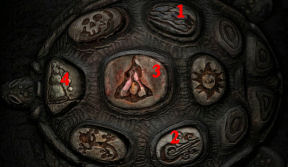
Elements puzzle – Climb the stairs and see a
turtle with drawings etched on his back.Planking the turtle are 2 statues that can be bad
for your health if you enter the wrong answer.Click on the drawings
that correspond to the sequence of the 4 elements passed at the path below.If wrong, the statues
blows poison dart – second chance time.Solution – Click on
top right (water), then air (below right), middle fire and falling rocks on the
left.Nancy falls down to
another chamber.
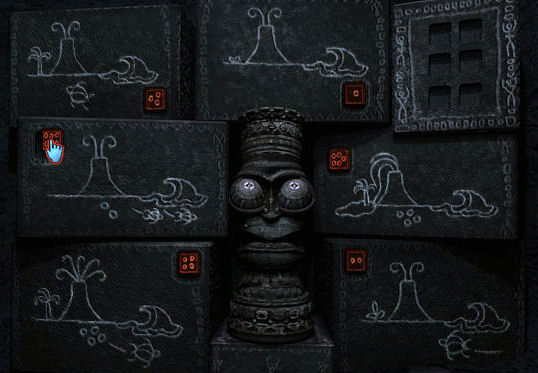
Story puzzle – Cross
the bridge or use the ledge at right to get to the story blocks at the other
end of the chamber.Look up at where the
eyes are focused on. There’s a big, really big boulder up there. Better not
make a mistake here or we’re pancake.The aim of the puzzle
is to place the numbered dice at top right on the empty square of the correct story
blocks to make the story sequence.Hint: Look at the
growth of the palm tree.The story starts by depicting an island with a
volcano. A turtle arrives in the island and stays for a while. After laying 4
eggs, the turtle leaves but the volcano is now active. The volcano erupts. Two eggs
are
hatched and the 2 baby turtles swim away.
Place the numbered
dice on the correct slot, if correct see the boulder stopped for a while by
the activated statue.Note that the eyes now
look toward right. Immediately turn right and be out of the way of the stalled
boulder.
Frank at Big Mike’s
Earn money – Frank needs money to rent the
suit. You can either make necklaces or fish.Buy Zippy fish bait from the shelter across the
necklace area.Go to the beach either
to fish or collect shells and hear the Mike and Pua quarrel.There are 16 baits in
each Zippy jar. Hopefully you can catch the expensive ones.After fishing or making necklaces, talk to Pua.
Rent the
snorkeling equipment for 30 Big Island bucks. Take the bag.Go to the building if
you still have money. Let’s try to play the Wiki Tiki game.Wiki Tiki game – This puzzle is not
necessary for the completion of the game.Take note of which god
defeats another as seen on the machine.Click on slot to place credits.
To activate the war of
the gods, alternatively click on the white buttons on the left to get the
lights to reach the Tiki top.Then select the god
you want to fight against the computer’s choice.I won 4 games against
one of the computer to get a shark’s tooth that can be used for necklace
making.
Snorkel: Time to
snorkel. Go to the beach where there’s a dark area on the sand. Face the water
and click to dive in. Go forward until a split on forward direction. To the right is a
nice shell under a turtle. Go left and see a stand
with the eel.
Go with the current – Click in sequence on
the animals seen in the chart: click on the eel, go through entrance, shark, turtle, octopus,
porcupine fish, crab, urchin and manta ray. The current will suck you to the
next animal after each correct click. Whoaa!
Cave: Go forward and
see the runaway boulder that Nancy sidestepped destroy the bridge. Climb the
bridge and go around the ledge to the left.
See the story block puzzle. Climb up above the story
block
to where the boulder was.
Go forward and see a decorated door. Press the button
on the right. Enter and see a big chamber.
Tile chamber – See
statues at each corner of the tiled floor. There’s another stair across the
chamber. Go down and look around. The side stair is destroyed on one side and
the door on the other side is broken by the earthquake.
Look close at the crates with canisters that are
completely covered by Fritillated flag beetles.
Aha! See Big Mike and then Pua. Listen to them and learn
about their plan. Nancy sees them from
above.
Tile puzzle – This is
a random puzzle.The object is to jump to another tile until Frank reaches the
stairs behind Big Mike and before Big Mike reaches the other stairs where Pua
is standing.Doing the second
chance makes the next attempt easier. Good luck.See you at Nancy
Drew 16: The White Wolf of Icicle Creek
This document may not be
distributed without express written permission of the author and the content
may not be altered in any way.For Questions or
Comments on this Walkthrough,
Please write to:
MaGtRoCopyright ©
10/2006
MaGtRo