Just Adventure original
Morpheus Walkthrough by Dan Kennedy
Billy the Freak
You find yourself in the
middle of a carnival…of the damned!! Seriously though, the place
is operating, but is totally deserted. Begin by examining the organ
with the horse pictures on it located next to the central merry-go-round.
There are six coloured knobs located above the keyboard that can be
pulled out or pushed in to change the number above each knob. Press
the keyboard to get a short set of notes, but little else. Clearly
we’ll need to know more before we can solve the mystery of the organ.
Turn around to face the
fortune-teller’s wagon, and click on it to see the teller herself.
Not much you can do here – there are three blank spots displayed below
her – maybe we need to bring her something.
Step away, and move in
a counter clockwise direction around the merry-go-round. A large fun-house
is located left of the fortune teller – proceed there, enter the building,
and click on the screen to watch the show. The production consists
of 5 scenes: the circus arriving in town, the jester cruelly taunting
the monster, the disastrous fire, the elephant running wild, and the
monster saving the jester. I sure do love a love story.
Exit the fun-house and
continue to the left to a horseracing game. Click on the starting
pistol in the top right corner to begin the race. The six horses race
across the screen, and the blue one wins., Hit the pistol and watch
the race again – we get the same results. The colours should look
familiar – they are similar colours to the ones on the organ knobs.
Record the order of finish (1-Blue, 2-Red, 3-Lime, 4-Lilac, 5-Black,
and 6-White). Now go back to the organ and position the six knobs
to match their order of finish in the race (i.e. set Blue to 1, White
to 6, etc.). Now click the keyboard, and enjoy the merry-go- round
ride. Once you are done, click to get off, and receive a Queen of
Hearts card. Place it on one of the empty places at the fortune teller’s
wagon.
Proceed back around the
merry-go-round, past the horseracing game, to the poster of King Colossus.
Click on the garbage cans located behind the poster – a big rat jumps
out and scares us off. Now click on the Ferris wheel, and enjoy the
view from the top.
Keep proceeding in a counter-clockwise
direction, and click on the Oddities trailer to enter. Click on the
closest display and read about the mermaid. Click to the left to see
the beast itself, and then examine the curtain below to see how they
concocted this beast (looks like a big fish, and some plaster of Paris).
Examine the next display, and read about the world’s smallest brain
– the same weight as a 4-ounce coin. The cauliflower used to make
the "brain" can be examined under the curtain below. The
third display shows the severed hand of an electric man. His secret
– underneath the curtain he’s plugged into the wall.
Upon exiting the Oddities
trailer, a note flies into our hands. The flier details the substantial
girth of King Colossus (4 average men needed to lift him) and his
yearly tax of 500 coins (the same type of coin that is weighed against
the brain in the Oddities trailer). Now examine the small arcade to
the left of the trailer. This device requires us to guess the weight
of the fat lady by entering a number using the three red levers (slide
the levers over to the right to change each digit above). The weight
guess is submitted by pulling down the black lever in the top right
corner. Since we don’t know this weight, we’ll have to come back in
a bit.
Continue to circle the
merry-go-round – at the poster of the Bearded Lady, stop and examine
the garbage can. We are able to knock it over, and the spilled popcorn
has attracted out nasty rat friend. Perhaps we can now look into the
other garbage cans by the King Colossus poster. Continue along past
the closed trailer (next show at 2:00), and stop at the strong man’s
hammer game. Click on the hammer to grab it and hit the target – I
always knew you were a He-man. Note the guideline to the right – a
Weakling can manage 25 pounds (of pressure?), an average man can handle
75 pounds, and a He-man can do 150 pounds.
Examine the poster of the
fat lady to the left of the hammer game. The fat lady is exactly balanced
with what looks like King Colossus and a bag of money. Can we use
this information to calculate the fat lady’s weight?
· The hammer game
tells us that 1 average man can handle 75 pounds. The Colossus flier
indicated that 4 average men could carry the regent. Therefore, the
King must weigh 4 men x 75 pounds per man = 300 pounds.
· The bag of money is presumably his yearly tax of 500 coins.
As we learned in the Oddities trailer, 1 coin weighs 4 ounces. Therefore,
the bag of coins must weigh 500 coins x 4 ounces per coin x 1 pound
per 16 ounces = 125 pounds.
· If the king plus his money weighs 300 + 125 = 425 pounds,
then the perfectly balanced fat lady must weigh the same.
Go back to the arcade,
and using the three red levers, input 425 pounds into the guessing
game as the weight of the fat lady. Pull the black lever, and claim
your Queen of Diamonds prize for the fortune teller.
Its now time to re-examine
the garbage cans by the King Colossus poster. Click on them to travel
through the fence to the trailer of the fat lady (I’m guessing by
the size of the underwear). Enter the trailer and click on the suitcase
under the bed – once you open it, a poster advertising the lady and
her 40-pound 6-month-old son Will is displayed. Could this be Billy?
Close up the suitcase and exit the trailer.
Proceed off to the right
of the trailer to the stage door for the fun house. Open the door
and note the ropes off to the right. First, turn down the house lights
by pulling down on the switch under the ropes. Now pull down on each
of the ropes to see a different scene from the play. The scenes must
be played in order from start to finish, and the house lights must
be turned down each time you attempt to order the ropes. The correct
order is: far right rope (circus comes to town), middle rope (jester
cruelly taunts the monster), far left rope (disastrous fire), 2nd
rope from left (elephant runs amok), and 2nd rope from right (monster
saves jester). We are rewarded with the Queen of Spades.
Placing the last card on
the fortune teller’s wagon causes us to transfer back to the Herculania
just in time to see Billy’s face melt away – I guess his spirit is
finally at peace.
Amazing Grace
Proceed back upstairs,
and using the elevator return to the passenger staterooms. Find Grace
Thermon’s stateroom, and punch in her code of 244. Enter her room,
and have a peek around. Grace’s doll collection can be viewed by examining
the large suitcase to your left. Move forward into the room, and click
on Grace’s bible located to the left of her bed. The bible contains
a letter dismissing her from her position at the Goodman Home for
Boys due to cruel punishment (and something involving the police).
Examine the hat box located
to the right of the bed. Grace is one sick twisted puppy, and has
a thing for solitary confinement. Finally, examine the wooden serum
box with the flame design on it, and pick up her serum container.
Make your way back down
to the NG, and enter the empty pod. Press the serum into the flame-shaped
receptacle, and hang on for the ride.
You are transformed to
a beautiful tropical beach with a giant waterfall, and find yourself
standing in front of a grass and mud hut. Click on the hut to go inside,
where there are three burning torched fashioned out of clay figurines.
There’s nothing to do here yet, so exit the hut, and travel up a short
hill to the left towards some upright poles.
At the top of the hill,
you will find yourself surrounded by drums mounted on a series of
poles. As you pan across the poles, you will hear each drum sound.
Try spinning around a bit – you’ll notice that the drums will sound
more consistently when you are travelling in a clockwise direction.
Make the drums play by spinning around at a slow pace, and then gradually
build up speed (if you start too fast, the drums will stop playing).
Soon, you will be spinning wildly out of control, and end up inside
the hut with a flame in your hand. Click on one of the torches to
extinguish the flame, and disintegrate the clay figure.
Back outside, head in the
opposite direction from the hill. Eventually you will come to a location
with a cave entrance to one side, and a path up the beach on the other.
Proceed up the beach to a tall, thin structure, and a small graveyard.
Examine the graveyard, and click on the individual gravestones – only
children are buried here. Now turn around and enter the structure
– you will find yourself below ground, with 6 caves leading off in
different directions in front of you. Enter the caves randomly until
you encounter a screaming gorilla in one of them (my wife actually
still has nightmares about this gorilla after two years).
A box with a monkey on
top will appear before you – turn the box around and read the inscription:
"To my darling son, who would have been 7. May the angels continue
to watch over you". You are then transported back to the graveyard
– examine the gravestones to find the stone for the 6-year old boy,
and place the box in the flower pot on the tombstone. The stone is
the furthest one to the right, and has the name Stephen Speer on it.
If you somehow screw it up, you’ll have to head back underground and
find the gorilla again. After succeeding, you will be sent back to
the hut to extinguish another torch.
For the third torch, go
back outside and proceed into the cave you saw earlier. Move forward
towards the large idols until you are standing in front of a large
round stone. There will be three suspended chairs surrounding the
stone. Click on the chair on the opposite side of the stone from you,
sit down, and pull the hanging chain. The chair will rise and stop.
Now pull the lever sticking out of the wall – the stones groan, and
then stop. Pull the chain again to lower yourself to the ground.
The round stone is now
bathed in light. Proceed back to your initial vantage point, and now
choose the chair located immediately to your left – sit down and elevate.
Again, pull the lever sticking out of the wall, and descend again.
Now the ball has been replaced with a flat mirror. We now must position
the mirror in the correct direction.. From your original position,
select the chair on your right side, ascend, and pull the lever twice
(you will need to wait some time between the two pulls to allow the
contraption to stop moving). Descend back to the ground – the mirror
should be directing light upward towards the chair located immediately
to your left.
Climb into the left chair,
and ascend to the top. Turn around – you should have a route open
to you across the rafters. Click ahead until you can see the giant
waterfall through a crack. Go out through the crack and soar off into
the sky for a breathtaking scene. Once you’ve landed, you’ll be back
in the hut ready to extinguish the last flame. You will then be automatically
sent back to the Herculania to watch Grace fade away, finally free
of her many demons.
Leo the Lyin’
Make your way back to the
staterooms, and use the code 155 to enter Leo Galte’s room. Click
on Leo’s bed to hear him rage against Billy, and admit to some funny
business long ago in Ireland. The only items of interest on Leo’s
table are his boxing poster, and his serum box, which is decorated
with a rose symbol. Open the box, grab the serum, and proceed back
down to the empty NG pod. Click on the rose symbol to be transported
to Ireland.
You find yourself standing
in front of a flower cart run by someone named Molly. However, the
flowers are all dead inside the cart. Turn to your right and head
towards the police station located ahead. Before going in the front
door, have a peek at the barber shop across the way.
Once inside the police
station, note the six maps displayed on the wall off to your right
– they have some pretty diverse locations (Mediterranean, Far East,
the Eastern Seaboard of the US, etc.) Turn around and examine the
four detective’s desks located behind you. One desk has a poster showing
a missing dog on it, last seen near Sweeny’s Meats (oh Leo, what did
you do?). The last desk on the left curiously has a row of six push
pins corresponding to the names of six women. The pins can be picked
up – perhaps they’re to be stuck into the maps somewhere. We’ll need
to come back to this.
Go back towards the door
to the station, and then travel around the big desk and down a hallway
to the morgue. Its empty – continue off to the right to the jail cells.
Click on each of the cells to get a close up of the personal item
in each one. After, continue to the far door, and step though to the
area behind the big desk. You will find a map of the police station
here, and well as six numbered keys corresponding to six women’s names
(the same six names that were on the pushpins). Using the keys, the
map and the contents of the cells you can lay out the following information:
Cell 1: Tess blue glove
Cell 2: Ophelia brown yarn
Cell 3: Molly white flute
Cell 4: Lulu greyish blue cup
Cell 5: Kitty flowery hat
Cell 6: Ingrid blue earring
This is a lot of information,
but it still doesn’t tell us where to place those pins. Exit the cell
block via the morgue, and leave the police station in search of more
clues.
Passing the flower stand
on your right, enter the boarding house located to your left. The
downstairs area is quite beautiful – have a look at the piano in the
main room, and the old fashioned telephone in the room to the left.
Proceed up the stairs – there are six bedrooms located up here. Each
room belonged to one of the six girls listed at the police station
– there is a personal effect and a postcard in each room to help us
identify where the girls are from. From your perspective standing
on the top of the stairs:
- First room on left:
yarn, postcard from London…Ophelia! - Second room on left:
teacup, postcard from Hong Kong…Lulu! - Third room on left:
blue glove, postcard from Paris…Tess! - First room on right:
sheet music, postcard from New York…Molly! - Second room on right:
blue earring, postcard from Egypt…Ingrid! - Third room on right:
hat box, postcard from Rome…Kitty!
Armed with our location
information, leave the boarding house and return to the police station.
Proceed over to the desk with the pins, and place each pin in its
proper location on the maps:
- Ophelia’s red pin should
be placed on London, located in the centre of the 4th map from the
left - Lulu’s blue pin should
be placed on Hong Kong, located in the bottom-central portion of
the 3rd map from the left - Tess’ lilac pin should
be placed on Paris, located in the upper-central portion of the
2nd map from the left - Molly’s green pin should
be placed on New York, located on the right side of the 6th map
from the left - Ingrid’s yellow pin
should be placed on Egypt, located in the centre of the 1st map
from the left - Kitty’s grey pin should
be placed on Rome, located in the centre of the 5th map from the
left
Once the pins are placed
in the correct positions, you are whisked into the locked room beyond
the wall maps. A single rose lies on the desk in front of you. Pick
up the rose, and find yourself standing in from of the flower cart.
Click on the cart to bring some of the flowers to life.
Move off in the direction
of the boarding house again, but this time proceed past it and enter
the pub straight ahead. Click on the 6 draft tap handles for a close
up of the designs on each. Pay particular attention to the logos,
colours, and number of stripes. Now look around the pub. You find
a set of six darts at each of the six booths within the pub, as well
as a fireplace and a dart-board. Examine the darts closely – the darts
match the designs on the six tap handles, but only one dart at each
booth exactly matches the corresponding handle (the others generally
resemble the handles but differ somewhat).
The object here is to throw
the correct dart from each of the six booths (after a correct dart
is thrown, the corresponding tap handle is pulled down). Throw one
incorrect dart at then board, and the other darts already in the board
simply disappear, requiring you to start again. If we number the booth
closest to the dart-board as 1, and the one farthest from the board
as 6, and if we number the darts 1 through 6 running top to bottom
in the dart box, we get the following matches:
- Booth 1 – Dart 3
- Booth 2 – Dart 1
- Booth 3 – Dart 5
- Booth 4 – Dart 6
- Booth 5 – Dart 2
- Booth 6 – Dart 4
Once finished, all six
tap handles are pulled, and the fireplace spins to reveal a passageway
into the back alley. Proceed through the door ahead, walk over to
the boxing ring, and pick up the rose on the stool. Click on the flower
cart to grow more flowers.
Go back towards the pub
and proceed off to the left (the streets to the right is a dead end).
Turning to your right will yield a close-up of Henchly Bro. Merchants.
Across the street is Sweeny’s Really Fresh Meats" (I think I
see where this is going). Click to enter the butcher – you are taken
into the backroom where the evidence on the table indicates that Muffy
the dog did not make it out of here alive. Click on Muffy’s tag to
learn that that Miss Pettibone was the dog’s owner.
Go back outside, and enter
the boarding house again. Proceed to the left, and click on the phone
– it’s ringing. Answer the phone, and listen to the threatening message
from Muffy’s kidnaper. Will Miss Pettibone be able to stay out of
the morgue? Lets go find out. Return to the police station, and go
into the morgue. Sure enough, Miss Pettibone’s body is now laid out
on the table. Click on the body to receive the final rose, and add
it to the cart. We are sent back to the ship in time to see Leo slip
away, his secrets finally revealed.
Claire-ify
Since we have only Belle’s
dream-world left to visit, let’s take this opportunity to have a look
in Claire’s stateroom. Return to the stateroom hallway and key in
324 to unlock her door. You can operate Claire’s music box to the
right of the bed by clicking on it, and then clicking on the winding
key. Move forward into the room, examine another bathroom if inclined,
and then have a look at Claire’s sketch of Jan to the left of the
bed.
Examine Claire’s mirror
– we catch a quick glimpse of Claire, and then can peruse her diary.
She holds much empathy for Jan, and feels the others continue to mistreat
him. A letter from Jan, which arrived with a now-missing necklace,
declares his fondness for her, and mentions the word mirror several
times in reference to the necklace.
Belle’s Hells
Exit Claire’s room, and
proceed across the hall to Belle’s stateroom door. Unlock the door
with 586 and enter. Examine the book to the left of Belle’s bed –
this is a photo album of Belle’s life and loves. She’s managed to
outlive more than several husbands (all of whom passed away under
suspicious circumstances). Apart from another empty bathroom, there
isn’t much to see in here. Examine the compact on the table and see
Belle’s reservations about returning into the NG. Open her serum box
(marked with a feather) and pick up the serum container. Take the
serum down to the NG again, enter the pod, and click on the feather
symbol to be transported into Belle’s dream world.
You find yourself standing
on a raised level at one end of a sultan’s palace. Go either left
or right, follow along the walls and descend to ground level. Proceed
towards the back wall of the palace to the doors behind the large
fountain. The walls of the 12-sided room inside have frames to hold
the pieces of a tapestry, 10 of which are empty. We will have to collect
the ten missing pieces and return to this location.
Back outside, cross to
the other side of the fountain, turn to your right, and proceed towards
the set of blue doors located straight ahead. Once inside, examine
the five hookah pipes located at either ends of the room – each pipe
when activated emits a puff of smoke that forms into a symbol. The
symbols include a spade, an "S", a star, a triangle, and
three vertical lines. Note the locations of the pipes and the symbols
they create. Afterward, enter the 7 small chambers located about the
room and collect the pieces of the tapestry located there (5 of the
rooms have the tapestry, 2 others are empty).
Leave the room, and proceed
through another set of blue doors straight across the palace grounds.
Enter the small chambers located here and collect the remaining 4
pieces of the tapestry. After, examine the small mounted obelisk present
at one end of the room. You must follow the maze of lines to determine
the proper order of the 5 symbols produced by the hookah pipes. Turn
the obelisk until you see a small circle at the top with a line leading
from it. Follow this line until you encounter all five symbols on
the path. The order should be: triangle, vertical lines, star, "S"
and spade.
Return to the room containing
the hookah pipes, and activate the pipes in the order determined by
the obelisk. Once completed, you are given a feather – click on the
bell to see a mechanical bird flutter around. Proceed back down to
ground level, and return to the room behind the fountain. All of the
tapestry panels should be in place.
We must now place the pieces
of the tapestry in the proper order to tell the story. Starting from
the piece that is fixed (the one located immediately to the right
of the door), place the pieces in order by clicking on the proper
piece and carrying it over to the proper position. It’s tough following
the story – the easiest way is to look for common items that span
pictures (e.g. a set of mountains in the background may straddle two
pieces of the tapestry). The proper order is shown below, beginning
with the fixed panel:
1. Horseman attacks (look
for pink fence that runs into the next panel)
2. Woman kneeling (look for blue/pink wall that runs…)
3. Woman dancing for sultan (look for edge of throne…)
4. Battle (look for bodies…)
5. Santa Claus (!) kneeling (look for brown path…)
6. Man and woman sitting on carpet (look for pink mountains…)
7. White haired man comforting dying person (?) (look for blue banner…)
8. Purple dressed man praying on grass (look for white throne…)
9. Sultan sitting (look for beige robe…)
10. Sultan slitting throat of man
11. Man (ghost?) and woman talking
Once the panels are in
the correct order, the second feather is given to you. Click on the
bell to see the mechanical bird get some colour and begin chirping.
Descend once more to the ground level, and leave the palace by the
door in the far wall. Enter the village and move forward until you
reach the basket seller’s stall. Click on the closest basket, and
watch the cobra try to get you. We need to tame this beast with a
little music.
Turn around and return
to the stall with musical instruments for sale. DO NOT CLICK ON THE
DRUM UNLESS YOU HAVE DOWNLOADED THE MORPHEUS PATCH – YOUR GAME WILL
CRASH. You must choose an instrument that will tame the snake – what
else but the snake charmer’s flute? Click on the flute to start the
music, and return to the basket stall. Click on the basket to see
the snake sway, and to receive the final feather. Once the bird receives
the feather, it busts through the cage and flies away. Return to the
Herculania to see Belle dissolve away, her soul finally free as a
bird.
Looking for Jan
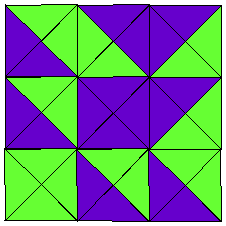
Now what? We’ve sent the
trapped souls off into the great beyond. Can we save Claire? Walk
back towards the staircase to the Sanitorium – the wall in front of
Claire will peel away. Claire appears to be alive, and she’s wearing
Jan’s necklace. Examine the necklace – do you recognize the pattern?
It looks to be the graphical code for Jan’s room. Copy the code down,
and proceed up to the theatre level.
Turn around so you are
facing Jan’s room, and examine the lock. Before you enter the code,
remember Jan’s words from his letter to Claire – he mentioned the
word mirror several times in reference to the necklace. What would
the pattern look like if seen reflected in a mirror?
Enter the mirror-reflected
code into the lock – you can change the configuration of each small
panel by clicking on it – and enter the room. Jan’s room is sparse
– move forward until you are facing the mirror and examine it. We
get a vision of Jan, desperate for Claire’s love, and approval from
his step-father. He smashes the mirror, revealing another graphical
code – this one for JC’s stateroom:
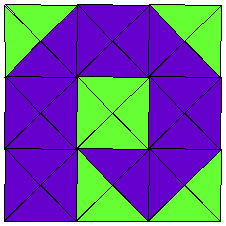
Yes, that’s a big "P" (and, if you’re wondering, you could
have entered this code to open JC’s room at any time in the game).
Enter the room and approach the pod located on the far wall. Enter
the pod and speed off to dreamland. You end up in an ice cave, with
the form of a frozen man encased in the ice. Turn around, grab the
ice pick stuck in the snow, and click on the man to release him from
his frozen prison. It’s your father Theodore. Click on his journal
to read of his attempt to deliver a letter from JC to Jan, and his
eventual demise in the ice cave.
Click on the letter – you
are transformed to the terrace of an ice-bound palace. Examine the
letter on the table (and see the silhouette of Claire giving the letter
to Jan). JC tells his son that he loves him. Finally Jan’s soul can
rest in peace, and the Herculania fades away. You are woken up on
the ice by a woman who looks exactly like Claire. "We thought
we’d never find you," she says.
Was it all a dream?
Screenshots

View this guide raw, exactly as the archive holds it