Legacy: Dark Shadows
Legacy: Dark Shadows
by Razbor Studios
Walkthrough by MaGtRo December 2004
Gameplay: The game comes in 3 CDs. The
manual in .pdf format is found in the program file after installation. It
connects to the Legacy the game homepage. The game can be played without the CD
in the drive.
The main menu has new, save, load, options, quit and later
resume to continue with the game. The options menu has selections for subtitle,
description, brightness and music volume controls. The save and load menus has
frames that show the graphics of
the saves. The saves can be labeled. There are scroll arrows to cycle the frames.
On the game screen, the menu button is at top right and new item
for inventory is on top left. Right click of the mouse shows the inventory. Left click
on the item takes the item out of inventory. Right click again returns the item to the
belt and closes the inventory.
Pressing the space bar skips the intro, cutscenes and dialogues.
The active (green cursor) makes the main character do an action.
In close up mode, click the active cursor on edge of frame to go back to screen
mode.
The inventory is in a PDA. The
log contains all the clues and
events. To look close at items and documents, click the middle mouse button or the
L on the computer keyboard. The action menu has look, take and talk.
Stalingrad 1941
War room: In a war room somewhere at the Stalingrad war front, a soldier
and Borisov, the journalist is seen. You are Borisov. Right click anywhere on
the screen and see that you have a camera in your inventory belt. Check
everything in the room. Check the
phonograph. Click the active (green) cursor outside the phonograph to back out
of close up mode. Look close at the table and see bottle, map and ashtray. How
about some vodka? Take the knife. Talk to Ivan, the soldier. A cutscene
of an airplane that crashed is heard.
Trenches: Go outside and check everything.
The left ladder goes
to the battlefield. Climb the right ladder to the crashed plane. Use the knife
on the strange box at middle bottom of screen.
Watch the introduction. You are Ren Silver, a private investigator.
Mars Colony 2138
See Ren arrive on Mars on a space shuttle, ride a bullet train
and arrive at the Mars Colony.
Inventory: Right click and see the
PDA-inventory. Right click on the
parts of the frame to examine them. On top left is the log that Ren has entered.
Below the log are the camera, the Evdcoll used to collect evidence and the wire that
is a small scramble devise used to unlock doors. The scroll arrows are on the
right side of the frame. Read the log at top left.
Maglev station: Talk to the woman
about the places to visit here. Move the cursor to right of screen and note the
way to a
corridor. Go up to Plaza.
Plaza:
The places to go to at the plaza are the Al Azif’s
Shop, MPD – the police station, the tree and the Hotel area.
Tree: Read the marble plaque under the tree.
See that the tree has blue fruits called Blue tooth. Use the camera on the
tree and get photo of Blue Tooth. See a girl reading something. From
here, you can go to Miner’s Roopa, the bar at right, down to Plaza and left to
Hotel.
Hotel Area: See a boy with
an interesting robot
puppy. Enter Hotel Ares. Talk to the robot receptionist at right. Your room is #17, first
floor, first door on the left. Take the elevator on the left of screen. Enter
room 17 at right of screen.
Room 17:
You can open and close the window. See a camera outside the window. Look close
on table. Read the flyer about the Mars Surface tour. Click on the computer
switch on the wall and see a computer open on the desk. Check the battery.
Go down to the lobby
and talk to the robot receptionist about the tour. Miss La Tour is in charge of
the trip to the surface. Exit the hotel. Look at hotel front and note the camera
is pointed to the Tree area.
Miner’s Roopa: Enter the bar
and click on bar. Talk to James, the bartender about things you’ve read on the flyer at the hotel
and about the tree. There’s only one cobalt mine left.
Al Azif shop: Look at any shopping box. Use
the scroll arrow on the screen to see what are available to buy. Click buy to
get the GlobMars. You will buy only what you need.
Hotel: Go back to the hotel and talk to Miss
La Tour. The next tour is in 4 days.
Plaza: Go back out and
walk out to the plaza, click on the green arrow by the police
dept. and get a call from Hacker. Ted has been kidnapped. Ren goes back to
earth.
Earth
Ren’s Office: The inventory has a
gun and a knife. Look close at the table and take neutron bullets. In inventory, combine
gun and bullets. Look at things in the office and on the table. Exit to the hallway.
Hallway:
Look at items in the hallway. Enter the laboratory on the left.
Laboratory: Look
around. Look close at the analyzer and take the influenza medicine. Read the
note from Charles and check the drawer and computer. Exit the lab and enter the
elevator.
Building foyer: Talk to Willard the
doorman. Exit to the street.
Street outside the
office building: Go to the car – its’ dead. Winny sends
a taxi. Enter the taxi and see 2 destinations on the screen: Dawson & Steehl
Offices (your building) and Dolphin at Red Alley. Click on Dolphin.
Red Alley: Look around and
then enter Hacker’s
place at bottom left.
Hacker’s place: See a dolphin swimming
in the aquarium. Talk to a wired Hacker. Ted was kidnapped with a scientist of
the Albert Hawking Institute, Prof. Harper Lee.
Albert Hawking Institute:
Ride the taxi to the
Institute. See a blue car outside. Enter the building and look around. Talk to
the red headed woman and learn that the 80th floor office of Prof. Lee is sealed
with laser by the police.
Suitcase: Click on the suitcase on the seat beside the worker in
blue. Talk to the worker in blue until he leaves to check on the van outside.
Look close at the suitcase (briefcase) and click on the lock. Take Universal
synchronous repair device. Click on lock to close briefcase. Enter the elevator.
Professor H. Lee’s
office: Look close at
the laser locked door of Prof. Lee. Use the repair device on the panel
(switchboard). Enter the office. Look around.
Evidence: Look at the broken mirror on the
corner table. See blood on the broken glass. Use the Evdcoll on the blood to get
blood sample. Note the broken vent on right wall and broken monitor at
the table. Look close at the footprint by the trash can. Use Evdcoll on the
possible oil on the footprints to get strange sample. Leave the building
and go back to your building, Dawson & Steehl.
Laboratory: Use the elevator and go to the
lab. Look close at analyzer.
Analysis – Click on drawer. Insert the blood sample and automatically get an
analysis data. Right click the analysis data in the PDA – it is Prof.
Lee’s blood. Press the L key on your keyboard while the analysis data is
selected or click the middle button of your mouse to see a full view of the
analysis data. Read the analysis data. Insert the strange sample in drawer. Check the PDA inventory again
and right click the new analysis data – it is an oil stain. Read the oil
analysis data. Learn that it is rocket fuel and that the last known user is the
Acme Power Plant.
Acme Power Plant:
Take the taxi to the Acme Power Plant.
Look up at the fence on the building on the left. Click on ventilator and note
that it is working but the plant is shutdown.
Open the power
plant main door – Go to the plate left of the large door. Flip all the 4
buttons to the on position and see the numbers cycle. Use the wire from
inventory on the hand panel and see the hand panel turn green. Pull back and
enter the large door.
Inside plant:
See a creature at the
rafters of the plant. Go to the entrance at right part of screen
and see a robodog. Use gun on robodog. See a danger marked panel to the right of the
entrance.
Factory hall: Go through entrance and see the
clone creature on top of the Danger High Voltage tank behind a chain linked
fence. Go to the trash barrels on top of screen. Take broom at right of
barrel and screwdriver
from top of right barrel. Use broom 2xs on trash on floor left of the barrels.
Take tongs (pliers) under the trash.
Removal of clone: Go back (exit) out to the danger panel right of door. Use
screwdriver on panel and see disconnected wires. Use tongs on the open board.
Watch Ren fix the connections and the electrocution of the clone. The clone
disintegrated.
The Professor:
Go back to the chain linked fence and use gun on chain of the gate. Go
deeper inside and see the bloody Prof. Lee guarded by a robodog. Talk to Prof.
Lee. Shoot the robodog. Talk with Prof. Lee again.
Albert Hawking
Institute: Go down to the taxi and go to
Hawking Institute. Go up to Prof. Lee’s office. Talk to Prof. Lee. The documents
are sketches of a space station, have Seal of League Nations and are dated March, 2020.
The National Archives buried underground after the Great Explosion might have a
copy of that document. Off we go to the old part of town.
Old part of town:
Click on the Metro St.
(abandoned) destination in the taxi. Talk to homeless man. Go down the Metro.
Take hammer from the train cab window. Go to the tunnel.
Tunnel: See
a monster rat blocking the
tunnel. Take the saw leaning on the wagon. Look at the cobweb and the
flabby brick above the rat. Use the hammer on the flabby brick and the bricks
will collapse on the rat.
Go to the door. Use the saw on the
rusty door chains. Enter and go to the bulge on the
left via the wooden bridge. Go to the cave on the right. Look at the skeleton
and take the chart from his hand. Go back across the bridge and go down
the stairs in the foreground.
Cathedral: Enter the cathedral. Look at Holy
Water. Go forward to the altar and look around. Talk to the old priest. Learn
about the great explosion and radiation after effects. Go left under the gallery into the passage.
See a locked door. Go back and talk to the blind priest again. The bums might
have taken the key. Exit the cathedral and
go right to the passage.
In front of the
National Archives: Talk to the
homeless by the fire. He has the flu. Trade the flu medicine for the key.
Go back to the passage in the cathedral.
Passage: Use key on locked door. Look around
at entrance to the catacombs. Go left to the catacombs.
Catacombs:
Select chart in inventory. Press the L key on your keyboard or click the middle button of your mouse to see a full view
of the chart.
Go forward and take planks
by the 2x4s. Continue to the left.Go right to the passage and take
rope in front of ancient
language plate.Go back to catacombs and now take the left passage. Take the empty
bottle from a niche on left wall.Go left to catacombs. Go forward to pile of rocks. Take the big
rock that is at the middle of the pile (screen).Go back to catacombs and go
bottom left of the screen to catacombs.Go forward and right to passage
from the screen with a door on
the right. Take the hose behind the barrel.Go back to catacombs and now go left to the catacombs. Take iron
pipe
with a hole from the niche on the right.Go forward to the passage. Go left to passage and see barrels
that have fuel inside. See that the right barrel has a vent. U&se knife on
the vent. In inventory,
use empty bottle with hose. Use hose & bottle on the vent to get a full
bottle of oil (black gold).Go back to catacombs and go right to catacombs. See a hole on the wall.
In inventory, combine rock with pipe with hole. Then combine it with the rope to
make a sledgehammer. Use sledgehammer on wall 2xs. Go up the stairs to
the archives.
Archives: Take the time to look at the
different books on the shelves. Look at the extreme right shelves. On the bottom
shelves of A. Hopkins, take the gray document book. Oops, the door slid
down and locked us in.
Archive door puzzle
– Look close at the 3 circle locks. The object of the puzzle is to place all the
lines to the 12 o’clock position. The left circle moves the left 1 space and
middle circle 2 spaces. The middle circle moves all 3 circles: left 2 spaces,
middle 3 spaces and right 1 space. The right circle moves the middle 1 space and
the right 2 spaces.Solution – Click
the right circle 3 times and the middle circle 7 times.Spider – Leave the archives and the catacombs. Use the planks on the
ladder and climb up. See a giant spider. Place the full bottle of oil on the
floor below its right legs. Watch.
Hacker: Go and talk to Hacker
at Red Alley. Learn
about the corruption and the connection with the Rope colony in Mars.
Mars second time around
Hotel Ares: Talk to robot twice about the room
and the missing tourist pictured outside the hotel. Go up to your room and try
to open the window. The window is stuck. Tell the robot receptionist to fix the
window.
Mars Police Department: Go to the MPD. Talk to
the Marshal. You can go to the surface by yourself if you have a suit. You can
get a suit by persuading a miner to lend you his suit. Note the cabinets and
monitors behind
the Marshal.
Tree: Take the Hotel Afrodita leaflet from the
bench and learn about Mr. Grant.
Miner’s Roopa: See that the bar is closed. Go
to the passage
right of the bar.
Hotel Afrodita: Enter the hotel. Read the
leaflet on the counter. Talk to the doorman. Go to left and up the hallway.
Notice
an article about missing people on floor under the MARS poster on left wall.
Enter the front room on the left. Talk to Onehand Grant. Learn about the cobalt
mining and he has dynamite stashed in his room..
Miner’s Roopa: Go back to the plaza and see that Miner’s Roopa is now
open. Talk to James, the bartender
and learn about the miners at the lower level.
Miner’s entrance: Go down to the
Maglev
station and go right to the corridor. Talk to the robot guarding the door to the
surface. Check the miner’s entrance and panel on the left. It needs a palm print.
Miner’s Roopa:
Talk to James and for a
bribe he mentions about John the electrician. Go to booth and talk to John. He wants
fruit vodka in exchange for a jammer.
Fruit Vodka:
Al Azif’s shop – Buy spray can and water.
Hotel room – Open window
now that it is repaired after talking to robot receptionist. Use spray can on
camera. Go down and talk to the Marshal who is checking about the water on
camera.Tree – Take the blue fruit.
MPD – Click a bottle of water on Ren. She
drinks it and get empty bottle. Go to the cabinet and click door open. See a vodka bottle at middle
shelf. Click the empty bottle on the vodka bottle to get vodka. Click the full
bottle of water on the empty vodka bottle on the shelf. In inventory, combine fruit and vodka
to get fruit vodka.
Exit and go to Miner’s Roopa. Look close at booth and read
John’s note.
Exit the bar and go right to passage. Enter Hotel Afrodita. Talk
to doorman and ask about Drunk John.
John’s room: Go upstairs and left to hallway.
Enter the front left room. Look at 2080 calendar. Talk to John and get scanner jammer.
Batteries not included.
Hotel room 17: Go to your room at the hotel.
Look close at table, take duct tape from table and click on computer
switch. Use knife on computer battery. Take battery. In inventory,
combine battery and scanner jammer to get charged SJ.
Miner’s entrance: Go to Maglev station. Go
right to the corridor and to the miner’s entrance. Use the charged SJ on the
panel left of door. Enter.
Warehouse: Take the hand held
drill on floor
right of dynamite boxes. Go up the stairs and look at the ZX48. Take crowbar
leaning on the rail. Go down and enter the locker room on the left.
Locker room: Look close at the screen on the
right to see the Duty Roster. Click screen again and note that Karen Harris is off duty. Look for Karen
Harris’ locker – it is at right foreground. Look close at Karen Harris’ locker.
Use crowbar on locker and take space suit.
Airlock – Mars Surface
entrance: Go and click on the airlock door to the surface. Automatically wear the space suit in the red chamber. Click on
door to Mars surface. Get a phone call from Hacker about the Marshal’s
involvement with the corporation. You need to get in the Marshal’s safe.
There’s a passage from Miner’s Roopa to Marshal’s place.
Check Marshal’s safe:
One hand Grant’s room at Hotel Afrodita
– Look
close at the drawer by the window. Take dynamite from middle drawer.Marshal’s place – Exit the hotel and go down
to dark alley. Go forward until the yard fence. Go through the yard fence and
the Marshal’s door.Meet and talk to Mary. Use duct tape on Mary. Look close on
desk and take matches.Enter the bedroom on left. Use knife on picture of
Marshal on
wall.Look close on safe. Use the drill on the safe just below the black knob. Insert the dynamite
on hole. Light the dynamite with the matches.Read the December 3, 2131 document
about the memo to the guards and abducted people to the mines at Pallas Asteroid
by Miriam de Balueda.Pull back and Oh –
Caught!
Aboard a cargo ship to a prison planet, Hacker
intervenes and
diverts the ship to the Asteroid field. Dolphin says Hi!
Cargo Ship, 2138
Ren is in
stasis. Hacker took over the ship and changed course. The cargo ship passed through a meteor storm and got
damaged.
Storage: Click on box at right foreground.
Take glove and baseball bat. Click on box at left foreground and
take liquid nitrogen tank. Use the liquid nitrogen to freeze the door. Then use
the baseball bat to break through the door.
Hallway: Go through door and look close at
monitor. The ship’s computer is malfunctioning. Click on bottom hallway
twice. See a door blocked by lasers. Click on the monitor on wall.
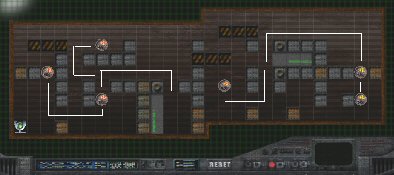
Barrel puzzle –
The computer will remove the laser if you play the game. The object of the
puzzle is to move 6 barrels to the warehouse, light colored squares using the
robot.Use the keyboard arrows
to move the robot located at bottom left, one square at a time.3 left barrels go to
left warehouse and the 3 right barrels go to the right warehouse.
Go forward bypassing the hallway with the control panel on the
wall. See another monitor that controls the 2 laser walls.
Line puzzle – The object of the puzzle is to get all the
lines horizontal. Marry me, Ren.The circled lines are
control by the 4 sets of arrows at bottom of puzzle. 2 or more circles are turn
by the arrows. Study which directional arrow moves what circles and deduce the
sequence to press to make a straight line from end to end.Solution – Numbering the set of arrows at the bottom L-R as 1-4: # 1 –
click right arrow once, #2 – click left arrow once, #3 – click left arrow once,
#4 – click right arrow once and #4 again – click left arrow twice.
Go to left hallway and take wrench.
Back to hallway and take
right hallway. Enter Command Bridge.
Command Bridge: Take flight stick
from the keyboard of monitors on the left of screen. Click the main monitor and see
another puzzle.
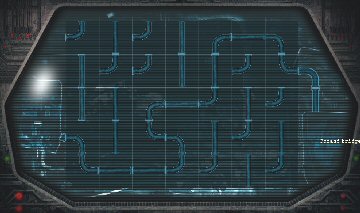
Pipes puzzle –
You have to arrange the pipes from the drive on the left to
the hangar on the right.
Exit the command bridge and go down the hallway. Go right to the
hallway we bypassed earlier that has a control panel by the corner. Use the
wrench on the monitor on the right wall to remove the laser beams. Go forward to
shuttle bay.
Shuttle bay: See a shuttle below at the
shuttle bay already facing the bay door. Go left of the platform and enter the
command room. Look close at command desk. Use the gloves on the stock (lever).
This lever controls the bay door. Go back to the platform and down the stairs to the shuttle bay. Go left twice to
get to the shuttle. Notice a console to the side.
Shuttle: Look at lower left in front of left
chair. Place flightstick on flightstick place. Click on screen to start shuttle.
We need fuel. Go outside to that console. Use wire scramble device from the PDA on
console. Now there’s fuel to go. Enter the shuttle and click on screen. Watch
the flight to the asteroid.
Asteroid Pallas 2138
Wasteland: Go right to wasteland
and see vehicle with a dead…ly driver. Take can of oil from top of
vehicle. Go left and then left again. Go left to Hillock. Nothing to do here. Go
back to wasteland at right. Go to bottom of screen to get to hill and base.
Base: Go to the entrance at center of compound
and talk to the robot guard. No way inside through here. Go back to yard and
then to the hangar on the right.
Hangar: Go to the backdoor at right of
building. The pipes bring sound of trapped miners. Use oil on valve
on wall. Use the wrench to turn the valve and this opens the ventilation
duct.
Air duct:
Go through the ventilation duct. Click on door switch to open the
storage panel. Take the map of the ventilation system. Go through hatch. Enter
the pipe on right wall.
Ventilation system: Go forward and take the
left opening 5xs to get to pipeline. The entry is marked with radiation signs on
the wall of the maze.
Pipeline: Climb the ladder on the left. Try to take
the wire cutter on top of the box. It’s too hot in here because of the steam.
Climb down and use the wrench on the now active red valve. Climb the ladder again. Take the
wire cutter. Climb down the ladder again. Go ahead towards the
ventilator. Use the wire cutter on the distorted ventilation on right wall.
Enter the hole.
Platform: Go to platform and see a top view of Ren and robot guard on floor. Take the
rock and watch how Ren took care of that
guard.
Floor: Go down the stairs
at top left of
screen. Go to Hall by guard. Take the keycard by guard. Use the wire from
the PDA on the locker left of the office door.
Office: Enter and read the 2 documents on the
desk. Hmmm. No human guards in the compound and the invincible soldiers are built here at
the asteroid. Go to the safe and use pink keycard on the control board. Take
card with photo. Exit office and go to elevator at bottom left. Enter the elevator.
Tunnel: Go forward on the tunnel and see a
barrier. Go back to the elevator and go left to climb the ladder to the metal
structure. Use the wire on the console and this will raise the barrier. Go back
down the ladder and go through the tunnel again.
Clones: Go to the drill ahead.
Be sure to click on drill. Go forward through the
tunnel and see a wall. Click on wall and Wow, that’s exciting.
Ren finds Ted.
The clones are destroyed.
Earth
Hacker: Talk to Hacker and find out that JB
Corporation is behind the clones and the Borisov heir is on the documents that
got Ted kidnapped.
Gunman: Click on the abandoned State Prison
destination in the taxi. Enter the State Prison building and forward on the
hallway. Talk to Gunman twice. In exchange for the Crogun, Gunman wants Behn
White, a security chief of the JB Corporation reminded of the money he owed
Gunman.
JB Institute: Click on JB Institute (top left)
destination. Go to the monitor in front of building. Click the tab on top and look through the
management lists of JB Enterprise. Click on Supp(ort), then Security and see
Bhen White is one of 3 security chiefs. Click on Bhen White’s name and
talk to him.
State Prison: As your taxi arrives at the
State Prison, another car was leaving. Go down the hallway and see that Gunman
is dead. Take cabinet key by his right hand.
Go bottom of screen to the hallway. Enter
the cell on the left. Look close at closet. Use the key on the cabinet and take
the keycard.
Go back to the warehouse door at end of other hallway close
to the entrance. Use
keycard on locker. Enter warehouse and look around. Take the Crogun at
foreground. Exit the building.
JB Corporation:
Click on JB Corporation
destination. Go to entrance and forward to the hallway. Enter the warehouse door
and take the overalls on the bench. Exit now wearing worker’s
clothes. Where did she hide the Crogun? Go back down the hallway and enter the elevator.
JB’s Office: Look at Danger sign left of door guarded by robot. Use Crogun on
robot. Enter the office. Talk to blue gowned secretary. Look close at desk and
see a workbook with the word – Stalingrad at bottom right. Talk to secretary
again. Read the computer data – Jevgenji’s Diary. Ren learns
that the sleeping chambers of the army are in an old military base in Russia.
In 1930, Japanese scientist
discovered an injectable anti-aging substance. Germany requested the aid of
Japan due to concerned about their soldiers in the cold Russian climate. In
December, 1941, Dr. Mengel, in charged of the Institute of Hereditary Biology
received a package from Japan. It was to be delivered to Germany aboard a cargo
plane that will fly over the Stalingrad war front. Jevgenji Borisov, a Russian
journalist at Stalingrad war zone found a crashed plane with a wooden box. In
1976, Borisov realized what the files in the box contain and made a serum for
himself. He became immortal. He built himself an empire. In March 2020, he made
a deal with the League of Nations to conquer the Universe. He took matters in
his own hands in the year 2100, when he initiates the factory for making the
cloned BioRoboSoldier (BRS) on asteroid Pallas.
Stalingrad Military Base 2138
Look at the forest. Go to the military base.
Yard: Go to the yard and
see that the tank is blocking the tunnel entrance. Look at the empty barrel just
in front of the tank. We need to look for explosive.
Trucks: Go the trucks at the left side of the
yard. Look close at
right truck and click on handle to open the truck door. Take the grenade
under the seat. Look close at left truck and take the hook from the box
under the truck.
Mine field: Go through the fence to the minefield. See a top view of the
mine field. Click on the ground by the fence to make a hole. Click the ground
all over the mine field in search of mines. Pick 3 mines.
Some mines can not be picked up.
Yard: Go back to yard and place the 3 mines on the empty barrel. Then
place the grenade on the barrel with mines.
Tunnel: Enter the tunnel. Go forward and look close at the truck on the
right. Take the rope in front of the truck.
Chasm: Go forward and see a chasm.
Combine the hook and rope to make a grappling hook. Click the grappling
hook on the metal structure above the chasm.
Door: Look close at jeep and take the
high explosive (H-E) from the
ground. Look close at door. Use knife on hole left of door to remove the grill.
Place the H-E on the hole. Watch!
The End
This
document may not be distributed without express written permission of the author
and the content may not be altered in any way.
For
Questions or Comments on this Walkthrough,
Please write to:
MaGtRo
Copyright © 12/2004
MaGtRo