Belief & Betrayal – Jonathan Danter: Belief and Betrayal
Jonathan Danter: Belief and Betrayal
by Artematica
Walkthrough by MaGtRo September 2007
Revised June 2008
Gameplay: This is a third
person point and click game. The main menu has New Game, Load Game, Options,
Credits and Exit selection. The Options menu has video and sound options. The
video options have the subtitles, shadow off and monitor adjustments. The sound
options have the music, effects and dialogue volume controls. Click the
temple icon at bottom right to return to previous screen.
When the cursor is placed at left of screen, the diary
and the save game frame is seen. Check the diary once in a while to review the
progress of the game and get clues to proceed with the game. The saves can be
overwritten by clicking an old save and click yes on confirm. The save feature
can also be accessed by pressing the S key. There are unlimited number of saves.
When the cursor is placed on the edge of the right
screen, the notebook for things to do and information gathered is seen. The
information or idea can be combined (click-hold-drop) with the communicator seen
at top left corner of the screen or combined with an inventory item or vice
versa.
The communicator is opened by clicking on the
communicator icon at top left of the screen. Use the touch pen to click on the
different functions of the communicator. Home accesses the main communicator
menu. Mail is used to send text messages. To send messages, select the message
and click-hold-drop it on the name of the person you want to send it to. The
Media is used to send audio or video files to another person. The list of
persons available is at the bottom of the frame. Click on the button at right to exit the communicator.
To exit a close up, move the cursor to the bottom of
the screen. Left click to skip dialogues and the intro. Press the P key to pause
the game.
Press the spacebar to show all the active items in the
screen. Left click of an item identifies it. To pick up an item, right click to get the action
cursor and then left click to take the item. The inventory screen is at bottom of the screen.
Double left click to make Jonathan
run. To change to another character, click on that character’s icon at top right
of the screen.
Press ESC to exit the game and go to main
menu.
Chartres AD 1194:
A hooded monk runs into the town of Chartres. He takes a torch and burns the
Cathedral of Chartres.
Prologue: Whispers from the Past
See a man running in an alley. A shadow creeps up.
Manhattan, New York 11-04-06: See Jonathan talking to his boss, Warren on the phone.
Jonathan is to fly to Miami, Florida to interview Cardinal Gregorio the next day.
The Cardinal is a very influential person.
Prepare for the trip: Look around
the apartment and pick up the things Jonathan needs for his trip. You can also
check the kitchen and the bedroom upstairs.
Go to the coffee table and look at the nibbled pizza.
Check the books and see a close up of the coffee table. Pick up (right click
and then left click) the cell phone. The cell phone has a camera.Go to the snack bar of the kitchen by clicking the fax machine. Pick up the
pocket watch given by Uncle Frank beside the Fax machine.Go to the front door and check it out. Look close at
the cubby holes right of the telephone. Take the passport from the
‘pile of stuff’ at bottom row, second cubbyhole.
Call to duty: Jonathan
automatically answers the phone call. Chief Constable Twinings of Scotland Yard is sending NY police to pick Jonathan up and place
him on a plane to London as soon as possible. He says that Jonathan is in
danger.
Chapter 1: A Knight’s Training
London, UK 11-05-06:
Chief Constable Twinings’ Office:
Inspector Twinings explains to Jonathan that his Uncle Frank that he thought
dead for 10 years has been murdered. Uncle Frank was a
Vatican Secret Service agent. There has been a series of brutal ritual killings of Vatican
agents. He needs Jonathan’s help. Uncle Frank left a safe deposit box at
Heathrow Airport to Jonathan. They think that there might a clue there to help in solving
the murder. They have to wait for a CIA agent to be present when they open the
box. He gives his Frank’s door keys and Twinings’ calling card.
Uncle Frank’s apartment building: Talk to the
2 British Bobbies at the door to the apartment building. Learn that Lt. Coletti
will be arriving to take him to the airport. You can go down the street; check
things on the street and use the doorbell.
Foyer – Enter the building. Look around and check the
caretaker’s window. You can look at the plants and the vent.Go to the bottom screen and see a lock door to the
garage. Read the right side the bulletin board by the stairs. Umbrella and cat, eh…First level – Climb the stairs at right. Go to the bottom
screen and see an orange cat. Talk to it in a friendly way. Go back to the left
screen. Click the umbrella of the bulletin board fame.Second level – Climb the stairs right of the umbrella. Go to the left and
check Frank Danter Investigation door.You can also check the third floor if you want.
Uncle Frank’s apartment:
Go back to the left and look at the writing on the apartment door. Check the mail.
Living Room – Enter the apartment. Look around. Go to the desk and check (right click) the laptop.
Check the piano and the writing table left of the piano. Check the grandfather
clock.Bedroom – Enter the door right of the clock. Look
around. Check Uncle’s trophies on top of the TV, wardrobe and box of cigars at
the foreground.Kitchen – Enter the room on the left. Check the
refrigerator and (hot pads) pot holders. Look at and then take the tin of
tuna from the top of the refrigerator.Go left and check the bathroom.
Exit the apartment and go down to the first level with
the umbrella. Go
to the cat at bottom screen. Give
(left click) the tin of tuna to the orange cat. Talk to the cat. Purr… Purr…
Go back to Frank’s apartment.Stand by the piano and look at the books on the chair
beside the desk. Right click and then left click the books to get a map
of London. Once the map is picked up, there will be a visitor to the flat.Lt. Coletti – Coletti arrives and points
a gun at Jonathan. He wants Jonathan to go with him and open the safe deposit
box or he will end up like the 2 policemen that were guarding Jonathan. A
girl arrived just in time and Jonathan took care of Coletti.Katrin McKendal – Meet Katrin. Learn that she
is a part of ‘The Legacy’. Her father is the Grand Treasurer of a group that
worked with Frank to find out about old historical mysteries using
scientific methods. One of the rules of the Legacy is to leave a clue behind
in case something dire happens.Jonathan is to look for the clue and Katrin is to look
for ride out of here.Search the apartment for clues –
Book case – If you haven’t yet; look close and
take note of the green books that are not in order at the middle right shelf.
Jonathan enters ‘book sequence’ in his notepad. Check the notepad by placing
cursor at right of screen.Piano – Check the piano again and see Mozart
music sheet.Writing table – Look close at the small
equestrian statue on the writing table. It lost his sword. Jonathan recalls a
memory.Grandfather Clock – Look close at the clock. It
is broken and stopped 10:10. This is noted in the notebook. Memories surfaced
again about an old clock that also stopped at 5:55.Bedroom – Look close at the fishing trophies on
top of the TV by the window. See and take the mysterious device.Mysterious Device – Look close and see that it
has Roman numeral similar to the out of sequence book at the book shelf in the
other room.Move cursor at right of screen to show the notebook.
Click the ‘book sequence’. Then click the word on the mysterious device in
inventory.A close up of the mysterious device is seen on the
screen.Enter the numbers of the books in the other room on
the mysterious device: VI IX I X III.Press the small knob left of the numbers.
Study the parchment inside. It has 3 symbols on it.
Kat at the Garage: When Jonathan
finds the hidden clue, automatically transfer to Katrin. Guide Katrin now at the
garage.
Inventory has postcard of London, gun and lipstick.
Look around the garage and check Frank’s
accumulated belongings. Check the motorbike.Go to bottom screen. Find a flicker on the wall in front of the motorbike.
Take the motorbike keys at the wall in front of the motorbike.
Automatically, Jonathan and Katrin are back together
at the apartment.
Chapter 2: Shining our
Swords
Jonathan and Kat drive to go to Arthur, Kat’s father.
Coletti wakes up. He reports to Twining that Jonathan
murdered the policemen with the aid of Kat.
Arthur McKendal’s Home: Meet
Arthur McKendal. Learn that Coletti is just a small fry in the mystery. Now,
Jonathan is a wanted man. Learn from Arthur that Frank has been investigating
the Imago Sanctissimus. The Knights of the Templars states that the Imago
Sanctissimus answers all the questions of mankind.
Damien: Damien, a computer
expert lives above a pub. Damien says that Arthur has been arrested. He gives
Jonathan a communicator seen at top left of the screen. The communicator
made for the members of the Legacy is untraceable by the police or Interpol. He
will research the symbols seen on the parchment. He advises for Jonathan to get
a fake passport so they can move around freely.
Robert: Meet Robert, an
expert forger. He will make a fake passport for Jonathan but needs a photo of Jonathan.
There’s an old photo machine around the corner. Kat will go home; check on
her father and get her fake passport.
Give your cell phone that can take picture to Robert.
Robert does not use those things.Find the old photo machine – Exit the
room.Grate – Look down at the grate twice and see
something shiny. It might be a coin.Outside there are 2 ways to go. Take the path on top
left.Continue left and look around to see if there anything
that can help us: rusty machinery, rubbish bin and pile of rubbish.Bottle of wine – Look close at the pile of
rubbish at the corner (not the 3 rubbish bin with blue lids).Right click and then left click on the pile of rubbish
several times. Jonathan will refuse to look at the rubbish; he will kick it;
then he will not play garbage football again and finally he will see a bottle of
wine. Take the unopened bottle of wine. (Thanks, Gimli.)Continue to the right around the building. By the
railroad track, see a pile of wood and a puddle full of rubbish.Puddle – Click twice or more on the puddle to get Jonathan to
look close at it. Take the piece of shoelace.Continue up the screen and see the Vega Motel to your
right and a rubbish bin to your left.Continue to the right pass the motel and the
motorbike. See a dump site of sort in the foreground.Dump site – Check out the old fridge. Take the
melted ice lolly.See 2 gas pumps. Check the bush filled with rubbish at
bottom left of the dump site. Take the yoghurt pot.Continue to the right of the street pass the
motorcycle.Drunken man – See a drunken man in front of the old photo
machine (Photo Matic).Talk to the drunken tramp. He doesn’t want you to use
his shelter.Look close at the broken glass right and on the ground
of the drunken tramp. Take the empty bottle.Abandoned car – Click twice to look close at
the abandoned car across the drunken tramp.Look close on the broken windshield and see-take a
magnetic religious figure.Get the drunken tramp away from his shelter.
There are 2 ways to get the tramp away from there:
1. You can give him the bottle of wine found in the
pile of rubbish.2. Or you can make a fake bottle of wine.
Fake Wine – Continue to the bottom of
the road. At the corner of the road and in front of the corner
of the building, there is a drinking fountain.Use the empty bottle on drinking fountain to get
bottle nearly filled with water.In inventory, combine the bottle nearly
filled with water with the melted ice lolly to get bottle nearly filled
with water and strawberry juice. Keep the wooden ice lolly stick.Combine the bottle nearly filled with water and
strawberry juice and the yoghurt pot to get bottle of fake wine.Give the bottle of fake wine to the drunken tramp.
He staggers away.Coin – Go back down to the bottom screen. Continue
down and to the right and be back in front of Robert’s
hideaway.In inventory, combine shoelace and religious magnet to
get magnetic fishing rod.Look close at the sewer grate. Use the magnetic
fishing rod on the glittering thing and get the chewed coin.Go back to the right; pass the water fountain and back
to the photo matic machine.Photo – Use the coin on the photo matic machine to
get ID photo.Go back to Robert. Go to bottom screen and then down
to the corner. Go right until the sewer grate and
enter through the steps at top of screen.Give the ID photo to Robert.
Kat at the McKendal house:
See Kat enter the back gate of the house. Look around. Check the kitchen door
and see that it is locked.
Enter the house – Look on the first floor of
the tower at left and see that the lights on the first floor are turned off.Look at the balcony at top of the house and see that the glass door is opened.
Examine the climbing rose trellis. Try to climb and
find out that there are too many
thorns.Look close at potting shed. Pick up the pair of gardener’s gloves in front
of the potting shed.Click the gloves on the climbing roses and Kat climbs up.
Inside the house – On the first floor, look around at
the paintings and doors.Go forward until the door at the end of the hallway –
My bedroom. Click twice the 18th century painting on top of the door. It is where father hides the
safe.Office – Go down to the lower floor. Enter the
room on the right.Look around. Go to bottom screen.
Look close at the documents and papers on the desk. Take the fake passport from the
corner of the desk on the right.Exit the office. Go to room left of the foyer to the
living room.Living room – Go left of the office to the
living room. Check and use the red sofa beside the TV and take the digital
photocamera.
Automatically be at Robert’s place. Jonathan’s fake
passport is under the name of Daniel Brown (shades of DaVinci Code). The
communicator rings and Kat says: Damien has news.
Back with Damien, Damien explains that the coded paper is a piece of cloth.
Damien gives a background about the burning of the Cathedral of Chartres in 1194
and the workings of the Cathars. He believes that the burning of the cathedral
was to destroy the relic that might be encoded. Kat says that she can do
research at the Library in London.Damien also wants them to go to Chartres and to talk
to Alan, a night flyer.Jonathan gives the keys to Frank’s place to Damien to
further check for information.Chapter 3: Imago Sanctissimus
Damien at Franks’
apartment: Inventory has communicator, USB disk, underground
seasonal ticket and Frank’s door keys.
Enter the building and
see the corpse silhouettes of the dead Bobbies. Look around.
Climb the stairs to
second level and enter Frank’s apartment.Look around to hear
Damien reminisce about Frank.New laptop –
Click and use the laptop.Password – The
laptop needs a password. Check with Jo for the password for Frank’s laptop is
placed in the notebook.Click the words about
the password on the notebook. See that the words are now the cursor. Move the
cursor with password sentence into the inventory at bottom of page. Click it on
the communicator.See the enlarged
communicator. Click the tip of the pen on the mail icon of the e-mail about the
password and then click the mail cursor on Jo at bottom left of the screen.See the flashing communicator and hear beeps. Click the communicator at top left of screen.
Read Jonathan’s answer. Click the on-off button to get out of the communicator.Laptop –
Use the USB disk on the new laptop. Damien finds a ‘list of books’ on the
laptop.Click the words about
the list of books on the notebook. See that the words are now the cursor. Move
the cursor with books sentence into the inventory at bottom of page. Click it on
the communicator.See the enlarged
communicator. Click the tip of the pen on the mail icon of the e-mail about the
books and then click the mail cursor on Kat at bottom left of the screen.
Jonathan at Alan’s
hangar: Jonathan sees and hears an orange cat.
Enter the fenced area
– The meshed door at right is locked. Check the wooden board beside the orange
tabby. Use the wooden board and it opens the whole gate fence.Alan – Enter the
hangar on the left. Go to the left and check the airplane. Enter the room right
of the airplane and meet Alan. Talk to Alan.Convince Alan –
Alan doesn’t believe that Jonathan is a friend of Kat and Damien.Show the fake passport
to Alan and he recognizes Robert work of art.Spark plug – Alan
needs a new sparkplug for his plane. Ask Alan if he can order it and where to
find this piece. He says that drunken boys came one night
stole a spark plug from his plane. He says that they might be in a pub or disco.Look around Alan’s
‘office’. Look inside the green trash bin behind the TV. Take the small
canister that contains ammonia.Where did we see a pub?
Check the map and click Damien’s name at right of the map.Check the sign right of door outside
Hunter’s Blue Skies Tavern. It was built by pieces of engine.See a close up of the
mechanical device. Use the complicated mechanical device at center of the pipe.Take an old spark
plug.Use the map to go back
to Alan. Enter the hangar and give the spark plug to Alan.
Kat at the Library:
Click the communicator at top left of the screen. See the e-mail from
Damien and automatically the list of books is entered in the notebook at right
edge of the screen.
Find the books – Enter
the door to the right. Talk to the librarian. He is very busy and he will not
help tonight.Go close to the bookcase
and look for the 3 books. They cannot be taken.Go to the next room at
right. Look around.Move the pile of books
at left end of the room. That didn’t work. Find another way to distract the
librarian.Move the fire extinguisher on the floor at right side
of the room. A rat comes out and the librarian goes to the rat
hole exposed by moving the fire extinguisher.Go to the bookcase at
next room and take: The Secret Book of Epicures, Imago Proditio
Divinum and The Mysteries of the Knights Templar.
Automatically, the group gathers at
Damien’s apartment. Damien explains that if the original basis for the Imago
Sanctissimus is the Imago Prodition Divinum, then the real meaning is betrayal. The Imago Sanctissimus is
a medallion forged from Judas’ 30 piece of silver. Jesus placed the secret of
life in the medallion to reveal it to mankind.
Alan on the Amazon Queen flies Jonathan and
Kat out of his hangar to Chartres, France.
London Docks, 11-05-06: Watch what happened to
Damien. Damien records his abduction on his webcam.
Chapter 4: Chartres Reminiscence
Jonathan and Kat stand
outside the Cathedral of Chartres. The communicator beeps. Oh my! Poor Damien.
Kat wants Damien’s body
taken down from the wall. Jonathan will call Twinings while Kat looks for a
place to stay.
The communicator beeps. Click to open the
communicator. Then click the movie icon.Call Twinings –
Go to the telephone box at right. See that it has been vandalized.Go to the far left of
the cathedral. You will see an overhead view of the area.Go to the fountain and
check it out. Take the packet of condom.Go farther left-down and
forward to the work in progress-construction zone at far left. Look close and take the metal
bar.Look at the famous Rose
Window of the Cathedral.Go back to the telephone
box. Look close and then use the metal bar on the stuck door.There’s even a phone
card in the slot.Watch Jonathan talk to
Twinings. Twinings had the phone call traced.Check the cathedral
– Check and take the tin of tomato sauce on the floor in front of the
newsstand door across the telephone booth.Go to the right side of
the cathedral.Check the benches that
line the walkway. At the first bench, take the newspaper someone left.Engraving on the
statue’s column – Continue to the left of the benches. Look at the statue of
the Blessed Mother. Look close at the column. It is not as old as the cathedral and the base column of the
statue has engravings.Take the stone
right of the column.Use the tomato sauce on
the engraving of the column. Use the newspaper on the tomato sauce covered column to get
newspaper with mysterious Latin sentence on it.Take a picture of the
newspaper with Latin sentence by combining the cell phone with the newspaper with
mysterious Latin sentence on it and ‘Mysterious Latin sentence’ will be placed in
the notebook.Click ‘Mysterious
Latin’ sentence on the notebook and then click it on the communicator.Click the mail icon and then click the name of Kat at bottom left.
As Kat: The communicator
beeps. Click to open the communicator. Then click the e-mail
icon. Exit the communicator.
Go to right screen and
talk to the man sitting on the bench at bottom of screen. Learn from the drunken guide about the
hotel, robes of the Virgin Mary and Golden Ratio. Learn about the column outside
the cathedral made by the Knights of Templar.Go back to the left
screen and talk to the kids playing in front of the house. Some of them are
dressed as Knights of Templar. Learn about the window that can be easily opened
and it is placed in the notebook.Take the ‘one of the
Cathedral’s windows can be opened easily‘ from the notebook and click it on
the communicator.Click the mail icon of
the entered sentence about the window on Jo’s name at bottom left.
As Jonathan:
Click Jonathan’s picture at top right to change to Jonathan.
Go inside the
cathedral – Open the beeping communicator and read the mail sent by Kat.
Click on-off button. Go to the window left of the statue.Look close at the
window. Use the ice lolly stick or the phone card on the window. There’s too
much light.Street lamp – In
inventory, combine the stone and the condom to get a simple knot.Use the simple knot on
the street lamp.Go back to the cathedral
window. Use the phone card or ice lolly stick on the window.Mary’s Robes – Look
around at one of the most beautiful cathedral in the world.Go to the left between the chairs until the
altar. Go to the other side of the altar.Look close at the altar
and see the relic – wooden box that contains Mary’s Robe.Open the box on top of
the altar. A kindly priest appears.Father Dominique and
Jonathan talk about Frank. The relic here is just a copy of the original. The
Knights of the Templar took the original and hid it in a very secret place after
the burning of the cathedral.Father Dominique explains the true meaning of life.
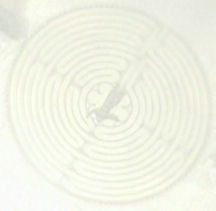
The labyrinth has a rose and constellation of Virgo at the center.Jonathan exits the
cathedral and is immediately surrounded by the French Swat Team. Kat sees what happened to
Jonathan.Chapter 5:
The Mystery Revealed
Kat arrives at the
Vatican after being dropped off by nice hippies. In her inventory was added: Map
of Rome, Guide to all Monuments of Rome and a match.
Vatican Museum:
Look around. Then go to the building with the 2 red banners at the back right side
of the courtyard.
Talk to the funny museum
caretaker sitting in front of the Vatican Museum.After convincing him, he
allowed Kat to enter the museum. Look around at all the rooms.Fire in the Borgo
fresco – Pass all the room. At the room at the end, study the Fire in the
Borgo fresco.Learn about Pope Leo IV.
Press the space bar and click on all the active spot of the painting. Click the Pope at the window
center of the painting.Take the ‘Mysterious
Latin Sentence translated to English’ from the notebook and click it on the Pope
at the window.Kat translates the
meaning of the passage. Exit out of the fresco.Go to the right wall and
see an alcove. The right wall of the alcove has a hole.Use the match on the
hole. A secret drawer opens. Take the magnetic cylinder.
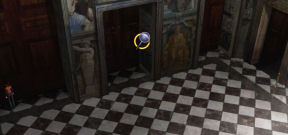
Exit the museum. Talk to
the funny museum caretaker again for help. He advises to go to the Magical Door.
A new place is added in the map.
Magical Door:
Use the map and go Magical Door at Piazza Vittorio Emanuele II.
Look around and note the
remains of an ancient monument on the left.Go farther inside the
enclosure and study the Alchemical (Magical) Door and the statues.Look up and study the
Architrave. Examine the centre of the circle – hole above the Magical Door.
Insert the magnetic cylinder taken from the Vatican Museum on the centre of the
circle. Another secret hole is opened. Take the Magnetic Cone.Where to go next? Click
the stone arrow above the hole of the Magical Door.
Click the map on the
arrow. A line will be drawn on the map.Click the Guide to all
Monuments of Rome on the map that has a lipstick drawn line. The guide describes
the eye or open roof of the Pantheon.
Pantheon:
Right click and then left click the map. Click to go to the Pantheon. Look
around the area.
Talk to the policeman
guarding the closed Pantheon. He does not want to let Kat in.The action ‘The
policeman in front of the Pantheon won’t let me in’ is entered in the notebook.Use the map to go back
to the Vatican Museum (St. Peter’s Square).Use the ‘The policeman
in front of the Pantheon won’t let me in’ in the notebook on Aldo, the funny
museum caretaker and again he helps Kat.The tourist guide talks
to the guard at the Pantheon and Kat enters the building.Inside the Pantheon
- Look around at all the displays.At the next screen at
right, go to King Humbert and Queen Margherita’s tomb.Click twice on the tomb
at the center. See a hole at the base of the tomb.Use the magnetic cone on
the hole. Hear a click and a drawer opens.Take the Magnetic
Pyramid. At the same time, a secret passage on the floor in front of Rafael
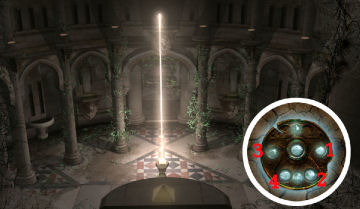
opens.Crypt – Kat goes
down the stairs.See a pedestal at the
center of the room. The ray of light ends on the pedestal.Look close at the altar
at the close to the column. Use the magnetic pyramid on the hole.Mirrors – A
mechanism is exposed. The mechanism controls the mirrors above the 6 columns.The object of the puzzle
is to position the mirrors so that the ray of light hits the altar where the
magnetic pyramid was inserted.Press the right, lower right, left and lower left
buttons.
Kat takes a picture of
the code seen on the rest of Mary’s Robe. A monk walks behind Kat.
Jonathan in London:
Jonathan talks to Twinings. Learn what happened to Coletti. Jonathan and Kat are
now taken off the wanted list.
Twinings gives the keys
to Frank’s apartment to Jonathan.Outside the New Scotland
Yard,
Jonathan’s communicator beeps. He reads the message from Kat about Mary’s Robe.The action ‘Second
half of Frank’s Clue found by Kat on Mary’s Original Robes’ is entered in the
notebook.Jonathan decides to ask
Arthur why Kat is still not home. He also needs to get the Frank’s parchment
from Damien’s flat.Check the communicator
and look at the photo of the second piece of Mary’s Robe.
McKendal House –
Use the map to go to McKendal ‘s House. Enter the house and the office at left of
the foyer. Go down the screen. Talk to Arthur.Damien’s flat –
Use the map to go to Damien’s flat. Enter the door right of the pub. Climb the
stairs and get stopped by the cleaning lady.Enter Damien’s flat – Talk to the cleaning
lady. Go farther down the hall and then climb up to the next floor. Go down the hall and see a shiny floor. Hmm…Go down and exit the
building.Enter the pub next door.
Talk to the bartender. After some talk, get a bottle of mustard for
overlooking an ‘olive’.Go back to the floor
above the old cleaning lady in Damien’s building. Use the mustard on the shiny
floor spot.Go back down to the old
cleaning lady and talk to her. She cleans the mustard mess.Enter Damien’s flat.
Look at the desk and take parchment – piece of Mary’s Robes.McKendal House –
Use the map to go back to Arthur’s House. Give the piece of parchment to Arthur.Arthur says that there
are ancient hieroglyphics inside the code. He gives a medieval key (passepartout)
used by Knights Templars to open locks.Heathrow Airport
- See the opening of the locker at the airport. Get Uncle Frank’s old watch.
Twinings will check the watch first.New Scotland Yard
- Twinings returns the second old watch to Jonathan in his office.
Outside, Jonathan realizes that the old watch must be a clue.Frank’s Apartment
- Go inside the building. Go up and enter Frank’s apartment.Watches and Clock
- In inventory, look close at both old watches. The gift watch stopped at 4:55
and the second watch stopped at 5:55.Look close at the
grandfather clock. It stopped at 10:10.Take the ‘Frank’s old
Grandfather clock has always been broken’ from the notebook. Click the words on
the second pocket watch to get ‘I could try setting the grandfather clock at
5:55’.Take ‘I could try
setting the grandfather clock at 5:55’ from the notebook and click it on the
grandfather clock.A secret drawer opens.
Take the little metal sword.Small equestrian
statue – Look close at the small equestrian statue on the writing table
right of the piano.Use the little metal
sword on the small equestrian statue.A secret drawer opens.
Take the piece of paper that has musical notes.Piano – Look
close at the piano. Click the piece of paper with musical notes on the music
sheet. Automatically, play the musical notes.A secret drawer opens.
Take the ancient medallion – Imago Sanctissimus.Get a call from Arthur
and sends Jonathan to Venice to search for an ancient crypt in a well at the
Ducal Palace. Arthur needs a Codex to interpret the symbols on the parchment.Heathrow Airport
- Push the trolley-pushcart back to the others and see a coin. Take the coin.Go to the right and use
the coin on the vending machine to get a fresh drink.Look at the desk left of the vending machine and
behind the couple at left. Take the pencil.
Venice 11-06-06:
Arrive in front of the Ducal Palace. Look around and enjoy the sights. There’s
the theatre left of the Ducal Palace and St. Mark’s Cathedral Bell Tower behind
it.
Enter the Ducal Palace.
See 2 wells at the courtyard. One is being worked on by a restorer.Talk to the restorer.
She stops Jonathan from entering the well.Sabotage the
restorer’s work – Look at the items on the work table.Take the sandpaper.
Combine the pencil and the sandpaper to get pencil’s graphite dust.Give the restorer the
fresh drink.Place the pencil’s
graphite dust on white plaster tin.Well – Climb down
the well. Look at the chain and realize that you’re stuck. The ladder is broken.Look at the little space
between two stones left of the broken ladder. There’s a hole in there. Look at
it several times and then try using it. Ouch.Go right and see stone
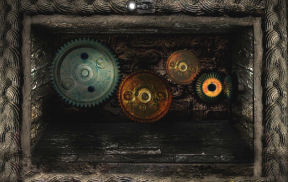
with a little hole. Use the medieval key (passepartout) on the little hole.Gears puzzle – Use the lever on the top
of the frame to reset the puzzle.Click-hold and place the gears in their proper knob so
that the gears will move.Click the lever on the
top of the frame to start the gears moving. The door opens.
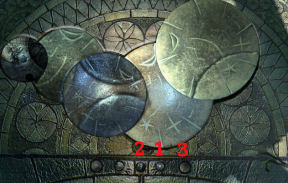
Circular Stones –
Enter the ornately decorated underground room. Go forward.Look at the rotating
circular stones on the floor. Take note of the 2 statues.Press the small circles
at the bottom of the frame in correct order.From left to right:
Click 4 3 5 buttons.Cross the bridge and
look at the pedestal. Take the (ancient medieval) alchemical codex.
London 11-06-06:
McKendal House
–
Back in Arthur’s home, give Arthur the alchemical codex. The parchment must be
immersed in a mixture made of water, ammonia and mercury. The order of
preparation is critical.Damien’s Flat –
Use the map and go to Damien’s flat. Climb up and enter Damien’s flat.Look around the flat. Go left to
the kitchen; the water is turned off.Parchment – Go to
the bedroom left of the kitchen and look around. Take the thermometer from the book case
right of the bed.Go to other side of the
bed. Take the biscuit box under the chair.Robert’s area – Use the
map to go to Robert’s at Brixton. That is where we saw a water fountain.Go right and go close to
the water fountain at the corner. Use the biscuit box on the drinking fountain
to get biscuit full of water.Use the small canister
of glass cleaner taken from Alan’s rubbish bin on the biscuit full of water to
get biscuit full of water and ammonia.Use the thermometer on
the biscuit full of water and ammonia to get biscuit full of water, ammonia
and mercury.Now use the piece of
parchment on the biscuit full of water, ammonia and mercury to get first half of
the Frank’s clue found on the piece of Mary’s Original Robes.Combine the words
‘second half of the Frank’s clue found by Kat on Mary’s Original Robes’ in the
notebook with first half of the Frank’s clue found on the piece of Mary’s
Original Robes to get ‘complete the clue that Frank left hidden on Mary’s Robes’
in the notebook.McKendal House –
Use the map to go back to Arthur’s home.Back in Arthur’s home, click the ‘complete the clue that Frank left hidden on
Mary’s Robes’ from the notebook on Arthur.Hidden in the image
of godmeaning of life that
will reveal in thosewho will find the
geometry built byFrederick II.
Arthur visited an octagonal
structure designed by Frederic II. It is a perfectly geometrical octagon like
the Imago Sanctissimus.The communicator
rings. See Kat beside a bomb that is ticking off 12 hours.
Jonathan flies to
Castel del Monte.
See the arrival of 2
cars with monks at Castel del Monte. Three monks went inside the building with
a toolbox. One is left with the cars and an open car trunk. Jonathan is up on
the scaffolding.
Chapter 6: Moonlight Shadows.
Outside Castel del
Monte:
Pick up the wooden
stick at the end of the scaffolding where Jonathan’s standing.Use the wooden stick on
the monk. Jonathan eventually places the monk in the car trunk.
Inside Castel del Monte:
Go to bottom screen and see the toolbox.
Look close at the
toolbox. Take the wrench and oil from the toolbox.Go down and
through the entryway to the other room.Go right and be at the
courtyard. Go inside the lit entryway at top of the courtyard.Kat – See Kat tied up by
the bomb with 2 monks on guard.Take note of the
chandelier above the 2 monks.Chandelier – Go
right back to the courtyard.Go right again inside
the hallway.Go down to bottom screen
and look at the wall.See a metal cable at top
of wall connected to a screw below.Look close at the screw
and use the wrench on the screw. The screw is rusty.Use the oil on the
screw. Then use the wrench.Hear a crash and moan.
Watch as Jonathan
releases Kat. That takes care of 3 monks only.
Underground passage:
Kat mentions that the monks talked about an underground
passage.
Go to underground
passage – Exit down and then right to be at the courtyard.At the courtyard, go
down to bottom screen. Look at the stone decoration at the center of the
courtyard.Go back down to the next
screen. To the right of the entryway that you exited from, look close at a hole.Use the Imago
Sanctissimus on the hole.See the stone decoration
at the center of the courtyard turn into stairs.
Metal Gate – Go
to the right until a metal gate flanked by skeletons and fountains.Look at the metal gate and see that it is connected to
the left stone fountain. The right fountain is not connected to the metal gate.Look close at the left
stone strange fountain and see a hole.Use the Imago
Sanctissimus on the hole.The gate opens.
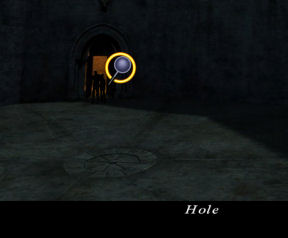
The map of all life
forms in the universe…
…hide the truth: Man’s greed.
The center of the
labyrinth…
This
document may not be distributed without express written permission of the author
and the content may not be altered in any way.
For
Questions or Comments on this Walkthrough,
Please write to:
MaGtRo
Copyright © 6/2008
MaGtRo