Just Adventure original
Faust: The Seven Games of the Soul Walkthrough by Dan Kennedy
Chapter 6,
“A Three Feet Tall Robinhood”, features the diminutive Tod – hero
or criminal (or perhaps both?). After Mephisto’s introduction, we are
placed back near the twins’ trailer and Hannibal’s tent in June 1930.
Turn around to face Tod’s house – a low building with a door that shows
no signs of a way in. Pan to the left a bit, and walk to the left of
the house. Turn around and examine the outer wall of the building here
– click on the small open window, but Faust wants to spare his body.
Turn back to the right, and walk back to the front door.
Turn away
from Tod’s door, walk forward, and turn to the left to face that tantalizing
punching bag you’ve seen during the other episodes. This time feel free
to click on the bag – Faust manages to move the needle on the dial above
the bag, but not enough to do anything. Game for another? Click again
– Faust kicks the bag, but manages to land on the ground amid laughter
from Homunculus.
The bag is
now un-clickable, so take Homunculus out and see what he can do – click
on the bag. Homunculus flies up above the bag, and manually turns the
dial’s needle over one complete turn. We see Tod’s door creep open.
Turn to the left, walk forward and watch as the door shuts again – we’ll
need some more assistance from our friend. Turn around, walk back to
the punching bag, turn to the right, take Homunculus out of your inventory,
and click on the bag again.
Once the door
opens again, turn to the left, take Homunculus out again, and click on
Tod’s door. Homunculus flies through the air and lands on the doorstep.
Take a step forward – our friend is propping the door open for us. Walk
forward into Tod’ s house.
Bred to the
Bone
Inside the
home, turn to the right, and click on the poster hanging on the wall here
to the right of the bed. Tod’s last name is Von Essenbeck, and it sounds
as if he was born into money, but was denied his heritage due to his size.
He gives us his birth date (November 1, 1893). Click on the top drawer
on the small table below the poster. Pick up the St. Christopher’s medal,
and listen to the message from someone who helped Tod escape certain death.
Look in the
drawer again – there’s a small ring to the right of where the medal way.
Pick up the ring with the Essenbeck crest on it, and listen as more of
Tod’s story is explained. He was rescued by servants from the murderous
clutches of his family, and raised by peasants. Close the drawer, and
open the one below. Inside, click on the newspaper and hear Tod raging
on about the idiocy of prohibition in the face of poverty and hunger.
Back away and close the drawer.
Turn back
to the left, and walk forward into the home. Turn to the left, and click
on the sink. In the close-up view, click on the left tap – click on the
brown drops to hear Faust describe the hooch dribbling out of the tap.
Next click on the right tap – click on the stream to confirm it’s water.
Back away from the sink, turn to the right, and click on the toilet.
The “paper” looks suspiciously like liquor bottle labels. Click on the
label to learn that Frank designed these for our little whiskey baron.
Back away
from the toilet and turn to the right to face the fire place. Click on
the wood piled inside the stove to put a piece into your inventory. Now
click on the dull yellow and red button above the logs. The close-up
view indicates that this is another Von Essenbeck crest. Take out the
ring from your inventory and click on the crest with it to activate some
sort of wood lift. Back away from the button, and note that the wood
has disappeared.
The Monsters
Under Your Bed
Pan to the
right, face the bicycle and click on the handle bars. We see Faust take
a turn on the stationary bike to no apparent end. Once he’s done, click
on the back (right) wheel of the bicycle to alter the gears in some way.
Now click on the handle bars again – Faust goes at it again, but this
time the bed lifts up to reveal a hidden box.
Clicking on
the red item inside the hiding place yields the same message we heard
back in Chapter 5 about Kalinka clothing Tod’s charges. Next click on
the book to see what Tod is reading – “The Little Book of Gangsters”.
Move the cursor off of the two objects in the box and click to move this
box aside, revealing a trap door.
Click on the
door to get a close-up of a combination lock for the opening. The only
number we’ve been given so far is Tod’s birth date, so it’s not too much
of a stretch to use it here. Since we’ve got 5 numbers in the combination,
drop the “18” from 1893, and dial in “1 1 1 9 3”. Align the numbers vertically
so that the bottom of each number is in line with the horizontal lines
on either side of the reading window. The door will open up, and Faust
will scramble down the rickety ladder.
You now sit
staring at a set of casks that hold “Tod’s Finest”. Click on each of
the casks – the left one in the middle row, and the centre one in the
bottom row, sound like they are empty. Click on the tap (the spout) on
the left cask in the middle row to place it into your inventory. Immediately
take it out again and click on the centre cask in the bottom row. The
cask opens to reveal a secret passage through the wall.
Click to go
forward through the passage, and watch as Mephisto boots you in the ass.
He thinks this is high comedy, but really wants to show us Frank telling
Theo that Tod uses orphans to make his illegal booze. We are automatically
pushed through into the next room.
A Load of
Bunk
We are now
inside Tod’s orphanage (or at least where he housed his street urchin
booze brewers). Turn to the right, and click on the cup and plate sitting
by the bunk bed here. Tod apparently runs a pretty tight ship. Turn
to the left now, and pick up the bat lying on the ground to the right
of the entrance tunnel. Turn right again, and walk forward into the room.
Turn to the right, and walk forward to the door. The door cannot be accessed,
but try clicking on the phone mounted on the wall to the right – we briefly
hear the operator. Turn around, walk forward, turn to the left, and walk
into the bathroom.
Click on the
mirror directly in front of you – we hear the same speech Tod gave by
clicking on the plate in the dorm room (this time we see him though).
Turn to the right and click on each of the two stall doors, which both
rock back revealing nothing. Click on the first aid kit mounted on the
wall to the left of the door, and click again on the big bottle on the
left with the red liquid in it. One of Tod’s charges has been roughed
up by Hannibal, and this time it’s personal.
Back away
from the kit, and note the grinding sound in the background. Pan to the
right and exit the bathroom. It sounds as if the telephone is ringing
– pan to the right, walk forward and click on the phone to answer it.
Tod is in conversation with a criminal named Nitty, hoping to win Hannibal’s
debts in a card game. After the conversation ends, turn around, walk
forward, turn to the right, walk forward, and exit the dormitory.
After we crawl
through, Mephisto decides to make things a bit sporty for us by changing
our body into Tod’s form.
Go-Go a Whiskey
It is time
to make use of Tod’s equipment to make some whiskey. Turn towards the
large stove situated to the right of the casks, and click on the bottom
door to open up the burner. Take out that piece of wood from the wood
pile upstairs in your inventory and click on the open space to deposit
into the stove. Try lighting a match from your inventory (just click
on the matchbook) and waving it over the wood, but you are still missing
a vital ingredient.
Back away
from the stove door, and turn to your right until you see a bucket on
the floor (near the ladder that leads upstairs). Click on the dark bucket’s
contents to receive an old newspaper. Turn around, click on the stove
door again, take out the newspaper from your inventory and click to place
it inside the stove. Now grab a match from your matchbook and wave it
over the stove’s contents, which happily burst into flame.
Back away
from the stove door, turn to the right a bit, and click on the boxes of
bottles to pick up an empty. Now to look for ingredients…keep turning
to the right, and walk forward towards the big vat on the other side of
the room. On the far side of the vat, turn to your left, and find the
small bucket sitting on the floor immediately to the right of the vat.
Click on it to place it into your inventory. Pan to the right, and note
the red button here – pressing it brings the pile of wood down from above,
and pressing it again sends the wood back up again. Since we don’t need
any more wood, give the elevator a pass.
Turn around
and cross the room again to stand in front of the stove. We still haven’t
found any ingredients to make our hooch with. How about something from
those casks that seemed to be full rather than empty? Take out the bucket
from your inventory and click on the taps of any of the following three
casks to get some molasses: right cask middle row, left cask bottom row,
or right cask bottom row. Turn to the right, click on the top door on
the stove, take your bucket of molasses out, and click on the opening
to pour it into the still.
In the Cards
Turn to your
right until you spot the ladder leading back up to Tod’s main floor, and
click there to ascend. Back up in the main room, the gangster Nitty is
sitting on the other side of the table demanding a drink before the game
begins. Pan to the right until you see the sink, and click for the close-up
view. Click on the left tap, take out the empty whiskey bottle from your
inventory, and click on the stream of whiskey coming out of the spout
to fill the bottle. Back away from the sink, turn to the left, and walk
towards the door. Pan to the right, take out the whiskey bottle and click
on the lone glass on the table to pour Nitty a drink.
The game begins
– if we win, we get Hannibal’s debt; and if we lose, Nitty (or is that
Mephisto?) gets free booze for a year. Our poker hand is dealt – the
object here of course is to get the highest value hand (which, generally
speaking, means collecting multiple cards of the same amount i.e. 2 Kings,
3 Queens, etc.). In poker, high cards (9, 10, J, Q, K, Ace) are more
valuable than low cards (2, 3, 4, 5). You also have one chance to “reject”
cards in your hand by clicking on them – once you are finished tossing
them out, click the deck on the table to get replacements. Again, generally
speaking, you want to toss out low, single cards and keep high cards or
multiple cards of the same number.
After your
replacement cards are dealt, a screen showing Nitty’s hand and your own
appears, with a win or loss displayed in the centre of the screen. Three
games will be played – if you can win two or three of the games, you win
the bet (and Hannibal’s debt). However, if you lose two or three games,
you’ve lost the bet. However, you have an out – after Nitty mentions
that it “looks like you’re broke”, open up your inventory, grab the lottery
ticket, and click on his hand. This buys you three more games. If you
lose 2 (or 3) out of 3 again, Nitty walks out, and God sends you back
to the start of the poker game with instructions to win.
After winning
the poker game, we watch a cut scene involving Tod finally putting Hannibal
in his place in front of the others (although this makes no sense because
Hannibal is whipping Tod at a later date in Chapter 5). We then hear
from Theo, who wanted to close the freak show at Dreamland until he got
to know how wonderful the freaks were. Theo admits he still hangs around
the park both because he’s waiting for someone, and because of a secret;
one that Mephisto shares. After the chapter ends, check out Tod’s entry
in Theo’s notebook for a tacked-on letter to Elliot Ness (oh pleeeze!).
Rub-a-Dub-Dub
Chapter 7,
“The Masterpiece of Giselle” starts with an admission from Mephisto
that demons have hearts, as they begin as humans. Our story begins in
December 1938, staring along a set of wooden stairs leading to the front
door of a house. Spin around to enjoy the view, then turn to the right
of the stairs and move forward towards the blue building on the other
side of the roller coaster. Turn to your left to access the building’s
front door, but the way in is unavailable. There’s nothing else to examine
here, so turn back and return to you starting point.
Facing the
wooden stairs and walkway again, move forward, and click on the door to
enter the building. Inside, turn to your left a bit and click on the
poster mounted on the wall in front of you. Tod the midget indeed proves
size does matter. Back away, turn to the left and click on the next poster
– this one’s about the twins playing piano. Back away, keep turning
and click on the poster to the left of the door – Frank the beast. Back
away, and click on the last poster in the room – this one advertises Giselle
as a 550 pound freak.. Back away from the poster, and click on the right
side of the bathtub beyond the poster to move forward.
We hear the
unkind reactions of the crowd. Find the hotspot on the floor of the tub,
and click to reveal a key hanging from the bottom of the plug. Grab the
key and back away. Click on the bathtub’s tap, and click again on the
tap handle to fill the bathtub with water (this isn’t necessary, but frankly,
you’ve been walking around awhile, and you smell a little). Grab your
new key out of inventory, and click on the metal plate on the wall to
the right of the tub (the one with the keyhole!).
The close-up
view shows the weight reading dial, and some gears inside the opened panel.
Click on the gear with the hotspot inside the panel, and holding the mouse
button down, drag the mouse to the right to move the weight reading to
the right. Align the moving silver arrow with the “550” mark (shown in
red), and the bathtub descends into Giselle’s home with Faust inside.
The Weight
Pan to the
right to face Giselle’s round bed, and click anywhere on the foot of the
bed (try just above the wooden trunk here). We see Giselle struggling
to get out of bed, but then slip deftly down a ramp through that metal
door on the other side of her bed. Now click on her pillow, and in the
close-up view, grab the spoon sticking out from under the right side of
the pillow. Back away, and hear about Giselle’s dreams of her parents.
Click on the
4 cubic containers to the right of the bed on the counter. The containers
are labeled Menthol, Cola, Grenadine and Apple. Next, click on the teddy
bear located on the floor to the right of the bed. We get a close-up
view of the bear, who has curious-looking holes in his hands, and a winding
key in his back. Back away from the close-up and click on the doll located
on the counter above the bear. In the close-up view, click on the key
in the doll’s front pocket to place it into inventory, and back away.
This triggers a conversation between Giselle and Mephisto; she misses
her parents and wants to join them in death, but Mephisto suggests patience.
He appears to have genuine concern for her – interesting.
Turn to the
right, and click on the large pot on the stove top. Try clicking on the
left-hand knob on the front of the stove (this starts the gas flow), take
a match from inventory and light the burner under the pot by waving the
match there. The water is getting hot, but there isn’t anything inside
the pot, and we don’t have anything to put in.
Back away
from the stove, turn a bit to the right and click on the old-time radio
on the counter. Click on the large button near the bottom of the radio
to start – we get a message from Mephisto on Radio 666, who gets into
a conversation with Giselle. Click the button two more times to hear
Mephisto agreeing to meet her. Now click on the button again, and while
holding the mouse button down, drag the mouse to the right to spin the
button. Once the arrow on the button is pointing to “1914”, stop. Listen
to the desperate plea of Giselle’s father to save them from their snowed-in
starvation.
Click, hold
and drag the button again to rotate the arrow over to “Interphone”, and
listen to Frank tell Giselle that he’s ready to start work in one hour.
The Hunger
Back away
from the phone, turn to the place setting on the counter to the right,
and click on the photographs here. In the close-up view, click on first
Dad and then Mom in the left photograph to learn of Giselle’s loneliness
and guilt over the deaths of her parents in 1914. Click on the right
photo to hear about how Giselle’s career at a bakery was cut short by
an addiction to pastry.
Back away
from the photos, and click on the small drawer in the side of the counter
directly below the plate. Click on the newspaper inside the drawer to
learn more about the events of 1914. Back away from the newspaper and
the drawer, turn towards the foot of the bed again, and move towards the
metal door on the other side of the room.
Examine the
metal door – it appears that a lock on the right side of the door is preventing
our access. Take out the key obtained from the doll’s pocket and click
on the lock (it’s located just to the right of the door’s handle). Now
click on the door to gain entry to a …refrigerator! (How did Giselle slide
into that?) Click on the freezer door located at the top of the fridge.
Inside you will find a frozen alarm clock, and a block of ice to its right.
Click on the block to place it into your inventory – turns out it’s a
piece of paper encased in ice. Click on the freezer door to close it,
and then note the hotspot in the centre of the fridge area that is currently
empty. Take out the spoon from your inventory and click on the empty
space to see Giselle’s perfect feast (click again for it to disappear).
Now click
on the inside of the refrigerator door. The close-up view shows four
bottles arranged on one of the door shelves. The bottles resemble the
four boxes that we picked up next to Giselle’s bed. Take out each of
the boxes and place them on the shelf below in the same order as the corresponding
bottle. Be careful though – pay attention to the labels on the bottles,
and not the colours. The correct order from left to right is Apple, Cola,
Menthol and Grenadine. Back away from the door view, and now click on
the metal shelf near the top of the interior of the door. The shelf opens
to reveal a chain – pick it up, and back away from the fridge.
Lift Me Up
Look on the
top of the now-closed refrigerator – there’s a hook sticking out of the
top, and an eyelet hanging down from the strange tracking system in the
ceiling. Take out your recently acquired chain, and click on the hook
to connect the fridge to the eyelet above. Turn around, and walk towards
the other side of the room. Turn to face the stove, click on the pot,
and click on the white handle on the left to start the gas flow again.
Take out the frozen paper from your inventory and click on the pot to
place it inside.
Now take a
lit match from your matchbook and wave it over the pot’s burner. The block
of ice promptly melts, making the paper accessible. Click on the white
knob again to turn on the burner, and then click on the paper inside the
pot. We see a doodle-filled page as a conversation between Mephisto and
Giselle plays. He seems to be helping her, and receiving nothing in return.
Backing away
from the paper triggers an interesting cut scene between Mephisto and
Faust. Faust seems to have grown angel wings, his memory has returned,
and Mephisto calls him Angelito. Apparently it was against the “rules”
for Mephisto to help Giselle out in this way. Because Faust, a former
angel, let this transgression slide, the people upstairs sent him back
down to the park as punishment.
Back in Giselle’s
room, turn to the right towards the netting hanging from the ceiling,
located to the right of the pictures of Giselle’s family. Click on the
netting for a close-up view, take out the teddy bear, and click on the
centre of the mechanism. Teddy grabs the handles, ready to do your bidding.
Click on the key in his back for him to activate the winch – we see a
scene of Giselle being hoisted across the room. After the scene has played,
pan to the right and walk towards the refrigerator, which has been lifted
up to reveal Giselle’s slide exit.
The Secret
Railroad
Walk forward
through the door, which triggers a cut-scene of Frank and Giselle riding
along an underground railway. Frank seems to be doing some painting –
perhaps a portrait of Giselle. A tunnel lies ahead of us – turn around
to see the hole on the wall that we just came through. Turn around to
face the tunnel again and walk forward.
The underground
railway is a bit of a maze. You can cast about looking for the way out
of the tunnels, or you can follow the following directions: at the big
“4” turn left; at the big “13” turn left, and at the bog “26” turn right.
If you get confused, use the following map and the numbers painted on
the wall as a guide as to where to turn:
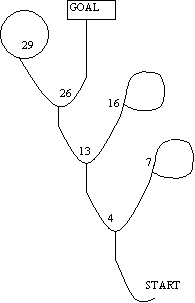
Once you’ve reached the door at the end of the railway maze, click
on it to proceed through…into Frank’s dark room! He’s “cleaned” up the
place, so no more screaming ladies. There are a number of PG drawings
mounted on the wall – pan around to face the ladder, and then click on
the third drawing to the left. The paper lifts up to reveal a hiding
place behind (just like last time).
Click on the
turtle-shaped box in the hiding place, and then on the newspaper clipping
inside. A painting of the goddess Ishtar on a mysterious canvas has taken
the art world by storm. Was this the masterpiece that Mephisto promised
Frank? Giselle was also heavily involved.
Back away,
and hear Frank congratulate Giselle. Turn to the left, and walk forward
to the counter on the other side of the room. Click on the top of the
wooden box on the counter to hear Frank and Giselle discussing the painting
method. Now click on the small drawer located on the front of the box.
Click on the rolled paper inside the drawer to place it into your inventory,
and close the drawer again.
Click on the
counter to the left of the wooden box (in front of the ink bottles), grab
the recently acquired rolled up paper from your inventory, and click on
the counter. The paper has been torn into 6 pieces, and needs to be reassembled.
Pick up each of the pieces into your inventory, and then arrange them
to form the completed document. The pencil sketch of the woman is on
the top portion of the paper, and the printed words are near the bottom.
If you have trouble, the pieces are numbered 1 through 6 when you mouse
over them in your inventory – just arrange them in the following order
to get a completed picture:
Top row: 1,
4
Middle row:
2, 5
Bottom row:
6, 3
Once the picture
has been formed, listen to Frank tell how the painting was accomplished.
Afterwards, you can click on the picture to see a close-up, and the poem
to hear it.
Postcards
From the Edge
Backing away
from the assembled document triggers a cut-scene in which God tells Faust
that he can get his angel wings back if he completes his appointed task.
We now find ourselves standing near the tall Ferris wheel. Turn to the
left a bit, and walk towards the wheel. From your present position, you
can walk forward to the base of the wheel, but there isn’t really anything
to do there. Instead turn to the left and click on the counter of the
ticket booth here.
Inside the
ticket booth, click on the slots holding post cards on the right wall.
Now click on the counter in front of you, and then take the cards out
from inventory and click on the empty counter to spread the cards out.
Pick up the cards, and place them in order across the counter using the
following information.
·
There is a black line that runs continuously
across all of the postcards – the line cannot be covered up in any of
the cards.
·
Some of the cards overlap others, and
can only be placed in certain spots.
·
Each card represents a chapter in the
story, and the cards should actually be placed in order, starting with
Chapter 1’s card on the left through to Chapter 7 on the right:
·
#1 Love Island (remember we went there
at the end of Chapter 1)
·
#2 The Great Inventor (Nathaniel’s house)
·
#3 Visit Us (Frank’s bedroom is pictured
on the card)
·
#4 The Enchanted Island (Kalinka’s home)
·
#5 Great Attractions (Hannibal’s casino)
·
#6 Bootlegging (Tod)
·
#7 Bath of Giselle
Once the cards
are placed in the correct order, the final scene (the “last act” according
to Mephisto) is triggered. Mephisto explains that he wants to retire
from demonizing, and Theo has agreed to “take over” for Mephisto. This
whole exercise was designed to get us to agree to take over the park from
Theo.
Complicating
matters is that a lawyer from the Blueday Corporation wants to buy the
park from you for gobs of cash. Should you sell the park to big business
and live on the proceeds, or become the proprietor of the park and restore
its lost glory?
If you
choose to sell, grab the pen located in your
inventory and click on the contract in the lawyer’s hand. As Mephisto
and Theo show their disgust, the lawyer offers you a lifetime pass to
Bluedayland. The game ends amidst the sounds of approaching bulldozers.
If you
choose to spurn the offer, grab the pen from
your inventory, and click anywhere except on the paper in the lawyer’s
hand. Mephisto kicks the lawyer out of the park, and you ruminate on
your plans to reopen Dreamland. As the game ends, it looks like the people
upstairs have also replaced your former angel role – Tod, now equipped
with angel wings, wanders away with Homunculus.
Screenshots

View this guide raw, exactly as the archive holds it