In order to reduce your splash make sure to put on the dunce cap before making your dive. Assuming you are wearing the dunce cap and replicate
Marco’s dive you should both get perfect scores and be forced to do a tie-breaking dive. You are going to need an advantage here and since you
can’t do anything better you are going to have to make Marco do worse. Head over to the changing tent and put some Schmear Whiz
in the bottle of Baby Seal Oil on the table. Note: You can only do this AFTER you have tasted the bagel. Since you tied you get to
make the first dive. You can do any combination you want since Marco is going to lose anyway. Enjoy the humorous results and take your
diving trophy, which is the second part of the Ultimate Insult.
Return to town and head to Planet Threepwood. Talk to Murray if you didn’t earlier then enter the restaurant and talk with the waitress.
Place your order for anything you want then offer to pay with the coupon you got either from Stan or the Microgroggery. Take a seat at the
table and the waitress will bring you your drink in a cool mug shaped like a monkey head. The waitress yells at you if you try to leave with
the mug, so talk to the jolly pirate and ask him to draw a pirate caricature of you holding the mug. Now go into your inventory and combine
the caricature with the glue then combine the sticky-caricature with the StarBuccaneers souvenir mug, which happens to be the same shape and
size as your Mega Monkey mug. While nobody is looking make a quick switch and pocket the Mega Monkey Mug then get
out of there.
Return to the dock and set sail back to Melee Island where you are greeted by the new governor when you enter your home. Ozzie is there
as well, and the two evil villains reveal more of their plot before taking all of your inventory items and exiling you to Monkey Island.

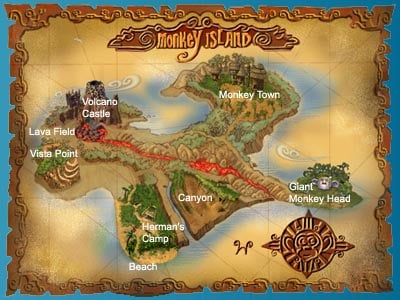
As you can see from the map there is plenty to do on Monkey Island. After Timmy welcomes you, read the note and notice the only remaining bunch
of bananas in the tree above. You will come back for them later. Head into the interior of the island and begin your adventure with a stop at
the camp.
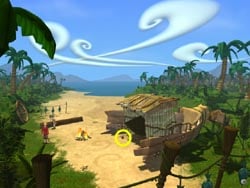
As you enter the camp you can read another note tacked to the hut and get the coconut lying on the ground. Head to
the other side of the fire and talk to the old hermit who turns out to be your old friend Herman Toothrot; an acquaintance from your previous
trips to Monkey Island. Chat with him and explore the various dialogs until you realize he has amnesia. Ask him what the last thing he
remembers is to get a clue to the object you need to use. This time it’s a coconut so throw the coconut at him to jog his memory. This seems
to restore more of his memory and now he can remember a milk bottle lying near a lava field. You notice a lava field shown on your map, but you
have a few other stops first.
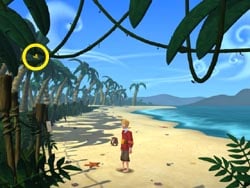
When you reach the open area to the right of Vista Point, head down the path to the right leading to the canyon. The mineshaft needs to wait
until later, but you can pick up the very useful banana picker leaning against the cactus on the right. Now head back
to the beach and use the banana picker on the bunch or bananas. Keep picking them until you have the entire bunch then feed one to Timmy who
will now follow you. Return to the mineshaft feeding Timmy as needed to keep him with you. He should follow you the entire way unless you leave
the map and enter an area. Then you will have to feed him again.
Feed Timmy then enter the mine. The mine cart and track switch are useless along with the bags of gunpowder. Make a mental note
of the roots in the ceiling. Head to the large metal door in the back and open the bottom vent. Toss a banana through the opening and Timmy
will go fetch it. Quickly close the door then look through the portal above. Use a banana on the portal to tease Timmy who will climb up and
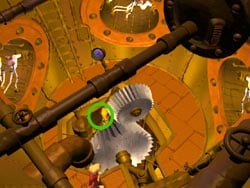
trip the latch opening the door. Take Timmy back outside then search the new passage. After you drop into the large mechanical room, move
around to the other side of the catwalk and use the banana picker to snatch the weed whipper from the gears in the
center. Return to the tube and exit the mine.
Exit the canyon area. If you want you can make a quick trip to the far side of the canyon to investigate the strange rock formation above the
entrance to the mine. Head to the lava field and locate the milk bottle just as Timmy arrives to toss it into the lava field. It lands on one
of the rocks and you are forced to find someway to retrieve the item. Head up to the castle and enter. Examine the skull carving above the door
and note the small shields in the eye sockets. Use the banana picker to retrieve the shield, which look more like
cymbals when you inspect them more closely. Cross the bridge and talk to the ghostly priest. Explore all the dialog options and ask for a test
run of the lava ride. You will have to ask twice.
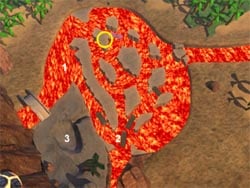
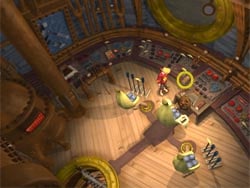
After a screaming trip down the lava falls you enter the maze of twisty lava passages. The milk bottle will always be on the same rock (circled
in picture) but it will randomly be either on the left or right side, so you may have to adjust your route as necessary. The important thing to
remember is when you loop around to the fork (1) leading back into the volcano keep steering left to loop around until you get the bottle. Once
you have the bottle you can then turn right at this fork to return to the castle. Several logs (2) block the various routes, but these are
easily knocked out of the way by simply ramming them. Doing so will even give you some reverse momentum if you need to pick another path. The
logs will make one loop then block your way again, so you need to act quickly once you knock them loose. When you float past the proper side of
the island use the banana picker to snatch the milk bottle then return to the castle. During your trip around the lava
field you will want to make a note of the area with the weeds (3). This will be important later in the game.
Return to Herman’s camp and toss the milk bottle at his head to knock some more memories back into him. Now the last thing he remembers is an
accordion. Leave came and begin your new quest. The entire north half of the island is blocked by the river of lava, so head to Vista Point to
see if you can find another route to the other side of the island.
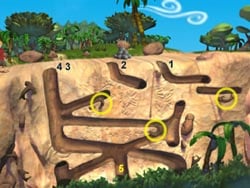
This puzzle is rather difficult and requires some very precise timing. Your objective is to stand by the rock pile and pick up a rock and throw
it into one of the three tunnels. The rock will roll along the path and eventually touch a root (circled in picture) causing it to move. This
is your signal to throw the next rock. You will throw four rocks total into the three tunnels. I’ve numbered the tunnels in the order that you
throw the rocks. Make sure to pick up the next rock and highlight the correct tunnel option so when the root moves you can just hit ENTER to
quickly throw the rock. By getting the exact timing you will cause the various rocks to collide forcing them down alternate paths. Your goal
is to get one rock into the middle chute at the bottom (5). This will send the rock flying into the lava field creating a dam and redirecting
the lava flow. Other chutes send rocks to other areas of the island. Hint: I found that if you wait until just after each root stops moving
before throwing the next rock you will have very good results.
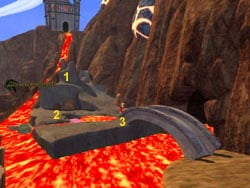
Return to the Volcano Castle and talk with Father Rasputin to get another log ride. This time just float around and turn left at the fork (1)
then steer into the small pool and climb out of the log. Head up the slope to the left and kick (use) the tree over to create a bridge across
the falls. Now you won’t need to ride the log anymore. Head back down the slope and use the weed whipper on the weeds (2) and watch the results
back in the mineshaft. When you are done with the landscaping, head across the bridge and follow the path to the north side of the island. When
the path forks, take the one leading north to Monkey Town. You will notice a small monkey wandering around this path. If he touches you then
you will zoom into a path view where you can either talk or walk past him. Ignore him for now and keep heading for the village.
When you reach the village you can talk with JoJo, the monkey leader. He is a wealth of information and also seems to be wearing a hat that
looks like a part of the Ultimate Insult. When you ask him for it he tells you that you must defeat him in Monkey Kombat in order to possess
the bronze hat. This leads to lots more talking about Monkey Kombat where you learn the basic rules and some strategy (but not nearly as much
as I am going to teach you).
Head into the village and locate the monkey in the hut playing the accordion. Get out your cymbals (shields) and play along. The monkey seems
very interested in your cymbals and drops the accordion before grabbing your cymbals and climbing back up into his hut. Pick up the
accordion then make the long trek back to Herman. Smack him with the accordion to restore his full memory and
identity as Elaine’s grandfather and former governor of Melee Island. After a lengthy history lesson you both come to the conclusion that you
need to build your own bigger and better Ultimate Insult. He tells you that Ozzie’s Ultimate Insult will not work without a special forth piece
that only Elaine has. Of course about this time she is captured.
Everything you need to create your own Ultimate Insult is on Monkey Island and he starts you off with his own Gubernatorial
Symbol. Now all you need is a giant monkey head, a bronze hat, and a gold statue. It’s now time to head back to JoJo and fight him for
the bronze hat. Return to Monkey Town. You will now need to fight several monkeys in that short north passage leading into town. JoJo won’t
accept your challenge until you have proven yourself in combat with lesser opponents. You will need to fight and defeat at least three monkeys
including the Brawny Monkey, but more than likely you will fight many more than that before you are ready to challenge JoJo.
MONKEY COMBAT
This is probably the hardest part of the entire game. Actually, it’s not that hard, just time consuming in the amount of research you must do
to become proficient in Monkey Kombat. The first thing you need to do is make a chart similar to the one below. You can even print mine if you
want.
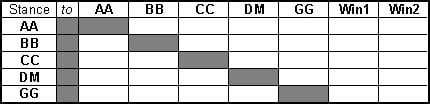
Now that you have a chart you need to go out and start fighting monkeys so you can fill in all the blanks. Here is how Monkey Kombat works and
the definitions of the codes I use.
Monkey Kombat consists of five stances: Anxious Ape (AA), Bobbing Baboon (BB), Charging Chimp (CC), Drunken Monkey (DM), and Gimpy Gibbon (GG).
Each stance defeats two other stances very much like a rock-paper-scissors game only much more complex. The hierarchy of the stances changes
with each new game, so you must learn which moves defeat the others by fighting other monkeys and logging the results.
In addition to learning which stance beats another, you must also learn a series of monkey insults that allow you to transition between the
various stances. These consist of Ack (A), Eek (E), Ooop (O), and Chee (C). So if you wanted to switch from Drunken Monkey to Charging
Chimp you would enter the combo ACO to make the switch. This is just an example as the insults change for each game as well. Each insult works
both ways, so once you learn the insult to go from DM to CC that same insult will also take you from CC to DM. Confused yet? Yeah – it took me
about two hours to figure it all out and make the chart.
Here is my completed chart I used for my last game. I’m providing it as an example only. It may or may not work with your game since everything changes with each new game.
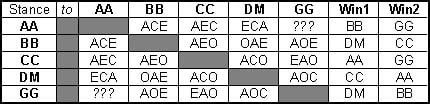
During the course of your battles you need to make a note whenever a message tells you that one stance beats another. You will also want to
watch the current stance of your opponent and the insult he uses and the new stance it takes him to. Log the insults in the appropriate boxes.
Remember that for each insult you get to put it in two boxes going both ways. The shaded boxes do not need to be filled in. If you want to
repeat the same stance just use any three identical commands such as EEE or OOO to keep the stance. A good way to learn the moves and fill in
the boxes quickly is use the “Monkey See Monkey Do” method. JoJo explains this and it basically involves you simply repeating the same insult
the monkey says to force a draw allowing you to see more insults and moves and write them down. Eventually you will have to let him hit you so
you can start logging the winning moves.
A sample battle may go like this. (this is just an example using the codes from my chart)
Guybrush and opponent face off both in the DM stance. Monkey switches to BB which damages Guybrush. I respond with an ECA insult that takes me
to an AA stance and damages his BB stance. The monkey insults me with AOE taking him to a DM stance and damaging my AA position. I use the ACE
insult to go to a BB stance and damage him. He foolishly responds with an OAE which also takes him to BB and there is a DRAW. Each player takes
a new random stance and continues.
As you start to win battles your health meter will increase in size (indicated by the row of bananas). This is another reason you must fight
many monkeys before JoJo. He has a very large health bar and he will almost never miss in his attacks. When you have filled in your chart
(or at least most of it) and have beaten the Brawny Monkey you can then go challenge JoJo. Note: You do not need all transition commands.
I never did find the one for AA to GG and it never affected the outcome.
Once you defeat JoJo you will get his bronze hat. Leave the village and take the other path to the giant monkey head.
Examine all the parts of the head then toss the hat on top of the monkey head and use the banana picker in the monkey nose to flip the latch and
open the mouth. Enter the head and locate the control room. A quick search reveals a slot you can stick the Gubernatorial Symbol into and
start the power-up sequence. Watch the amazing movie as monkey from all over the island come to the head and enter to take their seats at
various stations around the giant monkey robot.
When the movie is over you are back on Melee Island near some towers. Apparently Ozzie is going to use this tower to amplify his Ultimate Insult
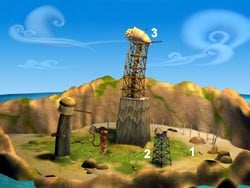
signal and demoralize all the pirates in the Caribbean in one single broadcast. Locate the plank (1) and stick it in the small tower (2)
creating a springboard. Now climb up this tower and use the plank to make an impressive bounce and leap to the top of the main tower. Once
there you can flip the switch (3) to deactivate the conch shell. This triggers another movie.
You now find yourself in the Ultimate Monkey Kombat. It’s you (in your giant mechanical monkey) vs. LeChuck who has animated his giant stone
statue from the town square. Ozzie is controlling him and Elaine is held captive in LeChuck’s massive stone hand. Engage in Monkey Kombat
using your handy chart from the recent monkey battles. You are unable to defeat LeChuck as you both regenerate your health faster than you can
lose it. Your goal in this battle is to force a DRAW. This is very easy. Simply look at the stance LeChuck is currently in and pick the insult
that will take you to that same stance. He will chance his stance and probably damage you, but you can take it. Match his new stance and repeat
this process until you have three DRAWS. At this point LeChuck loses it. He drops Elaine and starts pounding his head crushing Ozzie and
destroying the Ultimate Insult resulting in a small nuclear-like explosion that leaves only a crater behind.
After a short family reunion, JoJo gets back into the monkey and takes it back to Monkey Island to pick up his friends to vacation in Martha’s
Vineyard. Grandpa resumes his role as governor leaving you and Elaine to resume your pirate adventures on the high seas. The game ends as
you offend Elaine and she walk away as Timmy shoves you off the cliff….
CONGRATULATIONS!!! You have Escaped Monkey Island and defeated LeChuck and the evil Ozzie Mandrill and have made the seas safe for
pirates once again.
Note: Those of you familiar with LucasArts games already know they usually tack something on at the end of the credits. If you can sit through
the 10 minutes of credits there is a humorous epilogue to our hero’s plight as he dangles from the cliff.

The following is a list of all the items you will need to find while playing Escape from Monkey Island. They are listed in the approximate order that you will acquire them in the game if you are following along with my walkthrough. Some items are a combination of other items and you will get them after you acquire the various components.
| Inventory Item |
Where to find it |
Where/How to use it |
| Hot Coal |
In brazier on Honeymoon Ship |
Fire loaded cannon at enemy ship |
| Kudu jerky pretzels |
Back table of SCUMM bar |
Distract man operating the catapult |
| Deflated inner tube |
Near grog machine at the harbor |
Create slingshot with cactus near the mansion |
| Cushy Government Job Contract |
China Commode inside Governor’s Mansion |
Give to Otis and Carla after it’s signed |
| Gubernatorial Symbol |
Talk to Elaine at mansion |
Harbor to get a ship |
| Duck |
Outside Bait Shoppe (Lucre Island) |
Scares Pegnose Pete from his hideout |
| Spritzer |
Near perfume stand (Lucre Island) |
Combine with Free Bait Water to make perfume |
| Cologne |
Near perfume stand (Lucre Island) |
Spray on platypus (Ozzie’s house) |
| Grandpa Marley’s Letter |
Talk to lawyers (Lucre Island) |
Access safe deposit box in bank (Lucre Island) |
| Sword |
Bank Vault (Lucre Island) |
Break hinge and pry crack on vault door and open manhole |
| Pegnose Pete’s Handkerchief |
Bank Vault (Lucre Island) |
Bank robber identity clue and sniff for perfume recipe |
| Sponges |
Bank Vault (Lucre Island) |
Combine with Fine Grog and Broken Sword to open vault door |
| Music Box |
Safe Deposit Box in Bank Vault (Lucre Island) |
Play when stealing artificial hand from Palace of Prostheses (Lucre Island) |
| Fine Grog |
Safe Deposit Box in Bank Vault (Lucre Island) |
Combine with Fine Grog and Broken Sword to open vault door |
| Can of Chicken Grease |
Hall of Justice (Under Iron Maiden) |
Use on doormat at Pegnose Pete’s to make him trip when you scare him with Duck |
| Manhole Cover |
Outside bank (Lucre Island) |
Read for clues to get artificial skin |
| Artificial Skin |
Palace of Prostheses (Lucre Island) |
Use on manhole to enter bank |
| Artificial Hand |
Basket in Palace of Prostheses (Lucre Island) |
Combine with Termites to infest Ozzie’s walking stick |
| Scupper Ware |
Desk in bank lobby (Lucre Island) |
Combine with Free Bait to attract glowing fish |
| Artificial Nose |
Light fixture on bank balcony (Lucre Island) |
Used as evidence against Pegnose Pete |
| Wood Shavings |
House of Sticks (Lucre Island) |
Combine with Spritzer to make perfume |
| Free Bait |
Bait Shoppe (Lucre Island) |
Combine with Scupper Ware to attract glowing fish |
| Free Bait Water |
Bait Shoppe (Lucre Island) |
Combine with Spritzer to make perfume |
| Termites |
Bait Shop (Lucre Island) |
Combine with artificial hand to infest Ozzie’s walking stick |
| Swamp Water |
Puddle in Mystes of Tyme (Lucre Island) |
Combine with Spritzer to make perfume |
| Flower |
Fountain outside Ozzie’s house (Lucre Island) |
Combine with Spritzer to make perfume |
| Directions to Pete’s House |
Filing System Grabber in Palace of Prostheses (Lucre Island) |
Combine with Clock to navigate Mystes of Tyme |
| Clock |
Steal from chess players (Lucre Island) |
Navigate Mystes of Tyme |
| Marley Family Heirloom |
Pete’s treasure stash below the lagoon (Lucre Island) |
Proves Guybrush’s innocence and gets Ultimate Insult clues from Voodoo Lady |
| Itty-bitty Screw |
Pete’s treasure stash below the lagoon (Lucre Island) |
More evidence to prove Guybrush’s innocence |
| Earrings |
Part of Marley Family Heirlooms |
Makes figurehead on Guybrush’s ship come alive |
| Necklace |
Part of Marley Family Heirlooms |
Put on figurehead for a pen holder |
| Pen |
Part of Marley Family Heirlooms |
Allows figurehead to draw picture of Ultimate Insult |
| Quarter |
Coin slot on Grog Machine at harbor (Melee Island) |
Buy grog |
| Can of Grog |
Grog machine at harbor (Melee Island) |
Extinguish fire in sushi boat machine’s boiler |
| Paintbrush |
Inside Meathook’s house (Melee Island) |
Jam sushi boat machine at LUA Bar |
| Painting |
Behind sushi boats at LUA bar (Melee Island) |
Allows figurehead to draw picture of Ultimate Insult and causes puppeteer at Knuttin Atoll to give you his puppets |
| Empty Groggocino Mug |
Window at StarBuccaneer’s (Jambalaya Island) |
When filled, will keep Guybrush awake while Stan talks and identifies Jumbeaux’s parrot on Knuttin Atoll |
| Souvenir StarBuccaneer’s Mug |
Lady’s shopping bag in StarBuccaneer’s (Jambalaya Island) |
Combine with Glue and Caricature to make phony Mega Monkey Mug |
| Schmear Whiz |
Counter at StarBuccaneer’s (Jambalaya Island) |
Combine with Baby Seal Oil during plank diving competition |
| Grog Jr. |
Microgroggery (Jambalaya Island) |
Identifies Jumbeaux’s parrot on Knuttin Atoll |
| Rowboat |
Harbor (Jambalaya Island) |
Gets you to Knuttin Atoll |
| Puppets |
Puppeteer on Knuttin Atoll |
Attract Admiral Casaba to smash boulder on Knuttin Atoll |
| Dunce Cap |
Pirate Transmogrification Center on Knuttin Atoll |
Helps Guybrush win plank diving competition |
| Pirate Trading Card |
Chest inside school on Knuttin Atoll |
Helps to locate Parrot Whistle in same chest |
| Parrot Whistle |
Chest inside school on Knuttin Atoll |
Summons Jumbeaux’s parrots |
| Bronze Hat (1) |
Under the boulder on Knuttin Atoll |
First part of Ultimate Insult |
| Time Share Brochure |
Stan’s desk (Jambalaya Island) |
Influence the judge during plank diving competition |
| Glue |
Building behind Stan’s desk (Jambalaya Island) |
Combine with caricature and mug to make phony Mega Monkey Mug and also to help Guybrush ride the mechanical manatee in the Microgroggery |
| Mega Monkey Mug Meal Coupon |
Listen to Stan’s sales pitch or ride mechanical manatee in Microgroggery (Jambalaya Island) |
Redeem at Planet Threepwood for Mega Monkey Mug |
| Diving Trophy |
Win the plank diving competition (Jambalaya Island) |
Another part of the Ultimate Insult |
| Caricature |
Jolly pirate at Planet Threepwood (Jambalaya Island) |
Combine with glue and mug to make phony Mega Monkey Mug |
| Mega Monkey Mug |
Use coupon at Planet Threepwood (Jambalaya Island) |
Another part of the Ultimate Insult |
| Coconut |
Toothrot’s Camp (Monkey Island) |
Restores first part of Herman’s memory |
| Banana Picker |
Canyon (Monkey Island) |
Gets shields in LeChuck’s Cathedral, milk bottle in lava, bananas on beach, weed whipper in abandoned mine 5 and used on Giant Monkey Nose to open the monkey head |
| Bananas |
Beach (Monkey Island) |
Makes Timmy (the monkey) follow Guybrush to abandoned mine |
| Weed Whipper |
Behind door in abandoned mine (Monkey Island) |
Picks weeds near lava pool to power the Giant Monkey machine |
| Shields |
Over the door in LeChuck’s Cathedral (Monkey Island) |
Trade with monkey in Monkey Town to get accordion |
| Milk Bottle |
Lava field (Monkey Island) |
Restores second part of Herman’s memory |
| Accordion |
Trade Shields with monkey in Monkey Town (Monkey Island) |
Restores third part of Herman’s memory |
| Gubernatorial Symbol (2) |
Grandpa Marley at Herman’s Camp (Monkey Island) |
Use with Giant Monkey control panel |
| Bronze Hat (2) |
Defeat JoJo Jr. in Monkey Kombat (Monkey Island) |
Use with Giant Monkey head to complete Ultimate Insult |
| Wood Plank |
Ground near transmitter tower (Melee Island) |
Use with small tower as spring board to reach the top |
|