
Welcome to the Sinjin’s Guide to the Islands, the ultimate online walkthrough for Escape from Monkey Island, the latest adventure of Guybrush Threepwood. Those of you who have sailed with Guybrush on his past adventures will know what to expect and for those of you new to the “pirate’s life”, prepare yourself for a fun-filled adventure filled with lots of humor and devious puzzles.
Throughout the adventure you will want to follow a few basic guidelines:
- Talk to everyone. Keep talking until there is nothing new to say.
- Try different conversation branches. I will provide you will solutions to the harder ones.
- Examine everything and take anything that isn’t nailed down.
- Save often and under different save games so you can return to previous parts if needed.
I will also be providing many screenshots and maps of the various areas to assist you during the adventure so you hopefully won’t get lost.
During the course of the walkthrough I will be having you pick things up and go certain places that may not make sense at the time. This is
because I have played the game multiple times and know what items are needed in advance. While following this solve will certainly keep you
from backtracking between locations you may lose some enjoyment and surprises by following it too closely. So grab your sword and
mug-o-grog and prepare to Escape from Monkey Island…

You gain control of our mighty pirate hero only to find yourself all tied up. Spin around and locate the brazier of hot coals. Kick it over and pick up one of the hot coals and toss it toward the cannon to the right to ignite the fuse. Lucky Shot!
After you reach dry land you are alerted to “some trouble” at the Governor’s Mansion by Timmy, the hyperactive monkey. Head off toward the
mansion (which happens to be YOUR house too) and survey the situation. A man is operating a catapult firing huge rocks at your house. You can
speak with him between shots to learn that your wife (the governor) was presumed dead and he has orders to knock down the mansion. Elaine takes
off for town to clear up the obvious misunderstanding leaving you in charge of stopping the catapult operator and getting legal advice from the
family lawyers on Lucre Island.
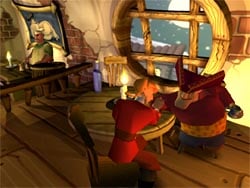
With no obvious solution to the immediate puzzle, head into town and locate the SCUMM bar. Enter and talk with the guys throwing darts and the
bartender. The drunken pirate in the back has a bowl of kudu jerky pretzels but he doesn’t want to share. Look at the
birthday balloon then go talk to the dart throwers and use dialog 1-2-4-5 to get him to throw the dart at the balloon and pop it. The helium combined with the grog knocks the pirate out and you can take his pretzels.
Another pirate sits at a nearby table. This is I. Cheese, the new owner of the SCUMM bar. Talk to him about joining your crew and use dialog
1-3-?-1-2-?-1-1 (?=pick any dialog choice you want). You will have to Insult Arm Wrestle this guy if you want him to join your crew. This is very similar to the Insult Sword Fighting in previous Monkey Island games where you trade insults. Here is a table with the Insults and their appropriate Responses.
| Insult |
Response |
| Your knuckles I will grind into a splintery paste. |
I thought the bean dip had a strange taste. |
| I’ve got muscles in places you’ve never even heard of. |
It’s too bad none of them are in your arms. |
| Hey, look over there! |
Yeah, yeah, I know. |
| My 98-year-old grandmother has bigger arms than you. |
Yeah, but we both got better bladder control than you. |
| I’m going to put your arm in a sling. |
Why, are you studying to be a nurse? |
| Do I see quivers of agony dance on your lips? |
It’s laughter that’s caused by your feathery grip. |
| My stupefying strength will shatter your ulna into a million pieces! |
I’m surprised you can count that high! |
| Give up now, or I will crush you like a grape. |
I would like it if you would stop your WINE-ing. |
| Your arms are no bigger than fleas I have met. |
So that’s why you’re scratching. I’d go set a vet. |
| People consider my fists lethal weapons. |
Sadly, your breath should be equally reckoned. |
| Only once have I met such a coward! |
He must have taught you everything you know. |
| You’re the ugliest creature I’ve seen in my life! |
I’m shocked that you never have gazed at your wife. |
| Today, by myself, twelve people I’ve beaten. |
From the size of your gut, I’d guess they were eaten. |
| I’ve out-wrestled octopi with these arms! |
I’m sure that spineless creatures everywhere are humbled by your might. |
| My forearms have been mistaken for tree trunks. |
An over-the-counter defoliant could help with that problem. |
There are also a few things you never want to say. These bogus insults and responses are thrown in with the good ones so make sure you don’t say any of these.
Note: These responses do not correspond with any particular insult.
Now that you have your first crewman you need to find a ship. Head to the harbor to locate a ship. You seem to be lacking the authority to obtain a boat and
you are all out of change for the grog machine. Get the inner tube lying nearby and return to the Governor’s Mansion. The cactus
near the house is the perfect shape to make a slingshot with your new inner tube. Put the tube on the cactus then go talk to the catapult operator and
offer him some pretzels to distract him while your adjust his controls. This forces him to have to recalibrate, and from your previous discussion you
know he uses the cactus to do this. The results are quite smashing.
Your job is half done. You still need to get a crew and a ship and head for Lucre Island. After your introduction to Charles L. Charles you can return to town
and talk with the two people in front of the Melee Town Hall. After much prying you will get them to confess that they were on your crew in a previous adventure
and they aren’t too thrilled about joining up with you again. The promise of a cushy government job seems to make them forget your past indiscretions.
Now all you need is a contract.
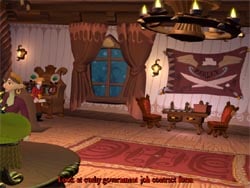
Your wife is the governor so that would be a logical first stop. Since the bombing on the house has stopped you can find Elaine inside the mansion. There is a government job contract on the table that Elaine is working at but this is a normal contract. You can find the cushy government job contract that you need in the china commode behind Elaine. (see picture) Make sure to have her sign the contract otherwise it is worthless. Ask Elaine
about a ship and she will give you the Gubernatorial Symbol. When you are done talking to Elaine you can exit the mansion and head
back to town.
Stop by the town hall and give the signed contract to Otis and Carla who will agree to join your crew. Now head to the harbor and show your Gubernatorial Symbol
to the Lady of Leisure who provides you with a ship. The only thing worse than sailing a ship named The Dainty Lady is to have it painted pink. Swallow
your pride and gather your crew to set sail for Lucre Island.

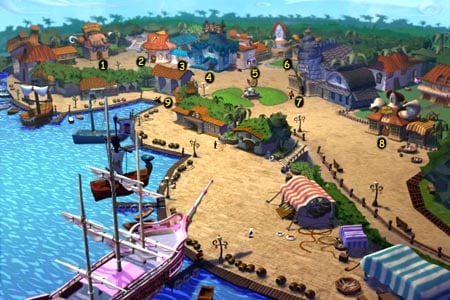
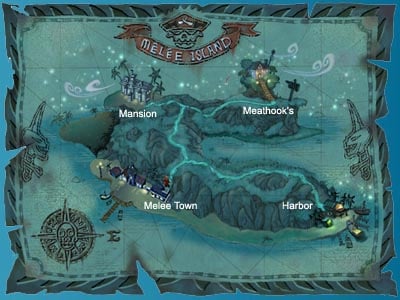
Your stay on Lucre Island will be filled with plenty of unexpected events. The map above shows some of the key locations you
will visit during your adventure. Below is the location key to the map above. You can visit these places in any order you wish
and gather clues and collect various inventory items. The following narrative outlines how I played this part of the game.
Feel free to explore and have fun and remember to talk to everyone, even if they don’t look important.
1. Palace of Prostheses – collect valuable clues and items from this store and its owner.
2. Lucre Island Bank – be part of an exciting bank robbery and the #1 suspect.
3. Archway – this leads to the island map with paths to other exciting locations.
4. Lawyers’ Office – visit this location early to unlock other possible adventures.
5. Scents and Sensibilities Perfume Stand – get spritzed by a rehabilitated pirate.
6. House of Sticks – canes for every occasion and everybody including Australian villains.
7. Hall of Justice – also known as the JAIL. Become a visitor and a prisoner all in one day.
8. Bait Shoppe – all sorts of smelly stuff can be collect here. Check out the circus.
9. Chess Playing Pirates – tucked away down at the docks, these two pirates have a valuable item.
After you arrive at the island and your team of pirates goes their separate ways, head up the steps and locate the
duck in front of the Bait Shoppe. Stuff him in your pants then head into town toward the left.
Your immediate goal is the law offices (4) but you may as well visit the perfume stand (5) since it’s on the way. Talk to
the ex-pirate and grab an empty spritzer bottle from the pile to the left. Also get the
cologne from the stand.
The law office are just around the corner to the left. Enter and have a humorous conversation with the three lawyers. Before
you leave they will give you a letter from Grandpa Marley. This letter has a clue about family
heirlooms locked in the Lucre Island Bank and a cryptic reference to something called the “Ultimate Insult”.
Head to the bank (2) located down the street just past the archway. Enter and eavesdrop on the conversation with Brittany and
the angry Australian, Ozzie Mandrill. Watch what he does with his walking stick when he gets mad. This is a valuable clue for
a future puzzle. After he leaves you can go talk to Brittany and ask to see your safe deposit box. Show her the Gubernatorial
Symbol to prove your identity then you will be taken into the vault.
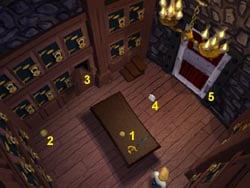
While you are viewing the contents of the chest a bank robber will burst into the vault. He looks strangely familiar until he
removes his mask revealing he has NO NOSE! He makes a hasty exit and locks you in the vault. A police standoff takes place
outside the vault leaving you to engineer your own escape. Collect the sword and sponge from the table (1) and another sponge from the corner of the vault (2). Search the open
safe deposit box (3) and get a music box and a bottle of fine grog. Finally
take the monogrammed handkerchief and the sponge that is under it. You now have all the items necessary to break out of a bank.
Approach the vault door and use the sword on the lower hinge to snap it off. The sword breaks, but you are still able to wedge
it in the door creating a gap. Now stuff all three of the sponges you collected into the crack and pour the grog on the sponges.
The resulting expansion pops the door off and you are free! Well not exactly. Seems you have been mistaken for the bank robber
so you are swiftly taken to jail.
Apparently the jail was overcrowded (Otis had already been arrested), so you are placed on house arrest. An ankle restraint is
attached to ensure you don’t leave the island and you are given the task of proving your own innocence. So far the only clue
is the handkerchief with the initials P.P. but the inspector wants more evidence. On your way out make sure to pick up the
can of chicken grease under the iron maiden and chat with Otis. Apparently he will be set free when
you are.
Once you return to semi-freedom you need to start solving the crime. Return to the bank and talk to the banker who is convinced
you are the robber. Try to enter the bank and Inspector Canard will quickly arrive and ask you to leave the crime scene. Head
around the bank and locate the manhole. Pry the manhole cover off with your broken sword which falls
into the hole afterwards. Inspect the cover and read the “love note” inscribed. Make a note of the three names as you will need
them shortly. Stuff the cover in your pants and head to the Palace of Prostheses (1) behind you.
Enter and talk to Deadeye Dave who is both blind and slightly deaf. Explore the various conversation options and when you ask
for a “free gift” he will tell you a story asking you to fill in the names. Use the names from the manhole cover and you will be
rewarded with an artificial skin, YUCK! Offer Dave the handkerchief and let him sniff it. It seems
Dave has a cold and his sniffer isn’t working too well. If only you could “enhance” the smell for him…
Before leaving you will also want to get the artificial hand in the basket between the door and window.
Even though Dave is hard-of-hearing, he can still detect your attempt at shoplifting unless you cover your theft with some noise.
Head to the counter and play the music box for him. The music only plays for a few seconds so you quickly have to get over to
the basket and get the wooden hand before the music stops.
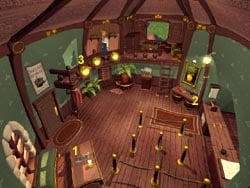
Return to the manhole and look at the bank window then the manhole and you will come to the not-so-obvious conclusion to put the
artificial skin over the manhole creating a makeshift trampoline. Take a few bounces (use the USE command) and you will sail
gracefully into the bank and land in the balcony. Your search for clues turns up only a few items. A Scupper Ware container is on the desk (1). You can also pull the cord (2) to turn on the lights which reveals a suspicious shadow
on the wall (3). Climb back to the balcony and search the light on the far left to find an artificial nose. About this time the inspector enters and demands you hand over the nose. Toss it down to him then jump back out the
window…oops!
Your investigation now takes a turn (or rather smell) for the worse. Sniff Pegnose Pete’s handkerchief several times to get a
variety of ingredients that make up his unique odor. We now need to make some perfume so Deadeye Dave can hopefully ID our
bank robber. Wood, fish, swamp water, and flowers seem to be the key ingredients to this potion and you already have an empty
spritzer bottle.
You can collect the ingredients in any order you want. I’ll list them in order of left to right across the city starting with
the House of Sticks (6). This shop is full of all sorts of canes and walking sticks. While you are browsing Ozzie enter the
shop and inquires about his replacement stick (remember he broke his at the bank). After he leaves you can collect the pile of
wood shavings from the floor where Ozzie’s stick was. Talk to the shopkeeper and get some valuable information
about Pegnose Pete and one of his worst fears.
Now head back to the Bait Shoppe (8) and this time go inside. Again, you can talk with the owner before or after you are done collecting
the various items. Use the spritzer bottle on the water in the free bait tank to collect some free bait water.
You will also want to take some free bait and put it in your Scupper Ware to keep it fresh. Check out the
Termite Circus. If you try to take the termites you will get yelled at by the owner. Instead, use the wooden hand you swiped from Dave’s
store to collect the termites unnoticed. Only two more ingredients to go.
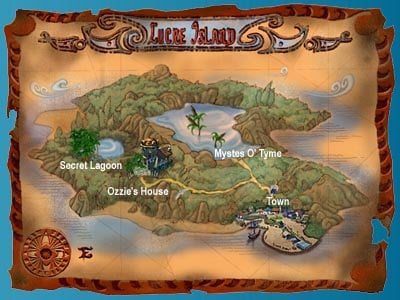
Head out the arch (3)and follow the map to the Mystes O’Time swamp. Use the spritzer bottle on the puddle to collect some
swamp water then return to the map and head to Ozzie’s house. A small yellow flower grows near the fountain. Pick the flower and add it to your homemade perfume to complete the mix. Enter the house and admire the various
trophies on the wall. Talk to Ozzie and even challenge him to Insult Sword Fighting if you wish. Before leaving, squirt some of the cologne
(not the Homemade Perfume) on the smelly platypus. Ozzie gets very made and snaps another cane forcing him to return to town to order a new one.
Head back to town and visit the House of Sticks again. Ozzie’s new walking stick is ready for him over in the corner again. Quickly move near
it and deposit your termites on the stick. About that time Ozzie will enter and get his new stick. He now leaves a trail of tiny piles of
sawdust wherever he goes. This could prove very useful later. For now, head back to Deadeye Dave over at the Palace of Prostheses.
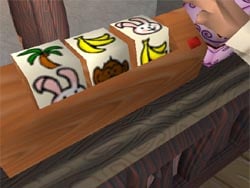
Squirt your homemade perfume at Dave and he will be able to identify the bank robber, or at least his alias. He even has his address but
without his monkey he is unable to work the mechanical filing system. You can work the machine for him by entering in the three initials on
the set if dials. The alias changes so I cannot give you an exact combination but here is how it works. Each wheel has five sides with a
picture and each picture represents several letters of the alphabet. The rabbit (which looks suspiciously like Max from “Sam and Max”) is
side one and represents the letters A-D. Side 2=E-H, 3=I-M, 4=N-S, and 5=T-Z. My image shows combination 2-5-1 for the name Francis Z. Drake,
which was the alias when I played the game this time through. Your name and combination may differ.
Press the red button to activate the machine and a customer record will be retrieved. If you got the combination right then you will get the
directions to Pete’s house. The compass directions are easy to follow but the time index seems to indicate you need
a clock to find his house. Leave the store and head back to the docks. As you pass by the fountain you can stop and talk to Brittany. She
doesn’t seem to upset at losing her job and wants to get into show business.
Head down the steps and follow the dock to the left until you reach the pirates playing chess (9). They are using a clock to time their moves
but when you try to take it they don’t seem to appreciate it. Talk to the two pirates and see if you can distract them or get them to argue.
The heavy pirate on the left can be distracted by using dialog ?-5-4 and repeat 4 until he looks away. The skinny pirate on the right is
in love with Brittany and can easily be distracted using dialog ?-4 and repeat 4 until he misses a move. When the two pirates start
fighting you can swipe their clock and head out of town.
Return to the swamp and put the clock on the raft then get onboard. To navigate the swamp is quite easy. Keep an eye on the clock in the
lower-right corner and match the times shown with the times on the directions you got from Dave. You will eventually arrive at a locked gate
where you will encounter a duplicate of yourself courtesy of some warp in the space-time continuum. He identifies himself as Guybrush
Threepwood and you get to play the “guess the number I am thinking” game. Remember this number (usually 12 or 69 but could be something else).
You will also get some inventory items including a key to unlock the gate.
Once you have parted company you can pass through the gate and continue following the directions. You will arrive back at the gate only this
time you are the other Guybrush interacting with your prior-self. Now you must answer and ask the questions in reverse order and give
the other Guybrush the items you gave yourself only moments ago. Confused? The items are in your inventory in the same order so just pick
them from left to right. Only give him the first two – the third is automatic. If you corrupt the space-time continuum during or between the
times of these two encounters you will open a wormhole and be transported back to the beginning of the swamp and must start over.
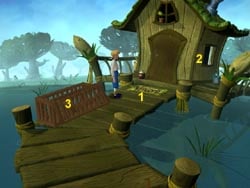
After your successful second encounter with yourself you will continue to follow the direction until you arrive at Pete’s hideout. Sneak up
to the window (2) and eavesdrop on Pete and Ozzie talking about the bank robbery and their frame-job on you. Ozzie will leave and you can set
up a clever trap to capture Pete. Dump the chicken grease on the doormat (1) then toss the duck into the window (2), which sends Pete running
out of the shack where he slips on the grease and lands in the crawdad trap.
You and your prisoner are magically transported to the jail where the inspector holds Pete for other crimes but you still don’t have
enough evidence to convict him for the bank robbery. You need the stolen goods and proof linking him to the crime. Now that you know Ozzie is
involved you can head back to his house. Accuse him of framing you and bluff him by telling him you have already been to Pete’s Booty Showcase.
He is suspicious but will go investigate anyway. Now that his walking stick is leaving a trail of sawdust you can easily follow him through
the woods to the secret lagoon.
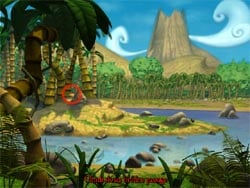
Spy on Ozzie through the bushes to locate the entrance to the secret cave. After he leaves search the area and the surrounding water. The
entrance to the cave is hidden behind the hill near the palm trees. (see image) Enter the underground hideout and check out the place. Push
the red button on the edge of the table to open the curtains revealing a window overlooking a glowing stash of treasure. It appears you will
need to locate an underwater entrance to this area. Return to the top and dive into the deep water on the far side of the screen.
You sink to the bottom of the dark water and notice several glowing fish swimming around. Wait for them to get close then open your Scupper
Ware to capture a glowing fish. Now you have a light that reveals the cave entrance to the left. Enter the cave
and collect the loot and your family heirlooms. Don’t overlook the itty-bitty screw lying
under the treasure. This is the final piece of evidence you need to convict Pete and clear your good name.
Return to the dark water and climb out on the right side and return to the Hall of Justice. Give the screw to Inspector Canard and watch the
justice system finally do justice to the system. Your ankle restraint is removed, and you are free to return to your ship (along with Otis) and
return to Melee Island.

Head back to the mansion and give Elaine the good news about your trip to Lucre Island. Charles L. Charles shows up and reveals his true
identity forcing you to take immediate action. Elaine suggests you begin your search for the Ultimate Insult by visiting the Voodoo Lady in
town. Head into town and visit the International House of Mojo, the second building on the right with all the torches. Once inside you can
browse at all the mysterious items including the large hand-shaped table. The index finger looks different than the others and when you USE
it the Voodoo Lady appears.
Enjoy a very humorous conversation with your old friend from the past and learn about the Ultimate Insult. When you ask her about the family
heirlooms she will cast some spells to reveal the important stuff. The earrings, necklace,
and pen will be added to your inventory, but it seems the forth gift is not in the chest. The Voodoo Lady assures
you the item is somewhere on the island and suggests you locate the original owner of the earrings.
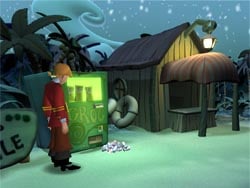
You definitely need a grog right now so head for the SCUMM bar. What’s this?! The SCUMM bar has been turned into a trendy sushi bar and grog
is no longer served. Remembering the vending machine down at the docks, you head to the harbor to get a drink. You are out of change, but a
quick inspection of the coin-return slot reveals a quarter. Of course it gets stuck, but after you kick, punch, and
yell at the machine a whole pile of grog tumbles out. Pick up a can of grog and put it in your pocket for now. If
you try to drink it your wife’s voice will haunt you about the evils of drinking on the job.
Now it’s time to visit your old friend Meathook who leaves on the other side of the island. Head to his house and enter. Explore the various
dialog paths and learn about his new hobby, wax painting. You will learn that he was the one who painted a map for Grandpa Marley, which was
to be given to Elaine as a wedding present. This was obviously the missing heirloom you are looking for, but he no longer has it. He painted
over the map with a landscape and sold it. Now that you know what to look for you can return to town, but make sure to grab that
paintbrush from the pail as you leave.
Return to town and head to the LUA Bar. Explore the place and talk with anyone you can then sit down on the middle stool at the bar. Note
the trough, boats, underwater mechanism, and the painting on the wall. Call the waitress and order some food. Raw fish sounds disgusting so
ask for something “cooked”. The only cooked food they serve is flaming cuttlefish, so that is what you order. The next series of events is on
a timer so get ready to act quickly.
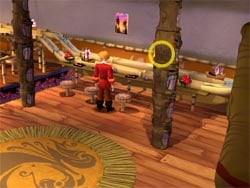
Stand up and wait next to your stool for a boat to appear with the flaming cuttlefish. As it approaches get out the paintbrush from your
inventory and highlight the option to Jam the Paintbrush in the Underwater Mechanism. Wait for the boat to travel down and around the
corner and start to head back toward the kitchen. As it passes behind the pole (see picture) jam the paintbrush into the trough to stop the
boats from moving. If your timing was correct the boat should be under the picture and the flames will start to melt the wax. The cook comes
running out of the kitchen to see what happened. While he attempts to repair the mechanism you have a few short moments to run to the kitchen
and explore.
Inside the kitchen, quickly head to the copper boiler and pour your can of grog into it. This puts out the fire and permanently stops the boats
from moving. Now the flames have all the time they need to melt the wax from the painting to reveal the map Meathook painted all those years
ago. Take the painting and return to the harbor.
I. Cheese stands guard at the boat, but you are more interested in the figurehead. Attach the earrings and necklace to the figurehead and enjoy
the animated conversation. Put the pen on the necklace and finally give her the painting so she can locate the island where you can find the
Ultimate Insult. She also draws a sketch of the Ultimate Insult which comes in handy later.
The rest of your crew shows up along with Elaine who wishes you good luck asks to get back her Gubernatorial Symbol. With all of your business
completed on Melee Island you are ready to set sail for Jambalaya Island.

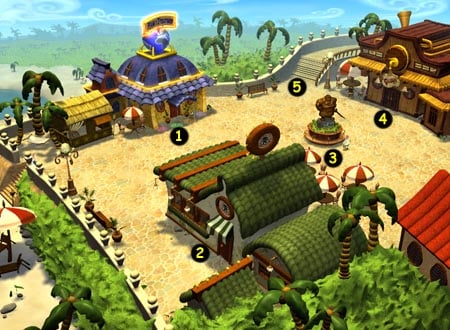
Your quest for the Ultimate Insult begins in town where you will find several trendy corporate franchises that have taken over the island and
created the ultimate tourist trap. The map above shows the key locations you need to explore while in town. Below is the location key to the
map above. You can visit these places in any order you wish and gather clues and collect various inventory items. The following narrative
outlines how I played this part of the game. Feel free to explore and to talk to everyone, even those annoying tourists who don’t believe you
are a REAL pirate.
1. Planet Threepwood – collect valuable Mega Monkey Mug once you have found the coupon.
2. StarBuccaneer’s – collect some valuable items from this establishment.
3. Statue of Tiny LaFeet – talk to the tourist for some valuable information.
4. Microgroggery – visit with Carla and get some Grog Jr..
5. Steps leading to island interior – this leads to the island map with paths to other exciting locations.
As you enter town you can check out the empty building to the left then head to Planet Threepwood (1). Outside, Murray is greeting customers
and also filling in as bouncer. Talk with Murray for some very enjoyable conversation then go ahead and enter the restaurant if you wish. You
really can’t do anything yet, but you can admire all the stuff they somehow have managed to steal from your life. Talk to everyone including
the tourist with the Fargo-accent over by the statue of Elaine.
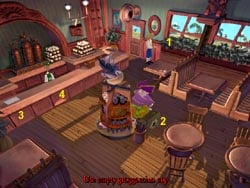
Head over to StarBuccaneer’s and make a note of the coffee mug inside the window as you enter. Once inside, take the empty
groggocino mug from behind the planter (1) then go talk with the tourist at the souvenir display. Check out her shopping bag (2) to
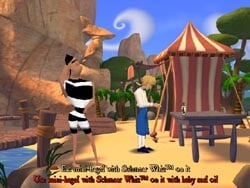
find a StarBuccaneer’s souvenir mug you can swipe after you distract her for a moment. Head over to the counter (3)
and grab a free mini-bagel topped with Schmear Whiz then talk to the clerk (4) to get a free refill of groggocino.
That’s about all you can do in here so head to the statue (3) in the center of town.
Talk with the tourist who actually has some useful information. After you show him the sketch of the Ultimate Insult you realize the statue’s
missing hat is a part of the object you seek. He also tells you that LaFeet’s son lives on the nearby island. Head over to the Microgroggery and
enter to find Carla. Talk with her and the bartender. You can attempt to ride the mechanical manatee but won’t get very far at this time.
Order a grog and once again you are asked for an ID which you do not have, so you are given a Grog Jr. instead. This
stuff would barely get a parrot drunk so don’t bother drinking it. Add this to your growing inventory then return to the docks.
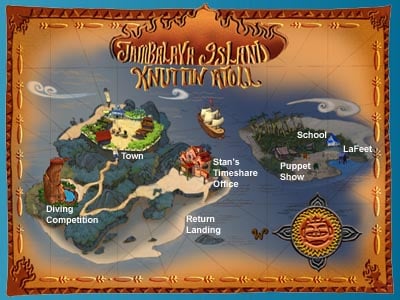
You decide to head over to the island where Tiny LaFeet’s son lives. Use the community rowboat and you will
eventually reach Knuttin Atoll after a brief encounter with Admiral Casaba and a deadly cannonball along the way. When you finally land at
the island you find only exiled pirates living in rundown shacks. Some are being rehabilitated up at the schoolhouse while another is
running a puppet show here on the beach.
Check out the puppet show and talk to each of the puppets. When you are talking to the Guybrush puppet ask to talk to the puppeteer. Ask
once more and the old pirate will poke his head up and talk with you. He seems very frightened when you mention the Ultimate Insult and when
you show him the picture (on the back of your map) he screams and runs away in terror leaving behind his puppets.
Head on up to the school house and talk with Miss Rivers, the teacher who is standing on the porch. Ask to sign-up and you are immediately
admitted into the next class. Listen to the amusing brainwashing techniques of the teacher and take her final exam. You are asked three
questions and you need to pick the most unaccptable, evil, true-pirate answer you can from the list. Everyone fails the exam but you are
singled out as her worst student and asked never to return. She puts the dunce cap on you, and you are expelled.
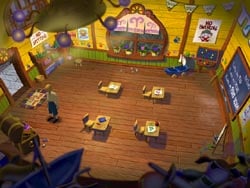
During class you noticed a nice chest of confiscated pirate paraphernalia in the corner. You really should check it out if only you could get
the teacher out of the school. The solution is right in front of you to your right and on the wall. Pull the Fire Alarm and the teacher will
run out of the schoolhouse. Immediately enter and approach the chest. You need to get two items from this chest; the
pirate trading card and the parrot whistle. You only have a few seconds before the teacher
returns and throws you out, so you will have to make two trips. The teacher never catches on to your trick, so if you mess up you have
unlimited opportunities to get these items. Return to the beach after you have the items.
Head down the shore past the hut to the right of your rowboat and you will arrive at a campfire with two pirates engaged in a conversation.
The female pirate runs away when you approach and you quickly learn that if three or more pirates are seen talking on the island the admiral
will fire at them from offshore. This is a handy clue so make a note of it. Talk with the large pirate who remains and learn he is Jumbeaux LaFeet, the son
of Tiny LaFeet. He tells you that he is the one who stole the hat from the statue back in the town-square and buried it on the beach under
a boulder, but doesn’t know which one…but his parrots do. The only problem is one parrot is a liar and the other tells the truth, and he
doesn’t know which one is which.
Head to the beach to the right to find a huge assortment of boulders. Blow the parrot whistle to summon the parrots then give one of the birds
a drink of the Grog Jr. you got previously. He will get a little drunk and start to stagger. Now you can visually tell them apart. If you
want to be extra-sure you can give the other parrot a sip of your groggicino and he will turn into a hyperactive bird. Now ask one of them
what your name is or a math problem. Depending on the answer you will know if the parrot is the liar and if he is drunk or normal (or
hyperactive if you gave the other coffee).
Now comes the painfully slow process of finding the boulder. Each time the parrots land ask one of them if the hat is under that rock. Based
on which parrot you ask and his response you will know if you need to keep looking. If you do, the next time the parrots land ask the truthful
parrot which direction you need to go then move in that direction and blow the whistle to summon them to the new rock. Repeat this process
until you locate the correct boulder – this usually takes 3-4 tries.
Now that you have located the boulder you need to remove it. It’s just too darn heavy to move but a cannonball would smash it. You remember
that Admiral Casaba will fire on any group of three or more pirates and you happen to have a pair of pirates in your pocket. Pull out the
puppets and put on a puppet show for the captain. Get the two puppets to argue by having LeChuck say something bad about Guybrush. A cool
movie takes over, and the boulder will be destroyed by incoming fire. Search the crater and get the bronze hat, which
happens to be the first part of the Ultimate Insult. This concludes your adventure on Knuttin Atoll, so return to the rowboat and head back to
the main island. You can land on the south side and avoid the admiral.
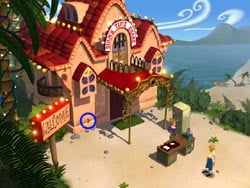
Head up the cliffside path to reach the festive house, which has been turned into the offices for Stan’s Time Share. You may remember Stan as
the fast-talking salesman who sold you your pirate ship in the first Monkey Island game or life insurance in the sequel. If you think his plaid
jacket is annoying just wait until he opens his mouth. A quick search of his desk reveals only a spare pair of underwear. Take a
Time Share Brochure and grab the bottle of glue on the ledge under the left window. If
you want to get the Mega Monkey Mug Meal Coupon from Stan then you will need to drink your groggicino before
asking Stan to give you the full three-hour sales pitch. Your other alternative is to win the coupon by using the glue on the mechanical
manatee back at the Microgroggery and riding it for two hours. It doesn’t matter which method you choose, and you can actually do both even
though you will only get one coupon.
When you are finished with Stan, head into the interior of the island and go to the cliffs where the plank diving competition is being held.
Watch Marco de Polo dive then chat with him as he passes by. Listen to his amusing tales then challenge him. You first need to visit the
judges and get certified which is quite easy for you but quite painful for Guybrush…something involving a staple gun. Take your diving
certificate back to Marco, then proceed to the diving competition after a quick clothing change in the tent.
You are going to be diving at least three times. The first time you can just jump off the board any old way you want. Go talk to the judges
and inquire about the low scores. The grouchy judge (left) admits he is being bribed and he needs the money to support his redheaded
wife and redheaded family and red-haired dog. The judge’s face seems very familiar. A quick check of your inventory shows the judge pictured
on the Time Share Brochure with a blonde woman. Using this information you quickly encourage the judge to be a bit fairer in the scoring.
The wise judge (middle) says you made too big a splash and the hippie judge (right) says you need to copy Marco’s dive exactly and gives you
the following instructions. Each of Marco’s dives are composed of four different moves which are announced before he makes the dive. You
can replicate the dive by performing the same moves in the same order. Here are the four moves and the keys to press for each:
Keelhaul: Press UP
Rum Barrel: Press DOWN
Alpha Monkey: Press LEFT
Spinning Swordsman: Press RIGHT
The dives change each time so listen for the announcement. In my game one of the dives was Alpha Monkey-Rum Barrel-Keelhaul, which requires
a Left-Down-Up arrow combination while Guybrush is running across the diving board. With each successful key press a gold statue will appear
in the upper-left of the screen. If all three statues are standing upright you did a perfect dive.
|