Dracula: The Last Sanctuary Walkthrough by Norma Kuderna & MaGtRo


Walkthrough written by NKuderna, MaGtRo,
and Ozma38
2/14/01
It has been one week since Jonathan
returned to London with Mina. Dracula followed them, set up a sanctuary at
Carfax, and plans to get Mina and the dragon ring back. Jonathan knows he
must confront and destroy the count for Mina to be safe.
CARFAX:
Before going inside, take a look around the gardens. To
the left you will find a large metal box with a wire hinged top and a couple of
pipes at the sides. To the right you will see a shallow pool. Go
into the pool, turn around and take a round knob from the center of the 4
sculptured tiles. Go to the other side of the garden. Go straight to
the stone fence and find 4 more of those tiles behind the dry bushes. Take that
knob also. Turn around and go forward then turn right and look toward the
base of the tree. Pick up the oil can.
Now it is time to enter the house. Use the key on the
door knob and go inside. Go up the stairs and enter the room at the
top. Go forward toward the dresser. Open the film cans labeled Styx and
pick up a token, notched paper, and box of matches. Look up at the picture
on the wall. Click on it and then after you hear about Carfax, turn the picture
over and pick up the note attached to the back. Turn to your right and
open the chest. Pick up the telescope and candleholder. Turn to your right
again and go over to the desk. Open the drawer on the right side and pick
up the compass, key/cylinder mechanism, the book and the candle. Read the
book from your inventory. Turn right and go in back of the screen.
It is dark back there! Place the candle holder on the table and then use
your matches on the candle. Place the lighted candle on the holder.
Ah! Now we can see there is a key hanging on the wall. In your
inventory use the bullets on the gun to load it. Good idea to get it
ready! Turn toward the door next to the screen and use the key on the door
knob. Enter that room and look at Pibody. Before taking the key from
his jacket SAVE YOUR GAME! As soon as you pick up the key a large vampire bat
will breakdown the door. Turn around and shoot the door lock. Open the
door and go forward once into the room, turn around and move the dresser that is
on the left side of the door to block it off from the vampire bat. Now you
can take your time to explore the room safely. Pick up the chair in front
of the fireplace and put it below the round boarded up window. Look in the
fireplace and get the other knob and the poker. Use the
poker to remove the boards from the window. Go to the other side of the
room and pick up the large mirror. Place it in the middle of the room,
then slide the dresser back away from the door allowing the werewolf to
enter. Protected by the sun! Pick up the other mirror and leave the
room. As you are leaving the room you originally started in you will see a
vampire bat standing by the doorway. SAVE YOUR GAME! Go forward once
into that room, look down and place the mirror there. Another bat will
disintegrate! There are more vampire bats outside on the balcony and down
stairs. Since you can’t go right, turn left and quickly go to the end of the
balcony and click on the chandelier! Watch the video scene.
Use your poker on that boarded up door to the left of the
stairs. Enter the basement and look at the crates along the right
wall. Slide the middle crate and pick up the wire cutters. Slide it back
and pick up another knob from the tiles.
Go outside to the large metal box. Get a closeup of the
lid on top and cut the chain with the wire cutters. Use the oil can on the hinge
then lift the wire screen. Put the note you found behind the picture of Carfax
on the top of the box. Use oil on the note and you will be able to see pictures
corresponding to the knobs you picked up earlier. Place the corresponding knob
next to the picture. See picture.
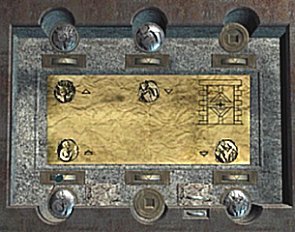
Notice the different triangles on the note. Get a close up of
the wheel with the triangles and move the wheel to correspond with the triangle
shape that is drawn on the note. You will only need to change the top left one
and 2 of the bottom triangles. Once you have done that the lid pops open and you
will hear a clang. Go toward the metal box again and turn the round handle on
the front. The pool will now fill with water.
Go back to the basement where you found the wire cutters and
you will be able to open the door with the huge locking device. This door leads
to the sewer. Go down the sewer all the way to the left until you come to a dead
end. Turn left and climb the ladder and then go through the manhole. You will be
at Seward’s Asylum. Knock on the door and when the video stops go into his
office. Talk with Seward about the ring and matches. Seward will give you a key
as you leave his office. In that waiting area outside his office go forward,
left, and forward again behind the desk toward that other smaller door. Use the
key on the knob and enter another sewer.
SEWER TO HIGHGATE:
Go forward into the sewer, turn right, forward X1 and look to
your right to find a rope on the wall. Take the rope. Continue going forward 3
more clicks until you come to a control box on your left with a little red
light. Turn to your right and look down. Pick up the wheel. Continue on in the
sewer until you come to a dead end and see a ladder in front of you. Combine the
wheel with the rope in your inventory and use it on the ladder. Walk to the
other side, look down and open the little tool chest. Take out the wrench. Go
back down the tunnel to where you picked up the wheel and saw the control box.
Use the wrench on the wheel and take it. Go back and cross the ladder again, but
stop when you are halfway across and look at the wall to your right. You will
see a notched area where you can put that wheel. Use the wrench to tighten it
and then turn the wheel. The water will drain out. Continue across the ladder,
turn around, look down and take the ladder. Place the ladder against the right
side of the pit vertically, so you can climb down. At the bottom of the pit,
pick up the ladder and go through forward once through the little tunnel. As you
turn to your right you will see a hot spot showing you where to place the
ladder. Climb up and use your gun on the latch to open the cover. Climb out and
you will be in Highgate cemetery.
HIGHGATE CEMETERY:
Find the large entrance gate to the cemetery. Facing that gate,
turn right, go forward once, then turn right about 135 degrees until you find
the magnifying glass cursor. Get closer and use Pibody’s key on the lock. Pick
up the ladder. Go back toward the gate, turn left and go forward 2 clicks until
you reach the intersection. Turn right, go forward 2 clicks, turn left to face
the tomb with the statues on each side. Use the ladder to climb to the top. Open
the briefcase and take the cross and stake. Climb back down and watch the video
of Pibody who is now a vampire. Use the cross on him and he will fall into an
open grave and get crushed with a tombstone. Go in after him and use the stake
on him. Pick up his watch and notebook. Read his notebook in your inventory and
he will talk about watching Dracula enter his vault. Go back up that ladder to
the top of the tomb again. Use your compass, click on the NW point and you will
see Dracula’s vault. Use the watch and when it finishes getting to 6 o’clock use
the telescope to see Dracula entering his vault. Go down and over to Dracula’s
vault. Go up to the statue, click on the eyes and try to enter the door to the
vault. You will hear high-pitched sounds and Jonathan will pass out. When he
wakes up that morning he will stumble over to the asylum to see Dr.
Seward.
DR SEWARD’S OFFICE/ASYLUM:
Dr. Seward is not in. Go around to the front of his desk and
open the top left drawer. Take the stethoscope. Listen to the recording machine
on top of the desk. Go over to the fireplace, look down and to your right
towards the window near the chair and you will see a magnifying glass cursor.
See picture.
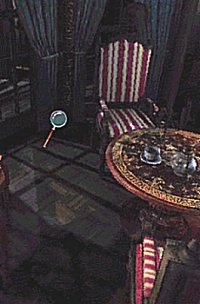
Pick up Mina’s wedding ring. Turn back toward the fireplace and
move the picture to find the safe. There are 4 little combination locks. (It
doesn’t matter which order you choose to do them.) On each lock you position the
stethoscope in the lower left corner. Turn the dial with the little arrows until
you hear a clunk sound then stop. Do this to each of the dials. From top left
clock-wise the numbers should be 8, 3, 6, and 4. Open the safe and take the
dragon ring. Open the case and take the green vial (anti-vampire serum) green
notebook, photo negative, and another recording cylinder. On the top shelf take
Hopkins’ file. Read the file and take his key. Read the green notebook. Go back
to the desk and remove the recording cylinder and place it in the case on the
desk. Place the new cylinder on the machine and click on the needle. The needle
will stick half way, so click on it again. It tells you to raise the temperature
5 degrees for the anti-vampire potion in order for the blood to thicken in the
solution.
Leave the office and go into the asylum. Go down the stairs to
the desk. Pick up the sugar cube from the saucer and combine it in your
inventory with the matches, then place it on the table. Hear that pesky fly?
That would make a nice snack for Hopkins! When the fly lands in the box, pick it
up. Go up to the cells and look at the 3rd one. You will see Hopkins through the
little panel. Open the door with the key you got from his file. Give him the
matchbox with the fly. He will tell you about Mina and Dr. Seward, then he will
get upset and stop talking. Leave his cell, turn right and enter the room at the
end. Bill has turned into a vampire also! Use the cross on him and then on his
forehead after he falls into a wheelchair. Take the key from his waist. Go out
to the desk again and use the key to open the drawer. Take out the syringe. Go
back to Bill and use the syringe to get blood from his right arm. Turn around
and open the roll top desk. Put the contents of the green vial into the
distillation flask and add the syringe of blood. Place the empty vial under the
coiled glass tubing. Get a plus sign to the right of the Bunsen burner and click
on it once twice until the temperature reaches 35 degrees. Click on the negative
sign to the left of the Bunsen burner and click on it once to keep the solution
from over heating. The solution will boil and then fill up the empty flask. Pick
it up. Combine the active anti-vampire potion with the loaded gun in your
inventory. Go back to see Hopkins and he will talk to you some more. He gives
you his spectacles which give Vampire vision. You hear a phone ringing in
Seward’s office. Answer it. Dracula knows your plans and says it is hopeless.
When you return you will find that Hopkins and Bill have left. Where the wheel
chair had been is a trap door in the floor leading to the sewers. They must have
escaped through that door. Follow them! Go through the tunnels in the sewer.
There is no sign of them! Use the spectacles that Hopkins gave you and you will
be able to see green foot prints. Follow the tracks and you will come to an open
area. Go up to the control box in the center of the hub and flip the switch.
Bill will appear! Use your vampire glasses on Bill, then aim and fire your gun
at that red spot. Take the path to the left across center of the hub. Follow the
tunnel until you come to a dead end. You will see a door you can’t enter and a
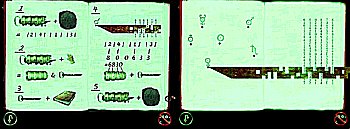
panel to the left of the door. See pictures below.
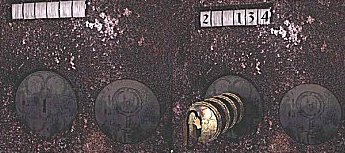
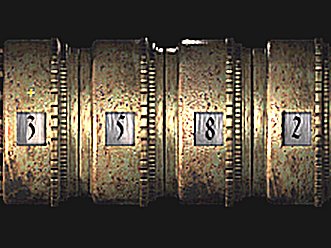
Use the key mechanism you picked up in Carfax on the slot of
the panel. Make a note of the numbers that show up (2, _, _, 1, 3, 4) and the
symbol to the right of the key. When you take your key out it separates in your
inventory. Use the narrow key with the notches on the red notebook. Activate
your vampire glasses and you will notice rows of numbers along the right side of
the page. Move the notched key to the symbol that you saw on the panel. Write
down the numbers in the notches. (5, 1, 0, 3, 8, 2)
Use the numbers you have from the panel to figure out the
numbers to use from the book. If you flip over 3 pages in the book, you will see
an example. For this particular lock this is how to figure the numbers. Line up
the numbers like this:
2 _ _ 1 3 4
5 1 0 3 8 2
The top row of numbers will give the order for the numbers you
need. They are 3, 5, 8, and 2. Now take the other part of the key that looks
like a cylinder and look at it in your inventory. Put the 4 number code on the
cylinder. Place the notched key back in the cylinder and use it on the lock
again. The door will open! Enter the Styx!
THE STYX:
Enter the theater. Go up to the mechanical Dracula and the
projector. Use the token you picked up from Carfax on the projector. Watch the
short film of Dracula carrying Mina up the stairs of his castle. Walk over to
the organ and use the perforated paper you picked up from Carfax on the hot
spot. The organ will start up and then some gas will come out of it. Jonathan
passes out and wakes up in Dracula’s bedroom Hopkins arrives to help him. Look
below the foot of the bed to find your gun. Leave the room and you will discover
you haven’t left the Styx at all. You were in a movie set! A vampire is in front
of you. Use the vampire glasses and shoot him in the red heart. Walk forward and
you will see Seward. He is now a vampire also. Turn left and go forward to the
control box with the red and green lights. Open it and flip the switch.
Mechanical Dracula will come at you! Turn to the left and grab the sword from
the dragon. Use it on Mech. Drac! Use the sword to cut the rope in front of you
and you will end up in the stage flies. Turn left and pick up the rope with
hooks and the handle. Turn around, go back and climb up that ladder to the next
walkway. Turn around and look down to find a box with a spot to put the handle.
Turn the handle and the platform you are standing on will go towards Mech. Drac
who is in the lift. You see him use a key from his finger on the lift controls
and something falls to the floor. He knocks some metal railing loose. Turn and
go to your right. Find the cursor on the ropes and use your sword. Climb up that
broken railing to enter the vent air ducts. Go forward, turn right and use the
sword on the fan to jam it! Crawl over the fan and go left until you come to a
vent grill. Take the key that is sticking out. Turn around and go back the other
way, but don’t go over that jammed fan again, just continue around until you
come to a ventilation grill. Use the key you just picked up to open that grill.
Use the grappling hooks and rope on the mechanical Dracula. He gets smashed to
pieces by the fan! Look over at the pieces and take the tuning fork from his
chest. Open the wrist and turn the hand over. Move the mechanism in the wrist to
activate the finger key and take that. Walk forward and right into the lift. Use
that finger key on the lift controls and go down. Turn right and go forward to
see Seward sitting against the back wall of the theater. He tells you about a
secret passage behind the organ and gives you a key for his laboratory in the
Asylum. He asks for your gun. Go to the organ and use the vampire glasses so you
can see which key to click on to open the secret passage. When you open that
passageway, Seward destroys the Styx and himself! Go forward into the sewers and
hop in the boat. Go forward in the boat down the rat infested sewer until it
comes to an end. Walk around the corner and to your left is a door and another
of those locks you encountered to get into the Styx. Figure out the code in the
same manner with your key cylinder.
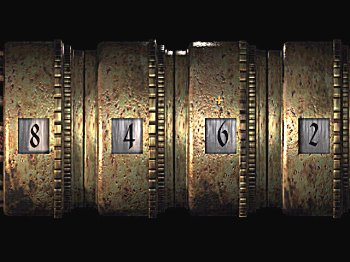
You are now back in the basement of Carfax.
CARFAX AGAIN!:
Pick up the cloth-covered crates. Go into the next room and
place these crates below the stairs. Pick up the gardening shears, the mallet,
and the axe. Go back into the basement and use the axe on Dracula’s coffin. Pick
up the pieces of broken coffin. Go up stairs and use the mallet on the desk.
Pick those pieces up too. Go into the room where you found Pibody’s body and cut
the drapes with the gardening shears. Pick the cut cloth up. As you leave to go
downstairs, go in back of the screen and take the candle. In each of the crates
put the pieces of coffin, desk, and drapes. Use the matches on the candle and
put the lighted candle on these crates. Dracula will appear and he leaves you to
burn in Carfax! Turn around and go to the door across the basement room. To the
left of the door you will see a little niche in the wall where you find a key.
Use that key on the door and you will discover a way out of Carfax!
CARFAX RESERVOIR TO THE ASYLUM:
Turn to your right. Find and turn a sluice wheel. The water
rises. Turn around and see an opening on the wall. Save Game Here! Dive in the
reservoir, go underwater, turn left, click on debris by the wall, look close and
click on exposed sluice wheel, turn around with the long wall to your left, look
up, click upwards, turn left facing the wall, look up again and click for a much
needed breath of air. The water rose once more. Dive underwater again and enter
the now submerged opening on the wall. You come out in the sewers, go forward 3x
passing a closed grilled gate. Turn left, climb the ladder and come out to the
entrance to the asylum. Enter.
ASYLUM:
Turn left, enter the asylum proper and proceed to the room
where you found Bill. Turn right and open the cabinet with the key Dr. Seward
gave you before he sacrificed himself. Look behind the curtain underneath the
workbench and find a photo developing setup. Place the photo negative on the top
part of the equipment on the left, turn off the light using the switch on the
middle of the back panel, get paper from folder on the right and turn on the
equipment with the photo negative. Click on paper and read the developed
photo.
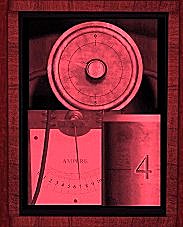
Note that the gauge is set to 8, the ammeter reads 7 and a #4
on the right. Backup and look at the work bench. Read the note found on the left
side of the bench. Put together the Anti-Vampire System, Dr. Seward describes.
Read the backside for instructions on how to use the setup. Place the
resistor/u-shaped object on top. Look close on the round object at the center of
the resistor and set it to 8 using the +/- icon. Place the electrolysis tube in
front of the u-shaped object. Look close and adjust it to 4 using the +/- icon.
Place the ammeter/white square box on the middle left and the rheostat/coiled
wires at the bottom. Look close on the coiled wire and adjust the ammeter
setting to 7 using the +/- icons.
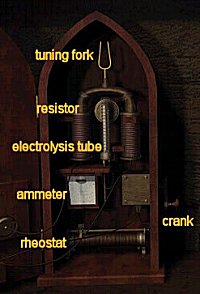
Remove the antenna that Dr. Seward said is not working well and
replace it with the tuning fork obtained from the Dracula robot. Close the door
and take the crank on the right side of the apparatus. Exit and go through the
trap door. Enter the sewers.
SEWERS:
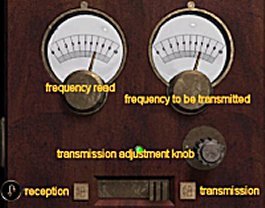
Go forward, turn right and see the rats. In inventory, use
crank on the newly made Anti-Vampire System, place the bottom middle switch to
the left by clicking on the left square box for reception. Point and click the
antenna on the rats when the green light light up on the energized apparatus
seen on the bottom right of the screen. Look at apparatus in inventory. The
number 7 on the left gauge is the frequency of the rats read by the apparatus.
Using the middle right knob, adjust the reading of the right gauge to 7. Click
the bottom right square box to transmit the frequency. Point and click the
antenna on the rats again when the green light light up on the energized
apparatus seen on the bottom right of the screen. The rats leaves.
Go forward 2x, turn right and go to the main junction of the
sewer system. Look close on the electric panel. Insert the silver ventilation
key at the bottom of the panel. A gate being raised is heard. That must be the
grill gate to Highgate, we passed earlier. Look close on the panel again and
raise the right lever. The bridge moves to another exit. Turn right, cross
bridge and enter. Another empty reservoir is blocking the exit. Turn around and
pick up wood planks and place them across the empty reservoir and cross over.
Look up and go out the manhole.
HIGHGATE CEMETERY:
Go to the main gate of the cemetery, turn left, move forward
and turn right to a wall with black plaques. Look close to the middle row of
plaques. Click on the one by Bram Stoker thanking St. George and pick up the
note from Hopkins and the dragon ring. The note gives the code for the lock of
Dracula’s secret sanctuary.
Go around the cemetery and look for gargoyles that might
prevent you from entering Dracula’s sanctuary like before. In the last page of
the red book, there is a picture of 3 gargoyles and the Anti-Vampire System. In
inventory, use the crank on the Anti-Vampire System, click on the left bottom
reception mode square. Turn left, move forward, turn left, look up on the
mausoleum roof and get the frequency (the green light is on the apparatus). As
before, move the right dial to the frequency reading of 6, click on the right
transmission switch. Focus the antenna on the gargoyle and click. The horned
gargoyle explodes. Energize the apparatus again and set it to reception mode by
clicking on left bottom switch. Go back to the main gate, forward to the corner
wall, look up at the gargoyle on the top of the corner wall. Get the frequency,
set the transmission to 4, click the transmission switch at bottom right, focus
the antenna at the gargoyle and click. The wolf gargoyle burst. Energize and set
the apparatus to reception mode again. Turn to the right, walk forward 1x, look
at the open crypt to your right, focus the apparatus at the head on top, set the
apparatus to transmit at 9 and explode the last birdlike gargoyle. Look at the
red book and see that all of them are marked off. Walk forward to Dracula’s
sanctuary.
Enter the mausoleum. Look close on the vampire lock and based
on Hopkins message, enter 9 – top left, 2 – top right, 8 – bottom right, 7 –
bottom left by using the turn arrows. Click on the half moon sign (dark on the
left side) at the bottom center of the lock. Enter the revealed
passageway.
CD 2:
Dracula, separated by a grill warns Jonathan about his luck
running out and his single life span possibly being shortened. Jonathan travels
to Transylvania and reminisced about the last time he was there.
TRANSYLVANIA
QUARRIES:
Turn away from the grilled gate with a vampire lock, forward 2x
and see another similar gate. The vampire lock on this one shows a half moon at
the bottom center (dark side on the right). Read the red book, using Hopkins’
vampire eyeglasses and find the page that has the moon in rotation. The letter
beside the half moon with the dark side on the left is G. On the left page the
numbers after G are 9,4,2,6. Enter 9 -top left, 4 – top right, 2 – bottom right,
6- bottom left. Click the half moon. Gate opens. Enter. The end of the hallway
is blocked by a Vampire face and to the right on the floor is a covered crate.
Take the spade and the crowbar. Go back out and enter the quarry proper. Go
forward towards the wood structure, turn right and look down between the stone
slabs. Use crowbar to move the stone and pick up the detonator. Move forward
towards the stairs, turn around and climb the pile of stones. Go forward, turn
around and pick up the hammer and chisel. Go to the table. Look close at the
drawer. Use hammer and chisel to open the drawer. Pick up the cable and use the
hammer and chisel on the back of the drawer. Pull out the drawer and pick up the
key. Go forward to the right of the table and look down on the box. Use the key
to open the box. Pick up the dynamite and go back up the stairs to the Vampire
face. Place the dynamite in the mouth and attach the cable. At a safe distance,
attach the detonator to the end of the cable. Press the detonator and see the
vampire’s head explode dropping a pink jewel. Pick up the pink jewel. Enter the
hole and go forward until you reach the prison.
PRISON:
Go to the chessboard on the wall. Turn right, look close on
another carved head missing an eye. Place pink jewel on the right eye slot. The
chessboard wall rotate, enter, go to the very end of the passage. The second
from the end prison bars has an opening. Enter. Turn left, move forward, turn
right and look down at a skeleton. Move his rib cage and dig using the spade.
Pick up the bone. Move forward, look down at another skeleton. Move him and dig
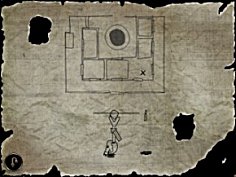
again. Pick up parchment and skull. Kazan, the writer of the parchment asks that
you find and free his Lord Radu and states that they made a way to get to him.
Look close on the parchment and it shows the layout of the prison and an
arrangement of skull, bone, stone and candle.
Go back out to the hallway, move forward 4x, turn left and
enter the alcove. Turn right and enter the small room. Pick up lantern and
crossbow. Climb table, pick up the arrows from the top shelf. Go down, open
drawer and pick up necklace with red jewel. Go out to the hallway.
Look down on the ground and follow the direction on the
parchment found under the skeleton. Place the skull on the ground. In inventory,
combine red jewel with bone and place it on top of skull. In inventory, light
the lantern with the match. Place lantern behind the skull setup. The light
passes through the jewel to a skull on the arch. The jewel explodes and the
barrier rises. Enter.
You are now in another group of prison cells. Move forward and
when you turn the corner, a growling sound is heard. Look up to see a monster.
In inventory, combine arrow with crossbow and then combine it with the green
bottle. Shoot the monster. Go down the stairs, move forward until you find the
remains of Lord Radu, hanging at the center of the pit. Jump forward to the
skeleton, look close and open the metal helmet. Pick up the jeweled medallion in
his mouth. You fall down the pit. Move forward and then go out. You are now at
Borgo Cemetery.
BORGO CEMETERY:
Climb out of the grave. Look at St. George’s icon with a dragon
on the snowy ground in front of it. There is a hole on it. Go around to the back
of the cemetery. Behind the crypt with chains, look close on an indentation on
the ground. Use the spade on the indentation surrounded by candles. Pick up the
broken piece of St. George’s icon. Turn right, move forward and look behind the
tombstone. Pick up the metal hand holding a cross. Put back the found icon piece
on the main St George’s icon. A sound is heard. Move back to one side of the
chained crypt, by the grave you came up from. Use Hopkins’ eyeglasses and see
the white light coming from St. George meet the red light coming from Dracula’s
crypt. Use the metal hand holding the cross on the the white light of St.
George. The chain explodes. Enter the crypt, turn right, down the stair and out
of Dracula’s crypt into the castle.
CASTLE:
Go forward 2x, turn right, forward 2x and down the stairs to
see Dorko. Look close on Dorko and she gives you warning about the dangers and
tells you that she has lost most of her powers. Click on parchment dialogue.
Dorko explains that Kazan is the chamberlain of Lord Radu, Dracula’s half
brother. He disappeared the same evening as Radu and some loyal henchmen. The
pentagram surrounding the parchment symbolizes the evil forces reigning in the
castle. The text tells of a Grand Knight of the Order of St. George buried in
the castle cemetery. A Gold Cross was cast to commemorate his feast and is a
symbol of the divine forces that can wipe out the pentagram that protects the
castle. Kazan and his men supposedly stole the cross to prevent Dracula getting
hold of it. Look close on the translated text that has 2 square-shaped holes.
Give Radu’s jeweled medallion to Dorko. She tells Jonathan that the combined
Radu’s medallion and the Dragon ring can bring about the downfall of Dracula.
The ritual to combine them can be accomplished on Dracula’s stele at his final
sanctuary but she can combine it now. Before she can do so, she was stabbed by
one of Dracula’s woman vampire and the vampire took the dragon ring. Before she
died, Dorko transfers her powers to her ring and gave it to Jonathan. The ring
will protect him from the pentagram, the forces protecting the castle.
Go out towards the cemetery, but the vampire surrounds it with
a red ring. Go across the yard and climb the stairs planked by 2 stone wolves.
Using Hopkins’ vampire eyeglasses, look close on the lock of the door and see a
pentagram. Use Dorko’s ring on the door. Enter. Move forward until the end and
pick up the rope with grapple. Go back out and while standing on the landing,
look across the courtyard. In inventory, combine crossbow and rope with grapple.
Aim and shoot it to the balcony across the cemetery. Swing over to the balcony
using the rope. Enter the door.
SMALL LIBRARY:
Go forward to the end of the room. Open the roll top desk. Pick
up the chessboard paper. Use crowbar of the inside panel on the left side of the
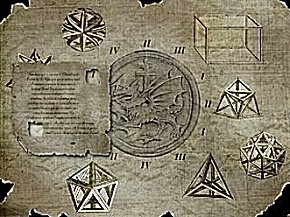
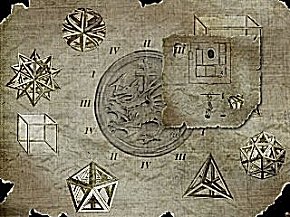
desk. A parchment rolls out. Look close on the parchment. Get the translated
parchment with 2 square-shaped holes. Click it over the desk parchment. Then
click on different shapes to move the translated parchment. Note the geometric
shapes that when selected/clicked on shows a roman numeral number on the other
squared-shaped hole. The opposite square-shaped hole will show only a part of
the selected shape. There will be 2 shapes with corresponding numbers on the
desk parchment seen. Turn the translated parchment over and do it again. There
will be 2 more shapes with corresponding numbers seen. They are I – 3
dimensional cube, II – Sphere made up of triangles, III – Pyramidoid with 4
sided base made up of triangles and IV – starburst made up of triangles.
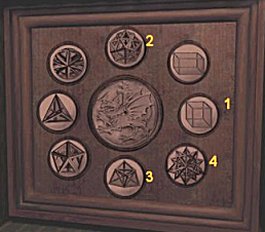
Turn around, move forward, turn right and look close at the
engraved panel between the bookcases. Click on it and a wooden frame is revealed
showing the geometric shapes shown on the desk parchment. Click on the geometric
shapes in consecutive order shown by the roman numeral number associated with
the shapes. The frame turns around and reveals the gold cross of the Grand
Knight of the order of St. George. Pick it up. Go outside to the balcony.
COURTYARD:
Swing on the rope again and jump off into the middle of the red
ring. Move forward, turn left and look close on the tomb of the Grand Knight.
Open the tomb with the crowbar and pick up the dragon medallion off the
skeleton. In inventory, combine the medallion with the gold cross. Turn around
and while wearing Hopkins’ eyeglasses, look down at the ground. A pentagram is
revealed on the snow covered ground. Use the combined cross and medallion on the
pentagram. The red ring is destroyed. Go to the atrium under the small library
and enter the door. Go to the small library.
SMALL LIBRARY:
Move forward, turn right and look close on another vampire head
lock. Use Hopkins’ vampire eyeglasses on the mouth of the vampire and see a
pentagram. Use the cross with medallion on the pentagram. Enter.
CHESSBOARD BALCONY:
Look close on the chessboard and insert the chessboard paper
found in the roll top desk underneath the chessboard. Open the red book and
using Hopkins’ eyeglasses, read the chessboard page. You will see the placements
of the chess pieces. Move the real chess pieces by clicking on the letters at
the bottom. Move the bottom black pieces first and the white piece on top last.
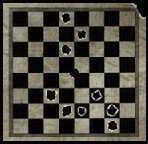
Click on F, B, H, E, A, C, G, D. Pull out the chessboard paper. The paper has
holes punched on the black and white squares tracing a path from the bottom to
the top.
Go out and down the stairs to the big floor chessboard.
FLOOR CHESSBOARD:
Look at the color arrangement of the floor chessboard and see
that the colors are the opposite of the one on the paper. From the bottom, the
paper start with white but on the floor chessboard that same place is a black
square. Looking at the paper as a guide to the path but using the opposite
color, walk on the floor. Upon reaching the middle, the floor falls and Dracula
appears and threatens Jonathan. Using the telescope, look at the door at the far
end of the room. Wear Hopkins’ eyeglasses to view the door and see a pentagram.
Use Dorko’s ring on the pentagram thus build a red bridge to walk across on. Now
close to the door, use Hopkins’ eyeglasses again to see the pentagram and use
the cross with medallion on it. Exit.
CABLE CAR:
Turn to the right, and press the button on the panel. Face the
cable car that arrived and walk to the left side of the car, turn around and
pull the lever down, platform slides out. Go back in front of the cable car.
Move forward to the cable car, turn to the right and click on freestanding box
to open the doors. Enter. Pull the lever on the right to close the door and
press the red button to start the cable car moving. The cable car moves toward
Dracula’s keep. Go out of cable car and meet Hopkins. He says that Mina is in
Dracula’s final sanctuary and he will take Jonathan there. One of Dracula’s
henchman throws a knife at Jonathan, Hopkins moved to intercept it. Dying,
Hopkins gives Jonathan the door key to the keep. Go back inside the cable car
and get the ladder. Place ladder on the back door of the cable car. Climb up,
open the ceiling door and climb out. Look up and get on the beam. Crawl towards
the keep’s door 1x. Look up on the ceiling, turn right and open the trapdoor.
Exit to the top of the Keep.
ROOFTOP OF KEEP:
Dracula’s henchmen are coming to stop Jonathan. Turn right,
move fast to get to the back of the statue at the other end of the rooftop and
find the head of St. George lying on the top of the stairs. Use crowbar on
statue. See it roll down and crush the men. Walk down the stairs and pick up a
wood plank lying across the steps. Walk down, enter the tower and get the bucket
on the floor on the left side of the cannon. Go back to the roof towards the
cannon by the outer wall and place plank across the big gap on the floor. Go
across, look close at cannon, push cannon and pick up the cannon ball. Go back
to the other side and do not forget to pick up the wood plank you used. Go down
into the gap on the roof. Turn around and look down. Pick up a dragon pennant
and pieces of wood under it. Climb out. Move forward, turn left and fill the
bucket with snow. Go back to the tower cannon. Look close at cannon. Place
bucket of snow on right square, cannon ball on middle square and dragon pennant
on the left square. In inventory, light the pieces of wood with the match and
place it under the cannon. The cannon shoots and hits Dracula’s henchman at the
other tower across the way. Go out, turn left and place the wood plank on the
gap on the walkway. Go back up the stairs and pick up the other wood beam on the
steps. Go back down and walk the first plank you laid down and then place the
new wood beam on the next gap on the walkway. Step on the second beam, turn
around pick up the first wood plank, turn around and place it on the gap . Move
forward to the other side. Enter the tower, look close on Dracula’s henchman and
pick up a flat metal strip. Go out and face the door. Use the key, Hopkins gave
you and open the door.
INSIDE THE KEEP:
Enter the elevator. Look close on the right corner and see 2
red buttons and a slit. Press the bottom red button, the elevator descend,
insert the flat metal strip into the slit, press top red button, jump out and
see the elevator rise and expose the door on the other side. Move forward and
find that you cannot exit again.
Look across and up and see that the drawbridge is up. Use
crossbow with bolts on the right rope holding it up. The drawbridge goes down,
walk across. Look and open the stand at the center of a gazebo. It has 3
markings of 3 handles. The stand has 4 drawers at the bottom. Turn to the right
and climb up the stairs. Enter and again realize that you are trapped and cannot
get out.
JACOB’S LADDER PUZZLE ROOM:
Move to your left and pick up the skull. Go back and look down
at the white steps. The first slab of stone serving as the first step has a
marking on it. Looks familiar. Open the green book and read the part about
Jacob’s ladder. It has 6 Sanskrit numbers on the picture. Step down on the
stairs using only the slabs with those markings. After going down and back up
without stepping through the arch make note of the marking on each slab. Then
starting from the first slab even to the hallway as #1, go down/click on steps
#1, 3, 6, 7, 9, 10. A sound is heard. Go through the arch, turn left and see a
hand with a handle that looks like the drawing on the stand in the gazebo. If
you pick it up the hand closes. Place skull on the hand. Use crowbar on skull
and pick up the u-shaped metal. Look close on the metal and see 2 hands forming
a handle. Turn to your right, move forward, climb down, out and up to the gazebo
landing. This is the gazebo floor below the floor with the stand. It looks like
the stand is used to pull up an elevator. Move to the right stairs and
enter.
DRAGON FIRE ROOM:
Turn left and pull chain. A drawbridge to the center appears.
Move forward. The drawbridge is pulled in and you get trapped at the center.
Surrounding the center are 6 outlets on dragon heads on the wall spewing fire
and 6 hanging chains that close the fire outlets. The open doorway is on your
back, the column with a carved stone is in front of you, numbering the hanging
chains clockwise 1, 2, 3 on your right and 6, 5, 4 on your left, pull chains 3,
5, 2, 6, 4, 1. The outlets are closed and the drawbridge appears. Move forward
to the column with a carving and pick up a handle that looks like 2 dragons. The
column turns and a door appears. Go through door and find yourself on the stand
level of the gazebo. You have gone through the 2 stairs, now move forward to the
opposite stairs going down. Enter.
LIVE ROOTS ROOM:
The room looks like it is surrounded by giant pink live roots.
Move to the center of the round room. Move forward to the pink egg-shaped thing
at the other end. Click on and it becomes transparent. Look close and see the
last handle we need for the stand at the gazebo. Pick up the handle and a
Jonathan look alike forms from the egg. Move back to the center of the round
root room. Use Hopkins’ vampire eyeglasses, turn a little to the right and
click. You will see that an aperture is feeding the egg.
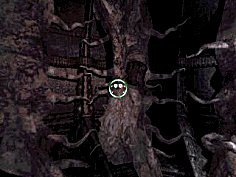
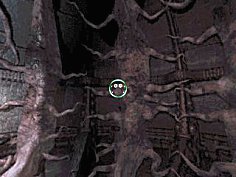
Use crossbow with bolt dipped combined with the green bottle
containing anti-vampire solution. Aim and shoot at the aperture that is opening
and closing. Still using Hopkins’ eyeglasses, look to your left and another
aperture is feeding the egg but now is protected by a metal visor.
Using the still glowing green crossbow with bolt, shoot at the
metal visor and then on the mouth. Look close at it. In inventory, fill syringe
with anti-vampire solution and inject the live root. The egg explodes. Pick the
roots handle suspended in the air. Turn around and exit the now unlocked door.
Go forward to the stand at the center of the Gazebo.
STAND AT GAZEBO:
Open the stand. Place the collected handles on each of the
holes, thus opening 3 of the bottom drawers. Pick up the 3 molds from each of
the drawers. Go back to the Dragon Fire Room by taking the stairs across from
the stand in front of you.
DRAGON FIRE ROOM:
Walk to the center and look close on the cylinder at the middle
of the bubble top stand. Open it and place the molds one on top of the other.
Open the bubble top and find holes similar to the stand at the gazebo. Go back
to the stand and pick up the handles that opened the drawers. Go back to the
bubble top stand at the Fire pit. Place the handles on the holes of the bubble
top. Close the top and turn the knob on the right of the bubble top. 2 Dragon
heads heats up the bubble top and melts the handles, it pours into the mold.
Open the cylinder with the molds and pick up the fourth handle. Go back to the
stand at the Gazebo.
STAND AT THE GAZEBO:
Open stand and place the fourth handle on the horizontal slots.
The elevator rises up. Turn around, down the stairs to the Root Room, across to
the other door and enter the elevator. It goes to Dracula’s Final
Sanctuary.
Jonathan is confronted, subdued and dragged by the female
vampires. Jonathan finds Dracula sitting on his throne on the stele and a
confused Mina. Mina asks for proof of their love. Give Mina her wedding ring.
Mina’s mind clears up and defies Dracula. Enraged, Dracula’s boasts of his
immortality and orders them dead. The 3 vampires closes in. Remembering Dorko’s
words, place Radu’s medallion on the dragon ring found on the stele in front of
Dracula’s throne. Red light emanates from it and wraps around Dracula. The keep
starts to crumble, the roof falls on the floor. St George’s statue falls through
the roof and his lance goes through Dracula’s body and he crumbles.
Is this really the end?

This walkthrough will be updated frequently.
This document may be freely distributed by any means, as long
as the content is not altered in any way and references/links are provided to
this site.
GameBoomers
Copyright © 2/14/01
Norma Kuderna MaGtRo and Ozma
38

View this guide raw, exactly as the archive holds it