Dementia – Cheats

by Len Green about 112 minutes to read


ARMED
& DELIRIOUS

WALKTHRU’s

(Also
entitled
  “Dementia
and
originally “Granny”
)

    Len
Green
:-      19
Sept. 1997
.   {updated; 2 July ’00}     
<>


This game is both totally
zany and quite complex
.

    Some players may wish to
    play it completely without ANY assistance from Walkthru’s, cheat-sheets,
    hints, or help from anybody.

    Others may want minimal
    help &/or hints. These players should use the Bare-Bones
    Walkthru
    “.

    Some may want a complete
    description of what to do for whenever they need it during the game. These
    players should use the Full
    Walkthru
    “.
    This latter contains
    not
    only
    the actions you
    MUST perform, but also a few
    which are not essential for finishing the game but provide a
    lot
    of incidental fun !

    Both walkthru’s have been
    arranged with identically numbered sections. In this way, anyone who chooses
    the “Bare-Bones Walkthru” and gets really stuck (or frustrated)
    need only go to the same numbered section in the “Full Walkthru” to get
    over the obstacle !

    Some players like to have
    printed walkthru’s (complete, or just excerpts of trouble-spots) for ease
    of use, and so as not to have to exit the game at all if any problems arise.
    Each walkthru was written in WinWord-6 (.Doc) format and utilizes
    several colors for extra clarity. Both have been designed so that in addition
    to a color printer, they can also be printed perfectly comprehensibly on
    a black and white printer. Two versions are available :- one in 14 point
    for very comfortable reading, and the other in 10 point which nearly halves
    the pages of hard copy (but, being smaller, is much more difficult to read)
    — There is also a (converted) version in 14 point HTML.

H
A V E
   F U N  W
I T H
  “G
R A N N Y
“!!

DisclaimerThese
walkthru’s were made before the game was officially released, and corrections/alterations
have doubtless been made since then ( 4th July ’00.  I haven’t
noticed any in the final commercial version ! ).
These may lead to
discrepancies re the final version — probably only minor ones.


====================================================================================

====================================================================================


ARMED
& DELIRIOUS

(Also
entitled
  “Dementia
and
originally “Granny”
)

BARE-BONES

WALKTHRU

    Len
Green
:-      19
Sept. 1997
.   {updated; 2 July ’00}     
<>

With grateful appreciation to Eyal
Kaduri
who made the excellent original
version upon which this was (almost completely) based ; to Tom
Feiner
for advice & help; and to
other members of “Makh-shevet” for their assistance
.

INTRODUCTION.

    “Armed & Delirious (Dementia)”
    is a unique Quest/Adventure Game from several points of view and well worth
    the effort of playing through to its conclusion. It is almost completely
    ‘open-ended’ and there are six Main-Worlds to explore (almost all containing
    many
    Sub-Worlds). “Armed & Delirious”, as its name infers, is pretty wacky,
    and hence somewhat difficult for all us sane (??) gamers to follow! 
    Anybody who manages to do so absolutely 100% without ANY
    walkthru, cheat-sheet, hints, or help from anybody REALLY deserves
    a prize — maybe the Distributors will send you one …… haha !?!?!?!? 
    But some lesser mortals may want just a little (or maybe quite a lot of)
    assistance. To that end there are TWO walkthru’s :-

    For very experienced Quest
    players who only need a small amount of help here and there,
    there is the “Bare-Bones Walkthru”.
    This walkthru tells you the BEST order in which to proceed
    without having to revisit Worlds and Sub-Worlds any more than essential
    (and saves quite a bit of time since they are spread over the five CD-Rom’s,
    which have to be changed frequently).  It also tells you all
    the inventory items you must collect at each site (and there
    are several dozen altogether). However, it does NOT tell you how or exactly
    where to get them or (in any way) how or where to use them,
    so it doesn’t completely rob you of the satisfaction of ‘doing your own
    thing’! If, at a particular site, you are still stuck (and there
    are several pretty tricky places like this), and you haven’t got the time
    or patience to solve the problem yourself, you can always go to the identical
    numbered section of the “Full Walkthru” which tells you in clear detail
    exactly
    what to do.

    If, however, you do not
    wish to play the game completely without any assistance,
    nor even ‘waste time’ with the “Bare-Bones Walkthru”, there is the “Full
    Walkthru”
    which is a VERY greatly amplified version and
    which tells you everything you need to do (and
    more !!
    — and in extremely great detail).

    IMPORTANT NOTE
    :-
    You can
    of course visit all the Worlds and Sub-Worlds in ANY order you choose.
    You can always move ahead, but generally only up to a certain
    limited point, since you are probably missing an essential item you need
    from somewhere else. So you often have to do quite a lot of superfluous
    ‘going backwards and forwards’ (you have to do quite a lot of this anyhow,
    even
    using either walkthru !).

    However, if you stick exclusively
    to either walkthru, you will definitely be able to finish the game,
    and via the ‘most efficient path’ : But, you will miss quite a large
    number of comic antics and a lot of amusing dialogue — these frequently
    are of a partially random nature and hence do not necessarily repeat themselves
    identically each time, but often vary according to your previous actions
    (and those of Granny !). So feel free to ‘go your own way’ !

    It’s worth mentioning that
    even these two walkthru’s are not the VERY minimum
    you need to do in order to finish the game. At many of the sites it is
    hinted that whilst you (Granny !) are there, you may as well want to do
    something which turns out to be not actually essential to
    continue the game and finish it, [ e.g. :- at (097) “Observe Granny’s
    ‘reading habits’ and note……” !! ]. Even though such actions are ‘redundant’
    to the final outcome of the game, you’ll miss some fun if
    you don’t perform them whilst you’ve been forced to go to the trouble of
    actually getting to these places (and you’ll only shorten your wanderings
    by a very few percent !!). Incidentally, you can usually
    guess when such ‘superfluous suggestions’ occur since they are generally
    incorporated into a section where there is something you
    HAVE to do in order to continue (and every
    single action
    you MUST do does have its own individual
    numbered section).

PREFACE.

    As written in the booklets
    and walkthru’s of most Quests ; pick up every item you can that is not
    actually ‘nailed-down’ — you’ll need it all (almost) later
    on. In BOTH walkthru’s, all the inventory items you must obtain
    are highlighted in bold-blue and
    underlined. In the “Full Walkthru” only, the ones you must
    use
    are in regular blue and not-underlined. (You
    are NEVER told which items to use or where in the “Bare-Bones Walkthru”).
    In this game, Granny stores all her inventory items in her bra !@#%$*&!?.
    So from here onwards, your inventory is referred to as your BRAVENTORY
    !!

    As in all Quest/Adventure
    games save VERY FREQUENTLY ! You never
    get ‘killed’ in this game (thank goodness !!), but you can VERY easily
    ‘get lost’. Unlike many games, “A. &. D.” is fully
    adapted to Windows ’95/’98, and so there is absolutely NO
    limit to the number of Saves you can make. If, as some do, you favor
    longish descriptions of your Saves :- no problem — they
    can be almost unlimited in length (there are some restrictions imposed
    by Windows ’95/’98, e.g., no front or back slashes, and no colons or asterisks,
    etc. — but they are very few and very easily spotted and avoided
    !). There are a few places where the timing is fairly critical and you
    may have to repeat a few times before getting it right — before these
    special
    situations arise, you are recommended (in green) to :- S
    A V E
    There are also a (very) few places where the
    actions are somewhat complex or ‘unclear’, and going back involves the
    bother of changing back to previous CD-Rom’s ; and hence it may be advisable
    to save — these places are marked (in green) :-
    s
    a v e
    !

    In “Armed & Delirious
    (Dementia)” there is a gimmick practically unknown in any other Quest/Adventure.
    You VERY frequently have to drag an object in a special direction
    or to a certain place. The “Bare-Bones Walkthru” does not tell you what
    to drag, how, or where ; but since you might
    overlook this action, every site in which you do have to
    drag something is marked in BOTH walkthru’s with a red asterisk,
    {e.g. drag*}, & also the instruction
    section number is highlighted in red {e.g. (007)
    }.
    The tape recorder gives
    you some ‘demented’ hints at many of the sites you visit. You can rewind,
    fast-forward, play and stop, as desired. In some screens you are informed
    that the tape recorder is not functioning (“intentionally” — those programmers
    !!!) for one reason or another :- obviously you get no ‘info’ from the
    tape recorder in those screens !
    Whenever you right-click
    on a braventory item, you obtain a large mobile illustration of the item
    and a (usually zany) written description of it &/or its use. These
    descriptions often contain (obscure) hints as to where/how you will have
    to use the item in the future !

    Usually it is very clear,
    both visually and audibly, whenever you obtain a new braventory item. Occasionally,
    however, you can pick up something without being aware of it
    ; so to avoid repeating actions and wasting time, check Granny’s braventory
    from time to time. The opposite can also happen (albeit rarely) and you
    imagine
    that you have obtained an item whereas in reality you haven’t. This can
    be very annoying, since, at a later stage when you actually need
    the braventory item you may have to return to another World and Sub-World
    and often have to change CD’s twice in the process.
    Bottom line :- WHENEVER
    you have got (or hope to have got) a new braventory item, it is
    well worth the extra few seconds to check to make certain —and
    also to view it in close-up !

    When you get the map, you
    can travel to the different Worlds and Sub-Worlds.  In order to save
    time later, here are some general notes and the appellations used (it is
    well
    worth while
    drawing your own simple rough circular diagram
    for easy reference — you will need it during the whole
    of the game
    , and the couple of minutes it takes to draw will save you
    very
    much more time later on in the game !).

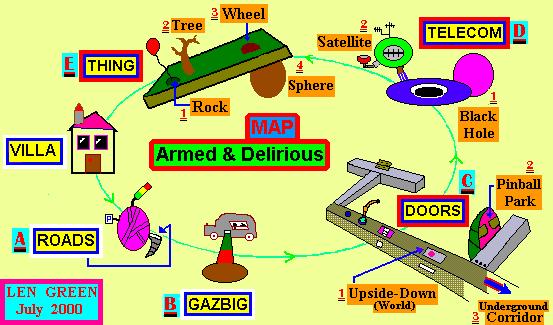
    On the map, the Worlds are
    situated on a circular track and Granny always travels in an anti-clockwise
    direction. In the following description, the numbers inside the ‘curly
    parentheses’ {} refer to the serial numbers of the CD-Rom’s concerned (not
    really necessary !). Granny’s villa is pretty obviously situated in the
    middle of the left hand circumference of this circle. Traveling anti-clockwise
    from the villa, the other 5 Worlds are marked in violet thus :-A,
    B,
    C,
    D,
    & E.     The
    villa
    itself {1}, A {2}, &
    B
    {1}, don’t contain any Sub-Worlds. The last 3 only, contain
    Sub-Worlds as follows :-

C
consists of :- C1 {4} which is the
right-hand square trapdoor (closed and with a hinged-lid).

                     
C2
{3} which is the large double swing-doored (orange colored)
vent opening.

                     
C3
{5} At the extreme right end of the platform (right-hand
bottom corner of the screen).

D
consists of :- D1 {2} which is the
‘black-hole’ (just below the center of your monitor screen).

                     
D2
{2} which is the ‘satellite’ (at the top, near the left side
of your monitor screen).

E
consists of :- E1 {5} which is the
rock (to which is attached a balloon), on the upper left of the

                                   
platform.

                     
E2
{4} which is the tree, in the ‘middle’ of the upper surface
of the platform.

                     
E3
{3) which is the wheel to the right of the upper surface
of the platform.

                     
E4
{3} which is the sphere to the right of the lower surface
of the platform.

    There is always at
    least
    one exit icon from every frame (screen) to get back to a
    previous frame, a ‘Sub-World’, a ‘Main-World’, or to return to the Map
    itself !

    SCREEN  “DESIGNATIONS”
    :-
    Whilst
    producing the game, the developers labeled each different screen and even
    location with an identification tag.  These tags consisted of the
    CD number and (almost always) a three or four character designation. 
    In most cases the characters bear some similarity to the name of the location
    (as on the map).

        
    It is no exaggeration to say that “Armed & Delirious (Dementia)” can
    be mighty bewildering.  Hence these identification tags have been
    made available to any player who wishes to access them.  Simply type
    <Ctrl+R> any time you wish, and they will appear in the top right corner
    of your

    screen (and remain there
    highlighting all the different locations until you exit the game).

        These
    tags will not be of much use with this walkthru, nor should they be necessary. 
    However they can be of use with the UHS-Hint File (written by the
    same author) and a walkthru released by the publishers.


************************************************

If you do not wish to
use the “Full Walkthru

:-

BELOW
IS THE
BARE-BONES
WALKTHRU
“.

************************************************

GRANNY’S
VILLA
.

(001) The game proper
starts ! Find the kitchen.

(002)
Click on the chair on the right, don’t let go of the button, and move the
drag cursor* to the far left of the
screen (wherever in the game you ‘find’ a drag icon, you have to decide
where to drag that specific item ) — Granny moves the chair towards the
cupboard.

(003) Get the snorkel
.

(004) Find the hallway.

(005) Go to the attic.

(006) Get the bottle
of brandy
.

(007)
Get*
a bucket.

(008) Click on the
bucket — your cursor will change to a bucket icon (whenever this happens
in the game, it means that this particular item is used on something/someone
in
that SAME screen
). Use the bucket icon on the running worm until you
catch the worm — you get color worms in a
bucket
.

(009) Find the bathroom.

(010)
Observe the antics of the ‘mad cow’ (no … NOT Granny), and find a way
of dealing with her* !

(011) Is Mrs. Cow
short sighted or something ??

(012) Wowww …..
Get the sun tan lotion .

(013) Find the dining
room and browse around !

(014) Obtain a
flying-casket
.

(015) Get the porno
magazine
(somebody’s going to want some ‘light’ reading
sometime/somewhere !!).

(016) Go to the bedroom
………………………

(017)
………….
and hear something of the ‘bio’ of Granny’s first husband*
!

(018) What’s the good
if she can’t open the jar ??

(019) Ahah ……
help at “hand ?”. Get Granny’s essential anti-dizziness
pill
.

(020) How to get out
of there ???

(021) The exit brings
you to ‘George’s secret room’. Have a nosey around —there’s lots there
!

(022) What is that
weird looking device at the bottom right hand corner of the screen (cut
scene !). The telephone is a pain in the neck, but it won’t hurt to answer
it a few times !

(023) But there are
more interesting things in there than that !!

(024) Get George’s
tape
recorder
—- THIS ITEM IS IMPORTANT, since George’s
recordings will give you clues (albeit obscure clues !) later on about
many, although not all, of the screens you’re in. Now return to the bedroom,
the dining room and finally the hallway.

NOTE.
Operate
the tape recorder from time to time in the (many) different places you
visit and listen to George’s “diary”. If you haven’t done so already, view
all
items in your braventory (mouse:- right click) &
read
the written captions below them – they may contain wacky hints ?

(025) Find a
plunger (with a bell
)
in the hallway. — Where is it hiding
out ?

(026)
Get it* !!

(027) Go to the washroom
and have a VERY good look around !

(028) Get an
electric button
— a bit tricky picking it up sometimes
!

(029) Get both
a
coat hanger
and
a
scarf
(simultaneously).

(030) Get Granny to
drive her incredible ‘washing-flying machine’ out of the washroom and “into
the great beyond” ! ( Before she can do this she has to find a way to lever
up the rails so that they don’t impede her progress. This is easy, but
keeping
them
up is more problematic! If the rails don’t remain
up, check that you have all of the following items
:- a snorkel ; color
worms in a bucket
; a bottle
of brandy
; sun tan lotion
; a flying casket ; a
coat hanger
; and a scarf).

(031) Gaaassssssssssssssss
………………

(032)
F u l l   T h r o t t l e ……………………. Now*
you get cut scenes of Agent Rabbit, one of his henchmen, astronaut-Granny
in orbit, finishing with a map of the Worlds with Granny in her incredible

washing-flying machine at
the villa.

NOTE.
Operate
the tape recorder again (hints !?).

THE
MAP
.

(033) See the description
at the end of the Preface and the map-graphic … above.

B.

(034) Granny goes
to
B, but due to age and dizziness,
quickly falls off — but somehow or other she acquires
a
chit
in the process !

(035) Return to B
and find out what seem to be the (only) two interests of the ‘guy in the
van’ and his companion (clues for the future !!?). Get the rubber
band
. Try to catch that obnoxious chicken ?!?!

(036) Get the half
a compass
whilst at B.

(037) Get a dream
maker capsule
whilst still at B.
………….. and exit !

D
& D1
.

(038)
Granny goes to D
and then direct to D1. A giant toilet
!  Get the dark brown boulder out of the way*.

(039) Use something
to ‘make a path’ —– for whom ??

(040) Hey ……….
you dig this, man ?

(041) …………..
again and again !!

(042) Get the critters
to change direction — this is a bit tricky ( and a nice touch !!!)

(043) Go to the eerie
forest, which has several exits …….. exit top left.

NOTE.
Operate
the tape recorder again (hints !?).

(044) Bo and Chuck
and a hopping kangaroo! Use the wedge shaped golden colored object on the
ground.

(045) Use one of the
planks……….

(046) Get Granny to
interact with the ‘seesaw’.

(047) Get a baby
carriage
(but not the baby !!).

(048) Return (using
appropriate exits) to the map.

B.

(049) Return to B
….
fishing time !! …. Make a ‘deal’ with the guy and get
a
hammer and music notes
.

NOTE.
Operate
the tape recorder again (hints !?).

D
& D1
.

(050) Go back to
D1
, and the kangaroo etc. Take the (only) other exit.

NOTE.
Operate
the tape recorder again (hints !?).

(051) Oboy ! A bit
of S & M going on here (that bluish colored masochist !!!). Find a
way to cause the cart to run out of control.

(052) Use something
to enable the weird green creature to ‘get his/her turn’ !!

(053) Whilst attention
is drawn away from Granny, seize the opportunity to get a
blow dryer
.

B.

(054) Return to
B
….. ice-age !! ….. How can you barter with him again ? 
You get a china plate.

C.

(055)
Go
to C and then to
C2
. Proceed through the center screen exit and enter into the
‘Pinball-Park’.

(056) There are 4
exits from Pinball-Park, as follows :- near the center of the screen, and
from left to right, [i], [ii], & [iii] ; and the ‘return exit’ at the
top right hand corner of the screen. Go to [i].

(057) ‘Sexy’ weapons
shop !! Nose around, eat, and get earphones.

NOTE.
Operate
the tape recorder again (hints !?).

(058) What’s the owner
doing ? — Hohoho ! … Get him to attend to Granny !

(059) Practice first
on an automatic weapon !  The owner gives ‘instructions’.

(060) Use another
weapon ; Granny only needs, and gets, a bullet
(She needs a braventory item to do this !).

(061) Exit the weapons
shop. Granny gets mugged but soon turns the tables on the mugger !

(062) Go to [iii].
Enter the bar. Try the toilet, etc.

NOTE.
Operate
the tape recorder from time to time in the (many) different places you
visit and listen to George’s “diary”. If you haven’t done so already, view
all
items in your braventory (mouse:- right click) &
read
the written captions below them – they may contain wacky hints ?

(063) What can be
done with that toilet door ?    S
A V E
!

(064) Granny wants
to join the card game. How ??

(065) Join the game.

(066) Shuffle and
start playing cards ….. get the translator
….. leave the bar.     s
a v e
!

(067) Exit the ‘Pinball-Park’
and go to C3.

(068) Try the toilet
?! Step forward and scrutinize the very strange floor.

(069)
This floor is double layered*
??

(070) Try the door
with the grille. A prison ??

(071) That darned
video camera !!

(072) Enter the ‘security
complex’ …. and get kicked out !

(073) Enter the prison/asylum
area again. The guard is quite busy on the phone (clues ?), etc. ‘Deal’
with him !

(074) How can you
get into the cells ? ………..

(075)
……… and what does Granny want to do*
when she gets in ??

(076) Get a
telescope
.

(077) Exit the ‘security
area’ (NOT via the door !).

(078) “The hairdresser
and the hedgehog” ……. Browse !

(079)
How to get rid of that effeminate hairdresser*
?

(080) Is Granny feeling
tired ?

(081) You’ve
still
got to get rid of that hairdresser !!

(082) Now Granny’s
got to eject Mrs. Hedgehog from her chair !

(083)
How
can you discover* the entrance to the
‘plants — underground command center’ ?

(084) Go to the ‘fan(ventilator)-chamber’.

(085)
Where do you proceed from here* ?

(086)
And how* do you accomplish this ?

(087) You’ve now entered
the plants’ underground command center.   ………..  Do
something !

(088) Go in &
out a couple of times. Listen to the plants’ words of wisdom ?!

(089) Get the double
mirror
. Chief-Plant will insist on briefing Granny …………
(clues ??).

(090) Use something/somewhere.

(091) Get a
pendulum
. (not the large hanging pendulum but the small
standing metronome !).

(092) Return all the
way back to the long (purple colored) corridor.

(093) Granny wants
to enter the library, but it’s closed from 12:00, to 11:59 or maybe even
12:00 !! There’s a notice saying that it has moved to other, completely
unspecified, premises! A bit difficult hey??

(094) Converse with
the two weird creatures ‘Yellow’ and ‘Brick-Road’.    S
A V E !

(095) “Follow the
yellow bricks road”. This is a bit tricky, although ‘if at first you don’t
succeed ; try, try, try again’ !?! …….. If the worst comes to the worst,
‘cheat’ by looking at (095) in the “Full Walkthru”.

(096) Enter the library.

(097)
Observe Granny’s ‘reading habits’ and note the large crack in the floor.
What a taste in literature Granny has !?  Find a way*
to open up a new exit.

(098) Take this exit.

(099)
Look for a braventory item*. You get
a
screw
.

A.

(100) Leave C3
and C. On the map, go to A.

(101) Try the door
at center screen a few times ………. Aliens — Arggh !

NOTE.
Operate
the tape recorder from time to time in the (many) different places you
visit and listen to George’s “diary”. If you haven’t done so already, view
all
items in your braventory (mouse:- right click) &
read
the written captions below them – they may contain wacky hints ?

(102) What else is
worth clicking on ?

(103)
Do some dragging*. Where to now ?

(104) How to proceed
from here ?

(105) How to get past
that parading guard ??    S
A V E
!

NOTE.
Operate
the tape recorder again (hints !?).

(106) If you haven’t
got past the guard yet, try ‘operating’ something very close to where Granny
is standing and to where the guard keeps returning !!

(107) How can you
neutralize the second guard ?

NOTE.
Operate
the tape recorder again (hints !?).

(108) Find the strange
garden with a peculiar flying creature hovering in the air.  S
A V E
!

NOTE.
Operate
the tape recorder again (hints !?).

(109)
This is a bit more tricky. Time for dragging*
!!

(110) You need to
be pretty destructive here ……………

(111) …………
And even more destructive to squash that flying critter ! Get his corn
flakes
.

(112) Exit to the
map and return to B.

B.

(113) Do some ‘cookery’
and obtain spiced corn flakes
!

(114) Those denizens
of this strange world love food ! You can get an air
bubbling pig
(of all things !!).

(115) Try a bit of
‘hypnosis’. You can get an airy chicken
(What next !!).

(116) The guy is reading
something — ‘Help’ him, and he gives you the worms
poster
he was looking at (what a lousy deal ??).

E.

(117) On the map,
go to E and then to E1.

NOTE.
Operate
the tape recorder again (hints !?).

(118)
What looks as though it can be dragged*
?.

(119)
And what else ?*.

(120)
Drag* two objects together.

(121)
Repeat (118)* — “what a drag” !!

(122) Take the new
exit. You are in an underground cavern with a lagoon. Browse around a bit
but don’t exit yet.

NOTE.
Operate
the tape recorder again (hints !?).

(123) Get Granny to
manufacture a mobile !

(124) Get a fish
tank
.

(125) Granny exits
and arrives into a pastoral scene (and music !). Converse and look around.

NOTE.
Operate
the tape recorder again (hints !?).

(126)What
can you drag here ?*. A lake emerges.

(127) And what/who
would be quite pleased to use it ?

(128) Get a
round green creature
.

(129) Return, more
or less the way you came (to the well). Go to the gas-station.

(130) ‘Sniff’ around
the area.

(131) Operate whatever
you can, and see what happens.

(132) You will have
to click on something THREE times (Quite a show !).

(133) You get a
baseball cap
(better than some previous exchanges ??!).

(134) Return to the
well and find a different exit. WOW ! some huge guy — a
real
giant

in fact !!

NOTE.
Operate
the tape recorder from time to time in the (many) different places you
visit and listen to George’s “diary”. If you haven’t done so already, view
all
items in your braventory (mouse:- right click) &
read
the written captions below them – they may contain wacky hints ?

(135) Keep him ‘occupied’
with one of your possessions (what could a giant possibly want ??).

(136) You take a
giant belt
.

(137) Find a different
exit and arrive in a sort of Einsteinian chamber with a pseudo-cosmonaut
floating around in space.    s
a v e
!

(138)
Look around this place and try to figure out how things work. Drag*
whatever and note what happens to the ‘cosmonaut’.

(139)Drag*
something again. See what changes !

(140)
Drag* something yet again — and again
see what changes !

(141)
Drag* something else. Granny grabs
something and gets moving !

(142) Granny finds
an ‘air raising’ solution that should revive the guy — he may then give
Granny some “hints”.

(143) Click on something
and get it to start moving.

(144) You get a
memo (echo) machine
.

(145) Granny exits
(at least she gives the guy back his helmet !!) …. back past the giant
….. the well …..  exit (right side of screen) to E.
Go to E3. Phew — what pollution …..
what a stink !    s a v e
!

(146) Get moving pretty
quickly ….. if Granny stands there too long she gets literally ‘carted
away’ back to E.  DO SOMETHING
to avoid her getting asphyxiated —–> Peg-Nose !!!

NOTE.
Operate
the tape recorder again (hints !?).

(147) Exit — Take
a look around the broken conveyer-belt machine.

(148) Exit and go
to a smelly pool with grandpa tied up in a large transparent blue plastic
sack — (nuclear waste ??).

NOTE.
Operate
the tape recorder again (hints !?).

(149) Get old grandpa
moving
!

NOTE.
Operate
the tape recorder again (hints !?).

(150) Return to the
conveyer-belt machine. Use an appropriate item from your braventory ………

(151)
……….. And another appropriate item.

(152) Place a suitable
item from Granny’s braventory onto the conveyer. — a cut scene, finishing
with the old man still in his bag, on the ground !!

(153) Get grandpa
in bag
. (Hey there ! — what a thing to possess !! —-
in Granny’s braventory ?!?).

(154) Exit bottom
left ; right ; then just above mid screen (don’t take the right hand exit
just yet !) to E. From there go to
E4.

(155) Granny rests
her weary limbs and resents those grungy kids on their roller-blades, especially
the
ones with dynamo operated ‘head-lights’ that dazzle !!   S
A V E
!

(156)
How
can Granny put paid to those kids ?  Some more dragging*
! (this can be a bit tricky — but “if at first …. etc., etc.”) —
nasty, nasty, nasty !!

(157) Granny uses
a very suitable item from her braventory to make some amends to the girl
!!??

(158) You get a
dynamo
.

(159)
Drag* !!! W—O—W !  Can old
grannies REALLY do that ?

(160) Get Granny to
regain consciousness (or maybe just wake up) !

(161)
Drag* something and maybe you’ll get
a windscreen-wipers-lever ???

(162) Get Granny to
do some ‘work’ (for a change !).

(163) Get a
light bulb
.

(164) Exit and enter
the last house on the right.    S
A V E
!

(165) Although giving
the game away’ a little, the next actions include grandpa (even though
he’s in the bag !?).

(166) What to do with
him (or on him) next ?

(167) What’s with
those three antiquated goons sitting round a table, drinking and nattering
?

(168) You get a
tablecloth
.

(169) Obtain a glass
of old liquor
.

(170) Exit from (someone’s
old parent’s ??) house.

(171) Now go to the
end ‘house’ at the very end of the road, facing Granny ! Whether you like
it or not, you get a slide show of the game’s credits (including the guy
who wrote this walkthru !).

{ Some gamers can’t be bothered
wasting their time with credits — can you blame them ??  If you’re
one of these, simply right-click them into oblivion ! }

   Whether you
‘appreciate’ credits or not, you get a metal crowbar.

(172) Exit to E.
From there go to E2.

NOTE.
Operate
the tape recorder from time to time in the (many) different places you
visit and listen to George’s “diary”. If you haven’t done so already, view
all
items in your braventory (mouse:- right click) &
read
the written captions below them – they may contain wacky hints ?

(173) Listen, talk,
and generally socialize with the tree (and its ‘friend’). But how to get
past it ??

(174) You need to
do something in front of the tree (If it doesn’t ‘succeed’ first time,
you can repeat it as often as you need to).

(175) Click on the
bike and you’re off.     S
A V E
!

===================

(176) |~ There are
8 (small, & quite ‘easy’) ‘actions’ you have to do here ;

(177) |~ They are
all in this same frame (lamp, table, mail-box, etc.).

(178) |~ HINT:-
There is NO dragging to be done here.

(179) |~ You will
have to use (up) 2 of Granny’s braventory items …..

(180) |~ ….. it’s
not too difficult to guess which are ‘appropriate’.

(181) |~ BOTTOM
LINE
You get folding
steps
!!

(182) |~ If you get
stuck for too long, maybe get help from the

(183) |~ “Full Walkthru”
(where you are told exactly what to do and in very full detail
; together with descriptions of what happens and why !).

===================

(184) Exit and return
to that revolting tree !

(185) Click on the
skateboard and travel to the woodland.

(186) Take the path
that leads to a ‘tree’ (an orchestra-conductor, complete with baton), with
a gabbling crowd in the bottom left corner of the screen.

NOTE.
Operate
the tape recorder again (hints !?).

(187) Try to take
the top box to the right of this tree …. BUT …. apparently, “no singing
— no prizes” !! What to do ?

(188) Use a braventory
item.

(189) You get a Jack-in-a-box.

(190) Exit and go
to a strange terrain where a never ending stream of ‘Humpty-Dumpty’ like
tree characters on skateboards seem intent on committing suicide ! S
A V E
!

NOTE.
Operate
the tape recorder again (hints !?).

===================

(191) |~ There
are 6 ‘actions’ you have to do here — all in this same frame.

(192) |~ HINT
:- There is ONE dragging* action to
be done here.

(193) |~ You will
have to use (up) only 1 of Granny’s braventory items…..

(194)
|~
BOTTOM
LINE
!  You get a horn
!!

(195) |~ If you get
stuck for too long, maybe get help from the

(196) |~ “Full Walkthru”
(where you are told exactly what to do and in very full detail
; together with descriptions of what happens and why !).

===================

C.

(197) Exit to E.
Jump off onto the map. Go to C and
then to C3. Take a single step forward.
s
a v e
!

(198) Enter the second
(orange colored door) room on the right. You are in some sort of workshop/laboratory.
A strange professor receives a communication via the system of tubes on
the rear wall. A mad ‘boat race'(??) crashes in and out of the room !

(199) Talk to the
professor !?  Get the weird animals to go berserk and scamper off
— If you wish to ‘punish’ Granny for her behavior, get her to touch the
small box just above the handle !

(200)
Drag* something in the room.

(201) Use a braventory
item and watch the show …..The prof’ exits pronto !!

(202) You get a
whistle
.

D.

(203) Exit via the
closet ; Step backwards ; exit through the first door on the left to C.
Jump off onto the map. Go to D and
then to D2.    s
a v e
!

===================

(204) |~ There are
6 ‘actions’ you have to do here — all in this same frame.

(205) |~ They are
all various clickings on objects (some more than once !!)

(206) |~ NO
braventory items or draggings are involved here !

(207) |~ BOTTOM
LINE
A
new door opens up. Exit via this door.

(208) |~ If you get
stuck for too long, maybe get help from the

(209) |~ “Full Walkthru”
(where you are told exactly what to do and in very full detail
; together with descriptions of what happens and why !).

    You enter
a room where a supervisor is scrutinizing a TV set and frequently answering
a phone. A mouse emerges periodically from a wide tube into a box below
!  Granny would like to get near to the TV set, but ………. no
go !

===================

(210) Do something
about it ?!?

(211)
Drag* something then sit back and wait
to see what happens to the supervisor —– poor fella !!

(212) What
to do now ?!?

(213) You get a
mouse
.

(214) Go into the
dressing room. Look around and get to know the striptease artiste (Zink
Flusik — !?@#$&%!?!).

(215)
Drag* something.

(216) Another action
— in the same room.   S A V E!

(217) You have to
do something & then your next action has to be QUICK
!!

(218)
A VERY quick drag* (ha
ha) …You may have to repeat this 2 or 3 times.

(219) Pick up the
model’s
clothes
.

NOTE.
If
you haven’t done so already, view all items in your braventory
(mouse:- right click) and read the written captions below
them — they may contain wacky hints ??

(220) Exit the dressing
room and back to the supervisor’s room.   S
A V E
!

(221) Do something
and pretty quickly proceed to the next action.

(222) Granny finds
herself in a ‘fork & shopping-cart’ contest !

(223) This short game
can best be ‘won’ by using the 4 arrow keys on the keyboard rather than
the mouse. For more details (if you need them) see the “Full Walkthru”
(223)
. You may do it first time, or it may take you many attempts —
but don’t give up if you find it somewhat tedious — you’ll succeed sooner
or later!!

(224) For all your
efforts, you get the bottom part of a hang
glider
— of all things !!

(225) Return to the
platform with those shutters, etc.

(226) Find a way to
get transported to an ‘electrified room’. Try entering the laser room —
serves
Granny right !!

(227) How can you
enter that room just the same ?

(228) Try again
and
Granny succeeds in stepping into the room but becomes invisible
!!

(229) You have to
‘open up’ a new exit !

(230) Again you have
to be fairly quick !!

(231) Exit to the
rabbit’s ‘residence’. Poke around things there — particularly the candy
machine and the bubble-gum machine. Where/how do you get a horn
connected to a whistle
??

(232) Use ‘whatever’
!! Interesting results ……… !

(233) Granny reverses
backwards to the ‘invisible-electric’ room. You get a
smelly cigar
.

(234) Examine the
entrances into the house. Mr. Rabbit himself ……….. scampers away
before Granny can get to him ! Look around and about.

===================

(235) |~ There are
6 ‘actions’ you have to do here — all in this same frame.

(236) |~ NO
braventory items are involved here, but there is 1 drag*
action.

(237)
|~
HINTS
:- Granny has a mud bath, & some very youthful
aerobics !

(238) |~ OBJECTIVES
:- 
(A) Get a squeegee.  
(B) Get onto the exercise bike.

(239) |~ If you get
stuck for too long, maybe get help from the

(240) |~ “Full Walkthru”
(where you are told exactly what to do and in very full detail
; together with descriptions of what happens and why !).

===================

(241) Get into a weird
red ‘vacuum’ room.

===================

(242) |~ There are
8 ‘actions’ you have to perform here — the last one only
needing fairly rapid speed ;

(243) |~ They are
all in this same frame (a sort of red ‘vacuum room’).

(244) |~ NO
braventory items or draggings are involved here !

(245) |~ BOTTOM
LINE
You get a Master
key
!!

(246) |~ If you get
stuck for too long, maybe get help from the

(247) |~ “Full Walkthru”
(where you are told exactly what to do and in very full detail
; together with descriptions of what happens and why !).   S
A V E
!

(248) |~ The last
‘action’ ONLY is a bit tricky and has to be done quickly,

(249) |~ so save frequently
and
particularly before the last but one ‘action’.

    If you
get the timing right, the whole room contracts and expands ; Granny is
swiveled to the left ; and you get the key. You may be lucky and succeed
first time or you may have to repeat a few times — but you’ll get there
! (N.B.
You may not notice that you actually GOT the
key, but if the abovementioned phenomena took place, then you DID. It’s
very
well worth while
just checking in Granny’s braventory to make absolutely
sure — you don’t want to have to make the very long
journey specially all the way back to here again, and then have to repeat
all
of this again, some time later in the game !).

===================

(250) Exit, exit,
etc. !  Travel from D to A.
Go into the room with the two ‘slumbering guards’.

A.

(251) What can be
done about that filthy mirror ?  Granny knows !

(252) You get a
diamond
.

(253) Exit, exit !
Go to E and from there to E2
You’re back at that drowsy tree again.

E.

(254) Something about
that yawning tree !?

(255) DO something.

(256) And again !

(257)
Find something to drag*. WHAT; yet
another room !! Wander around.

(258) Something here
may give you a clue as to what to do next ?

(259) You get a
long sheet of paper
.

(260) Back to the
yawning tree.

(261) Use the skateboard.
Back to the woodland again.

(262)
Drag* something — Granny is now in
the Rabbit’s (Alice in Wonderland type) stock exchange.

NOTE.
Operate
the tape recorder from time to time in the (many) different places you
visit and listen to George’s “diary”. If you haven’t done so already, view
all
items in your braventory (mouse:- right click) &
read
the written captions below them – they may contain wacky hints ?

(263) Make a cheeky
action !?

(264) And another
?!

(265) Create an
illusion of diamonds
. (A crafty way of multiplying one diamond
into many — a stock exchange gambler’s mirage !!).

(266) Illusions can
sometimes be constructive !

(267) You get exploding
boxes
.

(268) Go to D
and from there to D1. Go back to that
eerie forest again.

D
& D1
.

(269) You come upon
an old geezer snoring away despite the fact that he has an ax embedded
deep in his head !?!?  Examine the terrain.

NOTE.
Operate
the tape recorder again (hints !?).

(270) Observe the
‘bubble of thought’ emerging from his ‘open mind’ !

(271) Get ready for
brain surgery !!!

(272) What ‘anesthetic’
might be suitable ?

(273) The next actions
have to be done pretty quickly !   S
A V E
!

(274) “The laundress
and the tunnel”.
  This is a whole ‘scene’ involving several actions
but no braventory items (either given or received) and no ‘dragging’. 
Some of the actions have to be performed fairly quickly. If you ‘slip-up’,
you start all over again — but it’s fairly easy and you get as many tries
as you want. If you succeed, you automatically get transported to the next
stage of the game. If you get stuck for too long, maybe get help from (274)
of the “Full Walkthru” (where you are told exactly what to do and
in
very full detail
; together with descriptions of what happens and
why !).

(275) Granny would
like to get to the guy in the chair but the billy-goat isn’t having any
!

NOTE.
Operate
the tape recorder again (hints !?).

===================

(276) |~ There are
8 ‘actions’ which you have to perform here — there is NO dragging to
be done ;

(277) |~ They are
all in the same frame (That ghastly guy in the chair !)

(278) |~ HINT:-
You will have to use two of Granny’s braventory items.

(279) |~ BOTTOM
LINE
You get underpants
!!

(280) |~ N.B. 
It’s all a bit chaotic, but if you keep on clicking you’ll succeed.

(281) |~ Incidentally
:- Sometimes, when Granny is close to the guy, it goes better if you move
her anywhere away from him !

(282) |~ If you get
stuck for too long, maybe get help from the

(283) |~ “Full Walkthru”
(where you are told exactly what to do and in very full detail
; together with descriptions of what happens and why !).

===================

(284) There is one
‘game’ you can play here — it’s pretty easy !

(285) ‘Play’ it !
If you get stuck for too long, maybe get help from (285) of the
“Full Walkthru”.

(286) Success in the
game creates a new exit.

(287) Take it ! 
You are now in a place where a workman is using a pneumatic drill on a
giant snail.

(288) Granny keeps
shaking and falling down. What does she need to overcome this ??

(289) Do something.

(290) And something
rather similar.

(291) And something
else of a somewhat similar nature.

(292) You get a
mushroom
.

(293) Take the ‘new
exit’. You are in Melanie’s room. Roam around ?!?

===================

(294) |~ There are
9 (small, and quite ‘easy’) ‘actions’ you have to do here ;

(295) |~ They are
all in this same frame (Melanie’s room).

(296) |~ HINT
:- There is NO dragging to be done here.

(297) |~ { Quite a
bit of ‘fun’ with “toasted-bugs” or whatever ! }

(298) |~ You will
have to use (up) 2 of Granny’s braventory items…..

(299) |~ BOTTOM
LINE
You get a family
album
!!

(300) |~ { This album
comes from a weird creature you can’t get to directly
}

(301) |~ If you get
stuck for too long, maybe get help from the

(302) |~ “Full Walkthru”
(where you are told exactly what to do and in very full detail
; together with descriptions of what happens and why !).

===================

(303)
Drag* something which causes Melanie
to fly to … ?? … ??   s a v e
!

(304) Exit, exit,
etc. ! Go to the Villa.

GRANNY’S
VILLA
.

(305) Enter the villa. 
Go to the washroom. You get a ball filled with
water
.

(306) Exit the washroom
and the villa’s front door. Go to C
and then to C1.

C
& C1
. — (The
Upside-Down World
).

(307) Granny falls
down the elevator shaft.

NOTE.
Operate
the tape recorder from time to time in the (many) different places you
visit and listen to George’s “diary”. If you haven’t done so already, view
all
items in your braventory (mouse:- right click) &
read
the written captions below them – they may contain wacky hints ?

(308) Look around
the elevator ‘foyer’. Try whatever !

(309)
You’ll have to do* more than that to
make something really happen to that foyer ???!

(310) Again try various
things to see what happens, and try to get something going !

(311) Do whatever
necessary, and explore the various floors.

(312) Get to the floor
where the action really takes place !

(313) Get moving
!!!

(314)
And
onwards* !

(315) Get into a REALLY
upside down room with Granny upside down also !! Notice the rabbit —
who/what is he ?

NOTE.
Operate
the tape recorder again (hints !?).

(316)
Get to know the place. Drag* something
in order to move on.

(317) And now exit.

NOTE.
Operate
the tape recorder again (hints !?).

(318) You are now
in a room whose stairs are arranged crazily. Note who and what rushes in
and out and why ! You need to use something here.

(319) This enables
you to use something else.

(320) A braventory
item is needed.

(321)
A dragging* action will finish off
this scene by getting rid of the characters involved !!

(322) Exit and ‘converse’
with the creature on the ceiling/floor.

(323) Try something
which disproves Newton’s law of gravity !

(324) Get to a very
dark place.

(325) Cause something
to happen and see what it is when you return to the room below !

(326) You get a
lampshade
.

(327) Fit something
Granny’s been carrying.

(328) Cause Granny
to travel.

NOTE.
Operate
the tape recorder from time to time in the (many) different places you
visit and listen to George’s “diary”. If you haven’t done so already, view
all
items in your braventory (mouse:- right click) &
read
the written captions below them – they may contain wacky hints ?

(329) She is in some
sort of machine room. As always, poke around and keep your eyes and ears
open. N.B. Keep a half an eye on the cat and the goldfish.
Try to get something.

(330) You get a blueprint.

===================

(331) |~ There are
6 (small, quite ‘easy’) ‘actions’ you have to perform here ;

(332) |~ They are
all in this same frame (the machine room).

(333) |~ NO
braventory items or draggings are involved here !

(334) |~ BOTTOM
LINE
You get a weird
fish
. {Check your braventory to see you’ve really got it
!}.

(335) |~ If you get
stuck for too long, maybe get help from the

(336) |~ “Full Walkthru”
(where you are told exactly what to do and in very full detail
; together with descriptions of what happens and why !).

===================

(337) Exit to the
fourth floor corridor. Get to A VERY STRANGE ROOM INDEED !! Some
crazy architect has somehow split it horizontally along the middle —
goodness only knows how or why ?!?  This time, have a very
good look around (if you want to make ANY ‘sense’ of what is to happen
??). Granny can also take a shower here if she so wishes !?

NOTE.
Operate
the tape recorder again (hints !?). S
A V E
!

(338)
There is a round metallic looking knob on the floor near the bottom middle
of the screen. Click on it — anything significant happen ?  Drag*
it to Granny.  N.B.  It is ESSENTIAL
that you do this HERE, or you could be in very serious trouble later
(a nasty ‘dead end’ !!!).

(339) The set up here
is absolutely zany ! Granny has got to get ‘upstairs’ (talk
about “split level” !).

(340) Quite a bit
of ‘fun and games’ to achieve this !

(341) She would like
to get to the right hand side of this floor but the artist won’t let her
………… it spoils his ‘concentraaaaation’ !

(342) She will have
to distract him with one of her possessions. From his talking and singing,
it’s not difficult to guess what would appeal to him !

(343) Notice that
that there is a ‘counterpart’ chest of drawers on the upper level !

(344) And also an
‘ancient Russian fireplace’ on both ‘floors’ !

(345) There IS a somewhat
shorter method to get rid of the artist than the one described in the “Full
Walkthru” (see 345) !! Maybe you’ve found it ?!?  
But you miss a fair bit of the ‘fun’ !!

(346) Get rid of that
weirdo on the right of the camera !@#$%&? .

(347) You get a
camera (with a backwards flash)
.

(348) Granny has apparently
“missed her waxing appointment” ?!!

(349)
Drag*
something. Granny arrives at a ‘Hungarian cube’ with its crazy architect.
Inspect ! Why no electricity ? Wires disconnected ??

NOTE.
Operate
the tape recorder again (hints !?).

(350) Make part of
the cube rotate in one plane !

(351) And now another
part in a different plane …… Country and Western music, & dancing
red boots ! At least the cube looks a bit more ‘normal’ now!

(352) The architect
is obstreperous. What has he lost ? Oh yes — give him something ‘useful’
(not that it seems to actually help him much !).

(353) Muffle the music
(how ?) and make the red boots stop dancing and become more accessible.

(354) You get red
dancing boots
.   s
a v e
!

(355) Exit, exit,
etc. (some exits are a bit ‘trickier than usual’) !  Go to E
and then to E3.

E
& E3
.

(356) Exit and arrive
at George’s office. Click on him many times to get him to
pay any serious attention —- you’ll hear just what he thinks of his mother
(and vice versa) !!!

(357) Since (according
to Granny — his mother) George is only interested in “money and young
women”, get Granny to act the part. NOW George really pays
attention and opens up his inner sanctum !

NOTE.
Operate
the tape recorder from time to time in the (many) different places you
visit and listen to George’s “diary”. If you haven’t done so already, view
all
items in your braventory (mouse:- right click) &
read
the written captions below them – they may contain wacky hints ?

(358) Use something.

(359) Can you photograph
George ? ……………. Sure !!

(360) O.K. …………
and
George REALLY launches into orbit !!!!

(361) Look around
carefully. You get a suitcase (with a sock
credit card
)
{it’s rather difficult to see !!}.

(362) Exit and go
to the villa.

GRANNY’S
VILLA
.

(363)
Go back to George’s secret room { see (021) }. Drag*
something.

(364) Granny must
cause dark red curtains to be drawn revealing a sophisticated missile of
some sort.

(365) She tinkers
with gadgetry. Whooommmfff. ——– Hatch closed ————
Take off !

(366) You get a
football helmet
. — If the bed comes crashing down and
stops Granny from getting the helmet (you can try it if you like !!), don’t
worry — you can very easily get it to retract again !

(367) Exit, exit,
etc., and return to A.

A.

(368) Open the double
fawn colored doors at the top of the (static) staircase.

NOTE.
Operate
the tape recorder again (hints !?).

(369) Granny is given
‘instructions’ “for the sake of security”.

(370) She does what
she is told — for what it’s worth !!! — and is informed that she can
begin the game.      S
A V E
!

(371) This may be
a bit tricky (though sometimes extremely easy), but
not really hard. As always, you can repeat as often as you need. 
(HINT :- If you have trouble, sun tan lotion may assist !!).  If you
get stuck for too long, maybe get help from (371) of the “Full Walkthru”.
When you ‘win’, Granny reaches the trophy and obtains a
goblet
.

E1.

(372) Exit and go
to
E, and then E1,
and then to the giant.

(373) Find the balloon
maker — He’s not far away — A galloping stone will take Granny to him
— She shows off her dancing prowess with the wacky character (is that
her idea of ” jiving ” ??!!@#$%&???).

NOTE.
Operate
the tape recorder again (hints !?).

(374) Talk to the
guy. Granny wants an engine or electricity or whatever. He says she can
take it — but how ??  Give him something he wants.

(375) …………….
He lied ……………… He wants more than that !! You get an
engine and a car battery
. Exit, exit, etc., and return to
D
and then D1.

D1.

(376)
Go to the eerie forest. Try the car (which flew out of the ax-man’s head)
…… no go !  Use something pretty obvious on it and it lights up

literally !  Exit bottom left corner.  S
A V E
!

NOTE.
Operate
the tape recorder again (hints !?).

(377) Granny is in
front of a bench, next to a kind of ‘fruit-machine’ ; with that darned
kangaroo still hopping round and round in circles. Get the machine to ‘light
up’.

(378) Make the barrier
bar descend (timing a little tricky here !) — and see what happens to
the kangaroo!

(379) QUICKLY get
Granny to do something.

(380) Quickly
(since he soon recovers and resumes his hopping !) cause the kangaroo to
take Granny on a guided tour of the area — ride him Cow-Granny ! On their
travels, Granny picks up a magnet
On return, Granny is thrown down off the animal’s back. IMPORTANT
:-
check Granny’s braventory to see you’ve actually acquired
the magnet. Exit right bottom corner ; back to D,
and the map. Go to C and C2.

C2.

(381) At C2
g
o to [ii]
— see (056). Granny has arrived at a Disco. Slouch around and
talk to the deejay and listen to what he has to say.

NOTE.
Operate
the tape recorder again (hints !?).

(382) Granny does
something most grannies couldn’t do !

(383) She has another
session of acrobatics and sure clears the floor pronto !!

(384) …….. And
Granny goes dancing ……….. ” rock-‘n’-roll ” !!??@#$%&??!!

(385) Granny wins
the prize —
a clapping hat.

(386)
Drag* something. A new exit opens up
— Enter this large round hole.

(387)
Granny’s in a Karaoke hall. Her grandson is boring everybody to tears.
Play around there. Drag* an object
— ‘curtains’ to the brat (although you can still hear him !!).

NOTE.
Operate
the tape recorder from time to time in the (many) different places you
visit and listen to George’s “diary”. If you haven’t done so already, view
all
items in your braventory (mouse:- right click) &
read
the written captions below them – they may contain wacky hints ?

(388) Now shut him
up — thank goodness !!

(389) ‘Interact’ with
both of the two old geezers.

(390) Granny’s ‘repertoire’
— ” Honky-tonk ” ??

(391) Get out of there.
A guard bashes Granny, shakes her, and grabs her braventory.

(392) She finds herself
in another most curious room, and gets a REAL shock !! She can click on
the exit-icon on the large central screen …. sit in the chair …. pull
the lever on her right ………………… and get a really good close
up view of her hair and other things — but not much else !! ‘Retreat’
!

(393) She’s back with
the guard and gets her own back by kicking him where it hurts most (Kung-fu/Granny)
— She also gets her braventory returned.

(394) The guard has
plenty of pin-on metal medals — how ‘attractive’ !!!

(395) You get an
emergency steering wheel
.

(396) Now enter the
door and Granny’s back in that very curious room.

NOTE.
Operate
the tape recorder again (hints !?).

(397) Try various
things including conversation with the guard.

(398) Give the guard
something that will REALLY keep him occupied ! He will be too ‘mesmerized’
to pay attention to anything else.

(399) Granny enters
a room where Florence is making ‘music’ on an electric guitar.

(400)
‘Investigate’ Florence, the cage, the door, the loudspeaker ; whatever
!  Drag* something which makes
the cage rise — blessed silence !

(401) Push an object
which is a bit difficult to see and observe the result !

(402) More of the
same, but this time use something.

(403)
Drag* something ……………. ciao
Florence !!!! 
You get an electric
guitar
. Exit ; exit ; ……. etc.

B.

(404) Go out onto
the map. Go to B.

(405) Barter with
the trader. You get the top part of a hang
glider
.

(406) Return to the
trader for more ‘business’. You get a fishing
rod
.

E1.

(407) Go to E1
and again to the giant.

(408) Hook a
pair of glasses
. The walking stone vanishes — he can’t
see where he’s not going any more!

(409) Return to the
well. Go to the underground cavern and from there to the ‘pastoral scene’.

(410)
Drag* a ‘universal’ object and enter
the opening.

(411) One tiny Napoleon
playing with a cannon ……. another running around in circles attempting
to avoid being crushed by a steamroller driven by Quinn (Granny’s baby
grandson) !@#$%&?!@#$%&?. Get as much of the “story” as you can
from the ‘cannon-kid’ and surroundings.

(412) “How to make
a hang glider — for Dummies”
!

(413) Granny goes
hang-gliding !!!  Eventually, she chases Quinn away from his games
!

(414) Exit ; exit
; exit; ……. etc. Go to C then C3.

C3.

(415) Take a step
forward (so that the first door on your right is the ‘prison’ — with
the crazy video camera).   s a
v e
!

(416) Click on the
last (third — dark green) door on the right of the corridor.

(417) Granny is in
a room full of giant loudspeakers and a video camera (linked to Agent Rabbit).
How can she avoid getting deafened ?

(418) Find some way
to stop the video camera from tracking Granny’s subsequent movements !!

(419) What’s this
— a magic stick !  You get TWO crooked
sticks
.

(420) How can you
‘manufacture’ a large new (exit) hole ?

(421) Use this new
exit-icon and enter the hole. Granny enters a solitary confinement room
with her granddaughter Donna. ( Let the sequence run to the end ……..
No, there’s nothing wrong with your computer !! —
Granny’s been temporarily blinded by Agent Rabbit’s magic !).

(422) How can you
get Granny to see properly ?

(423) Have a few ‘polite’
grandma/granddaughter exchanges !!

(424) Use something.

(425) Use something
else to release Donna from her imprisoning hat !!

(426)
Drag* something.

(427)
Now drag* something else — well
I guess that’s one way to shut up a real pesky kid !!!!

(428) Return to the
plants’ underground command center.

(429) Do something
to the giant ventilator. Wowwww — all protective bars are removed (together
with that annoying plant) !

(430)
Drag* something again.

(431) Granny takes
action …….

(432) …….. And
more action.

(433) Step (click)
into the ventilator.

          
( N.B.  If Agent Rabbit isn’t inside and you’re
returned to the plants’ underground command center, check in your braventory
that you’ve still got a goldfish and also a mushroom !! —
if
not, get them if you want to see the very lengthy end sequence ) :-

S
I T
   B A C K   &  E
N J O Y

T
H E
   C L O S I N G   S E Q U E N C E 
OF :-

ARMED
& DELIRIOUS  (DEMENTIA)”


====================================================================================

====================================================================================


ARMED
& DELIRIOUS

(Also
entitled
  “Dementia
and
originally “Granny”
)

FULL

WALKTHRU

    Len
Green
:-      19
Sept. 1997
.   {updated; 2 July ’00}     
<>

With grateful appreciation to Eyal
Kaduri
who made the excellent original
version upon which this was (almost completely) based ; to Tom
Feiner
for advice & help; and to
other members of “Makh-shevet” for their assistance
.

INTRODUCTION.

    “Armed & Delirious (Dementia)”
    is a unique Quest/Adventure Game from several points of view and well worth
    the effort of playing through to its conclusion. It is almost completely
    ‘open-ended’ and there are six Main-Worlds to explore (almost all containing
    many
    Sub-Worlds). “Armed & Delirious”, as its name infers, is pretty wacky,
    and hence somewhat difficult for all us sane (??) gamers to follow ! Anybody
    who manages to do so absolutely 100% without ANY walkthru,
    cheat-sheet, hints, or help from anybody REALLY deserves a prize
    — maybe the Distributors will send you one …… haha !?!?!?!? 
    But some lesser mortals may want just a little (or maybe quite a lot of)
    assistance. To that end there are TWO walkthru’s :-

    For very experienced Quest
    players who only need a small amount of help here and there,
    there is the “Bare-Bones Walkthru”.
    This walkthru tells you the BEST order in which to proceed
    without having to revisit Worlds and Sub-Worlds any more than essential
    (and saves quite a bit of time since they are spread over the five CD-Rom’s,
    which have to be changed frequently).  It also tells you all
    the inventory items you must collect at each site (and there
    are several dozen altogether). However, it does NOT tell you how or exactly
    where to get them or (in any way) how or where to use them,
    so it doesn’t completely rob you of the satisfaction of ‘doing your own
    thing’! If, at a particular site, you are still stuck (and there
    are several pretty tricky places like this), and you haven’t got the time
    or patience to solve the problem yourself, you can always go to the identical
    numbered section of the “Full Walkthru” which tells you in clear detail
    exactly
    what to do.

    If, however, you do not
    wish to play the game completely without any assistance,
    nor even ‘waste time’ with the “Bare-Bones Walkthru”, there is the “Full
    Walkthru”
    which is a VERY greatly amplified version and
    which tells you everything you need to do (and
    more !!
    — and in extremely great detail).

    IMPORTANT NOTE
    :-
    You can
    of course visit all the Worlds and Sub-Worlds in ANY order you choose.
    You can always move ahead, but generally only up to a certain
    limited point, since you are probably missing an essential item you need
    from somewhere else. So you often have to do quite a lot of superfluous
    going backwards and forwards’ (you have to do quite a lot of this
    anyhow,
    even
    using either walkthru !).

    However, if you stick exclusively
    to either walkthru, you will definitely be able to finish the game,
    and via the ‘most efficient path’ : But, you will miss quite a large
    number of comic antics and a lot of amusing dialogue — these frequently
    are of a partially random nature and hence do not necessarily repeat themselves
    identically each time, but often vary according to your previous actions
    (and those of Granny !). So feel free to ‘go your own way’ !

    It’s worth mentioning that
    even these two walkthru’s are not the VERY minimum
    you need to do in order to finish the game. At many of the sites it is
    hinted that whilst you (Granny !) are there, you may as well want to do
    something which turns out to be not actually essential to
    continue the game and finish it, [ e.g. :- at (097) “Observe Granny’s
    ‘reading habits’ and note……” !! ]. Even though such actions are ‘redundant’
    to the final outcome of the game, you’ll miss some fun if
    you don’t perform them whilst you’ve been forced to go to the trouble of
    actually getting to these places (and you’ll only shorten your wanderings
    by a very few percent !!). Incidentally, you can usually
    guess when such ‘superfluous suggestions’ occur since they are generally
    incorporated into a section where there is something you
    HAVE to do in order to continue (and every
    single action
    you MUST do does have its own individual
    numbered section).

PREFACE.

    As written in the booklets
    and walkthru’s of most Quests ; pick up every item you can that is not
    actually ‘nailed-down’ — you’ll need it all (almost) later
    on. In BOTH walkthru’s, all the inventory items you must obtain
    are highlighted in bold-blue and
    underlined. In the “Full Walkthru” only, the ones you must
    use
    are in regular blue and not-underlined. (You
    are NEVER told which items to use or where in the “Bare-Bones Walkthru”).
    In this game, Granny stores all her inventory items in her bra !@#%$*&!?.
    So from here onwards, your inventory is referred to as your BRAVENTORY
    !!

    As in all Quest/Adventure
    games save VERY FREQUENTLY ! You never
    get ‘killed’ in this game (thank goodness !!), but you can VERY easily
    ‘get lost’. Unlike many games, “A. &. D.” is fully
    adapted to Windows ’95/’98, and so there is absolutely NO
    limit to the number of Saves you can make. If, as some do, you favor
    longish descriptions of your Saves :- no problem — they
    can be almost unlimited in length (there are some restrictions imposed
    by Windows ’95/’98, e.g., no front or back slashes, and no colons or asterisks,
    etc. — but they are very few and very easily spotted and avoided
    !). There are a few places where the timing is fairly critical and you
    may have to repeat a few times before getting it right — before these
    special
    situations arise, you are recommended (in green) to :- S
    A V E
    There are also a (very) few places where the
    actions are somewhat complex or ‘unclear’, and going back involves the
    bother of changing back to previous CD-Rom’s ; and hence it may be advisable
    to save — these places are marked (in green) :-
    s
    a v e
    !

    In “Armed & Delirious
    (Dementia)” there is a gimmick practically unknown in any other Quest/Adventure.
    You VERY frequently have to drag an object in a special direction
    or to a certain place. The “Bare-Bones Walkthru” does not tell you what
    to drag, how, or where ; but since you might
    overlook this action, every site in which you do have to
    drag something is marked in BOTH walkthru’s with a red asterisk,
    {e.g. drag*}, & also the instruction
    section number is highlighted in red {e.g. (007)
    }.
    The tape recorder gives
    you some ‘demented’ hints at many of the sites you visit. You can rewind,
    fast-forward, play and stop, as desired. In some screens you are informed
    that the tape recorder is not functioning (“intentionally” — those programmers
    !!!) for one reason or another :- obviously you get no ‘info’ from the
    tape recorder in those screens !
    Whenever you right-click
    on a braventory item, you obtain a large mobile illustration of the item
    and a (usually zany) written description of it &/or its use. These
    descriptions often contain (obscure) hints as to where/how you will have
    to use the item in the future !

    Usually it is very clear,
    both visually and audibly, whenever you obtain a new braventory item. Occasionally,
    however, you can pick up something without being aware of it
    ; so to avoid repeating actions and wasting time, check Granny’s braventory
    from time to time. The opposite can also happen (albeit rarely) and you
    imagine
    that you have obtained an item whereas in reality you haven’t. This can
    be very annoying, since, at a later stage when you actually need
    the braventory item you may have to return to another World and Sub-World
    and often have to change CD’s twice in the process.
    Bottom line :- WHENEVER
    you have got (or hope to have got) a new braventory item, it is
    well worth the extra few seconds to check to make certain —and
    also to view it in close-up !

    When you get the map, you
    can travel to the different Worlds and Sub-Worlds.  In order to save
    time later, here are some general notes and the appellations used (it is
    well
    worth while
    drawing your own simple rough circular diagram
    for easy reference — you will need it during the whole
    of the game
    , and the couple of minutes it takes to draw will save you
    very
    much more time later on in the game !).

    On the map, the Worlds are
    situated on a circular track and Granny always travels in an anti-clockwise
    direction. In the following description, the numbers inside the ‘curly
    parentheses’ {} refer to the serial numbers of the CD-Rom’s concerned (not
    really necessary !). Granny’s villa is pretty obviously situated in the
    middle of the left hand circumference of this circle. Traveling anti-clockwise
    from the villa, the other 5 Worlds are marked in violet thus :-A,
    B,
    C,
    D,
    & E.     The
    villa
    itself {1}, A {2}, &
    B
    {1}, don’t contain any Sub-Worlds. The last 3 only, contain
    Sub-Worlds as follows :-

C
consists of :- C1 {4} which is the
right-hand square trapdoor (closed and with a hinged-lid).

                     
C2
{3} which is the large double swing-doored (orange colored)
vent opening.

                     
C3
{5} At the extreme right end of the platform (right-hand
bottom corner of the screen).

D
consists of :- D1 {2} which is the
‘black-hole’ (just below the center of your monitor screen).

                     
D2
{2} which is the ‘satellite’ (at the top, near the left side
of your monitor screen).

E
consists of :- E1 {5} which is the
rock (to which is attached a balloon), on the upper left of the

                                   
platform.

                     
E2
{4} which is the tree, in the ‘middle’ of the upper surface
of the platform.

                     
E3
{3) which is the wheel to the right of the upper surface
of the platform.

                     
E4
{3} which is the sphere to the right of the lower surface
of the platform.

    There is always at
    least
    one exit icon from every frame (screen) to get back to a
    previous frame, a ‘Sub-World’, a ‘Main-World’, or to return to the Map
    itself !

    SCREEN  “DESIGNATIONS”
    :-
    Whilst
    producing the game, the developers labeled each different screen and even
    location with an identification tag.  These tags consisted of the
    CD number and (almost always) a three or four character designation. 
    In most cases the characters bear some similarity to the name of the location
    (as on the map).

        
    It is no exaggeration to say that “Armed & Delirious (Dementia)” can
    be mighty bewildering.  Hence these identification tags have been
    made available to any player who wishes to access them.  Simply type
    <Ctrl+R> any time you wish, and they will appear in the top right corner
    of your

    screen (and remain there
    highlighting all the different locations until you exit the game).

        These
    tags will not be of much use with this walkthru, nor should they be necessary. 
    However they can be of use with the UHS-Hint File (written by the
    same author) and a walkthru released by the publishers.

************************************************

If you do not wish to
use the “Bare-Bones Walkthru
“:-

BELOW
IS THE
FULL
(
DETAILED)
WALKTHRU
“.

************************************************

GRANNY’S
VILLA
.

(001) After the introduction,
t
he game proper starts with Granny in the kitchen of her villa. Click
twice on the pink thing on top of the cupboard — Granny can’t reach it
!

(002)
Click on the chair on the right, don’t let go of the button, and move the
drag cursor* to the far left of the
screen (wherever in the game you ‘find’ a drag icon, you have to decide
where to drag that specific item ) — she moves the chair towards the
cupboard.

(003) Now click again
on the pink thing on top of the cupboard — you get a snorkel.

(004) Now click on
the bottom left of the screen ( you’ll see an exit icon ); you are now
in the hallway.

(005) Click on the
stairs at the bottom middle of the screen; you are now in the attic.

(006) Click on the
green bottle on the table — you get a bottle
of brandy
.

(007)
Now drag* the pole (middle-rear of
the screen) to the right. A trapdoor opens in the ceiling and a bucket
falls on Granny’s head.

(008) Click on the
bucket — your cursor will change to a bucket icon (whenever this happens
in the game, it means that this particular item is used on something/someone
in
that SAME screen
). Use the bucket icon on the running worm until you
catch the worm — you get color worms in a
bucket
.

(009) Now exit the
attic (lower left edge of screen); you are now in the bathroom. The ‘mad
cow’ (no … NOT Granny !) is helping herself to Granny’s treasured sun
tan lotion. She seems a bit short sighted, but able to avoid the hole in
the floor !

(010)
Whilst the cow is otherwise occupied, drag*
the trash can near to the carpet.

(011) Click on this
‘cloning carpet’, and click the carpet icon over the hole in the floor.
The cow continues to luxuriate in her bath.

(012) Now click on
the trash can’s lid. Mrs. Cow tries to get to the bathroom cabinet again,
but WOW, Granny gets her sun tan lotion
!!

(013) Now go back
to the hallway. Click on the left exit at the bottom left hand corner of
the screen (at the side of the stairs); you are now in the dining room.
Click on the various objects there.

(014) Click on the
remote control on the desk and then click on the coffin in the left bottom
corner — you get a flying casket.

(015) Also click on
the drawer on the floor underneath the table — you get a
porno magazine
(which somebody will doubtless be keen to
read sometime/somewhere !).

(016) Click on the
exit under the stairs (left side of the screen, near the bottom); you are
now in the bedroom. Click a few times on the portrait & hear something
of the ‘bio’ of Granny’s first husband !

(017)
Drag* the portrait upwards.

(018) Click on the
jar of pills behind it. Granny can’t open the jar !

(019) Use the jar
icon on the huge footprint on the floor and leave the elephant to do the
rest — you get Granny’s essential anti-dizziness
pill
.

(020) Now click on
the trash basket in the bottom left corner of the screen. Click again,
and you get a new exit icon.

(021) The abovementioned
exit brings you to ‘George’s secret room’. Have a nosey around :- look
at the photograph, the left hand closet door marked ‘X’, the square gadget
on the rear wall to the right of the two doors, etc.

(022) In particular,
click the weird looking device at the bottom right hand corner of screen
(cut scene !). The telephone is a pain in the neck, but it won’t hurt to
answer it a few times !

(023) Click on the
second drawer up, near the left of the screen and notice that the bottom
middle drawer opens !

(024) Take George’s
tape
recorder
THIS ITEM IS IMPORTANT, since
George’s recordings will give you clues (albeit obscure clues !) later
on about many, although not all, of the screens you’re in. Now click on
the trapdoor in the floor and return to the bedroom, the dining room and
finally the hallway.

NOTE.
Operate
the tape recorder from time to time in the (many) different places you
visit and listen to George’s “diary”. If you haven’t done so already, view
all
items in your braventory (mouse:- right click) &
read the
written captions below them – they may contain wacky hints ?

(025) Click on the
safe on the right, and Granny will indulge in some petty larceny. However,
there’s nothing for her to get except ……………………… a
plunger (with a bell)
.

(026)
Drag* it to Granny. Now go the exit
door to the left of the main front door; you are now in the washroom.

(027) In here, investigate
the different objects, e.g. the taps, the vessels on the shelf above them,
the tool box, the items on the shelves on the rear wall. In particular,
click on the very end of the rails (cut scene !) and the rail-sleepers
in the middle of the bottom of the screen. Click on Granny’s unique ‘washing
machine vehicle’ — what a toy !! Click on the brown vase on the top shelf
— and see what happens !

(028) Click on the
white object that was previously in the vase (a bit tricky this one, sometimes
!) — you get an electric button.

(029) Now click on
the whitish object clipped to the top of the drawer — you get two
braventory items this time; a coat hanger
and a scarf.

(030) Get Granny to
drive her incredible ‘washing-flying machine’ out of the washroom and “into
the great beyond” ! ( Before she can do this she has to find a way to lever
up the rails so that they don’t impede her progress. This is easy, but
keeping
them up is more problematic! If the rails don’t remain
up, check that you have all of the following items
:- a snorkel ; color
worms in a bucket
; a bottle
of brandy
; sun tan lotion
; a flying casket ; a
coat hanger
; and a scarf). 
Now click again on the rail-sleepers in the middle of the bottom of the
screen. Granny’s braventory is now heavy enough to keep the rails levered
up !

(031) Now click on
the washing-driving machine. Gaaassssssssssssssss ………………

(032)
F
u l l T h r o t t l e ……………………. Drag*
the incredible flying machine to the door on the right. You now get cut
scenes of Agent Rabbit, one of his henchmen, astronaut-Granny in orbit,
finishing with a map of the Worlds with Granny in her washing-flying machine
at the villa. ………. and so :-
“into the great beyond” !!

NOTE.
Operate
the tape recorder again (hints !?).

THE
MAP
.

(033) See the description
at the end of the Preface and the map-graphic … above.

B.

(034) Granny goes
to
B, but due to age and dizziness,
she quickly falls off — but somehow she acquires a
chit
in the process !

(035) Return to
B
. The inhabitants appear to be a ‘man’ and a pig. If you talk
(click) on them both, the former seems to be only interested in bartering
items, and obsessed by food and particularly corn flakes ! Some objects
that you will find in the future have to be swapped by the guy in the van,
for different objects !  For now, just click on the elastic band on
the left — you get a rubber band.
Try to catch that obnoxious chicken ?!?!

(036) Now click on
the twirling object on the right (the object which is above one of the
clouds ) — you get a half a compass.

(037) Now click on
the left tire of the van and get a dream maker
capsule
. Now use the exit icon in the lower left hand corner
of the screen.

D
& D1
.

(038)
Granny goes to D
and then direct to D1. A giant toilet
!! There is a dark brown spherical boulder on the lower center area of
the screen. Try picking it up. OK — need a different way ! — drag*
it to the right.

(039) Click on the
very large needle in the rubbish barrel on the left and position it on
the rim of the toilet — a path ! (for the ants ??).

(040) Now click on
the shovel to the right of Granny and put it into the trash can (on the
right of screen).

(041) Click on the
shovel 3 times — something flies and sticks into the hole in the toilet
lid.

(042) Now click on
the golden colored metallic thing just sticking out from behind the rubbish
barrel (left middle of the screen). Whilst the marching ants are not ‘on
screen’, place it on the ground directly in their regular path (near the
bottom, mid screen). Yo-ho — an angle iron !  The ants have a feast
— and clear the path for Granny !! Exit center screen.

(043) You are now
in an eerie forest, which has several exits. Take the exit near the top
left corner of the screen.

NOTE.
Operate
the tape recorder again (hints !?).

(044) Weird !! Two
louts (Bo & Chuck) ‘minding’ a baby, with a kangaroo jogging round
and round in circles. Granny wants the baby’s carriage (but not the baby
!). She can try the rope ladder, the red button, the triple-X sign, etc.
(better not to explore the exit just to the left of this sign at this stage
— you’ll be going there shortly anyhow !!). Click on the wedge shaped
golden colored object on the ground and ‘place’ it a little left of the
base
of the tree (with the red button on it).

(045) Now click on
the plank closest to this wedge and put it onto the wedge itself.

(046) Click on the
left side of the plank and Granny will stand on it — a ‘seesaw’ ??

(047) Wait until you
see the kangaroo approaching from the left and click on the red button.
You may ‘misfire’ once or twice, but when you get the timing just right
you get a baby carriage.

(048) Exit middle
or top left side of the screen to the forest — then bottom middle to
the ex-/-toilet bowl site — then top right corner to D
— and the same again to the map.

B.

(049) Go again to
B
to find our turnip-head guy fishing. Give him your baby
carriage (from braventory) and you get a
hammer and music notes
. You also find yourself back on the
map again.

NOTE.
Operate
the tape recorder again (hints !?).

D
& D1
.

(050) Return as you
did before to D1 and to our kangaroo
still jogging around in circles (ignore him — at least for the present
!). This time DO take the exit just left of the triple-X sign.

NOTE.
Operate
the tape recorder again (hints !?).

(051) Oboy ! A bit
of S & M going on here !!!  Granny can browse here a little and
try to help the green elfin creature to get his/her turn. Click on the
wooden block at the end of the railings. This removes the buffer and the
cart goes crashing into the pedestal causing the green creature to fall
to the ground.

(052) Give him/her
the hammer and music notes and it GETS
its ‘turn’.

(053) Attention is
drawn away from Granny who is now free to go to the right hand wall (a
little above the head of the larger bluish masochist) and pick up the green
object — you have got a blow-dryer
!

B.

(054) Back again all
the way to
B. This World seems to have
entered another ice-age. Also, apparently there’s some sort of frozen plate
in the sky. Thaw out either the plate or the guy ; using your blow-dryer

you’ve got a china plate !

C.

(055) Go to C
and then to C2. Proceed through the
center screen exit and enter into the ‘Pinball-Park’.

(056) There are 4
exits from Pinball-Park, as follows :- near the center of the screen, and
from left to right, [i], [ii], & [iii] ; and the ‘return exit’ at the
top right hand corner of the screen… … … Go to [i].

(057) Granny, indiscreet
as ever, stumbles into a steamy session in a weapons shop. The proprietor
is making whoopee with his girlfriend offstage ! Granny noses around, finds
noodles, and takes earphones.

NOTE.
Operate
the tape recorder again (hints !?).

(058) She gets fed
up waiting and rings the bell twice. The owner appears !

(059) She tries out
the right hand automatic weapon. !!@#$%&?? . She wants to use the rifle
but must provide her own target.

(060) Granny gives
her china plate to the owner. BOOOOM ! Granny
only needs the bullet.

(061) Exit the weapons
shop (bottom left corner). Granny’s braventory is snatched, but she soon
gets the better of the mugger !!

(062) Granny enters
[iii], a bar, and investigates all its ‘facilities’.  She puts her
coat
hanger on the coat rack ( to the left of the toilet door ).

NOTE.
Operate
the tape recorder from time to time in the (many) different places you
visit and listen to George’s “diary”. If you haven’t done so already, view
all
items in your braventory (mouse:- right click) &
read
the written captions below them – they may contain wacky hints ?

(063) Click on the
toilet door and when it opens up, click on the coat hanger.  S
A V E
!

(064) Click on the
glass of beer on the counter. The woman who drinks it goes to the toilet
(Granny had a ‘hand’ in this !). As she starts to zip up and get out, click
on the coat hanger — you may have to do this more than once till you
get the actions and timing right ! The woman gets trapped inside.

(065) Click on her
empty seat and take her place in the card game.

(066) Click on the
cards ….. shuffled ….. chaos ….. you get the
translator
…….. and o u t !!!    s
a v e
!

(067) Exit Pinball-Park.
Go to C3 (cut scene) ….. Look around,
try the toilet, walk forwards and backwards, etc. ….. The very first
door on the left (to the left of the ash-tray/spittoon) is the exit from
this underground corridor.

(068) Take a step
forward. What a strange floor !!!

(069)
Click between Granny’s shoes and drag*
upwards — the ‘top layer’ of the floor flies upwards and Granny can now
progress !

(070) Click on the
first (“new”) door on the right — the one with the metal grille and a
video camera above it.

(071) Click on the
FLOOR and make Granny jump a little to the left and
back to the door again, a couple of times — the video camera goes berserk. 
(Be careful not to click on the entrance-icon to the orange colored door
next to the prison door).

(072) Enter the prison/asylum
door ……… Interrogation ……… Thrown out into the corridor again.

(073) Enter the prison
again and suss around. The Guard is busy on the phone (clues ?). Get the
scarf
ready, & when he bends down, strangle him !!!

(074) Use the control
panel to access the cell with a telescope, as follows (there may be other
ways ?!) :- There are 3 columns of different types of switches (the
left hand column has a blue box at the top — ignore this !). Press the
switches in the following order (and different ‘partitions’ move !) :-
Top middle column ….. Bottom right column …… Bottom left column …..
Bottom right column …… Middle button of middle column.

(075)
Click on the prison bars and drag*
in the direction of the manhole lid. The prison bars open !

(076) Granny’s in
! Click on the telescope/rabbit. Whoooops!! You’ve got a
telescope
.

(077) Click on the
entrance icon to the manhole lid ….. (cut scene).

(078) “The hairdresser
and the hedgehog” …… Granny interferes, and touches whatever she can
lay her hands on.

(079)
Drag* the circular lid on the floor,
upwards. — a hole !

(080) Click on the
mauve couch. Granny sits down.

(081) Click again
on the couch whilst Granny’s crossing and uncrossing her legs (you may
have to do it a few times to get the timing right). The effeminate hairdresser
walks backwards admiring his artistic handiwork ………. and falls down
the hole !!!

(082) Click on the
hedgehog. Granny jumps into her chair and taunts her by comparing her red
shoes with Granny’s ……. Exit hedgehog in a hurry !!

(083)
Drag*
Granny into her (right hand) mirror image. Whoooom!! ….. the wall disintegrates
and reveals an entrance to the ‘plants — underground command center’
! (Granny may want to do a bit of sweeping up and general pottering around
???).

(084) Exit via the
‘new’ staircase into the ‘fan(ventilator)-chamber’.

(085)
Drag* the right hand side of largest
fan (ventilator) cover to the left. The cover opens.

(086)
Drag* the tip of the fan itself to
the right. ( You may have to repeat this more than once ). Granny enters
the plants’ underground command center.

(087) Put the plunger
(with a bell) onto the circular manhole near the bottom right corner
of the screen.

20
Dec
. ’97 …… Updates.

{{ One player wasted a LOT of time here,
but (together) we pinpointed the probable ‘obstacle’.


In case you run into similar difficulties }} 
…………………………………………………………………………
S
A V E
!

(088) Try exiting
and entering 3 or 4 times. Listen to the plants’ words of wisdom.
This
seems to be obligatory & not optional. Definitely,
exit & enter the manhole 3 or 4 times !

(089) Click on and
get the double mirror. Chief-Plant
will insist on briefing Granny (clues ??). He rambles
on & on & on. Let him continue for quite a while (he divulges different
random ‘clues’). Only when you are CERTAIN he is repeating himself completely,
cut him off — you have to be rude to shut him up !! You will know that
you have ‘succeeded’ since if not, no creatures will
appear at (094) …… and then you’re in trouble when you get to (196)
!!!!

(090) Use the
translator on the device at the bottom left of the large
pendulum.

(091) Now you are
free to take a pendulum (not
the large hanging pendulum but the small standing metronome thing !).

(092) Now travel back
the way you came (fan-chamber ; hairdresser’s salon ; prison) to the corridor.

(093) Granny wants
to enter the library, but it’s closed from 12:00, to 11:59 or maybe even
12:00 !! There’s a notice saying that it has moved to other, completely
unspecified, premises! A bit difficult hey??

(094) Two weird creatures
emerge from the first door on the left (gold colored and to the right of
the ash-tray/spittoon). They look very vaguely rather like a large distorted
fly sitting on a strange sort of snail. Apparently their names are ‘Yellow’
and ‘Brick-Road’. Converse with them. Eventually they will tell Granny
to “Follow the yellow bricks road” !!    S
A V E
!

(095) This is a bit
tricky. You have to follow their small circuit clicking on FOUR
floor tiles just after they have moved on and away from them.
When you click ‘correctly’, the floor tile turns from purple to yellow.
It takes a bit of practice, but is not as difficult as it seems at first.
The first tile is the second one, directly outside the gold colored
door — you only click when the finger-icon turns to a sort of hammer-icon.
There is no limitation to the number of tries you get. The trouble is that
if you go wrong you have to start the whole performance again from the
beginning !  When you succeed, the library is open for Granny !!

(096) Enter the library
— the fourth door on the left (whitish in color and just to the left
of an oval mirror).

(097)
Observe Granny’s ‘reading habits’ and note the large crack in the floor. 
What taste in literature Granny has !?  Drag*
the large bookcase to the left and see what happens.

(098) Now a new exit
opens up at the bottom left hand corner of the screen — click on it.

(099)
Drag* the screw downwards. You get
a
screw
.

A.

(100) Leave C3
and C. On the map, go to A.

(101) Try the door
at center screen a few times ….. Aliens Arggh !

NOTE.
Operate
the tape recorder from time to time in the (many) different places you
visit and listen to George’s “diary”. If you haven’t done so already, view
all
items in your braventory (mouse:- right click) &
read
the written captions below them – they may contain wacky hints ?

(102) Click on the
large toothed-wheel/screw device just above that door.

(103)
Drag* the steps to this wheel. Where
to now ?

(104) Click the button
on the base of the steps until the opening on the large screw (in the center
of the middle axle) is accessible — a new entrance-icon !

(105) Click on this
entrance-icon. How to get past that parading guard ??

NOTE.
Operate
the tape recorder again (hints !?). S
A V E
!

(106) Click on the
swing doors just as the guard approaches Granny, this will knock him out.
(You may have to repeat more than once, but it’s actually easier than it
sounds —as is the following action !).

(107) Click on the
circular chandelier (or whatever) on the ceiling until the second guard
is neutralized.

NOTE.
Operate
the tape recorder again (hints !?).

(108) Take the right
exit and enter a very strange garden with a peculiar flying creature hovering
in the air.      S
A V E
!

NOTE.
Operate
the tape recorder again (hints !?).

(109)
You need to be pretty destructive here !! …… Drag*
the old fashioned cannon (the end of its muzzle just protrudes from the
right side of the screen) to the left, up to the middle path.

(110) Click on Granny.
Center the cross-hair onto one of the nine pillars and click on Granny
— the pillar is blasted away. Repeat for the other eight pillars. (if
your cross-hair reverts to an ordinary icon, simply click on Granny again
to restore it !).

(111) Click on the
two vertical retaining walls (at the extreme right and left of the screen).
The roof falls in and squashes the flying critter. Take his corn
flakes
.

(112) Exit to the
left. Click on the mirror near the middle-left side of the screen (just
to the right of the unconscious guard on the stairs). Exit to the map and
return to B.

B.

(113) In Granny’s
braventory, ‘pour’ (combine) your bottle of brandy
onto the corn flakes and cook up some spiced
corn flakes
!

(114) Give the spiced
corn flakes to the pig (if he doesn’t accept them first time, he
will the next time !). You get an air bubbling
pig
(of all things !!).

(115) ‘Hypnotize’
the chicken with the pendulum (metronome).
You get an airy chicken (What
next ??).

(116) The guy is reading
something. Give him a telescope to ‘help his
vision’, and he will give you the worms poster
he was looking at (what a lousy deal !!).

E.

(117) On the map,
go to E and then to E1.

NOTE.
Operate
the tape recorder again (hints !?).

(118)
Drag* the handle of the well to the
right, once.

(119)
There is a bent pipe with a lever on it near to the left corner of the
screen. Drag* this lever to the left.

(120)
Drag* the bucket to the lever.

(121)
Drag* the well-handle to the right
again. A new exit-icon appears (alongside the well).

(122) Take this new
exit. You are in an underground cavern with a lagoon. Browse around a bit
but don’t exit yet.

NOTE.
Operate
the tape recorder again (hints !?).

(123) Click on the
mauve items floating towards the rear right of the screen (close to Granny).
They turn into a sort of fishhook — hang it onto the left hand large
dangling hook and it turns into a mauve colored mobile !

(124) Click on the
bluish semi transparent box in the water. You get a fish
tank
.

(125) Exit lower right.
Granny arrives into a pastoral scene (and music !). Converse and look around.

NOTE.
Operate
the tape recorder again (hints !?).

(126)
Drag* the middle pair of fruits (on
the right) downwards. A lake emerges.

(127) Release your
color
worms in a bucket into the water.

(128) Click on the
hole beneath the bobbing green creature. You get a
round green creature
.

(129) Return, more
or less the way you came, to the well (with the handle). From there take
the exit to the gas-station (to the rear left of the well).

(130) ‘Sniff’ around.
Pick up the supply nozzle !?

(131) Click on the
triple-wheel-counter & see what happens (Quite a show !).

(132) Repeat this
TWICE more and the Jack-in-the-box/worm remains out of its box.

(133) Give him your
worms
poster. You get a baseball cap
(a bit better exchange than last time ?!).

(134) Return to the
well and take the exit at mid left of the screen. WOW ! some huge
guy — a
real giant in fact !!

NOTE.
Operate
the tape recorder from time to time in the (many) different places you
visit and listen to George’s “diary”. If you haven’t done so already, view
all
items in your braventory (mouse:- right click) &
read
the written captions below them – they may contain wacky hints ?

(135) Give your bullet
to the giant — this keeps him ‘occupied’ !

(136) You take (click)
a
giant belt
.

(137) Amongst other
things floating in the sky is a colored balloon supporting a pagoda-like
house. This is your next exit. Take it and you arrive in a sort of Einsteinian
chamber with a pseudo-cosmonaut floating around in space.   s
a v e
!

(138)
Granny herself is encapsulated in a large transparent cylinder with a lid
that opens and closes periodically and automatically. (Apparently, every
time it opens, bubbles of air are transmitted to the cosmonaut guy and
keep him going !). How can she get out ??  Close to her is a device
with three levers. Drag* the left hand
lever upwards. This diverts the air and causes the cosmonaut to lose consciousness.

(139)
Pull (drag*) the left lever back down.

(140)
Pull (drag*) the right hand lever upwards
and diagonally to the right. This causes the lid to remain fixed open (and
the bubbles of air to escape !).

(141)
Drag* the guy’s helmet to the right.
Granny gets out and dons his helmet !

(142) Use the air
bubbling pig on the cosmonaut. He revives and gives Granny some
“hints” ….. Granny discards the pig (it’s fulfilled its ‘air-raising’
purpose apparently !?!).

(143) Click on the
device at the bottom center of the screen (with two megaphones or whatever).
Something starts happening.

(144) Click again.
You get a memo (echo) machine.

(145) Granny exits
(at least she gives the guy back his helmet !!) …. back past the giant
….. the well ….. exit (right side of screen) to E.
Go to E3. Phew — what pollution …..
what a stink !    s a v e
!

(146) Get moving pretty
quickly :- If Granny stands there too long she gets literally ‘carted away’
back to E. To avoid her getting asphyxiated,
click on the laundry on the washing line just behind her … Hey there
Granny-Peg-Nose !!!

NOTE.
Operate
the tape recorder again (hints !?).

(147) Exit bottom
left corner. Take a look around the broken conveyer-belt machine.

(148) Exit near the
top left corner of screen. You arrive at a smelly pool with grandpa tied
up in a large transparent blue plastic sack — (nuclear waste ??).

NOTE.
Operate
the tape recorder again (hints !?).

(149) Click on him,
and get old grandpa moving !

NOTE.
Operate
the tape recorder again (hints !?).

(150) Exit lower left
corner and return to the conveyer-belt machine. Loop your rubber
band onto the lever (middle left side of the screen).

(151) Put your giant
belt between the cog wheels of the conveyer machine.

(152) Place your fish
tank on the (repaired ?) conveyer belt — a cut scene, finishing
with the old man still in his bag, on the ground !!

(153) Click on grandpa’s
head and you get grandpa in bag
— (Yikes! — what a thing to possess !! — in Granny’s braventory
??).

(154) Exit bottom
left ; right ; then just above mid screen (don’t take the right hand exit
just yet !) to E. From there go to
E4.

(155) Click on the
bench. Granny rests her weary limbs and resents those grungy kids on their
roller-blades, especially the ones with dynamo operated ‘head-lights’
that dazzle !!     S A
V E
!

(156)
Drag*
one of Granny’s legs upwards (this can be a bit tricky — but “if at first
you don’t succeed ; try, try, try again !”) so that she deliberately trips
up one of the girls who goes flying into the fountain — nasty, nasty,
nasty !!

(157) Granny uses
her snorkel to ‘rescue’ the girl in the fountain
!!??

(158) Click on the
object that just flew out of the fountain. You get a
dynamo
.

(159)
Drag* the bus to the left. W—O—W
! Can old grannies REALLY do that ?

(160) Click on Granny.
She regains consciousness — or maybe just wakes up ?!

(161)
Drag* the green hosepipe (top, towards the
right of the screen) down to the orange colored face to the right of the
steering wheel — could be the wipers-lever ?!

(162) Click on the
windscreen wipers. Granny jumps out to ‘operate’ them.

(163) Whilst she’s
on top of the bus, grab the light bulb. (you may have to repeat this more
than once — but it’s not very difficult !). You’ve got
a
light bulb
.

(164) Exit the bus
(the exit icon is on the stop sign — well where did you expect it to
be ? ). Enter the last house on the right.   S
A V E
!

(165) Wait until the
empty
trolley stops on the left (close to Granny). Dump poor old grandpa
in bag into the trolley. When the trolley stops at the right, click
on the dumpster below (right hand bottom corner of the screen) and grandpa
gets tipped out with the rest of the rubbish — is that all HE’S worth
?

(166) Now click on
the handle just above the dumpster. Grandpa obligingly pulls it ( I
wouldn’t !! ).

(167) Click on the
exit-icon just above the middle of the right edge of the screen. Granny
goes downstairs where three antiquated goons are sitting round a table,
drinking and nattering.

(168) On the round
table is a bone to which is attached a heart shaped balloon. Click on the
bone and whilst it is in the air click on the tablecloth — You
may have to do this more than once, but it’s pretty easy !  You get
a
tablecloth
.

(169) Click on the
skeleton and take his glass of old liquor.

(170) Exit at the
top left hand corner (from someone’s old parents’ house ??).

(171) Now go to the
end ‘house’ at the very end of the road, facing Granny !  Whether
you like it or not, you get a slide show of the game’s credits (including
the guy who wrote this walkthru !).

{ Some gamers can’t be bothered
wasting their time with credits — can you blame them ??  If you’re
one of these, simply right-click them straight into oblivion ! }

   Whether you
‘appreciate’ credits or not, you get a metal
crowbar
.

(172) Exit bottom
middle ; bottom middle/right ; to E. From
there go to E2.

NOTE.
Operate
the tape recorder from time to time in the (many) different places you
visit and listen to George’s “diary”. If you haven’t done so already, view
all
items in your braventory (mouse:- right click) &
read
the written captions below them – they may contain wacky hints ?

(173) Listen, talk,
and generally socialize with the tree (and its ‘friend’). But how to get
past it ??

(174) Click on the
pebbles in front of the tree (near the bottom right of the screen). Throw
the pebbles again whilst the tree moves its ‘limbs’.
(If this doesn’t ‘work’ first time, you can repeat it as often as you need
to).

(175) Now
click on the bike (on the left) and you’re off.    S
A V E
!

(176) Click on the
car battery. Granny kicks it and jumps on it. It disintegrates. ‘Lights
Out’ !

(177) Click on the
wooden bridge (near the right hand bottom corner of the screen). It caves
in !

(178) Click on the
shrub near to the bridge. It camouflages the gap left by the bridge !

(179) Click on the
envelope which is lying on the table (near the bottom left corner of the
painting on the easel). A weird postman cycles up, doesn’t notice the bridge-gap,
and crashes !

(180) Click on the
postman’s abandoned (half a) bike. Granny moves it into position !

(181) Use your light
bulb on the empty socket (it’s a bit difficult to see it, but it’s
hanging down from the roof and near the top left of the painting). Granny
plugs it in. But :- No battery — No light !!

(182) Use your dynamo
on the bike. Granny cunningly improvises ! — “……….. and there was
light !”

(183) Click on the
back of the painting. You get folding steps
!!

(184) Exit right and
return to that revolting tree !

(185) Click on the
skateboard and travel to the woodland.

(186) Take the path
at the middle of the bottom of the screen and get to a ‘tree’ (an orchestra-conductor,
complete with baton), with a gabbling crowd in the bottom left hand corner
of the screen.

NOTE.Operate
the tape recorder again (hints !?).

(187) Try to take
the top box (at the right of this tree) … BUT … apparently, “no singing
— no prizes” !! Jump (i.e. click) into the crowd and they disperse immediately.

(188) Place your memo
(echo) machine on the ground just to the left of this tree. This
appears to appeal to its sense of musical appreciation !

(189) Now click on
the top box to the right of the tree. You get a Jack-in-a-box.

(190) Exit bottom
right corner ; then near bottom left corner. You arrive at a strange terrain
where a never ending stream of ‘Humpty-Dumpty’ like tree characters on
skateboards seem intent on committing suicide !    S
A V E
!

NOTE.
Operate
the tape recorder again (hints !?).

(191) Kick (click)
on the wedge of cheese. It blocks the skateboarders’ path ….. but they
dislodge it every time they speed past. How to fix it in position ?

(192) Click on the
boulder (just below center screen).  It anchors the wedge in position
permanently.

(193) Click on the
signpost to rotate it. Then click on it a second time and it points to
the wall at the right hand side of the screen.

(194)
Drag* the painting (near the right hand edge
of the screen) a little upwards so that it resembles the opening of a tunnel
in the blank wall !

(195) Click on the
cheese again. W H A M ! The ‘tree’ is immobilized.

(196) Talk to the
guy.  He’s got a ‘screw-loose’ so give him your screw.
Watch what goes on inside his head ! He flies away happily, leaving behind
for you, a horn.

C.

(197) Exit lower right
side of screen ; again lower right ; upper right corner to E.
Jump off onto the map. Go to C and
then to C3. Take a single step (click
on the exit-cursor) forward.    s
a v e
!

(198) Enter the second
(orange colored door) room on the right. You are in some sort of workshop/laboratory.
A strange professor receives a communication via the system of tubes on
the rear wall. A mad ‘boat race’ (??) crashes in and out of the room !

(199) Talk to the
professor !?  Turn (click) the red handle (middle right side of screen).
The weird animals go berserk and scamper off — If you wish to ‘punish’
Granny for her general behavior, get her to touch (click) the small box
just above the handle !

(200)
Drag* the end of the transparent air
tube (just below the bottom right hand corner of the clock) to the cone
shaped transparent opening of the suction machine (just a
little
to the right and below the exit of the air tube).

(201) Put your round
green creature onto the brown conveyor belt and watch it travel
along the tubes until it attacks the prof’ who exits pronto !!

(202) Click on the
device above the nozzle of the cylinder. You get a
whistle
.

D.

(203) Exit via the
closet ; Step backwards ; exit through the first door on the left to C.
Jump off onto the map. Go to D and
then to D2.   s
a v e
!

(204) Click on the
switch some way below the top left corner of the screen — all sorts of
things start moving !

(205) Click on the
green shutters.

(206) Click again
on each half of the shutters separately.

(207) Click on any
2 of the 3 fawn colored triangular windows just to the right of the shutters.

(208) Notice that
there are 4 green plungers a fair bit above the bottom right corner of
the screen :- from left to right ; [a], [b], [c] & [d]. Click on them
as follows :- [a] once, [c] twice, and [d] three times.

(209) A new door opens
up (right of middle screen). Exit via this door. You enter a room where
a supervisor is scrutinizing a TV set and frequently answering a phone.
A mouse emerges periodically from a wide tube into a box below ! Granny
would like to get near to the TV set, but …….. no go !

(210) There is a cover
panel along the right side of the door with yellowish electric light bulbs.
Click this panel.

(211)
There is a black electric cable to the right of this panel. Connect (drag*)
the cable to the live panel. When the supervisor answers the phone next,
he
is electrocuted !! NOW
Granny can proceed !

(212) There
is a pair of switches just to the left of the TV screen. Press (click)
the right hand switch, which lights up red. The traveling mouse gets ‘frozen’
at the top of the box !

(213) Click on it
and you get a mouse.

(214) Go through the
(lit) door into the dressing room. Look around and get to know the striptease
artiste.

(215)
Drag* the nozzle of the vacuum cleaner
to the stripper’s (golden colored) shoes.

(216) Click on the
clothes-rack (on the left) which swivels round.    S
A V E
!

(217) Get your mouse
(from braventory) ready. When “Zink Flusik” goes behind the curtain to
shower, QUICKLY throw (click) the mouse over the shower curtain ………
and ……

(218)A
very
quick
drag* (ha ha) — QUICKLY
drag the vacuum cleaner nozzle upwards. She trips over the tube and makes
a really crashing exit !! (You may have to repeat this 2
or 3 times).

(219) Pick up (click)
the model’s clothes.

NOTE.
If
you haven’t done so already, view all items in your braventory
(mouse:- right click) and read the written captions below
them — they may contain wacky hints ??

(220) Exit the dressing
room and back to the (prostrate) supervisor’s room.

             
            VERY 
            IMPORTANT
              ……….  S
            A V E
            !

(221) Press the left
hand button which lights up yellow, and only for a short time
a new exit opens up (near the bottom left hand corner of the screen).

(222) Quickly
take this exit. Granny finds herself in a ‘fork & shopping-cart’ contest
!

(223) This short game
can be troublesome. It can best be ‘won’ by using the four arrow keys on
the keyboard rather than the mouse. Granny has to avoid being ‘killed’
by either the fork or the shopping-cart. She has to move left, right, forwards
(up) etc., with her pursuers following each of her moves. The object is
to lure the shopping cart into bumping into the wheel. Once she has done
that she can then climb over the top of the now stationary
shopping cart and over the wheel without hindrance (since the fork is also
immobilized). You may do it first time, or it may take you many attempts
— but don’t give up if you find it somewhat tedious — you’ll succeed
sooner or later !!

(224) For all your
efforts, you get the bottom part of a hang
glider
— of all things !!

(225) Click on the
top of the screen and then take the main door (middle screen near
to the left side) to return to the platform with those shutters, etc.

(226) Click on the
central rotating object and you are transported to an ‘electrified room’.
Try entering the laser room — serves Granny right !!

(227) On the wall
(left of center screen) are 3 knobs or whatever. The outside two are red
and the middle one fawn colored. You can try them all, but the one that
will do the trick is the center one. Granny uses it to make a sort of stepping
stone.

(228) Click on this
again
and
Granny succeeds in stepping into the room but becomes invisible
!!

(229) Near the bottom
right hand corner are 3 pairs of transistors (or maybe radio vacuum tubes
?). At the top right of the window (with expanding circles) are a pair
of wire endings. Click on the middle pair of transistors and a rod descends
from the ceiling.

(230) Quickly,
before the rod retracts, click on the wire ends. The window ‘opens’ into
a new exit !

(231) Exit to the
rabbit’s ‘residence’. Poke around things there — particularly the candy
machine and the bubble-gum machine.  In Granny’s braventory, combine
your
whistle together with your horn
and obtain a horn connected to a whistle.

(232) Use this horn
connected to a whistle on the bubble-gum machine (on the
right). The residence door opens and the rowing-boat/chariot makes another
brief ‘appearance’.

(233) Granny reverses
backwards to the ‘invisible-electric’ room. A
smelly cigar
has emerged, near the middle of the screen
— take it !

(234) Examine the
circular entrance into the house, and then the square ‘trapdoor’. You get
inside the place. Mr. Rabbit himself ….. ….. scampers away before Granny
can get to him !  Look around and about.

(235) Click on the
squeegee. It flips up and away and finishes up at the bottom of a mud bath
together with Granny. Granny gets out (remarkably clean ?!@#$%&!?)
but not with the squeegee !

(236) Click on the
tap.

(237)
Drag* the spout of the tap vertically
downwards into the mud bath.

(238) Click and you
get a squeegee.

(239) (Young ???)
Granny …….. ‘aerobics’ ……. on the trampoline.

(240) Whilst in mid
air she grabs the pair of gymnastic rings, somersaults, and finishes up
inside the transparent cubicle and astride the exercise-bicycle !

(241) Click on the
cycle wheel. A door opens automatically and Granny enters a weird red ‘vacuum’
room.

(242) Click on the
‘red-eye’ on the rear wall near center screen. The ‘eyelids’ close !

(243) Pull (click)
the handle beneath the green box (middle right edge of screen).  The
machinery stops.

(244) Turn (click)
the hand-wheel to the right of the rectangular shaped main machine (a bit
to the right of center screen). This disconnects the tube from the ‘bellows’.

(245) Close (click)
the open circular hatch to the left of the green box.

(246) Click on the
seat in the left bottom corner of the screen. Granny sits in it and straps
up her seat-belt.

(247) Click on the
open hatch near the middle of the ceiling. Granny is hoisted up and closes
the hatch. She is lowered again, still strapped into her seat !  S
A V E
!

(248) Click on the
gray button near the top right of the main machine.

(249) VERY
QUICKLY

:- Click again on the seat. If you get the timing right, the whole room
contracts and expands ; Granny is swiveled to the left ; and you get a
Master
key
. You may be lucky and succeed first time or you may
have to repeat a few times. (N.B. You may not notice
that you actually GOT the key, but if the abovementioned phenomena took
place, then you DID. But it’s very well worth while just
checking Granny’s braventory to make absolutely sure
— you don’t want to have to make the very long
journey specially all the way back to here again, and then have to repeat
all
of this again, some time later in the game !!).

(250) Exit near the
bottom right corner ; middle left ; middle bottom ; middle left ; middle
left again. Jump off onto the map. Travel from
D
to A. Go back into the
room with the two ‘slumbering guards’.

A.

(251) Click a few
times on the mirror just a little left of center screen. Phew ….. filthy
!! Clean (click) it using your squeegee on
Granny’s image in the mirror. Click the mirror again a couple of times.

(252) You now see
an image of the back of the safe (which was not visible before). Click
on the gray colored handle of the safe and you get a
diamond
scintillating !

(253) Exit bottom
center ; top right hand corner (what :- another alien ?!) ; out onto the
map. Go to E and from there to E2.
You’re back at that drowsy tree again.

E.

(254) When the tree
yawns, click on its open mouth ….. another room !

(255) Click on the
table.

(256) Click on the
chair.

(257)
Drag* the rope hanging down from the
ceiling towards the books on the table.  WHAT…. yet another room
!!  Wander around.

(258) Click on the
chair (bottom left hand corner) a few times. Apart from a possible clue,
this gets you nowhere.

(259) Use your smelly
cigar on the chair — it panics, and you NOW get a
long sheet of paper
!

(260) Exit bottom
right hand corner ; middle right of screen ; back to the yawning tree.

(261) Click on the
skateboard. Back to the woodland again.

(262)
Drag* vertically upwards on the tree
immediately behind Granny. She is in the Rabbit’s (Alice in Wonderland
type) stock exchange.

NOTE.
Operate
the tape recorder from time to time in the (many) different places you
visit and listen to George’s “diary”. If you haven’t done so already, view
all
items in your braventory (mouse:- right click) &
read
the written captions below them – they may contain wacky hints ?

(263) Click on the
judge’s desk — what a nerve !

(264) Click on the
largest (left hand) monitor ….. smash the Rabbit’s secret device for
rigging the market!

(265) Open up Granny’s
braventory, combine your diamond with your
double
mirror and you will create an illusion
of diamonds
. (A crafty way of multiplying one diamond into
many — a stock exchange gambler’s mirage !!).

(266) Give an
illusion of diamonds to the trader in the white shirt at the right
of the screen ……… and see what happens !

(267) Pick up (click)
the box just in front of him. You get exploding
boxes
.

(268) Exit Bottom
right hand corner ; the same again ; exit top right hand corner ; out onto
the map. Go to D and from there to
D1.
Go back to that eerie forest again.

D
& D1
.

(269) Take the exit
at the bottom right hand corner. You come upon an old geezer merrily snoring
away despite the fact that he has an ax embedded deep in his head !?!?  
Examine the terrain.

NOTE.
Operate
the tape recorder again (hints !?).

(270) Click on the
ax. A ‘bubble of thought’ emerges from his ‘open mind’.

(271) Again on the
ax. The old guy’s head remains open.

(272) Slip in your
dream
maker capsule and just see what happens !!

(273) Exit lower left
hand corner of screen. The next actions have to be done pretty quickly
!   S A V E !

(274) Click on the
right hand top corner of the screen. Granny appears at the far end of a
semicircular tunnel. AS SOON AS YOU CAN, click on Granny and she ducks
down behind the tunnel. Again, as soon as you can, click
near to the right hand bottom corner of the screen, and Granny edges her
way around without being seen, to the front end of the semicircle and waits
there. The laundress fills a trolley, which first tips out its contents
(dirty washing ?) in one spot, continues, and picks up things (clean washing
?) at a later spot. AS SOON AS it comes to rest next to Granny,
click on the trolley and Granny jumps aboard. It carries on (unseen) through
the tunnel. Here comes the (mildly) tricky part. The
laundress is poking the contents of the trolley with a stick, and if she
pokes Granny, you’ve ‘had it’ ! To avoid this, click quickly just
to the left
of Granny and then just to the right of her.
(You may see Granny feint in one direction and then the other). 
If you don’t do this correctly, you start the WHOLE performance over again
— but it’s fairly easy and you get as many tries as you want.  When
you DO complete it O.K., the trolley carries on and dumps Granny
down the dirty washing chute — which is apparently ‘what she (you) wants’
!

(275) Granny would
like to get to the guy in the chair but the billy-goat isn’t having any
!

NOTE.
Operate
the tape recorder again (hints !?).

(276) Click on the
white bone on the cabinet just right of center screen. This keeps the goat
busy !

(277) There is a basket
being pulled up and down from the roof. Click on the basket (when you can
get to it) and Granny jumps over the rope ‘divider’.

(278) Keep on clicking
on the basket (as often as you can) until Granny grabs it, removes a hand
grenade from it, and lobs it at the chap. —– Boy ; does he deserve
it !!
  He literally starts smoking !!! After this, it gets a bit
chaotic, but if you keep on clicking you’ll succeed (N.B.
Sometimes, when Granny is close to the guy, it goes better if you move
her anywhere away from him !).

(279) Use your baseball
cap on his head.

(280) Use your glass
of old liquor on the tankard on the table to the left of the fellow’s
chair.

(281) Click on his
legs (maybe more than once).

(282) Click on his
chair (maybe often). Eventually he’ll rush off.

(283) Continue to
click on the chair and Granny will occupy the chair, gyrate around, get
the shakes, etc. Eventually she gets a pair of underpants.

(284) Click on the
dart-board.

(285) There are 3
concentric circular rings of several colors. When you click a color, the
ring rotates until that color finishes up on top. From the inner
to the outer
rings :- click yellow ; then blue ; and finally brown
{since there is more than one brownish color in the outside ring, the one
you need is between the red and the gray}.  Bull’s-eye :- the darts
go flying into the board !!

(286) Exit bottom
right hand corner. The microwave is now open.

(287) Click on the
microwave and enter. You are now in a place where a workman is using a
pneumatic drill on a giant snail.

(288) Granny keeps
shaking and falling down. She needs (so give her) her anti-dizziness
pill.

(289) Click on the
giant snail’s head.

(290) Click on the
snail’s shell, very close to its tail.

(291) Click on the
workman with the drill.

(292) Pick up (click)
a
mushroom
.

(293) Exit via the
‘new-exit’ at the top of the rope ladders at the rear (mid screen).
You are now in Melanie’s room. Roam around ?!?

(294) Use the metal
crowbar to lever up the triangular wedge on the floor (just to the
right of the glass aquarium). It ends up in front of the stove.

(295) Up-end this
wedge by clicking on it, and it becomes a serrated ramp.

(296) Click on the
toaster ; and again ; keep on clicking on it. With each ‘click’, it moves.
…….. Continue until the toaster is poised at the top of the wedge-ramp.

(297) There are two
small bug-like creatures bouncing up and down over the two hot plates of
the stove. Click on each ‘bug’ in turn until both are inside the toaster.

(298) Click on the
lever of the toaster. A toasted bug flies up and gets speared beneath the
ceiling fan.

(299) Repeat exactly
for the second bug.

(300) There is a black
box just to the left of the circular disk that rotates Melanie. Use your
Jack-in-a-box
on this black box. Bingo !!  Melanie deigns to get up !

(301) Use the underpants
on Melanie. She’s totally hypnotized into ‘action’.

(302) Click on the
opened closet.  Granny somehow gets to the creature in the aquarium,
and then acquires  a family album.

(303)
Drag* the vacated circular disk to
the left. It rotates and Melanie flies to ……….. ?? ………..
?? ………. ??    s a v e
!

(304) Exit :- bottom
left corner ; upper right corner ; upper right screen ; upper middle screen
; lower left corner ; bottom middle screen ; upper right corner ; out onto
the map. Go to the Villa.

GRANNY’S
VILLA
.

(305) Enter the villa. 
Go to the washroom.  Use the long sheet of paper
to reach the sphere on the uppermost shelf.  You get a
ball filled with water
.

(306) Exit the washroom
and the villa’s front door. Go out onto the map.  Go to C
and then to C1.

C
& C1
. — (The
Upside-Down World
).

(307) Granny falls
down the elevator shaft. She is in a sort of foyer outside an elevator.
There are all sorts of things she can do here (some quite amusing !). Try
as many as you wish.

NOTE.
Operate
the tape recorder from time to time in the (many) different places you
visit and listen to George’s “diary”. If you haven’t done so already, view
all
items in your braventory (mouse:- right click) &
read
the written captions below them – they may contain wacky hints ?

(308) Remove (click)
on one of the retaining screws on the panel (near mid screen)
and see what happens.

(309)
If you haven’t already done so, try tickling the protruding foot (near
bottom right) …. Serves Granny right !!  Drag*
the foot towards the mirror on the left. Now something really
starts to happen. The foyer turns upside-down (or at least twists 90º
onto its side).

(310) Again try various
things to see what happens.  If nothing works’, do as follows :- There
are four vertical buttons near the center of the screen (for the four floors
of the building).  Click, say, the second from the bottom and see
what happens.

(311) Pull (i.e. click)
the left hand red knob just left of the buttons. {N.B.
Don’t
click the right hand red knob — this is your exit ‘icon’ !!). You can
now explore (say) the second floor.

(312) You will find
that there is nothing much of great significance on any of
the floors except the top (fourth) floor. So repeat the previous actions
and go there.

(313) Click in front
of Granny (center screen). Granny ‘meditates’ and then ‘hides’ whilst one
of Rabbit’s agents noses around.

(314)
There is a triangular shaped swing-barrier barring her progress. 
Drag* the pointed tip of this barrier
horizontally towards the end of the screen.  She’s through !

(315) Enter (click)
the last door (on the right) in the corridor.  She’s in a REALLY upside
down room now — Granny’s upside down too !! The rabbit follows her and
smashes her through a (thin) wall !

NOTE.
Operate
the tape recorder again (hints !?).

(316)
Get to know the place. Near to the middle of the left hand side of the
screen is a ‘back to front’ staircase. Try to use it !@&#$%? 
Drag* the stairs to the left and a
‘reversed’ door materializes.

(317) Click on this
exit door!

NOTE.
Operate
the tape recorder again (hints !?).

(318) You are now
in a room whose stairs are arranged crazily. Fritz and a dog rush in and
out — Fritz is trying out some newfangled magnetic dog-catcher device.
Explore as much as you want. Granny wants the half-compass floating near
the middle of the screen. Try to get it !?@#&$% . Use your folding
steps on the gap in front of Granny.

(319) Now you can
put (click) your half a compass
(from braventory) on the floating half. The resulting full compass points
somewhere — look up at the ceiling !

(320) Wait until the
dog is sitting next to its kennel, doing whatever dogs do (if it refuses
to appear, exit the room and re-enter it !). ‘Show’ the dog your photos
of Fritz in Granny’s braventory family album.
The dog goes down for the count !

(321)
George’s magnetic device pulls and attaches him to the dog.  Drag*
them both up to the skylight window ……………….. and get
rid of them both !!

(322) Exit bottom
right corner. Click on the creature on the ceiling/floor. ‘Converse’ with
the creature.

(323) Put your ball
filled with water on Granny’s feet. Whatever happened to Newton’s
law of gravity ?

(324) Click on the
hole created in the floor/ceiling.  Darkness !!

(325) Near the bottom
middle of the screen there is a faint orange glow (in the same position
on the screen where the creature was).  Click on this.  Granny
will be back, upside-down, in the upside-down room. Notice that the lampshade
has fallen down onto the table below/above !

(326) Click on it
and you get a lampshade.

(327) Put your electric
button into the gray circular button-panel (near middle-right of
the screen). It fits !

(328) Click on the
service-elevator just to the right of the electric button (holder). Granny
goes traveling.

NOTE.
Operate
the tape recorder from time to time in the (many) different places you
visit and listen to George’s “diary”. If you haven’t done so already, view
all
items in your braventory (mouse:- right click) &
read
the written captions below them – they may contain wacky hints ?

(329) She is in some
sort of machine room. As always, poke around and keep your eyes and ears
open. N.B. Keep a half an eye on the cat and the goldfish
(near the top of the screen towards the right). Hanging from the pipe is
a sketch — not exactly Picasso, but …….!   Click on it
and see what happens.

(330) Click on the
drawing a second time. You get a blueprint.

(331) Turn (click)
the wheel underneath the drawing.

(332) Near to the
bottom right corner is a large machine with 2 brown handles and a gray
button between them. Pull (click) one handle. What happens ?

(333) Pull (click)
the other handle. What happens this time ?

(334) Click the button
between them.

(335) Now go to another
gray button a little to the right and below the (remaining) drawing. Click
it. This time something unusual really does happen !

(336) There is some
sort of cavity near the bottom left corner of the screen. Click on it.
NOSEY !!  You get a weird fish
! (check Granny’s braventory to see you’ve really got it !).

(337) Exit bottom
left corner. Exit again near mid screen and you are back in the fourth
floor corridor. Click on the bottom ledge of the first
entrance on the right. You are now in A  VERY  STRANGE ROOM 
INDEED !!
  Some crazy architect has somehow split it horizontally
along the middle — goodness only knows how or why ?!?  This time,
have a very good look around (if you want to make ANY sense’
of what is to happen ??).

   Granny can
also take a shower if she so wishes !?    S
A V E
!

NOTE.
Operate
the tape recorder again (hints !?).

(338)
There
is a round metallic looking knob on the floor near the bottom middle of
the screen. Click on it — anything significant happen ?  Drag*
it to Granny.  N.B.  It is ESSENTIAL
that you do this HERE, or you could be in very serious trouble
later (a nasty ‘dead end’ !!!).

(339) There is a crack
in the floor in front of the chest of drawers (near the left bottom corner).
Click on the crack and a trapdoor opens on both levels
For some really weird behavior, click on the trapdoor, and
the two drawers of the chest and its ‘counterpart’ on the upper level !!

(340) If you don’t
succeed, click on the upper drawer on the upper chest.

(341) And THEN click
on the lower trapdoor. Granny has made it to the upper floor
(talk about “split level” !).  Granny would like to get to the right
hand side of this floor but the artist won’t let her ……. it spoils
his ‘concentraaaaation’!

(342) From his French
accented talking and singing, it’s not difficult to guess what would distract
him ! The only thing that seems to obsess the artist is ‘chicken’. So give
him your airy chicken. But unfortunately it
jumps (or rather, floats) ‘downstairs’.

(343) Return downstairs
:- Click on the top drawer of the lower chest
and jump into the upper trapdoor !

(344) Click on the
chicken ……… into the ‘ancient Russian fireplace’ ……………
……. upstairs ‘via’ chimneys ………. mayhem !! ………. exit artist
!!?@#$%&?!!

(345) Repeat (340)
&
(341). { N.B. There IS a somewhat shorter
method to get rid of the artist than that described above !!  Maybe
you’ve found it already ?!?  But you miss a fair bit of the ‘fun’
! }.

(346) Click on the
weirdo on the right of the camera (maybe more than once) …… good-bye
weirdo !!!

(347) Click on, and
get, a camera (with a backwards flash).

(348) There is a mirror
to the left of the easel.  Click on it. Granny has apparently “missed
her waxing appointment” ?!!

(349)
Drag* the mirror to the right. Granny
arrives at a ‘Hungarian cube’ with its crazy architect. Inspect! Why no
electricity ?  Wires disconnected ?

NOTE.
Operate
the tape recorder again (hints !?).

(350) Click on the
(only) arrow which is pointing towards Granny. Part of the cube rotates
in one plane !

(351) Click on the
arrow which is directly in front of Granny (pointing down screen and a
bit
towards the left — not the far left arrow).  A different
part of the cube rotates in a different plane ………… Country and
Western music, and dancing red boots !  At least the cube looks a
bit
more ‘normal’ now !!

(352) Go into the
‘cubic-house’ (click on the phonograph, bucket, electric wire, etc.). The
architect is obstreperous. What has he lost ?  Oh yes — give him
your
blueprint
(not that it seems to actually
help him much !).

(353) Now you can
click on the bucket and put it onto the phonograph. The music becomes very
muffled and the red boots fall down and stop dancing.

(354) Click on either
red shoe and you get red dancing boots
.    s a v e !

(355) Exit via the
hook (right upper corner) or via the arrow at the left bottom corner ;
then {see (343) } exit the split-level studio ; exit bottom right
corner ; exit bottom right corner again ; exit rotated foyer { see (311)
} ; exit right side of the screen ; Go out onto the map.  Go to E
and then to E3.

E
& E3
.

(356) Exit middle
right side of the screen (if you click higher up, you’re returned to base
!). Granny has arrived at George’s office. Click on him many times
to get him to pay any serious attention —- you’ll hear just what he thinks
of his ma (and vice versa) !!!

(357) Since (according
to Granny — his mother) George is only interested in “money & young
women”, get Granny to put on the model’s clothes
!!@&$%!! .

    
NOW
George really pays attention, and opens up his inner
sanctum !

NOTE.
Operate
the tape recorder from time to time in the (many) different places you
visit and listen to George’s “diary”. If you haven’t done so already, view
all
items in your braventory (mouse:- right click) &
read
the written captions below them – they may contain wacky hints ?

(358) Put your flying
casket just to the left of the column (a little to the left of where
George is sitting).

(359) Click on George.
“Can you photograph him ?” ……………. “Sure !!”.

(360) Use your camera
(with a backwards flash) on George. Wait a few seconds, and George
REALLY launches into orbit !!!!

(361) Click on the
suitcase next to the table (it’s rather difficult to see — it’s against
the right hand side of the table & just to the right of Granny’s green
mini-skirt). You get a suitcase (with a sock
credit card
)
!

(362) Exit bottom
middle ; exit top of the screen ; Go out onto the map. Go to the villa.

GRANNY’S
VILLA
.

(363)
Go back to George’s secret room { see (021) }. There are two red
doors near the middle of the screen. Click on them both. Now drag*
the
left hand door to the left …. and the right hand door opens
!!

(364) Put your suitcase
(with a sock credit card) onto the square panel (to the right of
the two doors — near to middle right of the screen). Dark red curtains
are drawn revealing a sophisticated missile of some sort.

(365) Click on the
machine inside the right hand opened door. Whooommmfff. Hatch
closed –Take off!

(366) Click on and
get a football helmet. (If you
click again on the above machine, the bed crashes down and stops Granny
from getting the helmet — you can try it if you like !!  Don’t worry
— simply click on the machine again, and the bed retracts !).

(367) Now click on
the trapdoor in the floor and return to the bedroom, the dining room and
finally the hallway. Go out onto the map. Go to A.

A.

(368) Open (click)
the double fawn colored doors at the top of the (static)
staircase near the middle of the right hand side of the screen.

NOTE.
Operate
the tape recorder again (hints !?).

(369) Click on the
intercom near the middle of the right hand side of the screen and also
on the creature in the booth near center screen. If you do this a few times
Granny will be told that “for the sake of security” she must have a helmet.

(370) Put the football
helmet on Granny. She is (sometimes, but not always) informed that
she can begin the game ; whereupon she quickly discards the helmet (what
was it for?) & begins the game !  S
A V E
!

(371) This may be
a bit tricky (or extremely easy), but not really hard. One way of
‘winning’ is as follows (there may be better, easier and more precise methods. 
It’s possible sometimes to simply walk to the trophy and
take it … random ??) :-

    There
is a sort of forecourt of 4 large squares in front of the game area (near
the right side of the screen). As each of the four creatures lands on its
particular forecourt square, ‘dose’ it with sun tan
lotion (gives them sticky feet — at least temporarily). Then position
Granny at the jumping off point at the middle-front of this forecourt.
Click on a square in front (or behind) of one of the four creatures, and
it jumps to that square, often causing one of the obstacles to rise or
fall. Do the same with the other creatures until the first small square
of
the middle row
opens up for Granny — click on this free square
and Granny jumps onto it. By continuing this procedure, Granny can proceed
along the middle row from square to square (five in all).  After this,
she just has to click on the trophy and Granny automatically obtains a
goblet
.  (N.B.
Sometimes, Granny
may have to backtrack in order to ‘wake the creatures up’ !).

E1.

(372) Exit lower right
side of the screen ; and again exit lower right side of the screen ; Go
out onto the map. Go to E and then
E1
and then to the giant.

(373) Granny needs
to find the balloon maker — He’s not far away.  Just below and to
the right of the large colored balloon (from which is suspended the pagoda-like
house) there is a V-shaped hill from which balloons are emerging. 
It is an entrance-icon — click on it. A galloping stone carries Granny
to the wacky dancing balloon maker.  Granny shows off her dancing
prowess (is that her idea of “jiving” @#$%&???).

NOTE.
Operate
the tape recorder again (hints !?).

(374) Talk to the
guy. Granny wants an engine or electricity or whatever.  He says she
can take it — but how ??  Give him your lampshade.

(375) ….. He lied
…. He wants a trophy ; so give him your goblet.
You get an engine and a car battery.
Exit bottom left hand side of the screen.

D1.

(376) Exit, exit,
etc., and go out onto the map. Go to D,
and then D1, and to the eerie forest. 
Near the right hand bottom corner is the car (which flew out of the ax-man’s
head). Click on it … no go !  Use the engine
and a car battery on it. It lights up — literally
!  Exit bottom left corner.    S
A V E
!

NOTE.
Operate
the tape recorder again (hints !?).

(377) Granny is in
front of a bench, next to a kind of ‘fruit-machine’ ; with that darned
kangaroo still hopping round and round in circles. There is a switch-lever
on the right of the machine (near the bottom of the barrier bar). Click
it and the machine lights up.

(378) After the kangaroo
has made a circuit and before he starts another (timing a little tricky
!), click on the top fruit (a red pepper). The barrier bar descends and
the kangaroo halts.

(379) QUICKLY click
on the bench and Granny jumps on it. The kangaroo staggers on a few steps
and collapses.

(380) Quickly
click on the kangaroo (since he soon recovers and continues hopping), and
he takes Granny on a guided tour of the area — ride him Cow-Granny !
On their travels, Granny picks up a magnet.
On return, Granny is thrown down off the animal’s back.  IMPORTANT
:-
check Granny’s braventory to make certain you’ve actually
acquired
the magnet. Exit right bottom corner ; back to D,
and the map. Go to C and then to C2.

C2.

(381) At C2
go
to [ii] — see (056). Granny has arrived at a Disco. Slouch around
and talk to the deejay and listen to what he has to say.

NOTE.
Operate
the tape recorder again (hints !?).

(382) Click on the
table (near the bottom right hand corner of the screen) — Granny jumps
on it and does things most grannies couldn’t do!

(383) Click on the
rotating ceiling lights. Granny has another session of acrobatics and sure
clears the floor pronto !!

(384) Use your red
dancing boots on Granny’s red shoes …… and she goes dancing
….. “rock-‘n’-roll” ?

(385) Click on the
deejay. Granny wins the prize — a clapping
hat
.

(386)
Drag* the base of the table to the
bottom right hand corner of the screen. A new exit opens up — Enter this
large round hole.

(387)
Granny’s in a Karaoke hall.  Granny’s grandson is boring everybody
to tears. Play around there. There are three pedals near the right end
of the bottom of the screen. Click on the right hand pedal (more than once
if you like !) ….. see what happens !  Drag*
this pedal downwards — ‘curtains’ to the brat (although you can still
hear him !!).

NOTE.
Operate
the tape recorder from time to time in the (many) different places you
visit and listen to George’s “diary”. If you haven’t done so already, view
all
items in your braventory (mouse:- right click) &
read
the written captions below them – they may contain wacky hints ?

(388) Now click on
the middle pedal. THAT shuts him up —- thank goodness !  (You can
click on the left hand pedal as well if you like ?!).

(389) Click on the
hearing tubes of both of the two ancient geezers.

(390) Click on the
piano — Granny’s ‘repertoire’ ……… “honky-tonk” ??

(391) Click on the
opening to the left of the old guy in red. A guard bashes Granny, shakes
her, and grabs her braventory.

(392) She finds herself
in another most curious room, and gets a REAL shock !!  She can click
on the exit-icon on the large central screen …. sit in the chair ….
pull the lever on her right ………………… and get a really good
close up view of Granny’s hair and other things — but not much else !! 
‘Retreat’ :- center bottom screen, and then the bottom of the screen.

(393) She’s now returned
to the guard and gets her own back by giving him a good kick him where
it hurts most (Kung fu/Granny!) — She also gets her braventory returned.

(394) The guard has
plenty of pin-on metal medals — use your magnet
on him — how ‘attractive’ !!!

(395) Click on the
brown button to the right of the cloakroom ‘window’.  Articles start
moving round and you get an emergency steering
wheel
.

(396) Now enter the
door to the left of the window and Granny’s back in that very curious room.

NOTE.
Operate
the tape recorder again (hints !?).

(397) Try various
things including conversation with the guard.  Put your chit
into the conical chute just to the left of the guard.

(398) Give the guard
the porno magazine (There HAD to be
some
useful reason for this !!!). He’s too ‘mesmerized’ to pay attention to
anything else.

(399) Click on the
curtain. Granny enters a room where Florence is making ‘music’ on an electric
guitar.

(400)
Click on Florence, the cage, the door, the loudspeaker ; whatever ! 
Drag* the speaker upwards to the hook.
The cage rises — blessed silence !

(401) Push (click)
the loose red brick on the wall (a bit difficult to see — just right
of center screen).

(402) Use your emergency
steering wheel on the gap left by the bricks — it inflates and
expands, and the gap gets bigger.

(403)
Drag* Florence to the hole in the wall
……………. ciao Florence !!!! You get an
electric guitar
. Exit bottom of the screen near to the right
edge ; the bottom of the screen ; the left bottom corner ; the left top
corner ; the right middle side ; the right middle side.

B.

(404) Go out onto
the map. Go to B.

(405) Give ‘trader’
your clapping hat.  You get the
top part of a hang glider
.

(406) Return to the
trader and give him your electric guitar.
You get a fishing rod.

E1.

(407) Go to E1
and again to the giant.

(408) Use your fishing
rod on the walking stone neat to the bottom left hand corner of
the screen. You hook a pair of glasses.
The stone vanishes — he can’t see where he’s not going
any more !

(409) Return to the
well. Go down the hole next to it into the underground cavern and from
there to the ‘pastoral scene’.

(410)
Drag* the sun to the right and enter
the opening — ‘what a sunset’…….

(411) ………..
One tiny Napoleon playing with a cannon, and another running around in
circles attempting to avoid being crushed by a steamroller driven by Quinn
(Granny’s baby grandson)  !@#$%&?!@#$%&? Get as much of the
“story” as you can from the ‘cannon-kid’ and surroundings.

(412) In Granny’s
braventory, combine the upper half of a hang glider
& the lower half of a hang glider. You
get a ‘full’ hang glider.

(413) Use the (complete)
hang
glider on the fork sticking out vertically from the armchair. Granny
goes hang-gliding !!!  Eventually, she chases Quinn away from his
games !

(414) Use the exit-icon
on the manhole just by the armchair (close to the lower left corner of
the screen). Exit the ‘pastoral scene’, the underground cavern, the well,
E,
the map.  Go to C then C3.

C3.

(415) Take a step
forward (so that the first door on your right is the ‘prison’ — with
the crazy video camera).    s
a v e
!

(416) Click on the
last (third — dark green) door on the right of the corridor.

(417) Granny is in
a room full of giant loudspeakers and a video camera (linked to Agent Rabbit).
Quickly
put on the earphones so that Granny won’t
get deafened.

(418) Click on the
table just in front of the rotating circular plate
supporting the microphone (or whatever).  Granny goes to the right
hand side of the table and messes with the instrument (cut scene to Agent
Rabbit), and the video camera points downwards and ceases
to track her subsequent movements !!

(419) Click on the
partially opened drawer on the right side of the table ; what’s this —
a magic stick ! You get TWO crooked
sticks
.

(420) Still standing
on the right hand side of the table, Granny uses one crooked
stick on the revolving microphone.  It jams, pointing to the
left hand large speaker in which a large (exit) hole has appeared !

(421) Use this new
exit-icon and enter the hole. Granny enters a solitary confinement room
with her granddaughter Donna. ( Let the sequence run to the end ……….
No, there’s nothing wrong with your computer !! —
Granny’s been temporarily blinded by Agent Rabbit’s magic ! ).

(422) Put the pair
of glasses on Granny — now she can see properly !

(423) Click on the
violet colored top hat a few times — a ‘polite’ grandma/granddaughter
exchange !

(424) Now place the
exploding
boxes on the middle of the top hat.

(425) Use the second
crooked
stick on the box (which is now on the floor). That explodes it all
right — and releases Donna from her imprisoning hat !!

(426)
At the top left corner of the lower barred window is a hasp (or bolt, or
hinge, or whatever) which is a bit difficult to pin-point. Drag*
it to the right (maybe just clicking on it will do the trick also !) and
the barred windows fly open.

(427)
Now drag* Donna to the open window
well I guess that’s one way to shut up a real pesky kid !!!!

(428) Exit through
the hole and  the speakers-video room.  Then go through the corridor,
the prison, the hairdresser’s salon, the fan-chamber and into the plants’
underground command center.

(429) Place your Master
key on the center of the giant ventilator (where that annoying plant
is hitting it with a hammer). Wowwww — all protective bars are removed
(together with the plant) !

(430)
Drag* the ventilator to the right.

(431) Now click on
the mobile steps (near the right hand lower corner of the screen).

(432) There are four
bluish colored knobs on springs beneath the new position of the ventilator.
Click on the right hand (longest) one. The ventilator spins full speed.

(433) Step (click)
into the ventilator.

          
( N.B.  If Agent Rabbit isn’t inside and you’re
returned to the plants’ underground command center, check in your braventory
that you’ve still got a goldfish and also a mushroom !! —
if
not, get them if you want to see the very lengthy end sequence ) :-

S
I T
   B A C K   &  E
N J O Y

T
H E
   C L O S I N G   S E Q U E N C E 
OF :-

ARMED
& DELIRIOUS  (DEMENTIA)”

GAME
BOOMER’S Hints, Cheats, and Walkthroughs

GAME
BOOMERS DISCUSSION BOARD