Dead Reefs Walkthrough
Dead Reefs
by Streko-Graphics
Walkthrough by MaGtRo July 2007
Gameplay: This is a keyboard
controlled third person game. The main menu has new game, save, load, settings,
credits and exit. The main menu is accessed by the ESC key.
The settings menu has the audio and keyboard settings.
The audio menu has the music, sound, voice and subtitles selections. The
keyboard settings allow changes to the default settings: W = go forward or
combine, A = go left or scroll left, D = go right or scroll right. Right arrow =
action, left arrow = look, up arrow = talk, down arrow = inventory. M = map, Q =
documents, N = notebook, X = search, shift = run or walk, S = back out of
combine or turn 180 degrees and space bar = puzzle and ma interaction or read
documents.
Inventory is accessed by the down arrow. Once the
frame is seen, select the item using the A or D keys. Then use the action
key-right arrow. To combine items, select one of the 2 items and then press the
combine button (top arrow at bottom right of screen). Scroll to look for the
other item and select it. Then use combine icon and the items will now be
combined. Use the back out or S button to deselect the first item after pressing
the combine button.
Use the space bar to skip cutscenes. Tab key changes
the camera angle in some areas. No CD in the drive is necessary to play this game.
There are unlimited saves.
Map – Once the map is taken, it can be used outside
any structure to jump from one point to another. Use the M key,
select the place you want to go to by the use of A and D keys and then press the
space bar. You will automatically be transported to that spot area.
Active Spots – Use the X key and see all the active
spots in an area.
Documents picked up – Use the Q key and then use the D
key to see documents picked up. To read a book picked up, open it using the
space bar.
See a man attacked on a lookout structure and later
see his body at the bottom of
the cliff.
October 13, 1727: You are Sir
Amadey Finvinero, an investigator from the mainland sent to find the killer. The
crew of the ship leaves Finvinero at Dead Reefs.
Inventory – In inventory (down arrow at bottom
right) is a
walking stick. Press the down arrow again to remove the inventory circle.
Document – Press Q to see the journal or N for
the notebook alone. Press
the space bar to read what has been entered already. Check the journal
throughout the gameplay to learn what is observed by Finvinero. Press the
ESC key twice or press the space bar to close the journal and then use the Q key
to remove the journal.
SAVE GAME OFTEN! You can die in this game with no
second chance.
Pier: Go and talk to the man waiting at top of the
dock’s steps. William Hooke is the local clerk and will update Finvinero of the
events that brought him to Dead Reefs. Say goodbye to Hooke. He will have dinner
ready at the Inn at right.
Walk around to familiarize yourself with the controls.
Look and talk to the 2 men by the cart and also to the man in front of the Inn;
unfriendly local fishermen. Look at the strange symbols that are drawn on walls,
doors and gates in town.
Klenton’s Inn: Look at the
symbol on the Inn’s door. Enter the inn.
Go to Hooke sitting at far right corner of the
inn. Talk to Hooke about everything. Learn about the symbols, the history of
Dead Reef’s inhabitants, the fall of Patrick the son of Baron Arthur Wyndham
at Signaling Cliff and Benish Sue.Go and talk to the innkeeper who looks like the helmsman of
the ship, Shedwick Klenton. Learn about the symbols, ghosts at the manor and
the cook at the manor. Exit the inn.
Estate – Wyndham Manor: Go forward right
of the Inn. Go forward, down the stairs-ramp and try to talk to some unfriendly
locals. Go forward and see a house with stags on the gate posts. You can
enter the house later. Go cross the bridge and be at the manor.
The side gate is locked. Go to the door and knock
twice or more until a voice is heard behind the door.Foyer – Meet the butler, Belmont. The
lady’s picture on the second floor tilts. While he prepares the room, look
around the manor.Footsteps are heard on the blocked door of the left
wing.Go to the right wing and look around. The clock has
stopped and the 2 doors at right end of the hallway are locked.Kitchen – Go to the left end of the hallway
and enter the door to the kitchen. Go to the right and look around the kitchen.Wine Cellar – Go down the stairs at bottom right of
the kitchen.Look at the bottle on the shelf at right. Hmm –
strange smell. The document says that it is aroma scents.Go to the left and check the wine. Go to the hallway right of the wine cellar and see
the door to the garden.Go back to the foyer.
Second floor landing – Climb the stairs and
look close at the 2 pictures depicted on the wall.The lady’s picture is skewed. Take note of the
necklace. It is unique.Look at the man’s picture and note that he must be
the pirate.Bedroom – Talk to Belmont. Learn his version
of why the left wing is closed. The portraits are of Baron Kasbert Wyndham and
his wife, Clarissa.Read the document – press Q or N, then space bar,
scroll using the A or D keys and then close the journal using the space bar
and then Q key.Look around the bedroom.
Desk – Click on the desk’s papers and
Finvinero starts to write. Hear a woman singing by the cabinet.Cabinet – Go to the cabinet. Look and open
it. Use the walking stick on the cabinet.Use the hand icon on the back of the cabinet. See
a padlock. Look close and use the space bar. The pictures rotate. Use ESC to
back out of the puzzle.Exit the room and check all the other doors. See
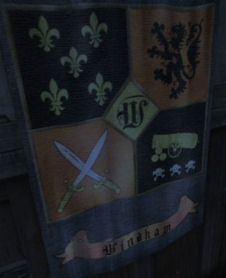
that except for one other door (left wing door) everything is bolted shut.Check the Wyndham coat of arms at each end of the
hallway. Go back to your bedroom.Padlock – Look close at the padlock.
Use the space bar to rotate the pictures.
See that the pictures are the same as that of
the Wyndham crest.Arrange the pictures to be similar to that of
the Wyndham crest.The back wall opens.
Secret passage-Upper level:
Climb the stairs. Go to the hallway.
Library – Enter the door on the right. Look
around.Desk bureau – Go to the desk at bottom left
of the room.Take and read a page from the Baron Kasbert’s
diary. It will now be in the documents.Learn about a monk, relic, curse and Clarissa. The post script says
something about cannon fire from the ship.Open the top small left drawer of the bureau. Take
the old key. Exit the library.Bedroom – Go to the door at end of the
hallway. Use the old key.Meet Clarissa’s ghost. Clarissa gestures to follow
her and she goes through the fireplace. The fireplace is blocked.Look around the room. Look at the chair and see
blood stain.Music – Play the music box by the window.
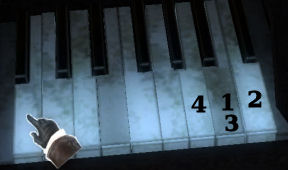
Piano – Replay the 4 tone music heard on
the music box.Use the A and D keys to move. Use the space bar
to play the piano keys.From left to right, numbered 1-9: press keys 8 9
8 7.The back of the fireplace opens.
Go to fireplace. Take the lamp from the
right of the fireplace.Take lamp from inventory and use on the fireplace.
Enter the fireplace.
Beyond the fireplace:
Go down the stairs and forward until a passage goes
to screen left and below.Take the screen left path. Go forward until a fork
in the path.Take the upper right path. The bottom path is
blocked.Grotto – Go forward and be at a grotto. See
Clarissa. Take the rusty key from top of a ringed pedestal.Turn back and go forward until the fork. Take the
upper left path back to go to the main path.Continue to the bottom of the main path. See
Clarissa beckoning again.Locked door – Go to the locked grilled door.
Use the rusty key.Enter and at the end see that it is the bottom of a
dry well. Climb up.
Cemetery: Go forward and see
the tombstones. There are nine graves and they died nine years apart. Go left
through the break in the wall to another part of the cemetery. Look around here.
Then enter to the cemetery on the left. See Clarissa go through the first
mausoleum at left.
Go to that Wyndham family tomb. Try to enter; it is
locked.
Caretaker’s cottage – Go to the
caretaker’s cottage at the other end of the cemetery. Enter and talk to Oliver
Boon. Learn about the curse. After Oliver left, take the cemetery keys
from the wall left of the fireplace-stove.Wyndham family tomb – Go to the
crypt-mausoleum and use the keys. Strange – it does not work.Caretaker’s cottage – Go back to the cottage
and look at the tool box on the table. Take a crowbar, Wyndham crypt
key and sharpening stone.Wyndham family tomb – Go to the
crypt-mausoleum and use the Wyndham crypt key. The key broke.Entry to crypt – In inventory, combine the
sharpening stone and the cemetery keys to get fixed cemetery keys.Use the fixed cemetery keys on the crypt door. Enter and go down the steps.
Clarissa’s tomb – Look at the tomb right of
the stairs. Clarissa died 9 years earlier and on the same day as the
first of the nine cursed death.Use the crowbar on the tomb. What? Where’s the
body?Patrick’s body – Go to the left side and
look at Patrick.Use the hand icon to examine the body. Get a
handkerchief. Look at it in inventory and see an eye in the
handkerchief.Look at the body again and see a cut received just
before he died on his hand. Something is clenched in his fist.Use the hand icon again but his fingers would not
budge.Witch – Exit the crypt and go forward.
Enter
the fenced in plot before the cottage and talk to the witch, Benish Sue.Learn about her vision, Patrick’s murder and the curse
passed from the ancestors.She tells you to go see her for the memory potion.
Intruder – See a man jump down
from the tree and run. Finvinero chases the eavesdropper.Go to the wall at top
right corner of the cemetery. At the broken part of the wall, see a piece of
his robe.Go back and continue to talk to Benish Sue.
Learn what she knows
about black overcoat man and how to unclench a dead man’s hand.She advises to see the
alchemist at his mountain top tower.Exit the cemetery by turning around and go forward
to the gate.Exit and automatically walk to the manor. Sleep and
wake up the next day.
Estate – Wyndham Manor:
Finvinero wants to talk to everyone in the house. Read the documents or notebook to review
what has transpired.
Exit the room, go down
the hallway and exit through the door at right. Go down the stairs.
Go to right hallway and enter the door at the right end.Steward’s room – Talk to Mr. Belmont. The laundry woman, Miss Hemfry will not be
here till later.There is a Wyndham
family chronicles at the Baron Arthur’s study. Get a key for Patrick’s
room across Edward’s room at the right wing. He doesn’t recognize the
handkerchief.Patrick’s room
– Go upstairs. Enter the right hallway and use the key on the room at left.Look around the room.
Look at the tools left of the door by the washstand. Take the rope.Go to the desk. Take
the map of the island. Take the smelly bottle to be compared
with the flask at the basement.Exit the right wing area and go down.
Kitchen – Go to the left end of the hallway of the right wing. Enter the
kitchen and talk to Melvin Klenton, the cook.Learn about Patrick’s passions (treasure and women),
the smelly bottle and a week of insomnia for the occupants of the manor.Wine cellar –
Go down and look at the smelly bottle on the shelf.Open inventory and use the
smelly bottle from Patrick’s room. Finvinero will smell both bottle and
conclude that they are the same.A running man’s noise
is heard. Follow the man by going forward and exiting through the door on the
left.Climb the steps to the
garden and look down on the footprints on the ground.Go back to the kitchen
and talk to the cook. Learn that he lost a knife the day before Patrick’s
accident.Exit the kitchen and
go forward to the other end of the hallway. Enter the door on the left.Go forward and down
the stairs to the left.Laundry room –
Talk to the old maid, Ms Hemfry.Learn about Edward’s drawings, Annabel Klenton the innkeeper’s daughter, Mervin and the lifting of the curse and the
anniversary of the ghost. Learn about the story of the poisoning of the
woman captive by Clarissa and brother’s jealousy.Steward’s room – Talk
to Belmont again at the room next to the laundry room. Learn about Patrick,
Edward and his alibi.Baron Arthur –
Climb the stairs and enter through the right wing door. Immediately go left
and forward. Enter through the door at end of hallway.Go right and look at
the desk. Read the family chronicles and learn about Clarissa. Take the paper
on the desk and read about the Baron’s order for books. Look around and note
the balcony door and telescope.Talk to the Baron.
Learn about Patrick’s search for the ancestor’s relic. The relic is a small
statue encased in precious metal. Learn more about Annabel.Edward – Exit
the room, forward, right and right to Edward’s room. Enter and look at the
portrait of Annabel beside the fireplace.Look at the fireplace
and see something there. Wait until Edward is gone from his room.Go upstairs and look
at the painting at right of room. Go to the left side of room and look at all
the paintings.Talk to Edward. With
the talk of the curse, the painting of the woman beside a rock with evil
shadow had red paint splattered on it.Mr. Hooke arrives in
the manor. Exit the room and go down through the front door to meet Mr. Hooke.
Signaling Cliff:
Talk to Mr. Hooke. Learn about the ship just off the cliff.
Look at the hole in the
ground by the broken fence.Go to the lookout
building. Go to the front part and look at the broken board on the railing. Take
the board and it falls off to the bottom of the cliff. Strange.Go back to the broken
railing down the path. Continue down the path to be at the bottom of the cliff.Just below the destroyed rope railing above is a rock
and he makes a comment that it is where Patrick was said to have fallen.Continue forward and be under the lookout building. See a rock at the fire
pit. Use the walking stick on rock and see blood on the ground. It is clear that
the body was thrown off from the landing.Go back up to the main
path. On the main path, someone pushed boulders to stop Finvinero.Continue forward, go up
the stairs and to the right by the cliff face. Look at the cliff edge and see
that the rocks were pushed from here. Not a trace.Look at the fire pits.
Go to the path at top of the screen and be in pier area.
Map:
Check the map by using the M key, select the place you want to go to and then
press the space bar.
Inn at the pier:
Enter the Inn and talk to the Innkeeper, Shedwick Klenton, Annabel’s father.
Annabel was sent to the mainland the morning of Patrick’s death.
Madam Sue Benish: Exit the Inn.
Use the map to go to Madam Sue.
Talk to Sue 🙂 She
wants help on the runes since she miscast the potion. Learn about the insomnia
potion for nightmares.Runes puzzle – Look around. Look at and
then take the runic alphabet on the dinner table left of door.Move the hand selection
using the S and W keys. Then use the space bar to write the runes. Press ESC to
get out of puzzle.If you want memories you
will seeAny creature on earth
Give back the cane of
memories – The first rune is already writtenTo the swamp owner at
dawn – king frogThat six eyed monster
guards – spiderWhere the unborn
laborers dwell – ant eggsBring her the boar’s treats barefooted – acorn
That grew on the wise-man in the green cape of eternity –
Hundred year old mossAutomatically take the chalkboard. If wrong, Benish Sue will say they don’t look
right. Redo the puzzle over.Talk to Sue. She said to
come back later since the potion needs to boil.Exit the house and take
the path to the right.
Town:
Be at the town center. Overhear the townspeople talk about a body found on the shore.
Shore:
Jump to shore using the map. Go forward and have a talk with Mr. Hooke.
Body – Look at
the body and see the tattoo of a boar on his hands.Move to the side of the body
and look again to see that he was stabbed in the heart. Use the hand icon to get
a medallion.Talk to the man and
woman. Exit through the path at right or use map.
Inventor Tirell:
Use the map to jump to Inventor Tirell or take the path left of the ramp in town
or right of the house with stags.
Lower the bridge – Look
close at the stand left of the raised bridge. Read Master Tirell’s letter.To gain entry, Tirrell
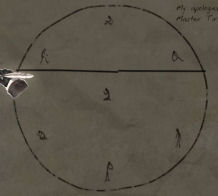
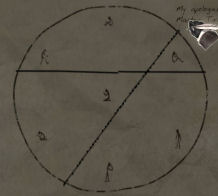
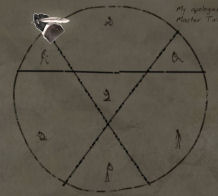
devised a puzzle to verify identity.Prisoner puzzle – See a circle with 7
prisoners.There are seven
dangerous criminals sitting in one cell. You have determined that they are
planning to mutiny. Before they are ready to strike you must separate them into
individual cells by dividing the main cells into smaller ones. Keep in mind that
you have only enough bricks for three straight walls.The object of the puzzle
is to draw 3 straight lines to separate the prisoners into each own cells.Move the pen using the A
D W keys. When placed the other end where you want, press the space bar.Move the pen and see
that a line is now formed. Move the pen to the place where you want the line to
end and then press the space bar.
If wrong, Finvinero will
crumple the paper. If correct he will pick the message up.Take the golden ball
capsule from right of that stand. Automatically, the message is in that
capsule.Go to the left and use
the capsule on the catapult. See the capsule fly to a funnel. The bridge is
lowered. Cross the bridge.Enter the house. See a flying machine
hanging in the other room.Tirell – Enter the tower
where the stairs are located (right of the blackboard).Go down the screen on
the next level and knock on the door.Tirell says that there’s
an electric fish at the laboratory that can help open the fist of Patrick.The tattoo and the
medallion are signs of the Order of Necromancer and can be explained by reading The Fall of Darkness found in his library.The flying machine
theoretically flies but the wings are too big to pass through the gate.Library -bedroom
– Go down the steps. Then go down to the lower level using the stairs in the
tower.Take the tin plated
scoop right of the entryway.Look at spider web left
of the entryway to get a fly.Go to the table with
plates and food. Take pieces of food.Go to the table with red
and green powder. Take the empty jar.Go to the other side of
the table and get electrodes.Go to the side of the
bed. Take the needle and thread from side table of bed. Combine in
inventory to get fishing hook.Get the electric fish
– Go to the aquarium close to the bed. You can try to take the electric fish and
get zapped.Combine fishing hook
with fly to get fishing hook with fly.Combine the jar and
electrodes to get jar with electrodes.Now, you can use the
fishing hook with fly on the aquarium and get jar with electric fish.Get the book – Go
to the automated librarian machine by the railing facing the library.Use the machine. Move
the knob to a letter and then press the space bar to enter it.Move to T, space bar and
then press the lever using the space bar.Move to F, space bar and
then press the lever using the space bar.The book is taken by the
automated librarian.Read The Fall of
Darkness by William Tirrell. Learn about the Son of Abyss, the Spirit’s Nest
relic and the demon. Learn also the different ranks: The magistrate (infinity
with 2 eyes), casters (no symbol known), controllers (hand with staff),
observers (eye) and runners (boar).Use S to pull back. An
explosion is heard. The book is now added to the documents.Look at the symbol on
the handkerchief taken from Patrick’s body. Looks familiar.Go back up and talk to
Tirell.Go down the stairs. Take
the candle from top of the barrel. Exit the tower.
Madame Sue:
Go forward and Finvinero sees the same footsteps seen this morning outside the
wine cellar at the manor on the ground in front of the hut’s door.
Go inside and look at
Sue. There were 4 stabs wounds. Use the hand icon to
take the knife.Let’s chase the murderer. Exit the hut.
Go left and forward and
be at the forest.
Forest – This is a
maze.
Maze – Go forward
and see a boulder ahead. Take a left.Go forward and see trees
at the next fork. Take a right.Go forward and see A
tree ahead at the next fork. Take a right.Go forward and see 3
trees ahead and a boulder a bit to the left. Take a left. See footprints here.Go forward and see tress
ahead at the next fork. Take a left.Go forward and fall into
a trap.Trap – Take a
rock at bottom left of the pit.Combine rock with rope
taken from Patrick’s room to make a sling with rock.Go a bit to the left
wall of the pit.Use the sling with rock
on that wall that you can not reach.The sling is
automatically taken.
Sloop – Go forward
after the trap and see the sloop ahead.
Men aboard – Go
forward and aboard the sloop. Look around.Go to the right end
and try to enter the hatch. There might be men there.Go to the left end and
see a bell.Go to the other side
and see a rope tied to the crossbeam. Try to use the knife and Finvinero says
to lure them out first.Lure the men – SAVE GAME here because you can
die. Use
the bell.Immediately, go to the
rope tie to the crossbeam. Face it and use the knife on the rope.Watch as the crossbeam
knocks the 2 men down. If slow, the man will throw a knife and game over.Go to the man knocked
unconscious and look at him. Use the rope to tie him up. If you forget to tie
him up, you can die – game over.Lower deck – Enter
through the cabin door.Take Benish Sue’s
memory potion from the top of the barrel.If you don’t have any
candle yet, take the one from on top of the barrel at bottom right.Go to left side of the
cabin. Look at top of the chest.Take the order of the
Magistrate to Runner Tarston to retrieve the artifact from the Observer at
Dead Reefs. The Observer is to be taken care of.Take the book that
states that the demon’s feeding cycle is every 9 years at quarter to one at
night. The page of the spell used to control the demon is torn off. The book
and order are added to the documents.There is a goat’s
skull on the wall. Exit the cabin.Talk to the tied up
man. (If the man was not tied up, he throws a knife and kills you – game
over). Thanks, catsmom.After the threat, learn about Tarston, the ‘someone’ who’s been here a
year (hmm…), relic and who Tarston is.Use the map to go back
to town.
Mr. Hooke’s house: Enter
through the entryway with the stags on both sides. Try the door; it is
locked. Look at the ladder at
left. One rung is missing.
Go to the Inn and talk
to the innkeeper about Mr. Hooke and the man in the sloop. Exit to town.
Cemetery:
Use the map or take the road across Mr. Hooke’s house.
Go to the Wyndham
crypt and see that it is locked.Go to the plat where
the witch was earlier and see that there is vandalism. Someone has been
digging graves.Take a piece of shroud
from the left dug grave.Scare Mr. Boon – Go to
the caretaker’s cottage and knock on door.He’s scared and thinks
that it’s the demon out there.Go to the side of the
cottage and see a scarecrow.Use the shroud on the
garden scarecrow. It needs a skull.Use the map to go back
to the sloop and see that the man is gone.Look at the blood on the side of the boat. He was
pushed overboard.Enter the cabin and
take the goat’s skull.Use the map to go back
to the cemetery.Use the goat’s skull
on the scarecrow with shroud.Still missing
something. Use the candle on the shrouded skulled scarecrow.Use the prepared
scarecrow. See Mr. Boon run.Enter the cottage.
Take the cemetery keys from the wall left of the fireplace.Crypt – Use the
cemetery keys to enter the crypt.Go down to Patrick’s body.
Use the jar with
electric fish on Patrick. The fish died and now have a jar with dead fish
in inventory.
Shore:
Jump to shore using the map.
Boy – See a boy
sitting on the rock.There’s a jar in front
of him. Look and see that it has an electric fish inside.Talk to the boy. He
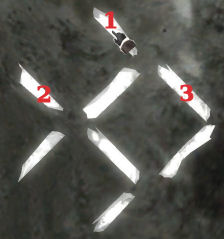
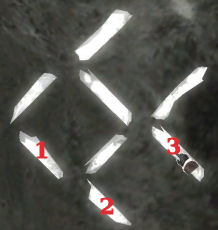
will trade the fish if you solve the riddle.Riddle – Look at the
riddle. It is a fish facing right.Move 3 sticks so
that the fish moves in different direction.Move the numbered line on left picture to the new
position at right picture.Use the WADS keys to move the cursor to the line
needed. Press the space bar to select that line.Use the WADS keys to move it to the new position
and then press the space bar to place the line in the selected position.
Go to the jar of live
electric fish and use it to get the jar with electric fish.Use the map to jump to
the cemetery.
Cemetery:
Enter the Wyndham crypt.
Patrick – Use
the jar with electric fish on Patrick. Get a button from his unclenched
fist.Finvinero uses the
memory potion and sees what happened to Patrick.Now, we need to find
the owner of the torn robe and missing button. As well as find the relic.Locked in – Go up to
the door and try to get out. Drunken Boon locked
Finvinero inside the crypt.Go back to Patrick and
take the 2 ropes under his body.Go to and look at the
window at right end of the crypt. The bars are loose.Combine the 2 ropes
together. Use the combined rope
on the bars of the window. The rope is tied to
bars and Clarissa’s tomb lid.Use the crowbar on the
tomb lid. Exit through the
window.Use the map or use the
gate across the caretaker’s cottage.
Estate:
Go to the manor using the map or take the bridge left of Mr. Hooke’s house.
Mr. Belmont – Enter the manor and talk to Mr.
Belmont cleaning the mantle of the fireplace.Learn that the cook, Mr. Hooke, Edward and Annabelle
have arrived back to Dead Reef 2 years or less.Edward’s room – Go to
the second level right wing. Try to get in the door at right and across
Patrick’s room; it is locked.Look at the door and a comment about a simple pin
can open the door.Go down and talk to
Mr. Belmont. Edward is painting in the mountains.Go to the Laundry room
and talk to Ms Hemfry ironing by the window. Get a pin.Go back to Edward’s
room and use the pin on the door. I must be a poor thief. Didn’t open. We must
find another way then.Go to the Baron’s
room. Go left before exiting the right wing door. Go forward and enter the
room at the end.Go to the door beside
the telescope. Use the pin on the balcony door.Go right and over the
balcony railing. Walk the ledge to the next balcony. Enter the balcony door
and be in Edward’s parlor.Fireplace – Look in
the fireplace. There is something there. Use the walking stick in the
fireplace.Get the burnt paper and read about Patrick’s plan. He needs to go
at low tide to retrieve Baron Kasbert’s relic.Go upstairs and look
at the painting Edward was working on earlier. We have seen this before.Go down and exit
through the balcony door. Cross over to the Baron’s balcony, enter and exit
the Baron’s library.
Secret Passage:
The painting is the stand we saw in the grotto where Clarissa led us to.
Go to your room. Open
the cabinet. Use the walking stick on the back of the cabinet and enter.Climb the stairs and
enter Clarissa’s room Use the piano and go to the fireplace. Use the lantern
on the fireplace.Go forward and left to
the side passage. Take the upper right path.The water receded
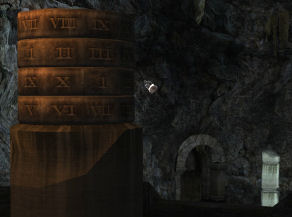
because it is low tide. See the pedestal shown in the painting.Ringed pedestal – Press the space bar to
rotate the rings of the pedestalUse the S key to go
down to the next ring.Enter from top to
bottom: VIII, II, X, VI.The door opens. Press
ESC to back out of the puzzle.