Darkness Within: In Pursuit of Loath Nolder Walkthrough
These actions will then enter symbols 1 2 3 and 4 in the
think frame.Map machine and statues room: Go back to
the red safe at Ivar’s cabin.
Open the red safe at the galleries under the cabin. Click on
the maps and Howard will take the correct map I-00548 automatically.
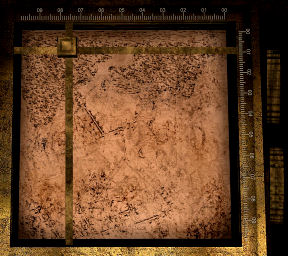
Look close at the marking area at top of the safe. Place the selected map on
it.
Using the 2 wheels on the right, enter the coordinates for
symbol 3 = 07.06 on top and 00.08 at right measuring lines.
Then click on the center square. It will show the intersected coordinate.
Double check the number and then select ‘yes’.
Do this procedure for: 05.05 -05.05, 00.03-01.04 and 09.04-02.04.
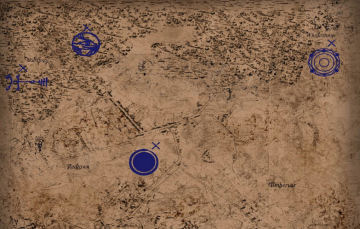
Each time the correct coordinates are marked, the symbol seen for those
coordinates will be seen on the map plus an X.
Take the marked map.
Marked Map: Right click on map and click on each of
the places. Howard should note all of them and wonder where Wolfsprey,
Wholestone and Redtown are since they have old names (clues).
Leave Ivar’s cabin and go to Clark Field’s residence.
Clark Field’s residence: Turn to the left and the
locked door.
Use the key taken from the robe in the Ivar’s cabin
prison cell.Enter and look around at the small hallway.
Dining room: Enter the
other door into the dining room. Look around.Check the paper on the table about gunshots in
Northwood Forest (rifles in Ivar’s place?) and the coming eclipse. Check the contents of the fireplace.
Storage room: Enter through the door at far end of
the room.Look around and check the items around this gloomy room.
Statue: Look close at the statue on the cabinet. This
is similar to the statue in the library upstairs.
Library statue: Go upstairs and face the book shelf
at the end of the room.Look down on the floor and study the statue.
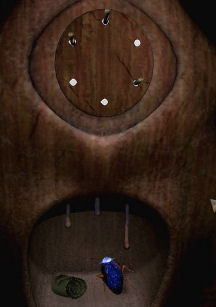
There are 6 white spots on the face. Open the round cover on the body. See 3
sticks of different sizes inside the cavity.Go back down to the statue in the storage room.
Look close at the statue again. It has the same 6 white holes on the face.
The stomach does not open. It should also have 3 sticks inside there.
The object of the puzzle is to open the circular cover on the body by
adjusting the size of the 3 sticks that are hidden in the cavity.Use the 3 sticks taken from the roll top desk in Ivar’s cabin on the white
holes in the face.There are 6 holes that are arranged in 3 columns of 2 holes in a column. The 3
sticks in the cavity are under each of those columns.Insert the sticks on one of the holes of each of the columns on the face.
Having 2 sticks in a column will not work.Insert sticks on: top left, top middle and bottom right column or if you count
the top as one and go clockwise: insert sticks on 1 3 and 6.The circular cover is unlocked. Open it and take the colorful insect
and rolled leaf. Look close at the items.
Howard says he has to know what tree that rolled leaf came from. The insect
does not have eyes. Remember the paper that was read on the corner roll top
desk in Ivar’s cabin. These 2 items are components of the Dversahe Mixture.Exit the room and Howard collapses at the dining room.
Nightmare 4: Wake up facing
a lit hallway. Turn right and enter through the door to a familiar hallway.
The Desperate Man: Go forward twice and look inside the cracked door at
right. See that it is Howard’s room. There’s a blue hole on the floor. and a
person in the bed. The dreamcatcher is gone from the ceiling fan.Check the other doors. Then go back to the other
hallway.
Wall of Sleep: Go down the hall and enter the left
door.Beautiful room: Look through the
window.Open the small cabinet on top of the dresser at the
back of the room.Click to open it. It is locked and a ring puzzle is
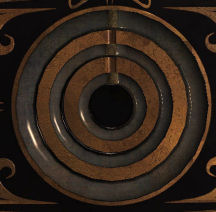
seen.Ring puzzle: The object of the
puzzle is to have all the indentation on each ring align on top of the circle.Note that clicking on top of a ring turns it
clockwise and clicking at bottom of ring turns it counterclockwise.Clicking the inner ring shows similar direction of
the inner and outer ring while the middle ring moves the opposite direction.Clicking the outer ring shows that the outer and
middle ring move in the same direction while the inner ring moves in the
opposition direction.Clicking the middle ring shows that all the rings
move in the same directions.One strategy is the arrange the rings in staggered
positions close to the top, gauge the speed the ring moves and then move them in
position.Hear a click when the lock is opened. Pull back and
open the cabinet.Take the dreamcatcher.
Vortex room: Exit the room
and enter the room across the hallway.Look at a destroyed room. Look outside the window
and see a vortex in the sky.Use the dreamcatcher on the sky outside the window.
November 17, 2011:
Howard’s home: Find out
that 4 days have passed.
Bedroom: Answer the cell
phone and talk to Arthur.Wholestone: He reports that the phone number Howard gave belongs
to that old fool, Edward Braunbell in Rowley in NE of Wellsworth. 200 years ago there was
hearsay about witchery. The town was formerly called Wholestone. A small
building was there before the mansion was built.One of the towns in the map is now identified by its
new name. Open the marked map and click on Wholestone. Howard
mentions that it is now called Rowley.Bathroom: Go to the
bathroom and see a pot containing an unknown substance on the counter.Use the pot on the toilet. Leave the apartment.
Ivar Bergen’s cabin: Enter
the cabin.
Loft: Open the big roll top
desk.Look at the second from left letter. Underline
28-11-2011. John D will not be at Braunbell’s house today.Look at the 4th letter and underline EB as Edward
Braunbell.Hidden clues: Underline IB and know that it is Ivar.
Underline Since we couldn’t take that old fool’s
house in ordinary ways.Howard wonders: Who else called Braunbell ‘old fool’?
Listen to the
dialog ‘Encrypted phone number’.Exit the house and go to Clark Field’s house.
Clark Field’s residence: Go to the living room by
turning right, forward and go through the door.
Secret room: Use the key
taken from Clark’s jacket to open the locked door on the left wall.Look around at a laboratory. Check the glass
objects.Read a newspaper clipping on the shelf right of the
door about someone digging at the City Cemetery.Open the box on the shelf. Read another newspaper
clipping about mammal carcasses and human corpse from the cemetery found at 15
Wind St.’s backyard. Read the letter to Mr. Asimov concerning the history of
the house and the owners. The letter is written by JO.Check the worktable with chemicals and instruments.
Go to the end of the room. Look under the worktable
and open the box. Read more letters of JO about moving his laboratory inside
the house. Look at several pages of pictures of inhuman beings.Look close at the drawings on the floor. Check the jug by the wall that emits smoke.
Curtained room: Go behind
the curtain.Look at the drawing on the floor. Check the drawings on the workbench.
Exit the room and the house.
Edward Braunbell’s Mansion:
Go forward until the small building. The path to the
right is the mansion. It is locked.In front of the door, turn left and see a raven.
Click on raven and read what he says (Easter egg).Knock on the door. Howard enters to find it
unlocked. This happens after knowing that no one is here from the note in
Ivar’s cabin.Look around at the room. Climb the stairs left of
the room.Hallway:
Go through the door at the end of the landing.Dresser: Look at the
dresser on the left. See a muddied flashlight.Open the top left drawer and move the paper. Take
the paper under the other white paper.Look at the paper in inventory and see 287 written
on the back.Enter the door at end of hallway. A sound is heard
just before entering the door to the tower.Tower: Climb the stairs and
then climb the ladder.Look around at items in the tower room.
Read the 2 letters on the cushioned stool center pf
the room to Braunbell from Loath Nolder
about his travel abroad and about the wooden sculptures that was seen in
Clark’s house.Chest: See a chest with a
lock. Use the number seen on the paper taken from the dresser downstairs.Enter 287; then press the square button.
Open the chest and take the 2 blue seal pieces.
Read the book ‘Children of Dis’.Exit the tower through the trap door and down the
spiral stairs.Hallway:
Source of sound: After
exiting the door
from the tower, look down on the floor.Look close at the area beside the plant. Click on
the 2 planks of the flooring. They sound different. One sound hollow and one
is solid.Push the dresser off the hollow sounding area.
Move the carpet off the flooring and see a trapdoor.
Underground: Climb down the
ladder.See grilled alcoves that are locked on both sides of
the hallway.The door at the end of the hallway is locked.
Pan left and open the grill door. Take the key and
the blue seal piece at the back of the alcove.Use the key on the door.
Temple: Enter and see a
temple.The seated statue is familiar, as well as the
Saurian statues on the floor.Turn right, forward and left to be at the right side
aisle.Go forward until the end. Go through another door at
the end of the right aisle.There are sarcophagi on the walls of the room.
Palanquin: See a palanquin
at center of room. This must be the one described in one of the letters on
Ivar’s roll top desk.Open the palanquin. Take 5 disks with
different depictions. Take the turnkey -metallic object beside the
disks.Exit the room.
Go to the middle aisle of the temple towards the
seated statue. Look down and see a symbol on the floor. It is the same as the
symbol on the marked map for this place.Look at the saurian seated statues on the floor of
the temple.Go to the left aisle of the temple.
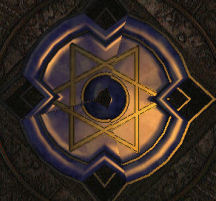
Seal door: See a familiar
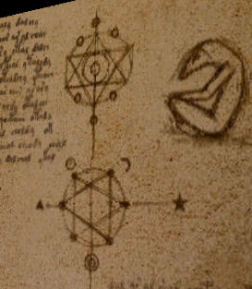
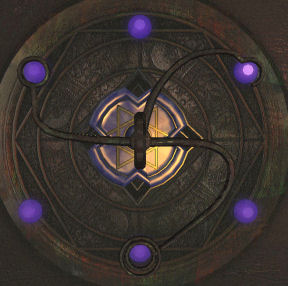
symbol on the door.The object of the puzzle is to correctly place the 3 pieces of blue seal and turn it.
The clue to this puzzle is found in the drawing at
the back of the old map taken from the roll top desk in Ivar’s cabin.The bottom picture shows the end position of the star and
the symbols on the points.Place the biggest seal piece with the point at the
center on the right side of the indentation. Place the 2 smaller pieces on
the left side.Place the turnkey-metallic object. Turn it 3 times
to get the hooked end on top right side.The door opens.
Cave: See that it is dark.
Howard will not go forward and goes back out.Exit the temple, hallway and climb the ladder.
Take the muddied flashlight from the dresser.
Go back down to the temple. Go to the opened seal
door and go forward to the cave.The battery of the flashlight is giving out. See
the water filled path to 2 arched doorway of the cavern.Go forward and see something come out of the left
archway.Howard runs back to a locked door. Something attacks him. Howard faints.
Hallway: Howard wakes up at
the hallway of the house.You can go back down if you want and check that door
again. It is now blocked.Leave the house.
Howard’s home: Go to the
bedroom and see that there’s a message on the answering machine. Listen to a
soft message. I wonder who that was. (Thanks, Becky!)
Loath Nolder’s Office: Go
to the desk.
Wolfsprey: Open the desk
drawer. Read the ‘Wellsmoth: Myths and Legends of an Ancient Town’ book.Underline the sentence a small town was built
around the Wolfsprey pond which also gave its name to the town; but later the
name of the town was changed to Windlapse. The clue Wolfsprey’s new name is
now in the clue list.Open the marked map and click on Wolfsprey. Howard
will wonder where The marked place in Wolfsprey is and it is placed in
the clue list.Combine on the right side of the think frame: The
Tombs, The marked place in Wolfsprey. Howard mentions a burnt down cemetery. A
new clue ‘The old cemetery in Windlapse’ is now in the list.Exit the office and see a new destination in the
map.Redtown: Click on Redtown in the marked map and Howard says that
it is most likely Clark Field’s
place.Exit the office and go to cemetery.
Cemetery at Windlapse:
Enter the right or left gate and go forward. Howard
says that the place is huge and will be better knowing where to go.North gate: Enter the north gate. Go around to the left side and
see a locked gate.Go to the path at left and it will lead to the
Northwood forest.Go back and enter the building in front of the gate.
Register: Look at the first book
shelf on the left.Click on the books and Howard will look for the name Poer
that was seen at the attic room in Ivar’s cabin. It is not there.Back room: Enter the door at the
end of the inner stairs.Look around. Go to the foot of the stairs and open
the trap door on the floor.Find and read the book. Read the journal of Robert
Hart the cemetery watchman.Underline: Each of them wears a
ring inscribed with a snake figure biting its own tail, wrapped around a shiny
stone.The clue Ring with a snake figure is now in the clue list.
The registers of this and similar crypts were
separated from the others....put into a secret section under the steps of
the cemetery building which they last visited.The clue Hidden Registers is now present in
the list.Hidden registers: Go left and look
at the panel under the stairs in this room.Open the panel. It’s stuck.
Tower: Climb the stairs,
through trap door and up until the top.Take the dagger from
the floor of the top landing.Look at the broken stairs and Howard notes that the
damage was intentional. Look up at the ceiling of the tower.Go back down to the secret panel under the stairs. Use
the rusty dagger on the panel.Take any book and click twice. Howard finds the book
with Poer’s name.Underline Poer‘s name. His crypt is at the west
side.Exit the building.
Poer’s crypts: Go through the
gate.Enter the west gate that is at right after exiting
the north gate.Go forward until the first intersection. Turn right
and go forward until the end.Turn left and look close at the sign on the left of
the mausoleum door. It is a stylized snake.If you wander around first, you will see an open
crypt on the left side with poisonous gas emitting from it.Enter the mausoleum. Look around.
Go down the steps and open the panel on the floor.
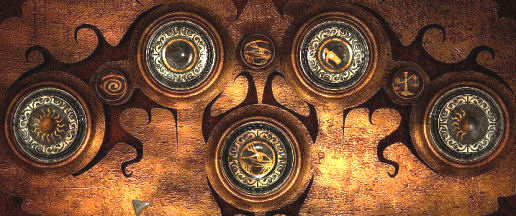
5 disk puzzle: Based on the burned
book on Field’s bed, the start and ending of the soul metamorphosis is the
sun.The object of the puzzle is to arrange the 5 disk
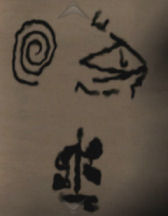
taken from the palanquin on the slots.Then arrange the symbols in between the disks based
on the tracings taken from the seated statue in Ivar’s cabin.The arrangement of the disks from left to right:
sun, human body, eye symbol, 2 human bodies and the eclipsed half darkened
sun.Select the correct small symbols in between the
disks by turning the edge of the circle holding the adjacent disks.The arrangement of the small symbols based on the
tracings: spiral on the left, eye on the middle and scale on the right.Turn the middle eye first and then arrange the 2 on
the ends using the rim of the end disks.Hear a click. Open the door and enter.
Howard hears someone calling him.
Enter the side doors and look at the tombs with
names on them. Take the rope from the floor beside the last tomb on the
right side room.Go back to the main hall. Go through the next door
and then the other door.Look up on the wall and see the symbol of this place
– Wolfsprey.Go through the gate and into the well room.
See the familiar seated statue on the throne and the
saurian statues.Stand by the gate and click on the well. Hear
‘Howard’.Use the rope on the gate. Go down the rope and into
the well.Bottom of well: This is the
place of Howard’s nightmare.Climb the stairs to go to the voice calling Howard’s
name.Go to the last recess. Pull out the coffin. Open the
coffin. Take the medallion with the symbol of Howard’s family – Loreid.Go inside the recess.
You know very well what I want with thee!
This
document may not be distributed without express written permission of the
author and the content may not be altered in any way.For
Questions or Comments on this Walkthrough,
Please write to:
MaGtRo
Copyright © 11/2007MaGtRo