Darkness Within: In Pursuit of Loath Nolder
Darkness Within: In Pursuit of Loath Nolder
by Zoetrope Interactive
Walkthrough by MaGtRo November 2007
Gameplay: This is a first
person point and click game. ESC key accessed the main menu. The main menu has
New game, Load, Options, Credits and Quit selection.
The Options menu has Video, Gameplay, Sound and
Advanced selections. Under Video options, resolution, gamma correction, noise
effect, fullscreen effects and auto configure selections are seen. Under
Gameplay options, the selections for cursor style, mouse sensitivity, dialog
speed and tutorials are seen. The sound selections are for SFX, music and
ambient volumes. At Advanced options, particles, shader effects, glow effect and
antialising selections can be chosen.
Right click accesses the inventory bar seen at top of
the screen. The items can be examined using either right mouse click or
selecting the microscope lens icon right of the bar. There is a think (brain)
icon that opens a think frame. The think frame has the inventory bar on top,
list of clues seen during gameplay on the left and the combining and information
frame on the right.
There are 50 save slots. The saves can be labeled
and overwritten.
At the start of the game, there is a difficulty
setting that needs to be selected. The choices are: standard with hints that are
available immediately and automatic research button available, Detective, with hints shown later in the game
and manual document researching and senior
detective with no hints given.
This walkthrough will
help you finish the game in a certain order. Actions can be done in different
order.
I did not find some secrets and
some of hidden
clues.
Wellsmoth Mental
Institution:
Howard was found 7 miles
from the town of Windlapse. He was raving, laughing and said that he was
investigating a cemetery around there.Howard talks about his
experiences, his thoughts and what he has seen.Nightmare: Howard is in a hallway.
Check the doors. Walk down the hallway and check the graffiti on the right wall
twice and see 2 faces (Easter egg)
and the one at the end of the hallway.Enter the last door on the left and see a ‘beautiful
room’. Pan down and see a man on the floor.
November 5, 2011: Howard wakes up from a nightmare.
Howard’s place:
Bedroom: The cell phone
rings. Answer the cell phone and talk to Arthur. Loath Nolder escaped
from the hospital last night (dialog and clue).
Howard’s mind: Right
click to access the inventory panel. Click on Howard’s mind (brain icon) and
see a new think frame. The left panel shows the List of Clues taken during gameplay.
The top is the inventory bar. The right side is where the items, thoughts or
clues can be combined to make a new item or new clue. It also has the frame
that shows the explanation of the clues or findings seen on the left.
Look around the bedroom. Check the drawer below the
phone and see a book of poems titled: I and My Nightmares by Edward Pickman.
Inside is a poem titled Time of the Triumphant Witch.Check the radio and answering machine. No messages
even though Arthur said he left messages (clue).Pan left and enter the walk in closet. Open the
bottom drawer of the cabinet. Under the right clothes, see a pistol and a ring
with the family symbol. It was handed down through generations by the fathers
of the family. Exit closet.Check the date on the clock at the other table. See
Howard’s dreamcatcher hanging from the ceiling fan.Hallway: Exit the bedroom.
Check the bathroom on the left. Go back to hallway.Open the drawer in the hallway. Open the box inside
and take the car keys.Exit through the door on the left. Go down to the
end of hallway.
Howard’s office: Look
around.
Go to the desk and check the in-out tray right of
the keyboard. See the Register of Deaths of Clark Field, the man Loath Nolder
supposedly murdered.Pan to the other side and take the 4
investigation pictures of the office of Loath Nolder’s office. Exit the
office.
Map: See a map. The
places that have been triggered will appear here and can be accessed.
Loath Nolder’s office:
Someone was here.
Click on 5 year old calendar (clue) on the wall by
the door.Go behind the desk. Take the letter opener
beside the red phone. Check the earthquake and archeological discovery
articles in the newspaper.Open the top left drawer of the desk. Read the
‘Wellsmoth: Myths and Legends of an Ancient Town’ book. Study the paper beside
the book that has a list of symbols.Compare the pictures to the actual scene:
Stand by the door. While in that view of the office, open the brain-think
frame.
Take the picture of that view of the desk and place it on one
of the small frames at top of right side think frame. Highlight it. Click
on the think/combine icon below it. Howard will make a comment about that
picture and view.Stand behind the desk. This will position you to
view the office the same way it seen in the other 3 pictures.With view on the screen, take the picture of that view and
place it on one of the small frames at top of right side thinking frame.
Highlight it. Click on the think/combine icon below it. Howard will make a
comment about that picture and view.
With the scene of the picture on the wall across the desk,
Howard says Hmm, there is something different with this picture.
Moved picture: Go to the picture.
Now, you can examine it closer. Howard notes that the picture has been moved.
Click on it at close up and automatically look at the back.Use the letter opener on the back of the picture. Take the envelope
from inside the ripped back.Open the think frame and place the envelope and letter opener on the
squares. Click on the gear icon.Items inside the envelope: letter, Clark Field notes and key.
Right click to examine all of them.
Letter from Clark Field to Jonathan: Right click to
read the letter.Underline to get clues: Using the pen icon at bottom right, underline sentences or specific words that
you think are clues.Click on the read/think gear icon to enter that clue in the list of clues. If
Howard deems the clue important they will be underlined; if not, he will say
so.Do this one clue or sentence at a time. At top left of the screen; see the
numbers of clues seen in a particular document.
Clues to be underlined one at a time and then read/think: bought a
house, Clark and Address: North End Street No 43 Northwood.
Hidden clues to be underlined: And don’t go to the
police regarding the affair.
Clark Field notes: Right click Field’s notes (part 1
or 4) and read them.Learn how he found and bought the house; how he met Ivar Bergen, the
community, friendship with Ivar and the well.
Exit the office and go to Clark Field’s residence
now that you have his address.
Clark Field’s residence: Look around. The door to the
left is locked.
Living room: Go right, forward and check the door to
the left. It is blocked not locked. Enter the living room at end of hall.Turn left and go forward to the main living room. Check the picture of the brothers on the fireplace
mantle.Take Part 2/4 of Clark Field’s notes. Read them and learn about his
exploration of the well. He found a place with saurian statues and a figure on
a throne. There are sounds and smoke.Go back to the foyer and main door of the house.
Upstairs: Climb the stairs. Look at the messy area by the stairs. Go left and forward.
Go left and check the bathroom. Go back out and check the door on the left.
Partially restored room: See a partially restored
room. Turn left and take the rope from the table. Exit the room.
Bedroom: Go forward until the end of the hallway.
Enter the room left of the clock. Check the partially burned book on the bed.
It mentions about soul metamorphosis and the Dversahe belief that the starting
metamorphosis of the soul are depicted with the eclipse of the sun.Go to the drawer at the corner. Open the top drawer and take the rusty key.
Exit the room.
Library: Enter the room right of the clock. Look
around the library. There are notes, masks, statue on the floor. We will check this place later.Go back down to the first floor.
Cellar: Enter the rear door left of the stairs. Go down
the stairs and enter through the rusty door.Howard mentions a strong scent (clue). Look at the
bottles on the shelves at right. They smell of Harmal scent (clue).There’s a cloth with slimy substance right of the
door.
Check the messy desk.Use the rusty key from the bedroom on the door right of the electrical panel.
Well room: Enter and look around. See a well that
Clark Field mentions on his second set of notes.Look close at the ladder at right rim of the well and then look at the
lantern.Look inside the well, click 3 times and Howard says the ladder will not hold
him.Look up and see pipes overhead the well. Use the rope taken from the partially
restored room upstairs on the pipes.Take the lantern at the rim of the well. Climb down the rope.
Go down as far as you can go. Look up and go forward in an opening on the well
wall.
Tunnel: Go forward until the blocked area.
Click on the gap at left where smoke is coming from.
Click on the collapsed ceiling (clue).Pan right and look down. Take the scheduler.
Hear a sound coming from the gap on the wall.
Howard decides to leave. Exit the tunnel, up the rope and out through the well
door.Howard automatically locks the well door. Hear another sound behind you when
you try to open the cellar door.Climb the stairs and look close at the shovel
(clue). The shovel has wet mud on it.Go upstairs and leave the house. Howard does not feel well and there’s
something in the air (clue).
Nightmare 1 The Madness: Turn right and enter the
apartment. Go to bedroom and lie down to rest.
Hear knocking on the door that woke Howard up.
The radio is on. Turn it off.
Go to the hallway and open the main apartment door.
No one is there. Pan right to the dark hallway. Click several times to see who
is there.Go back to the bedroom and see that the radio is back on. Turn the radio off
again.Hear the knocking again. Go to the door. The hallway sound is louder.
Go back inside the apartment. The light goes off before opening the bedroom
door.Hear the sound inside the apartment. It’s here.
November 6, 2011 – Wellsmoth Mental Institution:
Hear the doctor talk to Arthur. Howard is in for observation.
November 8, 2011:
Howard’s place:
Bedroom: Howard has been suspended from his police
job because of nervous breakdown. He decides to solve this case.
Arthur calls to check on Howard.
Bathroom: Get up and go to the bathroom. Turn right
and open the medicine cabinet.Take the bottle of medicine on the left. Automatically, Howard drinks his
medicine.
Clark Field’s scheduler:
Take the scheduler from inventory bar.
It asks for a password. Click on any 4 numbers and the scheduler will ask if
you forgot the password.Press space at bottom right of the machine.
The scheduler shows the reminder: When will the triumphant witch be reborn
(clue)?Remember that this poem is found in the book that is
in the drawer beside Howard’s bed.Go to the bedroom and open the top drawer. Take the book (clue). Read the poem ‘Time of
Triumphant Witch’.Underline these sentences and click on gear icon after each sentence:
They will die when they’re eighteen and this will be your woeful prize
(18
years old).Six children have died with the sign of the witch on their brow (6 children
died).And his chamber was changed; there were mirrors all round displayed (mirrors).
He was carving the sign – XI – to his brow with an old rusty blade (XI sign);
Everything started for me in the first of April, 1699 (date of Harold Gallow’s
death).Open the think page.
Click-hold from the left: the icons of mirrors and XI sign. Drop them on the
squares at right. Combine them to get a new clue called Reverse of the Sign.
This shows that the XI mark is seen as IX on the mirror.Click-hold from the left: the icons of 6 children and Reverse of the Sign. Drop
them on the squares at right. Combine them to get a new clue called 3 children
left. There are supposed to be 9 victims and 6 children already died; so there
are 3 left.Click-hold from the left: the icons of 18 years old, Children left and date of Gallow’s death. Drop them on the squares at right. Combine them to get
The
Witch’s Date of Rebirth 1753. This came from: 18 yo when the children die x 3
children left to die + 1699.Open the scheduler and enter 1753. The scheduler asks for a date.
Leave the apartment and go to Clark Field’s house.
Clark Field’s residence: Howard says to check the
place more carefully.
Go upstairs and look around at the different items on this open room by the
staircase.Check the red briefcase on the table and learn about the hallucinogenic drug
called Dversahe.Open the think page.
Click-hold from the left: the icons of a strong scent, Harmal smell and
Something in the Air. Drop them on the squares at right. Combine them to get a
new clue called Hallucinations.
Library: Enter the room right of the clock. Check
everything in the room.
Locked case: Go to the other side of the table and
see a locked briefcase.Click on the lock and button at right of the case. Howard says: What kind of a number can
a forgetful person like Mr. Field use for a password?Go to the green journal in the in-out tray at end of table.
Green journal and tape recording list:
Open the journal and underline:
When I was just 22 years old, Jonathan and I became solely responsible for my
father’s company (clue).Cassette no. 01 that has sounds.
Under Record no.0008-0010 – In Ivar’s place. This shows that a meeting happened
there.Hidden clue: Under Record no.0008-0010 –
Christopher
T. Dreaden one of the 3 men in that meeting apart from Ivar and me, told me
that this place was built by an unknown witch.Exit the house and go to Howard’s office.
Go to the desk. Look at the Register of Deaths in the in-out tray.
Study Clark Field’s Register of Deaths.Underline Date of Birth: 03/11/1976 and Died on the
October day of 21, 2011. You can also underline suffocation as the cause of
death.Open the think frame. Click-hold the clue icon of
shovel with wet mud on it and drop it on the square at right frame.Click-hold the clue icon of Clark Field’s death and
drop it on the square at right frame.Click on the gear combine icon and get someone dug
somewhere clue.Go back to Clark’s house and the library.
Locked Case continued: Go back to the locked case in
the library.Using the year of Clark Field’s birth 1976 + 22, the Important Event clue =
1998.Enter 1998 on the locked case. Press the button at right.
Take Clark Field’s note 3/4 and see several tapes that Clark Field
has
recorded.Read the note and learn about the meeting at Ivar’s place with 3 other strange
people.
Tapes: Take cassette no. 1 that Clark mentioned in
his list.Use cassette no. 1 on the tape recorder. Click on the recorder and press the
forward arrow to listen to the tape.
Press the double right arrows to listen to all the different tracks.Take note that track 8 is from Ivar’s cabin on the 5th of July, 2011.
Press the left button to return the recorder.
Scheduler: Take the scheduler from inventory. Enter
the date of Ivar’s place recording – 07 05 11.See the direction to go to Ivar’s place.
After knowing that address, Howard says he is not feeling well.Go down and leave the residence.
Nightmare 2 – Beneath the well: Go home. Turn right to
enter the apartment. Go to bed and have another nightmare.
Howard realizes that he is holding on to the rope in the well. After he
realizes that the rope can not hold him, he falls down.At the hallway, turn around and look down. Look close at the bones. Take the
bone and the torch.Use the torch on the blue fire stand.
Go forward until the door that is stuck. Use the bone on the door. Realize
that it is too big.Go back down the hallway. Midway, see a rock on the floor. Use the bone on the
rock to splinter the bone.Go back to the door and use the sharp broken bone on the door.
Statue: Enter and see a hooded statue at the center
of the room. Look close at the ring he has on his hand.Take the ring. It has a symbol that is familiar. It is Howard’s
family ring.
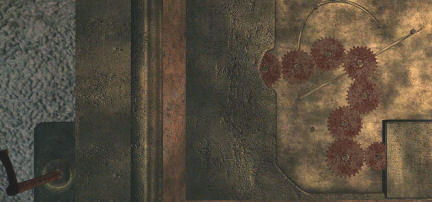
Cogwheels: Go to the wall and open the metal cover.
See a gear mechanism. Take 5 cogwheels.
Arrange the 5 cogwheels to join the 2 large cogwheels already on the
mechanism.
When the cogwheels are placed, test if it runs. Look at the left of the panel
and see a hole.Go up the stairs. See 9 crypt recesses each of which has a locked metal thing
on the top of the opening.At the end of the hall, take the handle (metallic object) on the floor.
Hear something.Go down to the cogwheel mechanism. Use the handle on the hole at left.
Use the handle to turn the placed cogwheels. If correctly done, the cogwheels
turns and hear opening sounds.
Tombs: Go upstairs at the crypt hall. Hear something
again.Click to open the metal thing above each of the tomb recesses.
At the last 9th recess, see that the symbol is the same as that of Howard’s
ring.Use the ring on the symbol. Howard wants to investigate. Pull out the coffin.
Open the coffin and see a skeleton with burning eyes.
November 10, 2011:
Howard’s place:
Bedroom: Howard looks at
the clock and realizes that he slept 2 days (clue).Bathroom: Open the medicine
cabinet, pick up bottle and Howard takes his medicine.Howard notices that the taste is different (clue).
He takes the bottle.Call Arthur on the cell phone. Click on the up
arrow, see Arthur’s name and then click on the green phone icon. Arthur will
have the medicine analyzed (dialogs).Look at the trashcan on the floor. Take the note.
It reads 10-11-2011: Meeting at the cabin after midnight. Gerald.Office: Leave the
apartment. Automatically go to Howard’s office and leave the bottle on the
desk.Leave the Office and select Ivar’s cabin in the map.
Edward Pickman: On the way
to the cabin, see a man at the cliff side.Walk over and talk to the man. It is Edward Pickman,
Howard’s favorite poet.After the talk (dialog), turn around and hear
something. Turn back and see that he is gone. Look down the cliff and see that
it is too misty to see anything.Take the paper from the ground. Read the
quatrain. Go back to the car.
Ivar’s cabin: Look around
the yard.
Bedroom: Enter the room
left of the hallway. Look around.See a blank piece of paper on the dresser.
Turn left and take a paint brush beside a
bucket.Go to the foot of the bed by the folding screen and
look down. See a locked trap door.Exit the bedroom.
Kitchen: Enter the room
across the hall. Look around.Check the dining table and cupboards.
See and take paint thinner at the bottom
cabinet of the left hutch.Take the wooden stick with metal hook propped
on the stove’s side. There’s a metal pot on the stove.Exit and go up the stairs.
Attic room: Before the
second set of stairs, look up at the ceiling.See a trap door at the ceiling. Use the stick with
metal hook to open the trap door.Pull out the ladder and climb up.
Look around the secret room. Turn around and see
jars of preserved sea life.Look at the furnace stove. See a curtain behind the
bench. There’s a book there. Read the book and learn about a trip to a cannibal
tribe’s jungle village.Go and use the telescope. Move it around and see
that it is focused at Northwood Mountains. There is a cave there.Check the books left of the telescope and read about
a talisman preparation.Look close at the table.
Check the note on the table. Learn about
preparations made for summoning some things.Underline:
Hidden clue – with the right timing and preparation
‘things’ can be summoned from sphere, beyond this universes or even death!Clues: They are in the crypts
below a tomb which stands in a very old cemetery in which interments has been
prohibited some time ago (The Tombs).The aforementioned tomb is registered in the name of
Samuel William Poer (clue).Exit the attic. Go up the stairs to the loft.
Loft: Look around and see 2
roll top desks that are locked.Strange man: Exit the loft,
go down and try to leave the cabin.A strange man stops you, Loreid. He asks if you got
the note?If you found the hidden clue about Dreaden, one
additional dialogue is added. Select You left that note?Secret found! Dreaden disappeared during an exploration of
the Moorland cemeteryIf you selected the answer: What note?; you failed
and the game ends. There is a second chance just before trying to exit the
cabin.If you answered, No; more dialogue ensues.
He gives a key ring and tells you to come
back tonight (dialogue and clue).Leave the cabin and Howard decides to come back
tonight.Dream: Go home and rest.
Wake up and see that Howard is in an island
completely surrounded by water.Look up and see the moon. Click on the moon and see
an eclipse occurring.Howard wakes up. It is close to midnight.
Go back to Ivar’s cabin:
See that there are lights at the loft. They are having the meeting. Let’s
continue and check the cabin.Galleries below the cabin:
Enter the bedroom at left.Look close and use the key ring on the trapdoor
lock. Climb down.Map machine and statues room:
Go to the room at first right. Look around.Check the cabinet on the wall at right. See 4
sculptures.Check the one sitting on a throne. Turn it to look
at the back. See 3 defaced symbols.Look close at the map marking machine.
Check the red locked safe below that marking
machine.Exit the room and continue down the corridor through
another door.Go forward twice, turn to the right wall and click
on the eye symbol (clue).Power room: Continue
forward and enter the door at right. Check the crate with rifles at right.See an electrified fence. Look close at the power buttons on the wall. Take
the putty on the left side of the power box. Press the red button to
turn the power off the fence.Enter the fenced in area and check the empty crate.
Exit the room.Prison cells: Enter the
door across the corridor.Look close at the prison cell on the left. Talk to
the crazed prisoner (dialog). I wonder who this prisoner is.Enter the cell on the right. It is dark inside.
Take the candle from the table and then enter
the right cell. See a jacket on the floor.Click the jacket to get Clark Field’s 4/4 notes
and key.Read Field’s notes. Learn about Ivar’s change of
appearance and his fear. In August, he heard the sounds. Exit the prison cells
after leaving the candle.Nolder:
Go forward to the door at the end of the corridor.
Enter and see that it is dark. Try to leave but the
strange man stops you.Talk to the man who says that he is Loath Nolder.
After the talk, he warns you to leave immediately
(clue).Exit, forward and be stopped by the staircase. They
are coming.Find a place to hide in. Once you have control of
the cursor, enter the prison cell or the electrified fence room. After waiting
a bit, leave Ivar’s cabin.
Nightmare 3 – The Mushroom Cult Cave: Go home and
sleep.
Wake inside an icy cold cave. Try to go outside and
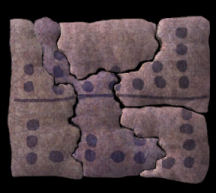
Howard will not.Look around and pick up 5 pieces of stones
from the ground.Go to the back of the cave and see a didgeridoo
music instrument.There are 4 holes on the didgeridoo.
In the think frame, combine the 5 pieces to get a
tablet that has dots on them.Note that the markings on the combined stone pieces
are the notes for the didgeridoo.
Read the markings from bottom up; 1 as bottom and 4
as the top.Click on the didgeridoo holes: 2 3 1 2 1 2 4 3 1 2 1
2 1 4.The cave shakes like an earthquake and collapses.
Howard wakes up.
November 13, 2011:
Howard’s home: Find out
that 3 days have passed.
Try to leave the apartment. Howard wants to know
about the medicine analysis.Use the cell phone to call Arthur. Find out that the
medicine has a neural medicine mixed with strong hallucinogen.Leave the apartment and go to Ivar’s cabin.
Ivar’s cabin: Enter the
cabin.
Kitchen: Enter the right
door.Go to the metal pot on the stove.
Use the paint thinner taken from the hutch cabinet
on the metal pot.Use the stiff paintbrush on the paint thinner to get
a soft paintbrush.Loft: Climb the stairs and
enter the loft.Big roll top desk: Look
close at the lock and use the key ring given by the strange man on the lock.See a strange blue lamp. Take the 3 sticks on
the pencil holder above the lamp.Take the old map. Examine the old map and
turn it around. See drawings on the back of the map.Look at each of the letters on the pigeon hole.
From left to right:
1. Learn about a missing Mr. R reported by a certain
FV.2. Try to underline the date of someone returning to
the house on 28-11-2011. It will not be entered on the clues list until later
when it is triggered.3. Learn about a city buried under the sands.
4. Try to underline EB but this also will not be
entered until we know who EB is.JD now resides in the little building now.
Underline kd78gt8 code (clue). Hmm… Use the cell
phone, call and press the corresponding letters and numbers on the keypad. It
turns out to be a phone number: 5378488 (clue). No one answers.Call Arthur and asks him to find out whose phone
number that is.5. It is a report of a summoning or experiment done
by DeG.Other roll top desk: Go to
the desk at the corner. Use the key ring to unlock the desk.Take the metal key on the shelf.
Take and read the note about an ancient cemetery and
ruins close to that cemetery Mr. Curwen will start searching the place.Read the book and learn about 2 wooden sculptures
from Africa with complex locking mechanism. The opened statue has an eyeless
insect and leaves. The purpose of these statues is to hold the Dversahe
Mixture. The mixture produces altered state of consciousness and is important
to the soul metamorphosis.These statues are also mentioned in Field’s notes.
Use the softened brush on the inkpot to get brush
with ink.Galleries below the cabin:
Go down and enter the bedroom. Go down the trapdoor.Map machine and statues room:
Go to the room at first right.Statues: Take the statue of
the sitting man from the cabinet on the right wall. Turn it to show the back
and see the defaced symbols.Use the putty on the back of the statue to get a
putty mold of the symbols.In the combining squares, combine the brush with ink on the putty mold to get
inked putty mold.Go back up to the bedroom. Use the inked putty mold
on the blank piece of paper. Get a picture of the statue’s symbol.Red Safe:
Go back to the red safe under the map machine.Use the key found on the locked roll top desk at the
corner of the loft.Inside the safe are a lot of maps. Click on the maps
several times but Howard does not know which to take (maps clue).Loath Nolder’s Office:
Leave the cabin and go to Nolder’s office.Open the top left drawer of the desk. Read the
‘Wellsmoth: Myths and Legends of an Ancient Town’ book.Study the paper beside the book that has a list of
symbols and numbers.
Underline the one with the eye symbol and WMT. This will
happen only if you have clicked on the eye symbol at the wall of the galleries
under Ivar’s cabin.
Howard makes a comment about the eye symbol seen in Ivar’s
place and WMT must stand for Wellsmoth.
Underline the other 3 WMT and symbol beside them, one at a time and then click
on the read/think gear icon.