Dark Fall 2: Lights Out
Dark Fall II: Lights Out
by Jonathan Boakes & XXv Production
Walkthrough by MaGtRo September
2004
Gameplay: This is a point and click game.
During installation, a pause might occur at 24% and 64% installation points. You
can skip the introduction using the arrow at the bottom of the screen. The main
menu has new game, load, credits and quit. The top part of the game screen
shows the activity bar – save, load and quit. The bottom part of the game screen
shows the inventory bar. The game can be played without the CD in the CD-ROM
drive.
To save a game, click on
Save and it will automatically open My
Documents folder. Make a new folder and label it Dark Fall 2 or any label you
want and then open this
folder. Enter the label you want to describe the saved game, click save and the
saved games are now in the DF2 folder.
The game is
non-linear. This walkthrough follows one possible sequence of gameplay.
Thanks, Pearl for some
of the Easter eggs.
You are Benjamin Parker, a cartographer sent to map the area of
the harbor town of Trewarthan.
1912 Trewarthan
Benjamin Parker has a nightmare of drawings, maps, room,
storm and lighthouse. A knock is heard. Open the door and no one is there. Look
up at the window of the building on the right and click the look cursor. The sky and
the lit top floor of the Fisherman Arms are seen. Turn right and look close at
the door of Reubans cottage next door. Go back inside the room by going right twice from Reubans’
door and enter.
Parker’s room: Look close
at the
worktable on the left
and see the map of Cornwall, 2 hooks and painting tools. Pull back and look up.
Check the picture of a man with a viewfinder and a railway map with 2 places
with an X mark. Turn right from table and see
Parker’s map box. Open it and see 2 old maps of Cornwall.
Close box. Look at the picture above the bed. Look close on the drawings and the red
book of Benjamin Parker on the bed. Read the journal and click on the edge to
turn the pages. He was met by Spivey with a cart and pony. Parker was
commissioned to come here by Robert Demarion, the local doctor.
Demarion’s kitchen
and garden: After reading the first 2
day’s journal, see 2 bird paintings on the wall and be transported to a recall
of journal events. Turn right, forward to sink and turn left. Exit through the
door and look close at axe on tree stump. Turn left and look up at tree. Turn
left to door and turn right to outhouse. Look inside the outhouse and read the 2
notes in the water. Hmm… Did Demarion try to flush these notes? Back out
of shed, look at tub of water on the ground on right side of shed, turn
right to see tree trunk and then turn around to view the wheel on the left of
shed.
Go back inside, check the sink, turn right to the hutch and
click on apples. Open the bottom right cabinet and see a stereoviewer. Click on
the top hinge to change the angle of the eyepieces. Look through the eyepieces
and see the top floor of the Fisherman Arms. Turn right, look close at a rabbit painting
and then at the groceries. Read the pasty recipe, cream tea
recipe and note by Mrs. Agnew about today’s meal. Note the mention of James on
the lighthouse.
Pantry: Turn right and forward to the door
that cannot be opened. Turn left and click on latch of the pantry. Check the
Devonshire Fudge box and read the diary. Note the comments about Fisherman’s
Arms and Fetch Rock. Note the description of a floppy disk with Hadden
Industries. This is 1912 – wow! Take the Hadden Industries floppy disk.
Next page describes a tunnel at the base of the lighthouse, a rock fall, pulse
sound, song… Look at the pictures of a hole and a ghost at the crates. Pull
back from box, look up and then down of center shelf. Click on bottom right of screen to exit the pantry.
Click any of bird pictures to get back to the journal.
Read the rest of the journal. Exit the room.
Harbor: Go forward, look up at the building on
the left (Garrett’s Pilchards), turn left and see a ladder going up. Turn around
and look up again to the windows of the Fisherman’s Arms – the one seen on the
stereoviewer. Turn left and go forward twice. Turn right and hear a ‘Who goes
there?’ Look up, down at the cart and at the sign. Click on door and talk to
Doctor Demarion about a job. Whatever dialogue is selected, it will end up to
continuing the adventure. Learn about the lighthouse. Demarion had the
lighthouse built in 1890. The ship Ribos
passed the lighthouse tonight and reported that the lighthouse is not lit. Oliver Drake, James Woolf and Robert Shaw man the lighthouse.
You should have checked already what is needed to be checked
from your room, the town and Demarion’s kitchen. Turn left to the dock. Go
forward to the boat. If you cannot get on the boat, retrace all the steps, click
on all active places and items. Look at all angles of viewing of items in all 3
places – room, harbor and kitchen.
Enter the boat. Listen
to the Ballad of Flannan Isle on the way to the lighthouse.
1912 Fetch Rock
Check the debris in the water, 2 clicks right and left of the
boat. Turn around from boat, forward, left and look up to see the unlit
lighthouse. Go forward, turn left and look up at the pointed rock (is this the
growing rock?). Turn around and climb steps to lighthouse. It is dark here. Go
forward to the left of the lighthouse hut. Look up at the weather vane. Look down
and see a cord. Turn right and flip the emergency
lighting switch to get light inside the hut.
Lighthouse hut: Enter and look around. See a
key on the window sill. Go down the steps.
Boiler room: Look close at the gauges of the
boiler. Go forward to right side of boiler and then click on the lantern in
inventory when you get a tool cursor. Turn left, forward and left to look at 3
levers. Have to know more before we can fiddle with these.
Go back to the front of the boiler and turn to face the stairs.
Click on the active cursor at bottom left of the stairs. Use lantern and take
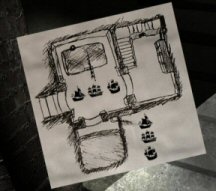
the drawing. Study the drawing and note the layout of this area. There are 3
ships in front of the boiler and 3 ships drawn on the room across it. The dark
room on the right shows steps and cabinets.
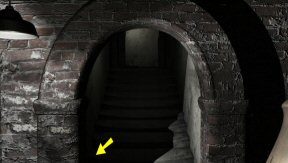
Coal room: Enter the room across the boiler.
Turn right and click on the blower, the 1912 version of intercom. Hear weird
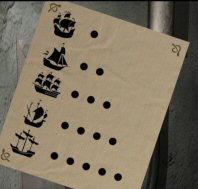
sounds. Look at the paper hidden behind the wood panel of the blower. Note the
number of dots beside the different ships. Turn right and look close at dark area at bottom left. Use the
lantern and see taps.
Go back out and let’s see if we can get the boiler going.
Boiler puzzle:
Prime the boiler – Based on the layout drawing, there are 3
different ships in front of the boiler. Using the ship-dots drawing, the ships are
decoded as from left to right: the ship with 2 dots, ship with 3 dots and the
ship with 1 dot.
Go to the levers back of the boiler. Use your
lantern on the tool cursor. Turn left and look at the levers. The levers are
noted in positions from left to right as 1, 2 and 3. The ships code of 2 dots, 3
dots and 1 dot is decoded to mean pull down (L – R) middle lever, right lever
and then left lever.Turn the boiler on – Go back to the coal room
and turn left to the taps at the bottom of the wall. Use lantern on tool
cursor. Based on the layout picture and the ship-dot picture, the 3 ships from
top to bottom are the ones with 2 dots, 3 dots and 1 dot.The taps are positioned 1, 2
and 3 from top to bottom. The ships
code of 2 dots, 3 dots and 1 dot is decoded to mean press the middle tap,
bottom tap and top tap.When correctly done, see lights come on
throughout the lighthouse.
Bottom level of lighthouse: Go to the room
next to the boiler room and see that
there are now lights. Turn right and use lantern to see head boards. Turn left to
the cabinet and check the shelves. Climb the stairs and look at the red bottle. Climb further and
enter the door with a hole. Look at the chair under the stairs. Climb
up to the first level.
First level: Look at the map of Cornwall, a work box with a hook and a FWW red book. Look at right side and note the filled coffee cup. Read the 1912 log book.
Crew room: Enter the door on the right. Look
around. Note cabinet on the left with cups, work list and stock list. Turn
left while facing the supplies cabinet and look close at the FRL crate. Click
on the cloth at right to reveal a hidden compartment. See a picture of a
grounded ship and paper with DRAKE, stars and numbers on it. Graphics is shown
later in the walkthrough. Turn around and look at the uneaten meal. Go to the other side
of the kitchen and look around. There is a small store door right of stove.
Enter the store door and look out to the table. Go to the door and click on the blower
to hear the weird sound again. Exit and look at the 2
pictures on the wall.
Second level: Continue up the lighthouse. Look
close at the ship and the lady in the picture.
Crew’s (Woolf and Shaw’s) Bedroom: Enter the door on
the right. Look at the picture on the left wall. Read the letter of Beatrice
to James behind the right picture about Drake possibly losing his mind. Click
on the mirror and read James letter to Beatrice. Malakai – remember that name. Check the drawers.
The second from the top has a ghostly robed man picture. The second from the
bottom drawer has more pictures. The bottom drawer has the poem.
Go forward and turn left to the table with the violin. Look
close at the FRL box and see pictures, one of is of a bottle on a
rock. Go to the bookcase under the window and read about the Piskie Little Folk of Duloe.
Look at the bunk bed, pictures and the photography book on the
lower bunk. Click on pillow of the lower bunk and read the letter of Beatrice
to James. Go to the door and play with the light switch. Use the lantern
on the blower at right of door and hear a louder scary sound. Exit and
continue up the stairs.
Third level: It is dark here. The lamp is
broken. See a ladder on the wall and a door on the right. The door has Drake’s
name instead of a doorknob. Flip the lock lid up and see buttons similar to the drawing
found on the trunk in the kitchen.
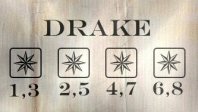
Numbering the buttons from left to right – 1 – 4,
press 1 2 1 3 2
4 3 4. Door opens.
Drake’s room: Look at the maps on the wall.
Turn left and see a ripped out lamp holder. Use the blower and listen. Turn left
of door and click on the bed. Open and check the contents of the top 2 drawers
under the bed. Read Demarion’s 4 letters to Drake concerning the lighthouse and
Parker.
Go to the work table and see an FRL stamp. Read Drake’s journal.
A mention of a small etching of Fetch Rock with no lighthouse is supposed to be
somewhere here. Same dream as Parker described is mentioned – comet. The rest of
the entries spoke directly to and about Parker.
Use the lantern on the picture on the wall right of the desk.
Click on the tower above the cliff on the painting. Press the button and a
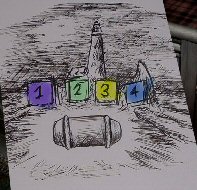
drawer below the bed is opened. A picture of the lighthouse with a purple 1,
green 2, yellow 3 and blue 4 is seen. Another picture of a series of walkways
going to under the lighthouse is depicted. Note that the start of the walkway is
behind the lighthouse and goes to a cave under the lighthouse.
Read the Bodmin book on the window sill.
Look at the 2 pictures
of William Drake, 18 and Catherine Drake, 24 on the wall by the window.
Closet: Turn left and open the closet left of
the window. Look close, use the lantern on the hanging clothes and click to move
the clothes aside. Another door is revealed. No data yet to open this door. Back
out and turn to face the door.
Lamp Room: Exit the room and turn right to the ladder. Climb to the top and
turn to see the lighthouse lamp. Pull the 2 levers that don’t
seem to be working. Pull the triangle handle to sound the foghorn. Look at
the lighthouse lamp.
Walkway to cave: Let’s look for the walkway shown on the picture
in Drake’s locked drawer. Go back down
and exit the lighthouse. Go around the hut and click behind the hut left of the
wall with the emergency lighting.
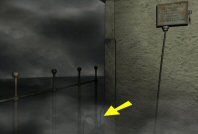
Climb down the ladder,
turn around and go forward to the walkway. Partway, you can look up at the
lighthouse. Go forward until the crates with a crab insignia. This place looks
like the ghost picture seen on the fudge box in Demarion’s pantry. Go forward,
down the steps and left to the cave.
Cave:
Hear ‘Over here’ guiding you inside the cave. Go forward, pass the crab crates
and right to the drums. Go forward to the drums, turn right, go forward and see
an entrance that was shown on the other picture in the fudge box journal. Enter and turn right. See colors
of a certain pattern flash on the wall. Turn left,
go forward once, turn left and see the colors flash on the wall again. Turn
right, forward and now the colors flash in front of the entrance. Turn around
and go back out.
2004
Fetch Rock
The drums and crates are not here but a pool. Go forward, left,
forward and go outside.
Turn right and look at
rock below the sign stand. Climb steps and come out to present day Fetch Rock.
Go right, then left pass the picnic table and look at the telescope. Oh, we need
money to use it. See Polly’s map further on in this walkthrough to guide you around the area. Note the different landscape and how it
changed from 1912.
Discovery Center – WW II building: Go
around the picnic table, then right and enter the WW II exhibit building. Look
around. Go forward, right and look at the information about The Haunted Radio –
Ralf. The right knob is missing.
Turn around and go to the laptop on the table. Use the floppy
disk on the purple floppy disk drive. Press the middle single arrow to listen to
the EVP capture 1. Exit the building.
Seven Sisters Rocks: Turn right just outside the building
and look at the rocks. Turn left and go forward to the other side of the island
pass the cave entrance.
Landing Station: Go forward and
turn right to the entrance booth. Go forward to the landing area. This is where
Parker’s boat landed in 1912. Turn left and look right of the yellow drums. Take a
spear from the ground. Turn left and look close at the red fuel tank.
Turn left and move the cursor left of the base of an antenna tower that is left
of the green tanks. See a Roman numeral II plaque.
Look inside the entry booth. See a drawing on the right wall
beside the green mug. Use the spear and click twice on the paper by the mug.
Note the number 5582 on the paper written for Ben by Diane on 29/04/04. Turn
around and see the Fang Rock.
Cafe: Turn right, go forward and look around
the closed Cafe area. Look at the right side of the trash bin to see the
Roman numeral IV plaque. Turn left and go to the steps leading to the lighthouse.
Toilet area: Go forward and turn right to
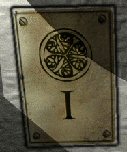
enter the female side. Look inside the right stall and see Roman numeral I
plaque under the toilet
paper dispenser. Look above the wall with the pictures and see the men’s toilet.
Exit and go to the men’s toilet. Look close under the sink to see the Roman
numeral I plaque.
Turn around from sink and look at the urinal on the right. Move the lid on the
floor grate and get coins.
Telescope:
Exit the toilet area and go back to the telescope at the other side of the
island: Go left to cafe area, turn right to the booth by landing area and turn
right. Go forward to the other side of the island. Look close at telescope. Use
the coins on the View Point. Move the cursor to get a view of the Roman numeral
III plaque on the side of the lighthouse. Go back to lighthouse steps and let’s
enter the lighthouse.
Lighthouse:
Door: Look close and see that this is the
drawing that was seen in the entrance booth. Counting from top to bottom, press
buttons 5582.
Gift Shop: Look around and read the books on
the table. See a picture of Benjamin Parker and learn of his life. Go to the other side of the book stand by going in front of the cash
register and turn left to the side aisle. Go forward and click on the
button right of the music CDs. Look down and press the one by the Trewarthan Fisherman’s Choir to hear an eerie voice, something about ‘until
dawn’.
Horror at Fetch Rock book: Turn left and read the book –
Horror at Fetch Rock. Learn what Demarion had to say on the inquest on the
disappearance of the 3 lighthouse keepers. Benjamin Parker was blamed for the
murder of the keepers. The combination to the locked closet door is the
daughter’s birth year combined with that of his son, add ’em up like. ‘And the
prefix is R’. Look at the different souvenirs on the back wall and then go to the
cash register.
Cash register: Go behind the register and read
the note to Polly White on the register, the missing 220 pounds note on the
counter and the 2 letters under the counter about Polly White and the state of
affairs at the Lighthouse. There’s a waste basket under the counter. Look at the
work schedule on the wall. Go through the red curtain.
Old Boiler room: Go to the bottom of the stairs and
then turn around. The sign states that this is the original boiler room. Read
the Fetch Rock Lighthouse brochure. Turn to the exhibit window showing Parker leaving
the harbor and
then look down. Look close at the blue file folder. Read about EVP (Electronic
Voice Phenomena), Polly’s assertion that she is a reincarnation of James Woolf
and that a Spivey still runs the Fisherman’s Arms.
Stay here for a while
– face and look at the display of Parker’s going to the boat at Trewarthan. Turn
right and then turn back to look at Parker again. Oh! Turn left and then turn
back to Parker again. Eeek! Leave the room, then come back and look at the
exhibit again. Mommy!!!
Backpack: Pull back and look
down at the backpack on the right. See Polly White’s
Zoom pass on left pocket and a camera on the right pocket. Click on camera
and see a picture was shot. Click again to look close at the camera, press the
round button and see a surprised Benjamin Parker – that’s you. Click on flap to
see a tape recorder and diary. Click on the tape recorder and listen to Polly’s
hypnosis regression sessions as James Woolf. Read the diary and learn about the
one knock for yes and 2 for no responses.
Turn around and see Parker’s picture on the poster. Read the 2
posters. Look at bottom right of the arched entryway and use lantern to see the
Roman numeral C plaque.
Lamp-old Coal room: Enter the Lighthouse
lamp-lens room which was formerly the coal room. You
can seat on the chair if you want. Turn around and use the lantern on bottom
right of the arched opening. See the Roman numeral V plaque. Exit the
coal-lighthouse lens room. Enter the display room at right.
Display room: This is where the
storeroom and base of the lighthouse was situated. Read the different posters
and look at the different items on the display cases. Look at the TV monitor
showing the town and the lighthouse area.
First level: Climb the steps to the
first level. Hear a voice – it is James Woolf. Look close at the sign on the
left and click on the picture of the crew room. Look at all the posters especially the pictures
of the missing lighthouse keepers. Turn right to the window, press the green
button and see an exhibit of a conversation between Woolf and
Shaw.
Second level:
Climb the stairs and check the window to see the landing area. See an unlit
restaurant. Enter to hear some scary sounds. Continue to climb up by clicking on
the window on the stairs wall on the right.
Third level: See the ladder on the wall,
posters and a bell. Look behind the bell to see the Roman numeral VI plaque.
Staff Room (Polly): Look close at the keyhole of the
staff room. Talk to Polly White (eye seen only). She recognized you as Benjamin
Parker. Click on the door to answer her questions – click on left side of
keyhole to get one knock for yes and click on right side of keyhole to get
2 knocks for no answer. Yes, you are Parker and No you are not going to
harm her. Polly slips the lighthouse diagram under the door.
Note the drawing of the EVP/EMP detector pointing to the Discovery Center.
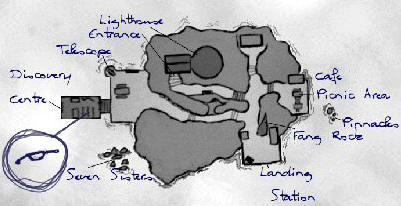
Lamp Room: Climb the ladder to the Lamp room,
turn right one ramp below the topmost one. Look around at the paintings and then look close at
the binocular of the keeper. See Roman numeral L plaque on top of the fuel tank.
Lighthouse Puzzle by Andrew Verney – Look close at the
lighthouse puzzle left of Matt Clark paintings. The solution to the puzzle
is based on the correct sequence of the Roman numerals depicted on the different
plaques seen around the area. Compare the design on the puzzle to the designs of
Roman numeral plaques 1-4. Then pull the lever in 1-4 sequence.The leftmost design is seen on the base of an antenna at the landing
with Roman numeral II.The next design is seen on right side of the trash bin at the Cafe area
with Roman numeral IV.The third design is seen on the toilet with Roman
numeral I.The rightmost design is seen through the telescope on the side of the
lighthouse with Roman numeral III.
Pull down levers (L-R, numbered 1-4) 3 1 4 2. If done correctly,
the secret drawer opens.
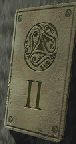
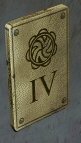

Look at ? envelope and take the missing Ralf knob.
Look at the Ralf picture and note where the 3 knobs are positioned.
Go down and exit the lighthouse. Go to the Discovery Center – WW
II exhibit.
Discovery Center – WW II exhibit:
Look around for Polly’s EVP/EMP.
Turn left to the first row of chairs by the door. Click in between the chair’s
backrest and use the lantern to see what is on the floor. Take Polly’s EVP/EMP
detector. The EVP/EMP detector is placed at bottom right of inventory bar.
2004 EVP/EMP activity
are
seen in these places.
Once a place or item shows activity, the detector at
bottom right of screen flashes and beeps. Click on detector to show the anomaly.
Sometimes you can click on the item or picture and something else happens.
Discovery Center:
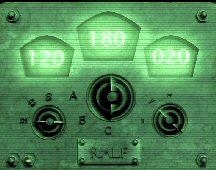
Ralf radio – Look close at radio. Use the knob taken from the
lighthouse puzzle on the Ralf radio. Turn the knobs to the position shown by
the lighthouse puzzle picture: 01 for the left knob, vertical for the middle
knob and pointing to Y for the right knob. Once correctly done, the knobs will
not move anymore and EVP/EMP flashes indicating electromagnetic pulses and voices
from the past. Click on detector, hear voices and see 120, 180 020 on the gauges.
Bottom left column
picture, right of Ralf shows a ghost man and glowing propeller. The propeller
glows in a Y shape.Top second from right column of pictures shows a ghost man
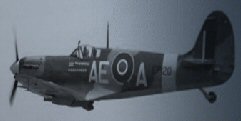
between the group of men pictured.Second from top at right column of picture shows an airplane
with A E (target)A on the side. Don’t do it now but if you click on picture,
you will be transported to a 2090 AD DEOS kitchen.
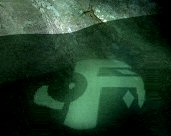
Cave under the
lighthouse – Enter cave and go to the wedge shaped entrance. Turn around and see
a green symbol.
Lighthouse:
Museum – Old Boiler Room
– Look close at the picture on the sign stating that this room is originally the
Fetch Rock Boiler room. If you click on the picture after it is activated, you
will be transported to the 1912 boiler room. Back out if you don’t want to go there
yet.
Display room – Look close at the robed statue carved by James Woolf on the
display case, see it glow and hear James talk.
Stairs by Display room – Take a step up the stairs and turn around. See the
display cases connected by the energy.
First level – Look close at the sign that says this is the level of the main
crew room. If you click on the picture after it is activated, you will be
transported to the 1912 crew room. Back out if you don’t want to go there yet.First level –
Look close at the picture of
James Woolf and hear James talk.
Second level – Look at the picture of the lighthouse door at top of the left column of
pictures. If you click on the picture after it is activated, you will be
transported to the 1912 lighthouse door. Back out if you don’t want to go there
yet.
1912
Fetch Rock
Click on any of the 3
pictures in 2004 that will bring you back to 1912: Old Boiler room picture, Crew room
picture at first level or picture of lighthouse door on second level.
1912 EVP/EMP activity
are
seen in these places.
Once a place or item shows activity, the detector at
bottom right of screen flashes and beeps. Click on detector to show the anomaly.
Sometimes you can click on the item or picture and something else happens.
Boiler room: Go behind
the boiler, turn to the pipe and turn to the wall. If you click on the wall after it
is activated, you will be transported to the 2090 AD destroyed basement. Back
out if you don’t want to go there yet. You can also click on this same 2090 AD wall to
get back to 1912 wall.
First level Cornwall map: See an X on Tallamut area.
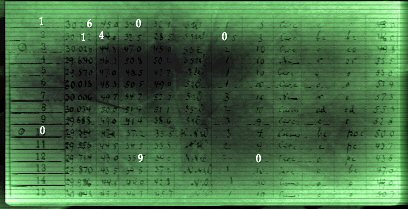
First level 1912 book:
Take note of the highlighted numbers. 160 140 090
First level Crew room:
Go inside the small store cabinet right of sink. Look at James’ ghost and listen to all of
what he says. He’s sorry about getting Polly involved. Wait a while and he will
talk more.
Second level stairs
going down: When in between the second level and the first
level, turn around and look down at the stairs. Listen to Robert Shaw and see his ghostly shape.
Second level Crew
Bedroom: Open the FRL box on the table and look at the picture of a bottle on a
rock. If you click on the bottle picture after it is activated, you will be
transported to the 2004 second level in front of the same picture. Back
out if you don’t want to go there yet.
Lamp Room: Stand
facing the ladder with
levers on the left and the lens on the right to see and hear Robert Shaw by the
ladder.
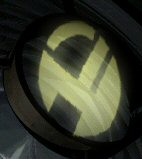
Lamp Room: Stand with
the chart on your back and the ladder on the left, look up at the lens to see a
yellow symbol.
Drake’s cupboard: Enter
Drake’s room by numbering the buttons from left to right – 1-4, press 1 2 1 3 2
4 3 4. Door opens. Go to closet and use the lantern on the clothes in closet.
Drake’s closet door
puzzle – Based on the clue stated in the Horror at Fetch Rock book, the
combination to the locked closet door is the daughter’s birth year combined with
that of his son. And the prefix is R.The back of the 2
pictures on the wall states that William Drake is 18 and Catherine Drake is 24.The year is 1912 now. So
William was born 1894 and Catherine was born 1888. 1894 + 1888 = 3782.Enter R 3782 on the
closet lock.Look inside the closet
at the picture of marshland. You will be transported to 2090 BC.
2090 BC Marsh
Remember this view of
where you landed. This is the same place you need to use to go back to 1912. Look around
at the drying animal skins and go to
the huts on the other side of the marsh.
Village:
After passing through the reeds, turn left and look close at the wood
arrangement on a rock. Turn right and enter the
village. Note the prehistoric landscape of Fetch Rock.
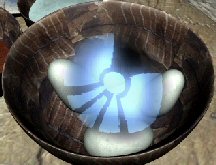
Eggs – Look close at eggs on
rock table. Activity is noted. Check EVP/EMP activity on the egg on the rock table and see a
blue
symbol.
Go forward and see an
axe that can be moved on a rock on the left. Turn right and forward
in between the huts. Turn left and forward to the arranged rock on the shore.
Turn right and go forward to the island.
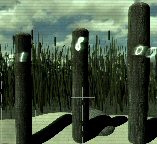
Seahenge:
Using the EVP/EMP detect 3 sets of numbers on the surrounding poles – 180 110
150.
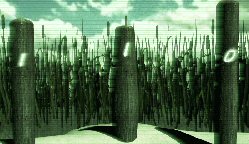
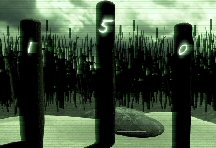
Look close at the central rock
on the ground and the radiating lines around it. Use the detector and see Z on the rock.
Listen to the words – not of earth…. Assistance… that is where I
reside…waiting…
Go back to the village
between the 2 huts. Turn right in the village and go
forward. See a shell necklace on a rock but with a computer board at the end.
The other end of the necklace has a key.
Cave:
Go forward 2 times, turn left, forward once and then turn right. Enter the
cave. Go forward to the pool, turn right and enter the familiar entrance. Go the
very end and see that there are paths to the right and to the left.
Bowl Cave – Turn left and go to the
bowl cave. Go forward as possible to the rock wall, turn around, move cursor to
bottom of screen until a look cursor is seen. Click and see a pot. Use the EVP/EMP
detector and listen to Malakai – death is everywhere.
Malakai’s cave – Exit and
go to the other cave. See a space probe. Open the side and see #4/deos/malakai. Study
the data on the frame. We need more information to do this puzzle. Close lid – leave
this place…
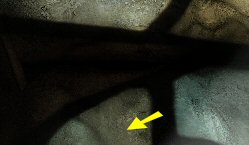
Exit the cave area by
clicking twice from Malakai’s cave and turn right. Go forward to the pool, forward once, turn left
and go forward to outside.
Rocks: Outside the cave, turn
right and go forward until a small pool at the end. Turn around with pool on
your back, look up to the
right and see a pile of rocks on top of the big boulder. Click on the pile of
rocks to automatically be on top of the boulder. Take a floppy disc from
the rock.
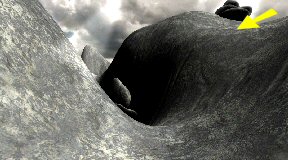
Go down and go to the
village. Go back to the other
island with the drying skins. Just before you reach the island turn right and
click on the reeds that activate the EVP/EMP detector. This is the original place
that we arrived here on. Click to get back to 1912.

2090 AD
Still 1912 – Go down to
the boiler room. Go behind the boiler by the pipe, use lantern, turn left,
forward to pipe and turn right to the wall. Click on the wall after it is
activated. Back up and see this wall is at a different time period. You can
also click on this same 2090 AD wall to get back to 1912 wall.
Shadow Cave: Turn right, forward,
left, forward to the arched opening and then turn right. Forward, left, forward
2times and hear children’s voices. Turn right to an opening on the wall.
Elevator shaft:
Enter though the hole and turn right. Turn around to see dynamite with timer.
Let’s not fool around with it. Turn right and go forward until the grill ledge. Climb down the ladder
until the top of an elevator. Turn around and go to the other side. Turn around
and look at the green tool box. Look at Gerard Magnus’ ID tag. Open the toolbox
and take the laser. Check the PDA in front of the yellow box. Jump down
to the lit floor below.
Cargo Bay:
Go forward to the red lit walkway 2xs and then turn right. Look close at the ID
tag of Maria Ortega. Click twice on her PDA and read what happened in the last
days. Continue forward and pass through door 1.
Decontamination
chamber: Go to right side alcove between 2 posts close to
the door and see lights dim and hear a sound. Go through door 2.
Storage:
Go forward 4xs. The other door is closed. Go back once and turn left to a grate.
Look close and use the laser on the screws on the grate.
Air duct: Enter grate and use
lantern. Crawl forward and turn left at the intersection. Forward 2xs, right,
forward 3xs, right, forward, left and forward until the grill. Open grill and
enter the storeroom.
Storeroom:
Turn around and look down on the crate. Press the button of the inventory PDA.
Oh, Maria was taken by Malakai. Look around and note the blinking machine on the
other side of the aisle.
Exit the room by going
through 2 vertical neon lines. Go forward 3 times and see a 4 way intersection
lit by red lined wall lamps.
Clinic: Go forward pass
the intersection and left to enter the clinic. Go around to the other side. At
the turn of the corner, click to open the curtain on the right window. Check the EVP/EMP
energy and see time and date on the floor of the room – 00:05 20/04/90.
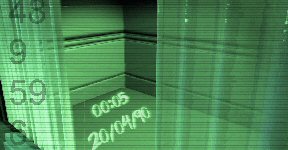
Look at the items on
the table and note a cigarette butt in a jar. Look at the x-ray films and it
changed color from blue to purple once. The first and last films have a star on
them. The 2 at the middle have a circular inserts. Check the desk. Exit and go
back to the 4 way intersection. Turn left to go to the crew quarters.
Hallway: Click on DEOS
panel on wall. Read about DEOS – Deep Exploration of Space. Click on the fourth probe and read about Malakai.
Malakai has a failsafe system know as The Keeper. Note monitors on the walls of the hallway.
Crew Quarters:
They all disappeared too. Check each room by clicking on the green
button under their pictures.
Maria Ortega – The door doesn’t open.
She was at the loading dock.Mitsuyo Taku – Press the
green button to enter the crew quarter. Look around and note that she smokes.
She might be the one on the jar at the clinic. Look close and click on the thumb
of the hand on the shelf – it twitched! Look at the PDA on the bed. She’s trying to match a
fingerprint of the person who searches her room. The data cable code is 113675 and the code for the x-light is
391865. There’s an emergency shutdown. Take a film strip on the box on
the bed. Let’s see if we can continue her detective work. Press green button to
open the door.
Storeroom – Go back to
the storeroom. Go forward and turn right at the dispenser. Enter the x-light
number taken from the Mitsuyo’s PDA – 391865. Take the x-light. Go back
to the crew quarters hallway.
Ivan Krozt – Look under the Sci-Fi magazine on the bed and get
a green remote control. There’s an MP3 player that you can listen to different
music.
It being Ivan’s birthday, there are presents around the room. Use the remote
control on the robot. Hmm… We don’t know the color codes yet. Press green
button to open the door.Vimel Dehlya – Look around on his desk, PDA and the pictures
on the monitor. Press green button to open the door. Exit.Magnus Griel is removed from the crew.
Hmmm…Corbin Hart – Enter the room of
the DEOS Project Manager. Check the
box on the bunk bed and read about Mitsuyo, Magnus and the loss of the Malakai
probe. These papers are important in learning the background of Malakai. Learn
that an unknown matter was encountered by the probe. Is this the reason the
Keeper safeguard was overridden?Read the
letter inside the tube by the football. Look at the children’s drawings. Looks
familiar – lighthouse, comet and the other drawing looks like Palmer. Listen to
the tape on the table by pressing the button on the right. The children’s nightmares are recounted.
They sound like the children at the pool above. Oh no! The children were taken
too. Turn back to
the door and look close at the windsurfer display on right middle shelf. Turn
it around and take a key. Press green button to open the door. Exit,
turn left and go to the 4 way intersection.
Go down the corridor and see that Malakai’s picture is
defaced. Enter through the other door, turn left before the door and use the key
taken from Corbin Hart’s windsurfer model on the slit.
Main Probe System:
The room is bathe in blue. Look at the monitor and note the similarity of this
to the lights on the wall when we entered the cave under the 1912 lighthouse.
Is this Malakai’s working circuits? Cannot do anything else here. Go back to the end door of the crew quarters
hallway.
Kitchen:
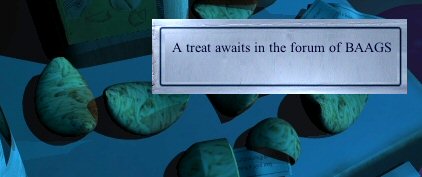
Look around the room and see that it is Ivan’s birthday. Check the fortunes
from fortune cookies right of the microwave. One of fortune states – Seek Malakai,
he knows all. Check the dining table, TV area and the soda cooler.
Airplane postcard
– Go to the far counter and see an airplane postcard similar to the one at
the 2004 Discovery Center except for the A H (target) V on the side. Check the EVP/EMP
activity. If you click on the picture after it is activated, you will be
transported to the 2004 Discovery Center. Back out if you don’t want to go
there yet.PDA – On the same counter as
the postcard, click on the DEOS
quick recipe PDA beside the postcard. Read the notes about Magnus
becoming strange and about looking for the rest of the fingerprint. This
follows what Mitsuyo wrote in the PDA in her room. So Magnus is Malakai’s
instrument here as Drake was at the 1912 lighthouse.
Fingerprint
puzzle:
Fingerprint – On the same counter as
the postcard, click on the x-light and see a blue light shine. The light will
move as you move the cursor. Use the x-light on the sake
cup. Click to pick up the sake cup and see a fingerprint. Use the film strip
taken from Mitsuyo’s bed on the fingerprint to take the imprint. Go
back to Mitsuyo’s room.Mitsuyo’s room – Use
the film strip with fingerprint on the scanner located left on the table. The
monitor shows comparison with known fingerprints. Click on the right arrow at
bottom left to change to another comparison. It is Magnus. Listen to the eerie voices. Malakai is more coherent. Exit the room.
2004
Fetch Rock
Still 2095 AD, go to the
kitchen. Click on the postcard again to go back to the Discovery Center at 2004.
Discovery Center:
Go to the floppy disk drive and insert the floppy disk taken from 2095 BC. See a
graphic depiction of the robot and remote control from Ivan’s room. There’s a
color palette on the left that has the purple-pink highlighted. There are 5
buttons on the remote control. The five colors starting with the highlighted
purple-pink on color chart are purple-pink, green, red, blue and orange.
Go back to 2090 AD by
clicking on the picture of the airplane by the door.
2090 AD
Ivan’s Quarters:
Look close at robot. Use the remote control on the robot. Press buttons pink,
green, red, blue and orange. See the robot project a pink symbol on the opposite
wall.

2090 BC
Marsh
Travel to 2090 BC.
One way from 2090 AD
is by going through the air duct in the storeroom to go to the supply ramp.
From here pass door 2 and door 1 to the elevator. At the elevator, click on
the top right wall to open the ceiling door. Climb the ladder, grilled ledge
and out to the hole. From the hole, go to the arched brick wall and out to the
1912 boiler room. Go to Drake’s closet and click on the marsh picture to get
to 2090 BC.The other way is to
use the postcard in the DEOS kitchen to get to 2004 Discovery Center. Go to
any of the 3 energized pictures at the 2004 lighthouse to go to 1912 lighthouse. Go to
Drake’s closet and click on the marsh picture to get to 2090 BC.
Malakai’s Cave:
Go to Malakai’s cave:
Open the side of
Malakai. Time to program Malakai to fulfill his programmed mission.First line – Click the
icon on the left to select the time and date seen on the room behind the
curtain at the 2090 AD Clinic – 00:05 20/04/90.X – Click on the X to
select the 3 numbers found on the 1912 second floor book with X seen on the
map -160 140 090.Y – Click on the
Y to select the 3 numbers seen on Ralf radio puzzle with Y seen on the picture
beside it – 120, 180 020.Z – Click on Z to
select the 3 numbers seen on the Seahenge posts with the Z seen on the center
rock – 180 110 150.Symbols in the color
sequence as shown by the drawing seen on the secret drawer under Drake’s bed
is purple 1, green 2, yellow 3 and blue 4:
The pink symbol is
seen from the robot projection in 2090 AD at Ivan’s quarters.The green symbol is
seen from the 2004 cave pool under the lighthouse.The yellow symbol is seen
from the 1912 Lamp Room lens.The blue symbol is
seen from the eggs in a bowl at the 2090 BC village.
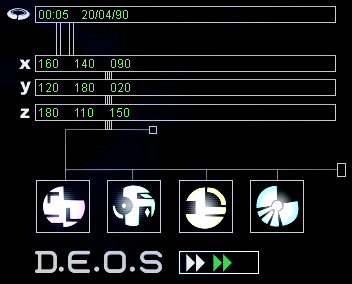
Press the green double
arrow to send Malakai to continue his travels.
"My Parker is no demon,
my Parker is my savior. Map man is thy name, map man is my freedom. I can now
return, leave this place and never come back. My time is calling to me, soon I
will be with my kind. All that will pass is set back on course and will never
suffer corruption. My past deeds forgiven, my past crimes reversed. You have
saved me, map man, and all time is yours…"
Thanks for everything, Jonathan!
This
document may not be distributed without express written permission of the author
and the content may not be altered in any way.
For
Questions or Comments on this Walkthrough,
Please write to:
MaGtRo
Copyright © 9/2004
MaGtRo