Cydonia
CYDONIA
Mars: The First
Manned Mission
An Adventure
Game by DreamCatcher Interactive, Inc.
Walkthru by
Dancer
CRASH LANDED…
Look at and listen to the female
astronaut. Turn around and zoom in on the Aux. Computer
Uplink. USE Uplink Cable (in your inventory) on the
uplink. Use Suit Computer (Helmet in inventory) and
click on Lander Uplink node. Look at Engines status and
dump all three tanks. Look at status of Lower Shaft and
note electrical fire. Quit the Suit Computer. Zoom
out. Talk to astronaut again.
Exit Cockpit to the Ready
Room. Find and click to add to your inventory: Fire
Extinguisher, Emergency Pressurized Patch, and Argon Torch. Go down thru the
hatch and USE Fire Extinguisher to put out the electrical
fire.
Return to the Cockpit and USE Emergency
Pressurized Patch on astronaut with leaky helmet, and USE Argon
Torch on beam over knee of female astronaut. Return to Ready
Room. Go up ladder thru hatch to Rescue Lifeboat.
Look around then return to Ready Room.
Try to go out Outer Door.
Oh-oh… BROKEN! Go back to Ready Room and down the hatch. Go
thru another hatch into the HoverCraft Bay.
Click on the Automatic Door of the
HoverCraft, enter and sit down at the controls. Look down
at the controls and click on "Engines", then click
(wavy arrow) Forward to make HoverCraft leave the ship. Go
Forward once, then look down at controls and click the "Jump
Jets".
MARS (Present Time)…
Other than the crashed ship, there
are three locations on Mars:
- CONTROL CENTER (Looks
like a hole up in the cliff) - PENTAPYRAMID (Steps
leading up) - SOLAR SYSTEM VAULT (top of a
hill, look for "manhole cover" with solar
system engraved on it)
Head first for the CONTROL
CENTER. When you arrive, shut off "Engines", exit
HoverCraft, walk up the hill and enter.
CONTROL CENTER
When you first enter, you are in
the Gong Room. Go Forward onto the platform, turn left and
go down the stairs Underwater. Look down and note the five
alien words, left to right. (If you USE your Suit
Computer‘s Decryption node to translate them, Left to Right
they are: Worker, Merchant, Warrior, Scholar, Judge.)
Go back up to the Gong Room and
walk around clicking on each of the five gongs. Note that
when struck, each gong lights up with alien words. The upper
left-hand word is the same as one of those you found
Underwater. To solve this puzzle, strike the gongs in the
same order as the words (left to right) underwater. (Facing
the platform, Left to Right the gongs are: Merchant, Worker,
Judge, Warrior, Scholar.)
If correct the center device
Underwater will start up. Go back down the stairs Underwater.
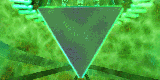 Tetrahedron Color
Device 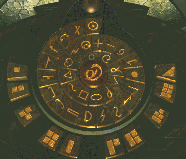 Alien
Alien
Keyboard
As soon as you get Underwater
again, the Tetrahedron Color device will flash three
colors. Note these colors each time a new set
flashes. The object of this puzzle is to input, in order,
one color at a time, those three that flashed. One correct
sequence should solve the puzzle, however, your copy of the game
may have a "glitch" in it; a patch is available from
DreamCatcher Interactive, and also available as a link at the end
of this walkthru. If you do not apply the patch, you may have to
repeat this sequence over and over and over and over (maybe 25+
times). Once the machine is satisfied, an alien will
automatically appear that you can talk to. (Finally! Someone
who knows what’s going on!)
Solving the Tetrahedron Colors
puzzle:
- Go into your Suit
Computer dictionary and write down the alien
symbols for the colors: Red, Orange, Yellow,
Blue, Violet and Green (all are three-symbol words).- Watch the three colors
flash and write them down.- Zoom in on the circular
alien "keyboard" that has all the alien
character-symbols on it (the middle device
underwater)..- For each of the trio of
colors you just wrote down, "spell out" the
alien word, then click on the center button on the
keyboard (we’ll call it "enter"). If
you’ve input the correct three colors, an alien will
appear that you can talk to to find out about
Cydonia. If you guessed the colors incorrectly, just
zoom out to see another trio of colors. Write
these down and repeat this process. For
example, if the colors are Red, Red, Blue: on the
keyboard, spell out Red, hit enter, spell out Red,
hit enter, spell out Blue, hit enter, then zoom out.
Keep repeating the steps 2 thru 4 until the alien
appears.
Once you’ve talked to the alien,
go back upstairs to the platform and continue up the stairs to
the Hall. Note that most of the wall panels in the Hall
have a purple center, but one is gold. Walk toward,
and click on, the gold panel and it will open. Zoom
in. Note the alien symbols at the base of the
pyramid. Rotate the pyramid levels (top to bottom) to match
the symbols at the base (left to right). If correct,
a Red Capstone separates from the pyramid; click to add
it to your inventory. Zoom out.
Still in the Hall, find the device
with four colored spheres and four tall triangle shapes.
The object of the puzzle is to click on the spheres to rotate
them until each sphere has an upright tall triangle as shown on
the face of the device. Once all four are set correctly, the
spheres will disappear and a door will open on your left.
Enter this room and find The Chair. Look around and notice
the six geometric shaped holes in floor. Look up and USE
the Red Capstone at the junction above The Chair.
That’s all you can do here for now.
Go back to the HoverCraft and head
for the SOLAR SYSTEM VAULT location — a "stop" at the
top of a hill. (Wait! What is that flat, circular stone with
carvings on the ground? Hmmm… this looks too heavy to lift by
yourself!) Look down at your controls and click on the
"Remote Arm" to lift away part of the stone that’s
broken. Shut down the HoverCraft, exit and go down the
opening.
SOLAR SYSTEM VAULT
There are two levels here
underground: Upper and Lower.
In the Upper level, there are nine
murals on the wall. Each mural shows three symbols in a
triangle shape, with a symbol in the middle of the
triangle. Write down these combinations. There are nine
murals, one for each planet in our Solar System. The symbol in
the center of each mural represents a planet (note that the
center symbol is the same as the symbol at the top of the
triangle). Look down towards the floor until the cursor
becomes a wavey arrow and click to go down to the Lower level.
Go to the wall that has the red
circle with three smaller circles around it. This is the
Planets puzzle. Remember the nine murals in the Upper level? The
object of this puzzle is to identify the symbol for each of the
nine planets. To solve:
- Click on each of the three
little circles positioned in a triangle pattern around
the inner red circle. Set the top circle to a planet
(this is the one you want to identify). Pictures of the
planets can be found in your Suit Computer‘s
Mission Data node. - Without changing the top
planet, click different combinations of the bottom two
circles until the red circle opens up to reveal a metal
tooth with a symbol on it. (The symbol on the metal
tooth is the symbol that goes with the planet you
set at the top circle.) Click on the metal tooth
to add it to your inventory. - Repeat these steps until you
have nine metal teeth — one for each planet.
(Make sure you note which symbol represents which
planet.)
Solution (Platetary positions
are TOP- LEFT- RIGHT):
- Mercury-Venus-Pluto
- Venus-Earth-Jupiter
- Earth-Mars-Neptune
- Mars-Mercury-Saturn
- Jupiter-Saturn-Neptune
- Saturn-Mars-Uranus
- Uranus-Venus-Pluto
- Neptune-Uranus-Mercury
- Pluto-Jupiter-Saturn
Go to the wall covered with alien
writing. Click on the wall and you raise your arm to scan the
text translation into your Suit Computer. USE your Suit
Computer‘s Decryption node and read the Transcript of what
you just scanned.
Go to the wall with the gold
circle in a red outer ring. If you click on the circle, it
opens up to show a design with symbols on it. Following the order
stated in the Transcript (that you scanned into your Suit
Computer), place the nine metal teeth from the
Planets puzzle in the design. When correct, you get the Discus.
Placing the teeth for the
planets in the following order, the solution is:
- Jupiter
- Saturn
- Neptune
- Uranus
- Earth
- Venus
- Mars
- Mercury
- Pluto
Go back to the HoverCraft and
travel to the PentaPyramid.
PENTAPYRAMID
The PentaPyramid has a central pit
and five pillars around the perimeter.
Go down the stairs and Forward
till you stop in front of a pillar. Facing a pillar, in the
center of the pillar there is a gold circle that looks like the Discus.
(There are five of these pillar stops as you walk around the
perimeter.) Each of those pillars is the door to a Crypt. The
gold circle on the pillar is the lock. You must use the Discus
to unlock each Crypt. Each Crypt has a puzzle within to solve
(aiieeEEE!) to obtain a Geometric Solid.
Standing outside a Crypt door, if
you walk toward the center of the room to the Pit and look down,
you will see a plaque. There are five plaques ringing the pit,
one in front of each Crypt: Judge, Warrior, Scholar, Merchant,
and Worker. We’ll use these plaques to reference the Crypts they
face.
To unlock a Crypt, click ONCE on
the Discus in your inventory and notice that you can
click on the different symbols on the Discus. Click on
one of the symbols to highlight that symbol, then USE the Discus
on the gold circle on the pillar. You have to keep repeating this
till you find the correct symbol for each Crypt door.
Crypt/Discus Lock
combinations:
- Judge Crypt = Discus
symbol for Neptune- Warrior Crypt = Discus
symbol for Uranus- Scholar Crypt = Discus
symbol for Venus- Merchant Crypt = Discus
symbol for Jupiter- Worker Crypt = Discus
symbol for Mercury
Judge Crypt Puzzle Click to pick up
all ten red wooden pegs (numbering them 1 thru 10 as you pick
them up, left to right). Examine each peg in your inventory and
note that one has unique markings, and the others are three sets
of three. The object of this puzzle is to place the pegs in the
holes in the design in the correct pattern. Set the unique peg at
the top.
Solution:
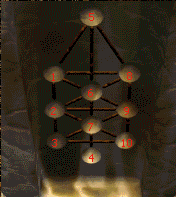
When all ten pegs are placed
correctly, a light beam will flash from above. Turn around and
walk once toward the door. Before you go out of the Crypt, turn
right and climb the stairs. Zoom in on the globe and click on it
to open and reveal a Geometric Solid. Click on the solid
to transfer it to your inventory. Zoom out and leave the Crypt.
Warrior Crypt Puzzle
This is the warrior checkers
puzzle. There are six warriors (one Bronze and five Silver). The
object of the puzzle is to jump over another warrior like you
would in checkers. Any warrior can jump over any other warrior,
regardless of color. To win, the Bronze warrior must be standing
alone on the center "X" square. Solution:
Jump#1: 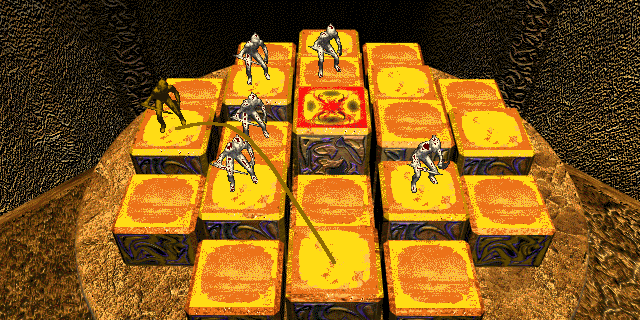 Jump#2: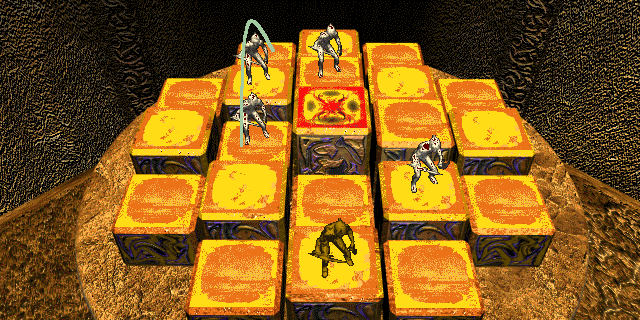
Jump#3: 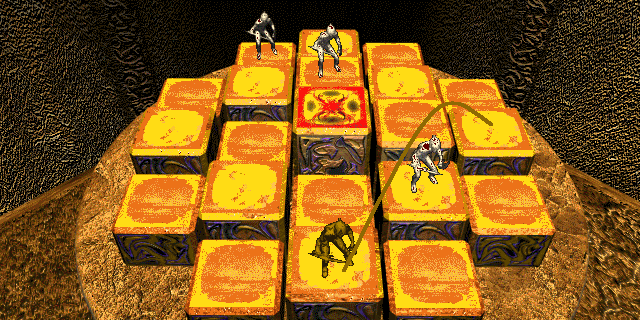 Jump#4: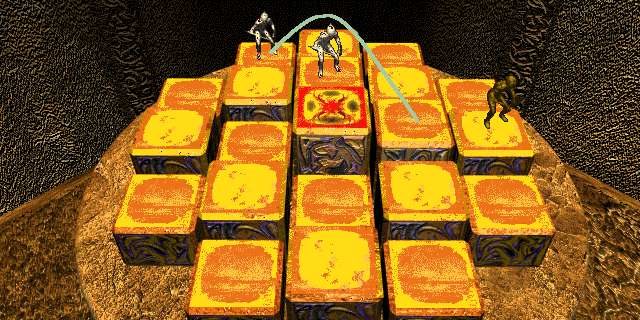
Jump#5: 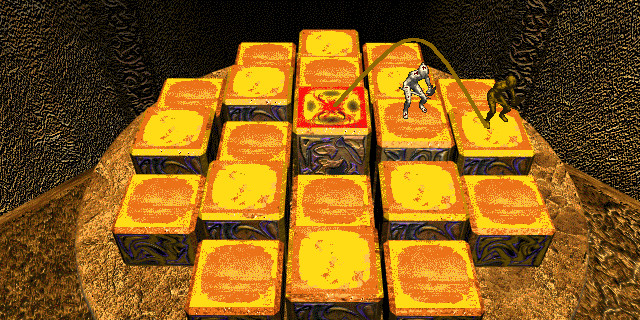
When correct, a light beam will
flash from above. Turn around and walk once toward the door.
Before you go out of the Crypt, turn right and climb the stairs.
Zoom in on the globe and click on it to open and reveal a Geometric
Solid. Click on the solid to transfer it to your inventory.
Zoom out and leave the Crypt.
Scholar Crypt Puzzle
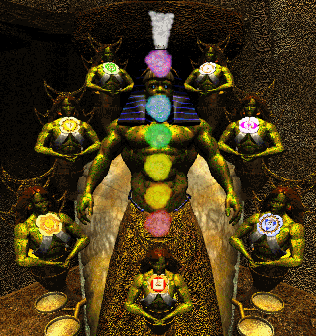
This is the rainbow puzzle. Click on the man statue to make the
statue stand up. Pick up all the coins in the four trays at the
base of the statue. USE the coins on the folded hands of the
little statues to get different colored teardrops. USE the
teardrops on the corresponding colored "tornados" to
brighten them. USE all the coins/teardrops.
Click on a tornado, then on another tornado, and they will switch
places. Order the tornados, bottom to top in the colors of the
rainbow: Red, Orange, Yellow, Green, Blue, Violet, and White.
Solution:
When correct, a light beam will
flash from above. Turn around and walk once toward the door.
Before you go out of the Crypt, turn right and climb the stairs.
Zoom in on the globe and click on it to open and reveal a Geometric
Solid. Click on the solid to transfer it to your inventory.
Zoom out and leave the Crypt.
Merchant Crypt Puzzle
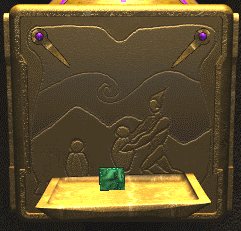
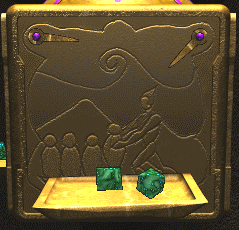
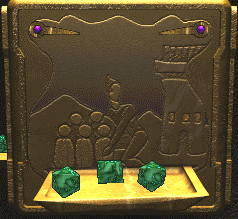
The object of this puzzle is to pick up the ten green jewels from
the two trays, and use the ten jewels in drawers that pop out of
the box. The box spins around. There are two levers on each of
the four sides of the box. Manipulate the levers (each lever has
three possible positions) until you find the combination that
will open a drawer. Open all four drawers (one on each of the
four sides). Study the pictures on the sides of the box. You must
place the ten jewels in the drawers: one drawer gets 1, another
drawer gets 2, another drawer gets 3,and the other drawer gets 4.
Solution:
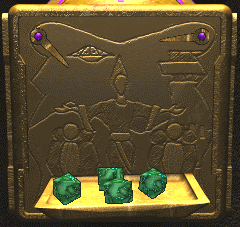
When correct, a light beam will
flash from above. Turn around and walk once toward the door.
Before you go out of the Crypt, turn right and climb the stairs.
Zoom in on the globe and click on it to open and reveal a Geometric
Solid. Click on the solid to transfer it to your inventory.
Zoom out and leave the Crypt.
Worker Crypt Puzzle The
object of this puzzle is to put the two, like-color blocks in
their appropriate color area. Solution:
Begin puzzle:
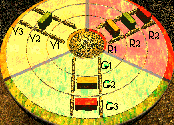
- As is, click on Y3.
- Move Y2 to Y1; Y3 to Y2;
click on Y2.- Move G2 to G3; Y2 to Y3;
click on Y1.- Move Y1 to Y2; and G1 to
G2.
When correct, a light beam will
flash from above. Turn around and walk once toward the door.
Before you go out of the Crypt, turn right and climb the stairs.
Zoom in on the globe and click on it to open and reveal a Geometric
Solid. Click on the solid to transfer it to your inventory.
Zoom out and leave the Crypt.
When you have successfully
acquired all five Geometric Solids from the five Crypts,
walk towards the center pit, zoom in and click the wavey arrow
Forward into the pit to take an elevator ride up to the Capstone
TimeShip. (Whoo, boy, hang on tight!) Look around. You cannot do
anything until you get a UVG (Unified Vector Geometry) Sphere.
Get back in your Hover Craft and travel back to the Control
Center.
CONTROL CENTER
Go to The Chair room. Place the
five Geometric Solids in their corresponding holes in
the floor. Sit in The Chair. On the alien keyboard, type the word
"open" then hit enter. (You’ll have to use the
Dictionary or Translator in your Suit Computer‘s
Decryption node.) If correctly, an automatic scene shows the
doors opening above, light shining thru the Red Capstone,
energizing the five Geometric Solids and creating a UVG
Sphere. Get out of The Chair and click on the UVG Sphere
to transfer it to your inventory.
Get back in your HoverCraft and
travel to the PentaPyramid.
PENTAPYRAMID
Go to the Central Pit in the
PentaPyramid and back up the elevator to the Capstone TimeShip.
Use the UVG Sphere on the console to trigger an
automatic scene of your TimeShip tunneling thru the Sun and
landing on Neptune.
AMBASSADOR’S PLANET …
When you land, exit the TimeShip
to stand on the Dock — a platform surrounded by five Crystals,
that, when you click on them, sound musical notes. This is the
Whale Puzzle. Move your cursor down until you see the wavey arrow
and click to take the elevator down one level. Here you will find
four Horns. The object of this puzzle is to listen to the
Crystals above, specifically the number of notes each crystal
sounds. Then, mimic the crystals above to identify and blow each
horn once in the correct order.
Solution: The horns are
connected together with bracings, except for between two of
the horns. Find this opening. The first horn to the right of
the opening we’ll call #1, the next to the right is #2, then
next right is #3, then next right is #4 (just before the gap
again). Click on the horns in this order: 4,3,1,2 .
If correct, an automatic scene
shows the Whale surfacing. Facing the opening, click Forward to
step off the elevator platform and onto the Whale’s back. Click
the wavey arrow Forward over the Whale’s head for an automatic
scene taking a ride on the Whale to an island. (Giddyap, and
don’t forget to hold your breath!)
You arrive in an underground cove
on an Island. Step off the Whale and walk toward the round
portal. Note the three symbols carved above the door. The door is
divided into sections. When you click on a section, a symbol is
shown in a box above the portal (you have to look up quickly to
see the symbol). Once you identify which sections of the door
make what symbols, click on the three door sections in the order
carved above the door and the portal will open. Go Forward thru
the portal.
All three Rings of Light are found
on the island. You will not have to leave this Island until you
have acquired all three.
Map of the Island:
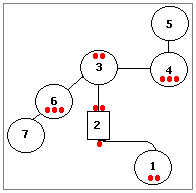
(1) Is where you came in from
the portal.(2) This is the Chasm
crossing. Depending on the direction you are going, hop the
rocks in the following pattern to safely get across. Save
your game before you cross because the rocks are slippery!Direction(1)to(3):
Direction(3)to(1):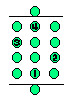
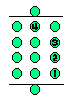
(3) This is the Rock
Spiral Clearing.(4) From (3), go Forward
towards the tree with blue leaves.(5) This is the Millstone
Nook.(6) From (3), go Forward
towards the tree with pink leaves.(7) This is the Pyramid
and Flower Nook.
Find and pick up all 13 Wooden
Pyramid Pieces. They are hidden in the grass on the ground.
(Shown by red DOTS on map.) Go to (5).
Millstone Nook:
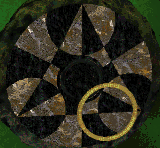
Click for a closeup of this puzzle. The object of the puzzle is
to create a design where adjacent pieces are contrasting. When
you first click on the millstone, the first piece is set for you,
as well as it’s shade (dark or light). When pattern is correct,
click on the Yellow Ring that appears to add it to your
inventory. Go next to (7).
Solution:
Pyramid and Flower Nook:
Look down and see a red circle on the ground. Use the 13 Wooden
Pyramid Pieces on the red circle to build a pyramid. When
complete, the pyramid will display alien writing. See the big,
beautiful flower? It needs some light! Use your Argon Torch
above the flower to let the sun shine in. When the folliage is
cleared away, click on the Red Ring that appears to add
it to your inventory. Go next to (3).
Rock Spiral Clearing:
When you walk into the clearing, the Alien Ambassador appears.
Talk to it. When you’ve asked all the questions, if you look in
your inventory, you will see the Ambassador gave you the Blue
Ring. Look down at the ground and take note of the spiral
rock formation on the ground.
You now have the three Rings of
Light to take back to the Control Center on Mars. Go back thru
the portal, ride on the Whale, and get back into the Capstone
TimeShip. Use the UVG Sphere on the console to travel
back to Mars and exit the TimeShip to the PentaPyramid. Get in
your HoverCraft and travel to the Control Center.
MARS (Present Time)…
CONTROL CENTER
Go back Underwater. Use the Red
Ring, Yellow Ring, and Blue Ring on the device to
the left. Watch the automatic scene of volcanos erupting.
Still Underwater, click for a
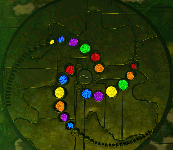
closeup of the device on the right. Remember that spiral rock
formation back on the Island? Click on the little circles in each
arm of the spiral to match the color pattern of the spiral rock
formation. When the colors for all three arms are complete, click
the power button in the center. You will hear a sound like a
machine powering down. You have successfully shut down the
protective shield. THERE IS NO AUTOMATIC SCENE!
Solution:
Saving Humanity…
Get back in your HoverCraft and
travel back to your crashed ship. You cannot pilot the HoverCraft
all the way into the ship; you have to cut the engines just
outside the ship and walk in. Go to the Ready Room and up the
ladder to the Rescue Lifeboat. Find the empty seat that has a
small device to it’s right and click the wavey arrow to sit down.
Turn to your right and push the red "Launch>" button
on the device. Watch the ending scene.
Tetrahedron Colors Puzzle
Patch (Control Center)…
CYDONIA FIX (for
the Glitch in the COLOR’s Puzzle Underwater)
INSTRUCTIONS:
- Find the C:CYDONIA
directory on your Hard drive (Or whatever
[Drive]:[directory] you installed to).- Go there and open up the
"DATA" sub-directory and then its
"S" sub-directory.- Find and DELETE (or
RENAME) the file titled: Fpan.s- Copy the downloaded
Fpan.s file (repaired Fpan.s file, size is 255 KB) to
the same DATAS subdirectory.