Just Adventure original
Cydonia Walkthrough
The unaltered guide: no contents list, no checkboxes, no page breaks. This is what the archive holds. Back to the reading view
TABLE
OF CONTENTS
Part 1–Segue I: Opening Movie
Part 2–Scene 1: The Cockpit
Part
3–Scene 2: The Ready Room
Part 4–Scene 4:
The Lower Shaft
Part 5–Scene 5: The Mainbay
Part 6–Scene 6: The Cydonia Landscape
Part
7–Scene 7: The Tholus Alcove
Part 8–Scene
8: The Tholus Underdome
Part 9–Scene 9: The
Face on Mars (Main Chamber)
Part 10–Scene
11: The Pentapyramid (Great Hall)
Part 11–Scene
12: The Laborer Trial
Part 12–Scene 13:
The Merchant Trial
Part 13–Scene 14: The
Scholar Trial
Part 14–Scene 15: The Warrior
Trial
Part 15–Scene 16: The Judge Trial
Part 16–Scene 10: The Face on Mars (UVG Assembler
Area, revisited)
Part 17–Scene 11: The Pentapyramid
Great Hall (revisited)
Part 18–Scene 17:
The Capstone Timeship
Part 19–Segue II:
Journey Through Time
Part 20–Scene 18: Past
Mars (The Capstone Landing Pad)
Part 21–Scene
19: The Whalesong Chamber
Part 22–Segue
III: The Underwater Journey
Part 23–Scene
20: The Subsurface Cavern
Part 24–Scene
21: The Shaft Spire
Part 25–Scene 22: The
Garden Spire
Map of the Garden
Part
26–The Endgame
Multiple Endings
PART
1–SEGUE I: OPENING MOVIE
PART 2–SCENE 1: THE COCKPIT
In
the cockpit of the crashed lander the Player will encounter the first set of situational
puzzles. These puzzles are important as failure will result in either the Player’s
death or the death of the Prometheus crew. The Player may continue with the game
if the crew dies, but will not have the satisfaction of saving the crew once the
lifeboat is finally ejected safely into orbit in the endgame.
The Player
must complete the following situational puzzles within the cockpit:
1. Computer
Access
2. Fuel Dump
1. Computer Access:
Objective:
- Gain access to the main computer which has been knocked off-line
Steps:
1. Locate the uplink access point labeled "Auxiliary Computer Uplink".
It is on the ship’s control panel on the side wall near the Player’s seat in the
cockpit.
2. Use the cable in inventory to connect to the main computer.
3. Use your suit computer (represented by the helmet in your inventory box) to
assess the status of the crashed lander.
2. Fuel Dump:
Objective:
- Dump the remaining fuel in the lander’s leaking tanks
- The Player has
5 minutes to complete this task before the lander blows up - The timer starts
as soon as the Player begins the game
Steps (cont’d):
4. Once
the suit computer is activated, select the "Lander Uplink" icon.
5. Click on the button labeled "Engines" in your suit computer.
6. Dump the fuel in all 3 tanks.
7. Click "close" to return to the
main menu of your suit computer, and then choose "Quit".
PART
3–SCENE 2: THE READY ROOM
The following situational puzzles involves
the Player returning to the Cockpit scene:
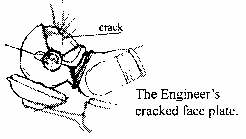
1. Face Plate Crack
2. Commander’s
Pinned Leg
1.
Face Plate Crack:
Objective:
- Apply a pressure patch
to the leaking face shield of the unconscious crew member (the engineer) - The
Player has 15 minutes from the beginning of the game before the engineer’s oxygen
runs out
Steps:
1. Exit the doors to the Ready Room.
2. Locate
the pressure patches in a cabinet labeled "COMPA1" in BIN2B. The cabinet
is on the left wall as you exit the Control Door of the cockpit.
3. Go back
to the cockpit.
4. Take the pressure patch from inventory and apply it to
the cracked face plate of the Engineer.
2. Commander’s Pinned Leg:
Objective:
- Free the commander’s leg from beneath the fallen bulkhead
Steps:
1. Locate the laser torch in the Ready Room. It is in a cabinet on the wall, to
the left of the outer door.
2. Go back to the cockpit.
3. Take the torch
from inventory and cut through the pipe pinning the Commander’s leg.
PART
4–SCENE 4: THE LOWER SHAFT
The following situational puzzle also involves
the Ready Room scene:
1. Lower Shaft Fire:
Objective:
- Extinguish the electrical fire in the lower shaft
Steps:
1.
Locate the fire extinguisher in a cabinet in the Ready Room. The cabinet is on
the right wall as you exit the Control Door.
2. Proceed to the ladder going
down into the portal.
3. This will lead the Player to a portal that takes
you to the lower level of the lander. Click on the door lock.
4. Once the
door closes behind you, continue to descend the ladder.
5. Here you will encounter
a fuse box on fire.
6. Use the fire extinguisher in inventory to put out the
fire.
PART 5–SCENE 5: THE MAINBAY
Once the
Player has completed these situational puzzles within the lander, they may proceed
to the Mainbay where the hovercraft is docked. The puzzles do not have to be completed
in a particular order, but the Player must keep in mind the time restraints on
the Fuel Dump and Face Plate Crack puzzles.
Objective:
- Launch
the hovercraft so the Player can explore the Cydonia landscape
Steps:
1. In the lower shaft, find the door to the Mainbay.
2. On the hovercraft,
look for the door marked "Automatic Door". It is located at the rear
of the vehicle.
3. Click on the door. This will automatically take you to
the interior of the hovercraft.
4. Find the main control console and click
on the button labeled "Engines".
5. Click when the cursor begins
to roll forward. You will automatically be taken across the Martian landscape.
PART
6–SCENE 6: THE CYDONIA LANDSCAPE
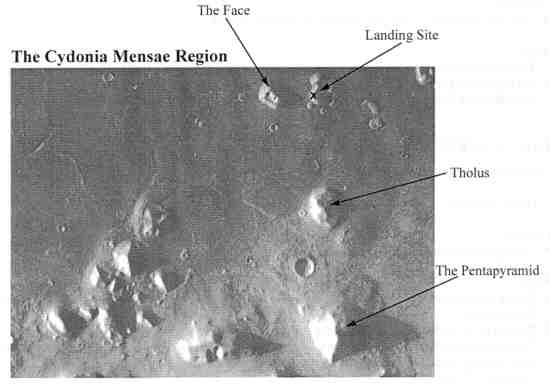
From here, the Player may explore
the landscape and will encounter the following structures:
- The Tholus
- The
Pentapyramid - The Face on Mars
The Player must use the "Jump-Jets"
on the hovercraft control panel to get out of the landing site area.
PART
7–SCENE 7: THE THOLUS ALCOVE
The Tholus is a huge swirled mound of
rock with a plug that seals a long shaft leading to an inner domed chamber.
The
Player will encounter the following situational puzzle:
1. The Tholus
Plug Puzzle:
Objective:
- Open the heavy plug to gain access
to the Tholus Underdome
Steps:
1. Once you see the plug from inside
the hovercraft, click on the button for the "remote arm" on the hovercraft
control panel. The plug is far too heavy for the Player to lift.
2. Once part
of the plug has been broken away, click on the "engines" button. You
may now exit the hovercraft and explore the chambers within the Tholus.
3.
The Player will notice drawings on the walls of the first chamber. This is a hint
to the Discus Puzzle.
PART 8–SCENE 8: THE THOLUS UNDERDOME
The
Player will encounter the following puzzle:
1. The Discus Puzzle:
Objective:
- Assemble the 9-piece Discus artifact that is used throughout
the game as a translating device, key, and an element in other puzzles
Steps:
1. Click on the rolling cursor to descend into the Tholus Underdome (the lower
chamber of the Tholus).
2. Proceed to the object with the dark red sphere
on the wall, known as the Triskellion object, situated directly behind you.
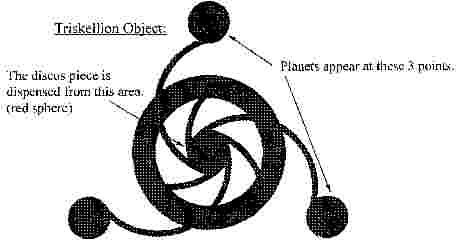
Three
planets will form a conjunction that will allow the center of the triskellion
to open and dispense a piece of the Discus. Hints that describe each planet in
simple visual terms, and the aUI symbol that represents that planet, can be found
engraved on the walls. The Player will have to use their suit computer to translate
the aUI inscriptions on the walls.
Steps:
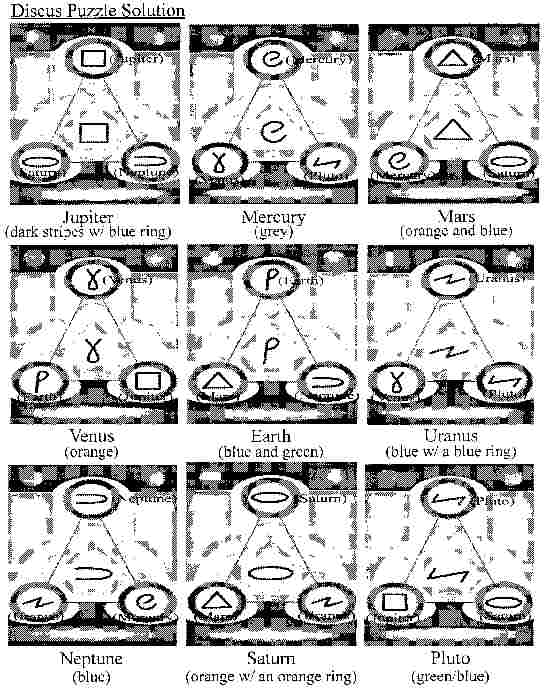
1. To set the following 9
combinations, simply click on each of the 3 circular points and a planet will
appear.
2. Continue clicking on a single point to select a planet.
3.
Once you correctly set one of the combinations one of the pieces to the Discus
will be revealed with an aUI symbol on it. Each of the symbols will represent
a different planet.
4. Click on the piece to add it to inventory.
Without
the Discus, the Player cannot understand spoken aUI or gain entry to the caste
trial chambers in the Pentapyramid.
The
Discus Object:
The pieces you acquired from the triskellion must now
be placed into the Discus. The Discus is on the wall directly across from the
triskellion object.
Steps:
1. Click on the center of the Discus and
it will open revealing 9 empty spaces where the pieces must be placed.
2.
Each piece must be placed in the Discus according to the size of each planet.
An entire wall in this room contains a hint that begins telling the Player that
"from greatest to smallest they are to be planted." Therefore, the largest
of the 9 planets in our solar system must be placed first, and the smallest placed
last.
3. Move the cursor around the Discus. The cursor with a pointing finger
will indicate the correct spot for that particular piece.
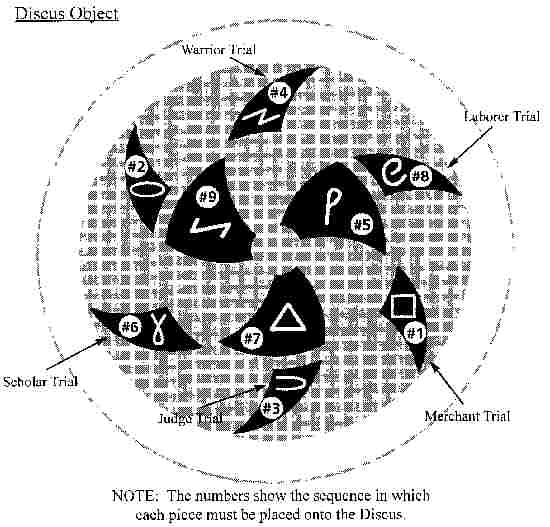
Once
the Player receives the Discus, they may travel to either the Face on Mars or
the Pentapyramid.
PART 9–SCENE 9: THE FACE ON MARS (MAIN
CHAMBER)
When you pass over this structure, you will see a bird’s-eye-view
of the Face. Upon entering the main chamber, the Player is propelled through an
anti-gravity field that takes them to a chamber with a giant spiral staircase.
The bottom floor of this structure is submerged under water. This is where the
Player will encounter the Brainframe, the console to control the force field over
Cydonia, and the console for the terraforming system used by the ancient Martian
people to create a breathable atmosphere on Mars.
The force field console
is activated by inputting an aUI code, and the terraforming system requires 8
rings to be placed in the indentations on the console. These are the final puzzles
that the Player must solve. The Brainframe computer (the floating inverted pyramid)
will give the Player hints on what to do as well as part of the overall storyline.
To communicate with the Brainframe, the Player must first solve the Gong Puzzle.
The hint to this puzzle is inscribed on the floor at the base of the Brainframe.
1.
Gong Puzzle:
Objective:
- Strike the gongs on the main floor
in a specific sequence to activate the Brainframe computer
Steps:
1. There are 5 gongs in total hanging on the walls. Click on any one of them.
The Player will notice that aUI symbols will appear. The group of symbols in the
top-left corner of the gong will match the hint inscribed on the floor at the
base of the Brainframe.
2. Use the doorway on the main floor as your reference
point. See the following diagram for the sequence the gongs must be clicked.
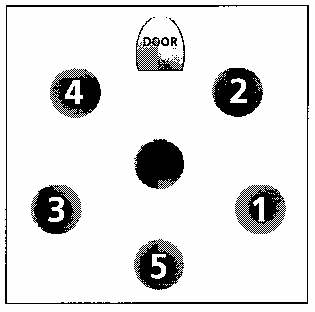
3.
Once the Player has clicked all of the gongs in the correct sequence, they may
proceed to the Brainframe.
4. If the Player clicked the gongs in the correct
sequence, the Brainframe will rotate flashing 3 different colors (at random) on
each of its sides. The Player must take careful note of the sequence of colors.
5. Once the Brainframe has stopped rotating, the Player must consult the spiral
aUI control panel below the Brainframe. Here the Player must enter the aUI symbols
for each color.
6. Activate the suit computer and select "Decryption".
7. Then select "Dictionary".
8. Look up the aUI symbols representing
each color and be sure to take notes.
9. Return to the spiral aUI control
panel.
10. Begin entering the aUI symbols for the first color in the given
sequence, then press "enter". ("Enter" is the symbol in the
center of the spiral control panel.)
11. Enter the aUI symbols for the second
color in the given sequence, and press "enter" when completed.
12.
Enter the final set of aUI symbols into the control panel and then press "enter".
13. The Brainframe is now activated, and the Player can communicate with it.
The
following are the possible colors the Brainframe may flash:
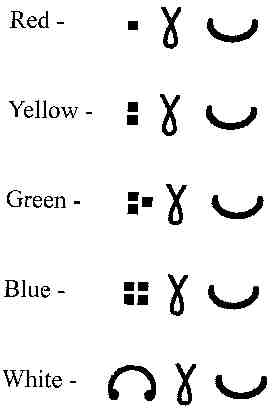
The
Player may explore the rest of the Face on Mars structure or proceed to the Pentapyramid.
PART
10–SCENE 11: THE PENTAPYRAMID (GREAT HALL)
The Player will encounter
stairs on the side of the Pentapyramid. The Player can enter this structure through
a large stone portal. A long sloping corridor leads to the Great Hall. The Great
Hall is a five-sided room with sloping walls. There are 5 tunnels (each with a
stone door) situated around the room. In the center of this room is a circular
depression for the construction of the pentagonal lift which takes the Player
to the Capstone Timeship.
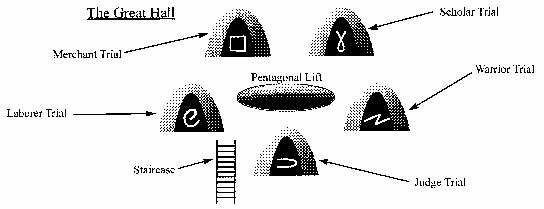
Objective:
- Gain access to each of the 5 caste trial chambers using the Discus artifact
Steps:
1. Approach one of the 5 doors leading to the caste trial chambers. An aUI character
inscribed on the Discus artifact corresponds to a doorway.
2. On the Discus
(in inventory) activate one of the aUI characters and then select "Use".
3. Click on the door and it will open.
4. Proceed to the puzzle.
NOTE:
If the Player selects the incorrect aUI symbol on the Discus, nothing will happen.
PART
11–SCENE 12: THE LABORER TRIAL
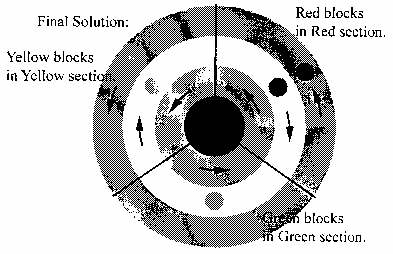
This puzzle consists of a board with
3 concentric rings, divided into 3 sections–red, green, and yellow. There are
6 blocks positioned on the board–2 red, 2 green, and 2 yellow. When 2 blocks
glow blue, the Player may click on the board to rotate that ring. The inner and
outer rings rotate counter-clockwise, and the middle ring rotates clockwise. The
Player may also change the positions of each block sliding them up or down within
each quadrant.
Objective:
- Align the blocks on the board so the
blocks and the section of the board match in color - The blocks should be
positioned in the middle and outer rings - There should be no blocks within
the inner ring
Solution:
1. Rotate the outer ring.
2. Move
the green block in the yellow section up one.
3. Move the red block in the
yellow section up one.
4. Rotate the middle ring.
5. Move the green block
in the green section down one.
6. Move the yellow block in the yellow section
down one.
7. Rotate the inner ring.
8. Move the green block in the green
section down one.
9. Move the yellow block in the yellow section down one.
10. End
To
retrieve the Platonic Solid the Player must open the gold, spherical container
at the top of the stairs.
PART 12–SCENE 13: THE MERCHANT
TRIAL
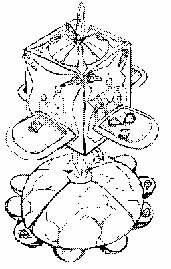
The Player will find a floating cube held in position by an alien
anti-gravity field mechanism and 2 trays with 5 gemstones on each of them. The
floating cube has different paintings on each side and a lever in each corner.
The levers can be shifted into either an upper, middle, or lower position.
Objective:
- Shift the levers into the correct positions to open the drawer
- Distribute
the 10 gemstones to mirror the progression of the merchant’s career from rags
to riches
Solution:
1. Pick up all 10 gemstones adding it to inventory.
2. The Player may click on the cube to rotate it.
3. Once the Player sets
the lever in the correct position a ledge will slide out of the cube providing
a place to set the gemstones.
| Box Side | Lever Positioning |
Number of Gemstones to Place on Ledge | |
| Left | Right | ||
|
Merchant with 2 items |
lower |
lower lower upper upper |
1 2 3 4 |
To retrieve the Platonic Solid the Player
must open the gold, spherical container at the top of the stairs.
PART
13–SCENE 14: THE SCHOLAR TRIAL
This puzzle has one main statue in the
center and 7 smaller ones surrounding it. Notice that each of the smaller statues
has a colored emblem on its chest and near the base of the statue there are 12
Chakra coins.
Objective:
- Arrange the colors in the order of
the spectrum (rainbow)
Solution:
1. Approach the main statue and
click on its chest. The statue will sit up.
2. Pick up all 16 Chakra coins,
adding them to inventory. The Player will only use 14 of the 16 coins. The other
2 are there to trick them.
3. Place each coin in the hand of the corresponding
statue according to color (i.e., green coin in the hands of the statue with the
green emblem on its chest). There are 2 coins of the same color per statue.
4. The Player will now notice that different colored Chakra teardrops appear in
inventory. "Use" each drop by clicking on a rotating circle on the main
statue (i.e., red drop matches with the red circle). The Player will notice that
with every drop, the circles begin to illuminate.
5. Now the Player must arrange
the colored circles, including the plume at the top of the main statue’s head,
into the order of the spectrum/rainbow. To change the order, click on the color
you want to move, then click on the spot you would like to move it to. The following
is the order in which the colors must be placed: (top to bottom) white, violet,
blue, green, yellow, orange, red.
To retrieve the Platonic Solid the Player
must open the gold, spherical container at the top of the stairs.
PART
14–SCENE 15: THE WARRIOR TRIAL
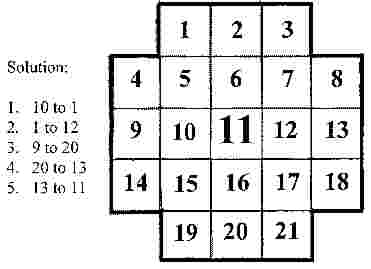
This puzzle is a small vaulted checkerboard
with Martian warriors as game pieces–5 are copper colored and 1 is gold. Moves
can only be made by "jumping" over other warrior pieces. The jumped
pieces will disappear.
Objective:
- The gold warrior must end
on the center vault (the tallest one, #11)
To
retrieve the Platonic Solid the Player must open the gold, spherical container
at the top of the Stairs.
PART 15–SCENE 16: THE JUDGE
TRIAL
The Player will come across an obelisk with the Tree of Life formation
on it, as well as 10 tokens on a round platform at its base.
Objective:
- Place the tokens in the correct position on the Tree of Life
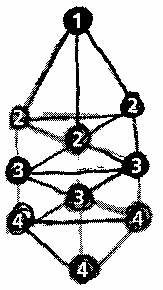
Solution:
1. Pick up all 10 tokens. They will be placed in inventory.
2. Examine each
of the tokens in inventory, recognizing their similarities and differences. The
Player will notice that different symbols represent a number.
- 1 token
w/1 star - 3 tokens w/2 triangles
- 3 tokens w/3 circles
- 3
tokens w/4 squares
3. Place the token that represents the number 1
in the top position of the Tree of Life.
4. Place the 3 tokens that represent
the number 2 in the next row. (Note the row is V-shaped.)
5. Place the 3 tokens
that represent the number 3 in the third row.
6. Place the 3 tokens that represent
the number 4 in the last row.
To retrieve the Platonic Solid the Player
must open the gold, spherical container at the top of the stairs.
PART
16–SCENE 10: THE FACE ON MARS (UVG ASSEMBLER AREA, REVISITED)
The Player
may return to the Face on Mars structure. Here they may complete the following
puzzles on the upper floor.
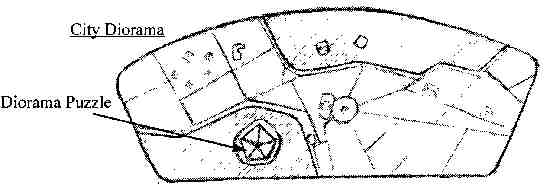
1. The Diorama Puzzle
2. The UVG Assembler
1.
The Diorama Puzzle:
This puzzle is a large sprawling model showing
the Cydonia city as it was over a million years ago.
Objective:
- Obtain the crystal that is required to solve the UVG Assembler puzzle by aligning
the correct sequence of aUI symbols engraved on the Pentapyramid model
Steps:
1. Follow the spiral staircase to the top floor.
2. Click on the panel with
the yellow sphere at its center. The panel will flip over revealing the diorama.
3. Locate the Pentapyramid model on the diorama. It has a red top.
4. Click
on this structure and notice that the sections rotate.
5. Align the aUI symbols
from bottom to top according to the clue engraved at the base of the Pentapyramid
model.
6. Click on the capstone (top) of the pyramid. This becomes the red
Diorama Crystal.
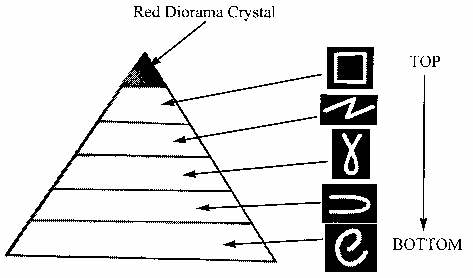
The
top of the Pentapyramid will glow red. Add the red crystal to inventory.
2.
UVG Assembler Puzzle:
The UVG Assembler puzzle is basically a large
iron like cage made up of 4 triangular girded spheres inside one another. In the
center is a platform where a seat rests and a "pentapod" (a tripod with
5 legs) with a slot for the Diorama Crystal.
Objective:
- Align
the UVG spheres, which are currently in a scrambled grid mess, using the Sphere
Control Panel - Place the Platonic Solids (acquired by solving the 5 trials
in the Pentapyramid) in their correct positions
Steps:
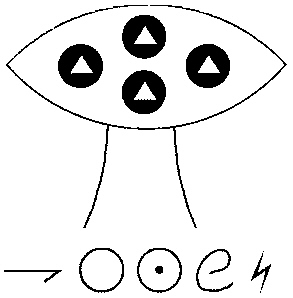
1. Locate
the Sphere Control Panel. It is eye shaped and has 4 circular indentations in
it. When clicked on, it will light up. It is located directly across from the
Diorama Puzzle.
2. Rotate all 4 spheres so each triangle is facing forward
and the apex is pointing upward.
3. Once completed, the doors will align.
4. Enter the central area within the UVG spheres. Notice the 5 indentations in
the flooring.
5. Place each Platonic Solid from inventory, in its corresponding
spot. The cursor with the pointing finger will indicate to the Player where each
Platonic Solid is placed.
6. Place the red Diorama Crystal in the center of
the pentapod located above the chair.
7. Get into the chair.
8. On the
circular console inscribed with aUI symbols, enter the aUI translation for the
word "open" (verb). This will activate the UVG energy ball (blue) which
is the power source for the Capstone Timeship.
PART
17–SCENE 11: THE PENTAPYRAMID GREAT HALL (REVISITED)
The Player may
return to the Pentapyramid after they have completed the UVG Assembler puzzle
and have obtained the UVG energy ball.
Objective:
- Gain access
to the Capstone Timeship
Steps:
1. Locate the pentagonal lift
in the center of the hall.
2. The Player will notice that the pieces which
make up the platform have been assembled. This automatically occurs when each
trial is completed and a Plutonic Solid is acquired.
3. Stand on the pentagonal
lift. The Player will be taken to the Capstone Timeship.
PART
18–SCENE 17: THE CAPSTONE TIMESHIP
The Capstone Timeship is the vehicle
that will transport the Player back in time to past Mars as it was over a million
years ago. Here they will acquire the necessary items that will deactivate the
force field allowing the Player to return to their mothership.
Objective:
- Activate the Capstone Timeship
Steps:
1. The pentagonal lift
will take the Player right into the Capstone Timeship.
2. Take the UVG energy
ball from inventory and place it on the bowl-shaped stand. This will power the
vehicle taking the Player back in time.
PART 19–SEGUE
II: JOURNEY THROUGH TIME
PART 20–SCENE 18: PAST
MARS (THE CAPSTONE LANDING PAD)
Once the Player has traveled back in
time to Mars, they will find themselves on the Capstone Landing Pad. The Player
will exit from the bottom of the vehicle and can explore this new environment.
PART
21–SCENE 19: THE WHALESONG CHAMBER
After the Player has exited the
Capstone vehicle, they may descend into the Whalesong Chamber. Here the Player
will find the Whalesong Puzzle.
Objective:
- Sound the shells
in a particular sequence to summon the Martian whale
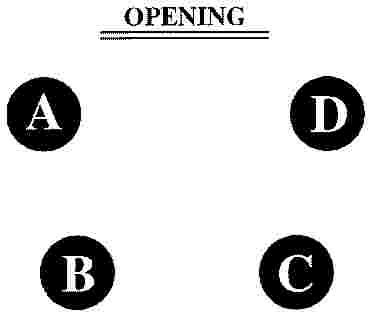
Solution:
Click the shells in the following order: A, B, D, and C.
PART
22–SEGUE III: THE UNDERWATER JOURNEY
Steps:
1. Click on the "opening"
(as labeled above) of the chamber. The Player will climb onto the back of the
whale.
2. Click on the rolling arrow in front of the whale’s head. The Player
will be taken on an underwater journey to a subsurface cavern.
PART
23–SCENE 20: THE SUBSURFACE CAVERN
Objective:
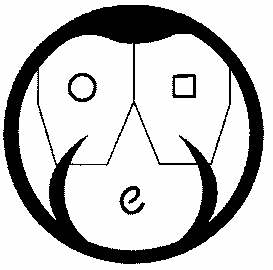
- Unlock the
portal to the shaft spire that leads to the Garden Spire
Steps:
1. Disembark from the whale by following the rolling arrow towards the portal
in front of you.
2. Above the portal, the Player will notice a sequence of
3 aUI symbols, as well as a gray cube. This is the solution.

3.
The portal is divided into 3 sectors. Click one of the sectors and notice the
symbol that appears in the cube.
4. When the sectors are clicked on in the
above sequence, the portal will unlock.
Portal Door
PART
24–SCENE 21: THE SHAFT SPIRE
The portal leads to the shaft spire which
will take the Player to the Garden Spire.
PART 25–SCENE
22: THE GARDEN SPIRE
The Player must complete the following puzzles
in the Garden Spire:
1. 13 Pieces for Lightbringer Puzzle
2. Bog Stump
Jump Puzzle
3. Contrast Puzzle
4. Lightbringer Puzzle
There are
clues and items the Player will encounter that will be used in other parts of
the game.
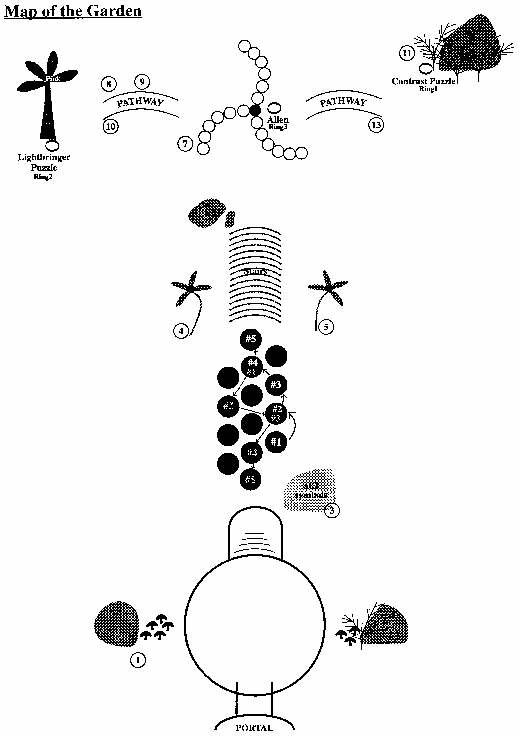
1. 13 Pieces for Lightbringer Puzzle:
There are
13 triangular shaped pieces that are purple in color, scattered throughout the
Garden. They are denoted by the circled number on the Map of the Garden. Search
each area of the thoroughly. Use the map as a general guide to where each piece
is located.
Objective:
- Find and collect all 13 pieces required
to assemble the pyramid, and acquire one of the 3 colored rings
2.
Bog Stump Jump Puzzle:
Objective:
- Step on the correct sequence
of bog stumps to get to the other side of the garden
Solution:
See the Map of the Garden. Note that the solution
for returning is different.
NOTE: Players should save their game before
attempting this puzzle. An incorrect answer leads to the Player’s demise.
3.
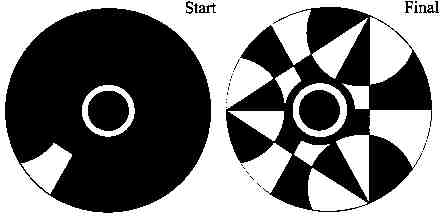
Contrast Puzzle:
Objective:
- Reveal all the shapes concealed
by the solid black texture and acquire one of the 3 colored rings
Steps:
1. Click on parts of the object to turn the hidden shapes into white sections
that contrast against the black sections. (The initial shape in white that is
visible is the clue to the correct contrast series.)
2. Once all the shapes
are made visible in black and white, the center ring will glow and become animated.
3. Click on the ring and add it to inventory. There are 2 other colored rings
the Player must collect.
Solution:
4.
Lightbringer Puzzle:
Objective:
- Assemble the 13 pieces collected
into a pyramid, and acquire one of the 3 colored rings
Solution (3
Parts):
Part 1: Assembling the Pyramid
- There are 4 levels
of the pyramid including the capstone - 4 identical items make up each level
- The
13th item will be the capstone - Use the cursor to indicate where the items
must be placed (pointing finger) - Notice that they are placed in a clockwise
fashion
Part 2: Decipher the Code
Once the pyramid is
assembled it may be rotated. The Player must take note of all of the symbols and
use the suit computer dictionary to determine what each symbol represents. This
is a clue to the final part of the puzzle which is described in Part 4.

Part
3: Clearing
The Player must use the laser torch from inventory to clear
away the vegetation blocking the light from above the flower. Once this is done,
they will see the flower become rejuvenated and one of the 3 rings will be dispensed.
The
Player can return to the Garden where the colored rocks lie in a spiral pattern.
After acquiring 2 of the 3 rings, the Player will encounter an alien life form.
Click on the lifework when the cursor says "Talk". It will speak with
the Player and give them the third and final ring.
Before leaving the Garden
to return to the Capstone vehicle, the Player must take note of the sequence of
colors on the rocks in the spiral pattern. This is the solution to one of the
endgame puzzles which deactivates the force field over the Cydonia region.
The
Player may now return to the Brainframe located in the Face on Mars structure,
by travelling forward in time to Present Mars.
PART
26–THE ENDGAME
The Player must complete the following puzzles/events:
1.
The Terraforming Console
2. The Defense Field Console
3. Launching the
Life Boat
1. The Terraforming Console:
The Player must place
the 3 colored rings into their correct places on the console. This will activate
the terraforming mechanism on Mars.
Hint: Place the red ring first.
2.
The Defense Field Console:
The Player must refer to the notes they
took in the garden pertaining to the sequence of colored rocks. This is the "password"
that will deactivate the force field surrounding the planet.
Solution:
Top Arm (from the center): orange, red, green, purple, blue, yellow
Left Arm
(from center): red, blue, yellow, orange, purple, blue
Right Arm (from center):
blue, purple, yellow, green, orange, red
3. Launching the Life Boat
STEPS:
1. After completing the Terraforming Console Puzzle and the Defense Field Console,
return to the crashed lander.
2. Once inside, proceed to the life boat. The
life boat is found at the top of the ladder in the Ready Room.
3. In the life
boat the cursor will indicate the seat that the Player must get into.
4. To
the right of the seat the Player will find a red button marked "Warning.
Launch". This button will launch the life boat.
5. Press the red button
and watch the endgame movie.
MULTIPLE ENDINGS
There
are 10 possible endings to the game. For instance, if the Player did not place
the pressure patch on the Engineer’s helmet, the Engineer would die, and subsequently
would not have returned with the rest of the crew to the mothership.
Each
ending is a permutation of one of the following 4.
1. You rescued all crew
members, terraformed the planet, and deactivated the force field.
2. All crew
members perished, you didn’t terraform the planet, and you deactivated the force
field.
3. All crew members perished, you terraformed the planet, and deactivated
the force field.
4. Only saved the Commander, didn’t terraform the planet,
but deactivated the force field.