Culpa Innata
After taking Bogdanov’s photo
Ancient Library: This is
triggered after getting the Cyrillic text from the back of the grandparent’s
photo. Go to second
floor of the GPSN building. Go to screen right and see Julius. Talk to Julius
and learn about his being a student and the General’s army. Go to screen right
(hall left and side from where Julius and the black dirt on the floor are
located) and see a door at the end of the hallway.Enter the library. Look
around. Go to the middle wall across the door. Take the red book from the book
shelf. Take a picture of the dictionary to get Cyrillic Translation table. Exit the room and go
bottom screen from the dirt on the floor. Go screen right and walk the
corridor. At the middle of the hallway, go to the left and see the elevators.
Phoenix’ Office after getting translation table:
Go to 3rd floor and enter the office. Use the computer.
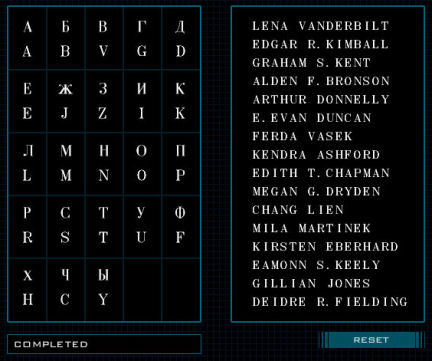
Decryption – Place the Cyrillic handwritten
text on right frame and the translation table on the left frame. Translate each
letter by clicking the appropriate English letter on the left and click
the Cyrillic letter on the right. Do this to all the letters even if they have
similar letters in translation. After translation is completed, get
Bogdanov’s name list in inventory.After exiting the computer, automatically report to
Chief Morssen.
Phoenix’ Computer: after first
hacker
Get an urgent message on
PA. Hackers got into the system and paid particular attention to Phoenix’
folders.
Phoenix’ office:
Check your PA and see an authorized data. It states ‘Hey, Officer, I dare you to
find out what I am’. Use the computer.
Data
Processing/Image Processing – Click the authorized data on frame and get a
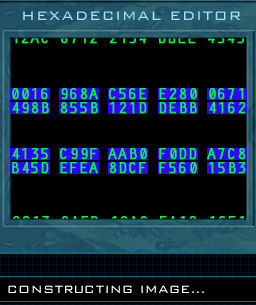
File corrupted result.Hexadecimal Editor –
The editor appears after the File Corrupted result. See several red ? that are needed to be
decoded. Based on the reference numbers-letters above the puzzle, find out the number or
letter corresponding to the red (?).This was done by trial and error. Start with a group
of 4 that has one red question mark first. Click the question mark until they
turn blue. Continue on until all the single red question marks set are
decoded.With the ones with 2 question marks, change one of the question mark once and then
process or click through the other one until you hit the correct letter or
number. If that first one doesn’t work, change the first question mark to the
next number or letter and process through the
second question mark again.
Once all the red marks
are changed to blue, see an image of Amor (love) to get recovered image 1.
Yes, now we have the 4th image.
3D Processing/
Reconstruct Multiple Images – Take the CD recovered image 4 from inventory and
use it on top wall of the frame. Place the recovered
image 3 taken from left wall of graveyard gate on the bottom frame and the butterfly reconstructed
from the data dump (recovered image 2 – Iustitia) on the left frame. Place the new image,
recovered image 1 – Amor on
the right frame. click reconstruct and see a 3D butterfly image.Station Omega 10: Take the stairs and go down to the lower level.
Look at the Butterfly
ad poster on the wall. Take a picture to get Butterfly image. Go back
to Phoenix’ office.
3D Processing/
Reconstruct from Single Image – Take the butterfly ad image from inventory
and use it on the frame. Click Extrude. Get 3D Butterfly ad.3D Processing/
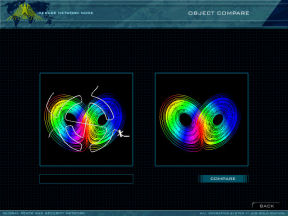
Object Compare puzzle – Place the 3D butterfly ad on a frame and the 3D
butterfly image on the other. Click compare.
See a map of the metro
system and an X that marks a spot. Exit the computer.Phoenix states that a
visit to the metro after hours would be best.


Phoenix’ Office after Military database
authorization:
Phoenix is given authorization to access Military
database since the military numbers are 7 digits and the numbers on the
decrypted Cyrillic text is also 7 numbers. Use the computer.
Military database – Use the 7 digit number on
the frame and do a search. Get a Military Captain, Juan Antonio Perez.Military Corps is added to the navigational map.
Phoenix’ Computer: Bogdanov’s financial report
Chief Morssen’s office: Learn that Bogdanov
brought 1.3 M when he emigrated and that Larissa Lukin was Bogdanov’s nuptial
partner in Russia. He was killed with a 9 mm handgun. Phoenix is asked to checkthe financial records and that Spencer, the dead Professor was in Bogdanov’s
list. Phoenix was asked to talk to DeVille about the matter.Phoenix’s Office:
Bogdanov’s
financials – Access the PA and check the inventory for Bogdanov’s financials.
Check the other 2 pages using the arrow at bottom left. Bogdanov’s bank
list is in inventory. Phoenix will take note of Lena Vanderbilt.Information
Analysis – Use the computer and do an information analysis. Place
Bogdanov’s bank list and name list on the 2 frames. Click Analyze. The 2 names
that are not common to 2 lists are Melvyn Spencer and Gillian Jones.Lena Vanderbilt and
Gillian Jones are added to the map.
Military Corps
This location is triggered by the Military database
search. Go down the screen and talk to the guard at the desk. At the personnel
office, talk to Ashling Monaghan. Learn about Perez’ death in a plane crash in
Russia. Ask more info about Perez to be referred to Officer Thorrsen.
Find Officer Thorrsen: Exit the personnel office and end at an intersection. Look close at the fire
extinguisher by B1070 door and see Thorrsen’s name on it. Look at the fire
chart above the extinguisher and see her room number. Go to top screen
corridor and be
at Thorrsen’s office.First visit: Talk to Officer Thorrsen.
Second visit:
Talk to Thorrsen about the last time she saw Capt. Perez. Her confession
mentions that Perez exhibited similar irrational behavior as Bogdanov before he died.Third visit:
Talk to Thorrsen and ask if someone else asked about her relationship with
Perez. Learn about Bryan Ainsworth of WXBG. The station is placed
in the map.
Lena Vanderbilt’s house
This location is triggered by Bogdanov’s bank list.
Enter the first door #712 and talk to the home security. Lena is at the
Rehabilitation Center.
First visit: Go to the windows, forward and right of the
house. Talk to Lena Vanderbilt about last time she saw Bogdanov. She mentioned a device she was using caused
her to go to rehab. Get an urgent call from Sandra to meet her at the Pyramid.Second visit: Talk to Lena and learn about the Virtual Reality device
and Bogdanov’s rentals. Get a virtual device sketch in inventory.
Melvyn Spencer’s house
Go to the end of the hall and then right to the open
door. Enter the bedroom with the round bed. Check the book on the floor beside
the box. It is a book about Sir Thomas More. Look around and exit back to the
living area. Look around and check the laptop on top of a box left of the
window.
Laptop – The
laptop needs a password. click the password area and a keyboard appears.
Type in SirThomasMore. Click OK.Check the www. Close
the frame by clicking the x at top right. Check the garbage at bottom
right. See Flyer and Draft files. Click-hold and drop them to the Documents
folder. Close the garbage using the x at top right.Open the Documents and
read the flyer and drafts files. From the Flyer learn that Spencer taught at
the Adrianopolis University. The drafts shows Spencer will talk about
Discrepancies in History According to the Media. The Adrianopolis
University is placed in the map.
Adrianopolis University
This location is triggered by the flyer in Spencer’s
laptop.
First visit: Talk to Janka Gabor
and learn the rumor about Spencer’s
death as told by Ivania.Second visit: Talk to Janka Gabor about the
Professor and his research.Third visit: Talk to Janka Gabor about the
Professor.
Ultimate Faithful
Anti Chaos Poster
and kiosk: Look close at the anti chaos poster and kiosk
beside the Ultimate Faithful door. The poster has 026 in different color on
it. Enter the number on the kiosk keypad and see that the fifth line has changed
to Chaos is peace.Ultimate Faithful: Look
close at the door of the shop.Door lock – See
2 pendulums at top and 2 small doors at the bottom. 2 bars block
the door. They need to be moved away from the center.Open the 2 small
doors. Turn the left knob to point West or turn 2xs clockwise. Turn the right
knob to SE or 3 times counterclockwise.Move the left pendulum
to the left and move the right pendulum to the right.Click the exposed
blue button. Ha! Got it!Smokey and sales
pitch room – The room is full of incense smoke and the drone of the sales
pitch is non stop. We need to remove the smoke. Look around the room.Totems – There
are totems on each corner by the door. Take the eyes – 2 purple gems
from the right totem. Take eyes – 2 green gems from the left totem.
Take the embroidered cloth from the table beside the green eyed totem.Steam pipes
– Look close at the pipes under the right shelf when facing the back of the
room.Turn the middle yellow
handle to the right. The top wheel is hot. Use the cloth on the wheel. Turn
the top wheel until steam comes out of the right pipe.Turn the bottom left
yellow handle to the left. Turn the left wheel until steam comes out of the
left pipe.Once steam is let
out of the pipes, turn the 2 yellow handles to original position.Pull the bottom chain
to flush the room. Pull back to the now cleared room.Office door –
Go back to the rear of the room and see that the door is locked. There are 2
heads on both sides of the door.Look close at the left one – winged bearded man and place the green gems on its eye sockets.
Look close at the
right one – lion head and place the purple gems on its eye sockets.Click or move the
African shield left of the lion head. Pull the handle seen. Enter the office
door.First visit: Talk to Gillian Jones.
Look around the room after the talk. Gillian’s HDI is 75.Second visit:
Talk to Gillian in her office about renting.
Cafe Rose:
Gossip with Sandra. After discussing DeVille; the Carpe Diem, Zap (dress
store) and Gary’s (shoe store) will be available in the map.
Zap: The location is
triggered by Sandra. Talk to Theodora and get a call from Sandra.Phoenix’ house: Pick up the
dress at the delivery chute.
Gary’s Shoes
The location is triggered by Sandra.
First visit: Talk to the
store clerk in white shirt, Al. He insults Phoenix. Phoenix exits the store
and goes back in and talks to Al again. Go to the store counter by the door
and look close at the purple frame at end of counter. Look close and complete
the form: File Complaint, Complaint related to service quality and select the
last choice – born loser…Second Visit: Talk to Habib, store
clerk. Phoenix selected a 375 dollars shoe. Time to get credits.Third visit:
Buy the shoes from the Habib you talked to earlier.
Allied Investor
This location is triggered by needing credits to buy
shoes. Jump to Allied Investor at the Pyramid. Exit back
out of the store.
Anti Chaos Poster
and kiosk: Exit the store and look at the poster on left wall. Look
close at the Anti Chaos poster and the kiosk beside it. The poster has #802
highlighted at the center. Look at kiosk and enter the number 802 on the
keypad. See second line change to Chaos can be calculated.Allied Investor: Enter the
office and go left. Go to the terminal at the foreground. Click the Allied
Investor name. Click Extended credit. Place 375 worth of coins from left to
the right circle. Yellow coins are 100’s, green are 50’s and purple are 25’s.
Thing Store Headquarters
After a report to Chief Morssen about Piper’s
statement,
the Thing Store Headquarters is added to the map.
Business District
1: Jump to Business District 1. Select Things Store
Headquarters.Anti Chaos Poster
and kiosk: Look at the poster on left wall outside the Things
Store HQ. Look
close at the Anti Chaos poster and the kiosk beside it. The poster has #s 2 4
6 prominent in the text. Look at kiosk and enter the number 246 on the keypad. See
first line change to Fear not of chaos.Combined Anti Chaos
poster and kiosk puzzle – Look close at the kiosk. We now have 5
numbers and 5 changed lines from 5 kiosks.Enter the numbers
taken from 5 kiosks in any order:1. Enter 246 on the
keypad to get line 1 changed to Fear not of Chaos.2. Enter 802 on the
keypad to get line 2 changed to Chaos can be calculated.3. Enter 611 on the
keypad to get line 3 changed to Turbulence and Stability co-exists.4. Enter 505 on the
keypad to get line 4 changed to Truth is non-linear.5. Enter 026 on the
keypad to get line 5 changed to Chaos is peace.If done correctly, new words and numbers appear on the screen. Chaos becomes Peace. 12814.
Thing Store Headquarters: Enter
the HQ and talk to the receptionist. Then talk to Richard Ackermann. There is
no store rental policy.
Metro Tunnels
Station Omega 10: Jump to
Station Omega 10. Use the front stairs, Platform A to get down the lower level (not the
one with the energy field). Go to the left end of the ramp and see a closed
gate. Click again to enter the Metro tunnels.Metro Tunnels: Walk to the
left and check each door. Go pass room 10-1 and see a ramp between the rails.
Cross to the other side.Room 9-1 – Go left screen and enter room 9-1.
Go to the open locker on the left. Take the
proximity key hanging on the door. Take note of the number on the coat
hanging in the locker – 143954. Look around and exit the room.Cross the rail again to go to the other side.
Room 10-2 – Use the proximity card on the
door. Look close at the terminal (monitor) right of the empty shelves. Use the
proximity card on the terminal. It will ask for access number. Enter the
number from the coat – 143954. Select key access. The terminal updated the
proximity card. Look around and exit the room.Room 10-3 – Enter the room and take the dirty
cloth on top of crate on right side of the room. Look around the room and
then exit.Room 10-1 – Enter room and take Acme Rust
Solvent bottle on right foreground on the table. Go to the rusty metal
plate left of exit door and look close. Use the solvent on rusty plate and
then use the cloth to wipe the plate. Read the word RATIO. Exit the room.Cross the rail again to go to the other side. Room
9-2 is closed but has no visible locks.Room 9-3 – Enter the room and see a room full
of cables, laser lights and stands. Look around the room and see the word
CHAOS on the wall. Look close at the center computer server. Look close at the
panel across the CHAOS wall.Letter puzzle – See letters on the panel. The
bottom left red button turns every other letters starting from the left.
While the red button on the right, flips every other letters starting from the
second left.The word needed is the one that is revealed on the
rusty metal plaque in room 10-1.Press the left button until you get (from left to
right) the first letter to be R, third letter T and fifth letter O.Press the right button until you form RATIO.
See that the CHAOS on the wall turns to PEACE. Exit
the room.Room 9-2 – See that the door is now opened. It opened
after the completion of the puzzle in room 9-3. Look close on the back wall
and see Anti Chaos writings.Anti – Chaos letter puzzle – Go to the back
wall and look close at the Anti-Chaos writings.The clues from the kiosks are: Chaos
becomes Peace and 12814.Click letters and see that certain letters on the
wall can be pushed in. The letters are ACEP.Try the letters until Phoenix says these words:
‘wonder what the anti-chaos people say about this’. Then the correct word can
be entered in the puzzle.Push letters PEACE in the context of 12814.
From top to bottom find the first letter P (sPherical) on the wall. Push it in.
From top to bottom find the second letter E (nEither) on the wall. Push it in.
From top to bottom find the 8th letter A (equAtions) on the wall. Push it in.
From top to bottom find the first letter C (Cones)
on the wall. Push it in.From top to bottom find the fourth letter E (arE) on the wall. Push it in.
If done correctly, hear gears and the wall opens.
See a room at the end of the corridor.Unknown Underground Installation:
Go forward to the lit room at end of corridor. Look at the woman and see that
it Rana Shah. Look at the man beside her and see that he is the Peace
Impersonator. Talk to the Peace Impersonator and Phoenix is zapped with a
butterfly ray that came out of the Impersonator’s hand.Phoenix’ house: Phoenix
staggers to bed.
Business District
I/WXBG
This location is triggered by Officer Thorrsen. Look close at the Provo Tower
directory on the wall. WXBG is on the 7th floor. Go to the red carpet on the right of the
directory. Take the elevator at end of hallway.
Bryan Ainsworth’s
Office: Talk to Bryan. Learn that there’s a 2D video
footage of the crash. Accept his invitation. He will give it to you at
dinner tonight at Cafe Rose.Phoenix’ house:
Change clothes and click map.Cafe Rose:
Accept or decline his invitation. If accepted, Phoenix is at Ainsworth’s’ house. Go left to the hallway and then screen down to the living room. Pick up the
audio-visual disc from the coffee table. If declined, the
audio-visual disc is at Phoenix’ office desk the next morning. (Thanks,
Laura).
Phoenix’ Computer:
AV footage
Audio Visual
Viewing – Place the AV disc on the frame. Click the arrow to view the
footage. Need help on this footage. Exit the office.Monitoring Room Part 1
Take the elevator to the 2nd floor. Go to right screen from elevator. At the hallway, go to top of
hallway and see Julius on a side hall. Talk to Julius if you want to. He says
he’s 1500 yo. Enter the room left of Julius’ hallway and be in the Monitoring room.Go to back of room and
talk to Beverly. She will eventually refer Phoenix to Harold. Click the AV
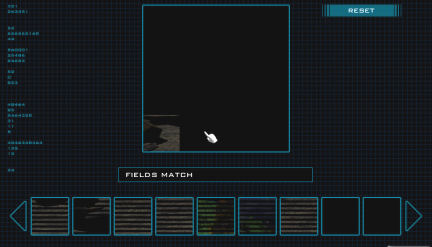
disk on Harold.Video Processing
– Click the arrow and the machine will search, acquire and lose the frames.
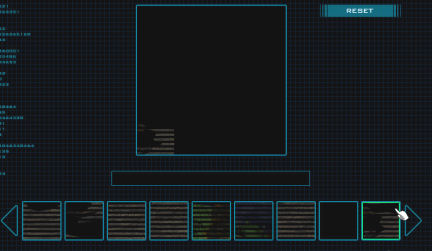
Processing error. The machine recovers the viable frames but they are separated.Reconstruct the frames
manually. The reset button is on top right. The big frame above is
used to reconstruct the frames.There are 2 steps to
do here:1. Make a focused
colored frame. A focused frame is made up of 2 frames from the bottom bar. Take one frame from
the bottom bar and place on the big frame. One goes on top of the other
to make a colored frame; the black lines are covered by the colored lines to form a complete frame.The bottom bar has all the loose frames. Scroll the
arrows right or left to view them. Locate
a possible matching frame. See if there are any distinguishable features that
might match: shapes, colors, blank areas… The black lines will be covered by the
focused colored lines to make a complete focused colored frame.Take a bottom bar
frame that might match the one on the big frame and click it over the
one on the big frame. If they match, the screen will state ‘Field Match’ and
if they don’t match, the screen will state’ Field does not match’.Separate 2 mismatched frames on the top frame by
clicking one off the other and placing it on a blank space on the big frame or
it will go back to the bottom bar.
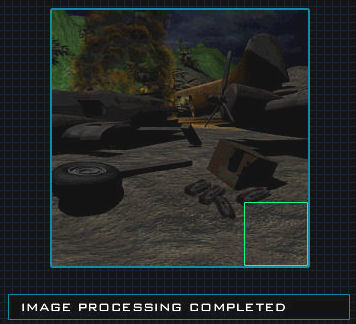
2. When all frames are
matched and in color, arrange the frames to make a scene of the plane crash.The computer will then
analyze the picture frame by frame.See a frame of illegal
tobacco on the ground spilled from the crash. Click the cigarette frame to
continue the scan until completed.
Chief Morssen’s
Office: Phoenix reports about the illegal tobacco.Monitoring Room Part 2
Phoenix’ Office:
Check the PA’s
inventory and see that Lena’s virtual reality device sketch is there.Monitoring Room:
Go down to second floor, pass Julius’ and enter the
Monitoring Room. Give Lena’s virtual reality device sketch to Harold. The
search on the crash site finds pieces of a virtual reality device.Chief Morssen’s
Office: Phoenix reports about Lena’s device.
Carpe Diem
This location is triggered by Sandra and accessible
only at night.
DeVille visit 1: Go to
Pierre DeVille sitting on the left bar. He gets angry and leaves. Click the
dance floor pedestal twice and see Phoenix dance.DeVille visit 2:
Talk to Pierre DeVille about his money from art consultancy. Automatically
report to Chief Morssen which results in a request for a financial audit
for DeVille.
Pierre DeVille’s House
After getting the Search and Seizure Warrant for
Pierre DeVille, go to his house. Look at the firearm collection and realize
you need to know which one is 9 mm gun.
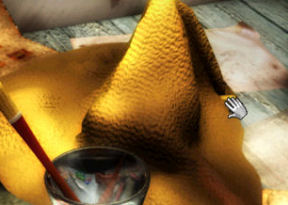
Go to the bench left of the easel. Look close and
click things. Pick up the bullet (look
at hand cursor) partly
hidden on a fold right side of the cloth.
Go to the firearm
collection and use the bullet on each gun to see which gun fits the bullet. It
is #15.Chief Morssen’s
Office: Phoenix reports about DeVille’s firearm. Chief
will send it to the ballistics lab right away.
Rehabilitation Center
After getting the autopsy report on Dr. Spencer, the
Rehab Center is placed in the map.
First Visit: Check the
Insurance Policy poster on the wall. Talk to receptionist.Talk to Dr. Gisella Nemeth, the head of the Criminal
Task Force. Get a message that hackers have entered with interest on Phoenix’
files the network again.Phoenix’s Office: Check the
PA and look close at the pirate manifest in inventory using +i at top right.
Read the Hacker’s manifest.Second visit: Talk to the
receptionist and then Dr. Nemeth. Learn about the hemorrhage, device and death
of Spencer.Morgue:
See the body of Spencer. He died 7:03 AM and body discovered at around 11 AM.
Metro Tunnel
After a call by Julio, automatically be at the Metro
Tunnel.Unknown Underground
Installation: Go forward to the lit room at end of corridor.
See that the room is empty. Look around at the monitors, text and handwritten
papers.
Land of the Renovators
Enter the closed door
of the elevator behind the desk. Go forward and talk to the young boy Konrad.
He states that this is the Land of the Renovators. The elevator behind Phoenix
does not have buttons. She is trapped here.
Go through the energy
field and it triggered an alarm. Go down the tunnel and see that end of the
tunnel is dark. Enter the door on the side wall.
Computer room:
Look around.Joshua – Check the
Joshua monitor. Play chess with Joshua if you want by typing yes and clicking
the enter key on the game keyboard.Type ‘no’ and press
the enter key on the game keyboard.See a Main Menu
selection: 1. Security Menus 2. Environmental Settings 3. User Administration
4. Network Settings 5. Play Games; and then Enter Choices.Type in the number of
the selection and press the enter key on the game keyboard.Select and type 5.
3 Game Selections are
seen. Select Tic Tac Toe. When the number of players is asked, type 0 and then
click enter key. This will make the computer play against itself and a no win
situation results. The computer has a system error. (Thanks, Laura.)All other monitors are
powered up. Check all the monitors
and see the games introduction sun scene. Exit the room.Hospital:
Go to right screen and down the tunnel. After the Joshua puzzle completion, the lights are now on at the dark
tunnel. Enter the next room on the side wall. Talk to Wilma and hear about
Phoenix’ quest. Exit this area.Grand Shaft:
Go to right screen and down the tunnel. Automatically be inside a tower like
structure.Follow the curving
tracks to the right exit, find a locked door. Go back and go to left screen.
Enter the tunnel and end up in a wood door.Cafeteria –
Enter through the door and see Phoenix again chase Talayman, the student that went
through the graveyard gate. Go to right screen and take the circuit board
beside a food tray. Look around if you want. Go back to the left and exit the
cafeteria.Go back to the shaft
and right to the end of the straight rail track. It ends at a rail car in
front of a dark opening. Go back to the Grand Shaft.Fenced Area –
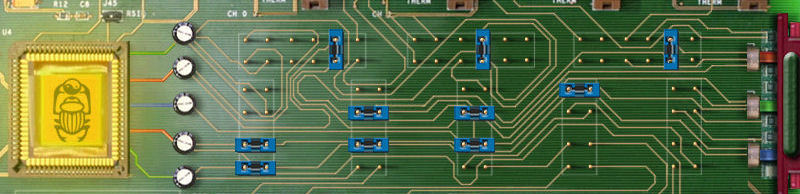
Go right to the fenced in area and see a control panel on a stand.Circuit board –
Use the circuit board on the control panel. See the circuit board that has 5
leads on the left (green, red, blue, red and green) and 3 on the right (red,
green and blue).The aim of the puzzle
is to have a connecting circuit of a color to the same color on the other end.So the red on the
right will connect to the 2 reds on the left. The blue on the right
connects to the blue on the left and same goes for the green.There are connectors at bottom left that can be used
to make the circuit. Click hold and drop a connector on the blank space to
connect 2 knobs (you might need to use a tweezers to pick up the connectors). The circles should be
centered on the knobs to fit.
Once complete, press
the green bar at right; then press large bug square on the left and if done correctly, it will light up.
(Thanks, misa!)Observatory:
Enter the tunnel left of the fenced in area. See that the dark opening behind
the rail car is not dark anymore. Enter and see the galaxy. Talk to Konrad.
Meet Grandmaster Magnus. Listen to and watch Grandmaster and Phoenix.Mine:
Phoenix is transported to an abandoned mine. Look straight and click the
ancient locomotive. Go beside it and take the lever. Go forward to the
mine entrance and pick up the funnel on the ground right of the
chimney. Go close to the mine entrance and see that it is dark in there. We
need light.Go back to the fence
area, go right and see the sleeping barracks with a Russian sign. Go right of
the sleeping barracks and pick up the wire by the destroyed stone wall.
Go back left of the area by following the wire fence. Far behind another
sleeping barracks is a destroyed building with exposed beams. Enter that
destroyed building and pick up the full gas canister.Exit this destroyed
building and go right. Go right of the building with a collapsed roof and
behind the warped building to see an archaic power generator.Power generator
– Remove the cap of the fuel tank at the center and use the funnel on the
hole. Use gas on the funnel. Use the lever on the knob at lower right. Do not
crank the lever yet. The red button stops the generator: by clicking it
the number of times the lever was cranked. Look on the side wall
of the generator and see dots and a line. Pull back.Wire panel –
Click wire panel right of the power generator. Take the wire from inventory,
click one hole and then click the hole you
want to attach the wire to. Based on the dots and a line seen on the side of
the generator; place a wire connecting the left and the right bottom leads.
Since the other leads are opened, connect the top left to middle right
and connect the middle left to top right to form an X. If done correctly,
Phoenix will say ‘I think I did it right this time’.Power Generator
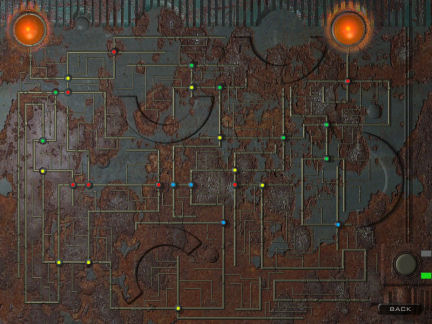
– Crank the lever several times and hear the generator power up.Inside the mine:
Enter the mine now that there is light. Go to the end and see that it blocked
by boulders. Turn to the right and see a wall panel. Open the panel.Power lines and
lights – See lights on lines. There are big lights at
top right and top left. At bottom right is a button with a green light showing
that
power comes through it.The aim of the puzzle
is to make connection from bottom right to top right and connection from
bottom right to top left.Press the button on
the right to see how the power goes through the lines.Click each small
lights to determine where the power is directed by each color.Blue directs the power
down.Red directs the power
up.Green directs the
power right.Yellow directs the
power left.If done correctly and
the 2 large lights are on, see the boulder walls open up.
Elevator:
Press the button right of the elevator. Watch Phoenix go down in the unsafe
elevator and back in her bed.
Stardust Club:
Talk to Mikhailov and learn that he is in Russia when Bogdanov died. He is
Bogdanov’s brother in law and Larissa’s biological brother.
Chief Morssen’s
Office: Phoenix reports about Mikhailov.
Larissa Lukin:
Talk to Larissa.
Chief Morssen’s
Office: Phoenix reports about what Larissa said about Mikhailov
and Gambinos. Ask for a questioning warrant for Mikhailov.
Watch what happens.
Pass! or
Failed!
This document may not be distributed without express written permission of
the author and the content may not be altered in any way.
For Questions or Comments on this Walkthrough,
Please write to:
MaGtRo
Copyright© 7/2006
MaGtRo