Culpa Innata
Culpa Innata
by Momentum AS
Guide by MaGtRo July 2006
Gameplay:
This game is a third person point and click adventure game. The main menu has
Start Game, Options, Credits and Quit. The Start game has a choice of new game
or load. The Options has video (resolution and anti aliasing), audio (voice,
music and FX levels) and Caption selections.
Right click of mouse
brings the in game menu. The in game menu has the save, load, graphics, sound
and exit to main selections. Another right click of mouse closes the in game
menu and brings the game screen back. Right click toggles back to the gameplay
screen.
Once the PA is picked
up, right mouse click opens up the PA. The PA has the contact list, inventory,
navigation map, diary and game controls. The middle scroll mouse button can also
be used to scroll through the PA. Right click again to disable the PA.
The contact list has the phone numbers and description of the characters that
Phoenix has been in contact with during gameplay. The inventory shows the items
picked up. In inventory, select the item and it will be placed on right frame.
Click the gear icon to use that item or click the +i icon to look closer on some
items.
The navigation map
once updated shows the map of Adrianopolis. All active locations will be seen
and when clicked can automatically go to that location. Some locations are
accessed only during the night. The diary has Phoenix’ thoughts. The Game
Controls has the in game menu. There are 48 saved game slots.
Double left mouse
click makes Phoenix run. Right click skips phone conversations.
Culpa Innata means
inherent guilt or original sin. The democratic countries have united to form the
World Union. The World Union lasted for 27 years. It ended on May 19, 2052 – The
first day of Devolution.
This is 2047. Listen
to Mr. Hamilton describe what is happening to our blue planet. This is reality.
He transports himself to a meeting of the World Union with use of a rainbow
butterfly.
At Adrianopolis, Dagmar Morssen’s address to the Immigration Academy
graduates explains the World Union’s principle – The most selfish, the most
determined and strongest
shall inherit the world. Phoenix Wallis is introduced to the graduates. The
Almighty Sage!
Global Peace and
Security Network (GPSN)
Phoenix’ Office: Located
on the Third floor of the GPSN building left of Exit sign. Look around the room.
Check the computer, pink make up kit, cabinet and Human Development Index (HDI)
certificate on wall.
Chief Morssen’s
office: Located
across from Phoenix’ office. During the game, Chief Morssen will call Phoenix to
a meeting or Phoenix will automatically report her findings.
Locate Julius and
Personal Assistant (PA) –
Use the elevator left
of third floor Exit sign. Go to second floor.
From the elevators,
go to bottom screen and then right screen. Go forward and see Julius sweeping the floor at far
corridor. Talk to Julius, who will speak about dead bodies. Maybe the cemetery
should be checked? Talk to Julius now and then to learn more about the
background of the Union.
PA:
Pick up the blinking PA from the floor behind Julius & Phoenix
(bottom screen). The
cabinet key is still not found. Right mouse click brings up the PA. The PA has
the contact list, inventory, navigation map, diary and game controls. Right
click again to disable the PA. The contact list has the description of the
characters that Phoenix has been in contact with during gameplay. The inventory
has the GPSN Rules.
The navigation map is
disabled and needs to be updated. The diary has Phoenix’ thoughts. The Game
Controls has the in game menu.
Cabinet puzzle
– Take the pink makeup kit and social security card from desk.
Look close at the
cabinet under the left HDI frame behind the desk. See a close up of the lock.
The security pass is in there. Open the makeup kit in inventory (use the “i”
icon) and take out a hairpin.
Insert the hairpin in
the lock. Move it up, down right and left and listen for the different sound
each time.
Listen for the sharp
click sound and not the clunk sound. Find the correct sequence that produces all
click sounds.
Click to move the
hairpin: 2 up, 1 down, 1 left and 1 up. Ha, it worked! Take the security
pass. Back out of close up.
Floor 1:
History of the Union: Exit
the office and go to the elevators, left of the EXIT sign. Take the elevator to
floor 1. Go right of screen and look at the 2 wall panels that described the
conditions that led to the present day situation. Go right and look close at the
third wall panel to see what supposedly this Utopia has done to date.
Auditorium:
Enter the door at right under the beautiful stained glass. Go down to front row
and take the ID card of Talay Talayman. Look around Check out the stage,
flags and podium. There is a full version of Chief Morssen’s speech there. After
you have looked at everything, exit the auditorium.
Exit:
Go to left screen, pass the elevators and go to the EXIT at intersecting corridor.
Use security pass on EXIT door.
GPSN Exterior:
See a cutscene of a man sneaking towards the building. Chase is on. Wow – he
went thorough the graveyard gate. Look at the plaque on the right. It is the
Pater Noster.
Textured plaque:
Look at the plaque left of the gate. click it while in close up. There’s a
shape here but the carving is too fine.
Open the makeup kit
in inventory. Take the Desiree hand lotion and apply it on the plaque. Take a
cotton ball from makeup kit and apply it on the lotion on the plaque. This needs
to be scanned. A camera icon appears. Click the camera icon to get recovered
image 3.
Graveyard gate:
Look at the gate and see that it has a lock.
The lever on top left
resets the puzzle. The 4 buttons pulls back different bars at center of the
lock.
The object of the
puzzle is to press the buttons to remove all the bars at the center.
Check what bars each
button affects. Note that a second click on some buttons shows another set of
affected bars.
One solution: Click (top to bottom 1-4): 4 4 3.
Graveyard:
See a digital disk on the ground. Use camera to take a picture of the butterfly
image on the disc to get recovered image 4. Take the graveyard CD.
We can check all the items collected so far later on Phoenix’ computer.
Station Omega 10
Follow the path to
the left, cross the bridge and then click the signs on either side of the
path. The blue one is the mighty Union flag.
Metro:
Enter the Metro area. Look around and check the different active places. Go down
the front stairs on either side of the balcony to get to Platform A. Look at the
posters on the wall. Note that one has a rainbow butterfly. Go to extreme left
of the rail tracks under the left stairs. It is an entry to the tunnels.
Go back up to the top level. Go to
either right or left side of the main floor and turn the corner. Go pass the
green Station Omega 10 sign and then to Platform B. See an energy field that
blocks the stairs. Click energy field and learn that you need to renew
metro pass. Turn back and go to the right side hall where you see the brown
Metro Pass machine.
Metro pass machine
– Click the machine and buy metro credit.Enter the social
security number seen on the social security card in inventory: 293-72-4925-2.100 credits are
added to your account.
Metro Car: Go
forward, right, forward and through the energy field of Platform B. Go down the
stairs to see Phoenix ride the metro.
PA – Right click mouse to
access the PA but the PA has reset.Click OK on the first 2 frames seen. The
last reminder showed unidentified binary data.Click to ‘Save’ the unidentified
binary data to get Data Dump from PA crash.
The Navigation Map
has expired. We need to update the map. Exit the PA and look close at the white
map on the wall inside the metro car. See the Adrianopolis Metro Map. Take a
picture of the map to update the navigation map. Phoenix will say that the map
is now updated.
General Gameplay Tips After Activating
Navigational Map
1. Witnesses are interviewed only once a day and are questioned a minimum of
2 visits depending on any previous actions and dialogues chosen.2.
Once
locations are opened within the map the gameplay becomes highly non-linear and
events, people, locations will be revealed or can be resolved in different
orders. This guide will try to describe by characters or locations and is but
one pathway through this game. Visit the characters or locations at your
discretion.
Hints:
This is NOT a
walkthrough.
1. Check the map which characters can be visited. It would help to cross off
the actions already taken from the guide below.
2. Check locations than can be visited earlier. The Thing Store is usually the
earliest place to visit.
3. Visit other places like the Pyramid, go to the gym, or complete any puzzles that
can be progressed or solved using Phoenix’s office PA to use up time while
waiting for news or reports. A check of the in game diary or a visit with Sandra
can provide valuable tips if you are not sure what to do next in the game. Goals
or things to do are written in red ink in the diary, once completed they turn to
black ink.
Bogdanov’s house
Right click to show the PA. Click the navigation map tab and see Vassily
Bogdanov’s house in delta quadrant. Click Bogdanov’s home. Go right of
elevator and click room 3105.
First visit: The
home security program does not let Phoenix in. Select Access Case# response for
a more diplomatic approach.Look around at the different items in the apartment. Go to bottom screen to see
a wide window. Take a close look at the items on the coffee table on the left.
See an old fashioned business card. Bogdanov is the owner of The Thing Store at
The Pyramid. The PA adds the Thing Store to the map. Look close at the magnetic
card on the bar. Take the swipe card.
Bogdanov’s bedroom: Enter
the room on the left. Look around. Take a look at the ‘Arrivee in 21 Days’ on
the side table. Look close (click twice) on the Mata Hari picture above the bed.
There’s a colored lock safe. We need more data to do this puzzle.Note: The player can access and solve the safe puzzle before getting the hints.
The solution is to replicate the colors of the Russian Flag in exact order, so a
player may intuitively guess this or by sheer brute force end up with the right
solve. Once the player opens the safe, an unknown sculpture will appear in
Phoenix’s inventory, but its purpose until later in the gameplay, in visits to
the Thing Store after Piper appears.
Second visit: To
be done after visit to Bogdanov’s Office and Rubik’s cube puzzle completed.
Safe puzzle: Go
to the bedroom and click Mata Hari’s picture above the bed. See the safe.Change the colors of
the safe buttons to the pattern on the Rubik’s cube completed puzzle at
Bogdanov’s office.Top row is white,
middle row is blue and bottom row is red.Take the unknown
sculpture.
Thing Store
Anti Chaos Poster and
kiosk:
Click Pyramid and then Thing Store in the map. Exit the Thing store and go
across the street. Look close at the Anti Chaos poster and the kiosk beside it.
The poster has #505 on it. Look at kiosk and enter the number 505. See the
fourth line change to Truth is never linear. Note: Later in the gameplay,
all the Anti Chaos poster/kiosk locations appear on the Navigation map. They can
be visited by walking out of locations nearby, once those locales open or by
directly going to each kiosk icon on the map.
Alicia Cordoba:
First visit:
Click Pyramid and then Thing Store in the map. Walk to the left screen and up
the stairs. Talk to the female sales clerk in blue-gray uniform, Alicia Cordoba.
Learn about Harry Callahan, a Peace Officer impersonator.
Suspect modeling
comparison – See a face.
Click a feature of the face and then click ‘compare’. Alicia
will say if is not or is a match. Once that part of the face matches, go to
another feature of the face.Do the hair, eyes,
nose, mouth and chin comparison. Alicia’s answer will progress to: Slightly like
him, moderately like him, more like him, very much like him and when all
features are correctly done she will say ‘that is exactly him’.When Alicia says: "That
is exactly like him", click ‘reconstruct’ button to see a picture of the
impersonator. The picture is added to your inventory.
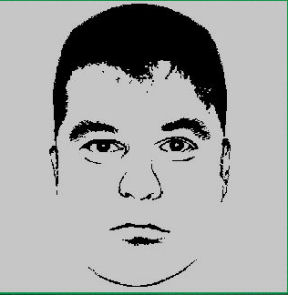
Continue to ask Alicia
about Bogdanov’s death and learn about the other sales clerk, Piper and Monica.
Ask her anything pertaining to Bogdanov. You are allowed only one visit per day
in interrogating witnesses. Check Bogdanov’s office.
Second or third visit: Talk
to Alicia at left side of the store about Bogdanov and about his business
venture. Learn about art consultancy and the club that Bogdanov frequents. Talk
again about Bogdanov’s business. At last visit with Alicia, Monica will be at
the other side of the store. Visit Monica.Go down the steps and
walk to right screen. Check the Thing Store elevator. Use the swipe card taken
from the bar at the apartment. Note: this can be done before speaking with
Alicia.
Bogdanov’s office:
First Visit: Look
around the room. Bogdanov’s HDI score is 70. Take note of the Russian newspaper.
Rubik’s cube: Look
close at the one sided Rubik’s cube at side table. Solve the puzzle by making
all the squares yellow similar to the center one.Note that the colors
of allouter squares cycles to 6 different colors of same sequence. The center
square also cycles to 6 colors but in reverse sequence as the outer squares.
Clicking a square changes the last square clicked to the next color. However,
clicking the upper right square does not reset the last square clicked.This is one possible
way to solve this puzzle:1. Change one outer
square to green. Click the top right square after change of an outer square to
green.2. Do all outer
squares like step 1.3. Click the top right
square to green.4. Once all the
surrounding squares are one color, the center square will automatically cycle to
the next color in its series. Since this would be green, all squares will now be
the same color and the puzzle is solved.This is a longer
solution:1. Click one of the
outer square until it turns yellow. Then click top Right Square until it
turns yellow.2. Do another outer
side square and then click top Right Square until it turns yellow. Do the
rest of the outer squares in similar fashion.3. Click top right
corner square (~20+xs) until the top right and the central squares are both
yellow.Phoenix will look at
the completed Rubik’s cube again and note that there’s a familiar pattern to the
cube. The top row is all white squares, middle row is all blue squares and the
bottom row is all red squares. This is a duplicate of the Russian Flag.
Photo album: Take
a look at the old book on the table – an album of 2D photographs. Click arrow
at bottom of screen to flip through the album. Note the picture of the older
couple with a baby and the building with 657.
Computer:
Look close at the computer and see that it needs a password. Enter the number
seen on the building picture in the old photo album – 657. Read the new e-mail.
A meeting was set up with Douglas Anderson. A new destination is added to your
map.
Second visit: This
visit is triggered when Larissa Lukin mentions Bogdanov’s grandparents. Use the
elevator to go to Bogdanov’s office. Look at the photo album. Take photo of the
grandparents with the baby. Click the picture to turn the photo over. Use
camera on back of photo to get Cyrillic handwritten text and 3865959.
Monica:
First visit: Go across the floor and up to the right side of the
store. Talk to Monica Lacour about Bogdanov.Second visit:
Talk to Monica at right side of the store about Bogdanov and her job
description. Close working relationship…Third visit:
Talk to Monica about other business ventures and relationship with others. Learn
about Piper.
Display: This is triggered by
having opened Bogdanov’s safe in his bedroom.
Go to the very back display wall at left side of the
store (where Piper is standing). See 3 items on display. Click the middle one that looks like the item taken from Bogdanov’s safe. Click the unknown sculpture from
Bogdanov’s safe on the center
display. A secret drawer opens. Take Bogdanov’s e-diary. Chief Morssen
will have the e-diary analyzed.
Piper: Go to
the back area of the left side of the store and talk to Piper.
First visit: Oh My! Approach
her harshly.Second Visit:
Talk to Piper.Third visit:
Talk to Piper about Bogdanov’s visit to Russia and his last visit to Russia.
Learn about Bogdanov’s visitor. Get a call for another interview. This
interview gets cut when Phoenix reports to Chief Morssen.Fourth visit:
Talk to Piper especially about Bogdanov’s other ventures. Learn about boxes
brought by his friends to his office and ‘renting the contents’.
The Pyramid
If you want, look around the Pyramid. You can also use
time by checking the different place. It is a good place to wait for news or
reports. You can use the map of the Pyramid and see the street layout
and where the known buildings are located.
See Fallen Soldier’s monument, the NGO poster by the WVS (World Vegetarian
Society), NGO kiosk, Metro entrances and GreenPeas poster. Phoenix can do her
exercise at her favorite gym. At night, you can see Cafe
Rose, Stardust Club and Carpe Diem.
Douglas Anderson’s Law Office
Anderson Law Office is triggered by the completion of
the computer puzzle in Bogdanov’s office. Select the Anderson’s Law Offices on
the Navigation Map. Walk down the hallway and click to read the Directory of the
Building Occupants. Douglas Anderson is on the 7th floor. Go right to the
elevators. Exit elevator and go to left screen. Go down the hallway and enter
the first door right of the wall with the eye. Talk to the door security
program.
First Visit: Enter the office and
look at the frame left of door. Douglas Anderson has an HDI of 82. Go down the
screen and talk to Anderson. Continue the discussion in a formal manner. The
people Bogdanov mentioned are Larissa Lukin his sexual partner, Ms. Capello the
therapist and Roger Arnett the image maker. New destinations are added to the
map.Second or third visit: In one
replay, I had 3 visits. On another replay; I had only 2 visits with Anderson.
Talk to Anderson about other things and business venture. Learn about Pierre DeVille, an artist.
Anderson interview is now done.
Immigrant Interviews
GPSN Offices:
Talk to Ingrid, head of the Immigration Academy in blue standing on the left.
Click the different
panels on the table (Computer Interview System). The one the right is the neuro-impulse
locator which shows if the person is thinking one thing and telling another.
The one on the left is the security coefficient indicator; it detects lies and
reduces points. If the score goes
below 70, the applicant fails.
Interview Raj Patel:
Talk to the candidate. Watch the graph and the bar of the computer system. Ask about his past
and plans. Scrutinize his past. Ask him
about his participation in the riots and about his acts during the riots.
Raj Patel failed. (If the question asked is his action after the riots, Patel
will pass. It is best that he fails and is weeded out.)Interview Al Hayari:
Talk to Ingrid. Talk to Al Hayari aka Shakira. You can lead questions to either
accept or reject her. Lead questions to learn more about her shopping, career
and then her work plans. She is rejected. Lead questions about her family and
her need to be away, she is accepted.Phoenix was called for a third interview but the
process was cut by a call from Chief Morssen.
Larissa Lukin’s house
This location is triggered after Anderson mentions
Larissa’s name. Use the map to go to Larissa Lukin’s House. Talk to the security program at room 2108.
Go down the room and talk to Larissa sitting by the window.
First Home Visit: Select ‘Approach her
nicely’ dialogue. After small talk, concentrate on asking about Bogdanov.Phone Call: Use the PA, click
contact list and select Larissa Lukin. Click the antenna at top right of
frame. Ask for an appt. Hmm… Maybe invite her to a place where she’ll be more
comfortable.Second Phone call: Use the PA,
click contact list and select Larissa Lukin. Click the antenna at top
right of frame. Ask for an appointment to meet at Cafe Rose.Cafe Rose:
Meet Larissa automatically and make small talk with her at the Cafe. Agree to
meet her tomorrow. After the small talk, ask about Bogdanov.Second Home Visit:
Talk to her about everything or if her relation with Bogdanov is steady. Learn that Bogdanov’s memories of Russia
are about
his grandparent’s who took care of him. Automatically report to Chief Morssen.Third Home visit: Talk to
Larissa.Another Home
visit: After
learning about the relationship with Bogdanov, talk to Larissa harshly and learn about the Gambino crime family. Report the findings to Chief Morssen.
Phoenix’s home
Look around the apartment.
Check the delivery tube. Go close to the window and click the round projector on the floor by the sofa. Watch the news and learn about
the death of Dr. Melvyn Spencer, a Professor of the Adrianopolis University by
use of unauthorized device during the first day or court case in subsequent
times. Go to the bedroom and check the bathroom. Open the closet and select an outfit
for Phoenix if-when she goes out. Go to bed.
Nightmares: First nightmare
of Phoenix young days alone is triggered by talk with Fabian at the Stardust Club.
The graphic nightmare should be
triggered by seeing Spencer but right now is randomly triggered.
Alessandra Pescara
Get calls from Sandra, Phoenix’ best friend to meet at
Cafe Rose. They meet at 8 PM at the Cafe. Go home, change clothes and click
the map to meet with Sandra automatically. You can gossip with her or ask to go
home.
Sophia Capello’s office
This location is triggered by Anderson. Use the map to go to Capello’s
office.
Fix the security
program – Go down the hallway and click to note that the security program on
her door is malfunctioning.Click the door and Phoenix says ‘there seems to be
no power’.Go back towards the
elevator. See 2 metal panels on the wall before the office doors.Click the top
electrical control panel and click again to
open it. Make all the tubes ontop right (section A) all red by clicking to red the bottom tube. Exit
panel.Click the bottom fuse panel and see that one fuse is
off. Click to make complete fuse connection. Exit panel. Click the top
electrical control panel again and turn back to green the bottom of the 3 tubes
of section A. Exit panel. Yes, got it!First visit: Go back to Capello’s
office and talk to security door program. Inside the office look around and see
that her HDI is 78. Talk to Dr. Capello.
Approach her in a formal manner. Learn about the affair with a teacher, Katina
Stavropoulos at the Child Development Center (CDC).Second visit: Talk to Dr. Capello about
Bogdanov and later his free time. Learn about some irrational behavior, Stardust, a chic club and Mata Hari. New
destination is added to map. This is the last visit with Dr. Capello.
Child Development
Center
This location is triggered by Dr. Capello. Read the CDC essay paper on the end of the bulletin
board. Talk to the obnoxious young girl in pink working on the computer.
Candy machine: Look around
the playroom on the right. Look close at the rabbit
candy machine left side of the room. Press the red nose and take a candy. Give the candy to the
obnoxious young girl. Kiwi flavored candy, oh my!Go back to the Rabbit
candy machine and press the hand to cycle the candy selection: cherry, peach,
raspberry, orange and strawberry. No kiwi. Press the nose again and take another
candy.Kiwi candy: Look
around the playroom and see edible play dough at far side of the room. Look close
and see different colors of play dough. Take (click-hold) a bit of blue and
place on empty square. Take a bit of yellow and add to bit of blue to make
green play dough. Add a bit of white to make a kiwi colored play dough.
Take the candy from inventory and use it on the kiwi colored play dough to get
kiwi candy.Give kiwi candy to the brat. She finally paged Kati.
First visit: Talk to Kati and ask about something wrong between
them.Second or third visit:
Tell the receptionist you need to talk to Kati right away. Ask Kati if it were her
choice to cool off the relationship and her career choice.
Roger Arnett Salon
This location is triggered by Anderson. Use the map to
go to Arnett’s Salon.
First visit: Talk to Gladys, Arnett’s Assistant. After
learning about WIMA, make an appointment. Look to the desk on the right and take
an epilaser flyer. Look at flyer in inventory. Take note of the homemade
wax recipe.Second visit: Gladys gives
Phoenix a complimentary makeover. Talk to Arnett about
Bogdanov. He states that he is expecting that Bogdanov’s next quarterly will
show a rise in earnings. After the talk look around the office: mask, carpet
and other decorations. Arnett has a high HDI of 83.Third visit: Talk to Gladys.
Accept or decline a makeover. Talk to Arnett.Fourth visit: Talk to Arnett
after passing through Gladys. Ask him about Bogdanov’s NCO duties. Phoenix
hears a different outlook in life.
Phoenix’ Computer
Use the computer.
Search/Census database –
Use the picture of the impersonator on the Census Database frame. Click search
button. No record found.Audio Visual Viewing – Use the graveyard CD on
the frame and see a device. Click the arrow and that data was erased.Data Processing/Text
Processing – Use the data dump from PA crash on text processing frame. Select
Analyze and see the result as unrecognized text.Data Processing/Image
Processing – Use the data dump from PA crash on image processing frame. See part
of a picture and word.Click-hold a gray square and drop it on another square to
form a picture and name. The colored areas are already at the correct place.Once a correct piece is at the correct place, spatial match is seen. When
completed, a blinking image reconstructed of Iustitia (justice) appears.

Chief Dagmar Morssen’s office
Once in a while, Phoenix will report
her findings to Chief Morssen. Report pertinent information. Chief Morssen will
approve or not a request for warrants. Evidence will be given to her also. She
will also call you for updates on evidence or reports.
Reports and
Request Warrants at the appropriate time:
Report about Anderson, impersonator, Kati, DeVille and Larissa’s conversation.
Chief Morssen stated that a warrant is available but to be careful in selecting
the person to use it for. No need for a warrant yet. Before leaving, Phoenix
reports about the ghost student at the cemetery. The guards have reported
similar sightings also.Report about the Cyrillic handwritten text, number and
e-diary. Chief will have the e-diary checked.Report about Bogdanov’s name list.
Learn that Bogdanov brought 1.3 M when he emigrated
and that Larissa Lukin was Bogdanov’s nuptial partner in Russia. He was killed
with a 9 mm handgun. Phoenix is asked to check the financial records and
learn that Spencer, the dead Professor was in Bogdanov’s list. Phoenix was asked to
talk to DeVille about the matter.Report about Larissa Lukin’s info about the Gambino
family.Report about Piper’s statement, Mata Hari and anything
else you feel like.Report about Piper’s statement and Mikhailov. Thing
Store Headquarters is added to the map.Phoenix reports possible illegal trade-renting.
Phoenix reports the Impersonator. Request Questioning Warrant for the Impersonator.
Phoenix reports about DeVille’s interview. Request Financial Audit for Pierre DeVille.
Reports about DeVille’s financial report and asks for
a Search & Seizure warrant for Pierre DeVille.Phoenix reports about DeVille’s firearm. Chief will
send it to the ballistics lab right away.Get a call from Chief Morssen that the gun is not the
one that is used to murder Bogdanov. The GPSN had apologized with a 6 digits
sum to Pierre Deville.The Warrant for the impersonator was approved. The
Chief has requested a Special Forces Team to help in the apprehension of the
underground people. Chief Executive Mr. Hamilton arrives and cancels the orders.
The underground people are under his personal orders. Crystal clear!Phoenix reports about the illegal tobacco.
Phoenix reports about Lena’s device.
Julio Santo Dominguez
Julio is a co worker of Phoenix who wants to be the
lead investigator. He will message Phoenix now and then to goad her.
Jean Michel Fremont
Jean Michel is Phoenix’ boyfriend.
First call: Get a message from
Jean Michel for dinner at Chez Pierre. Select either formal or playful dialogue. If
playful, Phoenix goes home with Jean Michel. If formal, Jean Michel leaves alone
and you can
talk to the pianist at the lower floor left side of the restaurant.Second call: Get a message
from Jean Michel. They are on high alert with defense condition 4 – near at war.
Pierre DeVille’s house
This location is triggered by Anderson.
First visit: After getting pass the home security
program; look around inside DeVille’s home. Look at the firearm
collection on the wall. Go down the screen and see that his HDI is 70. Talk to arrogant DeVille
about Bogdanov.Second visit:
Ask about business with Bogdanov.Third Visit
Ask about other Business Venture and his firearms collection. After this visit,
Pierre will not be available at his house.Fourth visit:
Talk to the home security program and learn that DeVille is not in.
Stardust Club
This location is triggered by Dr. Capello. This location can only be visited at night.
First visit: Talk to Fabian, the bartender about Bogdanov and about Fabian’s past. Learn history of city, Phoenix’ background and PSP. Exit
the club through the door. Talk to the bouncer guarding the door of Stardust Club.Anti Chaos poster and
kiosk: Go down the steps and to the right road. See Anti chaos poster with a
kiosk beside it. The
poster has the date June 11. Look close at the kiosk and enter 611 on the
keypad. See third line change to Turbulence and Stability co exist.Second visit:
Talk to Fabian. Be sure to give 25 dollars for the drink (with 13 dollars –
Fabian will
clam up and no info is taken). Learn about Bogdanov’s devotee friends
Third visit:
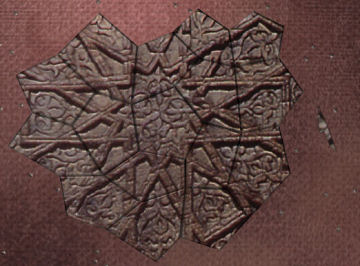
Fabian the bartender is not around. Go up the stage and look at the wood
relief on the back wall of the stage. Look closer and see the crack. Wood
pieces fall off the wall.Wood relief pieces
– See broken pieces on the floor. Look closer on the pieces and see the
puzzle.Click-hold-drop the
pieces to combine them. If the piece is in place, hear a click and the pieces
cannot be separated anymore.
Look close at the combined pieces on the floor and
Phoenix says not to pick it up or it will scatter. Click the hole on the wall and Phoenix says to ‘fix it fast’.Go to the bar and
click the right gate to enter the bar area. Phoenix can enter only if she
says to fix the wall of the stage fast.See a setup to make
glue.Prepare Glue –
Look at the epilaser flyer taken from Arnett’s Salon. Check the wax
preparation procedure.Click-hold 1 cup on water
and then click measured water on bowl. Click-hold 1/2 cup on water and click
measured water on bowl.Click-hold 1/2 cup on sugar
and then click the measured sugar on bowl.Click 1 tablespoon on
lemon and then click it on bowl. Repeat to get 2 tablespoon of lemon in bowl.Take bowl and click it
on microwave.If correctly done,
Phoenix will say ‘I’m a mad scientist’ and the sticky gel will be in
inventory.Fix the wood relief
wall – Go back to the stage and click the sticky gel on the hole on the
wall. Click the sticky gel on the combined pieces on the floor after trying to
pick it up. Take the glued
pieces from inventory and click it on the wall.Fabian comes back to
the bar. Talk to Fabian. Ask about Bogdanov’s friends at the club. Learn about
Mikhailov who is sitting in the room. The lady sitting with him is Mata Hari.
See them leave when Phoenix notices them.Fourth Visit:
Ask Fabian about Mata Hari.Fifth Visit: Ask Fabian about Mata Hari’s strange behavior. Hmm….
Mikhailov
Visit 1:
Talk to Mikhailov sitting alone in front of the stage. Ask for his help
coldly. Learn that he was Bogdanov’s childhood buddy. Watch Mata Hari dance.
Continue to talk to Mikhailov.
Phoenix’ Office and Computer: