Cleopatra: Riddle of the Tomb Walkthrough
Fire the
catapult again.Good Day –
There’s an opening to pass through.Bad Day – The
stone ball is in pieces and you have to make a new one.Take
rubble from the pieces on the top of the wall.In inventory,
combine rubble, chisel and wooden frame to make a new stone ball.Fire on the
wall again to make a bigger opening.
Apollo’s
Chariot
Plaque:
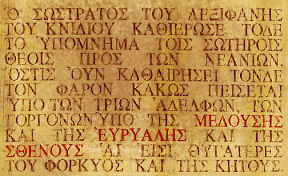
Look down and see a broken plaque on top of a boulder close to the wall.Pick up the
plaque pieces from the ground. Put the pieces together with the broken
plaque on the boulder.Thomas will
read about ‘Sostratos dedicated this monument… whoever destroys the lighthouse
shall fall victim to the 3 Gorgon sisters…’Inside the
Lighthouse: Go through the opening on the wall.Turn left and
pick up the chain mail from the floor.Go forward and
try the metal door that leads up to the top of the lighthouse. It’s locked!Apollo’s
chariot: Go to the other side of the room and look at the
broken winch wheel.Automatically
look up and see Apollo’s Chariot (elevator) that rose to the top of the
lighthouse.Name wheel
– Look left at the inscribed metal plaque-wheel on the pillar.Good day – The wheel is intact.
Bad day – The wheel is bent.
Use the hammer to straighten the wheel.
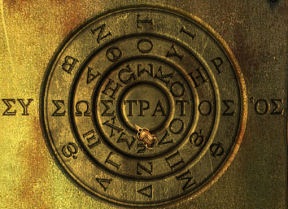
Click on the
inscription below the wheel: You… who built this lighthouse, become the
guardian of the sun chariot.Remember the
broken plaque outside; it mentions Sostratos as the dedicator (builder) of the
lighthouse.Turn the
letters to form the name Sostratos on the horizontal center of the wheel: sigma,
omega, sigma, tau, rho, alpha, tau, omicron, sigma.SWSTRATOS
Click at center of the wheel. It opens. Take the
letter of the kidnapper to the ‘favorite of the King’. Sounds familiar.
Learn the fate of Iris and Akkad.Apollo’s chariot – Pull the lever and the
counterweight is dropped.Go to the counterweight. Let’s find out what weight balances the chariot and the counterweight.
Good day – All the weights are intact.
Bad day – Some weights are broken by the soldiers.
Take all of the weights from the counterweight cage
and place it beside the other weights on the stone shelf.Thomas says that the counterweight and chariot seem to
weigh the same.The chariot dropped to the ground now that the
counterweight is lighter.Now to even the weight of the chariot and the
counterbalance.Good day – Place 11 weights on the chariot.
Bad day – Go back outside and take 3 sandbags from the
catapult’s counterweight.Place 6 weights on the chariot and the 3 sandbags.
Take the rope hanging at right to lower the
counterweight. The rope will automatically be tied to the ring on the floor.Now place the rest (10) of the weights in the
counterweight box. This makes the cage just a bit lighter than the chariot.
Untie the rope and the heavier chariot goes down.Enter the chariot! Take the weights off the chariot
while you’re on it and place them back at the ledge and place the sandbags on
the floor.When you-chariot gets lighter than the counterweight,
you rise up to the top.
Hydra
Hydra
chamber: Where is Iris? Go up the stairs to the Hydra
room.
Winch:
Go to the left and see a winch on a stand with depictions of 3 Gorgon heads. The winch is
blocked and cannot be turned.Read the
inscription on the winch stand. Three Gorgons guard the sun, call them and the
light shall be yours.Look up to the
ceiling and see the Great Prism. It looks low. The winch is used to lift the
Great Prism.Go to the
other side with a hole on the floor. Look up and see a basket up there.Go to the
center of the room and Iris will call out. Talk to Iris completely. A hunchback!
Now, that is quite a coincidence.3 Gorgon
Sisters: Based on the inscription, we need to know
the names of the 3 Gorgons to call them. Where did we see the Gorgons mentioned?Plaque
– Exit the room and go down the stairs. Remove the bar holding the metal door
and go to the main door.Go back out to
the broken plaque.In inventory,
combine the chain mail, the wooden frame and the reel of thread to make a
sieve.Use the sieve
on the 2 piles of sand left of the broken plaque until Thomas says that’s all
the pieces that can be found here now.Put together the plaque and see if you need to look
for more pieces.If you need more pieces and have used
the sand close to the wall when making the sandbags, pick up 3 sandbags made from the catapult
counterweight.Empty the
sandbags on the sand close to the wall. Sift through the sand to get the
remaining
pieces.Put the pieces
together to form the plaque. Read the
completed plaque.The document
shows the name of the 3 Gorgons in red: Medusa, Euryale and Stheno.
Enter the
name – Climb back up the stairs to the top of the lighthouse.Go to the
center of the room and see a ring of Greek letters on the floor.Enter the
names of the 3 Gorgons by pressing on the Greek letters. Verify the letter by
the label at top right of the screen.The letters on the floor do
not repeat, so once it is pressed down, continue to look for the next letter to
be entered.
Thomas will say when the name is finished.Medusa:
mu, epsilon, delta, omicron, upsilon, sigma, eta. And a renowned Gorgon at
that!Euryale:
‘epsilon (with apostrophe), rho, alpha, lambda. Two Gorgon names down.Stheno:
theta, nu. The Gorgons are defeated!Great
Prism: Use the winch to raise the Great Prism.Panels:
Go to the center of the room and look up at the Great Prism.Note that
there are 3 areas that do not have a raise panel that looks brown.Click on the area with no brown panel and Thomas will know that the rope can be raised
for that area.Look-move down while following the
column and then the rope down to the end on the wall in front of you.Then pull that
rope and the panel will be opened.Iris comes
down from the top of the lighthouse. So Kordax is the head of the kidnappers? They
(actually Iris) reached a
decision to stay and do Cleopatra’s divination.Cleopatra
agreed that Iris do the divination.
Unwashed
Hands
Observatory:
Terrace:
Talk to Iris twice completely. Look at the heliotrope and see that the rod is
missing.Go down the
steps. Hear Kordax call out.Turn around and see – take the part of a mask from
the bottom step of the stairs. In inventory, click the 2 masks together and see that
they are parts of one.Go back up to
Iris and talk to her. Now, Iris is sure that Kordax is the murderer.Reception
room: Go down and enter the reception room. Talk to Kordax
completely. Told ‘ya!Go back to the
terrace and talk to Iris. She needs to find Akkad’s secret observatory in the
mausoleum to use the proper instruments. The medallions in Akkad’s crown are
the key and the frescoes in the tomb would show the way. Iris decided to poison
the nail biting Kordax.Go back down
and talk to Kordax. Pick up his washbowl. Turn around and take the
Fragrance formula from the table by the wall.
Library of
Alexandria: Use the map to jump to the library gardens.
Garden:
Go to the end of the pond. See that the old crocodile caretaker is dead.Take Sobek’s
staff and use it on the crocodile. Enter the library and go to the laboratory.Laboratory:
Using the scrolls as reference, identify all the ingredients.Know if a
mixture is correct – Based of the Prusias properties scroll, the different
ingredients when mixed properly with correct ingredients produces a specific
result:Mitanni gum
produces a white smoke. Kerma powder
makes water boil briefly. Arsawa powder
produces a black smoke. Pitassa gum
produces a brief red coloration.Identify
all the ingredients – Using the Zoilos reactions scroll, test the different
unlabeled powders.Empty bowl and
fill it with water. Add 1 handful of Mitanni gum and 1 handful of yellow powder.
It is identified as Nuzi leaves.Empty bowl and
fill it with water. Add 1 handful of Mitanni gum, 2 handfuls of Pitassa gum and
1 handful of orange powder. It is identified as Ashur leaves.Empty bowl and
fill it with water. Add 1 handful of Kerma powder and 1 handful of ochre powder.
It is identified as Kassite bark.Empty bowl and
fill it with water. Add 1 handful of Kerma powder, 1 handful of Arsawa powder
and 1 handful of green powder. It is identified as Masa thorns.Empty bowl and
fill it with water. Add 1 handful of Kerma powder, 1 handful of Arsawa powder, 1
handful of Pitassa gum and 1 handful of black powder. It is identified as Teresh
roots.Empty bowl and
fill it with water. Add 1 handful of Kerma powder, 2 handfuls of Arsawa powder,
one handful of Pitassa gum and 1 handful of white powder. It is identified as
Ekron leaves.(Done already on bad day) Empty bowl and fill it with water. Add 1 handful
of Kerma powder, 2
handfuls of Arsawa powder, 2
handfuls of Pitasa gum and 1 handful of grey powder. It is identified as Ataniya roots.Empty bowl and fill it
with water. Add 1 handful of Mitanni gum, 1 handful of Kerma powder, 2 handfuls
of Pitassa gum and 1 handful of red powder. It is identified as Askelon leaves.Ingredients:
Top row (left to right) : Lullubi
flower, Makkan seed, Melukhka bone, Uruku, root, Canaan thorns, white nugget,
Nuzo leaf and Ashur seed.Bottom row (left to right): Kassite
bark, Masa thorn, Teresh, roots, Tjekker flower, Askelon seed, Ashod resin,
Ekron leaf and Ataniya roots.Make the poison:
Using Kordax’ soothing balm double recipe and the fragrance formula scroll,
prepare the poisoned water.Empty bowl and fill with
water. Add 2 handfuls of Melukhka bone, 2
handfuls of Ashod resin or Ataniya roots, 2 handfuls of Canaan thorns, 2
handfuls of Tjekker flowers. What a stench!To the above sleeping
draught, add the fragrance formula.Add 2 handfuls of Nuzi
leaves, 1 handful of Ashur seeds, 2 handfuls of Kassite bark, 2 handfuls of Masa
thorns and 1 handful of Teresh roots.Empty Kordax’
washbowl that is in inventory on the container left of the ingredients. Use the
empty washbowl on the fragrant sleeping draught to get poisoned and fragrant
washbowl.
Observatory:
Jump to Akkad’s workshop.
Reception room:
Go to the reception room. Place the poisoned and fragrant washbowl on the table.Good day – Kordax falls
asleep.Bad day – Kordax will
say how he learned from King Mithridates how to be immune to poisons.Take the washbowl.
Go back to Iris and talk
to her. She says her bracelet has poison that is not well known to even an
assassin.The bracelet needs to be
dipped in a solution of Melukhha bones.Library Laboratory
– Jump to the Hall of the library and go to the laboratory.Empty bowl and fill with
water. Add 1 handful of Melukhka bone. Use Iris’ bracelet in the solution.Empty the poisoned
washbowl on the container left of the ingredients. Use the empty washbowl on the
poison to get poisoned washbowl.Jump back to Akkad’s
workshop and go to the reception room. Place the poisoned washbowl on the table
by Kordax. He falls asleep.Open the bag on the
floor and take the heliotrope and half of Akkad’s crown.Take the horn and
automatically blow the horn.Go back to Iris and talk
to her.
The Astral Gate
Mausoleum:
Jump to the mausoleum.
Find the entrance to
the secret observatory:Iris said the
medallions in Akkad’s crown are the key.In inventory, combine
the 2 halves of Akkad’s crown to get Akkad’s crown, the
Aries medal and the Taurus medal.Look at the fresco
facing the door. It shows Aries on the right and the Taurus on the left above a
barge where Iris is sitting on.Go to the back of the
structure. See a barge with 2 men holding their hands out. Place the Aries medal
on the right man and the Taurus medal on the left man. Hear a noise.Go back to the front
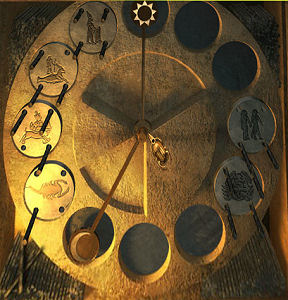
part and see that the slab recessed. It exposed a circle made up of astrological
signs and 2 hands (moon and sun). Some of the astrological circles are covered.The frescoes in the
tomb would show the way.Look at the frescoes on
the sides of the structure. Capricorn, Sagittarius and Aquarius are on one side.
Scorpio, Cancer and Gemini are on the other side.Go back to the
astrological circles. Move the sun and moon so that Scorpio, Capricorn,
Sagittarius and Aquarius are exposed on the left and Cancer and Gemini are
exposed on the right.This happens when the
Sun is at 12 o’clock position and the moon is at 7 o’clock position.In inventory, combine
Akkad’s crown and the small pliers to get all the rest of the crown’s
medallions.Place the Scorpio,
Capricorn, Sagittarius, Aquarius, Cancer and Gemini medallions in their proper
place.Take note that there are
4 holes in each medallion. There are rods on the 4 corners framing the circles.Go to the frescos and
study each one. Take note that each of the 6 frescos has demons and astrological sign
depicted.Look at the frescos again. Note the placements of the demons of each of the 6
astrological signs.Go to the front and
insert rods on holes of each medallion using the position of the demons as
guide.Do this to all the 6
astrological sign. If done correctly, hear a sound and the entrance to the
secret observatory is opened.
Top left – TL, Top right – TR,
Bottom left – BL and Bottom right – BR.
Aquarius – All holes should
have rods
Capricorn – TL, BL, BR.
Sagittarius – TL, TR, BR.
Scorpio – BL
Cancer – All holes should have
rods.
Gemini – BL, BR.
Secret
Observatory: Go to the back side of this structure and see
steps going down.
Use the
lighter on the oil cavity left of the entrance. Go down the steps. Look around
and click at right side of the chamber.
Thomas says ‘We have to fill it with water from the basins.’Look right and
see the last fresco. Open the small casket on the left wall. Take and read Akkad’s last will and testament. So
we need to raise the observatory to the roof.Look at the
chest with a Libra sign on the cover. Use the Libra medallion on the circle.
Open the chest and take the moldboard tube and Heron’s letter to Akkad about the
Titan.Go forward and
see the Titan set up on the right.Go forward to
the platform at end of the room. Take the gangway at right before
climbing to the platform.Climb to the platform and look at the 3
astrological instruments. Take the beam at left side of the
platform (bad day only). Thanks, GeeGee!Titan:
Go back to the machine. Talk to Iris.Light up the Titan – Open the 2 grills of the furnace.
Use the lighter to start a fire on both sides.Pull the
handle bar over the furnace and the other handle bar over the coal-heliolites on
the left. This will vent the smoke out.Go back
outside and go to the Horus and Anubis statues across the mausoleum. Remove the
cover of the vents to release the smoke outside.Fill the
water basin: Go to the area close to the wall where the
Eros with the arrow is located.Face the pond
and see the 4 hippos at the middle of the pond. It’s an overflow. Place the gangway to cross to
the hippos.Cross over and
look down. See the overflow to the secret observatory.Good day – The drain is unblocked.
Bad day – The
drain is covered by a trapdoor. Use the beam twice on the trapdoor that blocks
the overflow.Pull up the
sluice gate at top of the overflow. Water pours in the secret observatory
basins.Go back to the
secret observatory.A crocodile blocks the walkway. Use the Sobek staff to
send it on its way.Make steam
power: Be sure that the furnace domes are closed.Look at the post right of the furnace.
Insert the
Pisces medal on the circular slot between the sun and moon.Press the moon
and the big container on the right goes down and fills with water.Automatically, press the sun and the big container
filled with water rises.Insert the
moldboard tube on the pipe on the left (behind the post) to connect the furnace dome with the water
container.Pull up the
valve on the wood end (water container) of the moldboard tube to release water
to the furnace dome.Open the grill
doors and see if you can now add heliolites (coal) to build up the fire. Add 5
scoops to each side or until Thomas says there’s enough on both furnaces.Release steam
to power the platform: Go forward just below the platform.If the furnace
is done correctly, see steam come out from top of the machine at right.See 3 circles
that stop the rotation of a wheel. This wheel turns to raise the platform
when the steam powers it up.Turn around
and unlock the chest by placing the Leo medal on the circular slot.Good day –
There are 3 disks inside.Bad day – The
chest is empty.Go back to the
heliolites bin. The removal of some heliolites from the bin exposed a sack.Open the sack
and take the fire disk, air disk and water disk.Face the
machine by the platform. Insert the Virgo medal at the center.Place the air
disk at top, fire disk at bottom left and water disk at bottom right slots.Watch the
platform rise to the roof.
Cleopatra reads her divination.
This document may not be distributed without express written permission of
the author and the content may not be altered in any way.
For
Questions or Comments on this Walkthrough,
Please write to:
MaGtRo
Copyright
© 9/2007
MaGtRo